
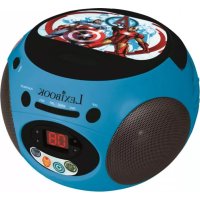
SPIDER-MAN BOOMBOX CD PLAYER - Mp3 player LEXIBOOK - Free user manual and instructions
Find the device manual for free SPIDER-MAN BOOMBOX CD PLAYER LEXIBOOK in PDF.

| Product type | Portable CD player with FM/AM radio and auxiliary input |
| Brand | LEXIBOOK |
| Model | SPIDER-MAN BOOMBOX CD PLAYER (RCD100SP) |
| Power supply | 6 C/LR14 (UM-2) batteries or 9V DC 600 mA mains adapter (center positive) |
| CD playback formats | CD audio, CD-R, CD-RW |
| Radio functions | FM stereo, AM, with telescopic FM antenna |
| CD playback functions | Play, pause, skip forward/backward, search, repeat one track or all disc, program up to 20 tracks |
| Auxiliary input | AUX IN socket (3.5 mm jack) for MP3 player or other audio device |
| Headphone output | 3.5 mm headphone jack (impedance 8-32 ohms) |
| Speakers | Built-in speakers (number not specified) |
| Dimensions | Not specified (portable boombox type) |
| Weight | Not specified |
| Warranty | 2 years |
| Laser safety | Class 1/1M - Do not look directly, do not disassemble |
| Maintenance and cleaning | Clean the casing with a soft dry cloth. Clean compact discs by wiping from center to edge with a soft cloth. Do not use chemical products. |
| Operating temperature | 5 °C to 35 °C |
| Batteries | Do not mix new and old types, do not recharge non-rechargeable batteries, remove if not used for a long time |
| CD-R/RW compatibility | Playback possible but not guaranteed due to media variability |
| Included accessories | No accessories (batteries, adapter, earphones not supplied) |
| Technical support | 0892 23 27 26 (€0.34 incl. VAT/min) - Website: www.lexibook.com |
Frequently Asked Questions - SPIDER-MAN BOOMBOX CD PLAYER LEXIBOOK
User questions about SPIDER-MAN BOOMBOX CD PLAYER LEXIBOOK
0 question about this device. Answer the ones you know or ask your own.
Ask a new question about this device
Download the instructions for your Mp3 player in PDF format for free! Find your manual SPIDER-MAN BOOMBOX CD PLAYER - LEXIBOOK and take your electronic device back in hand. On this page are published all the documents necessary for the use of your device. SPIDER-MAN BOOMBOX CD PLAYER by LEXIBOOK.
USER MANUAL SPIDER-MAN BOOMBOX CD PLAYER LEXIBOOK
Copyright © Lexibook 2007
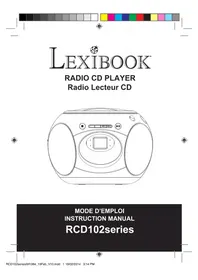
Spider-Man™ Boombox CD Player – RCD100SP Instruction Manual
Congratulations on your purchase of the Lexibook Spider-Man™ Boombox CD Player. Please read this manual carefully to ensure you understand the operation of this product and keep it for future reference. Before using this unit, please remove the clear film label from the LCD screen by pulling the tab. You also need to remove the shipping protector located inside the CD player (over the spindle). To do so, lift the shipping protector up, and pull it gently towards you.
Follow the advice below for safe operations.
CLASS1 LASER PRODUCT
CLASS1LASERPRODUCT
APPAREIL LASER DE CLASSE 1
PRODUCT LASEN DE CCASE 1
This product contains a low power laser device.
CAUTION
INvisible LASER RADIATION
WHEN OPEN AND INTERLOCKSE PRESSED
AVOID EXPOSURE TO BEAM

ON PROTECTION AGAINST LASER ENERGY EXPOSURE
- As the laser beam used in this compact disc player is harmful to the eyes, do not attempt to disassemble the casing.
- Stop operation immediately if any liquid or solid object should fall into the cabinet.
- Do not touch the lens or poke at it. If you do, you may damage the lens and the player may not operate properly.
- Do not put anything in the safety slot. If you do, the laser diode will be ON when the CD door is still open.
- If the unit is not to be used for a long period of time, make sure that all power sources are disconnected from the unit. Remove all batteries from the battery compartment, and unplug the AC-DC adaptor from the wall outlet.
- This unit employs a laser. The use of controls or adjustment or performance of procedures other than those specified here may result in exposure to hazardous radiation.
CAUTIONS FOR SAFETY
Do not dismantle the unit. The laser beam used in the unit could harm your eyes.
- Do not insert metal or other objects inside the unit. This unit is equipped with a safety device which automatically turns the laser beam off when the disc compartment is opened. If metal or other objects were to get inside the unit, this safety device may be deactivated.
- Do not drop the unit or subject it to strong shocks. Otherwise, the unit might be damaged.
Do not place the unit in the following locations:
Copyright © Lexibook 2007
- Locations where the temperature is high. The unit's cabinet could bend or the unit could be damaged if placed in direct sunlight, near heaters (where the temperature is 60^ (140^) or greater) or in cars with the windows closed (in summer, the temperature may get higher than 110^ (212^) .
- Use the unit within a temperature range of 5^ (41^) to 35^ (95^) .
- In humid or dusty places.
- In locations exposed to strong vibrations.
- On unstable or tilted surfaces.
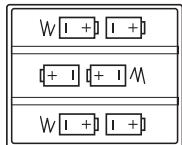
LOCATION OF CONTROLS
Please refer to the image at the back of the cover page.
- POWER ON / OFF
2.DISPLAY - POWER INDICATOR
- PLAY/PROGINDICATOR
- REPEAT INDICATOR
- X-BASS BUTTON
- REPEAT BUTTON
8.PROGB BUTTON - B.SKIP BUTTON
- STOP BUTTON
- PLAY / PAUSE BUTTON
- F.SKIP BUTTON
-
FM ST. INDICATOR
-
FUNCTION SELECTOR
- TUNING CONTROL
- BAND SELECTOR
- VOLUME CONTROL
- CD DOOR
- CD COMPARTMENT
- DC JACK
21.AUX IN - HEADPHONE JACK
- BATTERY COMPARTMENT
- FM ANTENNA
- HANDLE
BATTERY OPERATION
This CD player operates with 6 X C size (LR14) -- batteries (not included) or with a with 9V - - - 600mA adapter with a positive centre . Only use batteries or adapter of the same or equivalent types as recommended.
Battery installation
- Open the battery compartment located under the CD player using screwdriver.
- Insert 6 X 'C' size (UM-2) batteries according to the polarity indicated in the bottom of the compartment.
- Close the battery compartment. Do not use rechargeable batteries.
Non-rechargeable batteries are not to be recharged. Rechargeable batteries are to be removed from the toy before being charged. Rechargeable batteies are only to be charged under adult supervision. Different types of batteries or new and used batteries are not to be mixed. Only batteries of the same or equivalent type as recommended are to be used. Batteries are to be inserted with the correct polarity. Exhausted batteries are to be removed from the product. The supply terminals are not to be short circuited. Do not throw batteries into a fire. Remove the batteries if you are not going to use the CD palyer for a long period of time.
WARNING: If the unit malfunctions or receives an electrostatic shock, switch the unit off and on again using the POWER button. If this proves to be ineffective, remove the batteries and/or perform the Reset procedure.
Adapter
This CD player also works with a 9V 600 mA, with positive centre

To connect to the mains, follow these instructions:
- Check that the CD player is switched off.
- Insert the DC plug, at the end of the AC adaptor cord into the DC input jack, at the back of the unit.
- Plug the other end of the adaptor in an AC 230V - 50Hz power outlet. A power adaptor is not a game. Switch off the power adaptor if you are not going to use the product for a long period of time, this will avoid overheating. While the game is powered by a power adaptor, do not play with it outdoors. Check regularly the condition of the power adap tor and its leads. If the latter becomes deteriorated, do not use them until they are fully repaired.
Copyright © Lexibook 2007
USING HEADPHONES
Headphones are not supplied with this Player. You will require headphones fitted with a 3.5 mm diameter stereo plug and an impedance of 8-32 ohms. Plug your headphones into the HEADPHONE jack [22] on the rear of the unit for private listening. After plugging in the headphones, the speakers will be automatically disconnected.
ALWAYS LOWER THE VOLUME LEVEL BEFORE PUTTING ON YOUR HEADPHONES. OTHERWISE YOUR HEARING COULD BE DAMAGED.
RADIO OPERATION
- Press the POWER button [1] once to turn the radio on. The POWER indicator will light.
- Slide the Band Selector [16] to "AM" or "FM" for the desired radio band.
- Adjust the TUNING control [15] to select the desired radio station.
- Adjust the VOLUME control [17] to obtain the desired sound level.
- To turn the Radio off, press the POWER [1] button again.
Tips for good radio reception
To ensure maximum FM tuning sensitivity, the FM wire antenna [24] should be fully extended to obtain the best possible reception. Avoid close proximity to the speakers and other electrical appliance.
For FM stereo reception, the FM stereo indicator will light steadily when a stereo program is being received. When tuning in AM reception, to ensure best AM sensitivity, try repositioning the unit until the best reception is obtained.
CD PLAYER OPERATION
Note: This player plays not only commercial CDs but also self-compiled CD-R/RW discs.
- Press the POWER button [1].
- Set the FUNCTION [14] selector to "CD" position. The player will load the disc and will display "no" if no disc is loaded.
- Open the CD lid. Carefully place an audio CD with its label side upward in the CD compartment [19] and close the CD door [18]. The total number of tracks on the CD will appear on the LCD display.
- Press the PLAY/PAUSE button [4]. The PLAY indicator [4] will light and the CD will start playing from the first track.
- Adjust the VOLUME control [17] to set the sound level.
- To suspend playing, press the PLAY/PAUSE button [4] again. The
track number will flash and the PLAY indicator [4] will go off. To resume playing, press the PLAY/PAUSE button [4] again.
- You can choose to play your favorite track directly by pressing either the Skip Forward [12] or Skip Backward [9] button. The display will indicate the track number selected.
- To locate a particular passage within a track, keep the Skip Forward [12] or Skip Backward [9] button depressed until it is found.
- To repeat a particular track, press the REPEAT [7] button once or until the REPEAT indicator [5] flashes.
- To repeat the entire CD, press the REPEAT [7] button twice or until the REPEAT indicator [5] lights steadily.
11.To stop playing, press the STOP [10] button. - When you wish to turn off the CD player, press the POWER [1] but on again.
CD PROGRAMMED PLAY
This function allows the tracks to be played in a programmed sequence.
- In CD stop mode, press the PROG [8] button once. The number "01" will blink on the display.
- Press the Skip Forward [12] or Skip Backward [9] button to select the first song to include in the programmed sequence.
- Press the PROG [8] button again to store the song.
- The number will change to "02" and blink. Select the next song to save (see steps 2 and 3). You may program as many as 20 tracks.
- Press PLAY/PAUSE [4] to start playing the programmed sequence.
- To cancel programmed play, press the STOP [10] button twice.
Notes on CD-R/RW Discs
Because of non-standardized format definition/production of CD-R/RW, playback quality & performance are not guaranteed.
Manufacturer is not responsible for the playability of CD-R/RW due to recording conditions such as PC performance, writing software, media ability, etc.
Do not attach a label or seal to either side of the CD-R/RW disc. It may cause a malfunction.
This device is not meant to read .wav-files (direct copy of the CD to the traditional audio format). Otherwise, please note that portable laser readers are very sensitive to the quality of the CD-R base, to the recording speed and to the general state of the CD-R (scratches, stains, etc.). The possible difficulties of reading a burnt CD-R, rewrite or not, are normal and do not constitute a default of the reader of the device.
Copyright © Lexibook 2007
AX IN OPERATION
You can play music through the speakers of this CD player by connecting its AUX IN jack to your MP3 or other digital audio player.
- Plug one end of an audio cable (not included) into the AUX IN [21] jack and the other end of the cable to the line out jack of your digital audio player.
- Set the FUNCTION [14] selector to AUX IN.
- Press POWER [1] to turn on the unit.
- Play your digital audio player.
- Adjust VOLUME [17] control to your desired listening level.
CARE AND MAINTANENCE
Please pay attention to the following:
- Handle the disc by its edges.
- To keep the disc clean, do not touch its surface.
- Disc should be put back into their cases after use to avoid scratches that could cause the laser pickup to skip.
- Do not expose discs to direct sunlight, high humidity, or high temperatures for extended periods. Prolonged exposure to high temperatures can bend the disc.
- Do not stick paper or write anything on either side of the compact disc. Sharp writing instruments, or the inks used in some felt-tip pens, may damage the surface of the disc.
- Unplug the unit from the electrical power outlet immediately in case of malfunction.
- Children should be supervised when using the appliance.
CLEANING DISCS
- Fingerprints should be wiped off the surface of the disc with a soft cloth. Unlike conventional records, compact discs do not have grooves collecting dust and microscopic debris. Gently wiping them with a soft cloth should remove most of the particles. Wipe the disc in a straight motion from the inside to the outside.
- Never use such chemicals as record cleaning sprays, anti-static sprays, benzene or thinner to clean compact discs. Such chemicals can damage the plastic of the disc.
- The unit will not play a disc that has been inserted upside down, or discs that do not conform to the Compact Disc standard. Also, the unit might not play discs that are scratched, soiled or carry fingerprints.
- 3" (8cm) CDs can be played without an adaptor.
TROUBLE SHOOTING
If you experience difficulties in the use of this music system please check the following.
| SYMPTOM | POSSIBLE CAUSE | SOLUTION |
| Noise or sound distorted on AM or FM broadcast | Station not tuned properly for AM or FM.FM: Wire antenna is not extended.AM: The bar antenna is not positioned correctly | Retune the AM or FM broadcast station.FM: Extend FM Telescopic antenna.AM: Reposition the unit until the best reception is obtained. |
| AM or FM no sound | Unit not in RADIO function mode.Volume set at minimum. | Slide Function Selector to RADIO position.Increase Volume. |
| CD player will not play | Unit not in CD function mode.CD is installed incorrectly.It the CD is self-compiled, the media used may not be compatible with the player.Batteries become exhausted | Select CD function mode.Insert CD with label side up.Use better quality blank media and retest.Replace all batteries with new ones. |
| CD skips while playing | Disc is dirty or scratched. | Wipe CD with clean cloth or use another disc. |
| Intermittent sound from CD Player | Dirty or defective discDirty pick up lensPlayer is subject to excessive shock or vibration | Clean or replace the defective discUse a CD-lens cleaning disc to clean the lensRelocate the player away from shock or vibration |
| Sound distorted | Batteries become exhausted | Replace all batteries with new ones. |
WARRANTY
This product is covered by our 2-year warranty.
To make use of the warranty or after-sales service, please contact your retailer and supply proof of purchase. Our warranty covers material or installation-related defects attributable to the manufacturer, with the exception of wear caused by failure to respect the instructions for use or any unauthorised work on the equipment (such as dismantling, exposure to heat or damp etc).
Note: It is recommended that all packaging be kept for future reference. Keep this instruction manual in a safe place as it contains important information. In our constant concern for improvement, the colours and details of the product may differ slightly from those shown on the packaging.
Copyright © Lexibook 2007
Customer Service:
For technical assistance call our freephone helpline: 0808 100 3015
Lexibook UK Limited
Unit 10 Petersfield Industrial Estate
Bedford Road, Petersfield
Hampshire, GU32 3QA
United Kingdom
Web: http://www.lexibook.com
- The contents of this manual are subject to change without notice.
- No part of this manual may be reproduced in any form without the express written consent of the manufacturer.
Warning: the excessive use of this product at full power might damage hearing.
Copyright © Lexibook 2007
Environmental Protection
Unwanted electrical appliances can be recycled and should not be discarded along with regular household waste! Please actively support the conservation of resources and help protect the environment by returning this appliance to a collection centre (if available).

Copyright © Lexibook 2007
EMPLACEMENT DES TOUCHES
Copyright © Lexibook 2007
Copyright © Lexibook 2007
Copyright © Lexibook 2007
Copyright © Lexibook 2007
NETTOYAGE DES DISQUES
Copyright © Lexibook 2007
Copyright © Lexibook 2007
Copyright © Lexibook 2007
Copyright © Lexibook 2007
Copyright © Lexibook 2007
Copyright © Lexibook 2007
Copyright © Lexibook 2007
GARANTÍA
Copyright © Lexibook 2007
Copyright © Lexibook 2007
Copyright © Lexibook 2007
Copyright © Lexibook 2007
Copyright © Lexibook 2007
LEXIBOOK Electronica Lda
Quinta dos Loios Praceta Jose Domingos dos Santos, 6B-8A
2835-343 Lavradio-Barreiro Portugal

m = 311 ;
Copyright © Lexibook 2007
Copyright © Lexibook 2007
Copyright © Lexibook 2007
Copyright © Lexibook 2007
Copyright © Lexibook 2007
Copyright © Lexibook 2007
Spider-Man™ Boombox CD-Player RCD100SP - Bedienungsanleitung
LASERPRODUKT KLASSE 1
Copyright © Lexibook 2007
Copyright © Lexibook 2007
RADIOBEDIENUNG
Copyright © Lexibook 2007
Copyright © Lexibook 2007
FEHLERBEHEBUNG
Copyright © Lexibook 2007
Haftungsausschluss
Copyright © Lexibook 2007
Umweltschutz
Copyright © Lexibook 2007
Copyright © Lexibook 2007
Copyright © Lexibook 2007
Copyright © Lexibook 2007
[7] toets of druk je tot de REPEAT-indicator [5] constant blij branden.
Copyright © Lexibook 2007
Copyright © Lexibook 2007
PROBLEMOPLOSSING
Copyright © Lexibook 2007
Copyright © Lexibook 2007
- Spider-Man™ Boombox CD Player – RCD100SP Instruction Manual
- ON PROTECTION AGAINST LASER ENERGY EXPOSURE
- CAUTIONS FOR SAFETY
- LOCATION OF CONTROLS
- BATTERY OPERATION
- Battery installation
- Adapter
- USING HEADPHONES
- RADIO OPERATION
- Tips for good radio reception
- CD PLAYER OPERATION
- CD PROGRAMMED PLAY
- Notes on CD-R/RW Discs
- AX IN OPERATION
- CARE AND MAINTANENCE
- CLEANING DISCS
- TROUBLE SHOOTING
- WARRANTY
- Customer Service:
- Environmental Protection
- EMPLACEMENT DES TOUCHES
- NETTOYAGE DES DISQUES
- GARANTÍA
- Spider-Man™ Boombox CD-Player RCD100SP - Bedienungsanleitung
- LASERPRODUKT KLASSE 1
- RADIOBEDIENUNG
- FEHLERBEHEBUNG
- Umweltschutz
- PROBLEMOPLOSSING
Brand : LEXIBOOK
Model : SPIDER-MAN BOOMBOX CD PLAYER
Category : Mp3 player