
DVDP1SP - DVD player LEXIBOOK - Free user manual and instructions
Find the device manual for free DVDP1SP LEXIBOOK in PDF.

| Product Type | Portable DVD player with TFT screen |
| Brand | LEXIBOOK |
| Model | DVDP1SP |
| Screen | TFT LCD screen |
| Net Weight | 1.1 kg |
| Power Supply | AC 110-240 V 50/60 Hz ; DC 9 V ; 12 W |
| Rechargeable Battery | Built-in lithium, charging time ~4 h, battery life ~2 h (screen on), ~2.5 h (screen off) |
| Compatible Disc Formats | DVD, Audio CD, CD-R/RW, DVD±R/RW, DivX, JPEG |
| Region Code | 2 (Europe, South Africa, Middle East) |
| Main Functions | Play/pause, stop, forward/backward scanning, slow motion, repeat, programming, zoom, subtitles, angle, OSD, search |
| Remote Control | Infrared, CR2025 battery included, range ~3 m |
| Outputs | 3.5 mm headphone jack, composite video output (PAL/NTSC), analog audio output |
| Maintenance and Cleaning | Clean with a soft, dry cloth; do not use alcohol, solvent, or chemicals |
| Safety | Double insulation (class 2), class 2 laser, surge protection |
| Warranty | 2 years, covers material and assembly defects |
| Included Accessories | Remote control, CR2025 battery, AC adapter, car adapter, carrying case, user manual |
Frequently Asked Questions - DVDP1SP LEXIBOOK
User questions about DVDP1SP LEXIBOOK
0 question about this device. Answer the ones you know or ask your own.
Ask a new question about this device
Download the instructions for your DVD player in PDF format for free! Find your manual DVDP1SP - LEXIBOOK and take your electronic device back in hand. On this page are published all the documents necessary for the use of your device. DVDP1SP by LEXIBOOK.
USER MANUAL DVDP1SP LEXIBOOK
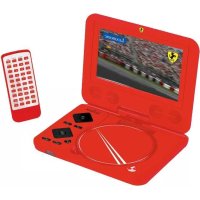
LECTEUR DVD PORTABLE SPIDER-MAN
SPIDER-MAN PORTABLE DVD PLAYER
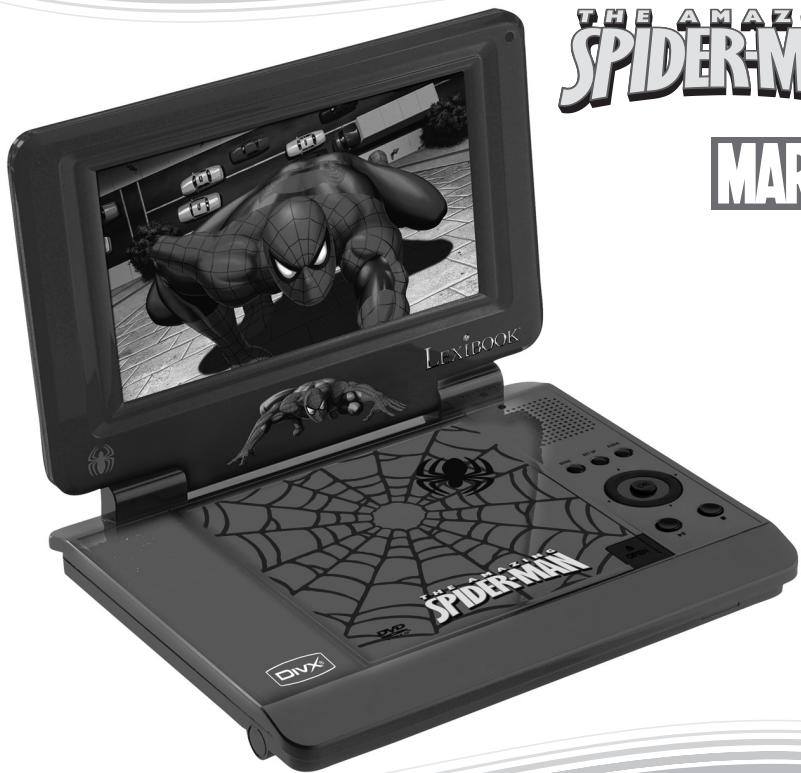
SPDERMAN
MARVEL
LEXIBOOK
www.lexibook.com
L: 215mm, I: 175mm, H: 40mm
©2008 Marvel Characters, Inc.
©2008 LEXIBOOK®
| Safety Instructions | 19 | TFT screen | 28 |
| Important safety instructions | 20 | Title | 28 |
| Portable DVD Player Description | 21 | Zoom | 28 |
| Remote control | 22 | DVD settings | 28 |
| Battery installation | 22 | General Setup Page | 29 |
| Using the remote control | 23 | TV Display | 29 |
| Charging the built-in lithium battery | 23 | Angle Mark | 29 |
| Charging time/playback time | 23 | Screen Saver | 29 |
| Installation | 24 | Selecting the OSD language | 29 |
| Unpacking the device | 24 | Audio settings | |
| Power Connection | 24 | Speakers’ setup | 29 |
| Headphones connection | 24 | Video setup | 30 |
| Disc types | 24 | Password Setup | 30 |
| Disc maintenance | 25 | Preferences | 30 |
| Region Management Information | 26 | TV Type | 30 |
| DVD keys functions | 26 | Audio language setting | 31 |
| Play/Stop | 26 | Subtitle language | 31 |
| Pause | 26 | Parental control | 31 |
| Previous /Next | 26 | Menu language setting | 31 |
| Scan forward /backward | 27 | Default | 31 |
| Slow play | 27 | Special DVD functions | 31 |
| Clear | 27 | Program mode | 31 |
| Other DVD functions | 27 | CD/CDG | 32 |
| Menu | 27 | DVD | 32 |
| Repeat mode | 27 | Picture CD | 32 |
| Repeat A-B | 27 | Troubleshooting | 32 |
| Subtitle | 27 | Specifications | 32 |
| Audio | 28 | Maintenance | 33 |
| Angle | 28 | Warranty | 34 |
| Search | 28 | 34 | |
| OSD | 28 | 34 |
Safety Instructions

CAUTION RISK OF ELECTRIC SHOCK DO NOT OPEN

CAUTION: TO REDUCE THE RISK OF ELECTRIC SHOCK. DO NOT REMOVE COVER (OR BACK). NO USER SERVICEABLE PARTS INSIDE. REFER SERVICING TO QUALIFIED SERVICE PERSONNEL.
The graphic symbols on the back cover of the set mean the following:

The lightning flash with arrowhead symbol within an equilateral triangle is intended to alert the user to the presence of uninsulated "dangerous voltage" within the product's enclosure that may be of sufficient magnitude to constitute a risk of electric shock to persons.

The exclamation point within an equilateral triangle is intended to alert the user to the presence of important operating and maintenance (servicing) instructions in the literature accompanying the appliance.

CLASS 2 - DOUBLE INSULATION
WARNING:
- To reduce the risk of fire or electric shock, do not expose this appliance to rain or moisture.
- The apparatus shall not be exposed to dripping or splashing and that no objects filled with liquids, such as vases, shall be placed on the apparatus.
- The mains plug is used as the disconnect device, the disconnect device shall remain readily operable.
- In order to disconnect the apparatus from the mains completely, the mains plug should be disconnected from the mains socket outlet completely.
DANGER
LASER SAFETY

This unit employs an optical laser beam system in the CD mechanism, designed with built in safeguards. Do not attempt to disassemble, refer to qualified service personnel. Exposure to this invisible laser light beam may be harmful to the human eye.
THIS IS A CLASS-2 LASER PRODUCT. USE OF CONTROLS, OR ADJUSTMENTS OR PROCEDURES OTHER THAN THOSE SPECIFIED HEREIN, MAY RESULT IN HAZARDOUS LASER LIGHT BEAM EXPOSURE.
Invisible laser radiation when open and interlock failed or defeated. Avoid direct exposure to laser beam.
Manufactured under license from Dolby Laboratories "Dolby", "Pro Logic" and the double-D symbol are trademarks of Dolby Laboratories. Confidential unpublished works. © 1992-1997 Dolby Laboratories, Inc. All rights reserved.
This product incorporates copy protection technology that is protected by U.S. and foreign patents, including patent numbers 5,315,448 and 6,836,549, and other intellectual property rights. The use of Macrovision's copy protection technology in the product must be authorized by Macrovision. Reverse engineering or disassembly is prohibited.
Important safety instructions
- Read these instructions.
- Keep these instructions.
- Heed all warnings.
- Follow all instructions.
- Do not use this unit near water.
- Clean only with a dry cloth.
-
Do not block any ventilation openings. Install in accordance with manufacturer's instructions.
-
Do not install near any heat sources such as radiators, heat registers, stoves or other apparatus (including amplifiers) that produce heat.
- Do not defeat the safety purpose of the polarized or grounding-type plug. A polarized plug has two blades with one wider than the other. A grounding-type plug has two blades and a third grounding prong. The wide blade or the third prong is provided for your safety. If the provided plug does not fit into your outlet, consult an electrician for replacement of the obsolete outlet.
- Protect the power cord from being walked on or pinched particularly at plugs, convenience receptacles, and the point where they exit from the unit.
- Only use attachments/ accessories specified by the manufacturer.
- Unplug this unit during lightning storms or when unused for long periods of time.
- Refer all servicing to qualified service personnel. Servicing is required when the unit has been damaged in any way, such as the following: the power-supply cord or plug has been damaged; liquid has been spilled or objects have fallen into the unit; and/or the unit has been exposed to rain or moisture, does not operate normally, has changed its performance or has been dropped.
- Do not overload wall outlet. Use only power source as indicated.
- Use replacement parts as specified by the manufacturer.
- The product may be mounted to a wall only if recommended by the manufacturer.
- Upon completion of any service or repairs to this product, ask the service technician to perform safety checks.
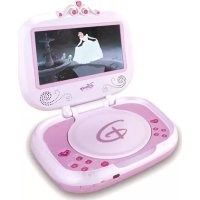
Portable DVD player description
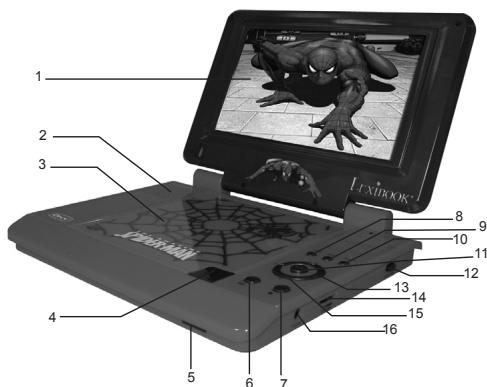
- TFT screen
- Speakers
- DVD compartment
- DVD compartment open button
- Battery indicator (left) Remote control sensor (middle) Power indicator (right)
- Play/pause button
- Stop button
- Title button
- Setup button
- Audio button
- OK button
- ON/OFF button
- Fast forward button (right)
Fast rewind button (left) - Volume control button
- Next button (down)
Previous button (up) - Headphones jack
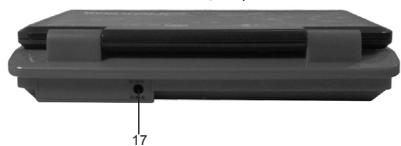
- DC IN 9V
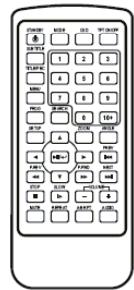
Remote control
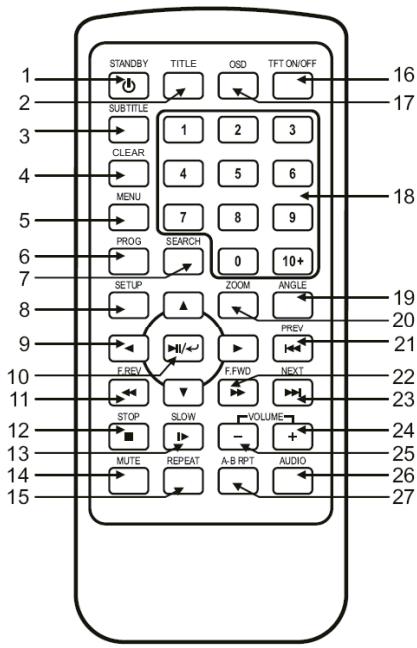
- STADNBY key
- TITLE key
- SUBTITLE key
- CLEAR key
- MENU key
6.PROG key
7.SEARCH key - SETUP key
- Direction keys
- Play/pause/enter key
- F.REV key
- Stop key
- SLOW key
- MUTE key
- REPEAT key
- TFT ON/OFF key
- OSD key
- Numeric keys
- ANGLE key
20.ZOOMkey - PREV key
- F.FWD key
- NEXT key
- VOLUME+ key
- VOLUME- key
- AUDIO key
- A-B RPT key
Battery installation
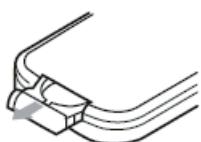

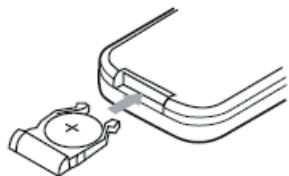
Note: Before you start using the remote control; please carefully remove the battery tab located at the rear of the unit.
- Open the battery compartment cover as shown above.
- Insert 1 lithium CR2025 3V --- type battery (included) as illustrated and replace the battery cover.
- Replace the battery compartment cover.
Corrosion, oxidation, battery-leakage and any other gradually acidic defect of this nature will invalidate the guarantee.
Non-rechargeable batteries are not to be recharged. Rechargeable batteries are to be removed from the toy before being charged. Rechargeable batteries are only to be charged under adult supervision. Different types of batteries or new and used batteries are not to be mixed. Only batteries of the same or equivalent type as recommended are to be used. Batteries are to be inserted with the correct polarity. Exhausted batteries are to be removed from the toy. The supply terminals are not to be short circuited. Do not throw batteries into a fire. Remove the batteries if you are not going to use the game for a long period of time.
WARNING: If the unit malfunctions or receives an electrostatic shock, remove the battery and insert it again.
Using the remote control
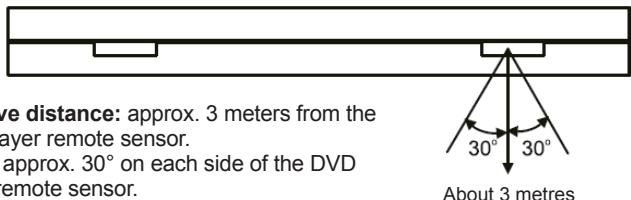
Effective distance: approx. 3 meters from the DVD player remote sensor.
Angle: approx. 30^ on each side of the DVD player remote sensor.
Note: When direct sunlight, an incandescent lamp, fluorescent lamp or any other strong light shines on the remote sensor of the unit, the remote operation may be unstable.
Charging the built-in lithium battery
Your DVD player is equipped with a built-in rechargeable lithium battery.
Fully charge the battery before using it for the first time.
- When the unit is turned on, the power indicator is blue.
- When the battery is being charged, the battery indicator is red.
- The battery can be charged while using the player, but it is highly recommended to turn off the unit when charging.
- When the battery is fully charged, the indicator becomes green.
- To save the battery energy when listening to a music CD, it is recommended to turn off the TFT screen (press the TFT ON/OFF key on the remote control).
Note: When the TFT screen does not turn on, even when pressing on the TFT ON/OFF key, charge the battery.
CHARGING TIME/PLAYBACK TIME
| Charging time | Playback time (TFT screen turned on) | Playback time (TFT screen turned off) |
| Approx. 4 hours | Approx. 2 hours | Approx. 2 :30 hours |
Note: The playback time may vary based on usage patterns of the DVD player.
Installation
Unpacking the device
When unpacking, ensure that the following elements are included:
1 x portable DVD player DVDP1SP_02
1 x remote control
1 x CR2025 lithium type battery
1 x AC/DC adapter
1 x car adapter
1 x car pocket
1 x instruction manual
WARNING: All packaging materials, such as tape, plastic sheets, wire ties and tags are not part of this DVD player and should be discarded.
Power connection
Use the AC/DC adapter (AC ~ 110V-240V 50/60Hz) or the car adapter to connect the portable DVD player to a main socket.
Headphones connection
On the right side of the unit is a headphones socket, suitable for any normal earphones fitted with a 3.5mm jack plug. When the headphones are in use, the speakers are turned off. CAUTION: too high volume, especially when using headphones, can damage your hearing. For this reason, please turn the volume down before connecting the headphones.
Note:
- Please switch off the DVD player before you make any connections.
- Before using this product for the first time, please remove the static label from the LCD screen.
Disc types
| DVD | VIDEO | Audio +Video |
| CD AUDIO | COMPACT OISCH DIGITAL AUDIO | Audio |
| CD-R | COMPACT OISCH Recordable | Audio or Video |
| CD-RW | COMPACT OISCH (ReWritable) | Audio or Video |
| DVD-R | DVD P 1M | Audio or Video |
| DVD+R | RW DVD-R | Audio or Video |
| DVD-RW | DVD RW 1M | Audio or Video |
| DVD+RW | RW DVD+RWtable | Audio or Video |
Note:
- The portable DVD player is compatible with DivX, and JPEG formats.
- Discs can only be used when they have been correctly recorded.
Disc maintenance
Caring for discs (A)
- Do not touch the shiny surface of the disc or bend the disc.
- Never use solvents such as benzene or other strong chemical cleaners since these could damage the unit's finish.
- It is important that no liquid reaches the inside of the unit.
- Remove the disc from the case by holding it at the edges while pressing the centre hole lightly.
- Place the disc into the tray with the label facing up.
- A dirty disc may not play correctly. If a disc becomes dirty, wipe it with a soft cloth in a straight line from centre to edge.
- Avoid exposure to direct sun light, temperature extremes, and moisture.
- Treat the disc carefully. Handle the disc only by its edges. Never allow your fingers to contact with the shiny, unprinted side of the disc.
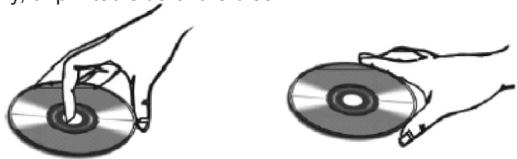
(A)
Clean the discs (B)
- Do not attach adhesive tape, stickers, etc. to the disc label.
- Clean the disc periodically with a soft, lint-free, dry cloth. Never use detergents or abrasive cleaners to clean the disc. If necessary, use a CD cleaning kit.
- If a disc skips or gets stuck on a section of the disc, it is probably dirty or damaged (scratched).
- When cleaning the disc, wipe in straight lines from the centre of the disc to the outer edge of the disc. Never wipe in circular motions.

(B)
Correct

Incorrect
- Discs should be stored in their cases after each use to avoid damage.
- Do not expose discs to direct sunlight, high temperatures or dust, etc.
- Prolonged exposure or extreme temperatures con warp the disc.
- Do not stick or write anything on either side of the disc. Sharp writing instruments, or ink, may damage the surface.
Region Management Information
This DVD Player is designed and manufactured to respond to the Region Management Information that is recorded on a DVD disc. If the Region number described on the DVD disc does not correspond to the Region number of this DVD Player, this DVD player cannot play that disc
This Region number of this DVD player is Middle-East).
(Japan, Europe, South Africa,
DVD keys functions
IMPORTANT NOTE: The functions described below are only available for DVD discs. The on screen messages and operations may be different for any other type of discs.
Play/Stop
- Slide the ON/OFF button to the ON position.
- Press the open button located on the player to open the disc tray.
- Hold the disc without touching either of its surfaces and place it on the tray with the printed title face up (for a Double-sided DVD Disc, put the disc with label A/1 up).
-
Close the tray; the disc will be loaded automatically.
-
If it is a DVD disc, the main menu or the title page will be displayed. Use the direction keys of the remote control to select the desired option, and then press the / key to confirm.
-
If it is a CD, the first track will play automatically.
-
Press the STOP key if you want to stop the disc playback. You can resume playback by pressing. Playback will resume at the location where you have pressed STOP (Resume Play function).
- Press STOP twice to cancel the resume function and completely stop the disc.
Pause
- Press the key to pause DVD or CD playback.
- Press / again to resume playback.
Previous |/ Next
- During playback, press the key to return to the beginning of the previous chapter or track.
- During playback, press the key to move to the beginning of the next chapter or track.
Scan forward /backward
- Press to search forward. Press this key repeatedly during playback to change the search speed: "2X", "4X", "8X", "16X", "32X" and "normal playback".
- Press to search backward. Press this key repeatedly during playback to change the search speed: "2X", "4X", "8X", "16X", "32X" and "normal playback".
Note: Press the key at any moment to resume to normal speed.
Slow play
- Press the SLOW key to enter the slow play mode. Press the key repeatedly to change the slow play speed and direction: "1/2" forward, "1/4" forward, "1/8" forward, "1/16" forward, "1/2" backward, "1/4" backward, "1/8" backward, "1/16" backward and "normal playback".
- Press the key at any moment to resume to normal speed.
Note:
- The sound turns to mute in slow mode.
- This function is not available for audio and MP3 CD.
Clear
Use the CLEAR key of the remote control to cancel a wrong input (for example, when using the program mode, see p.32).
Other DVD functions
Menu
During DVD playback, press the MENU key to go to the DVD main menu. Use the direction keys of the remote control to select the desired option and press the / key to confirm.
Repeat mode
This function is available for DVD and audio CD but with different effects.
- For DVD disc playback, press the REPEAT key once to repeat the current chapter; twice to repeat the current title; and three times to repeat the entire disc.
- For CD playback, press the REPEAT key once to repeat the current track, and two times to repeat the whole disc (repeat all tracks).
- Press the key repeatedly to cancel the repetition.
Repeat A-B
You can specify the repeating interval by marking the starting point and the end point.
- Press the A-B RPT key to mark the starting point (playback will continue).
- Press the A-B RPT key again to mark the end point (the marked part will then be repeated automatically.)
- Press the A-B RPT key during repetition to disable the Repeat A-B mode.
Subtitle
Press the SUBTITLE key repeatedly to turn on and change the subtitle language shown onscreen.
Note: Number of subtitles available depends on the DVD disc.
Audio
- During DVD playback, press the AUDIO key to change the audio language of the DVD disc (if this function is available with the disc). Press the AUDIO key repeatedly to change the language.
- During audio CD playback, press the AUDIO key to change the audio channel between "Mono Left", "Mono Right", "MIXTE-MONO" and "Stereo".
Angle
- If a DVD disc contains multi-angle feature, the viewing angles may be selected.
- During playback, press the ANGLE key repeatedly to select the desired viewing angle.
Note: The number of viewing angles depends on the disc.
Search
You can jump to a specific time location, track, chapter or title.
DVD:
- Press the SEARCH key once to jump to a chapter, twice to jump to a specific time of the current title or three times to go to a specific time in the current chapter.
- Use the numeric keys to enter the desired chapter number, title number or target time.
- The player will jump to the target location immediately.
Audio CD:
- Press the SEARCH key once to jump a specific time of the disc, twice to go to a specific time of the current track or three times to jump to a specific track.
- Use the numeric keys to enter the desired track number or the target time.
- The player will jump to the target location immediately.
OSD (On screen Display Messages)
Press the OSD key to display time and status information on the screen ( elapsed time, remaining title, elapsed chapter, remaining chapter ...). Press this key repeatedly to hide the information.
TFT screen
Press the TFT ON/OFF key to turn on or turn off the DVD player's TFT screen.
Note: To save the energy of the built-in lithium battery, it is recommended to turn off the TFT screen when listening to an audio CD.
Title
For some DVD discs, you may press the TITLE key to display the title menu. Then use the direction keys to select your favourite chapters.
Zoom
This function enlarges or reduces a still picture or a moving picture. Press the ZOOM key to select the zooming levels: "X2", "X3", "X4", "1/2", "1/3", "1/4". Press this key repeatedly to cancel the zoom function.
Note: Use the direction keys (▲/▼/▲/▶) to navigate within the image.
DVD settings
The portable DVD player provides 5 setting menus: "General Setup Page", "Audio Setup Page", "Video Setup Page", "Password Setup Page" and "Preference Page".
Note: To access all the setting menus, the disc must be completely stopped (press the STOP key twice).
- To enter the setting menus page, press the SETUP key.
- Use the or keys to select a menu and press / or to confirm.
- Use the direction keys ( / / / ) to navigate through the menus and to select the available options. Press to confirm your settings.
Note: Press on to go back to the list of menus.
- To exit the setting menus page, select "Exit Setup Menu" and press or press the SETUP key at any time.
General Setup Page
Press SETUP, and use the and keys to highlight "General Setup Page". Then press or .
TV Display
- Use the and keys to highlight "TV Display".
-
Press , then use the and buttons to select "4:3 Pan Scan" / "4:3 letterbox" / "16:9".
-
"4:3 Pan Scan": the sides of the image are cropped off to fit the proportions of a standard 4:3 aspect ratio television screen.
- "4:3 Letterbox": the film's original aspect ratio is preserved by reducing the vertical height of the frame (black bars appear on the top and bottom areas of the screen).
-
"16:9": wide display format for widescreen televisions.
-
Press to confirm your selection.
Angle Mark
- Use the and keys to highlight "Angle Mark".
- Press , then use the and buttons to select "On" or "Off".
- Press / to confirm your selection. If the "Angle Mark" option is turned on, when you press the ANGLE key during DVD playback, the OSD will display your selected angle constantly. If the option is turned off, the OSD will display your selected angle only for a few seconds.
Screen Saver
With this option, you can turn the screensaver on or off.
- Use the and keys to highlight "Screen Saver".
- Press , then use the and buttons to select "On" or "Off".
- Press / to confirm your selection.
Note: the screen saver default setting is "On".
Selecting the OSD language (OSD Language)
This option allows you to select the desired OSD language.
- Use the and keys to highlight "OSD Language".
- Press , then use the and keys to select the desired on-screen display language.
- Press / to confirm your selection.
Audio settings
Press SETUP, and use the and keys to highlight "Audio Setup Page". Then press / or .
Speakers' Setup
Use the and keys to highlight "Analog audio setup" and press / to go to the speakers settings menu.
Downmix
- Use the and keys to highlight "Downmix".
- Press , then use the and buttons to select "LT/RT" or Stereo".
- Press to confirm your selection.
Note: When "LT/RT" is selected, the sound will be like in a movie theatre if the original movie was encoded in the ProLogic Dolby Digital format.
D.R.C.
- Use the and keys to highlight "D.R.C".
- Press , then use the and keys to select "On", "Off" or "Auto".
- Press / to confirm your selection.
Video setup
Press SETUP, and use the and keys to highlight "Video Setup Page". Then press / or .
- Use the and keys to highlight "Panel Quality", then press .
- Use the and keys to select "Brightness", "Contrast", "Hue" or "Saturation" and press / or .
- Use the and keys to adjust the setting selected. Press to confirm.
Password Setup
Press SETUP, and use the and keys to highlight "Password Setup Page". Then press / or .
- Use the and keys to highlight "Password", then press to select "Change". Press / to confirm.
- Use the numeric keys to enter the old password and enter the new 4-digit password. Confirm the new code then press / to save the change.
Note:
The default code is 8888.
- To use this option, the disc must be completely stopped.
Preferences
Press SETUP, and use the and keys to highlight "Preference Page". Then press /or .
TV Type
Use this option when you need to change the TV system output.
- Use the and keys to highlight "TV type".
- Press , then use the and buttons to select "PAL" or "NTSC".
- Press / to confirm your selection.
Audio language setting
- Use the and keys to highlight "Audio".
- Press , then press and to select the desired audio language.
- Press to confirm your selection.
Subtitle language
- Use the and keys to highlight "Subtitle".
- Press , then press and to select the desired subtitle language or select "Off" to turn off the subtitle display.
- Press to confirm your selection.
Parental control
The parental control feature allows parents to prevent their children from watching inappropriate material on a DVD. The player will deny access to the DVD contents if the DVD's rating is over PG-13.
- Use the and keys to highlight "Parental".
- Press , then press and to select one of the 8 categories.
- Use the numeric keys to enter the 4-digits password (the default code is 8888) and press / to turn on the parental control function.
Menu language setting
- Use the and keys to highlight "Disc Menu".
- Press , then press and to select the desired menu language.
- Press to confirm your selection.
Default (restore original settings)
- To return all the setup options to their default settings, use the and keys to highlight "Default".
- Press to highlight "Reset" then press I / to confirm.
Special DVD functions
Program mode
This function is available for DVD and CD audio discs. You may assign the playback sequence according to your preference.
CD/CDG
- Press the PROG key. The Program Sequence table will be displayed on the screen.
- Enter the track numbers according to your preference with the remote control's numeric keys.
- After assigning the playback sequence, use the / / / keys to highlight "Start". Press to confirm.
- To cancel the function, press the STOP key at any time. Note: You can also press the PROG key at any time to exit the program mode.
DVD
- Press the PROG key. The Program Sequence table will be displayed on the screen.
- Use the numeric keys to enter the title number.
- Enter the chapter number of the title selected in the last step.
- Use the / / / keys and repeat the last 2 steps to input the sequence.
- After assigning the playback sequence, use the / / / keys to select "Start".
- Press / to confirm.
- To cancel a program, move the cursor to highlight "Exit" at the bottom of the screen and press / to confirm.
Note:
If you press STOP , the sequence will be cancelled.
- You can also press the PROG key at any time to exit the program mode.
Picture CD
- Load a picture CD into the tray. If the disc is identified, the player will display the list of the folders and photos stored on the CD.
- Use the and keys to select a folder, then press / to start browsing through the files.
- Use the and keys to select a photo, then press / to launch a slide show of the pictures.
- Press to pause and/or resume the slide show.
- Press to skip to the next picture, press to return to the previous picture.
- Press the ZOOM key repeatedly to enlarge or reduce a picture.
- Use the direction keys to flip or rotate the pictures.
- During the slide show, press STOP to go to the "Digest" mode. 12 pictures will be shown on the screen each time. Use the / / keys and to select one of the available options at the bottom of the screen: "Slide Show" (to resume the slide show), "Menu" (for a brief description of the keys' function in photo mode), "Prev" (to go back to the previous 12 thumbnails) or "Next" (to display the next 12 thumbnails).
Note:
- During the slide show or in "Digest" mode, the numeric keys can also be used to input directly the number corresponding to a photo. Press the / key to display the desired picture.
- Press the MENU key at any time to go back to the list of pictures.
Troubleshooting
| Problem | Solution |
| The player does not turn on. | - Check the power connection. - The battery may be empty. Recharge the battery. |
| No picture on the TFT screen. | - Check the battery power. |
| No sound. | - If the player is connected to other devices (TV or audio amplifier), check the connections. - Make sure the connected devices operate properly. - Check the unit's volume. |
| The player does not play the inserted disc. | - Make sure the disc is properly inserted. - Clean the disc. - Turn off the parental control function or change the rating category. |
| The remote control does not operate properly/ The player does not respond properly to the remote control. | - Make sure there are no obstacles between the remote control and the player's remote sensor. - Make sure to aim the remote control at the remote sensor on the front panel of the player. - Check the remote control's battery and replace it if necessary. - Make sure to use the remote control within 3 meters of the remote sensor. |
| Low quality picture. | - Check the disc for dirt and scratches. - Shut down the player, wait ten seconds, and restart the unit. |
| The player's keys don't operate properly. | - Power surges or other electrical phenomena may cause malfunction. Shut down the player, wait ten seconds, and restart the unit. |
Specifications
GENERAL
Power source
AC 110V -240V50/60Hz
DC 9V
12W
215x175x40mm
5^ to 35^ (41^ to 95^)
Horizontal
5% to 90%
1,1Kg
Power consumption
External dimensions (LxWxH)
Operating Temperature
Operating position
Operating humidity
Weight
SYSTEM
TFT screen size
Signal system
Frequency response
S/N
Video/Picture
Audio
Analogue audio output
Video output
7 inch
PAL/NTSC
CD: 20Hz-20KHz (EIAJ)
DVD:
20Hz-22 KHz (48 KHz) (Sample result)
20Hz-44 KHz (96 KHz) (Sample result)
more than 65db
MPEG1 V2.0; MPEG2
MPEG LAYER2 standard
Electric level output: 1.0V-2.0V
Resistance: 10K
Electric level output: 1.0Vp--p
Resistance: 75KΩ
Maintenance
To prevent fire or shock hazard, disconnect your unit from the AC power source when cleaning. The finish on your unit may be cleaned with a dust cloth and cared for as other furniture. Use a soft, clean cloth moistened with plain, lukewarm water to clean the exterior of the unit. Use caution when cleaning and wiping the plastic parts. Mild soap and a damp cloth may be used on the front panel.
Warranty
This product is covered by our 2-year warranty.
For any claim under the warranty or after sale service, please contact your distributor and present a valid proof of purchase. Our warranty covers any manufacturing material and workmanship defect, with the exception of any deterioration arising from the non-observance of the instruction manual or from any careless action implemented on this item (such as dismantling, exposition to heat and humidity, etc.). It is recommended to keep the packaging for any further reference.
In a bid to keep improving our services, we could implement modification on the colours and the details of the product shown on the packaging.
NOTE: Please keep this instruction manual, it contains important information.
Reference: DVDP1SP 02
©2008 Marvel Characters, Inc.
©2008 LEXIBOOK®
Designed and developed in Europe - Made in China
LEXIBOOK UK Ltd,
Unit 10 Petersfield Industrial Estate,
Bedford Road, Petersfield, Hampshire,
GU32 3QA, United Kingdom
Helpline: 0808 100 3015, http://www.lexibook.com
Environmental Protection
Unwanted electrical appliances can be recycled and should not be discarded along with regular household waste! Please actively support the conservation of resources and help protect the environment by returning this appliance to a collection centre (if available).

12 =
Contidente
©2008 Marvel Characters, Inc.
©2008 LEXIBOOK®
Lexibook Ibérica S.L.
©2008 Marvel Characters, Inc.
©2008 LEXIBOOK®
5^ to 35^ (41^ to 95^)
Orizzontale
5% to 90%
1,1Kg
Consumo di energia
Dimensioni esterne (LxLxA)
©2008 Marvel Characters, Inc.
©2008 LEXIBOOK®
©2008 Marvel Characters, Inc.
©2008 LEXIBOOK®
©2008 Marvel Characters, Inc.
©2008 LEXIBOOK®
IM code: DVDP1_02SPIM0258
YOUR OPINION MATTERS / VOTRE AVIS COMPTE
First name/Prenom : Last name/Nominal
[命题规律]
Address/Adresse :
Zip code/Code Postal : Country/Pays : City/Ville
- French: English : E-mail:
Disappointing/Decevant Very disappointing/thes decevant
Please feel free to leave your comments here / Vouspouvez a present utiliser l'espace sui
Find all our new products / Retrouvez toute notreactualite: http://www.lexibook.com
- LECTEUR DVD PORTABLE SPIDER-MAN
- SPIDER-MAN PORTABLE DVD PLAYER
- SPDERMAN
- MARVEL
- LEXIBOOK
- Safety Instructions
- CLASS 2 - DOUBLE INSULATION
- WARNING:
- DANGER
- LASER SAFETY
- Important safety instructions
- Portable DVD player description
- Remote control
- Battery installation
- Using the remote control
- Charging the built-in lithium battery
- Fully charge the battery before using it for the first time.
- Installation
- Unpacking the device
- Power connection
- Headphones connection
- Note:
- Disc maintenance
- Caring for discs (A)
- Clean the discs (B)
- Region Management Information
- DVD keys functions
- Play/Stop
- Pause
- Previous |/ Next
- Scan forward /backward
- Slow play
- Clear
- Other DVD functions
- Menu
- Repeat mode
- Repeat A-B
- Subtitle
- Audio
- Angle
- Search
- OSD (On screen Display Messages)
- TFT screen
- Title
- Zoom
- DVD settings
- General Setup Page
- TV Display
- Angle Mark
- Screen Saver
- Selecting the OSD language (OSD Language)
- Audio settings
- Speakers' Setup
- Downmix
- D.R.C.
- Video setup
- Password Setup
- Preferences
- TV Type
- Audio language setting
- Subtitle language
- Parental control
- Menu language setting
- Default (restore original settings)
- Special DVD functions
- Program mode
- CD/CDG
- DVD
- Picture CD
- Specifications
- GENERAL
- SYSTEM
- Maintenance
- Warranty
- Environmental Protection
- Contidente
- YOUR OPINION MATTERS / VOTRE AVIS COMPTE
Brand : LEXIBOOK
Model : DVDP1SP
Category : DVD player