
VANTAGE CNM - Network Management ZYXEL - Free user manual and instructions
Find the device manual for free VANTAGE CNM ZYXEL in PDF.

| Product Type | Network management software |
| Brand | ZYXEL |
| Model | VANTAGE CNM (version 3.1) |
| Main functions | Configuration, monitoring and centralized management of ZyXEL devices via a browser interface |
| Server operating system | Windows Vista English, Windows XP SP2, Windows 2000 Server SP4, Windows 2003 Server SP1 |
| Minimum server configuration | CPU Pentium IV 2.8 GHz, RAM 2 GB, hard drive 80~250 GB |
| Minimum client configuration | CPU Pentium III 450 MHz, RAM 256 MB, resolution 1024x768 (1280x1024 recommended) |
| Supported browsers | Internet Explorer 6.0+, Firefox 1.5+, Flash Player 9.0+ |
| Access | HTTP (port 8080) or HTTPS (port 443) on the server IP address |
| Number of managed devices | Varies according to license (iCard key) |
| Compatible devices | ZyWALL 2, 5, 35, 70, 2 Plus, 2WG, 1050, USG 100/200/2000/300/1000, P-662H, etc. |
| Communication protocols | UDP 1864, UDP 11864, TCP 443, TCP 8080; FTP and SMTP for services |
| Encryption | DES (8 characters) or 3DES (24 characters) for CNM traffic |
| Installation | Via installation wizard, requires deactivation of existing web servers |
| Upgrade | Only from Vantage CNM 3.0.00.61.02 to 3.1 |
| Interface languages | Several languages selectable during installation (definitive afterwards) |
| Required software | Flash Player 9.0+ on client |
| Maintenance | Stop/restart via Windows services or the icon in the taskbar |
| Security | Authentication by username/password (default root/root), HTTPS certificate |
Frequently Asked Questions - VANTAGE CNM ZYXEL
User questions about VANTAGE CNM ZYXEL
0 question about this device. Answer the ones you know or ask your own.
Ask a new question about this device
Download the instructions for your Network Management in PDF format for free! Find your manual VANTAGE CNM - ZYXEL and take your electronic device back in hand. On this page are published all the documents necessary for the use of your device. VANTAGE CNM by ZYXEL.
USER MANUAL VANTAGE CNM ZYXEL
Centralized Network Management
Quick Start Guide
Version 3.1
10/2008
Edition 1
DEFAULT Login
IP Address https://localhost or https://{CNM-server-IP}
User Name root
Password root
CONTENTS
ENGLISH 1
DEUTSCH 19
ESPANOL 37
FRANÇAIS 55
ITALIANO 73
PYCCKN 91
繁體中文 111
Overview
Vantage CNM is a browser-based, management solution that allows you to easily configure, manage and monitor ZyXEL devices from any location.
This Quick Start Guide shows you how to install Vantage CNM. If you have already installed "Vantage Report for CNM", then see 3.1 and your User's Guide.
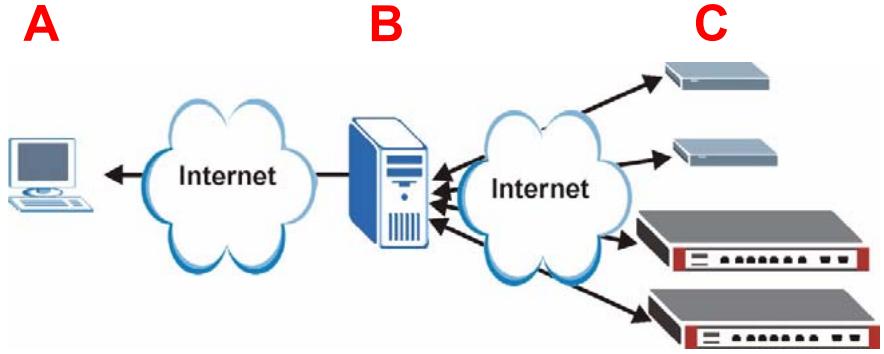
The following figure displays a Vantage CNM application:
- A - This is the Vantage CNM "client" that manages ZyXEL devices via the Vantage CNM "server".
- B - The Vantage CNM "server" is the computer with Vantage CNM software installed.
- C - These are the ZyXEL devices being managed by Vantage CNM.
This Quick Start Guide consists of the following sections:
1 Vantage CNM Requirements
2 Vantage CNM Installation
3 Initial Setup
4 Reinstall Existing License on a Different Computer
5 Starting and Stopping Services
6 Accessing Vantage CNM
7 Device Setup
8 Adding a Managed Device to Vantage CNM
1 Vantage CNM Requirements
Vantage CNM Server Requirements
| Hard Disk | 80 ~ 250 GB |
| Software | Windows Vista English Version/Windows XP (SP2)/Windows 2000 Server (SP4)/Windows 2003 Server (SP1) All web servers must be disabled on the server prior to installation. |
| CPU | Pentium IV 2.8 GHz or faster |
| RAM | 2 GB or more |
| Other | License key - This is a licence to manage a specific number of ZyXEL devices. It can be found in the iCard. Authentication code (AC) - This is an automatically generated code after you have installed Vantage CNM. You have to provide this key when you reinstall the Vantage CNM on a different computer. See section 4. |
Vantage CNM Client Requirements
| CPU | Pentium III 450 MHz or faster |
| RAM | 256 MB or more |
| Software | Flash player 9.0 or higher must be installed on the client computer. |
| Browser | Internet Explorer 6.0 or higher, Firefox 1.5 or higher with 1024x768 resolution or higher (1280x is recommended) Pop-up blocking disabled for the Vantage CNM server IP address |
ZyXEL Device Requirements
| Firmware | See section 7 for the ZyXEL device and the corresponding firmware version supported by Vantage CNM. |
2 Vantage CNM Installation
- For first time installation instructions, go to section 2.1.
- For upgrading instructions, go to section 2.2. You can only upgrade to Vantage CNM 3.1 from Vantage CNM 3.0.00.61.02. For all earlier versions of Vantage CNM, you must uninstall the old version of Vantage CNM and perform a first time installation of Vantage CNM 3.1.
2.1 Vantage CNM Installation Procedure
Use the Vantage CNM installation wizard to install Vantage CNM server software.
1 Download the Vantage CNM software (a zip file) from one of the following FTP sites and save it to the Vantage CNM server computer.
ftp://ftp.zyxel.dk/Vantage_CNM/software/
ftp://ftp.zyxel.com/Vantage_CNM/software/
2 Double-click the Vantage CNM executable file to begin the file extraction process. The Vantage CNM logo appears briefly during extraction.

Follow the directions in each wizard screen, click Yes or Next to proceed to the next screen in the wizard, click Back to return to the previous screen or click Cancel to abort the installation and exit the wizard.
3 After the installation, a screen reminds you to disable any web servers you may already have running on the Vantage CNM server computer before a system restart. Click OK to go to the restart screen.
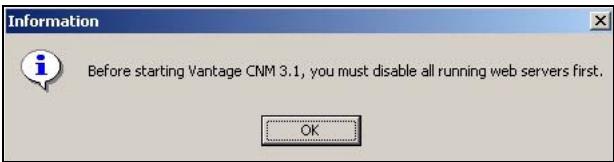

See section 5 for details on how to disable your web servers.
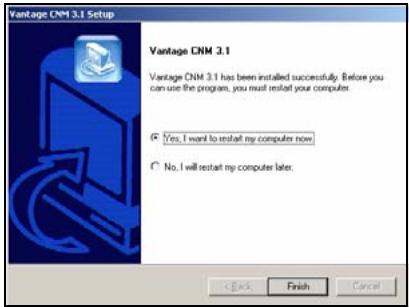
4 You must restart the computer for Vantage CNM to complete the installation. After you have disabled web server(s), click Finish and wait while your computer restarts.
2.2 Upgrading from Vantage CNM 3.0.00.61.02
Use this section to upgrade from Vantage CNM 3.0.00.61.02. Click System > About to view your version details.

You can only perform the upgrade if you have the latest release of Vantage CNM 3.0.00.61.02.
See upgrade notes from the Vantage CNM 3.1 package for instructions on how to apply the latest patch to Vantage CNM (upgrade patches are also included).
Use this procedure to upgrade from Vantage CNM 3.0.00.61.02 to Vantage CNM 3.1.
1 Stop Vantage CNM 3.0.00.61.02. Also stop any web servers from running, see section 5.1.
2 Close any other programs on your computer (the installation requires a computer restart).
3 Run the Vantage CNM executable file from the Vantage CNM 3.1 package.
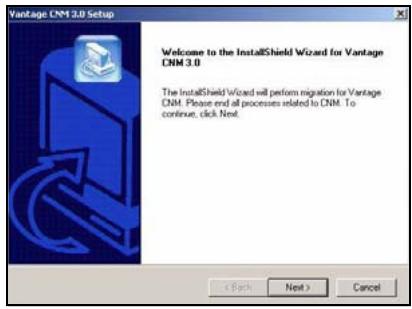
4 The installer detects Vantage CNM 3.0.00.61.02 and displays a screen like the following. Click Next.
5 Follow the prompts until you finish the installation.

Part of the upgrade is migration of data done via a batch file. So you will see a command prompt window. Simply allow it to execute and it will close automatically.
6 Vantage CNM automatically runs the next time your computer restarts. See section 6 for information on how to access Vantage CNM.
3 Initial Setup
The Vantage CNM server starts automatically after a restart. A wizard guides you through the setup the first time you access Vantage CNM. To access the Vantage CNM server,
1 Open a browser window on the server that you installed Vantage CNM, and go to http://localhost:8080.
You can also access the Vantage CNM server from a computer on the LAN by typing http:// {Vantage CNM Server IP Address}:8080. Where, "Vantage CNM Server IP Address" is the IP address of the computer on which you installed Vantage CNM.
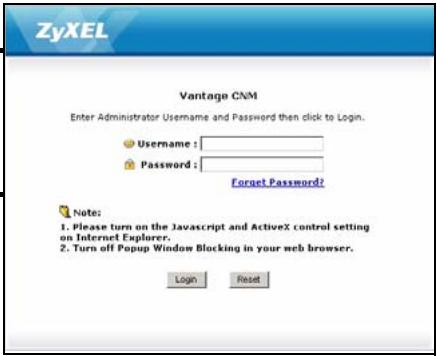
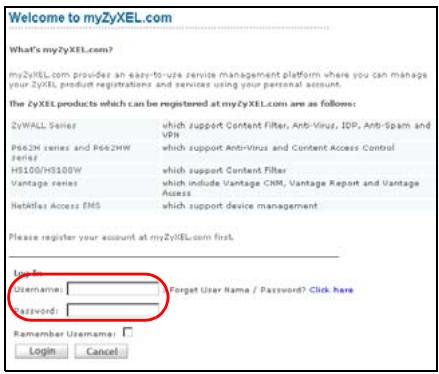
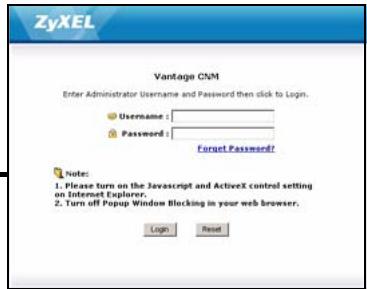
2 The Login screen appears.

If the login screen does not appear make sure that pop-up blocking is disabled on your browser.
In the login screen, enter your user name and password, and click Login.
- Default user name: root
- Default password: root
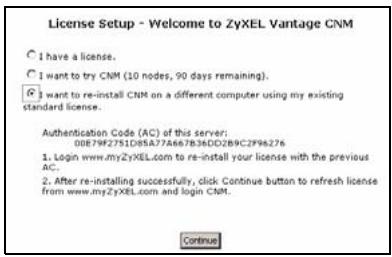
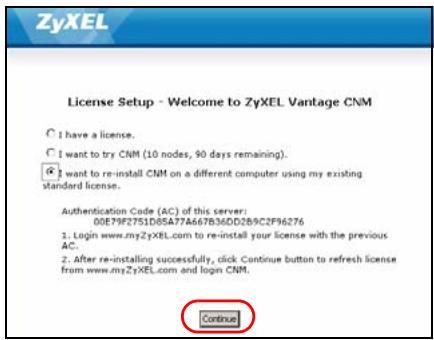
3 The License Setup screen appears. Select I have a license to start the product registration. Or select I want to try CNM to enter a 30-day trial period where you can manage up to 10 devices. Then click Continue.
You only select the third option if you are reinstalling the Vantage CNM. See section 4.
4 The Activate CNM with License screen displays. Some fields do not appear in your screen if you already have a myZyXEL.com account or if you are getting the trial version. Enter the license key and the myZyXEL.com account information in the fields provided. Click Apply to activate the product.

The number of registered devices you can configure depends on your iCard. For more information, see the product specifications chapter in the User's Guide.
ZyXEL
License Setup - Welcome to ZyXEL Vantage CNM
I have a license.
I want to try CNM (10 nodes, 30 days remaining).
C I want to re-install CNM on a different computer using my existing standard license.
Control
ZyXEL
License Setup - Activate CNM with License
License Key
New myZyXEL.com
account
(Type username and password from 6 to 20 characters.)
UserID
Password
Confirm Password
E-mail Address
Country
word from 6 to 20 characters.)
Select a Region
Appy
Buck
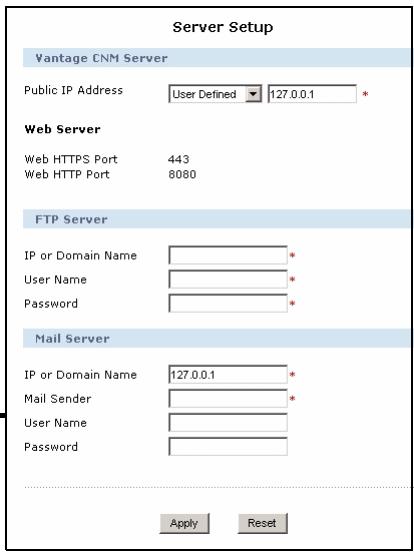
5 The Server Setup screen appears and allows you to configure the Vantage CNM server public IP address, FTP and mail servers.
The IP address is what ZyXEL devices use to communicate with Vantage CNM. If Vantage CNM is behind a NAT router, then you need to enter the public IP address (WAN) of the NAT router.
The Vantage CNM server uses the FTP account to get backup logs or device alarms from the FTP server.
The mail server is used for e-mail notifications; contact the e-mail administrator on your network if you are not sure of your mail server's domain name or account details.

Note up the public IP address you assign in this screen, you will need it to access Vantage CNM from the WAN.
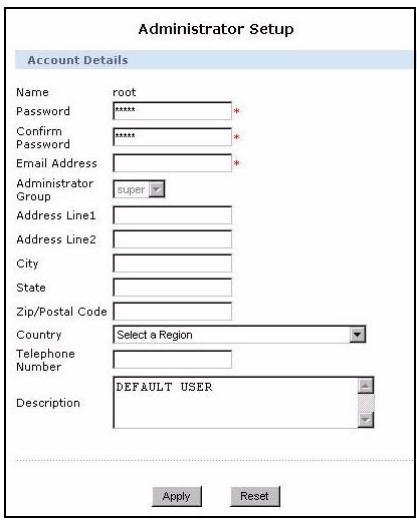
6 The Administrator Setup screen appears. Enter the e-mail address and the other details. Click Apply.
7 The Vantage CNM dashboard displays.
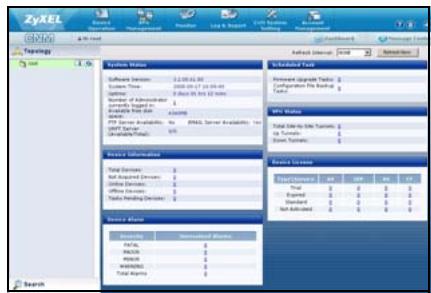
The following describes the parts of the Vantage CNM screens.
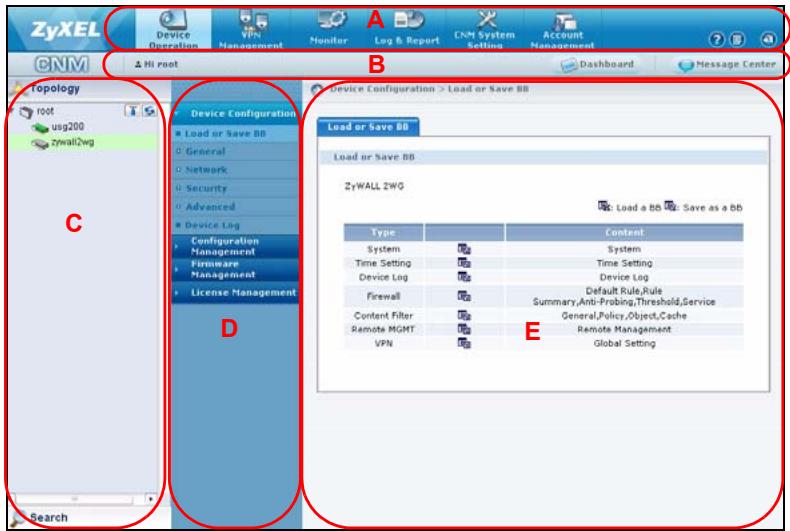
- The menu bar (A) displays main menu links that you use to access related sub-menus in the navigation panel (D) or to manage the Vantage CNM.
- The title bar (B) displays login user name, dashboard and message center buttons.
- The device window (C) displays the devices that are managed by the Vantage CNM. You can also configure and view the logical groupings of the managed devices. This is also known as OTV (Object Tree View).
- The navigation panel (D) displays the sub-menu links that you use to access configuration, log or status screens.
- The configuration window (E) displays the configuration screens that you set for Vantage CNM or for a selected device.
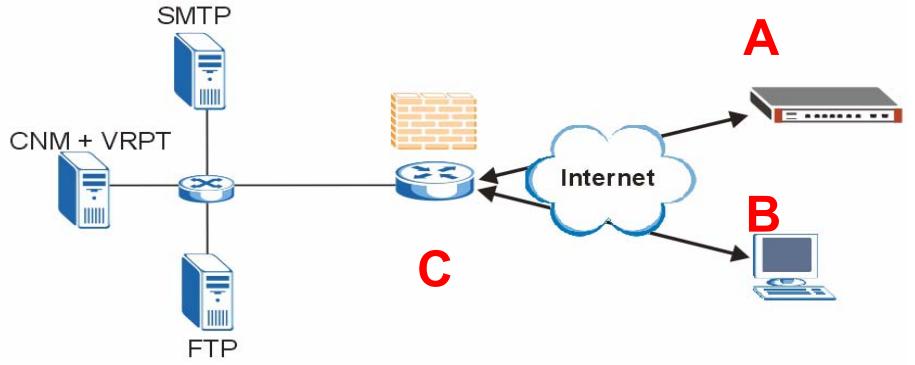
3.1 Example Deployment Scenario
In most network environments the Vantage CNM server is deployed on a LAN behind a NAT router with firewall enabled. Port forwarding must be enabled on the NAT router and firewall rules must be configured between the LAN and WAN. In the following figure the managed device (A) and the Vantage CNM client (B) are both communicating with Vantage CNM (and the other servers it uses) from the WAN via the NAT router (C).
If Vantage CNM is behind a firewall, you must setup firewall rules to allow traffic to flow to/from Vantage CNM to the ZyXEL devices. You must also configure NAT port forwarding to allow the following traffic to be forwarded to Vantage CNM via the following ports:
| Vantage CNM Server: | UDP 1864, UDP 11864, TCP 443, TCP 8080 |
| FTP Server (FTP): | TCP 20, TCP 21 |
| Mail Server (SMTP): | TCP 25 |
If you choose to install Vantage Report (VRPT) on the same server as the Vantage CNM server, you also need to setup firewall rules and NAT port forwarding on the NAT router for the following ports:
| Vantage Report: | UDP 514, TCP 8088 |

You also need to enable NAT loopback on the NAT router if both your Vantage CNM client and server are in the LAN network.
4 Reinstall Existing License on a Different Computer
If you perform a new installation of Vantage CNM, but want to use a license key from a previously purchased and registered instance of Vantage CNM. Do the following:
1 Log into the Vantage CNM. (See Accessing Vantage CNM.)
2 Select I want to re-install CNM on a different computer using my existing standard license. The screen will show you an authentication code (AC). Copy the AC displayed. Don't click Continue until you complete step 7.
3 Go to http://www.myZyXEL.com using your web browser.
4 Log into your account.
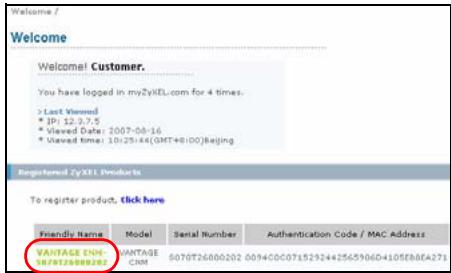
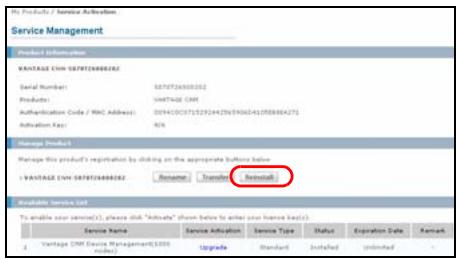
5 Browse to the Vantage CNM product detail screen of your already registered Vantage CNM and click Reinstall to use your existing license key for the new installation of Vantage CNM.

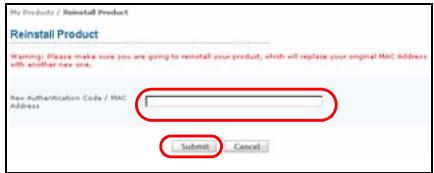
6 You are prompted to enter the New Authentication Code. Paste the AC you copied in step 2 and click Submit.
7 A successful reinstall screen appears. Click Continue and return to the License Setup screen (shown in step 2).
8 You will continue with the Server Setup and Administrator Setup screens before logging into the Vantage CNM server with the Dashboard screen.
5 Starting and Stopping Services
5.1 Windows Services
Vantage CNM is a Windows service, so you may start, stop or resume Vantage CNM in the Services window.
5.1.1 Disable Web Servers
Follow this procedure to disable any web servers you may have running on the Vantage CNM server before installing Vantage CNM.
1 Click Start>Control Panel>Administrative Tools>Services.
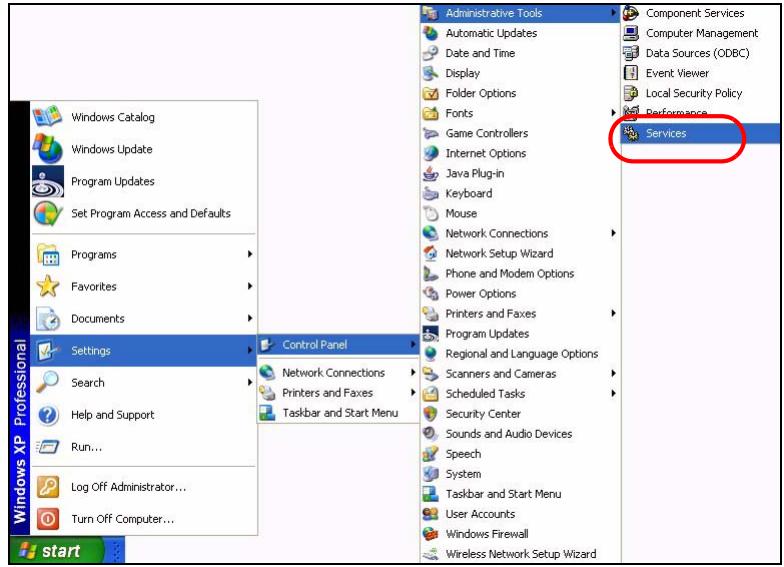
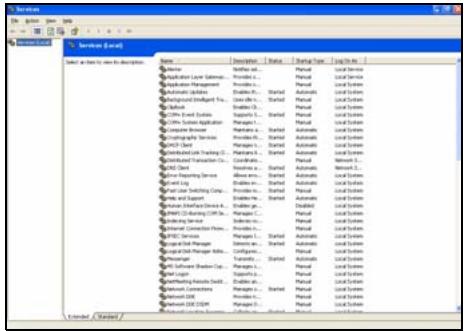
2 The Services screen opens.
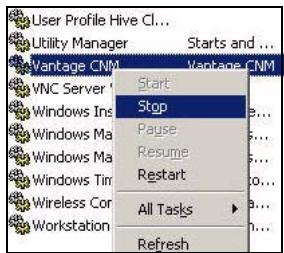
3 Right-click the (running) service you want to disable and click Stop. (You may also choose to start, resume or restart Vantage CNM in this way.)
5.2 Vantage CNM Icons
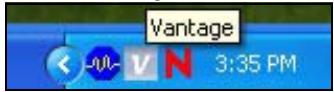
After your computer restarts, you will see the following Vantage CNM icons in the system tray (bottom right of your computer screen) indicating the status of Vantage CNM.
| Vantage CNM ICON | DESCRIPTION |
| V | A green icon indicates Vantage CNM is starting. |
| V | A blue icon indicates Vantage CNM has started. You may right-click this icon run (START), pause (STOP) or quit (EXIT) Vantage CNM. When you exit Vantage CNM the icon disappears from the system tray. |
| V | A red icon indicates Vantage CNM has stopped. |
If you have exited Vantage CNM and wish to restart it, click Start>Programs>ZyXEL>Vantage CNM to bring back the Vantage CNM icon to the system tray.
6 Accessing Vantage CNM
1 From the Vantage CNM client computer, open your web browser and type http://{Vantage CNM server IP address}:8080 or simply https://{Vantage CNM server IP address}.
2 When the login screen appears, type root as username, root as the Password (factory defaults) and click OK. You may see a screen asking you if Windows should remember this password. If this is a shared computer, Windows should not remember your password.

BothUsername and Password are case sensitive. If you change your login credentials make sure to enter them in the proper case.
3 A HTTPS certificate information screen appears. Click Yes to continue.

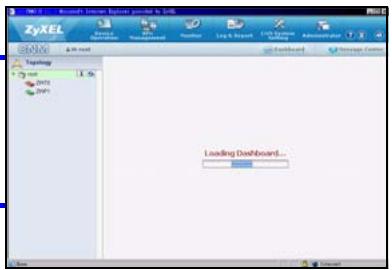
4 After a successful login, the dashboard loads.

If you don't see the left device window, check whether Flash Player 9.0 or higher is installed on your computer.
7 Device Setup
Check the release notes for each of your ZyXEL devices to find out if the current firmware supports Vantage CNM. Make sure you check the release notes for the exact version; for example, check the release notes for v4.01(WM.2), not just v4.01 (where WM identifies the specific ZyXEL device and WM.2 is the firmware release for that device). At the time of writing, Vantage CNM can create reports for the following devices and corresponding firmware versions. Not all device features may be monitored using Vantage CNM.
Table 1 ZyXEL Device and Firmware version Vantage CNM Supports
| ZyXEL Device | Firmware Version |
| ZyNOS ZyWALL: ZyNOS (ZyXEL Networking Operation System) is a ZyXEL proprietary system. | |
| ZyWALL 2 | 3.62 |
| ZyWALL 5 / 35 / 70 / 2 Plus | 4.00 or later |
| ZyWALL 2WG | 4.02 or later |
| ZLD ZyWALL: ZLD (ZyXEL Linux Distribution) is a ZyXEL's platform based on Linux. | |
| ZyWALL 1050 | 2.01 or later |
| ZyWALL USG 100 / 200 / 2000 | 2.10 |
| ZyWALL USG 300 / 1000 | 2.01 or later |
| P-662H(W)-D1 / P-662H(W)-61 / P-662HW-63 / P-653HWI-17 | 3.40 |
8 Adding a Managed Device to Vantage CNM
You have to configure each ZyXEL device to send its log entries to the Vantage CNM server (See 8.1, 8.2, 8.3, 8.4), and you have to add each device to Vantage CNM (See 8.5). In the ZyXEL device, you can configure CNM agent settings using commands and/or the web configurator.
8.1 ZyNOS and Encrypt Traffic Commands
Go to command mode (SMT menu 24.8 of most ZyXEL devices) and issue the following command: Enter cnm active. If cnm active 0 displays then Vantage CNM is disabled on the ZyXEL device. To enable Vantage CNM on the device
1 Enter cnm active 1.
2 Enter cnm managerIp x.x.x.x on the ZyXEL device where x.x.x.x is the public IP address of the Vantage CNM server.
3 To encrypt traffic between Vantage CNM and the ZyXEL device, type 'cnm encry X xxxxxxxxx'. Where X = 0 is no encryption, X = 1 is DES encryption, X = 2 is 3DES encryption. If X = 1 or 2, 'xxxxxxx' is the alphanumeric encryption key ("0" to "9", "a" to "z" or "A" to "Z") in the Vantage CNM server. Type an eight-character alphanumeric key ("0" to "9", "a" to "z" or "A" to "Z") for DES encryption and a 24-character alphanumeric key for 3DES encryption.
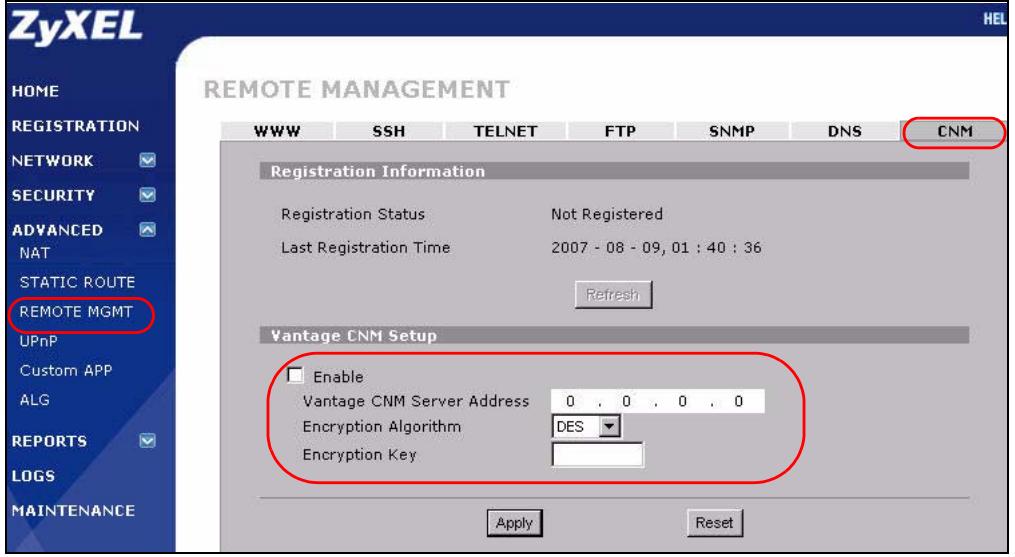
8.2 ZyNOS Web Configurator
Log into the device web configurator, click ADVANCED > REMOTE MGMT from the navigation panel and then click the CNM tab. Select Enable, enter the Vantage CNM Server (IP) Address and select an Encryption Algorithm and Encryption Key if desired. Then click Apply.
8.3 ZLD Commands
Go to command mode and issue the following command:
Enter show cnm-agent configuration to see whether Vantage CNM is disabled on the ZyXEL device. To enable Vantage CNM on the device
1 Log in as root.
2 Type configure terminal to enter the configuration mode.
3 Enter cnm-agent manager https://x.x.x.x/vantage/TR069 on the ZyXEL device where x.x.x.x is the public IP address of the Vantage CNM server.
4 Enter cnm-agent activate.
5 Enter exit to leave the configuration mode.
6 Enter write to save the setting.
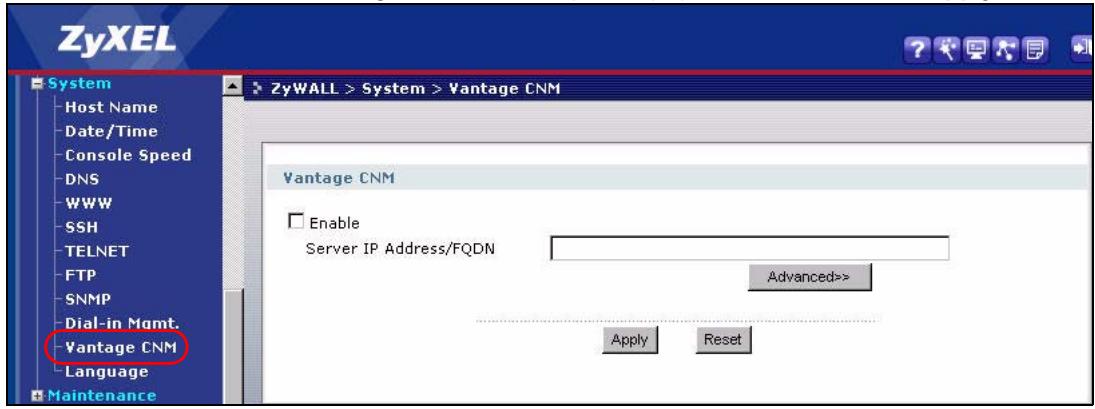
8.4 ZLD Web Configurator
1 Log into the device web configurator, go to System > Vantage CNM from the navigation panel. Select Enable, enter the Vantage CNM server's public (IP) address. Then click Apply.
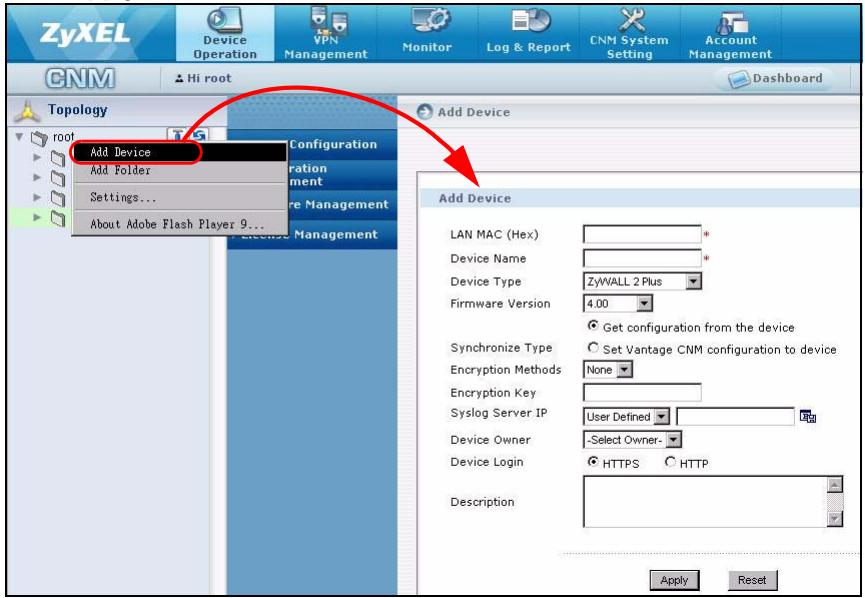
8.5 Adding a ZyXEL Device to Vantage CNM
In the Vantage CNM device window, right click the root folder and click Add Device. Enter the ZyXEL device's LAN MAC address, its name and other information at the configuration window. Click Apply.

If you still can't manage the ZyXEL devices after performing these steps; Check NAT and firewall settings between Vantage CNM and devices. And make sure that the encryption method used is the same on both Vantage CNM and the ZyXEL device and that the firmware version is compatible with Vantage CNM. See table 1.
Übersicht
- Quick Start Guide
- DEFAULT Login
- CONTENTS
- Overview
- Vantage CNM Requirements
- Vantage CNM Installation
- Vantage CNM Installation Procedure
- Upgrading from Vantage CNM 3.0.00.61.02
- Initial Setup
- The Login screen appears.
- ZyXEL
- Example Deployment Scenario
- Reinstall Existing License on a Different Computer
- Starting and Stopping Services
- Windows Services
- Disable Web Servers
- Click Start>Control Panel>Administrative Tools>Services.
- The Services screen opens.
- Vantage CNM Icons
- Accessing Vantage CNM
- Device Setup
- Adding a Managed Device to Vantage CNM
- ZyNOS and Encrypt Traffic Commands
- ZyNOS Web Configurator
- ZLD Commands
- ZLD Web Configurator
- Adding a ZyXEL Device to Vantage CNM
- Übersicht
Brand : ZYXEL
Model : VANTAGE CNM
Category : Network Management