
Serie 2 MUMS2AW21 - Food Processor BOSCH - Free user manual and instructions
Find the device manual for free Serie 2 MUMS2AW21 BOSCH in PDF.


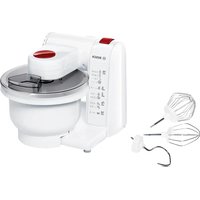
| Product type | Compact food processor |
| Brand | Bosch |
| Model | Series 2 MUMS2AW21 |
| Dimensions (L x W x H) | 28 x 26 x 30 cm |
| Weight | 4.5 kg |
| Power supply | 220-240 V, 50/60 Hz |
| Power | 1000 W |
| Bowl capacity | 3.9 L |
| Maximum working capacity | 2 kg of dough |
| Number of speeds | 7 speeds + pulse |
| Functions | Mixing, chopping, kneading, beating, cutting, grating, emulsifying |
| Included accessories | Whisk, dough hook, beater, chopping knife, grating and slicing disc, pusher |
| Bowl type | Stainless steel |
| Safety | Arm lock, overload protection |
| Care and cleaning | Bowl and accessories dishwasher safe |
| Cable length | 1.2 m |
| Color code | White / Silver |
| Repairability | Repairability index: 8.5/10 |
| Warranty | 2 years |
| Country of manufacture | Slovenia |
Frequently Asked Questions - Serie 2 MUMS2AW21 BOSCH
User questions about Serie 2 MUMS2AW21 BOSCH
0 question about this device. Answer the ones you know or ask your own.
Ask a new question about this device
Download the instructions for your Food Processor in PDF format for free! Find your manual Serie 2 MUMS2AW21 - BOSCH and take your electronic device back in hand. On this page are published all the documents necessary for the use of your device. Serie 2 MUMS2AW21 by BOSCH.
USER MANUAL Serie 2 MUMS2AW21 BOSCH
Meat mincer attachment
MUZS2FWW
[en] Information for Use Meat mincer attachment 12
https://digitalguide.bsh-group.com/?mat-no=8001226395
[en] You can find additional information and explanations online. Scan the QR code on the title page.


2 3

4

5

6

7

8

9

10


12


14


16

Therefore, m = 3/11

18


20


22


24


26


 |  |  |  |  | |
 | |||||
 |  |  |  |  |  |
 |  |  |  |  |  |
 |  |  |  |  |  |
 |  |  |  |  |  |
Safety
■ Read this instruction manual carefully. ■ Observe the instructions for the main unit.
Only use the accessories:
■ with a kitchen machine from the same series MUMS2. ■ with genuine parts and accessories. ■ for cutting up raw or cooked food, e.g. meat, fish and vegetables. ■ for additional applications described in these instructions.
▶ Do not reach into the filling shaft. ▶ Only use the pusher to push down ingredients. ▶ Never assemble the accessories on the main unit. ▶ Only attach and remove accessories once the drive has stopped and the appliance has been unplugged. - The accessories should only be used in the intended operating position.
Avoiding material damage
- Do not process food that contains hard components, e.g. bones, gristle or stones.
- Do not insert objects into the filling shaft or housing, e.g. wooden spoons. Before use, check the filling shaft and housing for foreign objects.
Components
→Fig. 1
A Meat mincer attachment
B Juicer attachment 1
C Perforated discs 1
D Grater attachment 1
E Cookie maker attachment 1
1 Housing
2 Worm gear with agitator paddle
3 Knife
4 Perforated disc, medium
5 Threaded ring
6 Seal
| 7 | Filling tray |
| 8 | Pusher |
| 9 | Worm gear for juicer attachment |
| 10 | Strainer housing |
| 11 | Juicer housing |
| 12 | Perforated disc, fine |
| 13 | Perforated disc, coarse |
| 14 | Worm gear for grater attachment |
| 15 | Grating barrel |
| 16 | Cover |
| 17 | Holder for shape plate |
| 18 | Shape plate |
Special accessory
You can find an overview of the special accessories and how to use them here.
Perforated discs
The fine and coarse perforated discs are suitable for additional processing functions.
Juicer attachment
The juicer attachment is suitable for squeezing soft fruit and vegetables, e.g. berries, tomatoes, apples, pears, rose hips.
Notes
- Do not press fruit whose pips are similar in diameter to the hole diameter in the strainer insert, e.g. raspberries.
- Cook hard food before squeezing to make it soft enough, e.g. rose hips.
Cookie maker attachment
The cookie maker attachment is suitable for shaping biscuit dough or shortcrust pastry.
Grater attachment
The grater attachment is suitable for grating hard foods, e.g. almonds, nuts, chocolate, hard cheese or dry bread rolls.
Note: Only process dry nuts and almonds in small quantities.
Overload protection
The overload protection system prevents the motor and other components from being damaged through being overloaded. If the meat mincer is overloaded or blocked, the agitator paddle on the worm gear will break at the predetermined breaking point.
Note: Spare parts with a predetermined breaking point are not covered by our warranty obligations. A new agitator paddle is available from customer service under order number 00418076.
Replacing the agitator paddle
- Remove the faulty agitator paddle.
- Insert the new agitator paddle.
Operation
Preparing main unit
Note: The food processor shown in the pictures may differ from your model in terms of shape and features.
- Set up the main unit as described in the main operating instructions.
- Press the release button and move the swivel arm down until it engages in the vertical position.
→Fig. 2
√ The swivel arm is fixed in position 3.
- Rotate the main unit to the operating position.
→Fig. 3
Inserting the seal
- Insert the seal into the housing and press in firmly.
→Fig. 4
The recesses must match up exactly.
Assembling the attachments
Note: To use the special accessory, you need the parts of the meat mincer, except for the knife and perforated disc.
Assembling the meat mincer
→Fig. 5 - 8
Assembling the juicer attachment ¹
Follow the illustrated instructions.
→Fig. 9 - 13
Assembling the Viennese whirl attachment ¹
Follow the illustrated instructions.
→Fig. 14 - 17
Assembling the grater attachment ¹
Follow the illustrated instructions.
→Fig. 18 - 21
Fitting the attachment
→Fig. 22 - 27
Recommended speeds
Observe the recommended speeds for optimum results.
Note: Your model is equipped with a 4- or 7-level rotary switch depending on the features of the appliance. The recommended speeds for the 4-level rotary switch are always shown in brackets in these instructions for use.
Setting Use
| 7 (4) Meat mincer |
| 7 (4) Juicer attachment |
| 4-5 (2-3) Cookie maker attachment |
| 3-4 (2-3) Shredding attachment |
Processing food
| →Fig. | 28 | - | 30 |
en Overview of cleaning
Processing food with the juicer attachment 1
Note: When working with the juicer attachment, note the following special features.
- Place two containers under the relevant openings.
- Before starting processing, turn the setting screw anticlockwise and open. →Fig. 31
- During processing use the setting screw to select the desired consistency of the fruit purée and pulp.
Removing the attachment
→Fig. 32 - 33
Tip: Clean all parts immediately after use so that residues do not dry on.
Overview of cleaning
Clean the individual parts as indicated in the table.
→Fig. 34
Safety
fr Overload protection
Perforated discs
Overload protection
Thank you for buying a Bosch Home Appliance!
Register your new device on MyBosch now and profit directly from:
- Expert tips & tricks for your appliance
- Warranty extension options • Discounts for accessories & spare-parts • Digital manual and all appliance data at hand
- Easy access to Bosch Home Appliances Service
Free and easy registration – also on mobile phones:
www.bosch-home.com/welcome
BOSCH HOME APPLIANCES SERVICE
Looking for help? You'll find it here.
Expert advice for your Bosch home appliances, help with problems or a repair from Bosch experts.
Find out everything about the many ways Bosch can support you: www.bosch-home.com/service
Contact data of all countries are listed in the attached service directory.
BSH Hausgeräte GmbH
Carl-Wery-Straße 34
81739 München, GERMANY
www.bosch-home.com
A Bosch Company
Valid within Great Britain:
Imported to Great Britain by
BSH Home Appliances Ltd.
Grand Union House
Old Wolverton Road
Wolverton, Milton Keynes
MK12 5PT
United Kingdom

8001348826 (050220)
de, en, fr, it, nl, da, no, sv, fi, es, pt, el, tr, pl, uk, ru, ar



- MEAT MINCER ATTACHMENT
- MUZS2FWW
- HTTPS://DIGITALGUIDE.BSH-GROUP.COM/?MAT-NO
- SAFETY
- AVOIDING MATERIAL DAMAGE
- COMPONENTS
- SPECIAL ACCESSORY
- PERFORATED DISCS
- JUICER ATTACHMENT
- NOTES
- COOKIE MAKER ATTACHMENT
- GRATER ATTACHMENT
- OVERLOAD PROTECTION
- REPLACING THE AGITATOR PADDLE
- OPERATION
- PREPARING MAIN UNIT
- INSERTING THE SEAL
- ASSEMBLING THE ATTACHMENTS
- ASSEMBLING THE MEAT MINCER
- ASSEMBLING THE JUICER ATTACHMENT ¹
- ASSEMBLING THE VIENNESE WHIRL ATTACHMENT ¹
- ASSEMBLING THE GRATER ATTACHMENT ¹
- FITTING THE ATTACHMENT
- RECOMMENDED SPEEDS
- PROCESSING FOOD WITH THE JUICER ATTACHMENT
- REMOVING THE ATTACHMENT
- OVERVIEW OF CLEANING
- FR OVERLOAD PROTECTION
- THANK YOU FOR BUYING A BOSCH HOME APPLIANCE
- LOOKING FOR HELP? YOU'LL FIND IT HERE
Brand : BOSCH
Model : Serie 2 MUMS2AW21
Category : Food Processor