
TYPE SIN 010 - Coffee machine SAECO - Free user manual and instructions
Find the device manual for free TYPE SIN 010 SAECO in PDF.

| Product Type | Home espresso machine |
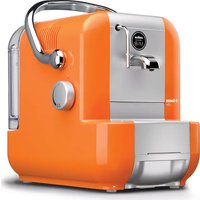
| Brand and Model | SAECO TYPE SIN 010 |
| Dimensions (W x H x D) | 245 x 310 x 250 mm |
| Weight | 4 kg |
| Power Supply | See rating plate (rated voltage and power) |
| Cable Length | 1.2 m |
| Body Material | Thermoplastic |
| Water Tank | Removable, capacity 2 L |
| Pump Pressure | 13-15 bar |
| Heater | Stainless steel |
| Safety Devices | Heater pressure safety valve, thermostat |
| Main Functions | Espresso (1 or 2 cups), hot water, steam for cappuccino |
| Control Panel | Front panel with main switch, coffee switch, steam switch and hot water/steam tap |
| Included Portafilters | "Crema" portafilter and brass portafilter with 1 or 2 cup filters |
| Supplied Accessories | Coffee scoop, tamper, drip tray with grid |
| Maintenance and Cleaning | Regular cleaning of tank, portafilters and steam tube; periodic descaling |
| Descaling | Recommended with non-toxic product; do not use vinegar |
| Safety | Do not immerse in water, do not direct steam towards body, use on stable surface |
| Compliance | European Directive 89/336/EEC |
| Usage | Household use only |
Frequently Asked Questions - TYPE SIN 010 SAECO
User questions about TYPE SIN 010 SAECO
0 question about this device. Answer the ones you know or ask your own.
Ask a new question about this device
Download the instructions for your Coffee machine in PDF format for free! Find your manual TYPE SIN 010 - SAECO and take your electronic device back in hand. On this page are published all the documents necessary for the use of your device. TYPE SIN 010 by SAECO.
USER MANUAL TYPE SIN 010 SAECO
natural_image
Line drawing of a laboratory filtration device with a curved base and control panel (no text or symbols)ISTRUZIONI PER L'USO OPERATING INSTRUCTIONS MODE D'EMPLOI BEDIENUNGSANLEITUNG INSTRUCCIONES DE USO INSTRUÇÕES PARA USO GEBRUIKSAANWIJZING
PER LA VOSTRA SICUREZZA LEGGERE ATTENTAMENTE LE ISTRUZIONI PER L'USO.
FOR YOUR SAFETY CAREFULLY READ THE OPERATING INSTRUCTIONS.
POUR VOTRE SÉCURITÉ, LISEZ SOIGNEUSEMENT LES INSTRUCTIONS D'EMPLOI.
Congratulations on choosing this top-quality espresso machine and many thanks for your confidence in our products. Before operating the machine, we recommend you read the following instructions thoroughly which explain how to use, clean and maintain the machine. For any other information, please contact the leader or our company directly. We will be glad to provide you with any explanations you may need.
Félicitations,
flowchart
graph LR
    A["3"] --> B[" "]
    C["9"] --> D[" "]
    B --> E[" "]
    D --> F[" "]
    E --> G[" "]
    F --> H[" "]
    G --> I["4"]
    H --> J["5"]
natural_image
Line drawing of a hand operating a coffee machine with an upward arrow indicating motion (no text or symbols)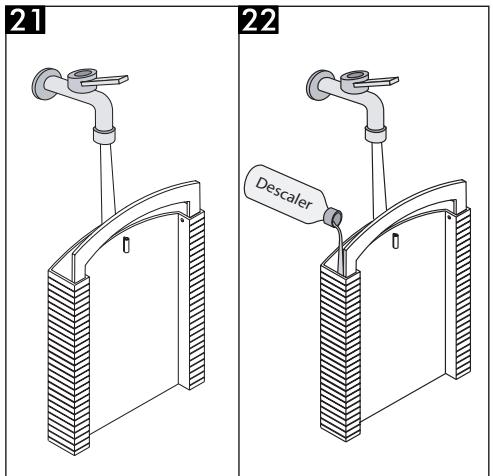
natural_image
Illustration of a hand using a sewing machine to press down a component, with no visible text or symbols.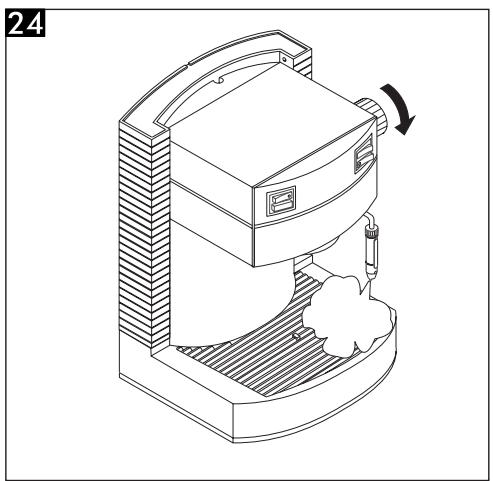
natural_image
Line drawing of a mechanical device with a handle and base, showing a rotating arrow (no text or symbols)
natural_image
Two technical illustrations of a coffee maker with a handle, showing pouring contents (no text or symbols)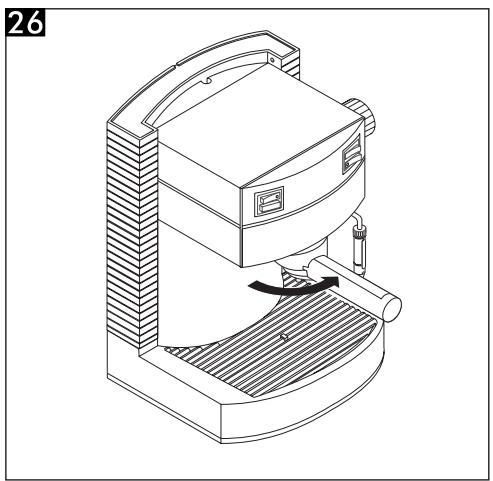
natural_image
Line drawing of a mechanical device with a lever and base, no text or symbols present27
natural_image
Line drawing of a coffee maker with a cup and stand (no text or symbols)28
natural_image
Line drawing of a mechanical device with a curved base and handle, no text or symbols present29
natural_image
Line drawing of a microwave oven with a side-mounted stand and cooling unit (no text or symbols)30

natural_image
Line drawing of a coffee maker with a cup and side panel, no text or symbols present31
32
natural_image
Technical line drawings of a microwave oven, a handheld tool, and a cylindrical device (no text or symbols)33
Indice
1 GENERALITÁ 6

B
C
natural_image
Illustration of a baby crawling under a crossed-out medical device with a hand symbol (no text or labels)D
natural_image
Illustration of a hand using a handheld device to adjust or install a device (no text or symbols present)E
F

3 NORME DI SICUREZZA

1.1 Guide to the instructions ..... 18
1.2 How to use these instructions ..... 19
2 TECHNICAL SPECIFICATIONS ...... 19
3 SAFETY REGULATIONS....21
4 INSTALLATION 23
4.1 Packaging 23
4.2 Installment requirements 23
4.3 Connecting the appliance to the power supply 23
4.4 Filling the water tank 23
4.5 Priming 23
5 COFFEE FLOW 24
5.1 Using the "Crema" filter holder 24
5.2 Using the brass filter holder 24
6 ADVICE ON CHOICE OF COFFEE ...... 25
7 HOT WATER JET 25
8 HOW TO PREPARE A CAPPUCCINO COFFEE USING THE STEAM TUBE ...... 26
9 CLEANING INSTRUCTIONS ...... 26
10 DESCALING 26
11 SERVICING 27
12 LEGAL INFORMATION ...... 27
13 DISPOSAL OF THE APPLIANCE 28
14 TROUBLESHOOTING 29
1 GENERAL
This coffee machine is designed to make 1 or 2 cups of espresso coffee, and includes an adjustable hot water/steam tube.
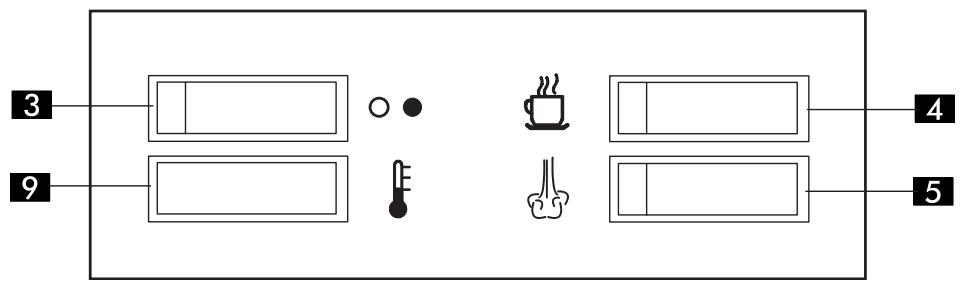
The switches on the front of the machine are clearly labelled with easy to understand symbols.
The machine is elegantly designed for a domestic kitchen and is not suitable for heavy duty, professional use.
Warning: The manufacturers accept no responsibility for eventual faults caused by any of the following:
- Misuse or use contrary to the manufacturer's recommendations;
• Repairs attempted by persons not belonging to an authorised service centre; - Mishandling of the mains cable;
- Mishandling of any part of the machine;
- Use of unauthorised spare parts or accessories.
In any of the above cases the guarantee will prove null and void.
1.1 Guide to the instructions
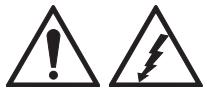
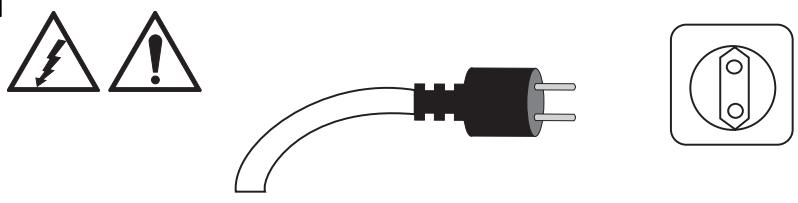
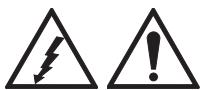
The warning triangle indicates all the personal safety instructions.
Follow these instructions carefully to avoid injury.

This symbol indicates the most important information for ensuring an optimal use of the machine.
B References to diagrams, parts of the appliance or control switches etc. are indicated by a number or letter. Keep the illustrations to hand.
The diagrams referred to in the leaflet are placed in the inside cover flap. Keep these pages open while reading the instructions.
1.2 How to use these instructions
Keep the instructions in a safe place or attach them to the machine for easy consultation by others.
If you desire any further information or have a problem not sufficiently covered by this leaflet please contact our qualified experts.
2 TECHNICAL SPECIFICATIONS
| Rated voltage | See rating plate on appliance |
| Rated output | See rating plate on appliance |
| Body material | Thermo-formed plastic |
| Dimensions (l x h x w) | 245 x 310 x 250 |
| Weight | 4 kg |
| Cable length | 1.2 m |
| Control panel | Frontal |
| Filter holder | “Crema” |
| (depending on model) | Brass |
| “Pannarello” | Cappuccino optional extra |
| Tank | Removable |
| Power supply | See rating plate |
| Water tank | 2 l |
| Pump pressure | 13-15 bar |
| Boiler | Stainless steel |
| Safety requirements | Pressure safety valve in boiler |
| Safety thermostat |
The manufacturer reserves the right to change the make up of the machine in the light of any technological breakthrough.
The machine complies to the European Standard 89/336/EEC (legislative decree 47604.12.92), referring to the elimination of broadcasting disturbance.
A

B

C
natural_image
Illustration of a baby crawling under a barrier with a crossed-out device, accompanied by a hand symbol (no text or labels)D
natural_image
Line drawing of a hand using a handheld device to press or install a device (no text or symbols present)E
F

3 SAFETY REGULATIONS
All electrical parts must be kept dry, as the machine may short circuit on contact with water. Steam and boiling water can cause burning. Always point the steam or hot water jet away from any part of the body and be careful when touching the steam/hot water nozzle as it may be hot: danger of burning.
Use of machine
The machine must not be used for anything other than its intended purpose.
The coffee machine is designed exclusively for domestic use.
Technical alterations or misuse are strictly forbidden owing to the risks that they involve.
The coffee maker must be used by adults only.
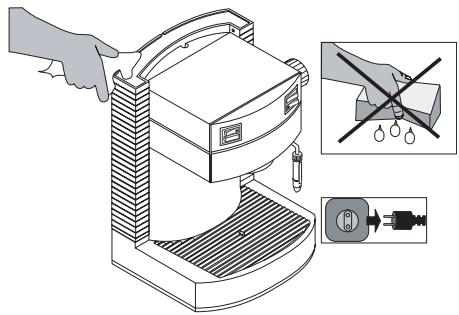
A Electrical requirements
The coffee machine must be connected to a suitable wall socket.
The voltage used must be that indicated on the rating plate.
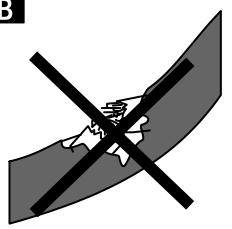
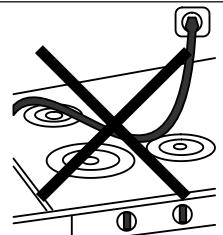
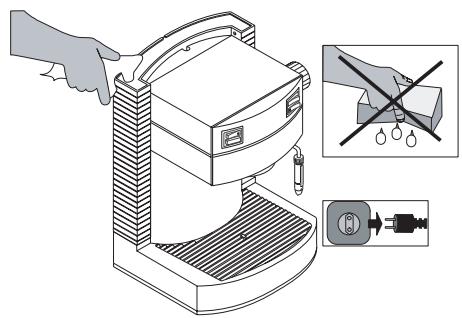
B Mains cable
The coffee maker must not be used if the mains cable flex is defective.
If a plug or cable is defective it must be changed immediately by a qualified specialist.
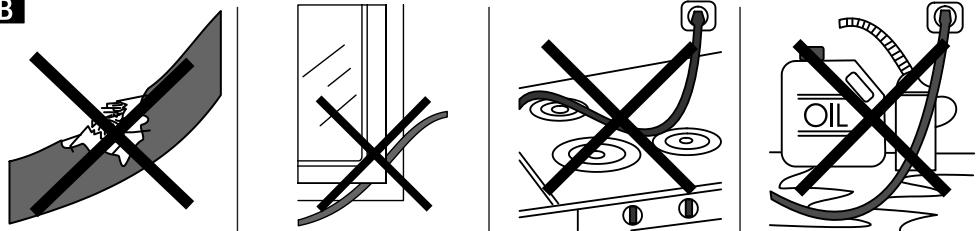
Do not locate the mains cable over hot surfaces or round sharp corners and keep it away from oil.
Do not carry or pull the machine by the mains cable.
Do not unplug the machine by pulling the
mains cable or with wet hands.
Do not allow the flex to dangle from a shelf or table.
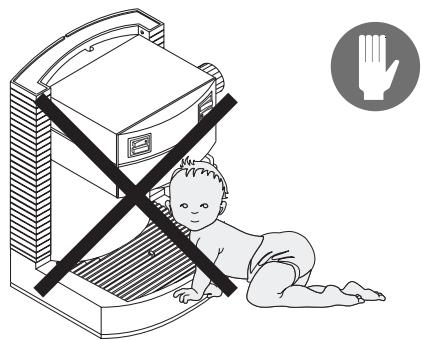
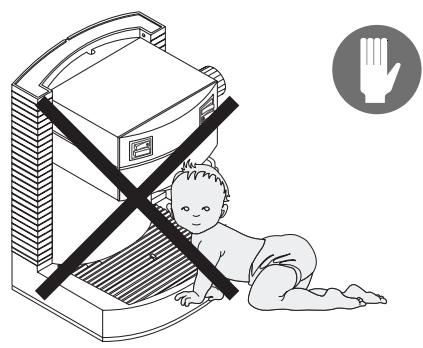
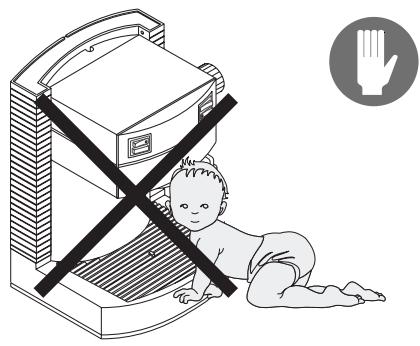
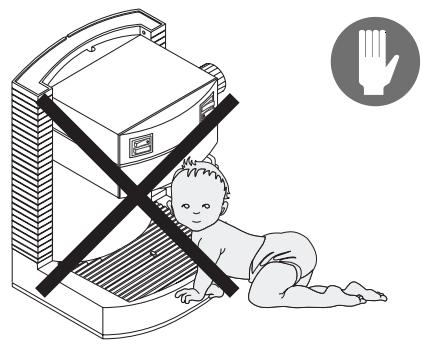
C Safeguarding others
Ensure that the machine is out of the reach of children.
Children are not aware of the risks involved in electrical appliances.
Packing materials must not be left within children's reach as they represent a potential source of danger.
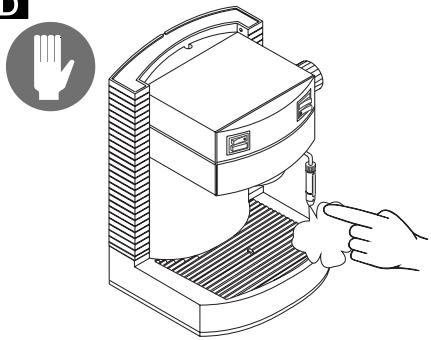
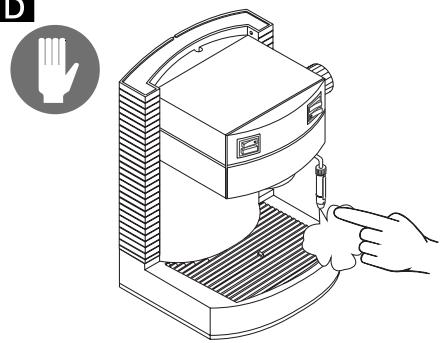
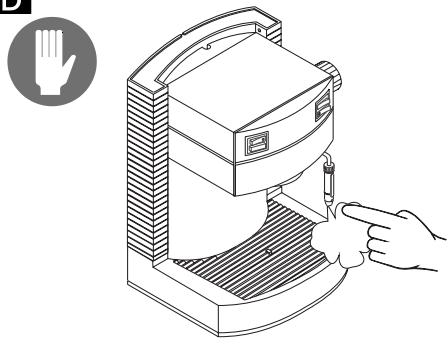
D Burning precautions
Always point the steam/hot water jet away from you.
Always use the correct handles or knobs.
Only touch the nozzle in the part where it has been insulated for your protection.
Do not remove the filter holder while the machine is in use.
While the machine is warming up, hot water may drip from the coffee outlet.
E Location
The machine must be positioned in a safe place where it cannot be knocked over or cause injury.
Hot water or steam may leak, causing possible burning.
Do not use the coffee machine outdoors.
Do not place the machine near hot surfaces or naked flames as this may damage or melt the cover.
F Cleaning Instructions
Before cleaning the machine, all switches must be in the "off" position, and the machine must be unplugged from the wall socket. You must wait for the machine to cool down. Never immerse the machine in water. It is strictly forbidden to tamper with the inside of the machine.
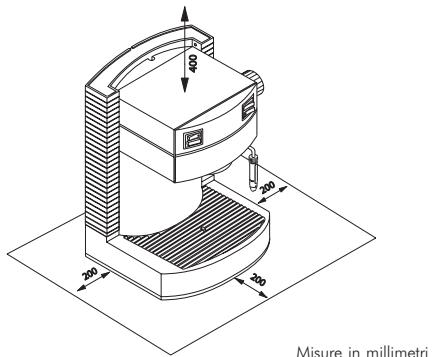
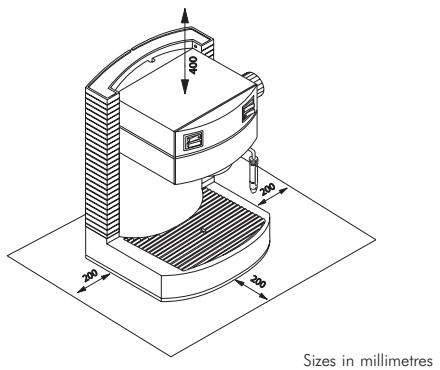
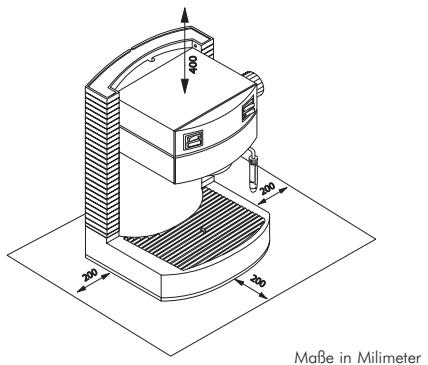
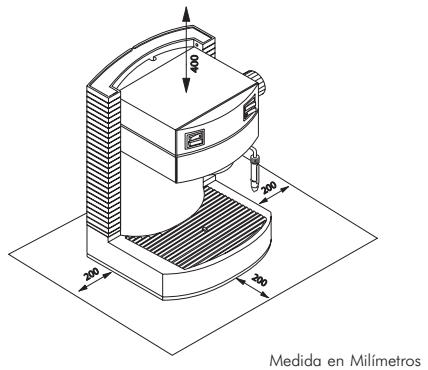
E Recommended space for use and maintenance
To get the best results from the coffee machine, the following is recommended:
- Place the machine on a flat, even surface;
- Choose a position that is well-lit, hygienic and where a wall socket is easily accessible;
- Check that the minimum distances around the machine are as indicated in the diagram.
Storage of the machine
If the machine is to be left unused for a long period, turn it off and unplug it from the wall socket. Keep in a dry place, out of the reach of children. Protect from dirt and dust.
Repairs/Maintenance
If the machine stops working, is in any way defective or has been knocked over unplug it immediately from the wall socket.
Never use a faulty machine.
Repairs or alterations must only be carried out by qualified experts.
Repairs or alterations must only be carried out by an authorised service centre.
The company will accept no responsibility for damage caused by repairs attempted by unauthorised persons.
Fire risks
Should the machine catch fire, use a carbon dioxide extinguisher. Do not use water or a powder extinguisher.
Legend of machine components
1 Water tank
2 Water tank lid
3 Main switch
4 Coffee switch
5 Steam switch
6 Steam/hot water knob
7 Coffee outlet
8 Steam tube
9 Machine on light
10 Mains cable
11 Drip tray + grill
Accessories (the accessories vary depending on the model)
12 Full tray warning light
13 "Crema" filter holder
14 Filter for "Crema" filter holder (A single unit for making 1 or 2 cups of coffee)
15 Brass filter holder
16 Single cup filter for brass filter holder
17 Twin cup filter for brass filter holder
18 Coffee measure
19 Press
4 INSTALLATION
For personal safety follow the "Safety regulations" found on Par.3.
4.1 Packaging
The original packaging has been designed to protect the appliance during transportation.
You are recommended to keep it for later use.
4.2 Installment requirements
Before installing the machine read the following safety instructions carefully:
- Locate the machine in a safe place;
- Make sure that it is out of the reach of children;
- Do not place the machine on a hot surface or near a naked flame.
The coffee maker is now ready to be connected.
4.3 Connecting the appliance to the power supply

Electricity can be dangerous, so always follow the safety actions carefully.

Never use a faulty cable. Faulty plugs and cables must be ged immediately by authorised nnel.
The coffee maker must be connected to a suitable wall socket.
The voltage of the appliance has been factory-set.
The voltage on the rating plate (positioned on the bottom of the appliance) must correspond to that of your house electricity supply.
- Uncoil a length of cable from the cable wind found underneath the appliance, sufficient for the plug to reach the wall socket.
- Check that the main switch is in the "0" position before inserting the plug in the wall socket.
- Plug the appliance into a wall socket carrying the correct voltage.
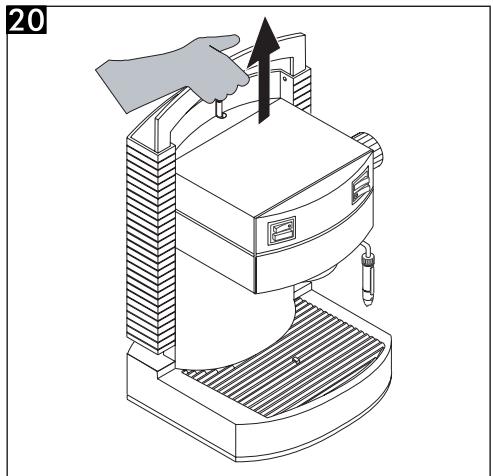
4.4 Filling the water tank
• 20 Open the tank lid (2).
- Lift the water tank (1) by using the lid. The valve on the bottom of the tank will not allow water to flow out.
- 21 Rinse and fill the tank with fresh water without overfilling.
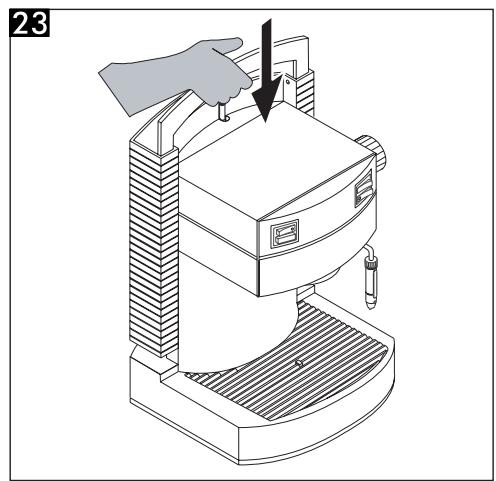
• 23 Put the tank back in its correct position.
- When the tank is in place, press lightly down on it to insert the valve correctly. The valve will open automatically.
- Close the lid on the tank.

Always fill the tank with fresh, not carbonised water: hot water or liquids may damage the tank.

Do not use the coffee maker without water, always check that is enough water in the tank.
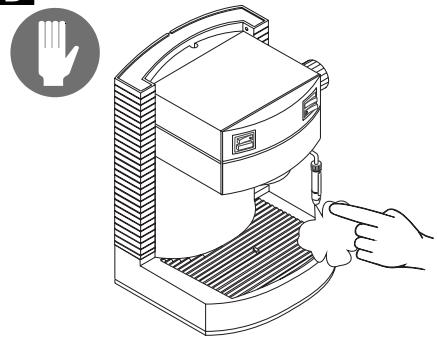
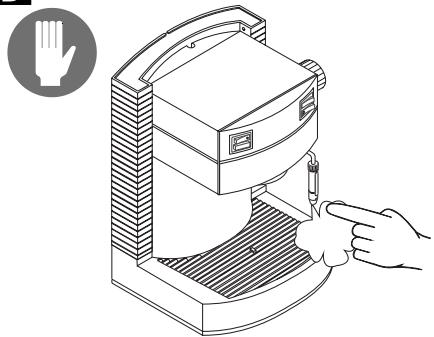
4.5 Priming
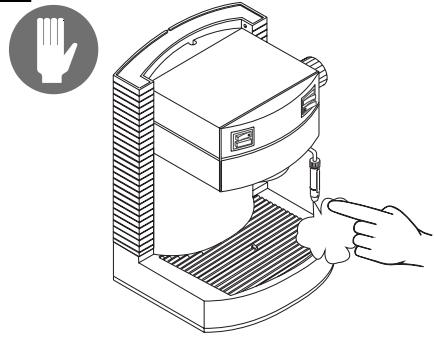
24 Before using the machine for the first time, after the appliance has been left unused for a long period or when the water and steam have run out, it is necessary to prime the machine.
- Turn on the main switch (3), the light on the inside will be on.
- Point the steam tube ("Pannarello") over the drip tray.
- Open the "hot water/steam" knob (6), turning it in an anti-clockwise direction
and press the coffee switch (4).
- Wait until a steady stream of water flows from the tube ("Pannarello").
- Press the coffee switch (4) again and close the "hot water/steam" knob (6), turning it in a clockwise direction.
The machine is now ready to make a perfect cup of coffee.
5 COFFEE FLOW
Warning! Do not remove the filter holder by turning it manually in a clockwise direction while the machine is producing coffee. Danger of burning.
- While the machine is working the "machine on" light (9) will go on and off. This is perfectly normal.
- Before using the machine, make sure that the "hot water/steam" knob (6) is closed and that there is sufficient water in the tank.
- Turn on the machine. If the coffee maker is not working the light on the inside of the main switch (3) will light up.
- Wait for the "machine on" light (9) to be on. Now the coffee maker is ready.
Note: we recommend emptying the water tray when the level float (12) rises.
5.1 Using the "Crema" filter holder
- Place the filter (14) inside the "Crema" filter holder (13).
- 26 Fit the "Crema" filter holder into the coffee outlet socket (7), pushing it upwards and turning it to the right until it locks into place.
- Let go of the filter holder handle. Automatically the handle will move slightly to the left. This movement guarantees the perfect functioning of the filter holder.
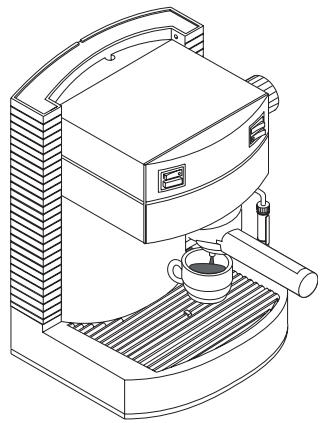
• 27 Place a cup under the filter holder. To warm up the filter holder and the cup, press the coffee switch (4); water will begin to drip from the filter holder (this operation is only necessary for the first cup of coffee).
- When the cup is sufficiently full, press the coffee switch (4) again.
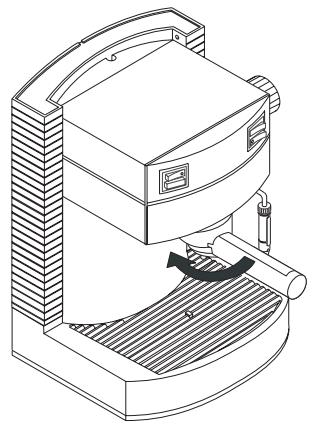
- 28 Remove the filter holder from the machine by turning it to the left and pour out any water that is left inside.
- With the special "Crema" filter holder (13) supplied with the machine, it is not necessary to change the filter to obtain one or two cups of coffee.
• 25 To make one or two cups of coffee, add 1 or 2 even measures of ground coffee to the filter.
- Clean the edges of the filter holder from any excess of coffee grounds.
- 26 Fit the "Crema" filter holder (13) into the coffee outlet socket (7), as explained before, pushing it upwards and turning it to the right until it locks into place.
• 27 Position two warmed cups under the filter holder, making sure that they are directly under the coffee spouts.
- Press the coffee switch. Wait until the cups are sufficiently filled.
- Press the coffee switch again to stop the coffee flow.
- 28 When the coffee flow has ceased, remove the filter holder and empty out the excess coffee grounds.
i Cleaning note: always keep the "Crema" filter holder clean by removing it and washing it with drinking water.
5.2 Using the brass filter holder
- Place the filter (16 or 17, single or twin cup, depending on the number of
coffees you wish to make) in the brass filter holder (15).
• 26 Fit the filter holder into the coffee outlet socket (7), pushing it upwards and turning it to the right until it locks into place.
- 27 Place a cup under the filter holder. To warm up the filter holder and the cup, press the coffee switch (4); water will begin to drip from the filter holder (this operation is only necessary for the first cup of coffee).
- When the cup is sufficiently full, press the coffee switch (4) again.
- 28 Remove the filter holder from the machine by turning it to the left.
• 25 To make one or two cups of coffee, add 1 or 2 even measures of ground coffee to the filter, depending on whether you are using the single or twin cup filter.
- Tamp the coffee down lightly using the press and brush off any excess coffee from the edge of the filter holder.
- 26 Fit the brass filter holder (15) into the coffee outlet socket (7), as explained above, pushing it upwards and turning it to the right until it locks into place.
• 27 Position two warmed cups under the filter holder, making sure that they are directly under the coffee spouts.
- Press the coffee switch. Wait until the cups are sufficiently filled.
- Press the coffee switch again to stop the coffee flow.
- 28 When the coffee flow has ceased, remove the filter holder and empty out the excess coffee grounds.
i Cleaning hint: when cleaning the filter take it right out of the filter holder and rinse thoroughly.
6 ADVICE ON CHOICE OF COFFEE
Practically any type of ground coffee on the market can be used with this machine.
Coffee is a natural product and its taste varies, depending on its origin and blend. It is therefore advisable to try a number of different types to discover your own personal preference. For best results use blends specifically ground for espresso machines. The coffee flow should be constant and should not drip.
The speed of the coffee flow can be regulated by changing the dosage, the fineness of the grinding and/or by how heavily you tamp down the coffee in the filter.
- If the machine is not already on, turn it on at the main switch (3) which will light up.
- 29 Place a cup or a glass tea cup under the steam tube ("Pannarello").
- Open the "Hot water/steam knob (6), turning it in anti-clockwise direction and press the coffee switch (4) to start the water flow.
- To stop the water flow, press the coffee switch (4) again, and close the steam knob (6) by turning it in a clockwise direction.
Danger of burning! When water begins to flow out, it may be very hot. The steam tube does get very hot, so avoid touching it in any way.
8 HOW TO PREPARE A CAPPUCCINO COFFEE USING THE STEAM TUBE
- If the machine is not already on, turn it on at the main switch (3) which will light up.
- Press the steam switch (5) which will light up. The “machine on” light (9) will turn off.
- When the "machine on" light (9) comes back on, the machine steam tube is ready to use.
- 24 Point the steam tube ("Pannarello") over the drip tray and open the "hot water/steam" knob (6) for a few seconds to clear the tube of any excess water. Wait for a few more seconds for steam to flow out.
- Close the knob (6).
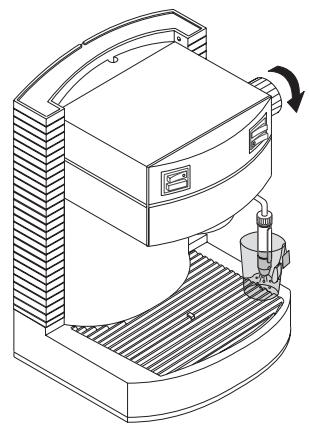
- 30 Immerse the tube in the liquid to be heated and open the knob (6).
Move the container gently up and down to ensure that the liquid is heated right through. - When the liquid has reached the required temperature close the knob (6) and turn off the "steam" switch (5).
To make a cappuccino heat milk using the method explained above.
• Proceed following the priming instructions found in par. 4.5 to operate the machine.
- When you have finished using the steam tube (pannarello) clean with a damp cloth.
9 CLEANING INSTRUCTIONS
Before cleaning the machine, let it cool down and unplug it.
- Do not immerse the coffee maker in water
and do not put any of the components in a dishwasher.
- Do not use sharp objects or abrasive chemical products (solvents) to clean the machine.
• 21 Clean the water tank and fill it with fresh water daily. - After heating milk, release a small quantity of hot water to clean out the steam tube and wipe the outside of it with a damp cloth.
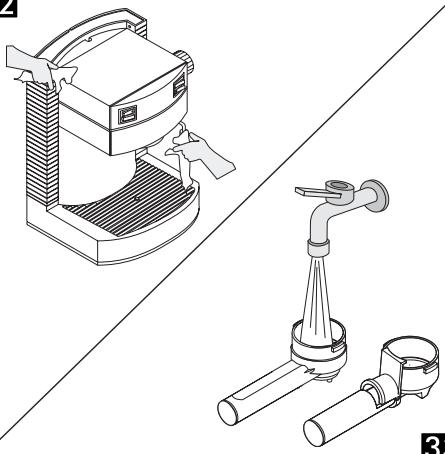
• 32 Use a damp cloth to wipe down the appliance.
• 33 Clean the filter holder as follows: - Remove the filter, place it in hot water and wash it carefully.
- Clean the inside of the filter holder.
- Do not dry the machine and/or any of its parts using a microwave and/or conventional oven.
- Clean the "Pannarello" located over the steam tube, if it is fitted on your machine. To do this, unscrew the ring nut, remove the "Pannarello" from the steam tube and take off the external casing.
Rinse the "Pannarello" under running water and then put it back together again.
The ring nut must be closed properly as otherwise the "Pannarello" may come loose during use.
10 DESCALING
31 The formation of lime on the inside of the appliance is inevitable.
If you notice a reduction in the water capacity of the appliance it is necessary to descale the machine.
If you wish to descale the appliance yourself, use a descaler
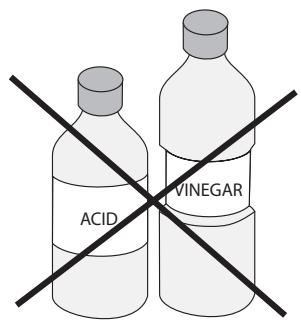
especially made for coffee machines. Use a product normally available on the market, that is neither toxic nor harmful.

Warning! Never use vinegar as a descaler.
- Remove the water container and empty out any remaining water.
• 22 Mix the descaling agent with water as directed on the package and pour the solution into the water container; place the water container inside the machine. - Turn on the machine by pressing the main switch.
- Position the steam tube over the drip tray.
• 24 Empty the entire contents from the water container at intervals (one cup at a time) by turning the steam knob (6) counterclockwise and pressing the coffee switch (4); to cut off flow press the coffee switch (4) again and turn the steam knob (6) clockwise. - Every time a cup of descaler is released the machine should be turned off at the main switch (3) and left for 10-15 minutes to give the descaling solution time to act.
- 21 When all the descaling agent has been used up, take out the water container, rinse it out and fill it with fresh drinking water.
- 24 Place the container back inside the machine; empty out 2/3 of the water in the container by turning the steam knob (6) counterclockwise and pressing the coffee switch (4); to cut off flow press the coffee switch (4) again and turn the steam knob (6) clockwise.
- Let the machine heat up and empty out the water remaining in the water container by turning the steam knob (6) counterclockwise and pressing the coffee switch (4); to cut off flow press the coffee
switch (4) again and turn the steam knob (6) clockwise.
If a descaling product that has not been recommended is used, we do advise the client to follow the manufacturer's instructions found on the packet.
11 SERVICING
Regular servicing carried out by an authorised service centre will prolong the life and efficiency of the machine.
Keep the original packaging as it may prove useful in protecting the machine at a later date.
12 LEGAL INFORMATION
• These instructions include information on how to use the machine correctly, its functions and its maintenance.
- If these instructions are followed closely no risks should be run in using the appliance and all necessary safety requirements regarding function and maintenance should be upheld.
- If more information is required or if a particular problem not dealt with or insufficiently explained in these instructions should arise, the customer should contact his/her local dealer or the manufacturer directly.
- We would also like to bring to the customer's attention that these instructions are not part of any previous or existing convention, agreement or legal contract and hence have no legal bearing.
- The obligations of the manufacturer are based on the relative contract of sale
which includes the complete and exclusive regulation regarding guarantee requirements.
The terms of the guarantee are in no way affected by these instructions.
The instructions contain information protected by copyright laws.
The instructions may not be photocopied or translated into a foreign language without the manufacturer's written permission.
13 DISPOSAL OF THE APPLIANCE
- An appliance that is no longer in use must be rendered unworkable.
- Remove the plug and cut the mains cable at the base.
• Take unused appliances to a qualified disposal centre.
14 TROUBLESHOOTING
| Problem | Possible causes | Solutions |
| The machine does not work | The machine is not properly connected to the power supply | Connect the machine correctly to the power supply |
| The pump is too noisy | There is not enough water in the tank (par. 4.4) | Fill up the tank |
| The coffee is too cold | Ready light was not on when espresso was made.The filter holder was not in place while heating up the machine (par. 5.1-5.2) | Wait until the ready light comes onWarm up the filter holder |
| The milk does not froth up | You are using the wrong type of milk | Check the fat content of the milk |
| The coffee flow is too fast, and it does not make a creamy coffee | There is not enough coffee in the filter holder or the coffee is not ground finely enoughThe coffee is old or unsuitable | Add coffee (par. 5.1-5.2)Try a different blend (chap.6) |
| The coffee does not flow or only drips | There is not enough water in the machineThe coffee is too finely groundCoffee is stuck in the filter holderThere is too much coffee in the filter holderThe “Hot water/steam” knob (6) is openThe machine needs descalingThe upper filter is blockedThe filter in the filter holder is blocked | Add water (par.4.4)Change type of coffeeLoosen itScoop some of it out using the coffee measureClose itDescale it (chap.10)Clean the filter elementClean the filter (chap.9) |
| Coffee is leaking from the filter edges | The filter holder has not been fitted correctly into the coffee outlet socketThe top edge of the filter holder is dirtyThe boiler washer is dirty or worn outThere is too much coffee in the filter holder | Insert the filter holder correctly (par.5.1-5.2)Clean the edges of the filter holderClean or change the washerScoop some of it out using the coffee measure |
If you should have a problem that is not dealt with in the above table or is not resolved by any of these solutions please contact an authorised service centre.
Table des matières
1 GENERALITE 30
1.1 Pour faciliter la lecture.... 30

B

C
natural_image
Illustration of a baby crawling under a crossed-out electrical device with a hand symbol (no text or labels)D
natural_image
Illustration of a hand using a handheld device to press or install a device (no text or symbols present)E

F

3 NORMES DE SECURITE
B

C

natural_image
Illustration of a baby crawling under a crossed-out electrical device with a hand symbol (no text or labels)D

natural_image
Illustration of a hand using a handheld device to test or inspect the interior area of a portable device (no text or symbols present)E
F

B

C

natural_image
Illustration of a baby crawling under a crossed-out electrical device with a hand symbol (no text or labels)D
natural_image
Illustration of a hand using a handheld device to press or install a device, with no visible text or symbols.E


B

C

natural_image
Illustration of a baby crawling under a crossed-out electrical device with a hand symbol (no text or labels)D
natural_image
Illustration of a hand using a handheld device to test or inspect the interior area of a portable device (no text or symbols present)E
3 NORMAS DE SEGURANÇA

13 VERWERKING ALS AFVAL 88
14 PROBLEEMOPLOSSING 89
1 KENMERKEN
B
natural_image
Cross-shaped diagram with a hand holding a small object, no text or symbols present
natural_image
Pure electrical circuit lines without any symbols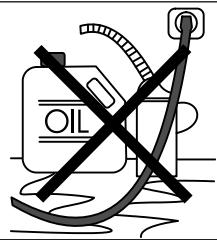
C
natural_image
Illustration of a baby crawling under a barrier with a hand symbol (no text or labels)D
natural_image
Illustration of a hand using a tool to clean or install a device with a circular warning symbol (no text or labels)E

F
3 VEILIGHEIDSMAATREGELEN

7 AFGIFTE VAN HEET WATER
13 VERWERKING ALS AFVAL
14 PROBLEEMOPLOSSING

- Félicitations,
- Indice
- NORME DI SICUREZZA
- GENERAL
- Guide to the instructions
- How to use these instructions
- TECHNICAL SPECIFICATIONS
- SAFETY REGULATIONS
- Use of machine
- A Electrical requirements
- B Mains cable
- C Safeguarding others
- D Burning precautions
- E Location
- F Cleaning Instructions
- E Recommended space for use and maintenance
- Storage of the machine
- Repairs/Maintenance
- Fire risks
- Legend of machine components
- Accessories (the accessories vary depending on the model)
- INSTALLATION
- Packaging
- Installment requirements
- Connecting the appliance to the power supply
- Filling the water tank
- Priming
- COFFEE FLOW
- Warning! Do not remove the filter holder by turning it manually in a clockwise direction while the machine is producing coffee. Danger of burning.
- Note: we recommend emptying the water tray when the level float (12) rises.
- Using the "Crema" filter holder
- i Cleaning note: always keep the "Crema" filter holder clean by removing it and washing it with drinking water.
- Using the brass filter holder
- ADVICE ON CHOICE OF COFFEE
- HOW TO PREPARE A CAPPUCCINO COFFEE USING THE STEAM TUBE
- To make a cappuccino heat milk using the method explained above.
- CLEANING INSTRUCTIONS
- The ring nut must be closed properly as otherwise the "Pannarello" may come loose during use.
- DESCALING
- If you wish to descale the appliance yourself, use a descaler
- Warning! Never use vinegar as a descaler.
- SERVICING
- LEGAL INFORMATION
- DISPOSAL OF THE APPLIANCE
- Table des matières
- NORMES DE SECURITE
- NORMAS DE SEGURANÇA
- KENMERKEN
- VEILIGHEIDSMAATREGELEN
- AFGIFTE VAN HEET WATER
- VERWERKING ALS AFVAL
Brand : SAECO
Model : TYPE SIN 010
Category : Coffee machine