
MULTI TECH II - Car seat BRITAX - Free user manual and instructions
Find the device manual for free MULTI TECH II BRITAX in PDF.
| Product type | Convertible child car seat |
| Brand | BRITAX |
| Model | MULTI TECH II |
| Weight groups | Group 1 (9-18 kg) rearward or forward facing / Group 2 (15-25 kg) forward facing |
| Recommended age | Approximately 9 months to 6 years |
| Dimensions (approx.) | Adjustable height, adjustable headrest |
| Seat weight | Approximately 15 kg (estimated) |
| Power supply | None (mechanical) |
| Attachment | Vehicle 3-point seat belt + support leg |
| Installation direction | Rearward facing (up to 25 kg) / Forward facing (from 9 kg) |
| Headrest | Height adjustable |
| Harness straps | Integrated, adjustable in height and width |
| Support leg | Adjustable support leg with pivoting flat foot (rearward facing) |
| Padding | Removable chest pads, removable cover |
| Cover maintenance | Wash in warm water, do not machine dry |
| Harness maintenance | Warm water and sponge, do not disassemble |
| Buckle maintenance | Clean with warm water if soiled |
| Safety | ECE R44 approval, do not use with active airbag |
| Warranty | 12 months against manufacturing defects |
| Spare parts | Covers available from Britax |
| Customer service contact | +49 (0) 731-93 45-199 or service.de@britax.com |
| Manufacturer | Britax Excelsior Limited, Andover, United Kingdom |
Frequently Asked Questions - MULTI TECH II BRITAX
User questions about MULTI TECH II BRITAX
0 question about this device. Answer the ones you know or ask your own.
Ask a new question about this device
Download the instructions for your Car seat in PDF format for free! Find your manual MULTI TECH II - BRITAX and take your electronic device back in hand. On this page are published all the documents necessary for the use of your device. MULTI TECH II by BRITAX.
USER MANUAL MULTI TECH II BRITAX
Follow these operating instructions carefully and precisely. If this seat is not securely installed and your child is not strapped in correctly, your child and other passengers are exposed to the risk of serious injury in case of an accident.
Please read through these operating instructions carefully, BEFORE installing your child seat.
The Hampshire Trading Standards Authority and Britax recommend neither buying nor selling on used child seats. Please dispose of your child seat safely and environmentally. Do not sell it or pass it on.
After an accident, the child seat the car seatbelts should be replaced. Even if these appear to be undamaged, your child seat and your car seatbelts can not longer protect your child sufficiently in the case of a subsequent accident.
No child seat is escape-proof
Harness systems cannot be designed in an absolutely "child-safe" manner; however, they comply with the legal requirements of the European standard ECE R44. The belt must always be correctly applied and adjusted, and the child must be required to keep the harness system on.
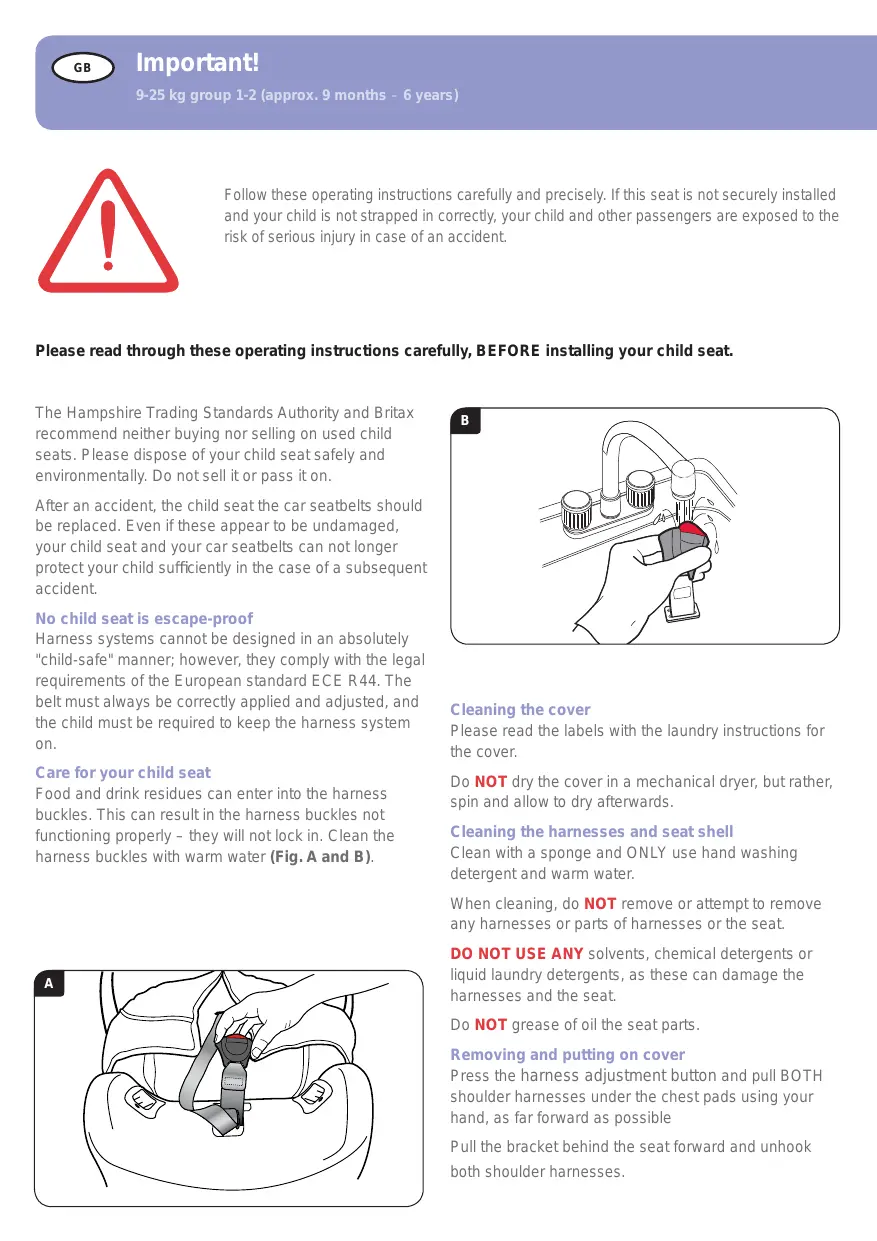
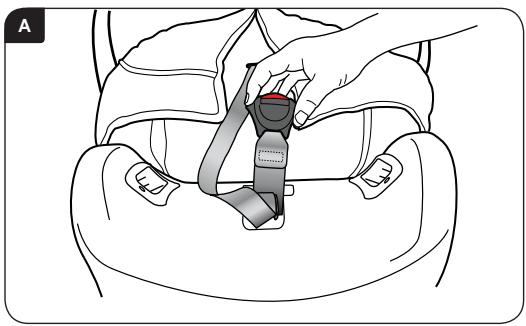
Care for your child seat
Food and drink residues can enter into the harness buckles. This can result in the harness buckles not functioning properly - they will not lock in. Clean the harness buckles with warm water (Fig. A and B).
Cleaning the cover
Please read the labels with the laundry instructions for the cover.
Do NOT dry the cover in a mechanical dryer, but rather, spin and allow to dry afterwards.
Cleaning the harnesses and seat shell
Clean with a sponge and ONLY use hand washing detergent and warm water.
When cleaning, do NOT remove or attempt to remove any harnesses or parts of harnesses or the seat.
DO NOT USE ANY solvents, chemical detergents or liquid laundry detergents, as these can damage the harnesses and the seat.
Do NOT grease of oil the seat parts.
Removing and putting on cover
Press the harness adjustment button and pull BOTH shoulder harnesses under the chest pads using your hand, as far forward as possible
Pull the bracket behind the seat forward and unhook both shoulder harnesses.
Pull the cover from the top edge of the seat and put the harnesses on the front of the seat, as illustrated (Fig. 6c). Loosen the buckle and remove the pad by loosening the hook and the eyelet strip. Pull the chest pad off the shoulder straps. Carefully pull the cover off of the seat, while loosening the shoulder straps, the harness buckle and the adjustment belt through the slots in the cover.
The cover is put back in a reverse process.
Make sure that the belts are not twisted.
IMPORTANT – The cover and chest pad are safety parts. NEVER use the child seat without these parts. Do not put your child's safety at risk by using replacement covers from other manufacturers. This could result in your child no longer being protected in the best possible manner.
Replacement covers are available from your Britax-Römer dealer, or contact Britax-Römer Customer Service at Tel.: +49 (0) 731-93 45-199.
Guarantee
All products by Britax-Römer have been carefully designed, manufactured and tested. However, if the product should emerge as being faulty within 12 months after purchase due to a material or production error, submit the product to your sales outlet. At our discretion, we will either carry out a free repair or replace the product with the same or a similar product.
The sales receipt is required for guarantee purposes.
For guarantee reasons, we recommend that you keep your sales receipt and attach it to the operating instructions and keep these in the seat.
Britax-Römer assumes no liability for damage caused by misuse or negligence.
This guarantee is not transferable and is therefore not valid for products that have been purchased in a used condition.
Your statutory rights are not affected by this guarantee.
In case of doubt, it applies that
Not all child car seats fit into all cars. For advice regarding whether this restriction applies to your car, visit our website at www.britax-roemer.de or call our Customer Service at
Tel.: +49 (0) 731-93 45-199 or send an e-mail to service.
de@britax.com.
DANGER TO LIFE!
NEVER position the child seat backwards on a vehicle seat that is equipped with an airbag.
NEVER position the child seat forwards on a vehicle seat with an airbag, unless the manufacturer confirms its safety.
Do NOT use the child seat on vehicle seats that are positioned sideways or backwards.
DO NOT USE ANY underlay, such as pillows or coats, in order to raise the child seat on the vehicle seat. In the case of an accident, the harnesses of your child seat and the car seat belts would not protect your child in the best possible manner.
Do NOT use the child seat at home. It has not been designed for household use and should only be used in your car.
Do NOT attempt to dismantle, modify or install parts into the child seat or modify its harnesses or the belts in your car or use it other than in the prescribed manner. The official approval is no longer value if modifications have been made.
You are NOT permitted to make any modifications to the child seat, this is the manufacturer's responsibility.
NEVER leave your children alone in the car, not even for a short time.
DO NOT leave any loose objects, such as luggage or books, in the back of the car. Loose items must be secured, as they fly around in the case of a sudden braking manoeuvre and could cause serious injuries. Large, heavy, loose objects pose a particular risk.
DO NOT leave folded up car seats unlocked. In the case of a sudden braking manoeuvre, a loose seat could seriously injure your child.
Do NOT allow your children to play with or adjust their child seat.
KEEP these operating instructions in an easily accessible place.
COVER the child seat when your car is left in direct sunlight. Buckles can become hot in sunshine and the cover could bleach out.
MAKE sure that the child seat is not trapped by a folding seat or the car door.
MAKE sure that the harnesses are adjusted according to your child's clothing prior to the journey – if the harnesses fit with winter clothing, they may be too loose with summer clothing.
If the child is not being used, KEEP IT IN A SAFE
PLACE. Do not place any heavy items on the child seat and do not store it near heat sources or in direct sunlight.
ALWAYS SECURE the child seat, even if it is not being used by your child.
MAKE SURE that all persons in the vehicle are wearing their seatbelts.
Although Britax-Romer pays attention to child car seats coming into contact with car seats during development, Britax-Romer is not liable for any damage to car seats or seatbelts.
IMPORTANT:
Use with backward positioning
The child seat MUST always be used with a lap belt and diagonal belt (approved according to UN/ECE Directive No. 16 or relevant standards).
Use with forward positioning
The child seat MUST always be used with a lap belt and diagonal belt (approved according to UN/ECE Directive No. 16 or relevant standards).
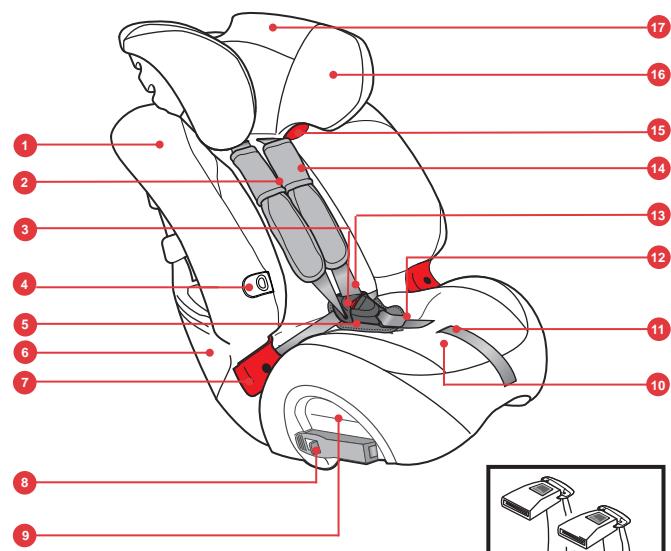
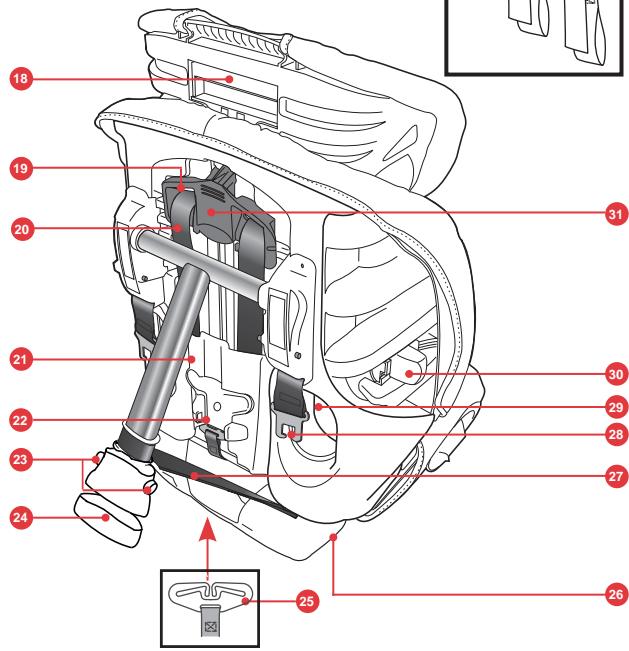
- Seat cover
- Storage compartment for operating instructions (behind cover)
- Harness buckle
- rubber holders
- Comfort pillow
- User information
- Lap belt guide (forward positioned use)
- Buckle
- Harness tunnel insert (backward positioned use)
- Harness adjustment button
- Harness adjustment strap
- Graduated clip
- Harness
- Chest pad
- Upper harness guide (15-25 kg, forward positioned use)
- Headrest cover
- Adjustable headrest
- Headrest adjuster (15-25 kg, positioned forward)
- Belt slot
- Webbing
- Belt protector
- Handle and support leg storage
- Unlocking button for support leg
- Support leg
- Handle (under the seat)
- Rocking base (for backward positioned use)
- Support leg holder
- Harness buckle tongue
- Seat harness guide slot (forward positioned use)
- Width adjuster
- Harness height / headrest adjuster (harness adjuster)
- Fastening belts
1. Adjusting the child safety seat
Place the child seat on the ground.
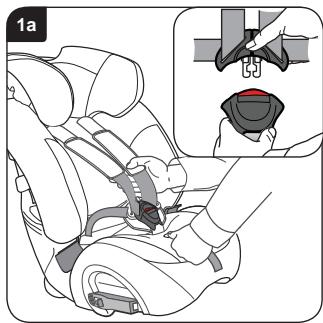
Press the adjustment button and simultaneously pull BOTH shoulder harnesses forward as far as possible (Fig. 1a).
Remove the belt from the buckle (Insert in Fig. 1a).
So that the harness does not twist, insert the harness over the sides of the seat, by inserting the buckle tongues into the rubber holders.
Put your child carefully into the seat, attach the harness and lock in the buckle again.
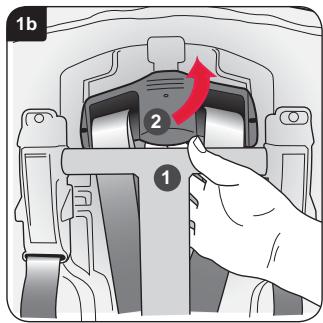
Pull the top end of the support leg off from the back of the child seat (Fig. 1b).
Lift the belt adjuster and move it up or down, 2 so that the harness slots in the headrest are positioned at the height of, or slightly above, the shoulders of your child.
If the headrest is in the correct position, release the headrest adjuster and check that it is locked into this position.
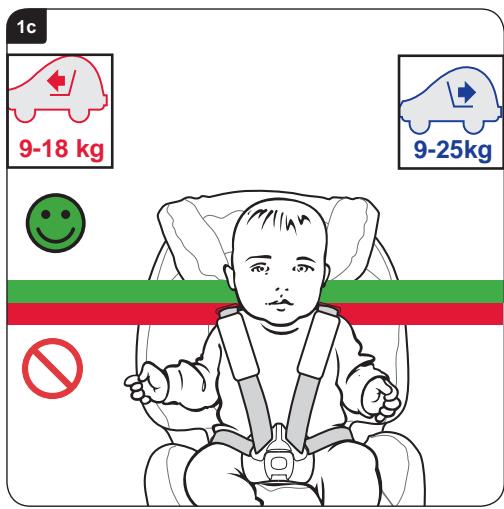
If you have reached the top end of the slots, your child can continue to use the child seat until his/her eyelevel is at the height of the top edge of the seat or until your child weighs no more than:
Position backward: 25 kg
Positioned forward: 18kg
Use the width adjuster (see "Introduction to your child seat" on the previous page) in order to set the width of your child seat.
2. Installation of your child seat (positioned backward) in a rear vehicle seat
IMPORTANT – The child seat MUST always be used with a lap belt and diagonal belt (approved according to UN/ECE Directive No. 16 or relevant standards).
IMPORTANT - Do not use any carrying points other than those described in these operating instructions and those labelled in the child restraint equipment.
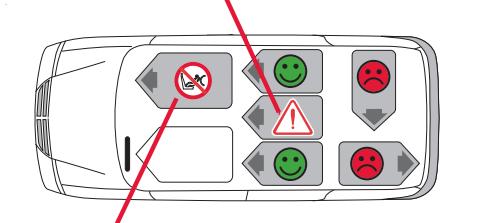
NEVER install a child seat backwards on a vehicle seat that is equipped with an airbag.
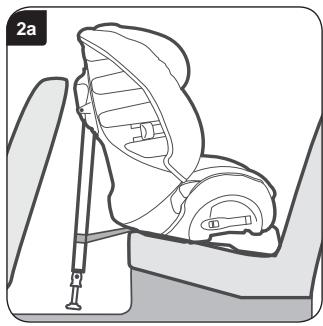
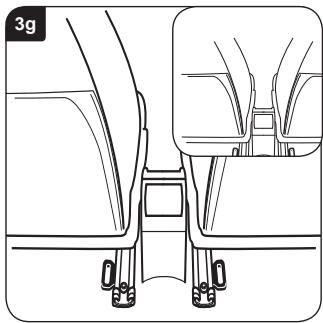
Place the child seat with the support leg in the shortest position backwards on the vehicle seat, so that the rocking base is lying against the back of the vehicle seat. After placement, the gap between the child seat and the car seat should not be larger than 10mm (Fig. 2a).
The child seat can touch the vehicle seat in front, but must not press against it. If the child seat touches the vehicle seat in front, adjust it so that the driver or passenger is not in an uncomfortable position. If this is not successful, try a different position in the car for the child seat.
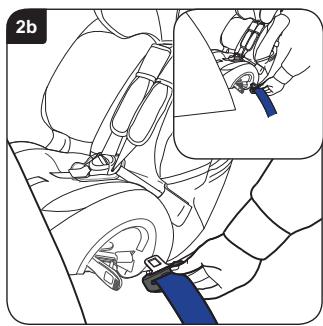
Open both buckles. Pull the lap and diagonal harness out sufficiently (approx. 600-900mm). Put the belt through the belt buckle guide on the opposite side of the buckle and into the belt tunnel (Fig. 2b). There are two access slots in the seat cover in order to simplify the insertion of the belt through the belt tunnel and under the seat cover (Insert in Fig. 2b).
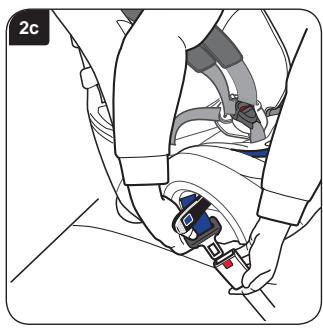
Push the belt through the belt tunnel, fasten it on the other side and put the belt tongue into the buckle (Fig. 2c).
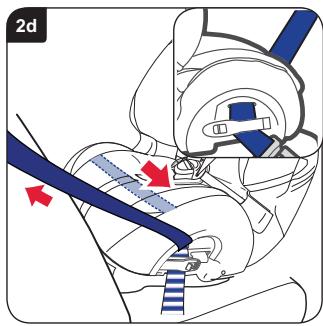
Pull the loose seatbelt through the child seat in order to ensure that the seatbelt is not twisted. When the belt is tight, close the buckle on the side of the belt buckle and ensure that the lap belt and diagonal belt are secured (Insert in Fig. 2d).
Close the belt buckle on the other side and ensure that only the lap belt is secured (Fig. 2d).
Ensure that both belt buckles have locked in.
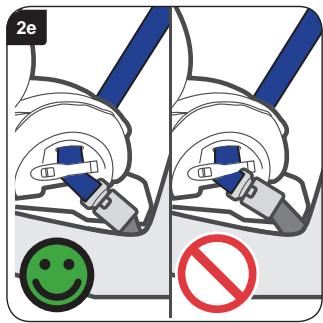
If the belt buckle is no in the position that is market with a as incorrect and the seat cannot be correctly fastened (Fig. 2e), try it on a different seat in the car.
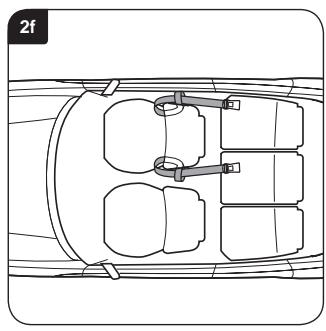
Place the harness around the car seat in front of the child seat, as illustrated (Fig. 2f).
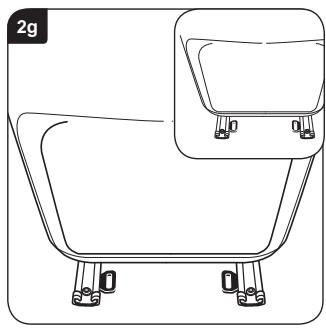
If your car has an eyelet in the glide rail of the set, this can alternatively be used (Insert in Fig. 2g).
IMPORTANT - Do not install the fastening belts with luggage straps.
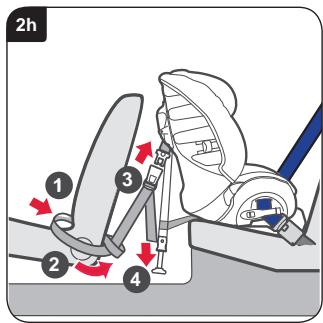
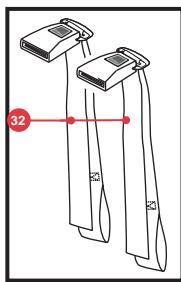
Loop the end of the loops of the fastening belts around the seat in front and back again, as illustrated ① (Fig. 2h). Put the ends of the fastening belt toward the outside of the car seat and guide them through the loops ②.
When the support leg brackets are pointing to the front and the belts are not twisted, lock the buckle of the fastening belt into the tongues on the sides of the child seat. Tighten the fastening belts by pulling the loose ends downwards evenly.
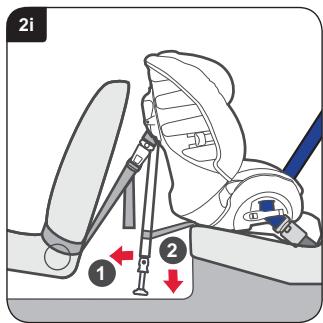
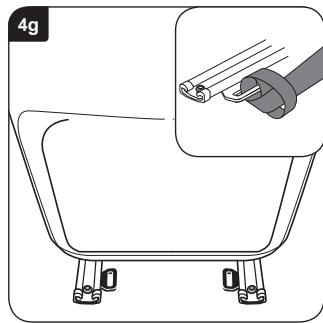
Pull the support leg as far away from the back of the child seat as possible (Fig. 2i). Lower the support leg as far as the floor, maintaining the correct angle. Move the support leg and ensure that the support leg is secured.
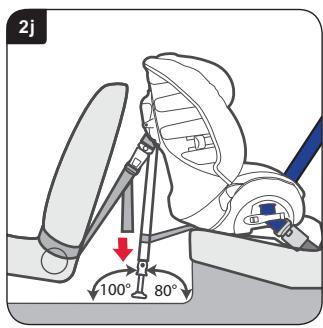
Finally, ensure that the fastening belts are fully tightened, by pulling down on the loose ends (Fig. 2j). The support leg must be resting on solid ground and not on the flaps of storage compartments or similar, at an angle of 100^ to the horizontal (Fig. 2j). Use the angle measurer on the last page of these operating instructions, in order to check the angle of the support leg against the floor.
Check whether the child seat is firmly installed by moving it back and forth, as well as sideways. If it is loose or if the support leg is not at an angle of 100^ to the floor, you will need to reinstall it, so that it is secured at the correct angle.
Put your child into the seat according to Fig. 5f.
3. Installation of your child seat (positioned backward) in a rear middle seat
IMPORTANT – The child seat MUST always be used with a lap belt and diagonal belt (approved according to UN/ECE Directive No. 16 or relevant standards).
IMPORTANT - Do not use any carrying points other than those described in these instructions and those labelled in the child restraint equipment.
NEVER install a child seat backwards on a vehicle seat that is equipped with an airbag.
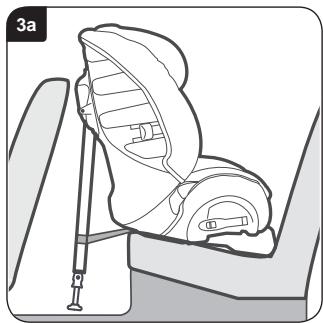
Set the support leg to the shortest length and position the child seat backward, in a central position between the driver and passenger seat, with the rocking base leaning against the back of the front seat (Fig. 3a).
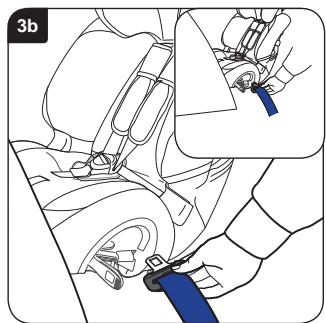
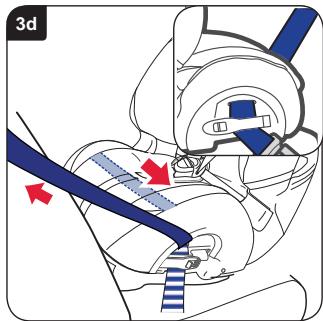
Open both buckles. Pull the lap and diagonal harness out sufficiently (approx. 600 - 900mm ). Put the belt through the belt buckle guide on the opposite side of the buckle and into the belt tunnel (Fig. 3b). There are two access slots in the seat cover in order to simplify the insertion of the belt through the belt tunnel and under the seat cover (Insert in Fig. 3b).
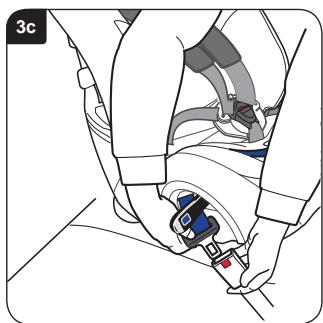
Push the belt through the belt tunnel, attach it on the other side and put the buckle tongue into the buckle (Fig. 3c).
Pull the loose seatbelt through the child seat, in order to ensure that the seatbelt is not twisted. When the belt is tight, close the buckle on the side of the belt buckle and ensure that the lap belt and diagonal belt are secured (Insert in Fig. 3d).
Close the belt buckle on the other side and ensure that only the lap belt is secured (Fig. 3d).
Ensure that both belt buckles have locked in.
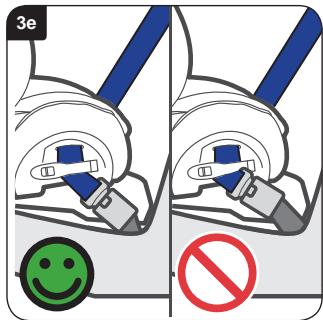
If the belt buckle is no in the position that is market with a as incorrect and the seat cannot be correctly fastened (Fig. 3e), try it on a different seat in the car.
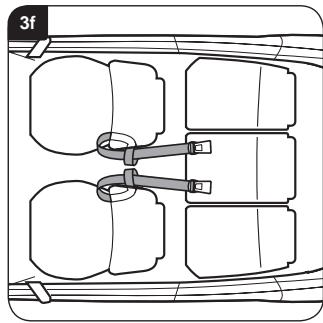
Place the fastening belt around the driver seat, as well as the passenger seat, as shown in (Fig. 3f).
If your car has an eyelet in the glide rail of the set, this can alternatively be used (Insert in Fig. 3g).
IMPORTANT - Do not install the anchoring belts with luggage straps.
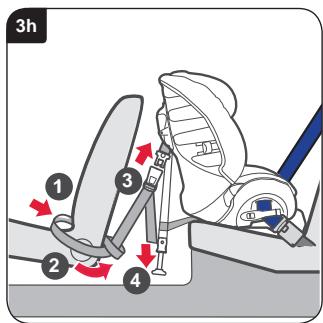
Loop the end of the loops of the fastening belts around the seat in front and back again, as illustrated ① (Fig. 3h). Put the ends of the fastening belt toward the outside of the car seat and guide these through the loops ②.
When the support leg brackets are pointing to the front and the belts are not twisted, lock the buckle of the fastening belt into the tongues on the sides of the child seat 3. Tighten the fastening belts by pulling the loose ends downwards evenly 4.
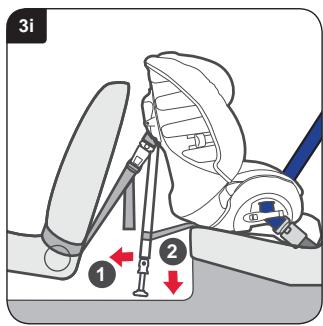
Pull the support leg as far away from the back of the child seat as possible (Fig. 3i). Lower the support leg as far as the floor, maintaining the correct angle (2). Move the support leg and ensure that the support leg is secured.
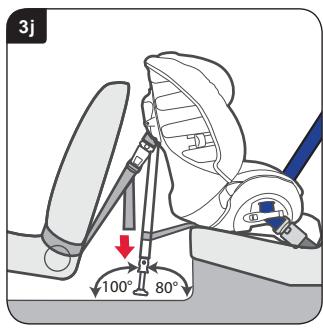
Finally, ensure that the fastening belts are fully tightened, by pulling down on the loose ends (Fig. 3j). The support leg must be resting on solid ground at an angle of 100^ to the horizontal. It must not rest on the flaps of storage compartments or similar (Fig. 3j). Use the angle measurer on the last page of these operating instructions, in order to check the angle of the support leg against the floor.
Check whether the child seat is firmly installed by moving it back and forth, as well as sideways. If it is loose or if the support leg is not at an angle of 100^ to the floor, you will need to reinstall it, so that it is secured at the correct angle.
Put your child into the seat according to Fig. 5f.
4. Installation of your child seat (positioned backward) in a front seat
IMPORTANT – The child seat MUST always be used with a lap belt and diagonal belt (approved according to UN/ECE Directive No. 16 or relevant standards).
IMPORTANT - Do not use any carrying points other than those described in these operating instructions and those labelled in the child restraint equipment.
NEVER install a child seat backwards on a vehicle seat that is equipped with an airbag.
Slide the front seat back in order to create space for the child seat, but only so far that the passenger sitting behind it can still sit comfortably.
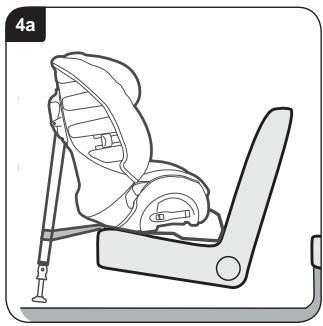
Place the child seat with the support leg in the shortest position backwards on the vehicle seat, so that the rocking base is lying against the back of the car seat. (Fig. 4a).
IMPORTANT - NEVER rest the child seat on the dashboard or on the wind screen.
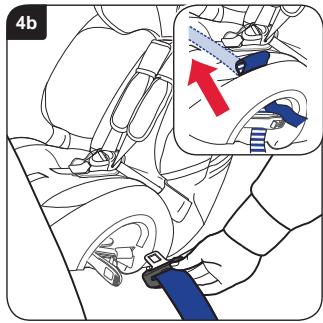
Open both buckles. Pull the lap and diagonal harness out sufficiently (approx. 600-900 mm). Put the belt through the belt buckle guide on the opposite side of the buckle and into the belt tunnel (Fig. 4b). There are two access slots in the seat cover in order to simplify the insertion of the belt through the belt tunnel and under the seat cover (Insert in Fig. 4b).

Push the belt through the belt tunnel, attach it on the other side and put the tongue into the buckle (Fig. 4c).
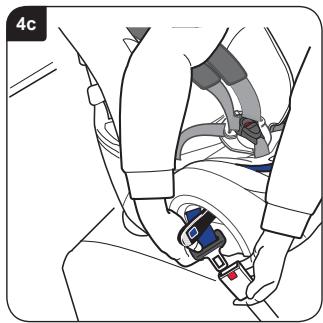
Pull the loose seatbelt through the child seat, in order to ensure that the seatbelt is not twisted. When the belt is tight, close the buckle on the side of the belt buckle and ensure that the lap belt and diagonal belt are secured (Insert in Fig. 4d).
Close the belt buckle on the other side and ensure that only the lap belt is secured (Fig. 4d).
Ensure that both belt buckles have locked in.
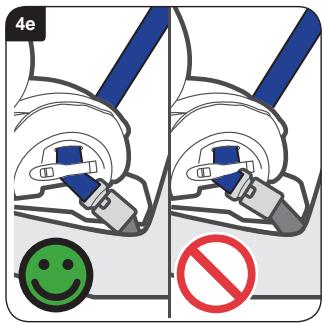
If the belt buckle is no in the position that is market with a as incorrect and the seat cannot be correctly fastened (Fig. 4e), try it on a different seat in the car.
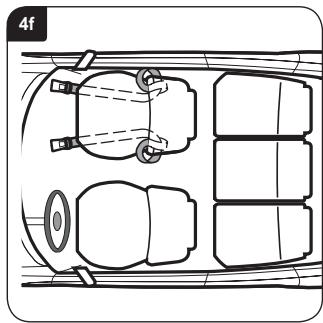
Lay the fastening belt around the passenger seat as illustrated in (Fig. 4f). If your car has an eyelet in the glide rail of the set, this can alternatively be used (Insert in Fig. 4g).
IMPORTANT - Do not install the fastening belts with luggage straps.
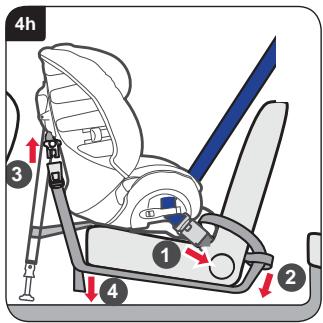
Loop the end of the loops of the fastening belts around the seat in front and back again, as illustrated ① (Fig. 4h). Put the ends of the fastening belt toward the outside of the vehicle seat and guide them through the loops ②.
Guide the tightening ends under the seat. When the support leg brackets are pointing to the front and the belts are not twisted, lock the buckle of the fastening belt into the tongues on the sides of the child seat ③. Tighten the fastening belts by pulling the loose ends downwards evenly ④.
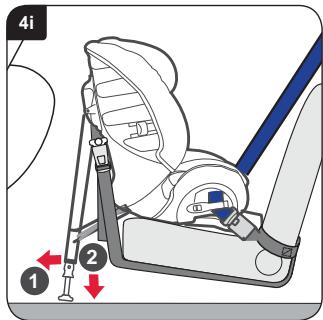
Pull the support leg as far away from the back of the child seat as possible (Fig. 4i). Lower the support leg as far as the floor, maintaining the correct angle (2). Move the support leg and ensure that the support leg is secured.
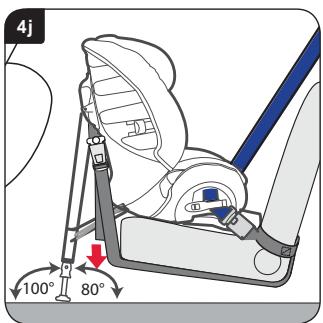
Finally, ensure that the fastening belts are fully tightened, by pulling down on the loose ends (Fig. 4j). The support leg must be resting on solid ground and not on the flaps of storage compartments or similar, at an angle of 100^ to the horizontal (Fig. 4j). Use the angle measurer on the last page of these operating instructions, in order to check the angle of the support leg against the floor.
Check whether the child seat is firmly installed by moving it back and forth, as well as sideways. If it is loose or if the support leg is not at an angle of 100^ to the floor, you will need to reinstall it, so that it is secured at the correct angle.
Put your child into the seat according to Fig. 5f.
5. Installation of your child seat (facing forward) with seatbelts
9-18 kg group 1 (approx. 9 months - 4 years)
IMPORTANT – The child seat MUST always be used with a lap belt and diagonal belt (approved according to UN/ECE Directive No. 16 or relevant standards).
IMPORTANT - Do not use any carrying points other than those described in these operating instructions and those labelled in the child restraint equipment.
Store the support leg in the designated storage space.
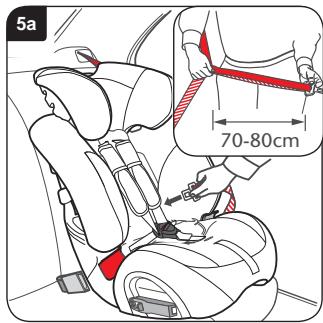
Place the child seat facing forward in your car. For easier access to the child seat, turn it toward you. Hold the lap belt and diagonal belt together and pull the seat belt out, as shown (Insert in Fig. 5a).
IMPORTANT - The belt must never twist.
Pull the safety belt around the front of the child seat through the guide slot toward the back of the seat at the point illustrated (Fig. 5a).
IMPORTANT - Do not use the red diagonal guide on the headrest.
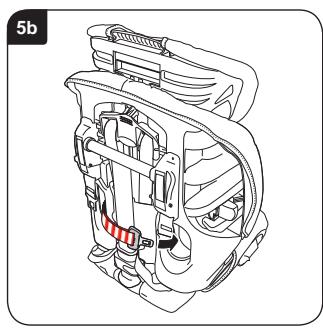
Take the belt and guide it through the second guide slot (Fig. 5b).
Practical tip - If the belt is too short, you may need to pull the diagonal belt behind the headrest prior to installation.
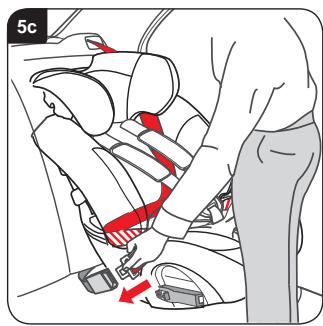
Pull the loose car seatbelt toward the front of the child seat and fasten the seatbelt in the buckle (Fig. 5c).
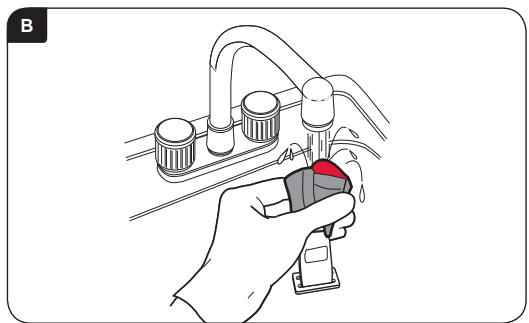
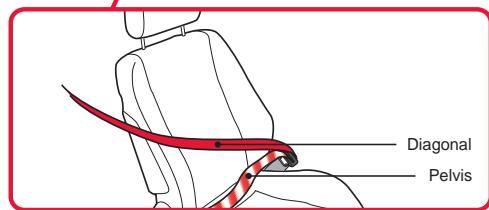
Ensure that the seatbelt is not twisted and that the lap belt runs over both red lap belt guides. Ensure that the diagonal belt is positioned in the child seat shell behind the headrest.
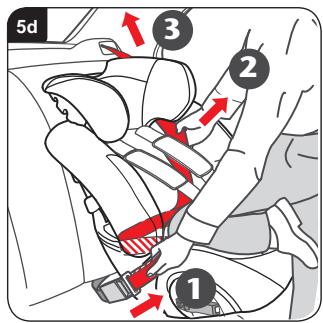
With your full body weight, push the child seat into your vehicle seat and fasten it in the following order.
Pull and hold the diagonal belt 1 in position 2, in order to remove loose points and pull the belt in order to tighten it 3 (Fig. 5d).
Check the seat by pulling tightly on the belt. It should only move slightly or not at all. If the child seat is still loose, you must repeat the fastening sequence.
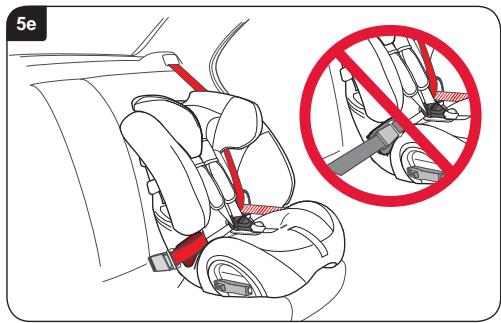
IMPORTANT - Check the position of the belt buckle and ensure that the belt and NOT the buckle is holding the child seat in position (Fig. 5e).
If the belt buckle of your seat is not positioned correctly, try a different seat position.
In case of doubt, contact Customer Service at
Tel.: +49 (0) 731-93 45-199 or by e-mail to
service.de@britax.com or visit
www.britax-roemer.de.
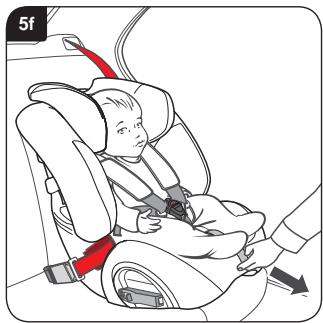
Put your child in the child seat and apply the harness. Ensure that the harness is not twisted. Tighten the harness by pulling the adjustment straps forward.
IMPORTANT – The lap belt should be positioned as far forward and as low as possible over the child's pelvis.
Finally, ensure that the chest pads are pulled down on your child's chest (Fig. 5f).
6. Installation of your child seat (facing forward) with seatbelts for adults
15-25 kg group 2 (approx. 4 years - 6 years)
Adjusting the child seat
In order to remove the belt on the child seat, place the child seat on the floor.
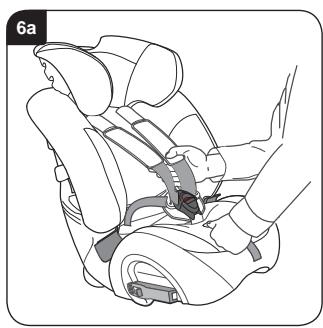
Press the adjustment button and simultaneously pull BOTH shoulder straps forward as far as possible (Fig. 6a).
Turn the seat around. Lift the belt adjuster on the back of the seat and slide it up until the shoulder strap slots are on the top position in the headrest (Fig. 6b).

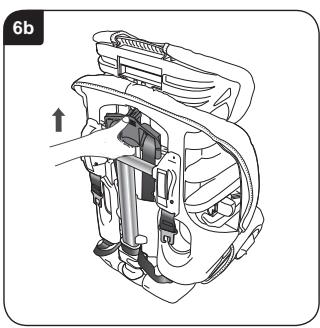
Unhook both shoulder straps from the bracket on the back of the child seat (Fig. 6c), lay the brackets on the bottom section of the shell (Fig. 6g).
Remove the chest pad from the chest pad fasteners (Insert in Fig. 6c). Pull both shoulder straps and the chest pads through toward the front of the seat and remove the chest pads from the shoulder straps.
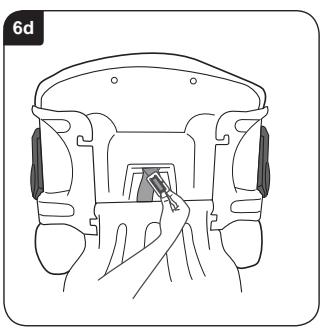
Lay the child seat on its back. Remove the adjusting belt from the bracket of the shoulder strap. Turn the bracket so that is fits through the graduated belt and push it onto the front of the seat (Fig. 6d).
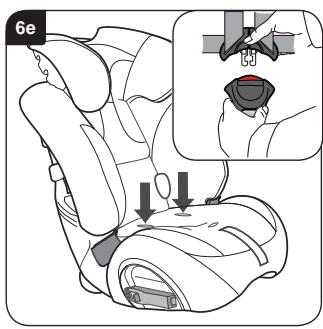
Place the child seat upright and remove the belt from the buckle (Insert in Fig. 6e). Push the belt brackets and buckle tongues under the cover through the lap belt holes (Fig. 6e).
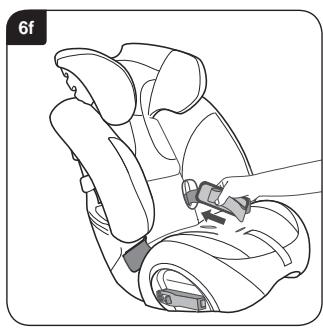
Put the buckle, belt straps and chest pads into the elastic holding straps (Fig. 6f). Thread the adjustment straps through the recess in the cover.
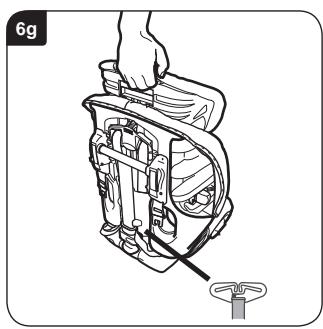
Support the seat and clip the headrest adjuster onto the back of the headrest (Fig. 6g).
Check whether the chest pads have been removed, as shown above in (Fig. 6c).
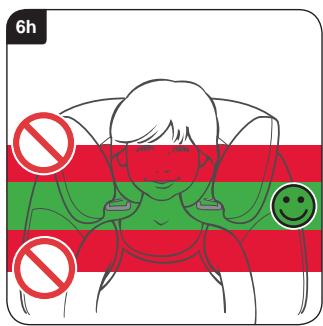
Lift the headrest until the head is position in the middle (Fig. 6h). If the headrest is in the correct position, release the headrest adjuster and check that the headrest locked into position.
Installation of the child seat
IMPORTANT – The child seat MUST always be used with a lap belt and diagonal belt (approved according to UN/ECE Directive No. 16 or relevant standards).
IMPORTANT - Do not use any carrying points other than those described in these operating instructions and those labelled in the child restraint equipment. Place the child seat facing forward in your car.
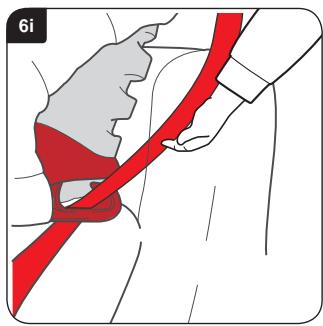
Guide the diagonal part of the seatbelt through the dark red, top belt guide to the OTHER side of the belt buckle (Fig. 6i).
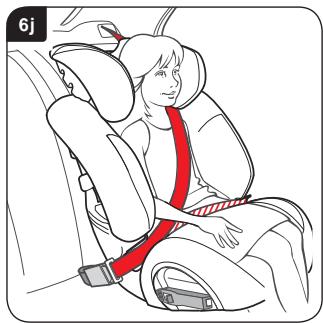
Pull the seatbelt horizontally over the child and fasten it (Fig. 6j). The lap section should be on the red lap belt guides on both sides of the child seat. Ensure that the harness is not twisted or loose.
IMPORTANT – The lap belt should be positioned as far forward and as low as possible over the child's pelvis.
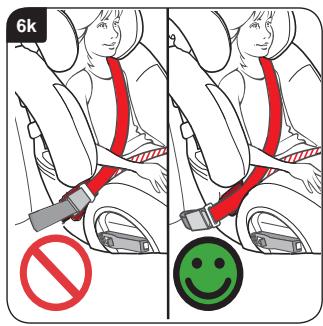
IMPORTANT - Check the position of the seat belt buckle and ensure that it is not pulled around the child seat on the red lap belt guide (Fig. 6k).
Check the position of the top seatbelt anchoring point in your vehicle (Fig. 6l). If this anchoring point is in front of the child seat, it should not be used. Try a different position in the vehicle.

Sorg for at brystpolstring er trukket ned over barnets bryst (III. 5f).
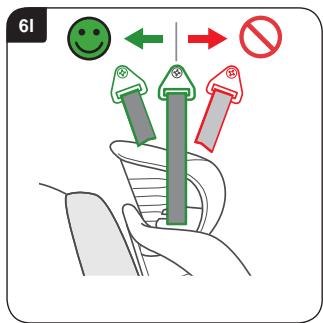
Use this angle guide to check the angle of the footprop to the floor Footprop installation - angle guide

Placering af stotteben - vinkelindikator
Brug vinkelindikatoren til at kontrollere stottebenets vinkel i forhold til bilens bund.

Stödmontering - vinkelmall
D-89077 Ulm, Germany
t + 49 (0)731 9345 0
f + 49 (0)731 9345 210
e info@de.britaxeurope.com
www.roemer.eu
- Please read through these operating instructions carefully, BEFORE installing your child seat.
- No child seat is escape-proof
- Care for your child seat
- Cleaning the cover
- Cleaning the harnesses and seat shell
- Removing and putting on cover
- Guarantee
- In case of doubt, it applies that
- DANGER TO LIFE!
- IMPORTANT:
- Use with backward positioning
- Use with forward positioning
- Adjusting the child safety seat
- Installation of your child seat (positioned backward) in a rear vehicle seat
- Installation of your child seat (positioned backward) in a rear middle seat
- Installation of your child seat (positioned backward) in a front seat
- Installation of your child seat (facing forward) with seatbelts
- Installation of your child seat (facing forward) with seatbelts for adults
- Adjusting the child seat
- Installation of the child seat
- Placering af stotteben - vinkelindikator
- Stödmontering - vinkelmall
Brand : BRITAX
Model : MULTI TECH II
Category : Car seat