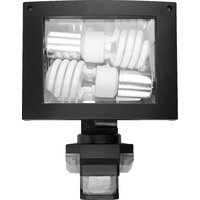
RD224EGL - Lamp Cotech - Free user manual and instructions
Find the device manual for free RD224EGL Cotech in PDF.


| Product Type | Lamp |
| Brand | Cotech |
| Model | RD224EGL |
| Category | Indoor Lamp |
| Power Source | 220-240V AC, 50/60Hz |
| Light Source | LED |
| Wattage | 12W |
| Luminous Flux | 1000 lm |
| Color Temperature | 4000K |
| Lifespan | 25,000 hours |
| Dimmable | No |
| Material | Aluminum, Plastic |
| Base Type | Weighted Base |
| Height | 45 cm |
| Arm Reach | 60 cm |
| Weight | 1.2 kg |
| Cable Length | 1.5 m |
| Certifications | CE |
| Warranty | 2 years |
| Adjustable Head | Yes |
| Flexible Arm | Yes |
| Maintenance | Wipe with dry cloth |
| Safety Warning | Do not cover while in use |
| Spare Parts Availability | LED module integrated, not user-replaceable |
Frequently Asked Questions - RD224EGL Cotech
User questions about RD224EGL Cotech
0 question about this device. Answer the ones you know or ask your own.
Ask a new question about this device
Download the instructions for your Lamp in PDF format for free! Find your manual RD224EGL - Cotech and take your electronic device back in hand. On this page are published all the documents necessary for the use of your device. RD224EGL by Cotech.
USER MANUAL RD224EGL Cotech
Read the entire instruction manual carefully and make sure that you fully understand it before you use the equipment. Keep the manual for future reference.
Viktig information:
natural_image
Interior view of a mechanical device with two fluorescent bulbs and a connector housing (no visible text or symbols)ART.NO. MODEL
36-3962 RD224EGL
Ver. 200906
Motion Sensor Wall Light
ART. NO 36-3962 MODEL RD224EGL
Please read the entire instruction manual before using the product and save it for future reference. We reserve the right for any errors in text or images and any necessary changes made to technical data. If you have any questions regarding technical problems please contact Customer Services.
Product description
Motion Sensor Wall Light. Integrated LED lighting. Consists of 10 LEDs that come on at twilight. Adjustable lighting time. N.B. Designed only to be used with energy saving bulbs.

a) Lens cover screws (2x)
b) LED light housing
c) Terminal block
d) Strain relief screws (2x)
e) Strain relief for cable
f) Wall mounting screws (2x)
g) Cover plate
h) Wall plug (2x)
i) Cover plate screw (1x)
Placement
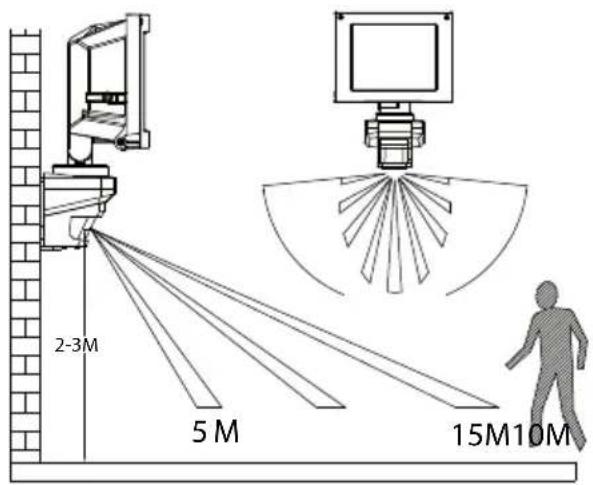
Position the wall light 2-3 metres above the desired detection zone.
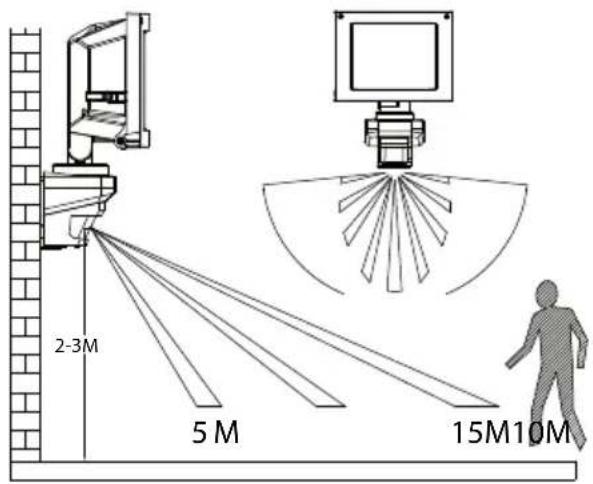
- The motion sensor has a range of 12 m, but this can vary depending on the weather, mounting height and placement.
- To avoid damaging the light, do not point the sensor directly at the sun.
- In order to prevent the light from being activated unnecessarily, try to avoid directing the sensor toward ventilation openings, fans, other light sources, traffic or sources of heat such as barbeques. Neither should the light be placed in the vicinity of strong electromagnetic fields.
- Do not direct the sensor towards highly reflective surfaces such as whitewashed walls or swimming pools.
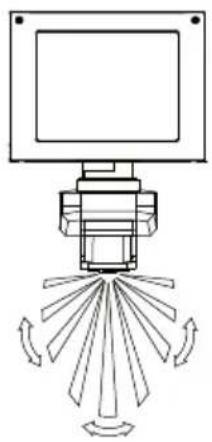
- Bear in mind that the sensor is more sensitive to lateral movement (see fig A) than to longitudinal movement toward or away from the sensor (se fig B).
natural_image
Diagram of a mechanical or electrical component with radial blades and a central rectangular block (no text or symbols)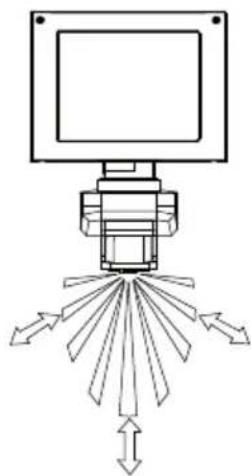
natural_image
Diagram of a mechanical or optical device with multiple directional arrows pointing outward from a central component (no text or symbols present)A B
Wiring and installation

flowchart
graph TD
    A["A"] --> B["B"]
    B --> C["C"]
    C --> D["D"]
    D --> E["E"]
    E --> F["F"]
    F --> G["G"]
    G --> H["H"]
    H --> I["I"]
a) White (lamp wire)
f) Yellow-green (lamp wire)
b) Yellow-green (power cable)
g) White (lamp wire)
- Always make sure that the power is turned off before beginning any electrical installation.
- Unscrew and remove the back cover plate.
- Use the cover plate as a template for marking the holes to be drilled in the wall. Drill holes approximately 3 cm in depth, push in the wall plugs and screw the cover plate to the wall.
- Connect the power cable (e.g. H05RR-F 3G 0.75 mm ^2 ) to the terminal block as shown above.
- Secure the cable using the strain relief.
- Open the lens cover by undoing the screws and then folding down the glass. Insert two E27 energy saving bulbs, max 24 W. Close the lens cover again.
- Mount the light onto the cover plate, fixing in place using the screws.
- Adjust the direction of the light. N.B. Loosen the screws slightly when adjusting the angle of the light.
- Plug the power cable into a wall socket and turn on the power.
Things to consider when changing the light bulb
- Disconnect the light from the power supply before changing the light bulb.
- Let the old light bulb cool before handling it.
- Take care not to damage the rubber seal around the lens cover.
- Do not hold the bulb with your bare hands, use a soft cloth.
Functions

Light duration time setting
The length of time that the light comes on for after it has been activated can be set from 10 seconds to 4 minutes. Adjust the time using the [TIME] dial.
PIR sensor sensitivity
Adjust the sensitivity using the [SENS] dial. Turning towards (-) decreases the sensitivity; towards (+) increases the sensitivity.
Light sensor sensitivity
The wall light is fitted with a light sensor that reacts to ambient lighting conditions. It turns the light on at night and off in the morning. Adjust the sensitivity from nighttime ( ) to daytime ( ), using the [LUX] dial. The closer the ( ) position, the lighter the conditions have to be for the wall light to come on. The closer the ( ) position, the darker the conditions have to be for the wall light to come on.
Settings
- Set the light sensitivity dial [LUX] to ( ) and the time dial [TIME] to (-).
- Turn the power on and wait half a minute. The wall light will now come on for 30-60 seconds.
- Adjust the direction of the light. N.B. Loosen the screws slightly when adjusting the angle of the light.
- Adjust the PIR sensor to the desired position. Get someone to walk across the detection zone to detect when the light comes on.
- Adjust the duration setting using the [TIME] dial.
- Adjust the light sensitivity using the [LUX] dial. To set the light sensitivity, wait until the lighting conditions are at the desired level and slowly turn the dial until the light comes on.
Troubleshooting guide
| Problem Possible cause Solution | ||
| The light does not come on even when someone is inside the detection zone. | 1. The light is not connected to the power supply.2. Faulty light bulb.3. Too much ambient light.4. The time, motion or light sensor setting is wrong.5. The PIR sensor is pointing the wrong way. | 1. Check all connections, fuses and switches.2. Check and change if faulty.3. Adjust the direction of the light sensor or move the wall light.4. Adjust the dial settings.5. Adjust the direction of the sensor. |
| The light comes on for no obvious reason. | 1. The heat of the bulb activates the sensor.2. External heat sources such as air vents or BBQs set off the motion sensor.3. Pets or insects set off the motion sensor.4. Fans or other lights on the same circuit as the light cause interference that sets off the sensor.5. Reflections from a pool or shiny surface set off the light sensor. | 1. Make sure that the distance between the light and the sensor is at least 40 mm.2. Direct the motion sensor away from these objects.3. Redirect the motion sensor.4. Try changing the fuse, change any flashing fluorescent tubes or connect the circuit in a different way.5. Redirect the motion sensor. |
| The light is on all the time. | The time setting is set for too long a duration. | Adjust the time setting. |
| The main light and path light come on when it is light (daytime). | The light sensitivity dial [LUX] is set to daytime. | Adjust the light sensitivity setting. |
| Setting the light sensitivity to daylight shortens the range. | Sunlight interference. Try making the settings when it is darker. | |
Care and maintenance
To ensure that the sensor works properly, wipe the lens using a damp cloth from time to time.
Disposal
Follow local ordinances when disposing of this product. If you are unsure of how to dispose of this product, please contact your municipality.
Specifications
Light bulb: 2 x E27 energy saving bulbs, max 24 W
Detection area: Max. 12 m, 180°
Aperture: 16 x 12.5 cm
Protection class: IP44
Power supply: 230 V, 50 Hz
natural_image
Diagram of a mechanical or electrical component with radial blades and a central rectangular block (no text or symbols)
natural_image
Diagram of a mechanical or optical device with multiple directional arrows pointing outward from a central screen (no text or symbols present)A B
a) Skruer for lampeskjerm (2 stk.)
b) LED-pærenes deksel
c) Koblingslist
d) Klemskruer (2 stk.)
e) Festeklemme for kabel
f) Skruer for veggmontering (2 stk.)
g) Festebrakett
h) Plastplugg (2 stk.)
i) Skrue for dekkeplate (1 stk.)
Plassering
Monteres 2 -3 m ovenfor det området som belysningen skal dekke.
natural_image
Pure mechanical diagram showing a lever system with rotating blades and a rectangular block (no text or symbols)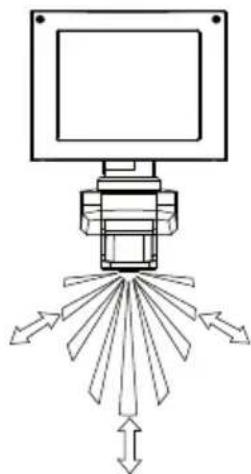
natural_image
Diagram of a mechanical or electrical component with directional arrows indicating flow or movement (no text or symbols)A B
natural_image
Diagram of a mechanical device with rotating blades and a central screen (no text or symbols)
natural_image
Diagram of a mechanical or optical device with multiple directional arrows pointing outward from a central screen (no text or symbols present)A B
For consumer contact, please visit www.clasohlson.co.uk and click on customer service.
INTERNET www.clasohlson.co.uk

- Viktig information:
- Motion Sensor Wall Light
- Product description
- Placement
- Wiring and installation
- Things to consider when changing the light bulb
- Functions
- Light duration time setting
- PIR sensor sensitivity
- Light sensor sensitivity
- Settings
- Troubleshooting guide
- Care and maintenance
- Disposal
- Specifications
- Plassering
Brand : Cotech
Model : RD224EGL
Category : Lamp