
TL3021B - Lamp Cotech - Free user manual and instructions
Find the device manual for free TL3021B Cotech in PDF.


| Product Type | LED Desk Lamp |
| Model | TL3021B |
| Brand | Cotech |
| Dimensions (LxWxH) | 18 x 12 x 40 cm |
| Weight | 0.8 kg |
| Power Source | USB-C rechargeable battery |
| Battery Capacity | 2000 mAh |
| Charging Time | 3-4 hours |
| Usage Time | 8-10 hours at medium brightness |
| Bulb Type | LED (integrated) |
| Lumen Output | 400 lm |
| Color Temperature | 3000K-6500K adjustable |
| Dimmable | Yes, stepless dimming |
| Material | Aluminum + ABS plastic |
| Switch Type | Touch control with memory function |
| Included Accessories | USB-A to USB-C cable, user manual |
| Warranty | 2 years |
Frequently Asked Questions - TL3021B Cotech
User questions about TL3021B Cotech
0 question about this device. Answer the ones you know or ask your own.
Ask a new question about this device
Download the instructions for your Lamp in PDF format for free! Find your manual TL3021B - Cotech and take your electronic device back in hand. On this page are published all the documents necessary for the use of your device. TL3021B by Cotech.
USER MANUAL TL3021B Cotech
Read the entire instruction manual carefully and make sure that you fully understand it before you use the equipment. Keep the manual for future reference.
Viktig information:
natural_image
White plastic electrical outlet with two outlets and a switch (no text or symbols visible)ART.NO. MODEL
36-1798 TL3021B
Ver. 201006
Original instructions
Bruksanvisning i original
Please read the entire instruction manual before use and save it for future reference. We reserve the right for any errors in text or images and for making any necessary technical changes to this document. If you should have any questions concerning technical problems please contact our Customer Services.
1. Introduction
This product is easy to install and use if you follow the instructions below.
Caution: Whenever installing any electrical fittings, basic safety precautions should always be observed to avoid the risk of fire, electric shock and personal injury.
2. Safety
- Read all the instructions before you install and use the light fitting.
- Make sure that the electrical specifications are in accordance with your installation.
- Make sure that there is no danger before drilling into walls and ceilings.
- Make sure that you stand steady and balanced at all times.
- Keep the working area tidy. Cluttered areas and benches invite accidents.
- All visitors, especially children, should keep at a safe distance from the work area.
- Use the correct tools and follow their specifications.
- Do not use a tool for another purpose than that for which it has been designed.
- Always turn off the power before assembling, connecting or repairing.
3. Unpacking
Unpack the contents carefully. Package contents:
- 1 x light tube fitting
- 1 x fluorescent tube PL - 1 x 11 W
- 1 x bag containing 2 screws and 2 wall plugs
- 1 x mounting instructions
4. Mounting
Mounting the light fitting
- Mark where you want to mount the fitting.
- Drill the holes.
- Attach the fitting using the supplied screws and wall plugs. The elongated holes can also be used, but the screws can only be max. 4 mm (not included).

natural_image
Diagram of a mechanical or electrical assembly with labeled components and directional arrows (no text or symbols)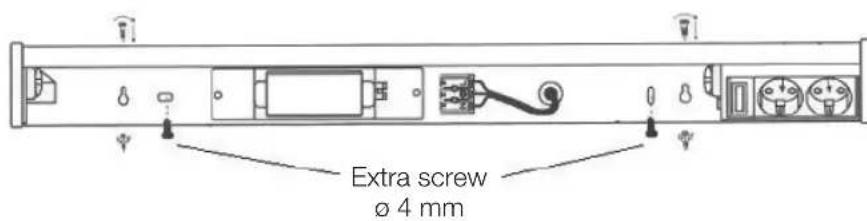
Wiring
Turn the power off before beginning any wiring. The wiring should meet the required standards. If you are unsure in any way, contact a qualified electrician. The circuit must be protected by a fuse. Connect the wires to the correct terminals (L, N or 12 ). Earth must always be connected.
Lead the cable out by cutting away the prepared hole in the side of the plastic housing.

natural_image
Simple line drawing of a curved pipe or channel with no text, numbers, or symbolsCAUTION: The maximum current for the two outlets is 16 A.
When the light fitting is mounted and the wiring has been done you may turn the power back on. To turn the light on, use the switch.
5. Cleaning
N.B. Do not expose the light socket or fitting to moisture.
- Turn off the power and wait until the fitting has cooled.
- Clean it with a soft cloth. If necessary, moisten slightly with water and mild detergent.
- Never use alcohol, solvent or similar agents to clean the light.
6. Maintenance
- Always turn off the power before carrying out any maintenance.
- You may only replace the fluorescent tube – any other repairs should be carried out by a qualified electrician.
- Only use fluorescent tubes that match the specifications.
- CAUTION: Using accessories other than those recommended in these instructions may lead to personal injury.
- This light fitting is approved according to current standards. Repairs must only be carried out by qualified personnel using original spare parts.
Replacing the tube
N.B. Bear in mind that the tube is fragile and should be handled with care.
- Turn off the electricity.
- Wait until the light has cooled.
- Remove the transparent part of the housing.
- Twist the tube so that the pins can pass along the groove.
- Remove the flourescent tube by pulling it straight out from its socket and replace it with a new one.

natural_image
Technical line drawing of a mechanical device with an arrow indicating direction (no text or symbols)- Replace the transparent part of the housing. The light fitting must not be used without the transparent cover.
7. Disposal
Electrical waste products must not be thrown away with household waste. Follow local ordinances when disposing of this product. If you are unsure of how to dispose of this product, please contact your municipality.
8. Specifications
Power supply 230 V AC, 50 Hz
Fluorescent tube PL, 1 x 11 W
Size 450 x 85 x 65 mm
Protection Class IP20
Bänk-/väggarmatur
ART.NR 36-1798 MODELL TL3021B
natural_image
Diagram of a mechanical or electrical assembly with labeled components and directional arrows (no text or symbols present)
Elektrisk anslutning
natural_image
Simple line drawing of a curved pipe or channel with a circular object inside, no text or symbols present.natural_image
Technical line drawing of a cylindrical device with internal components and an arrow indicating direction (no text or symbols)natural_image
Diagram of a mechanical or electrical assembly with labeled components and directional arrows (no text or symbols)
Elektrisk tilkobling
natural_image
Simple line drawing of a pipe or tube with internal components and flow indicators (no text or symbols)ADVARSEL! Maksimal strøm for de to uttakene er 16 A.
natural_image
Diagram of a cylindrical device with internal components and an arrow indicating direction (no text or symbols)natural_image
Diagram of a mechanical or electrical assembly with labeled components and directional arrows (no text or symbols)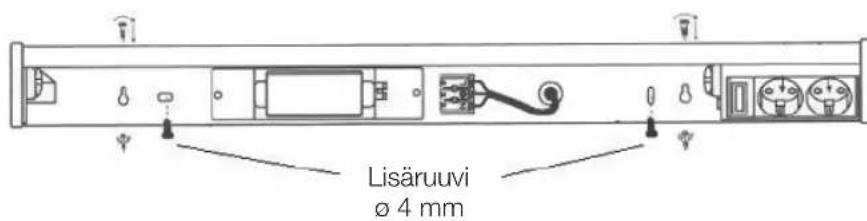
natural_image
Simple line drawing of a curved pipe or tube with internal components (no text or symbols)VAROITUS! Kahden pistorasian maksimivirta on 16 A.
natural_image
Diagram of a cylindrical device with internal components and an arrow indicating direction (no text or symbols)For consumer contact, please visit www.clasohlson.co.uk and click on customer service.
INTERNET www.clasohlson.co.uk
Brand : Cotech
Model : TL3021B
Category : Lamp