
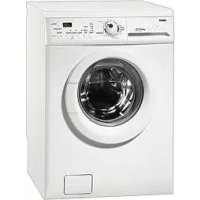
ZWF-1650 - Washing machine ZANUSSI - Free user manual and instructions
Find the device manual for free ZWF-1650 ZANUSSI in PDF.



| Product type | Front-loading washing machine |
| Brand | ZANUSSI |
| Model | ZWF-1650 |
| Height | 85 cm |
| Width | 60 cm |
| Depth | 62 cm |
| Maximum cotton load | 7 kg |
| Maximum synthetic load | 3 kg |
| Maximum delicate load | 3 kg |
| Maximum wool load | 2 kg |
| Maximum spin speed | 1600 rpm |
| Voltage/Frequency | 220-230 V / 50 Hz |
| Total power | 2200 W |
| Minimum fuse rating | 10 A |
| Minimum water pressure | 0.05 MPa |
| Maximum water pressure | 0.8 MPa |
| Wash programs | Cotton, Cotton Eco, Synthetics, Delicates, Lingerie, Wool, Refresh 30, Rinse, Drain, Spin, Memory 1 and 2 |
| Available options | Delayed start, Extra rinse, Prewash, Intensive, Easy iron, Energy saving, No spin, Rinse hold, Night silence |
| Display | Interactive display with clock and menu |
| Voice assistant | Yes, with choice of language and volume |
| Child safety | Door lock device |
| Water consumption (cotton 95°C) | 72 liters |
| Energy consumption (cotton 60°C) | 1.19 kWh |
Frequently Asked Questions - ZWF-1650 ZANUSSI
User questions about ZWF-1650 ZANUSSI
0 question about this device. Answer the ones you know or ask your own.
Ask a new question about this device
Download the instructions for your Washing machine in PDF format for free! Find your manual ZWF-1650 - ZANUSSI and take your electronic device back in hand. On this page are published all the documents necessary for the use of your device. ZWF-1650 by ZANUSSI.
USER MANUAL ZWF-1650 ZANUSSI
natural_image
Line drawing of a front-loading washing machine with control panel and door (no text or symbols)LIBRETTO ISTRUZIONI NOTICE D'UTILISATION GEBRAUCHSANWEISUNG USER MANUAL
Gentile cliente,
natural_image
Hand using a screwdriver to adjust or install a mechanical component (no text or symbols visible)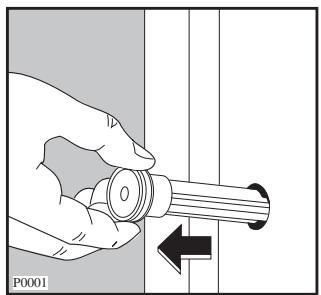
natural_image
Hand holding a mechanical component with a circular end, showing a left-pointing arrow (no text or symbols)natural_image
Technical line drawing of a mechanical device with a tool inserted into a housing (no text or symbols)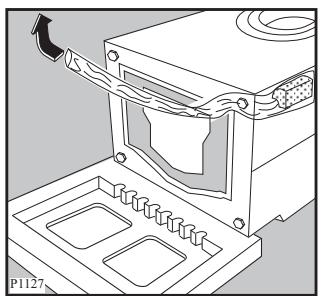
natural_image
Technical line drawing of a mechanical device with mounting base and internal components (no text or symbols)natural_image
Illustration of a hand using a screwdriver to adjust or install a mechanical component (no text or symbols visible)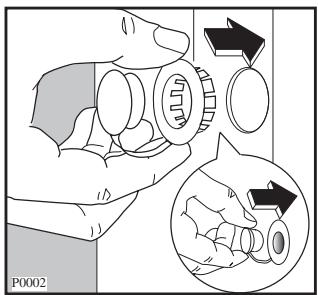
Posizionamento
natural_image
Diagram of a hand holding a pipe with a curved arrow indicating direction (no text or symbols)natural_image
Illustration of a hand holding a small tool next to a faucet and valve, with no text or symbols present.natural_image
Diagram of a pipe fitting with a valve and connector, no text or symbols presentnatural_image
Mechanical diagram showing a bolt inserted into a hexagonal base with directional arrows indicating rotation (no text or symbols)natural_image
Illustration of a hand inserting a device into a device casing, with no visible text or symbolsPannello comandi
natural_image
Line drawing of a hand inserting a component into a drawer (no text or symbols)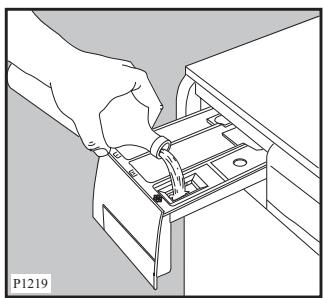
natural_image
Line drawing of a hand inserting a component into a drawer (no text or symbols)natural_image
Simple diagram with a circle, a diamond, and a small circle inside a square frame (no text or symbols)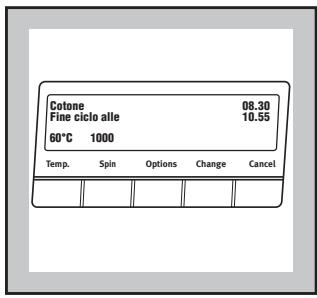
natural_image
Illustration of a hand placing a container into a circular tank (no text or symbols visible)Mobile
natural_image
Illustration of hands operating a mechanical device with a downward arrow and label P1220 (no text or symbols on the device itself)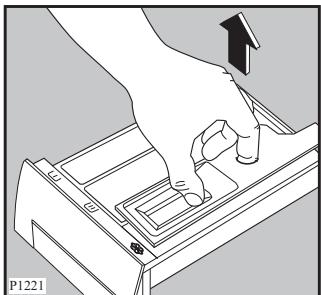
natural_image
Hand pressing down on a mechanical component with an arrow indicating upward motion (no text or symbols)natural_image
Illustration of a hand using a tool to clean or store items inside a storage unit (no text or symbols visible)natural_image
Hand holding a circular object with concentric rings above a surface, next to a small arrow pointer (no text or symbols)natural_image
Illustration of a hand using a tool to adjust or install a component, with no visible text or symbols.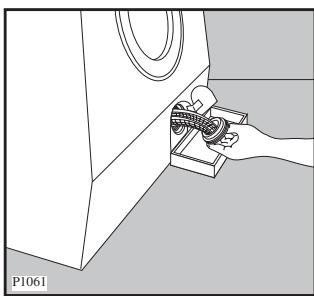
natural_image
Diagram of a hand inserting a component into a device labeled PI061 (no text or symbols on the diagram itself)natural_image
Illustration of a hand washing a bucket into a faucet, showing liquid flow and a magnified inset (no text or symbols)Chère cliente, Cher client,
- 73/23 CEE 19/02/73 (Basse tension) et modifications successives;
Débridage

natural_image
Illustration of a hand using a screwdriver to adjust or install a component, with arrows indicating direction (no text or symbols)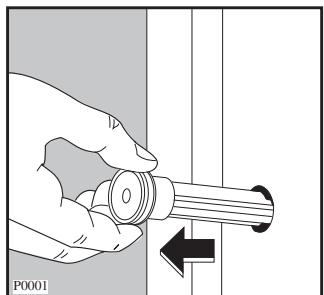
natural_image
Hand holding a cylindrical mechanical component with an arrow indicating rotation (no text or symbols)natural_image
Illustration of a hand using a screwdriver to adjust or install a component on a metal bracket (no text or symbols visible)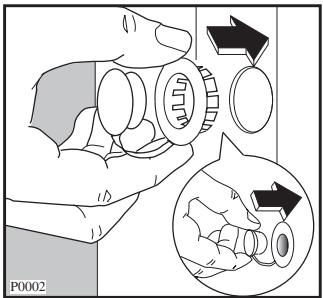
Emplacement
natural_image
Diagram of a mechanical assembly with arrows indicating rotational direction (no text or symbols)Arrivée d'eau
natural_image
Illustration of a hand holding a pipe fitting next to a faucet, with no text or symbols present.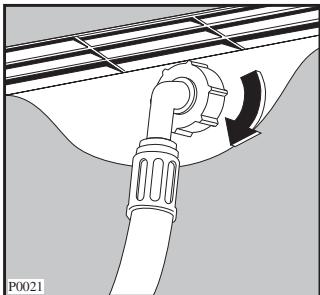
natural_image
Diagram of a pipe fitting with a curved arrow indicating direction, no text or symbols presentnatural_image
Diagram of a faucet assembly with tubing and a valve, no text or symbols presentnatural_image
Illustration of a hand inserting a device into a device casing (no text or symbols visible)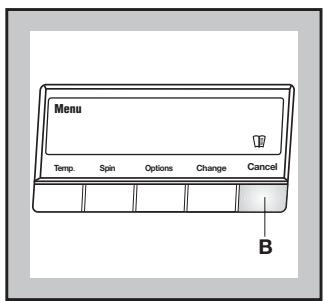
HORLOGE
natural_image
Simple diagram with a circle, two circles, and a diamond symbol (no text or labels)natural_image
Illustration of hands cleaning a circular object with rings (no text or symbols)2. Dosage de la lessive
natural_image
Line drawing of a hand inserting a device into a drawer (no text or symbols)
natural_image
Line drawing of a hand inserting a device into a drawer (no text or symbols)natural_image
Simple diagram with a circle, a diamond symbol, and a small circle inside a square frame (no text or labels)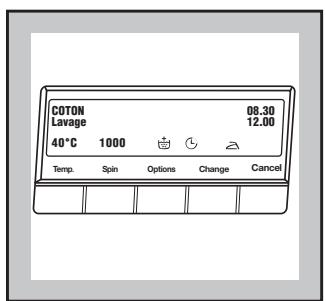
natural_image
Illustration of a hand pressing down on a circular component with a label P1050 n (no text or symbols on the diagram itself)natural_image
Illustration of hands operating a device with a handle and arrow indicator (no text or symbols)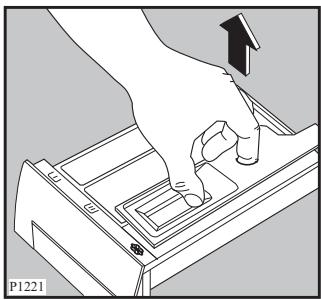
natural_image
Illustration of a hand pressing down on a mechanical device with an arrow indicating motion (no text or symbols)natural_image
Illustration of a hand using a tool to adjust or install a component, no text or symbols presentnatural_image
Illustration of hands using a screwdriver to install a wall-mounted pipe fitting (no text or symbols present)5. La pompe de vidange
natural_image
Hand holding a circular object with concentric rings above a rectangular panel, no text or symbols visiblenatural_image
Illustration of a hand using a tool to clean or inspect a component, with no visible text or symbols.natural_image
Technical line drawing of a mechanical assembly with a hand holding a spring-loaded component (no text or symbols)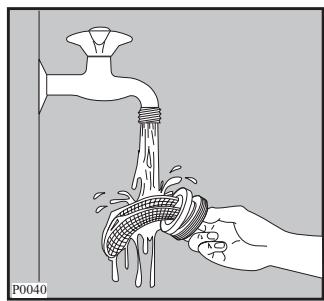
natural_image
Illustration of a hand washing a faucet with water splashing, showing the pipe and cloth (no text or symbols)natural_image
Illustration of a hand using a screwdriver to adjust or install a mechanical component (no text or symbols visible)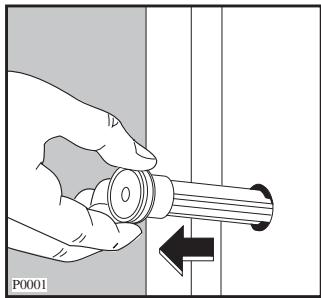
natural_image
Illustration of a hand holding a cylindrical component with a directional arrow, no text or symbols presentnatural_image
Technical line drawing of a mechanical assembly with a tool inserted into a housing (no text or symbols)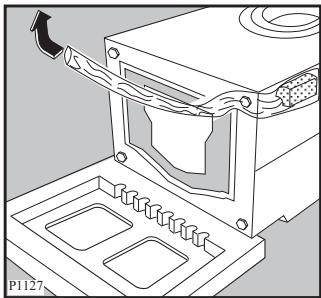
natural_image
Technical diagram of a mechanical assembly with no visible text or symbolsnatural_image
Illustration of a hand using a screwdriver to adjust or install a mechanical component (no text or symbols visible)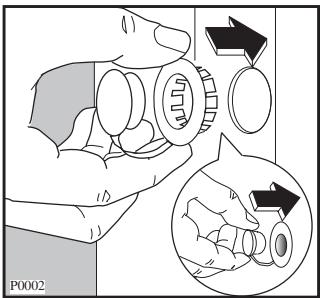
Hinweis:
natural_image
Mechanical assembly diagram showing a bolt inserted into a hexagonal base with two curved arrows indicating rotation (no text or symbols)Kaltwasseranschluss
natural_image
Illustration of a hand holding a tool near a faucet, with no text or symbols present.natural_image
Diagram of a pipe connection with a curved arrow indicating direction (no text or symbols)natural_image
Diagram of a pipe fitting with a valve and a separate inset showing the same pipe (no text or symbols present)natural_image
Illustration of a hand inserting a device into a device casing with a flower symbol (no text or labels)Bedienblende
1 Taste Ein/Aus
natural_image
Simple diagram with a circle, a diamond, and a small circle inside a square frame (no text or symbols)natural_image
Illustration of hands cleaning a circular object with a cloth, no text or symbols presentnatural_image
Line drawing of a hand inserting or removing a device into a drawer (no text or symbols)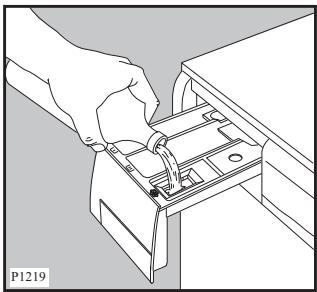
natural_image
Line drawing of a hand inserting a device into a drawer (no text or symbols)natural_image
Simple diagram with a circle, a diamond, and a small circle inside a square frame (no text or symbols)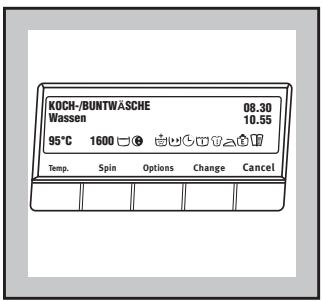
natural_image
Illustration of a hand pressing down on a circular component with a label P1050 n (no text or symbols on the diagram itself)natural_image
Illustration of hands operating a device with arrows indicating direction (no text or symbols)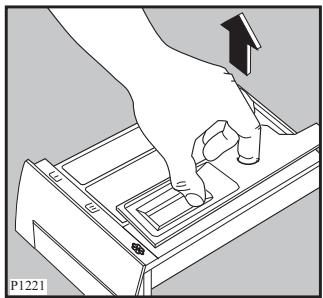
natural_image
Illustration of a hand pressing down on a mechanical device with an arrow indicating motion (no text or symbols)natural_image
Illustration of a hand using a tool to adjust or install a mechanical component, no text or symbols presentnatural_image
Illustration of hands using a wrench to adjust a pipe into a faucet (no text or symbols)natural_image
Hand holding a circular object with concentric rings above a surface, next to a mechanical component (no text or symbols visible)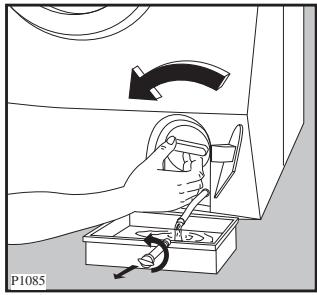
natural_image
Diagram of a hand inserting a component into a device, labeled P1061 (no text or symbols on the diagram itself)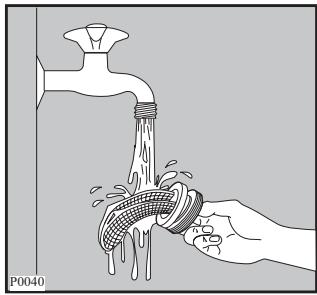
natural_image
Illustration of a hand washing a pipe with water splashing from the drain (no text or symbols)Please read these operating instructions carefully and pay particular attention to the safety notes indicated in the first pages. We recommend that you keep this instruction booklet for future reference and pass it on to any future owners.
Transport damages
When unpacking the appliance, check that it is not damaged. If in doubt, do not use it and contact the Service Centre.
The symbols you will see on some paragraphs of this booklet have the following meaning:

The warning triangle and/or the key words (Warning!, Caution!) emphasize information that is particularly important for your safety or correct functioning of the appliance.

The information marked with this symbol provides additional instructions and practical tips on the use of the appliance.

Tips and information about economical and ecological use of the machine are marked with this symbol.
Our contribution to the protection of the environment: we use recycled paper.
Contents
Warnings 82
Disposal 83
Tips for environmental protection 83
Technical specifications 83
Installation 84
Unpacking 84
Positioning and levelling 84
Water inlet 85
Water drainage 85
Electrical connection 85
Your new washing machine 86
Description of the appliance 86
Door locked light 86
Detergent dispenser drawer 86
Use 87
Control panel 87
Controls 87-93
Washing hints 94
Sorting the laundry 94
Temperatures 94
Before loading the laundry 94
Maximum loads 94
Laundry weights 94
Removing stains 95
Detergents and additives 95
International wash code symbols 96
Operating sequence 97-100
Programme tables 101-102
Maintenance 103
Bodywork 103
Door seal 103
Detergent dispenser drawer 103
Water inlet filter 103
Cleaning the filter 103
Emergency emptying out 104
Frost precautions 104
Something not working? 105-106
The following warnings are provided in the interests of overall safety. You must read them carefully before installing or using the appliance.
Installation
- All internal packing must be removed before using the appliance. Serious damage may be caused to the machine or adjacent furniture if the protective transit devices are not removed or are not completely removed. Refer to the relevant paragraph in the instruction book.
- Any electrical work required to install this appliance must be carried out by a qualified electrician.
- Any plumbing work required to install this appliance must be carried out by a qualified plumber.
- After having installed the machine, check that it is not standing on its electrical supply cable.
- If the appliance is placed on a carpeted floor, ensure that air can circulate freely between the feet and the floor.
Use
- This appliance is designed for domestic use. It must not be used for purposes other than those for which it was designed.
- Only wash fabrics which are designed to be machine washed. Follow the instructions on each garment label.
- Do not overload the appliance. Follow the instructions in the instruction book.
- Make sure that all pockets are empty. Objects such as coins, safety pins, pins and screws can cause extensive damage.
- Do not machine wash garments saturated with petroleum, methylated spirits, trichlorethylene, etc. If such fluids have been used to remove stains prior to washing, wait until they have completely evaporated from the fabric before placing garments in the appliance.
- Place small items such as socks, belts, etc. in a cloth bag or pillowcase to prevent them getting trapped between the drum and the tub.
- Use only the recommended quantities of fabric softener. An excessive amount could damage the laundry.
- Leave the porthole door slightly ajar when the appliance is not in use. This preserves the door seal and prevents the formation of musty smells.
- Always check that water has emptied out before opening the door. If not, drain the water following the instructions in the instruction book.
- Always unplug the appliance and shut the water tap after use.
General safety
- Repairs to the machine must be carried out only by qualified personnel. Repairs carried out by inexperienced persons could cause serious danger. Contact your local Service Centre.
- Never pull the power supply cable to remove the plug from the socket; always take hold of the plug itself.
- During high temperature wash programmes the door glass may get hot. Do not touch it!
Child safety
- Children are often not aware of how dangerous electrical appliances can be. When the machine is working, children should be carefully supervised and not be allowed to play with the appliance.
- The packaging components (e.g. plastic film, polystyrene) can be dangerous to children - danger of suffocation! Keep them out of children's reach.
- Keep all detergents in a safe place out of children's reach.
- This machine incorporates a special child safety feature to prevent small children from being trapped inside the machine. To activate this device, rotate the button (without pressing it) inside the door clockwise until the groove is horizontal. If necessary use a coin. To disable this device and restore the possibility of closing the door, rotate the button anti-clockwise until the groove is vertical.
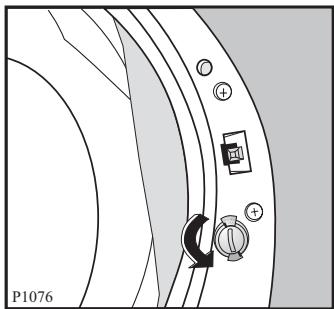
- When the appliance is to be scrapped, cut off the electrical supply cable and destroy the plug with the remaining cable. Disable the door catch in order to prevent children from becoming trapped inside while playing.
Packaging materials
The materials marked with the symbol 🌐 are recyclable.
PE<=polyethylene
PS<=polystyrene
PP<=polypropylene
This means that they can be recycled by disposing of them properly in appropriate collection containers.
Machine
Use authorised disposal sites for your old appliance. Help to keep your country tidy!
The symbol 📋 on the product or on its packaging indicates that this product may not be treated as household waste. Instead it shall be handed over to the applicable collection point for the recycling of electrical and electronic equipment. By ensuring this product is disposed of correctly, you will help prevent potential negative consequences for the environment and human health, which could otherwise be caused by inappropriate waste handling of this product. For more detailed information about recycling of this product, please contact your local city office, your household waste disposal service or the shop where you purchased the product.

Tips for environmental protection
To save water, energy and to help protect the environment, we recommend that you follow these tips:
- Normally soiled laundry may be washed without prewashing in order to save detergent, water and time (the environment is protected too!).
-
The machine works more economically if it is fully loaded. Do not overload!
-
With adequate pre-treatment, stains and limited soiling can be removed; the laundry can then be washed at a lower temperature.
- Measure out detergent according to the water hardness, the degree of soiling and the quantity of laundry being washed.
Technical specifications
| DIMENSIONS | Height | 85 cm |
| Width | 60 cm | |
| Depth | 62 cm | |
| MAXIMUM LOAD | Cotton | 7 kg |
| Synthetics | 3 kg | |
| Delicates | 3 kg | |
| Woollens, handwash | 2 kg | |
| SPIN SPEED | 1600 rpm max. | |
| POWER SUPPLY VOLTAGE/FREQUENCY | 220-230 V/50 Hz | |
| TOTAL POWER ABSORBED | 2200 W | |
| MINIMUM FUSE PROTECTION | 10 A | |
| WATER PRESSURE | Minimum | 0,05 MPa |
| Maximum | 0,8 MPa |

This appliance complies with the following EEC Directives: 73/23/EEC of 19/02/73 relating to low voltage
Unpacking

All transit bolts and packing must be removed before using the appliance.
You are advised to keep all transit devices so that they can be refitted if the machine ever has to be transported again.
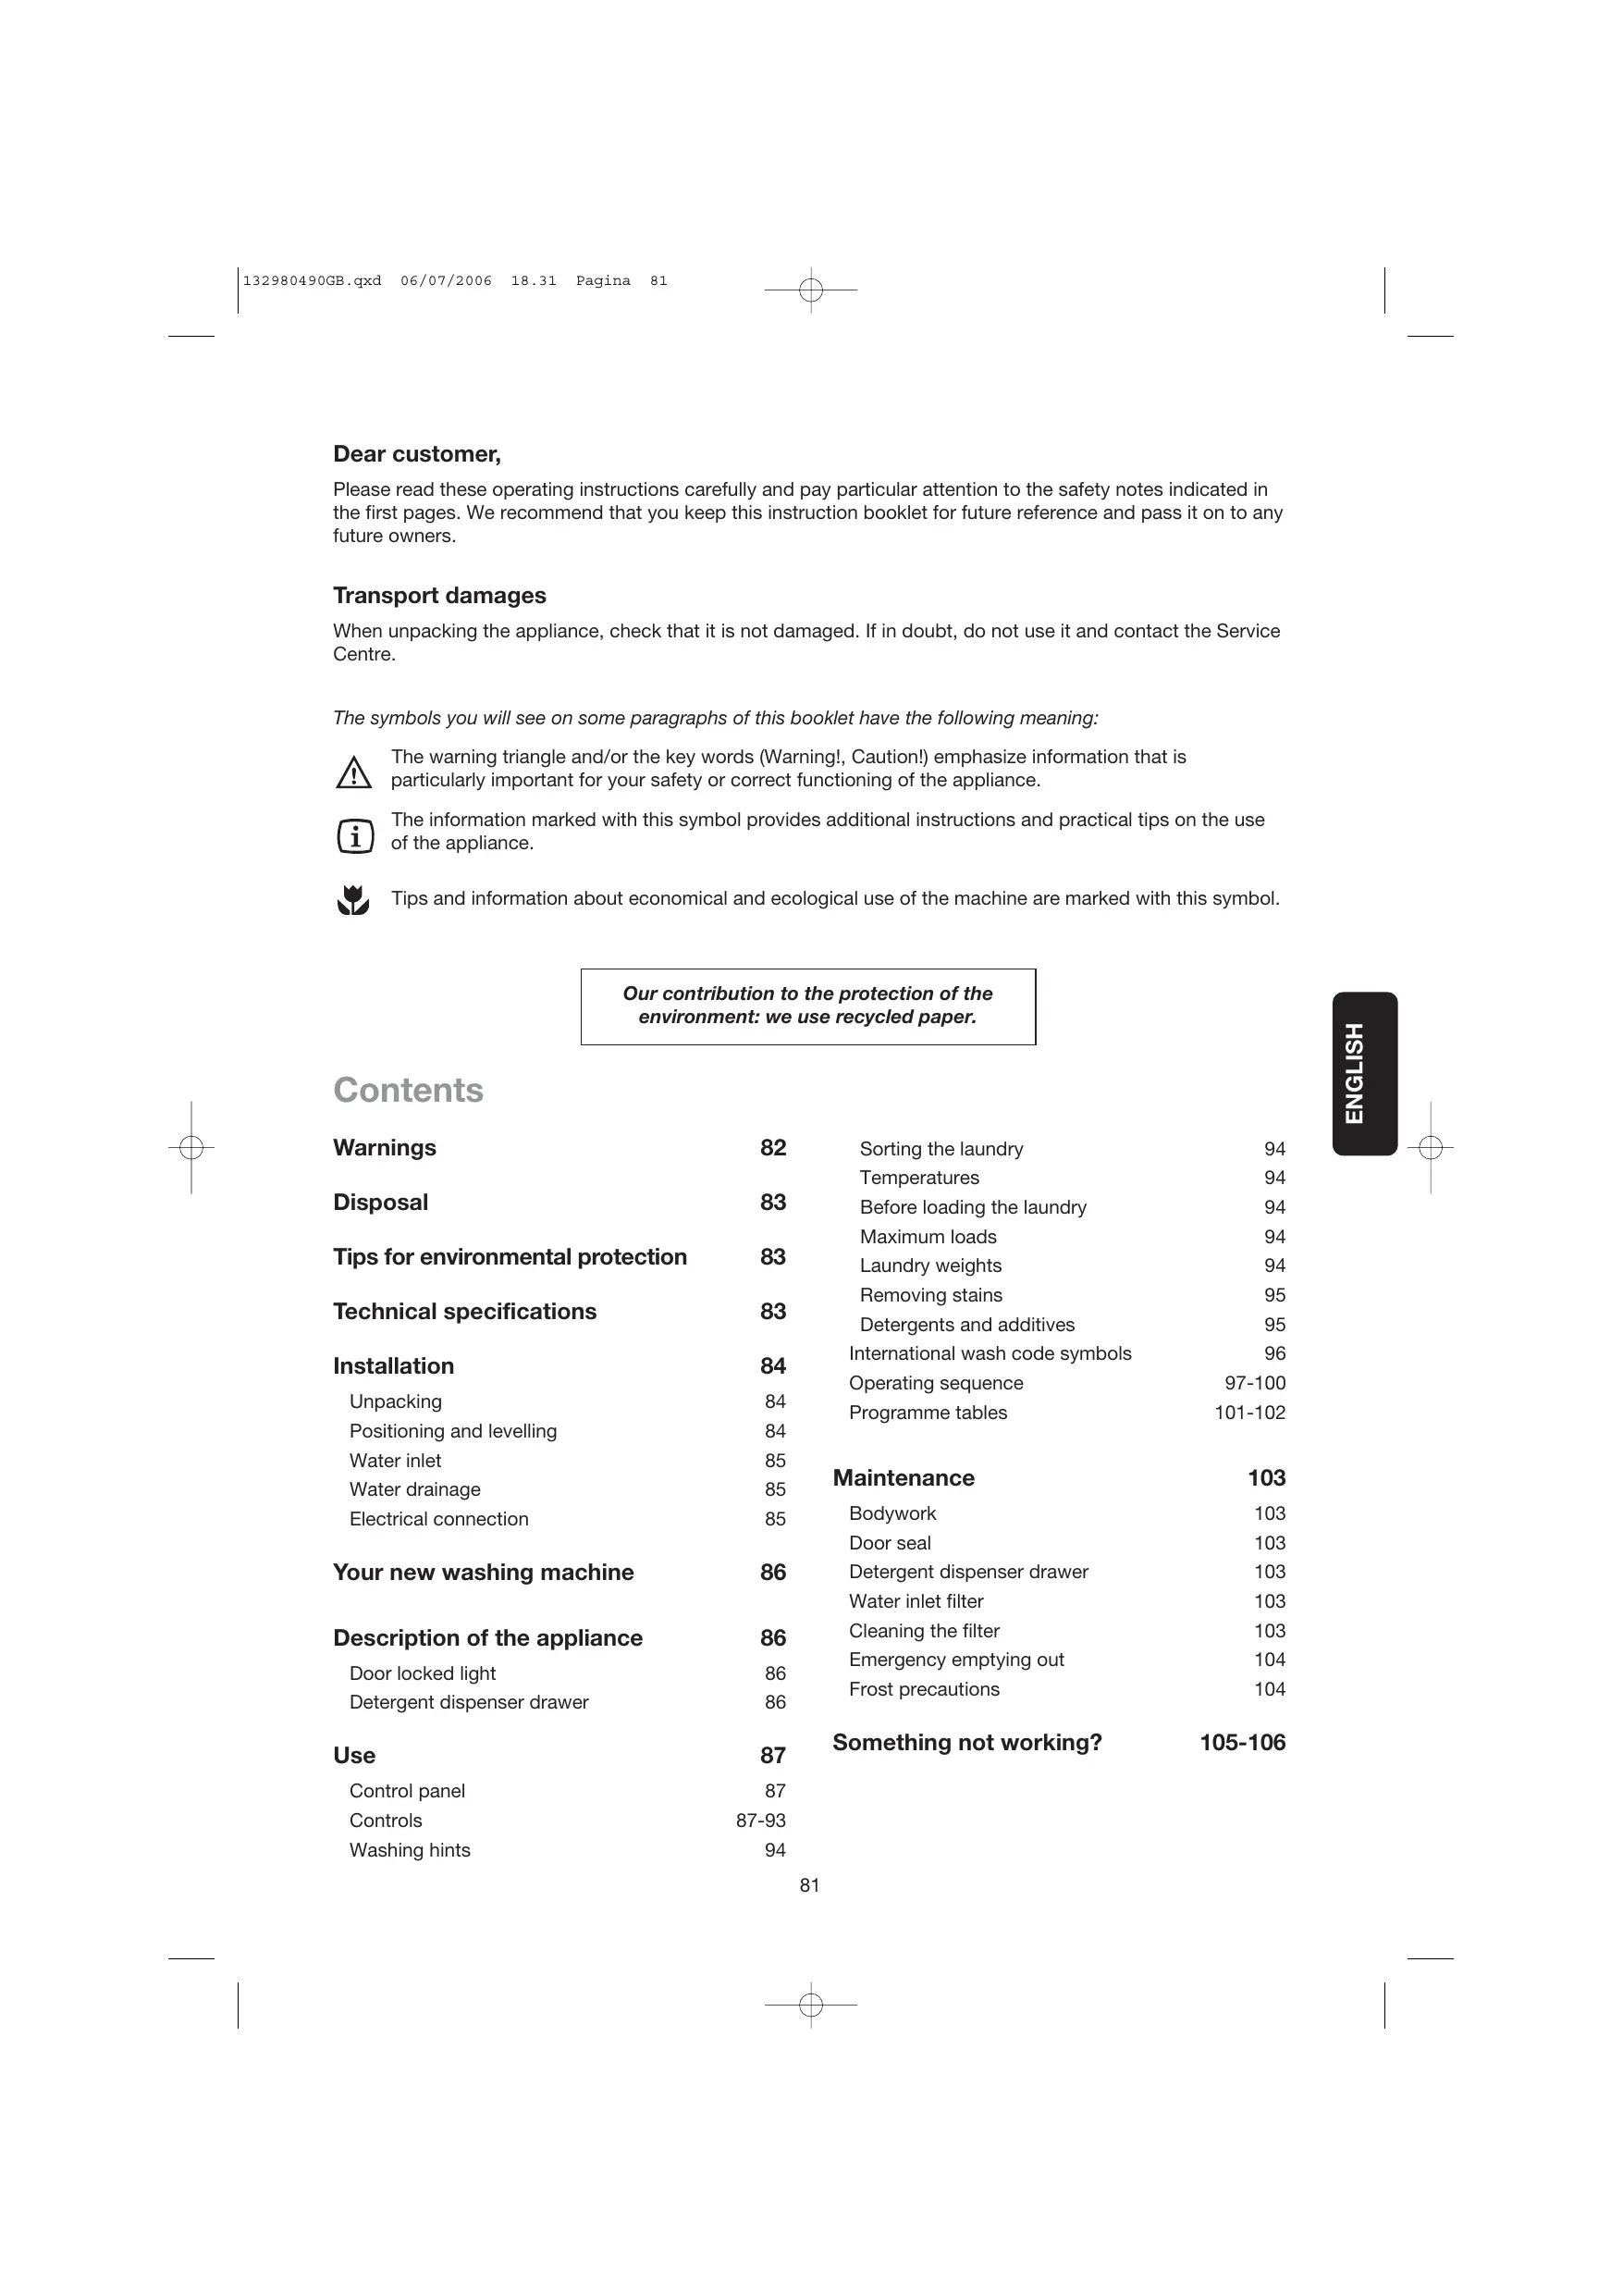
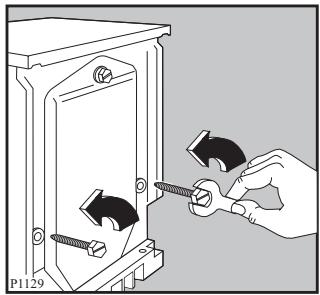
- Using a spanner, unscrew and remove the two rear bottom screws. Slide out the two plastic pins.
natural_image
Illustration of a hand using a screwdriver to adjust or install components inside a mechanical housing (no text or symbols visible)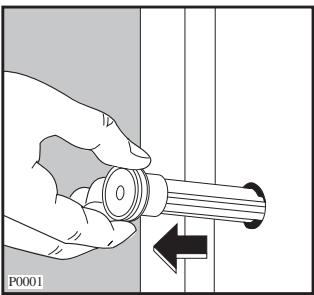
- Lay the machine on its back, taking care not to squash the hoses. This can be avoided by placing one of the corner packing pieces between the machine and the floor.
- Remove the polystyrene block from the bottom of the machine and release the two plastic bags.
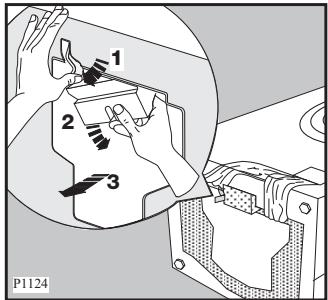
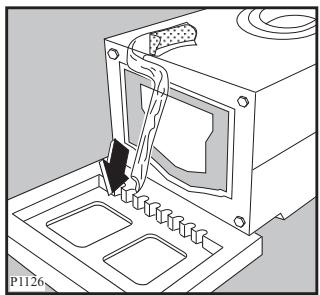
- Very carefully slide out the left polythene bag, removing it towards the right and then downwards.
- Very carefully slide out the right polythene bag, removing it towards the left and then upwards.
natural_image
Technical line drawing of a mechanical assembly with a tool inserted into a housing (no text or symbols)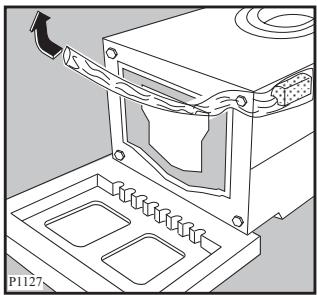
natural_image
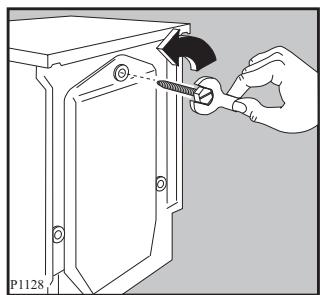
Technical line drawing of a mechanical device with mounting base and internal components (no text or symbols)- Set the machine upright and remove the remaining rear screw. Slide out the relevant pin.
- Plug all the holes with the plugs which you will find in the envelope containing the instruction booklet.
natural_image
Illustration of a hand using a screwdriver to adjust or install a component on an electrical cabinet (no text or symbols visible)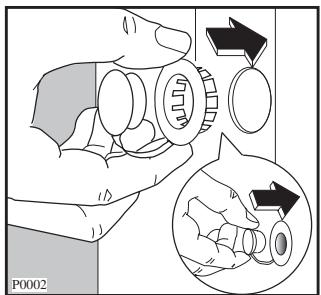
Positioning and levelling
Install the machine on a flat hard floor.
Make sure that air circulation around the machine is not impeded by carpets, rugs etc. Check that the machine does not touch the wall or other kitchen units.
Carefully level by screwing the adjustable feet in or out. Never place cardboard, wood or similar materials under the machine to compensate for any unevenness in the floor.
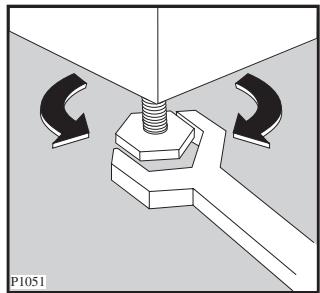
natural_image
Diagram of a mechanical assembly with arrows indicating rotational direction (no text or symbols)Water inlet
Connect the water inlet hose supplied with the machine to a tap with a 3/4" thread.
Do not use already employed hoses for water connection.
The other end of the inlet hose which connects to the machine can be turned in any direction. Simply loosen the fitting, rotate the hose and retighten the fitting, making sure there are no water leaks.
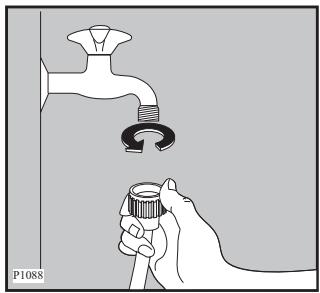
natural_image
Illustration of a hand holding a tool near a faucet, with no text or symbols present.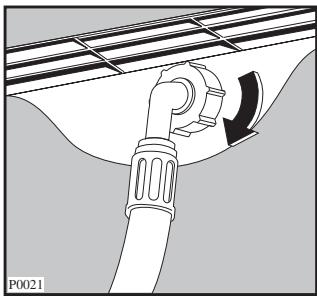
natural_image
Diagram of a pipe valve with a curved arrow indicating direction, no text or symbols presentThe inlet hose must not be lengthened. If it is too short and you do not wish to move the tap, you will have to purchase a new, longer hose specially designed for this type of use.
Important!
Before connecting up the machine to new pipework or to pipework that has not been used for some time, run off a reasonable amount of water to flush out any debris that may have collected in the pipes.
Water drainage
The end of the drain hose can be positioned in three ways:
Hooked over the edge of a sink using the plastic hose guide supplied with the machine. In this case, make sure the end cannot come unhooked when the machine is emptying.
This could be done by tying it to the tap with a piece of string or attaching it to the wall.

natural_image
Diagram of a pipe connection with a valve and tubing, no text or symbols presentIn a sink drain pipe branch. This branch must be above the trap so that the bend is at least 60 cm above the ground.
Directly into a drain pipe at a height of not less
than 60 cm and not more than 90 cm.
The end of the drain hose must always be ventilated, i.e. the inside diameter of the drain pipe must be larger than the outside diameter of the drain hose.
Any extension applied to the drainage hose should not be longer than 200 cm and its diameter must not be smaller than that of the original hose. Use a suitable fitting for the connection.
The drain hose must not be kinked. Run it along the floor; only the part near the drainage point must be raised.
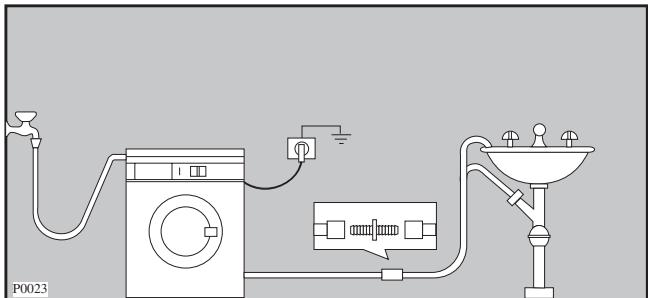
For a correct functioning of the machine the drain hose must remain hooked on the proper support piece situated on the top part of the back side of the appliance.
Electrical connection
This machine is designed to operate on a 220-230 V, single-phase, 50 Hz supply.
Check that your domestic electrical installation can take the maximum load required (2.2 kW), also taking into account any other appliances in use.
Connect the machine to an earthed socket.

The manufacturer declines any responsibility for damage or injury through failure to comply with the above safety precaution.
Should the appliance power supply cable need to be replaced, this should be carried out by our Service Centre.
Please ensure that when the appliance is installed the power supply cable is easily accessible.
Your new washing machine
This new washing machine, which is fitted with the Jet System, meets all modern needs for effective treatment of laundry with low water, energy and detergent consumption.
Further savings are achieved by washing small loads of laundry, since water and electricity consumption is proportional to the quantity and type of laundry being washed.
- The special wool programme with its new delicate wash system treats your woollens with extreme care.
- The automatic cooling of the washing water from 95irc to 60ircC before draining will prevent old drain pipes from being deformed and will reduce thermal shock to fabrics, helping to prevent creasing.
- The unbalance detection device prevents vibration during spinning.
- Your washing machine now talks to you. It incorporates an advanced vocal board able to guide you through the entire washing process and to alert you in case of any operating errors. The messages given make washing easier!
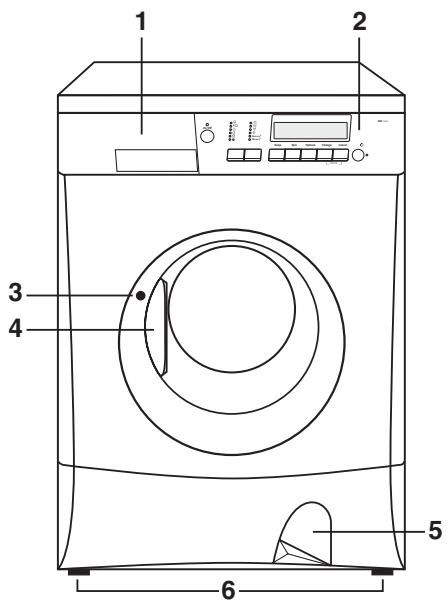
Description of the appliance
1 Detergent dispenser drawer
2 Control panel
3 Door locked light
4 Door handle
5 Drain pump
6 Adjustable feet
Door locked light
It stays on during the whole programme indicating that the door is locked.
When the light goes out, the door can be opened (see page 100).
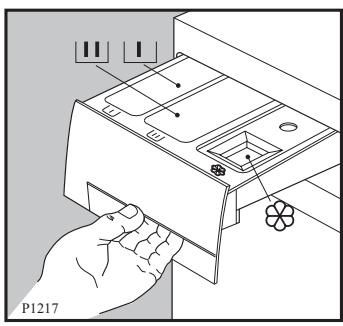
Detergent dispenser drawer

Prewash

Main wash

Fabric softener, starch
natural_image
Line drawing of a hand inserting a device into a device casing (no text or symbols)Control panel
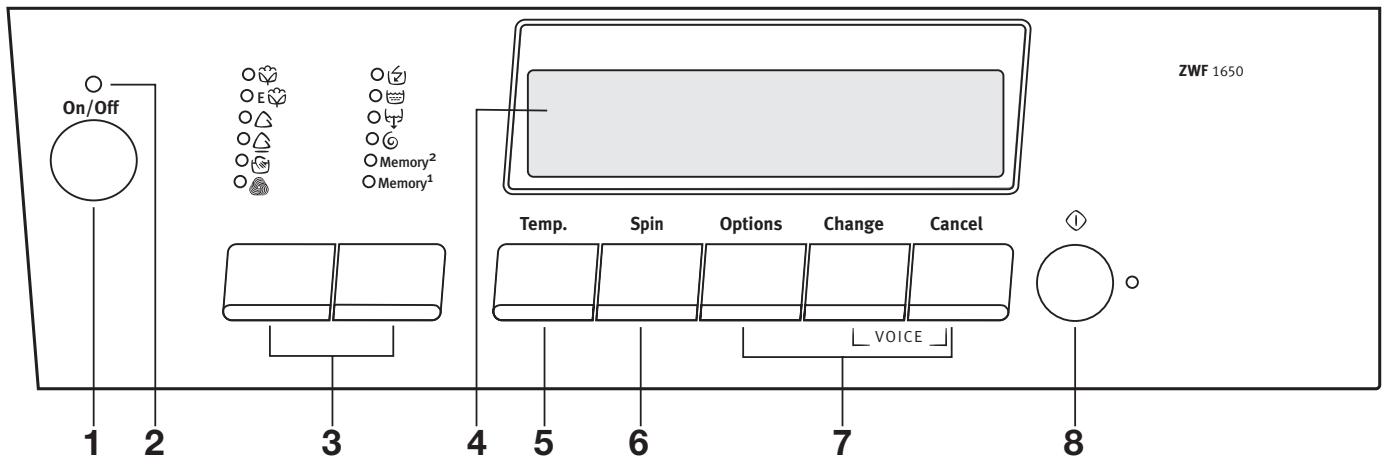
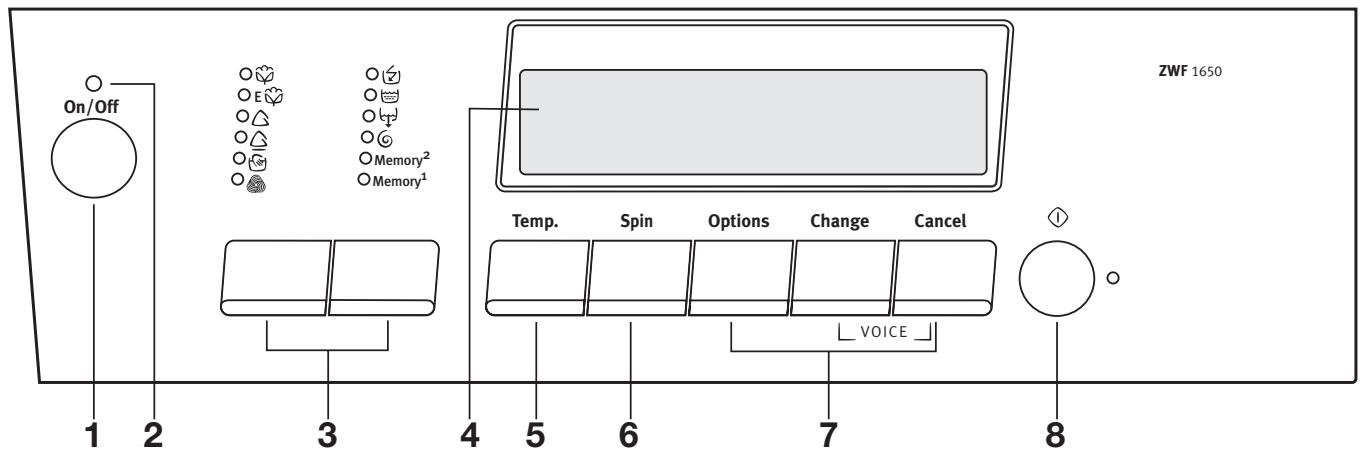
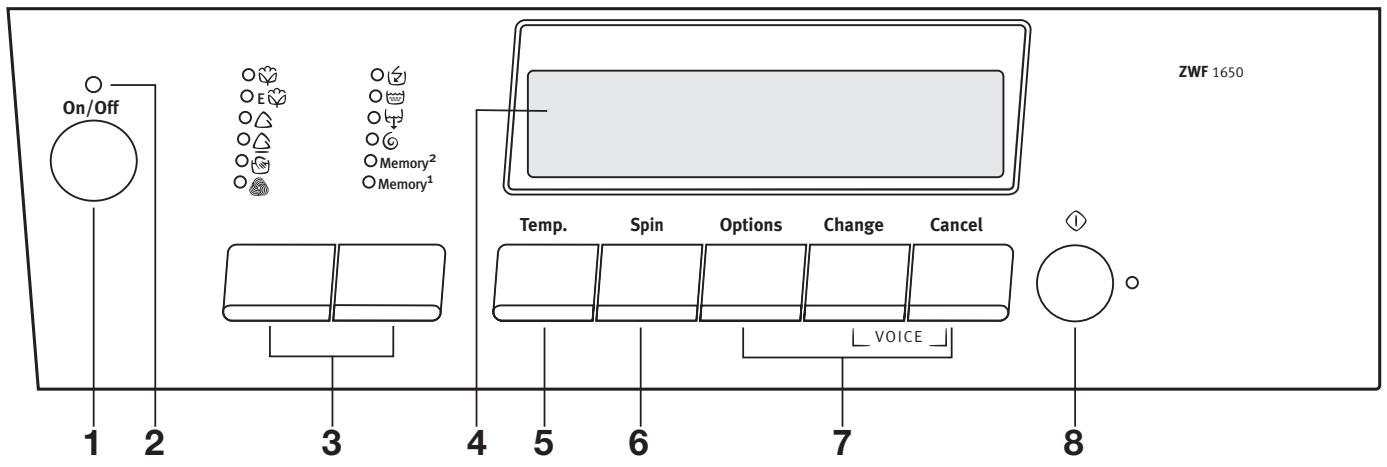
1 On/Off button
Press this button to switch the washing machine on.
The display will show the message: «Select a programme» unless the previous washing cycle has been cancelled.
Press the On/Off button again to switch the machine off.
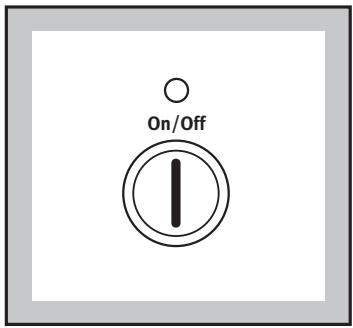
2 Mains-on light
This light is connected to the On/Off button. It lights up when you press the button, and goes out when you press it again.
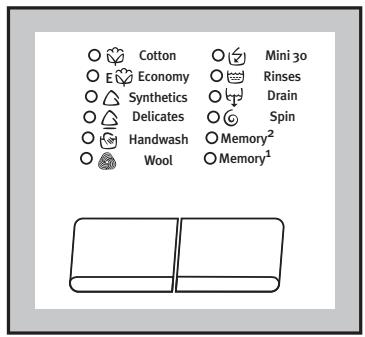
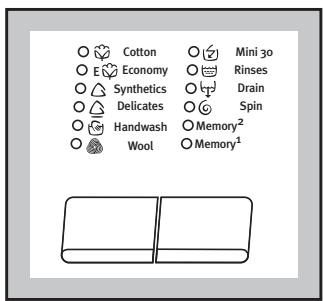
3/4 Fabric and Special programmes buttons
Press these buttons repeatedly to select the programme on the basis of the type of laundry to be washed or a special programme. The light relevant to the selected programme will light up. The washing machine will propose a temperature and automatically select the maximum spin value provided for the programme you have chosen. You can change these values by operating buttons 6 and 7.
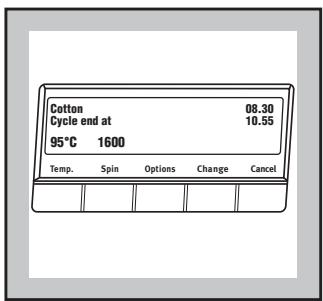
The display will show the CYCLE TIME of the selected programme, calculated on the basis of the maximum load for each type of fabric.
The Start/Pause ⏻ button light will start flashing. If the load of laundry to be washed is small, at the beginning of the cycle the display will still indicate the END CYCLE relevant to the maximum load. The duration value will be gradually adjusted during the execution of the cycle.
The programme E 🌐 (Economy) corresponds to the ENERGY SAVING programme for cotton.
Handwash and Wool
When you select these programmes, you obtain a particularly delicate wash, suitable for woollens and articles of clothing whose label indicates that they must be hand-washed 📂.
5 Display
The Display is used for setting a large number of functions and combine them with each other using only a few control elements (8 buttons). This simple control method is made easy thanks to the interactive display.
Interactive means that the washing machine display changes to reflect each step you have entered. This ensures that only those settings that make sense are made. You are able to see the current settings at any time in the information panel and in the option row.
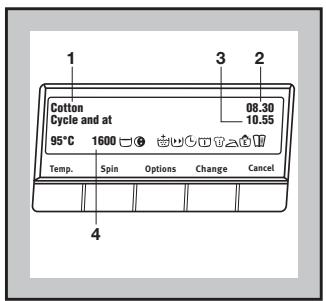
- Information panel shows the current settings
- Real time clock
- End cycle time
- Selection shows temperature, spin speed, options and extras.
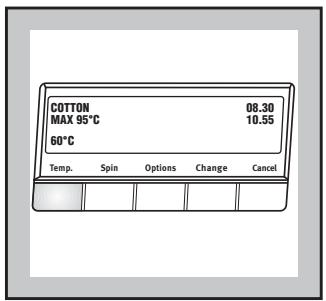
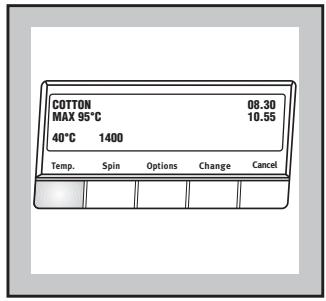
6 Temperature button (Temp.)
Press this button repeatedly to increase or decrease the temperature, if you want your laundry to be washed at a temperature different from the one proposed by the washing machine.
Maximum temperatures are 95°C for cotton, 60°C for synthetic fabrics, 40°C for delicate fabrics, wool and fabrics to be hand-washed, 30°C for Mini 30', while «0» corresponds to cold wash.
By depressing Temperature Temp. button, the relevant message will appear on the second row of the display (instead of «cycle end at»). In the corner of the third row appears the indication of the selected temperature.
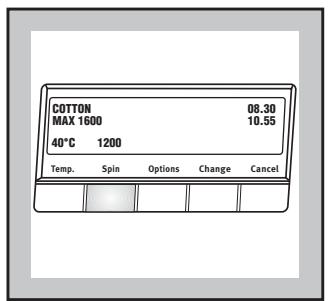
7 Spin speed button (Spin)
Press this button repeatedly to change the spin speed, if you want your laundry to be spun at a speed different from the one proposed by the washing machine.
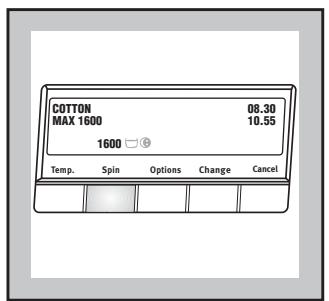
Maximum speeds are:
• for Cottons: 1400 rpm
- for Synthetics, Wool, and fabrics to be handwashed: 900 rpm;
• for Delicates and Mini 30': 700 rpm;
By depressing the Spin speed button you can also choose No Spin option «0», Rinse Hold option ☐ and Night cycle option ⓣ.
No spin «0» option eliminates all the spin phases and increases the number of rinses for cottons and synthetics.
Rinse hold position ☐: when you choose this option, the machine will not drain the water of the last rinse, so as not to crease the laundry.
Night cycle position ⚙: when you choose this option, the machine will not drain the water of the last rinse, so as not to crease the laundry.
As all spinning phases are suppressed, this washing cycle is very quiet and it can be selected at night or in times with a more economical power rate.
On cotton and synthetic programmes the rinses will be performed with more water.
To complete the cycle of the programmes, which end with water left in the tub, depress three times the Cancel button until the display will show the message «Select a programme» and then choose one of the following programmes:
- Drain
To drain only the water, select Drain programme by means of the button 4, then press the Start/Pause button ⏻.
- Spin
To drain and spin the laundry, choose Spin programme by means of the button 4; select spin speed by means of Spin button and then press the Start/Pause button ⏻.
Options button allows you to move through the option icons.
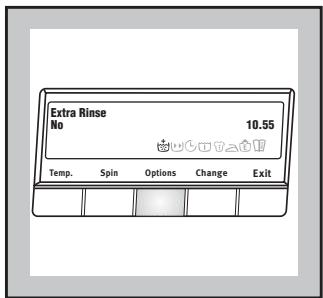
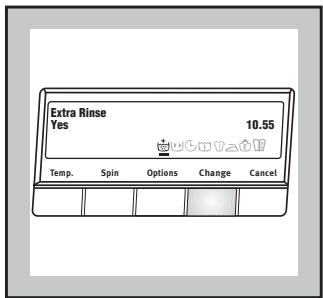
Change button allows you to select/change the status of the different icons.
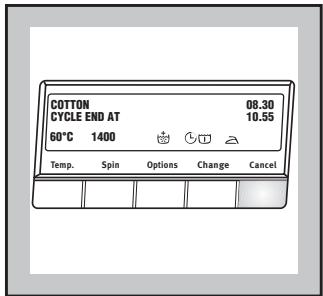
Cancel button allows you to return to the previous selection.
Depending on the programme, different functions can be combined. These must be selected after choosing the desired program and before depressing the Start/Pause button ⏻.
By depressing the Options button, all the symbol icons, allowed for the selected programme will appear in the display.
The first option 🤒 will start flashing. Its name and status will appear in the display.
If you want to change the option status, press
Change button. A line will appear below the selected icon, indicating that the option is set.
To select the other options press again the Options button and proceed as before.
Once you have completed the selection of the options, pressing the Cancel button, the selected icons will remain fixed in the display.
Note: To modify the already chosen option selections, repeat the previous procedure.
Important! While selecting the option, if you press the temperature Temp., Spin, or Start/Pause button ⏻, the relative function will be executed.
EXTRA RINSE: this option can be selected with all programmes, except the Wool and Handwash programmes and Mini 30'. The machine will add 2 rinses for cottons and 1 rinse for synthetics and delicates.
This option is recommended for people who are allergic to detergents, and in areas where the water is very soft.
TIME SAVING: this option can be used for lightly soiled cotton, synthetic or delicates items in order to obtain a good washing programme in a short time.
This option is not available with Wool, Handwash and Mini 30'.
The washing time will be reduced according to the type of fabric and the selected temperature.
Selecting this option «Short» or «Very Short» will be shown in the display.
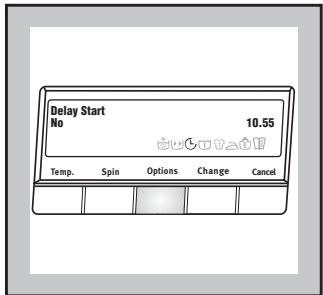
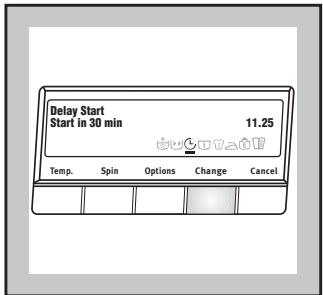
DELAY START: this option makes it possible to delay the start of the washing programme by 30 min - 60 min - 90 min, 2 hours and then by 1 hour till 20 hours. The delay you have selected is indicated in the display.
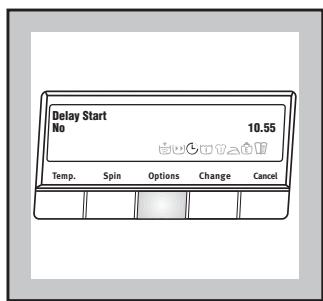
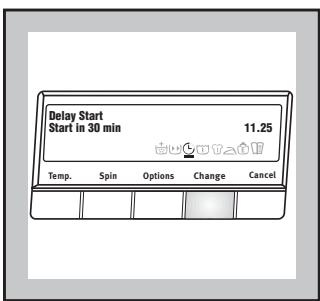
You must select this option after you have set the programme and before you press the Start/Pause button ⏻.
You can cancel the delay time at any moment, before you press the Start/Pause button ⏻.
If you have already pressed the Start/Pause button ⏻ and you wish to cancel the Delay time proceed as follows:
-
set the washing machine to PAUSE by pressing the Start/Pause button ⏻;
-
deselect the Delay Start option, changing the status;
-
press the Start/Pause button to start the program.
Important!
The selected delay can be changed only after selecting the washing programme again.
The door will be locked throughout the delay time (the door locked light is on).
If you need to open the door, you must first set the washing machine to PAUSE by pressing the
Start/Pause button ⏻. After you have closed the
door, press the Start/Pause button ⏻ again.
The Delay Start cannot be selected with Spin and Drain programmes.
UPREWASH: select this option if you wish your laundry to be prewashed before the main wash (not available for Wool, Handwash cycles and Mini 30'). The prewash phase ends with a short spin at 650 rpm in programmes for cotton and synthetic fabrics, whereas in the programme for delicate fabrics the water is only drained.
INTENSIVE: for heavy soiled laundry. This option can be selected only for cottons and synthetics.
The washing time will be prolonged according to the cycle temperature and the fabric type.
A EASY IRON: selecting this button the laundry is gently washed and spun to avoid any creasing. In this way ironing is easier. Furthermore the machine will perform 6 rinses instead of 3 for cotton and 4 rinses instead of 3 for synthetics. This function can be used for cotton and synthetic fabrics.
If this option is selected for cotton programmes, the spin speed automatically will reduce to 1000 rpm. If this option is selected for synthetics programmes, and you select a temperature of 60irc C or 50irc C, the appliance will perform the washing cycle at max 40irc C.
ECONOMY (Energy saving): this option can be selected only for synthetics lightly or normally soiled with a temperature of 40irc C or higher. The washing time will be prolonged. If you select 60irc C - 50irc C - 40irc C, the washing temperature will be reduced to 42irc C.

MENU SETUP: Menu option is used for
selecting various basic settings without affecting the particular wash programme. These basic settings will remain active until they are deselected/modified.
Selecting MENU Options: Memory 1 , Memory 2 , sound, rinse +, language, clock, contrast or brightness.
- Select a programme in order to turn the appliance on.
- Press Options button repeatedly until the symbol flashes.
- Press Change
Note: digital instructions are displayed if you wait 3 seconds after displaying each option in this menu.
- Press Options repeatedly until the required option choice is displayed.
- Press Change to select the desired option.
- Press Cancel twice to return to the set programme.
Memory 1 and Memory 2
Programme settings that are frequently used can be saved (e.g. cotton, 60°C, 1400 rpm, with time saving). There are 2 memory spaces available for this purpose. The saved programme can be selected in the same way as any other wash programme by means of the corresponding button 4.
Example: Cotton, 60°C, 1400 rpm, with Time Saving option.
- Select the cycle and programme settings.
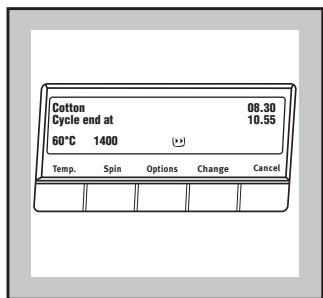
- Enter the Menu option and select one of the memory positions. A «Store programme?» message will appear in the display.
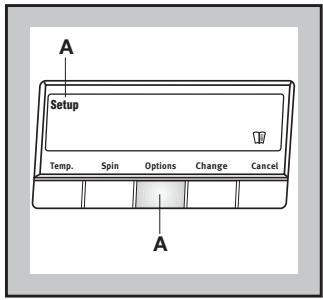
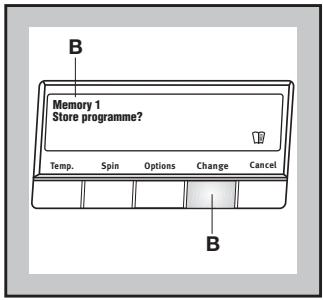
- To memorise the selected programme press the Change button. «Programme stored» message will appear in the display.
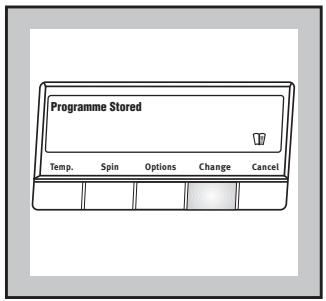
To change the memorised programme setting repeat the procedure from the beginning.
Note: once there is information saved in the memory it cannot be 'emptied'. However, it can be overwritten/changed.
SOUND
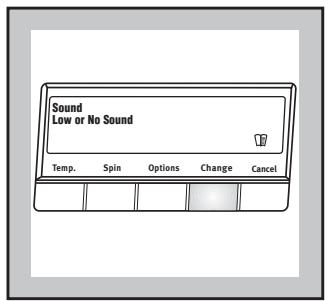
The sound setting permits you to modify the function. You can choose between different levels: low, no sound and normal.
Example:
- Enter the Menu option and select the sound setting.
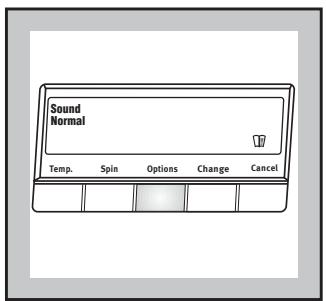
- Use the Change button to select the desired level.
RINSE +
The washing machine is set such that its water consumption is extremely economical. For people with allergies and in areas where the water is very soft, it can however be helpful to use more water when rinsing. When you select Rinse +, 2 additional rinses will be carried out for cottons and 1 additional rinse for synthetics and delicates. If Rinse + has been selected, 🤒 will appear in the option row.
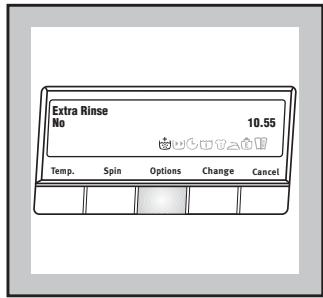
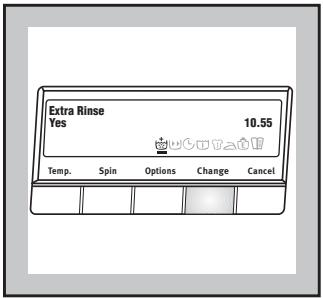
LANGUAGE
You can change the language setting if you would like the indicators in the display to appear in a different language.
Example:
- Enter the Menu option and select the Language setting.
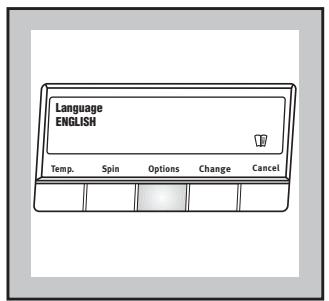
- Press the Change button to select the desired Language.
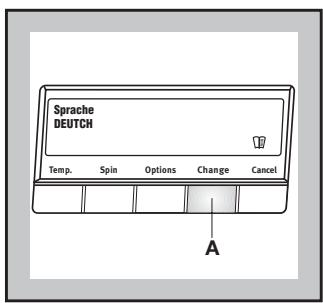
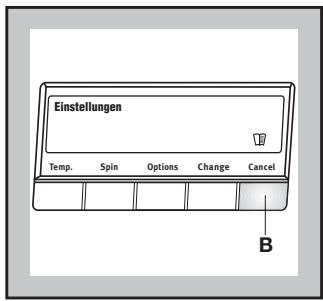
CLOCK
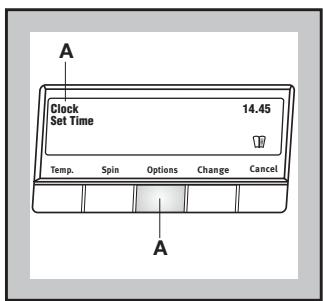
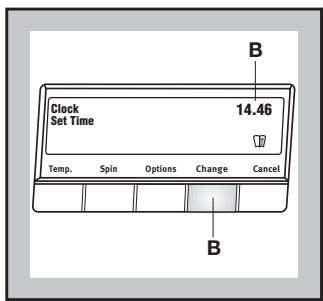
The clock setting permits you to modify/set up the current time. It is important to keep it updated as the current END Cycle Time depends on it.
Example:
- Enter the Menu option and select the Clock setting.
- With a short/single time pressure of the Change button, the time varies minute by minute. With a continued pressure of the Change button, the time varies 10 minutes by 10 minutes.
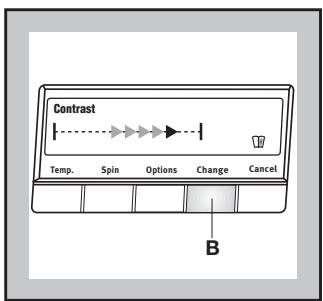
CONTRAST
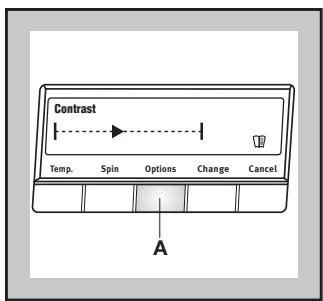
The Contrast setting allows you to modify the optical characteristic of the display.
Example:
- Enter the Menu option and select the Contrast setting.
- Use the Change button to set up the desired contrast level.
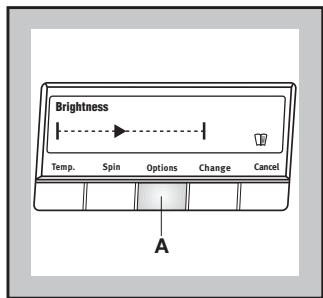
BRIGHTNESS
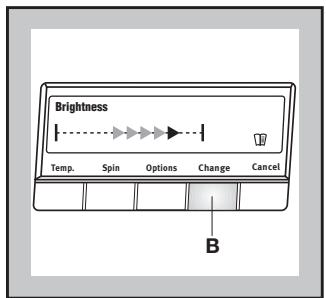
The Brightness setting allows you to modify the backlight intensity of the display.
Example:
- Enter the Menu option and select the Brightness setting.
- Use the Change button to set up the desired brightness level.
Note:
At the end of the programme if no button is pressed for approximately 10 minutes the backlight intensity goes off.
9 START/PAUSE button
natural_image
Simple diagram with a circle, a diamond, and a small circle inside a square frame (no text or symbols)This button has 2 functions:
- Start: after you have selected the desired programme and options, press this button to start the washing machine. The light close to the button will stop flashing and remain lit.
If you have selected a delay time option, the countdown will begin and will be shown on the display.
- Pause: when you press this button again, the programme in progress is interrupted. The light close to the button will start flashing. To restart the programme, press the button again.
When you PAUSE the cycle, it becomes possible to open the door if:
- The washing machine is not in the heating phase;
• The level of the water is not high;
• The drum is not turning.
If these requirements are met, the door locked light will go off.
Important!
You must set the washing machine to PAUSE before you make any change to the options.
PROGRAMME INFORMATION
Wool 📋 and Handwash 📋
Washing programmes for machine washable wool as well as for hand washable woollens and delicate fabrics with the “hand washing” care symbol.
Rinse
With this programme it is possible to rinse and spin garments which have been washed by hand.
The machine performs 3 rinses, followed by a final spin at maximum speed.
The spin speed can be reduced by depressing Spin button. The final spin is foreseen only for cotton items as in the spin programme.
Drain ↓
For draining out the water of the last rinse in programmes with the Rinse hold ☐ or Night cycle option ⓣ.
First turn press the button Cancel 3 times, then select the Drain programme and depress the Start/Pause button.
Spin ©
Separate spin at maximum speed for hand washed garments. Use this for cotton items. You can reduce the speed by means of Spin button to adapt it to the fabrics to be spun.
Mini 30'
This is a complete programme that can be combined with the following options: spin speed reduction, no spin, rinse hold or night cycle, delayed start.
To be used for laundry which is lightly soiled or which needs freshening up.
Max load 3 kg.
Washing temperature 30°C
Programme duration: 30 minutes
Final spin speed 700 r.p.m.
i Washing hints
Sorting the laundry
Follow the wash code symbols on each garment label and the manufacturer's washing instructions.
Sort the laundry as follows:
whites, coloureds, synthetics, delicates, woollens.
Temperatures
95° for normally soiled white cottons and linen (e.g. tea cloths, towels, tablecloths, sheets...)
60° for normally soiled, colour fast garments (e.g. shirts, night dresses, pyjamas....) in linen, cotton or synthetic fibres and for lightly soiled white cotton (e.g. underwear).
※ (cold) for delicate items (e.g. net curtains), mixed 30°-40° laundry including synthetic fibres and
woollens bearing the label «pure new wool, machine washable, non-shrink». The wool wash cycle of this machine has been approved by Woolmark for the washing of machine washable Woolmark products provided that the garments are washed according to the instructions on the garment label and those issued by the manufacturer of this washing machine. M9604.
Other types of wool and laundry marked with the “handwash” symbol 🏠 should be washed in programme 🔒.
Before loading the laundry
Never wash whites and coloureds together. Whites may lose their “whiteness” in the wash.
New coloured items may run in the first wash; they should therefore be washed separately the first time.
Make sure that no metal objects are left in the laundry (e.g. hair clips, safety pins, pins).
Button up pillowcases, close zip fasteners, hooks and poppers. Tie any belts or long tapes.
Remove persistent stains before washing. Rub particularly soiled areas with a special detergent or detergent paste.
Treat curtains with special care. Remove hooks or tie them up in a bag or net.
Maximum loads
Recommended loads are indicated in the programme charts.
General rules:
Cotton, linen: drum full but not too tightly packed;
Synthetics: drum no more than half full;
Delicate fabrics and woollens: drum no more than one third full.
Washing a maximum load makes the most efficient use of water and energy.
For heavily soiled laundry, reduce the load size.
Laundry weights
The following weights are indicative:
| bathrobe | 1200 g |
| napkin | 100 g |
| quilt cover | 700 g |
| sheet | 500 g |
| pillow case | 200 g |
| tablecloth | 250 g |
| towelling towel | 200 g |
| tea cloth | 100 g |
| night dress | 200 g |
| ladies' briefs | 100 g |
| man's work shirt | 600 g |
| man's shirt | 200 g |
| man's pyjamas | 500 g |
| blouse | 100 g |
| men's underpants | 100 g |
Removing stains
Stubborn stains may not be removed by just water and detergent. It is therefore advisable to treat them prior to washing.
Blood: treat fresh stains with cold water. For dried stains, soak overnight in water with a special detergent then rub in the soap and water.
Oil based paint: moisten with benzine stain remover, lay the garment on a soft cloth and dab the stain; treat several times.
Dried grease stains: moisten with turpentine, lay the garment on a soft surface and dab the stain with the fingertips and a cotton cloth.
Rust: oxalic acid dissolved in hot water or a rust removing product used cold. Be careful with rust stains which are not recent since the cellulose structure will already have been damaged and the
fabric tends to hole.
Mould stains: treat with bleach, rinse well (whites and fast coloureds only).
Grass: soap lightly and treat with bleach (whites and fast coloureds only).
Ball point pen and glue: moisten with acetone (*), lay the garment on a soft cloth and dab the stain.
Lipstick: moisten with acetone as above, then treat stains with methylated spirits. Remove any residual marks from white fabrics with bleach.
Red wine: soak in water and detergent, rinse and treat with acetic or citric acid, then rinse. Treat any residual marks with bleach.
Ink: depending on the type of ink, moisten the fabric first with acetone (*), then with acetic acid; treat any residual marks on white fabrics with bleach and then rinse thoroughly.
Tar stains: first treat with stain remover, methylated spirits or benzine, then rub with detergent paste.
(*) do not use acetone on artificial silk.
Detergents and additives
Good washing results also depend on the choice of detergent and use of the correct quantities to avoid waste and protect the environment. Although biodegradable, detergents contain substances which, in large quantities, can upset the delicate balance of nature.
The choice of detergent will depend on the type of fabric (delicates, woollens, cottons, etc.), the colour, washing temperature and degree of soiling.
All commonly available washing machine detergents may be used in this appliance:
- powder detergents for all types of fabric,
- powder detergents for delicate fabrics (60°C max) and woollens,
- liquid detergents, preferably for low temperature wash programmes (60°C max) for all types of fabric, or special for woollens only.
The detergent and any additives must be placed in the appropriate compartments of the dispenser drawer before starting the wash programme.
If using concentrated powder or liquid detergents, a programme without prewash must be selected.
Pour liquid detergent into the dispenser drawer compartment marked Ⓗ just before starting the programme.
Any fabric softener or starching additives must be poured into the compartment marked ✿ before starting the wash programme.
Follow the product manufacturer's recommendations on quantities to use and do not exceed the «MAX» mark in the detergent dispenser drawer.
Quantity of detergent to be used
The type and quantity of detergent will depend on the type of fabric, load size, degree of soiling and hardness of the water used.
Water hardness is classified in so-called “degrees” of hardness. Information on hardness of the water in your area can be obtained from the relevant water supply company, or from your local authority.
Follow the product manufacturers' instructions on quantities to use.
Use less detergent if:
- you are washing a small load,
– the laundry is lightly soiled,
– large amounts of foam form during washing.
Degrees of water hardness
| Level | Characteristic | Degrees | |
| German °dH | French °T.H. | ||
| 1 | soft | 0-7 | 0-15 |
| 2 | medium | 8-14 | 16-25 |
| 3 | hard | 15-21 | 26-37 |
| 4 | very hard | more than 21 | more than 37 |
i International wash code symbols
These symbols appear on fabric labels, in order to help you choose the best way to treat your laundry.
Energetic wash  Delicate wash Delicate wash | 95Max. wash temperature 95°C | 60Max. wash temperature 60°C | 40Max. wash temperature 40°C | 30Max. wash temperature 30°C | Hand wash | Do not wash at all |
| 60 | 40 | 30 |
 |  |  |
| Bleaching | Bleach in cold water | Do not bleach |
 |  |  |  |  |
| Ironing | Hot iron max 200°C | Warm iron max 150°C | Lukewarm iron max 110°C | Do not iron |
 |  |  |  |  |
| Dry cleaning | Dry cleaning in all solvents | Dry cleaning in perchlorethylene, petrol, pure alcohol, R 111 & R 113 | Dry cleaning in petrol, pure alcohol and R 113 | Do not dry clean |
 |  |  |  |  high temperature high temperature low temperature low temperature |  |
| Drying | Flat | On the line | On clothes hanger | Tumble dry | Do not tumble dry |

Operating sequence
Before washing your first load of laundry, we recommend that you run a cotton cycle at 95irc C, with the machine empty, in order to remove any manufacturing residue from the drum and tub.
Pour half a measure of detergent into the main wash compartment and start up the machine.
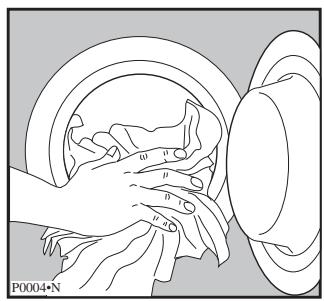
1. Place the laundry in the drum
Open the door.
Place the laundry in the drum, one item at a time, shaking them out as much as possible.
Close the door.
natural_image
Illustration of hands cleaning a circular object with rings (no text or symbols)2. Measure out the detergent
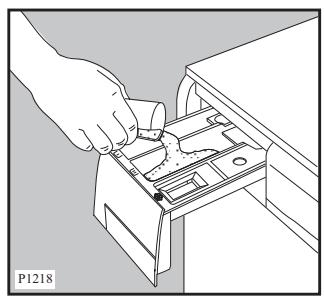
Pull out the dispenser drawer until it stops. Measure out the amount of detergent recommended by the manufacturer in a graduated cup and pour it into the main wash compartment Ⓗ.
If you wish to carry out the prewash, pour detergent into the appropriate compartment marked Ⓞ.
3. Measure out the additive
If required, pour fabric softener into the compartment marked ⚙, without exceeding the «MAX» mark.
natural_image
Illustration of a hand using a tool to adjust or install electronic components into a device (no text or symbols visible)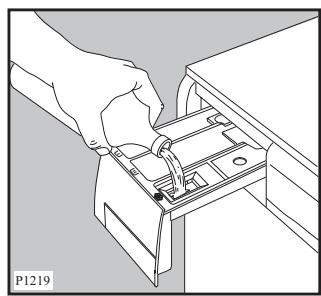
natural_image
Line drawing of a hand inserting a device into a drawer (no text or symbols)4. Switch the machine on
Depress the On/Off button to switch the appliance on.
The display light up and will show the message «Select a programme» unless the programme has been erased by pressing three times the Cancel button at the end of the previous washing cycle.
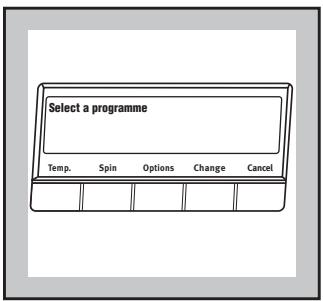
Switching the machine on for the first time LANGUAGE
When switching on the appliance for the first time you must set the language in which you want the indicators in the display to appear.
Important!
If the display is not showing any language, the appliance has already been switched on once. In such case, go to the chapter «Language» if you would like to change the language setting.
Example:
- Press the Change button until the desired language appears in the display.
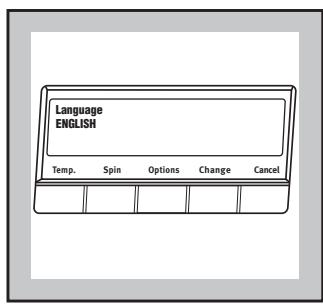
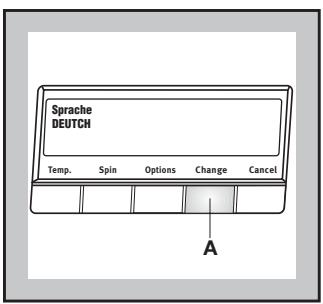
- Press the Cancel button to confirm the selection.
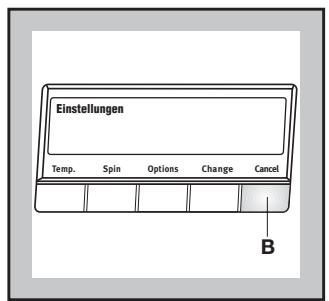
All indicators in the display will appear in this language from now on.
Note:
If the undesired language has been set, select first a washing programme and then press contemporary
Spin + Options buttons for about 3 seconds in order to change the language.
Follow the instructions as before.
SETTING THE TIME
You should set the time prior to the first wash and when changing to and from daylight savings time.
See «Clock setting», Menu.
5. Select the desired programme
Press the buttons Fabric and Special programmes repeatedly to select the desired programme.
The relevant message will appear in the display.
The display will show the END CYCLE TIME of the selected programme, calculated on the basis of the maximum load for each type of fabric.
The Start/Pause button ◆ light will start flashing.
If the load of laundry to be washed is small, at the beginning of the cycle the display will still indicate the END CYCLE relevant to the maximum load. The duration value will be gradually adjusted during the execution of the cycle.
6. Select the temperature
Press the Temp. button if you wish to select a temperature value different from the one proposed by the washing machine.
The message of the maximum available temperature appears on the second row of the display for 5 seconds (instead of «cycle end at»). In the corner of the third row appears the indication of the selected temperature.
7. Select the Spin Speed "Spin", the Rinse Hold 📋 or Night cycle 🌐
Press the Spin button repeatedly, in order to select the desired spin speed or No Spin «O» or the Rinse Hold ☐ or the Night Cycle ⚙ options. The relevant message will appear on the second row of the display for 5 seconds. The selected spin level will be shown on the third row next to the spin button.
If you select the Rinse Hold or Night Cycle options, the machine will stop at the end of the programme with the water still in the tub.
8. Select the desired options
Depress the relevant buttons to select the required options. Depending on the selected programme only certain options are available and shown during the selection phase.
Note:
Not all the options are compatible between themselves. The incompatible option icons will disappear.
9. Select the DELAY TIME
Before you start the programme, if you wish the starting to be delayed, choose the DELAY option. The selected delay time value (up to 20 hours) will appear on the display while selecting.
The end cycle will be updated and shown on the relative position of the display.
10. Start the programme
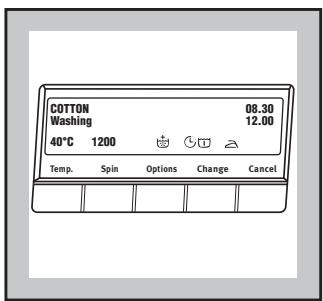
Press the Start/Pause button ⏻. The relevant light will stop flashing. The message relevant to the phase that is in progress will be shown in the display. If you have chosen a delayed start, the washing machine will begin the countdown.
11. How to change an option or a programme during its cycle
If the programme has already started, before you make any change, you must pause the washing machine by pressing the Start/Pause button ⏻. It is possible to change any option before the programme carries it out.
Changing a running programme is possible only by cancelling it and selecting a new programme. Depress twice the button Cancel to cancel the running programme, select the new programme and start it by depressing the Start/Pause button ⏻. The washing water remains in the tub.
Note: To drain the water before starting the new cycle you have to cancel the programme and select the Drain programme.
12. Interrupting a programme
Depress the Start/Pause button Ⓐ to interrupt a programme which is running. Depress the same button to start it again.
13. How to open the door during the cycle of a programme
You can open the door, after having set the washing machine to PAUSE, provided the following conditions exist:
- the washing machine is not in the heating phase beyond 55irc C;
• the level of the water is not high;
• the drum is not turning.
If these requirements are met, when you pause the washing machine, the door locked light will go off and the relevant message appears in the display: the door can be opened.
Should it not be possible to open the door, the «Door locked» message appears in the display, should it be absolutely necessary to do so, switch the machine off by depressing the On/Off button. After approximately 3 minutes, you can open the door.
Pay attention to the level and temperature of the water in the washing machine!
When you close the door and press the On/Off button again and then the Start/Pause button ⏻, the washing machine will resume the programme from the point where it had been interrupted.
14. End of programme
At the end of the programme, the washing machine stops automatically, gives an audible signal (if option no sound has not been selected), and displays the relevant message.
If you have selected the ☐ or ⚙ option, the Start/Pause button ⏻ light is off and the «Cycle ended/ Door locked» message appears in the display.
To drain or spin first :
- depress 3 times the Cancel button to cancel the just performed programme and the corresponding light goes off. The display will show the message «Select a programme»,
- select the Drain or Spin programmes.
- depress then the Start/Pause button ⏻.
Attention!
Always cancel the just performed programme. If you omit to do this, the next time you switch the machine on, the display will show the end of the previous washing cycle and the messages «Cycle ended» and «Door openable».
Release of the lock is also indicated by the extinction of the door locked light and by the message «Door openable» being displayed.
When the programme has been completed, an audible signal is given. The Start/Pause button ⏻ light goes off.
Press the On/Off button to switch the machine off. The relevant light will go out.
Remove the laundry from the washing machine. Check whether the drum is completely empty, by rotating it with your hand. The purpose of this is to prevent any items of laundry from remaining accidentally in the drum, where they might get damaged in a subsequent wash (e.g. by shrinking) or bleed colour into another load of laundry. We advise you to close the water supply tap and disconnect the plug from the socket. Leave the door ajar in order to air the washing machine.
Programme table
WASHING PROGRAMMES
| Fabrics | Temperature/Programme | Type of laundry | Additional functions | Consumptions* | |
| Energy kWh | Water It | ||||
| White and coloured cotton |   | Sheets, household linen, towels, tablecloths |    [IMAGE] [IMAGE] | 2.5 | 72 |
| White cotton economy |  | Slightly soiled sheets, household linen, underwear |  [1/2] [1/2] [IMAGE] [IMAGE] | 0.85 | 49 |
| Coloured cotton economy |   | Fast coloured items, for example hand towels, sheets, underwear, tablecloths, shirts, blouses. Normally soiled |   SPIN REDUCTION[IMAGE] SPIN REDUCTION[IMAGE] | 0.95 | 49 |
| Coloured cotton | [TBW6] | Non-fast coloured items, for example underwear, shirts, blouses |     | 0.37 | 49 |
| Synthetics |    | Shirts, blouses, underwear, mixed fabrics | [BTCA] [244A][Y76K] [244A][Y76K] | 0.9 | 54 |
| Delicates |   | Acrylic, viscose, polyester items, curtains |  [ZZKW] [ZZKW]  | 0.5 | 55 |
| Handwash |   | For wool mixtures, silk | [BKGK]  | 0.25 | 55 |
| Wool [IMAGE] |   [GHC6] [GHC6] | Special programme for garments bearing the “Pure new wool, non-shrink, machine washable” label |   [DAZZ] [DAZZ] | 0.35 | 55 |
ECONOMY PROGRAMME
For slightly/normally soiled cottons you can use the relevant Economy programme: you will obtain good washing results by saving energy.
In compliance with EC directive 92/75, the consumption figures indicated on the energy label refer to the E60 wash programme for cotton.
* The consumption data shown on this chart is to be considered purely indicative, as it may vary depending on the quantity and type of laundry, on the inlet water temperature and on the ambient temperature. It refers to the highest temperature for each wash programme.
Programme table
SPECIAL PROGRAMMES
| Programme selector dial position | Programme | Programme description | Additional functions | Wash load max. | Consumptions* | ||
| Energy kWh | Water lt | Duration min. | |||||
| Mini-programme | For lightly soiled fabrics | 2 rinses Short spin | SPIN REDUCTION ☑/☐ | 2 kg | 0.3 | 40 | 30 |
| Rinses | For rinsing hand washed items | 3 rinses with liquid additive, if required Short spin | SPIN REDUCTION ☑/☐ | 5 kg | 0.05 | 57 | 30 |
| Drain | For emptying out the water of the last rinse of programmes with option ☐ | Water draining | / | - | - | 2 | |
| Spin | Separate spin for cotton, synthetics, delicates and wool | Long spin or short spin with spin speed 700 rpm and 500 rpm | SPIN REDUCTION | 5 kg | - | - | 10/6 |
| Reset/Off | For cancelling the programme which is running or to switch the machine off. | / | - | - | - | ||
* The consumption data shown on this chart is to be considered purely indicative, as it may vary depending on the quantity and type of laundry, on the inlet water temperature and on the ambient temperature.
Maintenance
1. Bodywork
Clean the outside of the machine with soap and water only. Rinse with clean water and dry with a soft cloth.
Important: do not use methylated spirits, solvents or similar products to clean the bodywork.
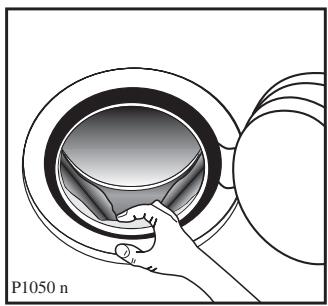
2. Door seal
Check from time to time the door seal and eliminate eventual possible objects that could be trapped in the fold.
natural_image
Illustration of a hand pressing down on a circular component with a label P1050 n (no text or symbols on the diagram itself)3. Detergent dispenser drawer
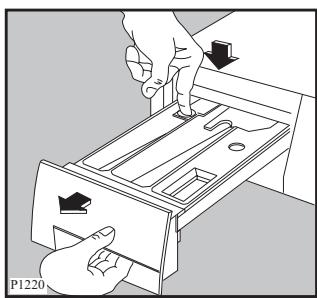
After a while, detergents and fabric softeners leave deposits in the drawer.
Clean the drawer from time to time by rinsing it under a running tap. To remove the drawer from the machine, press the button in the rear left-hand corner.
To facilitate cleaning, the top part of the additive compartment can be removed.
natural_image
Illustration of hands operating a device with arrows indicating direction (no text or symbols)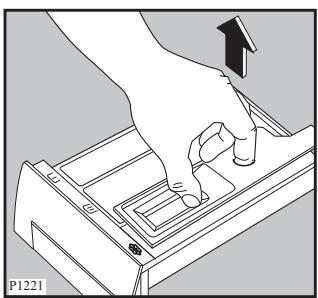
natural_image
Illustration of a hand pressing down on a mechanical component with an arrow indicating force (no text or symbols present)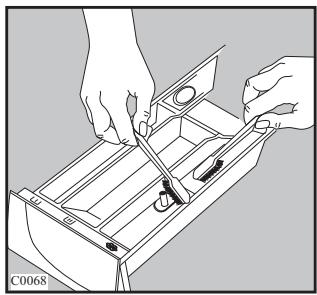
natural_image
Illustration of hands using a tool to adjust or install a mechanical component (no text or symbols visible)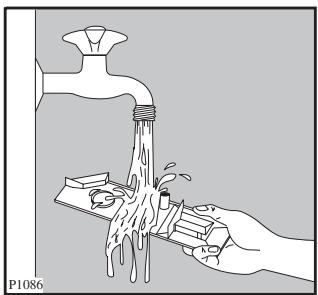
natural_image
Illustration of a hand using a tool to clean water from a faucet, with no text or symbols present.4. Water inlet filter
If you notice that the machine is taking longer to fill, check that the filter in the water inlet hose is not blocked.
Turn off the water tap.
Unscrew the hose from the tap.
Clean the filter with a stiff brush.
Screw the hose back onto the tap.
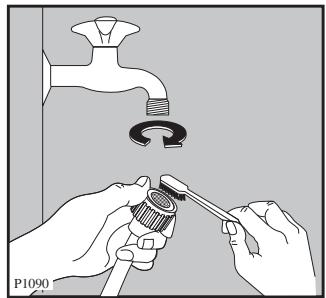
natural_image
Illustration of hands using a screwdriver to adjust a wall fixture with a faucet and valve (no text or symbols)5. Cleaning the filter
The water drain filter
A clean filter is important for the correct operating of the machine, and should therefore be cleaned after every washing programme.
Open the filter door by pulling it towards the right. Place a container under the filter to catch any spillage.
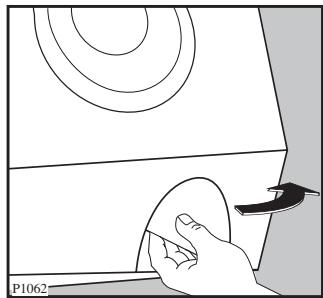
natural_image
Hand holding a circular object with concentric rings above a rectangular panel, no text or symbols visibleRelease the emergency emptying hose, place it in the container, and remove its cap by unscrewing it.
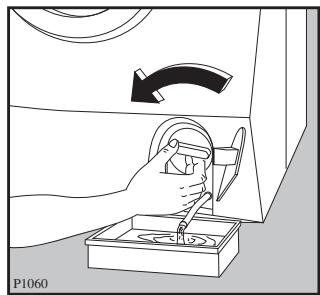
natural_image
Illustration of a hand using a tool to adjust or install a component, with no visible text or symbols.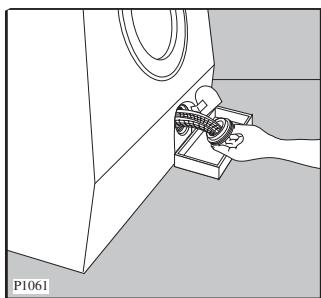
natural_image
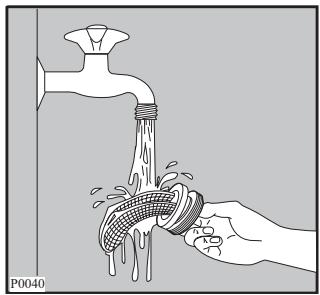
Illustration of a hand operating a mechanical device near a container (no text or symbols visible)Clean the filter under a running tap, then refit it, screwing it fully in.
natural_image
Illustration of a hand washing a faucet with water flowing from it, no text or symbols presentPut the cap back on the emergency emptying hose, place the latter back in its seat. Close the filter door.
Warning
When the appliance is in use and depending on the programme selected there can be hot water in the pump. Never remove the pump cover during a wash cycle, always wait until the appliance has finished the cycle, and is empty. When replacing the cover, ensure it is securely retightened so as to stop leaks and young children being able to remove it.
6. Emergency emptying out
If the water is not discharged, proceed as follows to empty out the machine:
- pull out the plug from the power socket;
- close the water tap;
- if necessary, wait until the water has cooled down;
- open the pump door;
- place a bowl on the floor and place the end of the emergency emptying hose into the bowl. Remove its cap. The water should drain by gravity into the bowl. Whe the bowl is full, put the cap back on the hose. Empty the bowl. Repeat the procedure until water stops flowing out;
- clean the pump if necessary as previously described;
- replace the emergency emptying hose in its seat after having plugged it;
- screw the pump cover again and close the door.
7. Frost precautions
If the machine is installed in a place where the temperature could drop below 0irc C, proceed as follows:
- Remove the plug from the socket.
- Close the water tap and unscrew the water inlet hose from the tap.
- Place the end of the emergency emptying hose and that of the inlet hose in a bowl placed on the floor and let water drain out.
- Screw the water inlet hose back on and reposition the emergency emptying hose after having put the cap on again.
By doing this, any water remaining in the machine is removed, avoiding the formation of ice and, consequently, breakage of the affected parts.
When you use the machine again, make sure that the ambient temperature is above 0irc C.
Something not working?
Problems which you can resolve yourself.
During machine operation it is possible that one of the following messages appears on the display and at the same time an acoustic signal will sound:
Problem with the water supply .....“No incoming water. Check tap & hose”
Problem with water draining ......“No drain. Check drain hose /filter”
Door open ......“Door not closed. Please check”
Once the problem has been eliminated, press the START/PAUSE button ⏻ to restart the programme. If after all checks, the problem persists, contact your local Service Centre.
| Problem | Possible cause |
| The machine does not start up: | The door is not firmly closed.(Door not closed.Please check)The machine is not plugged in or there is no power at the socket.The main fuse has blown.The Start/Pause button has not been depressed.The Delay Start option has been selected. |
| The machine does not fill: | The water tap is closed. (No incoming water.Check tap & hose)The inlet hose is squashed or kinked. (No incoming water. Check tap & hose)The filter in the inlet hose is blocked. (No incoming water. Check tap & hose)The door is not properly closed. (Door not closed. Please check) |
| The machine fills then empties immediately: | The end of the drain hose is too low. Refer to relevant paragraph in “water drainage” section. |
| The machine does not empty and/or does not spin: | The drain hose is squashed or kinked.The RINSE HOLD option ☐, NIGHT CYCLE ⚙ or NO SPIN «O» has been selected.The drain pump is clogged. (No drain. Check rain hose /filter) |
| There is water on the floor: | Too much detergent or unsuitable detergent (creates too much foam) has been used.Check whether there are any leaks from one of the inlet hose fittings. It is not always easy to see this as the water runs down the hose; check to see if it is damp.The drain hose is damaged.The cap on the emergency emptying hose has not been replaced after cleaning the filter.The pump has not been fully screwed in after cleaning. |
| ·Unsatisfactory washing results: | ·Too little or too much detergent has been used.·An unsuitable detergent has been used.·Stubborn stains have not been treated prior to washing.·The correct programme/temperature was not selected.·Excessive laundry load. |
| ·Water is not visible in the machine: | ·The machine, which is the result of modern technology, runs in a very economical way with low water consumption. Performance is nevertheless excellent. |
| ·Spinning starts late or the machine does not spin: | ·The electronic unbalance detection device has cut in because the laundry is not evenly distributed in the drum. The laundry is redistributed by reverse rotation of the drum. This may happen several times before the unbalance disappears and normal spinning can resume. If, after 10 minutes, the laundry is still not evenly distributed in the drum, the machine will not spin. In this case, redistribute the load manually and select the spin programme. |
| ·The machine vibrates or is noisy: | ·The transit bolts and packing have not been removed.·The support feet have not been adjusted.·The laundry is not evenly distributed in the drum.·Maybe there is very little laundry in the drum. |
| ·The door will not open: | ·The water level is above the bottom edge of the door.·The machine is heating the water.·The drum is turning.The door could be opened only when «Door openable» message appears in the display and the door locked light has gone off. |
| ·The machine makes an unusual noise: | ·The machine is fitted with a commutator motor which improves machine performance. |
If you are unable to identify or solve the problem, contact our service centre. Before telephoning, make a note of the model, serial number and purchase date of your machine: the Service Centre will require this information.

From the Electrolux Group. The world's No. 1 choice.
The Electrolux Group is the world's largest producer of powered appliances for kitchen, cleaning and outdoor use. More than 55 million Electrolux Group products (such as refrigerators, cookers, washing machines, vacuum cleaners, chain saws and lawn mowers) are sold each year to a value of approx. USD 14 billion in more than 150 countries around the world.
- Gentile cliente,
- Posizionamento
- Pannello comandi
- Mobile
- Chère cliente, Cher client,
- Débridage
- Emplacement
- Arrivée d'eau
- HORLOGE
- Dosage de la lessive
- La pompe de vidange
- Hinweis:
- Kaltwasseranschluss
- Taste Ein/Aus
- Transport damages
- Contents
- Installation
- Use
- General safety
- Child safety
- Packaging materials
- Machine
- Tips for environmental protection
- Unpacking
- Positioning and levelling
- Water inlet
- Important!
- Water drainage
- Electrical connection
- Your new washing machine
- Description of the appliance
- Door locked light
- Detergent dispenser drawer
- Control panel
- On/Off button
- Mains-on light
- 3/4 Fabric and Special programmes buttons
- Handwash and Wool
- Display
- Temperature button (Temp.)
- Spin speed button (Spin)
- - Drain
- - Spin
- Memory 1 and Memory 2
- SOUND
- RINSE +
- LANGUAGE
- CLOCK
- CONTRAST
- BRIGHTNESS
- Note:
- START/PAUSE button
- PROGRAMME INFORMATION
- Wool 📋 and Handwash 📋
- Rinse
- Drain ↓
- Spin ©
- Mini 30'
- i Washing hints
- Sorting the laundry
- Temperatures
- Before loading the laundry
- Make sure that no metal objects are left in the laundry (e.g. hair clips, safety pins, pins).
- Maximum loads
- Laundry weights
- Removing stains
- Detergents and additives
- Quantity of detergent to be used
- i International wash code symbols
- Operating sequence
- Place the laundry in the drum
- Measure out the detergent
- Measure out the additive
- Switch the machine on
- Switching the machine on for the first time LANGUAGE
- SETTING THE TIME
- Select the desired programme
- Select the temperature
- Select the Spin Speed "Spin", the Rinse Hold 📋 or Night cycle 🌐
- Select the desired options
- Select the DELAY TIME
- Start the programme
- How to change an option or a programme during its cycle
- Interrupting a programme
- How to open the door during the cycle of a programme
- Pay attention to the level and temperature of the water in the washing machine!
- End of programme
- Attention!
- Programme table
- WASHING PROGRAMMES
- ECONOMY PROGRAMME
- Maintenance
- Bodywork
- Door seal
- Detergent dispenser drawer
- Water inlet filter
- Cleaning the filter
- The water drain filter
- Warning
- Emergency emptying out
- Frost precautions
- Something not working?
- From the Electrolux Group. The world's No. 1 choice.
Brand : ZANUSSI
Model : ZWF-1650
Category : Washing machine