
HG07904 - Thermometers AURIOL - Free user manual and instructions
Find the device manual for free HG07904 AURIOL in PDF.


| Product Type | Weather Station |
| Dimensions | 120 x 80 x 20 mm |
| Weight | 200 g |
| Power Supply | 2 x AAA batteries (not included) |
| Indoor Temperature Range | -10°C to 50°C |
| Outdoor Temperature Range | -20°C to 60°C |
| Humidity Range | 20% to 95% RH |
| Display | LCD screen with backlight |
| Clock Function | Yes, with alarm and snooze |
| Wireless Outdoor Sensor | 433 MHz transmission, up to 30 m range |
| Weather Forecast | Display of weather symbols (sunny, cloudy, rainy) |
| Mounting Options | Table stand or wall mount |
| Maintenance | Clean with a soft, dry cloth |
| Safety Precautions | Keep away from water and heat sources; not a toy |
| Spare Parts | Batteries, outdoor sensor (sold separately) |
| Repairability | Battery replacement by user; other repairs by authorized service |
| Energy Efficiency | Low battery indicator |
Frequently Asked Questions - HG07904 AURIOL
User questions about HG07904 AURIOL
0 question about this device. Answer the ones you know or ask your own.
Ask a new question about this device
Download the instructions for your Thermometers in PDF format for free! Find your manual HG07904 - AURIOL and take your electronic device back in hand. On this page are published all the documents necessary for the use of your device. HG07904 by AURIOL.
USER MANUAL HG07904 AURIOL
Operation and Safety Notes
DIGITAL
Operation and Safety Notes Page 5
List of pictograms used....Page 6
Introduction Page 6
Proper use ...... Page 7
Supply scope....Page 7
Description of parts ...... Page 7
Technical data...... Page 9
Safety instructions......Page 10
Safety instructions for batteries /
rechargeable batteries....Page 12
Before initial use......Page 14
Mounting...... Page 15
Operation Page 15
Setting the temperature memory/
time zone/ time/ date manually ...... Page 15
Setting the alarm time...... Page 17
Select Celsius / Fahrenheit ...... Page 19
Activate / deactivate ice warning ...... Page 19
Call up the temperature memory......Page 20
Delete the temperature memory ...... Page 20
Replacing the battery....Page 21
Troubleshooting......Page 21
Cleaning and care ...... Page 23
Disposal Page 23
Warranty and service ...... Page 25
Warranty Page 25
Warranty claim procedure......Page 26
Service...... Page 27
| List of pictograms used | |
 | Direct current / voltage |
 | Battery included |
 | CE mark indicates conformity with relevant EU directives applicable for this product. |
DIGITAL THERMOMETER
Introduction
We congratulate you on the purchase of your new product. You have chosen a high quality product. The instructions for use are part of the product. They contain important information concerning safety, use and disposal. Before using the product, please familiarise yourself with all of the safety information and instructions for use. Only use the product as described and for the specified
applications. If you pass the product on to anyone else, please ensure that you also pass on all the documentation with it.
Proper use

This product is for indoor use only. The product is only suitable for use in private households and is not intended for commercial use.
Supply scope
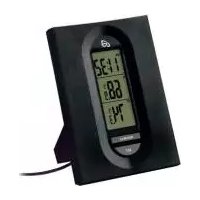
1 x Digital thermometer with outside sensor and 1.9 m cable
1 x 1.5 V = AA battery
1 x Operating manual
• Description of parts
Please refer to the fold out page.
1 Inside temperature display 2 Ice warning symbol 3 Outdoor temperature display 4 Time display 5 Alarm symbol
6 Snooze symbol 7 SNZ button 8 ALM button 9 °C/°F/ ▼ button 10 button 11 TIME button 12 Digital thermometer 13 Low battery symbol 15 Battery compartment 16 Reset button 17 Stand 18 Outside sensor
14 Battery compartment cover
Displays
IN = Inside temperature
OUT = Outside temperature
MAX = Stored maximum temperature
MIN = Stored minimum temperature

Ice warning
PM = Afternoon (time in 12-hour mode)

Alarm function

Snooze function

Low battery symbol
Technical data
Operating voltage: 1.5 V
Type of battery: 1.5 V=, AA
Inside temperature measuring range: -10 °C to +50 °C
Outside temperature measuring range: -50 °C to +70 °C
Tolerance: (-50 °C to 0 °C) ±2 °C (0 °C to +30 °C) ±1 °C (+30 °C to +70 °C) ±2 °C
Ice warning signal range: -1 °C to +3 °C
Outside sensor
cable length: 1.9 m
Outside sensor: IP44 (splash proof)

Safety instructions
PLEASE KEEP ALL SAFETY INSTRUCTIONS AND INSTRUCTIONS FOR USE FOR FUTURE REFERENCE!!

This product can be used by children age 8 years and up, as well as by persons with reduced physical, sensory or mental capacities or lacking experience and/or knowledge, so long as they are supervised or instructed in the safe use of the product and understand the associated risks. Do not allow children to play with the product. Cleaning and user maintenance should not be performed by children without supervision. The product is not a toy.

WARNING! Do not place the product anywhere near an airbag, since this may result in injury if the airbag is activated.
- Do not place the product directly in the drive windscreen area. This can restrict visibility and distract the driver.
- Do not allow yourself to become distracted from concentrating on the traffic by the displays.
- Check all parts to ensure that they are intact. Mounting damaged parts can result in injury.
- Check that all parts are assembled correctly. Improper assembly can result in injury.
■ Do not expose the product to:
• strong vibrations, - high mechanical loads, - moisture.
This product has delicate electronic components. This means that if it is placed near an object that transmits radio signals, it could cause interference. This could include, for example, cellular phones, walkie talkies, CB radios, remote controls and microwaves. If the display indicates a problem, move such objects
away from it. Electrostatic charge can cause the product to fail. In cases of the product failing to work press the RESET button 16 to reset the product, or remove the battery for a short while and then replace it.

Safety instructions for batteries /rechargeable batteries
DANGER TO LIFE! Keep batteries out of reach of children. If accidentally swallowed seek immediate medical attention.
■ Swallowing may lead to burns, perforation of soft tissue, and death. Severe burns can occur within 2 hours of ingestion.

DANGER OF EXPLOSION! Never recharge non-rechargeable batteries. Do not short-circuit batteries or open them. Overheating, fire or bursting can be the result.
■ Never throw batteries into fire or water. Do not exert mechanical loads to batteries. - Do not exert mechanical loads to batteries / rechargeable batteries.
Risk of leakage of batteries / rechargeable batteries
- Avoid extreme environmental conditions and temperatures, which could affect batteries, e.g. radiators / direct sunlight.
- Avoid contact of leaked chemicals with skin, eyes and mucous membranes. In the event of contact with battery acid, thoroughly flush the affected area with plenty of clean water and seek immediate medical attention.

WEAR PROTECTIVE GLOVES! Leaked
or damaged batteries can cause burns on contact with the skin. Wear suitable protective gloves at all times if such an event occurs.
In the event of a leakage of batteries / rechargeable batteries, immediately remove them from the product to prevent damage. ■ Remove batteries / rechargeable batteries if the product will not be used for a longer period.
Risk of damage of the product
■ Only use the specified type of battery / rechargeable battery!
- Insert batteries / rechargeable batteries according to polarity marks (+) and (-) on the battery / rechargeable battery and the product. ■ Use a dry lint-free cloth or cotton swab to clean the contacts on the battery / rechargeable battery and in the battery compartment before inserting! ■ Remove exhausted batteries / rechargeable batteries from the product immediately.
●Before initial use
Note: Remove all packaging materials from the product.
■ First remove the protective film from the display of the product. ■ Remove the plastic strip sticking out of the battery compartment 15. ■ The inside and outside temperature and the time are displayed.
Mounting
- Clean the surface on which you wish to mount the digital thermometer 12 with a degreasing and non-abrasive or chemical cleaning agent before mounting it.
- Attach the outside sensor on the window frame outside or behind the front bumper of your motor vehicle.
Pull off the protective film of the adhesive pad (one is on the base of the stand 17, and the other is on the bottom of the outdoor sensor 18). Then affix the product to the surface where you want to mount it.
Operation
Setting the temperature memory/time zone/time/date manually
- Press and hold down the TIME button 11 for about 2 seconds. “- -” flashes on the inside temperature display 1.
- Press the ▲ button 10 or the °C/°F/ ▼ button 9 to switch between the manual reset “--” or daily reset “1d”.
Note: Daily reset: When this setting is made, the minimum and maximum temperatures of the past 24 hours are stored and deleted every day at midnight.
Manual reset: This setting enables you to manually delete the temperatures stored so far.
- Press the TIME button 11 to confirm your settings, "24H" flashes on the time display 4.
- Press the ▲ button 10 or the °C/°F/ ▼ button 9 to switch between 12 and 24 hour mode.
Note: If 24 hr mode is chosen, "0:00" will appear in the time display 4. If 12 hr mode is chosen, "12:00" will appear in the timer display 4.
- Press the TIME button 11 to confirm your settings. Hour flashes on the time display 4.
Note: If you press and hold down the ▲ button 10 or °C/°F/ ▼ button 9, you accelerate the process and reach the desired value more quickly. This quicker method can also be used for making the following settings. If during a period of 20 seconds no buttons are pressed, the display
returns automatically to the normal display.
- Press the ▲ button 10 or the °C/°F/ ▼ button 9 to set the desired value.
- Press the TIME button 11 to confirm your settings.
- Repeat steps 6 and 7 to set the values for minute, year, month and date.
- After this, the display returns to the normal display.
- Setting the alarm time
Press and hold down the ALM button for about 2 seconds.
Note: If an alarm time has been set before, then that previously set alarm time appears in the display. If not, then the display shows 7:00.
The hour display flashes. Press the button 10 or the °C/°F/ ▼ button 9 to set the desired value.
Press the ALM button to confirm your settings. The minute display flashes.
Press the button or °C/°F/ button 9 to set the desired value.
Press the ALM button to confirm your settings and return to the normal display.
Switching the alarm on/off
Press the ALM button to call up the set time.
Press the button 10 or the °C/°F/▼ button 9 once to activate the alarm.
Note: The alarm symbol 5 appears in the display.
The alarm signal sounds as soon as the set alarm time is reached. The alarm signal ceases automatically after a period of 2 minutes.
Press any button to switch off the alarm signal before it switches off automatically.
Note: The alarm signal sounds every day at the set time.
Press the ALM button again to call up the set time.
Press the button 10 or the °C/°F/ button 9 once to deactivate the alarm.
Using the snooze button
Press the SNZ button while the alarm signal is sounding to activate the snooze function.
The alarm signal is silenced and the snooze symbol 6 flashes.
The alarm signal sounds again after approx. 10 minutes. The alarm signal ceases automatically after a period of 2 minutes.
Press any button to switch off the alarm signal before it switches off automatically.
- They indicate the signal range +3 °C to -1 °C. - Press and hold down the °C button 9 for about 2 seconds to activate the ice warning. The ice warning symbol “*” 2 appears in the display.
Press and hold down the °C/°F button 9 again to deactivate the ice warning. The ice warning symbol “*” 2 disappears.
Note: As soon as the outside temperature reaches the signal range, a 15-second warning signal is emitted at 5-minute intervals. In this temperature range, there is a risk of road surfaces becoming slippery, or they may already be slippery. Pay particular attention and drive according to the conditions.
Press any button to switch the warning signal off.
- Call up the temperature memory
In normal display mode, press the button 10 to call up the stored maximum temperature (MAX). Press the button 10 again to call up the stored minimum temperature (MIN). Press the button 10 again or wait approx. 5 seconds to return to the normal display mode.
Delete the temperature memory
In normal display mode, press the button 10 to call up the stored maximum temperature (MAX). Press and hold down the ▲ button 10 for about 2 seconds to delete the stored temperatures. In normal display mode, press button 10 to call up the stored minimum temperature
(MIN). Press and hold down the ▲ button 10 for about 2 seconds to delete the stored temperatures.
Battery state display
The low battery symbol 13 will appear on the inside temperature display 1 if the battery is weak.
- Replacing the battery
- Open the battery compartment on the back of the digital thermometer 12. Remove the old battery and insert the supply battery with the correct polarity.
- Close the battery compartment again.
Troubleshooting
| Error Cause / Remedy | |
| Incorrect temperature | Measurement is impaired, e.g. by direct sunlight, air-conditioning or a fan heater – remove the digital thermometer and the outside sensor from the area of interference. |
| Display diminishes / incorrect temperature is displayed | Discharged battery or dirty battery contacts - clean the contacts and insert battery; replace the battery if necessary. |
| Display is black | Temperatures are outside the measuring range or the product has been exposed to direct sunlight for a long time. |
| Irregular display of figures | Remove the battery and put it back in the battery compartment 15 . |
| Normal functioning of the product may be disturbed by electromagnetic interference. | If so, simply reset the product to resume normal operation as described in chapter “Setting the temperature memory / time zone / time / date manually”, or press the RESET button 16 to reset the product. |
Cleaning and care
- Clean the exterior of the digital thermometer only with a soft, dry cloth. Clean the buttons of the digital thermometer with a brush.
- Do not under any circumstances use liquids or cleaning agents, as they will damage the instrument.
- Clean the outside sensor with a slightly dampened cloth. The outside sensor is only protected against rain from above and splashes of water.
Disposal
The packaging is made entirely of recyclable materials, which you may dispose of at local recycling facilities.

Observe the marking of the packaging materials for waste separation, which are marked with abbreviations (a) and numbers (b) with following meaning: 1–7: plastics / 20–22: paper and fibreboard / 80–98: composite materials.

The product and packaging materials are recyclable, dispose of it separately for better waste treatment. The Triman logo is valid in France only.

Contact your local refuse disposal authority for more details of how to dispose of your worn-out product.

To help protect the environment, please dispose of the product properly when it has reached the end of its useful life and not in the household waste.
Information on collection points and their opening hours can be obtained from your local authority.
Faulty or used batteries / rechargeable batteries must be recycled in accordance with Directive 2006/66/EC and its amendments. Please return the batteries / rechargeable batteries and / or the product to the available collection points.

Environmental damage through incorrect disposal of the batteries / rechargeable batteries!
Batteries / rechargeable batteries may not be disposed of with the usual domestic waste. They may contain toxic heavy metals and are subject to hazardous waste treatment rules and regulations. The chemical symbols for heavy metals are as follows: Cd = cadmium, Hg = mercury, Pb = lead. That is why you should dispose of used batteries / rechargeable batteries at a local collection point.
●Warranty and service
Warranty
The product has been manufactured to strict quality guidelines and meticulously examined before delivery. In the event of product defects you have legal rights against the retailer of this product. Your legal rights are not limited in any way by our warranty detailed below.
The warranty for this product is 3 years from the date of purchase. The warranty period begins on the date of purchase. Please keep the original sales receipt in a safe location. This document is required as your proof of purchase.
Should this product show any fault in materials or manufacture within 3 years from the date of purchase, we will repair or replace it – at our choice – free of charge to you. This warranty becomes void if the product has been damaged, or used or maintained improperly.
The warranty applies to defects in material or manufacture. This warranty does not cover product parts subject to normal wear, thus possibly considered consumables (e.g. batteries) or for damage to fragile parts, e.g. switches, rechargeable batteries or glass parts.
●Warranty claim procedure
To ensure quick processing of your case, please observe the following instructions:
Please have the till receipt and the item number (IAN 373028_2104) available as proof of purchase.
You will find the item number on the rating plate, an engraving, on the front page of the instructions for use (bottom left), or as a sticker on the rear or bottom of the product.
If functional or other defects occur, please contact the service department listed either by telephone or by e-mail.
You can return a defective product to us free of charge to the service address that will be provided to you. Ensure that you enclose the proof of purchase (till receipt) and information about what the defect is and when it occurred.
Service
GB Service Great Britain
Tel.: 08000569216
E-Mail: owim@lidl.co.uk
CE
Safety information about batteries / battery packs
EXPLOSION HAZARD!
Improper disposal of batteries / accumulators causes damage to the environment!
Safety instructions
KEEP THE SAFETY INSTRUCTIONS AND ALL OTHER INSTRUCTIONS FOR FUTURE USE!

E-mail address: owim@lidl.ee
CE
List of symbols used......Page 149


- DIGITAL
- LIST OF PICTOGRAMS USED....PAGE
- INTRODUCTION PAGE
- SAFETY INSTRUCTIONS......PAGE
- BEFORE INITIAL USE......PAGE
- MOUNTING...... PAGE
- OPERATION PAGE
- TROUBLESHOOTING......PAGE
- CLEANING AND CARE ...... PAGE
- DISPOSAL PAGE
- WARRANTY AND SERVICE ...... PAGE
- DIGITAL THERMOMETER
- INTRODUCTION
- PROPER USE
- SUPPLY SCOPE
- DESCRIPTION OF PARTS
- DISPLAYS
- TECHNICAL DATA
- SAFETY INSTRUCTIONS
- SAFETY INSTRUCTIONS FOR BATTERIES /RECHARGEABLE BATTERIES
- RISK OF LEAKAGE OF BATTERIES / RECHARGEABLE BATTERIES
- WEAR PROTECTIVE GLOVES! LEAKED
- RISK OF DAMAGE OF THE PRODUCT
- ●BEFORE INITIAL USE
- MOUNTING
- OPERATION
- SETTING THE TEMPERATURE MEMORY/TIME ZONE/TIME/DATE MANUALLY
- SETTING THE ALARM TIME
- SWITCHING THE ALARM ON/OFF
- USING THE SNOOZE BUTTON
- CALL UP THE TEMPERATURE MEMORY
- DELETE THE TEMPERATURE MEMORY
- BATTERY STATE DISPLAY
- REPLACING THE BATTERY
- TROUBLESHOOTING
- CLEANING AND CARE
- DISPOSAL
- ●WARRANTY AND SERVICE
- WARRANTY
- ●WARRANTY CLAIM PROCEDURE
- SERVICE
- GB SERVICE GREAT BRITAIN
- CE
- SAFETY INFORMATION ABOUT BATTERIES / BATTERY PACKS
- EXPLOSION HAZARD
- IMPROPER DISPOSAL OF BATTERIES / ACCUMULATORS CAUSES DAMAGE TO THE ENVIRONMENT
- LIST OF SYMBOLS USED......PAGE
Brand : AURIOL
Model : HG07904
Category : Thermometers