
GDM 1000 - Milling machine GUDE - Free user manual and instructions
Find the device manual for free GDM 1000 GUDE in PDF.


| Product Type | Milling Machine |
| Brand | Güde |
| Model | GDM 1000 |
| Motor Power | 1000 W |
| Power Supply | 230 V ~ 50 Hz |
| Spindle Speed | Variable, 200-2500 rpm |
| Max Drilling Capacity | 25 mm |
| Spindle Stroke | 80 mm |
| Dimensions (L x W x H) | 650 x 400 x 450 mm |
| Weight | 50 kg |
| Frame Material | Cast Iron |
| Main Functions | Milling, drilling, boring, tapping |
| Maintenance and Cleaning | Cleaning after each use, regular lubrication of guides |
| Safety | Emergency stop button, transparent guard |
| Spare Parts and Repairability | Parts available via Güde after-sales service |
| General Information | Precision milling machine for workshop |
Frequently Asked Questions - GDM 1000 GUDE
User questions about GDM 1000 GUDE
0 question about this device. Answer the ones you know or ask your own.
Ask a new question about this device
Download the instructions for your Milling machine in PDF format for free! Find your manual GDM 1000 - GUDE and take your electronic device back in hand. On this page are published all the documents necessary for the use of your device. GDM 1000 by GUDE.
USER MANUAL GDM 1000 GUDE
Deutsch D
Translation of original operating instructions
PROFESSIONAL LATHE
Français F
PROFESSIONELE DRAAIBANK
M a g y a r




Marking
Product safety:
| CE | |
| Product compliance with respective EU standards |
Bans:
| No fire, no open fire and no smoking |
Warning:
| Warning/Caution |
Commands:
| Read instruction manual before use |
Environment Protection:
 |  | |||
| Wastes to be disposed of in a professional manner not to harm the environment. | Cardboard packaging to be collected for recycling. | |||
 | ||||
| Faulty and/or disposed of electrical/electronic appliances to be collected by authorised salvage places. | ||||
Packaging:
 |  | ||
| Keep away from moisture | The package should be held upwards | ||
 | |||
| Fragile | |||
Technical Data:
 |  |
| Connection | Motor |
 |  |
| Point wide | Point height |
 |  |
| Spindle revolutions | Max. turning length |
| Weight |
Scope of Delivery (Fig. 1 and 2)
- Stand
- Machine Bed
- Digital Indicator
- Tailstock
- Centring Point
- Copying Device
- Tool Support
- Carrier Tip
- Rating Plate
- Switch
- Motor
- Shifting Handle
- Face Plate
- Wrench
- Ejecting Broach
- Copying Tool
- T-wrench
- Allen Wrench SW 3, SW 4
Use as designated
The lathe is intended exclusively for working on wood. The machine cannot be used for works other than those for which it has been designed and that are specified in the Operating Instructions. Any other use is a use in conflict with the designation. The manufacturer will not be liable for any consequential damage and injuries. Please be sure to know that the machine has not been designed for industrial purposes.
Guarantee
The guarantee solely covers inadequacies caused by material defect or manufacturing defect. Original payment voucher with the sales date needs to be submitted for any claim in the guarantee period.
The guarantee does not cover any unauthorised use such as appliance overloading, use of violence, damage as a result of any unauthorised interference or caused by foreign items. Failing to follow the operating and assembly instructions and common wear are also not included in the guarantee.
Power

General Safety Instructions
Prior to the initial use of the unit, the operating instructions should be read completely. If in doubt with regard to connection and operation of the unit, consult the manufacturer (servicing department).
FOLLOW THE INSTRUCTIONS BELOW CAREFULLY IN ORDER TO SECURE A HIGH DEGREE OF SAFETY:
CAUTION!
- The unit shall always be fitted on the worktable horizontally, safely and firmly. • The workplace shall be kept clean and sufficiently lit.
- Never use the unit near easily flammable materials, gases or liquids.
- Wear goggles, ear protectors and suitable protection clothing. If necessary, use a breathing mask.
- Do not lean far forward. Always take care that your posture is safe and avoid losing your balance
- Do not overload the machine. The machine operates better and safer under conditions for which it was designed.
- Use proper tools. Tools or auxiliary equipment should be used only for the purpose for which they were intended. Always keep tools in good condition.
- To achieve optimum results and ensure safety during work, it is essential to keep tools always sharp and clean. It is necessary to follow the instructions for lubrication as well as for replacement of accessories.
- Make sure that your stance is stable when working with the unit.
- Keep unauthorized persons, especially children, away from the working area.
- Keep the existing protection devices in place and ensure their proper functioning.
- Make sure that the power cable is not close to rotating parts.
- Never leave the switched-on unit unattended. If you leave the unit, switch it off.
- If the unit is not in use, before maintenance/cleaning or replacement of a tool, unplug it. After use, put away the adjusting key.
- Make sure that the tool is properly secured before turning on the machine. If the unit is not in use, before maintenance/cleaning or replacement of a tool, unplug it.
- Persons unable to operate the appliance due to their physical, sensory, or mental abilities, or their inexperience or lack of knowledge, must not operate it.
- If the appliance or feeder cable shows any sign of visible damage, the appliance must not be put into operation.
- If the feeder cable of the appliance is damaged, it needs to be replaced by the producer or an electrician.
- Repairs of the appliance can only be executed by an electrician. There might be significant risks as a result of unauthorized repairs.
- The same regulations apply for accessories.
Güde GmbH & Co. KG does not answer for damages caused by:
- Appliance damage by mechanical influences and overloading.
- Any changes to the appliance.
- Use for any other purpose than that described in the Operating Instructions.
- Unconditionally follow all safety instructions to prevent accidents and damage.
Emergency procedure
Conduct a first-aid procedure adequate to the injury and summon qualified medical attendance as quickly as possible.
Protect the injured person from further harm and calm them down.
For the sake of eventual accident, in accordance with DIN 13164, a workplace has to be fitted with a first-aid kit. It is essential to replace any used material in the first-aid kit immediately after it has been used.
If you seek help,
state the following pieces of information:
- Accident site
- Accident type
- Number of injured persons
- Injury type(s)
Disposal
The disposal instructions are based on icons placed on the appliance or its package. The description of the meanings can be found in the "Marking" chapter.
Operating staff requirements
The operator must carefully read the Operating Instructions before using the appliance.
Qualification
No special qualification is necessary for using the appliance apart from detailed instruction by a qualified person.
Minimum age
The appliance may only be operated by persons over 16 years of age. An exception includes youngsters operating the appliance within their professional education to achieve necessary skills under teacher's supervision.
Training
Using the appliance only requires appropriate instructions by a professional or reading the Operating Instructions. No special training necessary.
Technical data
| Connection 230 V | |
| Frequency: 50 Hz | |
| Motor power P1: 550 W | |
| Max. turning length: 935 mm | |
| Point height: 140 mm | |
| Point wide: 600 - 2100 rev/min | -1 |
| Turning diameter: Max. 280 mm | |
| Weight: 70,5 kg |
Transportation and Storage

The unit has been designed for stationary use.
Units out of use should be stored in a dry locked room.
Inspection and Maintenance Safety Instructions
The machine will serve as a sufficient aid only if maintained and care for appropriately. Insufficient maintenance and care may result in accidents and injuries.
Assembly
Stand
Assemble the stand according to the figure (Fig. 3). Take care that screws are not tightened at the same time. Thus it is easier to position mounting holes and fix the screws. (See the following schematic drawing)
Introduction
On principle, short-fibred harder wood stored in a dry place is more suitable than long-fibred soft fresh wood. Wood from fruit and leafy trees and walnut trees are very suitable. Prepare the wood preferably by saw cutting for the thickness later required (possibly also by splitting). It should be stored without sun radiation in a dry and properly ventilated room.
Approximate rule for wood drying: for the thickness of 1 cm = 1 year.
Thus one can avoid wood cracking by far.
PREPARATION
Unmachined pieces or wood to be turned must be balance centred between carrying side (machine side) and the side of collateral run (tailstock) to avoid accidents as a result of possible tearing the workpiece off during machining! Pay attention using roundwood or timber coming in parallel direction if possible.
Determine the centre of your unmachined piece by drawing whilst determining the centre using a pin or marking awl and using the ruler or centring angle (available as optional accessory). (Fig. 4)
Fig. 4 A + B:
Centre location over the unmachined piece edges
Fig. 4 C:
Centre location using the centring angle (available as an optional accessory)
Fig. 4 D:
Centre fixation using a hammer and centre punch
Basic terms
Roughing: Thick and strong removal of workpiece material to form a rough contour (revolutions 800-1500 rev/min.).
Smoothing: Tiny, fine chip removal to produce fine contours (revolutions 1500-2000 rev /min.).
Grinding: Final working up the workpiece using abrasive rope or paper (revolutions 0-2000 ot./min.).
Polishing: working up the workpiece using a cloth or fleece with allowance of polishing agents – pastes, oils, agents for wood treatment or greases (available as optional accessory.

Attention!
Pay more attention to machining of a workpiece with grinding and polishing agents due to adhesive forces generated on instruments!
E.g.: Risk of accident resulting from captured and torn off cloth, fleece etc.
Assembled lathe with stand (Fig. 1).
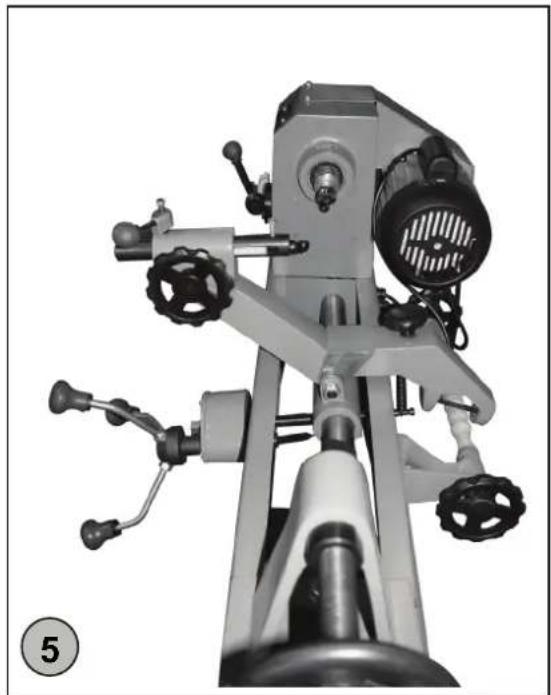
Finally assembled lathe with clamped copying template (Fig. 5).
COPYING ARM INSTALLATION
Insert the copying arm between both holding butt straps located at the slide and shift the joint pin (item 73) to the bearing opening. Tighten nuts at both sides (Fig. 6)
ATTENTION: Do not tighten too firmly, the arm should stay movable.
SLIDING WHEEL INSTALLATION
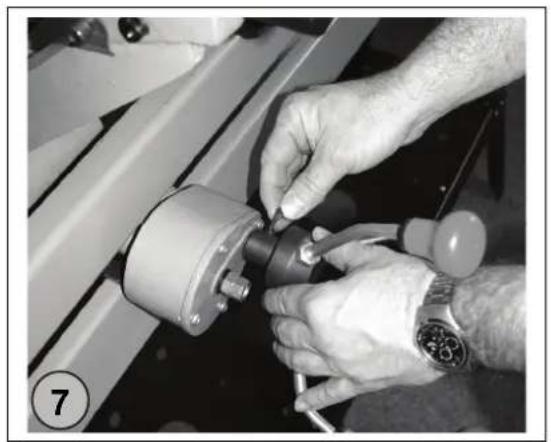
Shift the sliding wheel to the sled axis.
Securing is done using the Allen screw at the circumference of the sliding wheel (Fig. 7).
TOOL SUPPORT INSTALLATION
Mount the supporting tool holder and base plate to the machine bed and tighten. (Fig. 8) Then the tool support is fixed by clamping bolt in the supporting carrier of the tool (Fig. 9). Place the tool support as close to the workpiece as possible.

Attention!
The workpiece must not be in contact with the tool support during turning. Turn the workpiece by hand before you start the work to ensure it runs freely.
Turning
REVOLUTION ADJUSTMENT
Thanks to the special gearbox with variable belt pulleys the machine revolution can be adjusted continuously allowing exact analogue adjustment of revolutions being indicated in digital form at the gearbox. (Fig. 10)
Revolution adjustment must be performed on running machine to avoid the damage of the belt gearbox.
Roughing: 800-1500 U/min.
Smoothing: 1500-2200 U/min.

Attention!
Always lower the machine revolutions to the minimum value before its stopping; its starting again will be made much easier thus.
Roughing and smoothing: lay the turning chisel – see the figure – down on the tool support holding it with both hands firmly and safely and take care that chip removal takes place at the central axis height and sufficient stressing angle is available (see schematic drawing). Use only exactly sharpened and sharp turning tools. (Fig. 11).
CARRYING POINT REMOVAL
To remove the carrying point, direct the ejecting broach from the left side of the machine through the spindle hole (Fig. 12) and strike the carrying point strongly from the cone (this also holds for all clampable tools with conical grip MK2).
TURNING WITH FACE PLATE
To turn plates or bowls, remove the carrying point (Fig. 12) and turn the face plate onto the spindle thread.
ATTENTION: Secure well using both bifurcated wrenches that are part of the delivery!
TIP: The unmachined piece should be cut longer than necessary and fixed to the face plate with screws. (Fix it in the centre to avoid improper balancing!)
Copying turning
For copying, the copying arm must be installed between the tailstock and the carrying point. To place the copying device between the tailstock and the carrying point or face plate, the gripping screws on the tailstock must be dismounted (Fig. 14) and the tailstock must be removed.
Now the gripping plate should be split by loosening both screws (Fig. 15). Having done this, the plates are to be removed (Fig. 16), again replaced behind the copying arm, and the tailstock reinstalled.
The copied original will be clamped between the centring points of the copying grips. Now the moving in (holding-down pressure of the copying arm) can be adjusted using the stressing screw (Fig. 17).
The copying tool should be set to the largest diameter. The workpiece is then moved along the whole length of the copying pattern uniformly until any chip removal occurs. Copying tools are adjusted by turning the hand wheel and secured by clamping screw until the required contour or required diameter is attained (Fig. 18).
Template turning
Copying templates can be made of various materials; veneered plywood is perfectly suitable. The template is similar to the contour of the piece to be turned (Fig. 19).
To use the copying template as a pattern, lift the holding device up and secure it between the centring points of the copying grips (Fig. 20).
Loosen the clamping screws of the holding lath (Fig. 21) to allow stretching the template. During turning, the template is moved along as often as required until the contour is formed at the workpiece.
Servicing
Do you have any technical questions? A claim? Do you need spare parts or the Operating Instructions?
You will be helped quickly and without needless bureaucracy at our webpage www.guede.com in the Service part.
Please help us be able to assist you. To be able to identify your appliance when claimed, we need to know its serial No., order No. and year of production. All these details can be found on the type label. Enter the details below for future reference.
Serial No.:
Order No.:
Year of production:
Tel.: +49 (0) 79 04 / 700-360
Fax: +49 (0) 79 04 / 700-51999
E-Mail: support@ts.guede.com
EU – DECLARATION OF COMPLIANCE
We,
Güde GmbH & Co. KG
Birkichstrasse 6
D-74549 Wolpertshausen
Germany
herewith declare that the following appliance complies with the appropriate basic safety and health requirements of the EU Directives based on its design and type, as brought into circulation by us. In case of alternation of the machine, not agreed upon by us, this declaration will lose its validity.
Machine description: GDM 1000
Article-No.: 11420
• Date/authorised signature: 16.09.11
Applicable EU Directives:
2004/108/E
2006/42/EC

Applicable harmonised standards:
EN 55014-1
EN 55014-2
EN 61000-3-2
EN 61000-3-3
EN ISO 14121-1
EN 61029-1
Symbols:
EC DECLARATION OF CONFORMITY
We,
Güde GmbH & Co. KG
Birkichstrasse 6
D-74549 Wolpertshausen
Germany
ASSEMBLY OF THE PUSH WHEEL

- MARKING
- SCOPE OF DELIVERY (FIG. 1 AND 2)
- USE AS DESIGNATED
- GUARANTEE
- GENERAL SAFETY INSTRUCTIONS
- FOLLOW THE INSTRUCTIONS BELOW CAREFULLY IN ORDER TO SECURE A HIGH DEGREE OF SAFETY
- CAUTION
- GÜDE GMBH & CO. KG DOES NOT ANSWER FOR DAMAGES CAUSED BY
- EMERGENCY PROCEDURE
- DISPOSAL
- OPERATING STAFF REQUIREMENTS
- QUALIFICATION
- MINIMUM AGE
- TRAINING
- TRANSPORTATION AND STORAGE
- INSPECTION AND MAINTENANCE SAFETY INSTRUCTIONS
- ASSEMBLY
- STAND
- INTRODUCTION
- APPROXIMATE RULE FOR WOOD DRYING: FOR THE THICKNESS OF 1 CM = 1 YEAR
- PREPARATION
- FIG. 4 A + B
- FIG. 4 C
- FIG. 4 D
- BASIC TERMS
- ATTENTION
- COPYING ARM INSTALLATION
- SLIDING WHEEL INSTALLATION
- TOOL SUPPORT INSTALLATION
- TURNING
- REVOLUTION ADJUSTMENT
- REVOLUTION ADJUSTMENT MUST BE PERFORMED ON RUNNING MACHINE TO AVOID THE DAMAGE OF THE BELT GEARBOX
- CARRYING POINT REMOVAL
- TURNING WITH FACE PLATE
- COPYING TURNING
- TEMPLATE TURNING
- SERVICING
- EU – DECLARATION OF COMPLIANCE
- SYMBOLS
- EC DECLARATION OF CONFORMITY
- ASSEMBLY OF THE PUSH WHEEL
Brand : GUDE
Model : GDM 1000
Category : Milling machine