
Spiffy S60 - Vacuum Cleaner Simplicity - Free user manual and instructions
Find the device manual for free Spiffy S60 Simplicity in PDF.


| Product type | Canister vacuum cleaner |
| Model | Spiffy S60 |
| Brand | Simplicity |
| Dimensions (L x W x H) | 40 x 30 x 50 cm |
| Weight | 5.2 kg |
| Power supply | 220-240 V, 50 Hz |
| Power | 700 W |
| Collection type | Bagless, 2 L dust container |
| Filtration | Washable HEPA filter |
| Noise level | 78 dB |
| Operating radius | 8 m |
| Cable length | 5 m |
| Included accessories | Combination nozzle, crevice tool, upholstery brush |
| Main functions | Powerful suction, cyclonic system, HEPA filtration |
| Maintenance and cleaning | Empty container after each use, wash HEPA filter every 3 months |
| Safety | Automatic shut-off in case of overheating |
| Spare parts | HEPA filter, replacement bag (optional), belt |
| Repairability | Repairability index 7.5/10 |
| General information | 2-year warranty, European manufacturing |
Frequently Asked Questions - Spiffy S60 Simplicity
User questions about Spiffy S60 Simplicity
0 question about this device. Answer the ones you know or ask your own.
Ask a new question about this device
Download the instructions for your Vacuum Cleaner in PDF format for free! Find your manual Spiffy S60 - Simplicity and take your electronic device back in hand. On this page are published all the documents necessary for the use of your device. Spiffy S60 by Simplicity.
USER MANUAL Spiffy S60 Simplicity
natural_image
Line drawing of a vacuum cleaner with attached circuit board (no text or symbols)Spiffy™
Owner's Manual
S60
Polarization Instructions 3
Parts Identification 4
Vacuum Description....5-6
Assembling the Vacuum 7
Operating the Vacuum....8
Emptying the Dust Cup 9
Cleaning the Dust Cup....10
Replacing the HEPA Media Filter....10
Cleaning the Foam Filters ....11
Troubleshooting....12
Warranty 13
Customer's Record
The model and serial numbers of this product may be found on the back of the unit. You should register your vacuum online at www.SimplicityVac.com as soon as possible for your protection. Also note the model and serial numbers of your unit in the spaces provided below, and retain this book as a permanent record of your purchase.
Model Number ____
Serial Number
Date Purchased ____
This vacuum cleaner is a product of high-quality materials and superior workmanship. We urge you to read these operating instructions carefully before you use this vacuum cleaner in order to obtain the full performance and satisfaction it can offer you.
Save These Instructions
Before you plug in this vacuum cleaner charger, make sure the voltage indicated on the rating plate located on the back of the charger is the same as your local supply.
IMPORTANT SAFETY INSTRUCTIONS
When using an electrical appliance, basic precautions should always be followed, including the following:
READ ALL INSTRUCTIONS BEFORE USING THIS APPLIANCE. FOR HOUSEHOLD USE ONLY.
IMPORTANT:
IMPORTANT. The manufacturer cannot accept responsibility for damage caused when the appliance is not used according to the instructions, or for uses other than those for which it was intended.
WARNING:
To reduce the risk of fire, electric shock, damage or injury:
- Empty the dust cup before the contents reach the “fill line” on the dust cup. Over-filling the dust cup may cause dirt and debris to clog the filter and cause loss of suction.
• Always unplug the vacuum from the electrical outlet before removing the dust cup.
- Do not leave appliance when plugged in. Unplug from outlet when not in use and before servicing.
- WARNING: ELECTRIC SHOCK COULD OCCUR IF USED OUTDOORS OR ON WET SURFACES.
- Do not allow to be used as a toy. Close attention is necessary when used by or near children.
- Use only as described in this manual. Use only manufacturer's recommended attachments.
- Do not use with damaged cord or plug. Or if appliance is not working as it should, has been dropped, damaged, left outdoors, or dropped into water, return it to your Authorized Simplicity Retailer for service.
- Do not unplug by pulling on cord. To unplug, grasp the plug, not the cord.
- Do not pull or carry by cord, use cord as a handle, close a door on the cord, or pull cord around sharp edges or corners. Do not run appliance over cord. Keep cord away from heated surfaces.
- Do not handle plug or appliance with wet hands.
- Do not put any object into openings. Do not use with any opening blocked; keep free of dust, lint, hair and anything that may reduce air flow.
- Keep hair, loose clothing, fingers and all parts of body away from openings and moving parts.
- Do not pick up anything that is burning or smoking, such as cigarettes, matches or hot ashes.
- Do not use without filters in place.
- Turn off all controls before unplugging.
- Do not use to pick up flammable or combustible liquids such as gasoline or use in areas where they may be present.
- Do not attempt to service the unit while appliance is plugged in.
- Do not use vacuum to pick up water or any wet materials.
- Use extra care when cleaning on stairs.
SAVE THESE INSTRUCTIONS
Power Cord, 2-Wire Polarized Cord
To reduce the risk of electric shock, the vacuum is equipped with a polarized alternating current line plug (a plug having one blade wider than the other). This plug will fit into the power outlet only one way. This is a safety feature. If you are unable to insert the plug fully into the outlet, try reversing the plug. If the plug should still fail to fit, contact a qualified electrician to replace the obsolete outlet. Do not defeat the safety purpose of the polarized plug.

natural_image
Line drawing of an electrical plug and its corresponding socket (no text or symbols)State of California Proposition 65 Warnings:
WARNING: This product contains one or more chemicals known to the State of California to cause cancer.
WARNING: This product contains one or more chemicals known to the State of California to cause birth defects or other reproductive harm.
For more information visit www.simplicityvac.com

Replacement Filters
- Genuine HEPA Media and Foam Filter Set Part # RS60F
Rotating Cord Hook
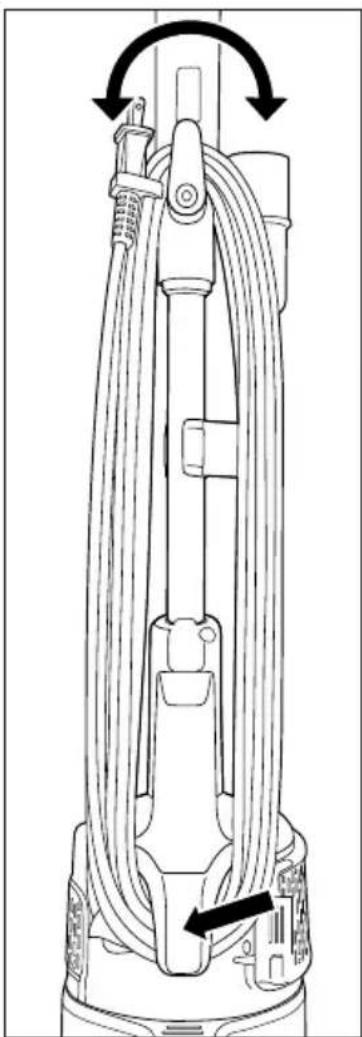
The upper cord hook rotates to allow quick access to the power cord (Fig. 1).
2-Speed On/Off Switch
Push the switch to the "Low Speed" position indicated by the "I". Push the switch to the "High Speed" position indicated by the "II" when more power is required. Push the switch to the "Off" position indicated by the "O" when not in use (Fig. 2).
Telescopic Wand
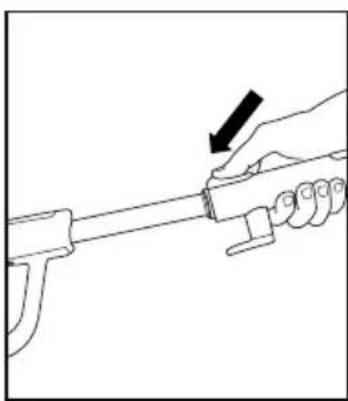
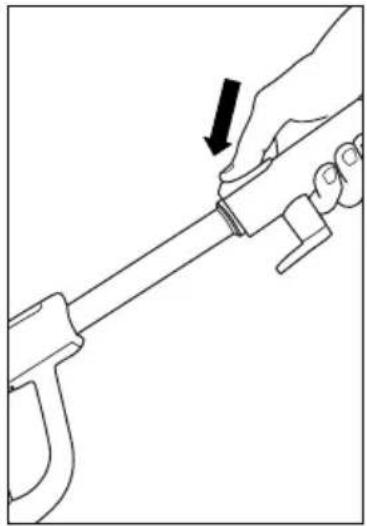
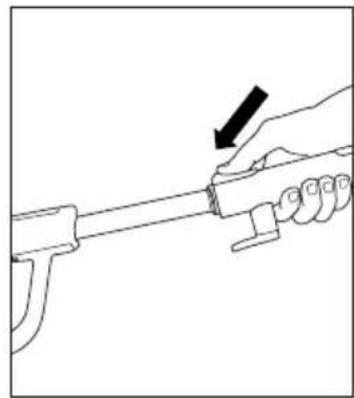
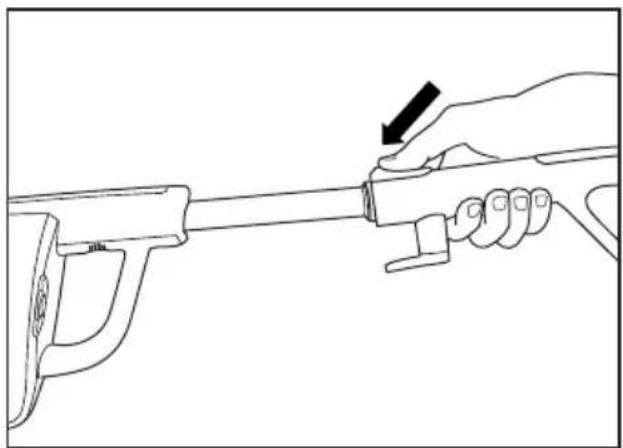
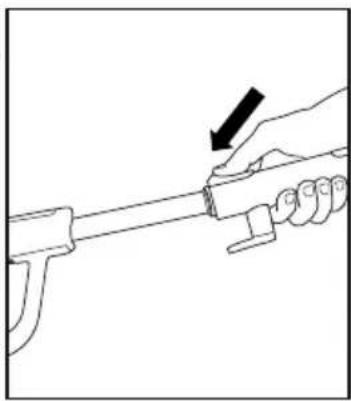
While pressing the button forward, shorten or lengthen the telescopic wand to the desired length (Fig. 3).
Cord Storage Hooks
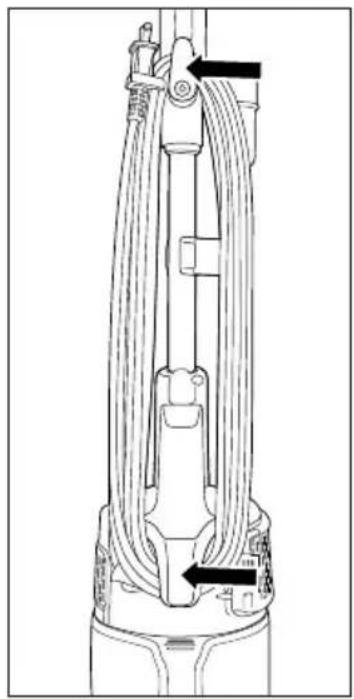
Turn the upper cord hook to the upright position and wind the power cord around the cord storage hooks when storing the vacuum (Fig. 4).

natural_image
Diagram of a mechanical lever mechanism with bidirectional arrows indicating rotational motion (no text or symbols)Fig. 1

natural_image
Diagram of a mechanical or fluidic component with concentric circular features and an arrow indicating direction (no text or symbols)Fig. 2
natural_image
Line drawing of a hand holding a rifle with an arrow pointing to the handle (no text or symbols)Fig. 3

natural_image
Technical line drawing of a mechanical device with coiled cables and connectors (no text or symbols)Fig. 4
Floor Nozzle
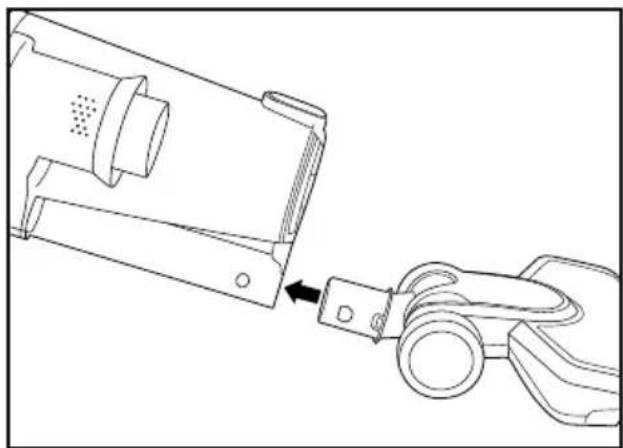
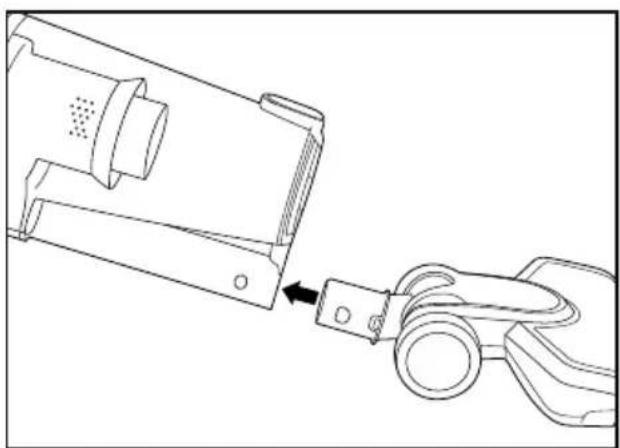
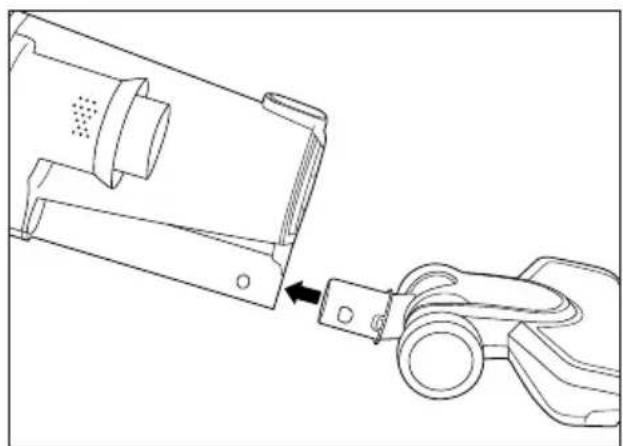
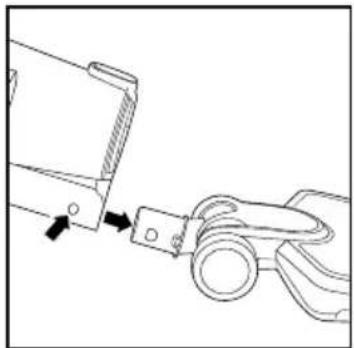
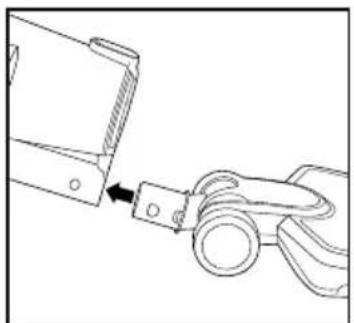
Attach the floor nozzle to the end of the neck of the dust cup for cleaning bare floors (Fig. 1).
Crevice Tool
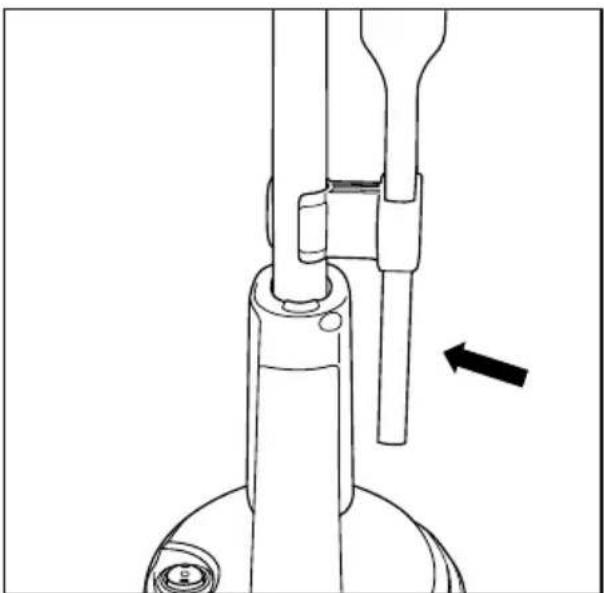
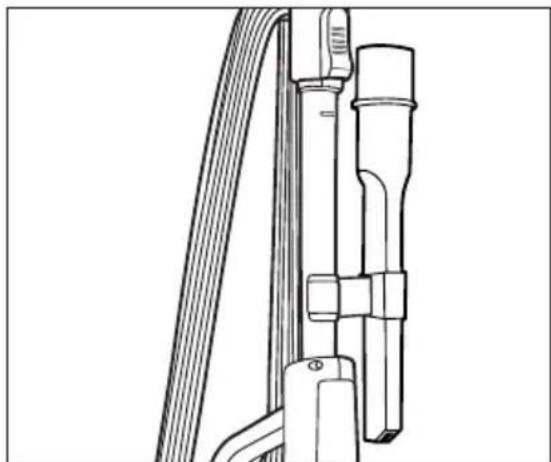
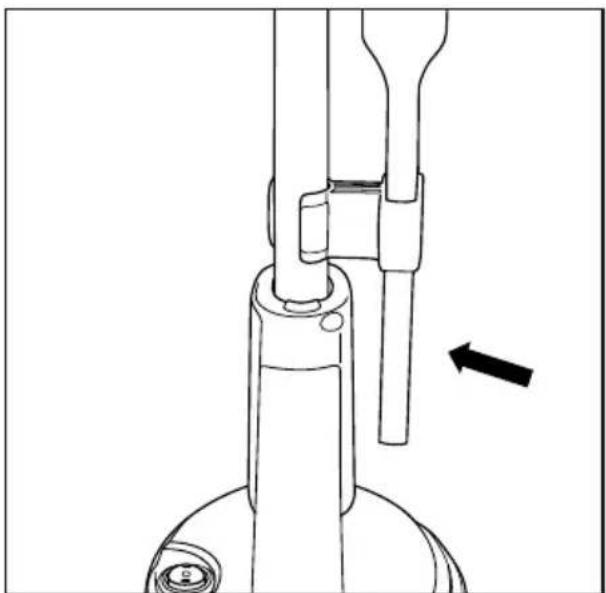
The cleaning tool caddy holds the crevice tool. This tool can be attached to the end of the main unit in place of the floor nozzle for cleaning along baseboards and small spaces (Fig. 2).

natural_image
Technical line drawing of a mechanical component being inserted into a clamping tool (no text or symbols present)Fig. 1
natural_image
Technical line drawing of a mechanical assembly with a directional arrow indicating motion (no text or symbols)Fig. 2
NOTE: Always unplug the vacuum before assembling or removing accessories.
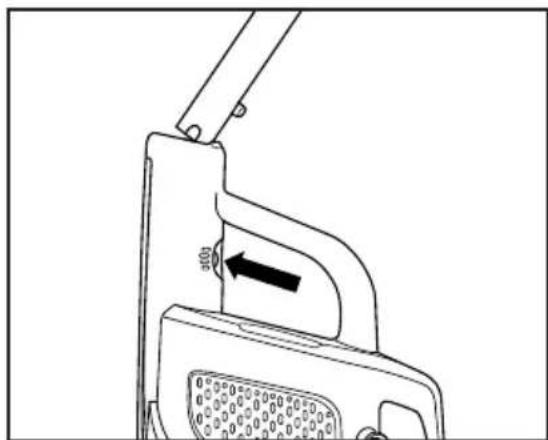
- Insert the telescoping wand into the top of the main unit. Ensure the button on the wand locks into place (Fig. 1).
- Attach the tool caddy to the telescoping wand, then insert the crevice tool into the caddy (Fig. 2).
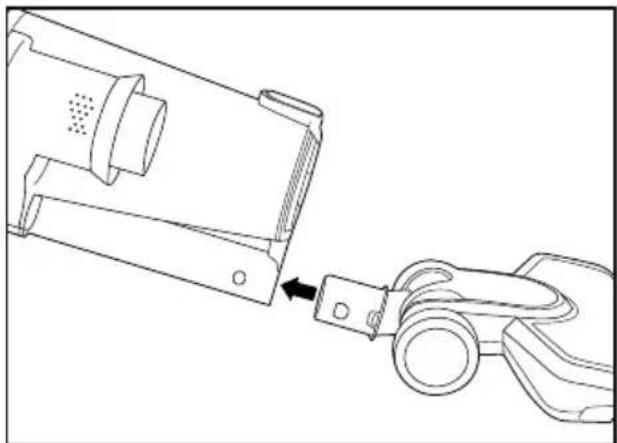
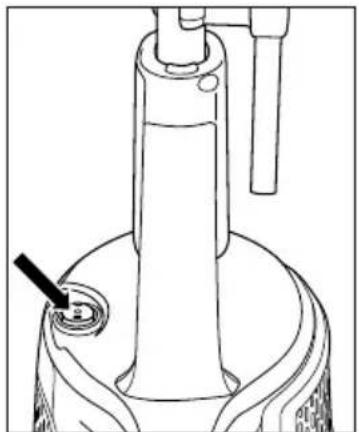
- Attach the floor nozzle to the neck of the dust cup ensuring the button on the nozzle neck locks into place (Fig. 3).
- Push the button on the telescopic wand forward to shorten or lengthen the wand to the desired length (Fig. 4).
natural_image
Technical line drawing of a mechanical device with a knob and handle (no text or symbols)Fig. 1

natural_image
Technical line drawing of a mechanical device with attached components (no text or symbols)Fig. 2
natural_image
Technical line drawing of a mechanical component being inserted into a clamping device (no text or symbols present)Fig. 3 Fig. 4

natural_image
Line drawing of a hand holding a tool with an arrow indicating the process (no text or symbols present)- Rotate the top cord hook to release the power cord from the cord storage hooks (Fig. 1).
- Extend the telescopic wand to the desired length (Fig. 2).
- If it is not already on the vacuum, attach the floor nozzle to the end of the dust cup for cleaning bare floors or area rugs (Fig. 3).
- Insert the power plug into a wall outlet and press the on/off switch located on top of the main unit to the desired speed (Fig. 4).
- Replace the floor nozzle with the crevice tool for cleaning baseboards, ceilings and small spaces (Fig. 5).
natural_image
Technical line drawing of a mechanical device with coiled cables and directional arrows indicating motion (no text or symbols)Fig. 1
natural_image
Line drawing of a hand holding a tool with an arrow indicating motion (no text or symbols)Fig. 2

natural_image
Line drawing of a mechanical device with a circular component and a pointer, no text or symbols presentFig. 4

natural_image
Technical line drawing of a mechanical component being inserted into a clamped bracket (no text or symbols)Fig. 3 Fig. 5

natural_image
Technical line drawing of a mechanical device with handle and internal components (no text or symbols)WARNING: Empty the dust cup before the contents reach the bottom of the cyclonic filter assembly. Overfilling the dust cup may cause dirt and debris to clog the filter and cause loss of suction.
WARNING: Always unplug the vacuum from the electrical outlet before removing the dust cup.
- Turn the vacuum off and unplug the power cord from the wall outlet.
- While holding the vacuum over a trash can, push the release button at the bottom of the dust cup. The base of the dust cup will drop down, releasing the dirt (Fig. 1).
- Close the bottom of the dust cup, ensuring it locks into place (Fig. 2). Resume vacuuming.

natural_image
Line drawing of a mechanical device with a circular component and a directional arrow (no text or symbols)Fig. 1

natural_image
Line drawing of a hand holding a mechanical component with an arrow indicating rotational motion (no text or symbols)Fig. 2
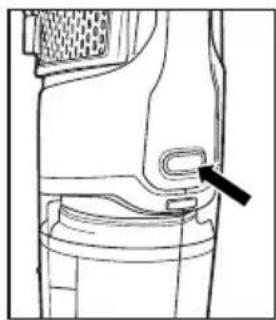
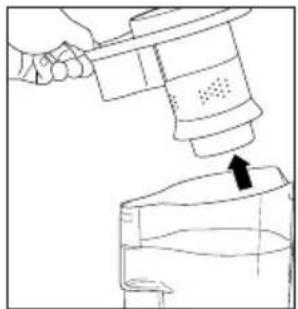
- Push the dust cup latch to remove the dust cup from the vacuum (Fig. 1).
- Remove the floor nozzle from the dust cup by pressing the red button on the nozzle neck and pulling the floor nozzle out of the dust cup (Fig. 2).
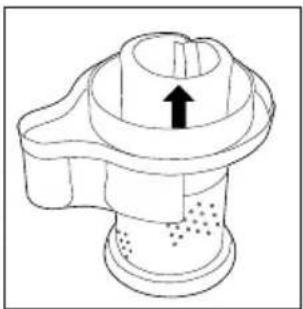
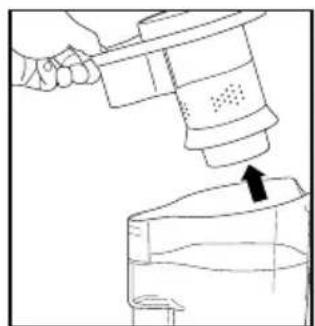
- Remove the cyclonic filter holder (Fig. 3).
- Shake out remaining dust and rinse with water. Make sure all pieces are completely dry before replacing in the vacuum.
- Replace the cyclonic filter holder.
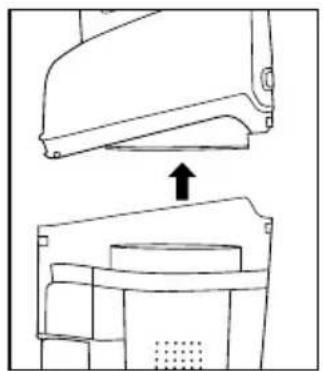
- Replace the dust cup onto the vacuum (Fig. 4). Then replace the floor nozzle and resume vacuuming (Fig. 5).
natural_image
Technical line drawing of a mechanical component with an arrow pointing to a detail (no text or symbols present)Fig. 1

natural_image
Technical line drawing of a mechanical assembly with two arrows indicating direction (no text or symbols)Fig. 2

natural_image
Line drawing of a hand pouring liquid into a container with an arrow indicating flow (no text or symbols)Fig. 3
natural_image
Technical line drawing showing a mechanical component with an upward arrow indicating motion (no text or symbols)Fig. 4

natural_image
Technical line drawing of a mechanical bracket with a pull arrow indicating assembly (no text or symbols)Fig. 5
REPLACING THE HEPA MEDIA FILTER
WARNING: Always unplug the vacuum from the electrical outlet before removing the filters.
- Remove the filter cover by pushing in on the tab and rotating the cover out (Fig. 1).
- Remove the filter by grasping the filter and pulling the filter straight out of the machine (Fig. 2).
- Replace with a new filter (do not wash and reuse).
- Replace the filter cover by inserting the two tabs in first then snapping the cover in place with the large tab.

natural_image
Hand holding a mechanical component with an arrow indicating direction (no text or symbols visible)Fig. 1

natural_image
Hand inserting a component into a device panel (no visible text or symbols)Fig. 2
Pre-Motor Filter
- Push the dust cup latch to remove the dust cup from the vacuum (Fig. 1).
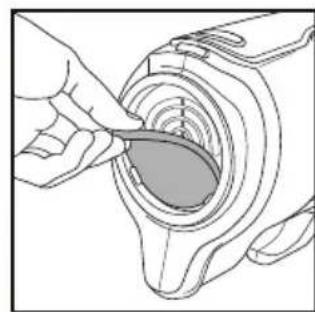
- Remove the gray foam filter from the frame located at the base of the main body (Fig. 2).
- Shake or tap the filter to remove excess dust or replace with a new filter (do not wash or reuse).
- Replace the dust cup onto the vacuum (Fig. 4).
High Flow Dust Bin Filter
- Push the dust cup latch to remove the dust cup from the vacuum (Fig. 1).
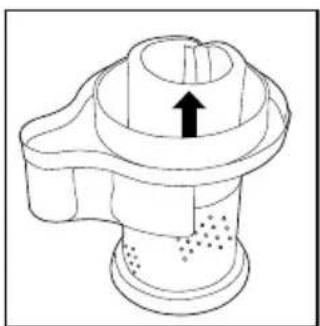
- Remove the white High Flow filter by grasping the top of the filter and pulling straight up (Fig. 3).
- Shake or tap the filter to remove excess dust or replace with a new filter (do not wash or reuse).
- Replace the dust cup onto the vacuum (Fig. 4).
Pre-Filter
- Push the dust cup latch to remove the dust cup from the vacuum (Fig. 1).
- Remove the cyclonic filter holder (Fig. 5).
- Remove the white High Flow filter by grasping the top of the filter and pulling straight up (Fig. 3).
- Remove the black pre-filter from the inside of the cyclonic filter holder (Fig. 6).
- Shake or tap the filter to remove excess dust or replace with a new filter (do not wash or reuse).
- Replace the pre-filter and the High Flow filter in the cyclonic filter holder.
- Replace the dust cup onto the vacuum (Fig. 4).
WARNING: Do not put filters in the dishwasher or clothes washing machine.

natural_image
Technical line drawing of a mechanical component with a black arrow pointing to a specific part (no text or symbols present)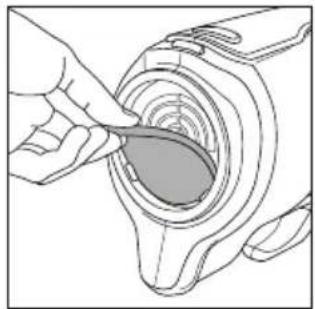
natural_image
Line drawing of a hand inserting a plug into a mechanical component (no text or symbols)
natural_image
Line drawing of a hand adjusting a circular component with concentric rings (no text or symbols)Fig. 3 Fig. 4

natural_image
Technical line drawing of a mechanical component with an upward arrow indicating motion (no text or symbols)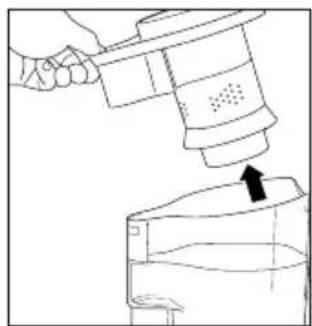
natural_image
Line drawing of a hand pouring liquid into a container with an arrow indicating flow (no text or symbols)Fig. 5 Fig. 6

natural_image
Technical line drawing of a mechanical component with an arrow indicating a feature (no text or symbols present)
natural_image
Technical line drawing of a mechanical component with a black arrow pointing to a specific part (no text or symbols present)
natural_image
Line drawing of a hand inserting a plug into a mechanical component (no text or symbols)
natural_image
Technical illustration showing a mechanical component being inserted into a circular opening, with no visible text or symbols.
natural_image
Technical illustration showing a mechanical component being inserted into a housing, with no visible text or symbols.
natural_image
Technical illustration showing a mechanical component being inserted into a housing, with no visible text or symbols.
natural_image
Technical illustration showing a mechanical component being inserted into a circular opening, with no visible text or symbols.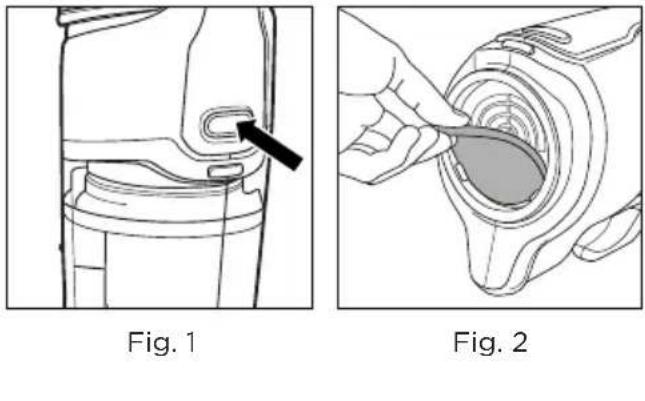
natural_image
Two-step diagram showing a mechanical component being inserted into a housing, labeled Fig. 1 and Fig. 2 (no text or symbols on the diagrams themselves)
natural_image
Two-step diagram showing a mechanical component being inserted into a housing, labeled Fig. 1 and Fig. 2 (no text or symbols on the diagrams themselves)
natural_image
Two-step diagram showing a mechanical component being inserted into a housing, labeled Fig. 1 and Fig. 2 (no text or symbols on the diagrams themselves)
natural_image
Two-step diagram showing a mechanical component being inserted into a housing, labeled Fig. 1 and Fig. 2 (no text or symbols on the diagrams themselves)
natural_image
Two-step diagram showing a mechanical component being inserted into a housing, labeled Fig. 1 and Fig. 2 (no text or symbols on the diagrams themselves)
natural_image
Two-step diagram showing a mechanical component being inserted into a housing, labeled Fig. 1 and Fig. 2 (no text or symbols on the diagrams themselves)
natural_image
Two-step diagram showing a mechanical component being inserted into a housing, labeled Fig. 1 and Fig. 2 (no text or symbols on the diagrams themselves)
natural_image
Two-step diagram showing a mechanical component being inserted into a housing, labeled Fig. 1 and Fig. 2 (no text or symbols on the diagrams themselves)
natural_image
Technical line drawings of a mechanical component with three views: top view, front view, and side view (no text or symbols)
natural_image
Technical line drawings of a mechanical component with three views: top view, front view, and side view (no text or symbols)
natural_image
Technical line drawings of a mechanical component with three views: top view, front view, and side view (no text or symbols)
natural_image
Technical line drawings of a mechanical component with three views: top view, front view, and side view (no text or symbols)
natural_image
Technical line drawings of a mechanical component with three views: top view, front view, and side view (no text or symbols)
natural_image
Technical line drawings of a mechanical component with three views: top view, front view, and side view (no text or symbols)
natural_image
Technical line drawings of a mechanical component with three views: top view, front view, and side view (no text or symbols)
natural_image
Technical line drawings of a mechanical component with three views: top view, front view, and side view (no text or symbols)
natural_image
Technical line drawings of a mechanical component with three views: top view, front view, and side view (no text or symbols)
natural_image
Technical line drawings of a mechanical component with three views: top view, side view, and bottom view (no text or symbols)
natural_image
Line drawing of a hand pouring liquid from a container into a container (no text or symbols)
natural_image
Technical line drawing of a mechanical component with an arrow indicating a feature (no text or symbols present)Fig. 5 Fig. 6
| Problem Check Point Possible Solution | ||
| Suction power is weak. | Dust cupFloor nozzle/Crevice toolFilters | If the dust cup is full, empty it.If clogged, remove the object.Replace filters. |
| The vacuum does not work. | Power cord Insert the power plug firmly into an electrical outlet. | |
| Sudden loss of power. | Thermal reset Turn off vacuum and unplug from electrical outlet. Let vacuum cool down for 60 minutes before turning back on. Check for clogs. Empty dust container. | |
| Dirt and debris are blowing through exhaust vent. | Filters Make sure all filters are clean, dry and installed correctly. | |
| Any other service should be performed by an Authorized Simplicity Vacuum Retailer. To locate your nearest Authorized Retailer, visit our website at www.SimplicityVac.com or call 888-9-SIMPLY. | ||
FOR BEST PERFORMANCE
- Keep machine and all accessories clean and in good operating condition.
- Replace HEPA media filter and clean foam filters frequently if vacuuming fine powders such as flour or drywall dust.
- Always use genuine filters and parts, as use of other products may result in poor cleaning or filtration performance. Simplicity Vacuums filtration products are designed for maximum performance.
- Store machine carefully in a dry area.
- For optimum cleaning performance and safety, follow your owner's manual.
What is Covered:
This warranty covers any defects in material and workmanship in your new vacuum and applies exclusively to the original purchaser.
How Long Coverage Lasts:
Warranty coverage for this vacuum lasts two years. Household models used commercially are only warranted for 90 days.
What is Not Covered:
- Damage to the vacuum which occurs from neglect, abuse, alterations, accident, misuse or improper maintenance.
- Normal replacement items: disposable filters.
- Damage associated with or resulting from the use of non-genuine parts including normal replacement items.
What We Will Do:
This warranty provides, at no cost to you, all labor and parts to keep this vacuum in correct operating condition during the warranted period.
How to Get Service:
Warranty service can only be obtained by presenting the vacuum to an Authorized Simplicity Retailer. A proof-of-purchase and product serial number will be required before service is rendered. To locate your nearest service center, please call 888-9-SIMPLY or visit www.SimplicityVac.com.
THIS WARRANTY IS EXCLUSIVE AND IN LIEU OF ANY AND ALL OTHER WARRANTIES WHETHER WRITTEN, ORAL, EXPRESSED OR IMPLIED, (INCLUDING ANY WARRANTY OF MERCHANTABILITY OR FITNESS FOR A PARTICULAR PURPOSE). THIS WARRANTY DISCLAIMS LIABILITY FOR INCIDENTAL OR CONSEQUENTIAL DAMAGES.
How State Law Applies:
This warranty gives you specific legal rights, and you may also have other rights which vary from state to state.
Register your warranty online at www.SimplicityVac.com
Simplicity® VAGUUMS
VACUUMS

natural_image
Line drawing of a vacuum cleaner with attached circuit board (no text or symbols)Spiffy™
Owner's Manual
S60
natural_image
Line drawing of an electrical outlet with two socket terminals and a cable connector (no text or symbols)natural_image
Pure mechanical diagram showing a lever mechanism with no text or symbolsFig. 1

natural_image
Diagram of a medical or anatomical structure with a curved arrow pointing to a circular region (no text or labels)Fig. 2
natural_image
Line drawing of a hand holding a tool with an arrow indicating direction (no text or symbols)Fig. 3

natural_image
Technical line drawing of a mechanical device with coiled cables and mounting brackets (no text or symbols)Fig. 4
Boquilla para suelo
natural_image
Technical line drawing of a mechanical component with a clamping tool inserted (no text or symbols)Fig. 1

natural_image
Technical line drawing of a mechanical assembly with a directional arrow indicating motion (no text or symbols)Fig. 2
natural_image
Technical line drawing of a mechanical device with a knob and handle (no text or symbols)Fig. 1
natural_image
Technical line drawing of a mechanical device with attached components (no text or symbols)Fig. 2
natural_image
Technical line drawing of a mechanical component being inserted into a clamping tool (no text or symbols present)Fig. 3 Fig. 4
natural_image
Line drawing of a hand holding a precision gun with an arrow indicating motion (no text or symbols)natural_image
Technical line drawing of a mechanical device with hoses and connectors, no visible text or symbolsFig. 1

natural_image
Line drawing of a hand using a tool to adjust a mechanical component (no text or symbols)Fig. 2

natural_image
Line drawing of a mechanical device with a central component and a pointed tip (no text or symbols)Fig. 4
natural_image
Technical line drawing of a mechanical component being inserted into a clamping tool (no text or symbols present)Fig. 3 Fig. 5

natural_image
Technical line drawing of a handheld device with handle and internal components (no text or symbols)natural_image
Line drawing of an airplane wing with a propeller and directional arrow (no text or symbols)Fig. 1

natural_image
Line drawing of a hand holding a mechanical device with an arrow indicating rotation (no text or symbols present)Fig. 2
natural_image
Technical line drawing of a mechanical component with a black arrow pointing to a detail (no text or symbols present)Fig. 1

natural_image
Technical line drawing of a mechanical clamp or bracket assembly (no text or symbols)Fig. 2

natural_image
Line drawing of a hand pouring liquid from a mechanical device into a glass container (no text or symbols)Fig. 3

natural_image
Technical line drawing showing a device with an upward arrow indicating motion or assembly (no text or symbols present)Fig. 4

natural_image
Technical line drawing of a mechanical assembly with a bracket and clamping tool (no text or symbols)Fig. 5
REEMPLAZO DEL FILTRO HEPA
natural_image
Line drawing of a hand inserting a component into a vehicle chassis (no text or symbols visible)Fig. 2
natural_image
Line drawing of a mechanical component with a black arrow pointing to a specific part (no text or symbols present)Fig. 1

natural_image
Line drawing of a hand inserting a small object into a mechanical component (no text or symbols)Fig. 2

natural_image
Line drawing of a hand adjusting a circular component (no text or symbols)Fig. 3

natural_image
Technical line drawing showing two views of a mechanical component with an upward arrow indicating motion (no text or symbols)Fig. 4
natural_image
Line drawing of a hand pouring liquid into a container with an arrow indicating flow (no text or symbols)Fig. 5 Fig. 6
natural_image
Technical line drawing of a mechanical component with an arrow indicating upward motion (no text or symbols)natural_image
Line drawing of a vacuum cleaner with attached circuit board (no text or symbols)Spiffy™
Owner's Manual
S60
Instructions de polarisation ....3
natural_image
Line drawing of an electrical outlet with two socket plugs (no text or symbols)natural_image
Pure mechanical diagram showing a lever mechanism with bidirectional arrows indicating rotational motion (no text or symbols)Fig. 1

natural_image
Diagram of a spiral object with an arrow pointing to it, no text or symbols presentFig. 2
natural_image
Line drawing of a hand holding a tool with an arrow indicating direction (no text or symbols)Fig. 3
natural_image
Technical line drawing of a mechanical device with coiled cables and connectors (no text or symbols)Fig. 4
Suceur pour sol
natural_image
Technical line drawing of a mechanical component being inserted into a clamping tool (no text or symbols present)Fig. 1
natural_image
Technical line drawing of a mechanical assembly with a directional arrow indicating motion (no text or symbols)Fig. 2
natural_image
Technical line drawing of a mechanical device with a knob and handle (no text or symbols)Fig. 1

natural_image
Technical line drawing of a mechanical device with attached components (no text or symbols)Fig. 2
natural_image
Technical line drawing of a mechanical component being inserted into a clamping device (no text or symbols present)Fig. 3 Fig. 4

natural_image
Line drawing of a hand holding a tool with an arrow indicating the process (no text or symbols present)natural_image
Technical line drawing of a mechanical device with coiled cables and directional arrows indicating motion (no text or symbols)Fig. 1

natural_image
Line drawing of a hand holding a tool with a black arrow pointing to the handle (no text or symbols)Fig. 2
natural_image
Technical line drawing of a mechanical device with a circular component and a pointer (no text or symbols)Fig. 4

natural_image
Technical line drawing of a mechanical component being inserted into a clamped bracket (no text or symbols)Fig. 3 Fig. 5

natural_image
Technical line drawing of a mechanical device with a handle and internal components (no text or symbols)natural_image
Line drawing of an airplane wing with a propeller and circular head (no text or symbols)Fig. 1

natural_image
Line drawing of a hand holding a mechanical component with an arrow indicating rotational motion (no text or symbols)Fig. 2
natural_image
Technical line drawing of a mechanical component with an arrow pointing to a specific part (no text or symbols present)Fig. 1
natural_image
Technical line drawing of a mechanical clamp or bracket assembly (no text or symbols)Fig. 2

natural_image
Line drawing of a hand using a brush to lift a container with liquid (no text or symbols)Fig. 3

natural_image
Technical line drawing of a mechanical device with an upward arrow indicating motion (no text or symbols)Fig. 4
natural_image
Technical line drawing of a mechanical clamp or bracket assembly with a pin inserted (no text or symbols)Fig. 5
REPLACEMENT DU FILTRE HEPA
natural_image
Hand inserting a component into a device (no text or symbols visible)Fig. 1

natural_image
Hand inserting a grid into a device panel (no text or symbols visible)Fig. 2
Filtre pré-moteur
natural_image
Line drawing of a mechanical component with a black arrow pointing to a specific part (no text or symbols present)Fig. 1
natural_image
Illustration of a hand inserting a plug into a mechanical component (no text or symbols visible)Fig. 2

natural_image
Line drawing of a hand adjusting a circular component (no text or symbols)Fig. 3

natural_image
Technical line drawing showing two views of a mechanical component with an upward arrow indicating motion (no text or symbols)Fig. 4
natural_image
Line drawing of a hand pouring liquid into a container with an arrow indicating flow (no text or symbols)Fig. 5 Fig. 6
natural_image
Technical line drawing of a mechanical component with an arrow indicating upward motion (no text or symbols)

- Owner's Manual
- Customer's Record
- Save These Instructions
- IMPORTANT SAFETY INSTRUCTIONS
- READ ALL INSTRUCTIONS BEFORE USING THIS APPLIANCE. FOR HOUSEHOLD USE ONLY.
- IMPORTANT:
- WARNING:
- Power Cord, 2-Wire Polarized Cord
- State of California Proposition 65 Warnings:
- Replacement Filters
- Rotating Cord Hook
- 2-Speed On/Off Switch
- Telescopic Wand
- Cord Storage Hooks
- Floor Nozzle
- Crevice Tool
- REPLACING THE HEPA MEDIA FILTER
- Pre-Motor Filter
- High Flow Dust Bin Filter
- Pre-Filter
- FOR BEST PERFORMANCE
- What is Covered:
- How Long Coverage Lasts:
- What is Not Covered:
- What We Will Do:
- How to Get Service:
- How State Law Applies:
- Simplicity® VAGUUMS
- Boquilla para suelo
- REEMPLAZO DEL FILTRO HEPA
- Suceur pour sol
- REPLACEMENT DU FILTRE HEPA
- Filtre pré-moteur
Brand : Simplicity
Model : Spiffy S60
Category : Vacuum Cleaner