MICRA LITE - Stroller RED CASTLE - Free user manual and instructions
Find the device manual for free MICRA LITE RED CASTLE in PDF.
User questions about MICRA LITE RED CASTLE
0 question about this device. Answer the ones you know or ask your own.
Ask a new question about this device
Download the instructions for your Stroller in PDF format for free! Find your manual MICRA LITE - RED CASTLE and take your electronic device back in hand. On this page are published all the documents necessary for the use of your device. MICRA LITE by RED CASTLE.
USER MANUAL MICRA LITE RED CASTLE
- Prolonged exposure to direct sunlight may prematurely discolour the stroller fabric and the cushion.
PLEASE NOTE! We do not recommend taking this stroller into the sea.
PLEASE NOTE! After using your stroller on the beach or on a snowy/salted pavement, always rinse the parts in contact with the salt and the sand, in particular the wheels, and the rivets.
PLEASE NOTE! Dry all textile parts thoroughly before folding the stroller. Make sure the raincover is dry before folding for storing.
WARNING: Only use parts recommended by the manufacturer.
WARNING: Never use the stroller if it is damaged or broken.
8. PRACTICAL ADVICE
THE WHEELS
Check the tyre pressure of the rear wheels regularly.
- To make your stroller easier to handle, the tyres should be pumped to the same pressure 1.5 bars (22 psi).
If you get a flat tyre:
- The tyres are repaired in the same way as bike tyres.
- Remove the inner tube and repair it with a patch.
- Run your finger round the inside of the tyre to ensure there is no sharp object (e.g. the tip of a thorn).
- Replace the inner tube then the wheel and pump up the tyre.
- If the inner tube is too damaged, replace it. (A replacement is included with your stroller). Inner tubes can also be purchased in bike shops.
Your stroller "pulls" to one side:
- Check that both rear tyres are at the same pressure.
5. ACCESSORIES (optional)
THE LUXURY PACK
Includes a sun screen and a reversible, comfy cushion.
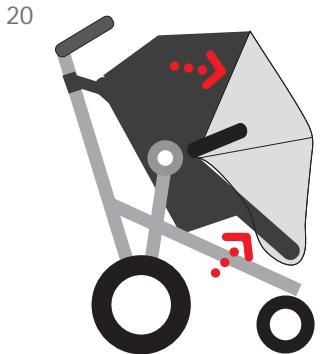
SUN SCREEN
- Zip the sun screen on the hood, pull it down to cover the stroller seat unit then attach the two elastic pieces together (20).
COMFY CUSHION
It is reversible (one side cotton, one side fleece).
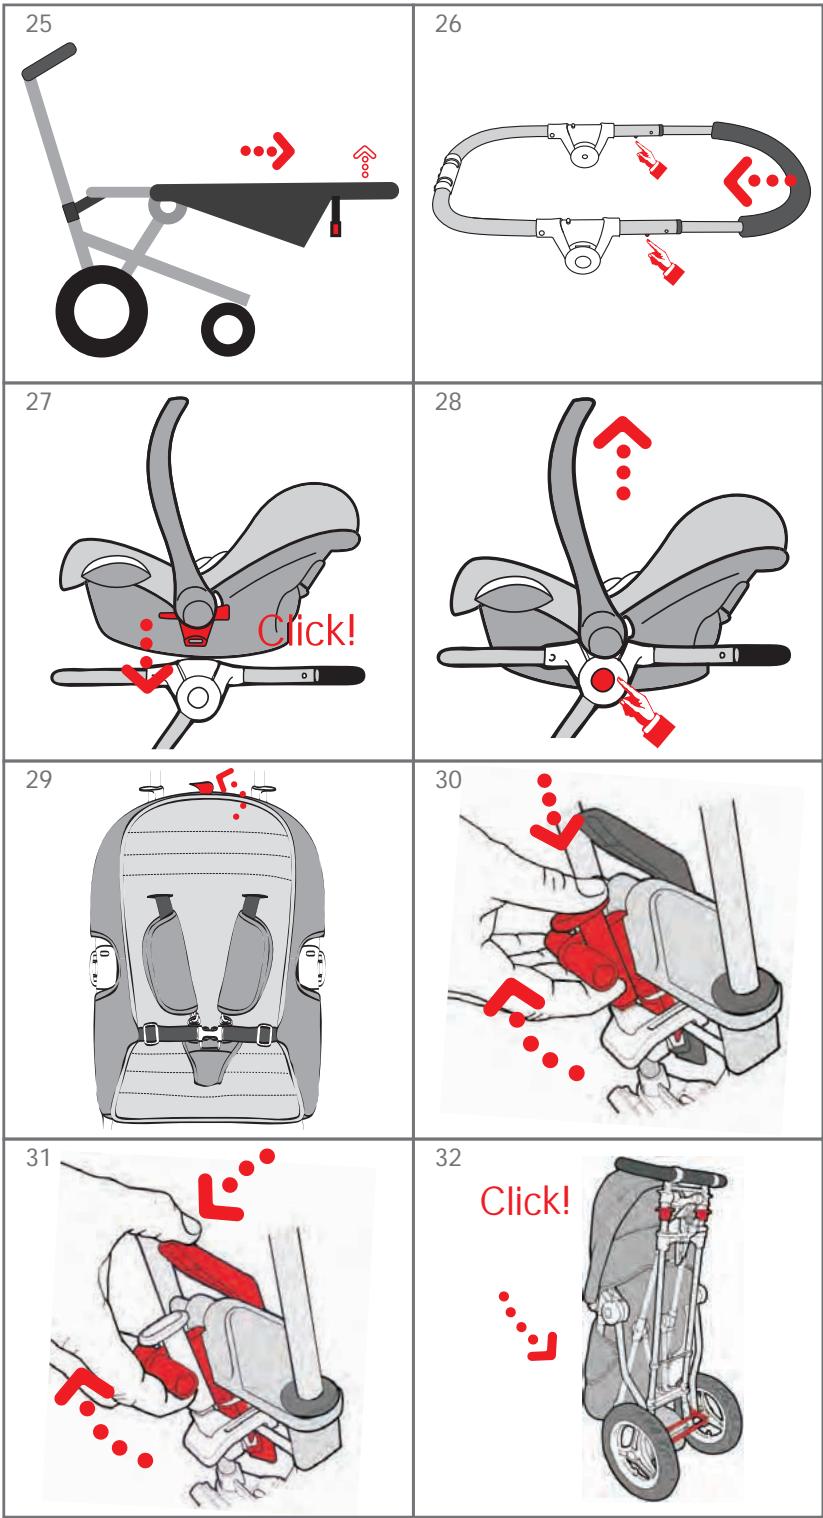
- Slip the safety harness shoulder straps and crotch strap through the slits in the cushion then set the cushion in place. The Velcro strip located at the top of the cushion matched with the Velcro at the top of the stroller will help to keep it in position (29).
6. FOLDING
- Fold back the hood.
- Unlock the front wheels (12).
- Push the lever down at the same time pulling the handle upwards (30), this will release the first safety system.
- Press on the lever marked «PRESS» at the same time pulling the handle upwards with a rapid movement to fold the stroller (31).
- With your hand, press on the base of the seat unit to bring it down towards the chassis until "click" heard. Doing so will block the stroller in a closed position (32).
PLEASE NOTE! pulling the stroller backwards will line up the wheels and make it easier to fold.
- Raise the bumper bar.
WARNING: Always remove the car seat before folding the stroller.
PLEASE NOTE! Make sure that the hood is folded before folding the stroller.
PLEASE NOTE! Empty the basket before folding the stroller.
7. MAINTENANCE
- This stroller should be checked regularly by its user.
- Clean the metal parts of your stroller with a damp cloth and dry them immediately. Do not use abrasive products.
- The textile parts should be wiped clean. Use only mild cleaning products.
- Check regularly screws, rivets and bolts and replace any parts which may have become worn.
- The comfy cushion (optional) is machine washable (low cycle).
- DO NOT USE BLEACH. Do not dry in direct sunlight.


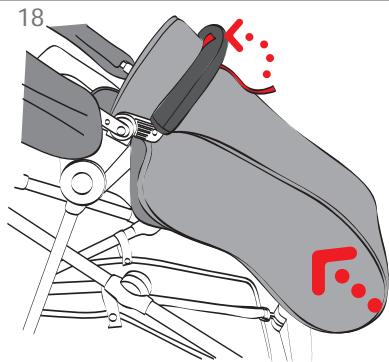
APRON
To attach the apron onto the stroller:
- Slip the apron up over the bottom of the seat unit and attach the Velcro (18) around the bumper bar.
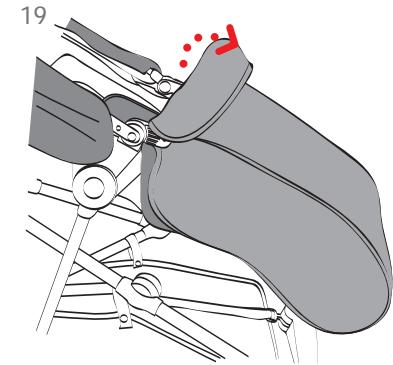
- Fold the top of the apron back over the bumper bar (19).
THE NET BASKET
- Easy storage thanks to the press studs on either side of the basket.
WARNING: The maximum load in the basket not to exceed 2kgs.
WARNING: Only use compartments provided for storage and do not exceed recommended weight.
WARNING: Empty the basket completely BEFORE folding the stroller.
PROTECTION AGAINST COLD, WIND AND RAIN
- Zip the raincover onto the hood, pull it down to cover stroller seat unit and attach the two elastic pieces together (20).
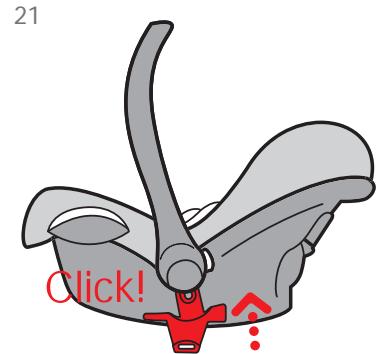
EASY TO ATTACH BRACKETS
The Easy to Attach brackets allow you to install the RED CASTLE SPORT / RECARO car seat (optional) on the stroller:
- Fit the Easy to Attach brackets in place below the handle of the car seat (21).
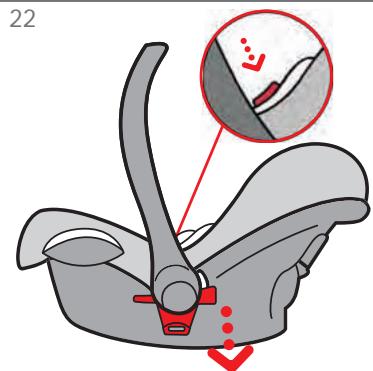
- To remove them: press in the button located on the side of the car seat and pull on the bracket then do the same on the other side (22).
N.B: When the Easy to Attach brackets are in place, you do not need to remove them to use the car seat in the car.
RED CASTLE SPORT / RECARO Car seat (optional):
PREPARING THE STROLLER:
- Remove the hood and bumper bar set (see chapter hood/bumper bar set).
- Undo the seat unit from your stroller
How to undo the seat unit:
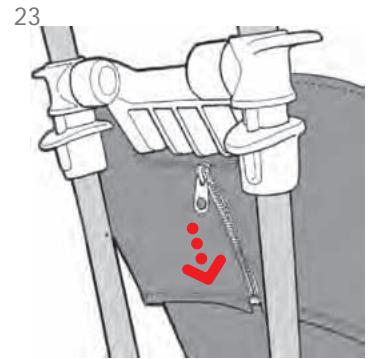
- Open the zip behind the seat unit and free the fabric from the chassis (23).
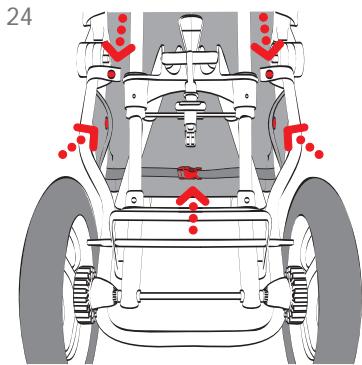
- Undo the strap and the 4 press studs located below the seat unit (24).
- Put the seat unit in the horizontal position (see chapter Adjustments seat back).
- Pull the seat unit forwards to remove it from the chassis (25). Press simultaneously on the 2 sprung buttons and push in the "U" shaped tube as far as it will go (26). This reduces the length of your stroller.
HOW TO INSTALL THE CAR SEAT
- Position the car seat as shown then press on it until "click" heard (27).
- To remove it, press on the raised buttons located on the car seat and lift up the car (28). WARNING: Always check that the Easy to Attach brackets are fitted properly before installing the car seat.
SEAT BACK
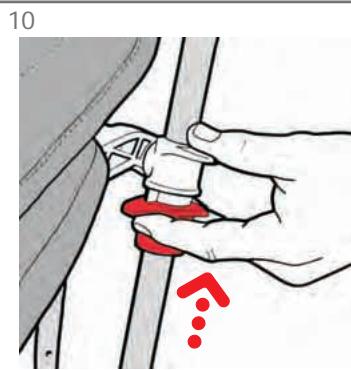
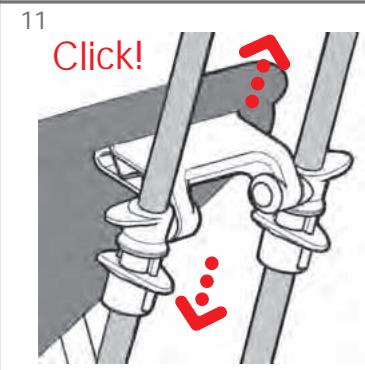
- The seat back has several positions.
- To change positions, press on the pistons located on either side of the chassis (10) and push down or raise them until the required position is reached (11).
WARNING: Make sure that the reclining position is correctly locked in place, "click" heard.
FRONT WHEELS SWIVEL OR FIXED
- To lock them, align the front wheels by pushing the stroller forwards then push down on the wheel locks, "click" heard (12).
- To disengage them, lift up the wheel locks (12).
WARNING: This stroller is not suitable for running or skating.
WARNING: The swivel wheels allow greater manoeuvrability of the stroller. Over rough grounds, it is strongly recommended that the front wheels be used in the fixed position.
HOOD and BUMPER BAR set
The stroller includes a hood and bumper bar set already in place.
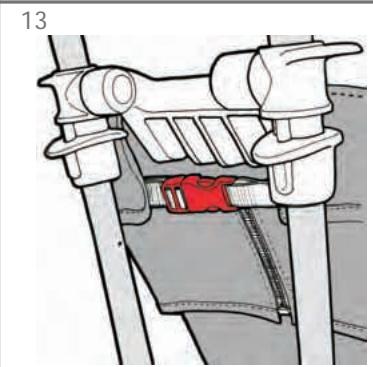
- To remove the set, undo the buckle behind the seat back (13).
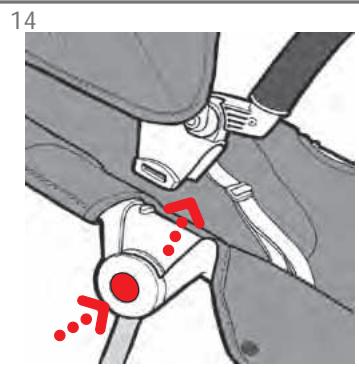
- Press in, one after the other, the white buttons located on either side of the stroller then lift up the set (14).
- To replace, position the block on the chassis as shown (14) with the bumper bar raised. Slot the ends into the places for them, above the white buttons located either side of the chassis, until 'click' heard.
- Fasten the buckle located behind the seat back (13).
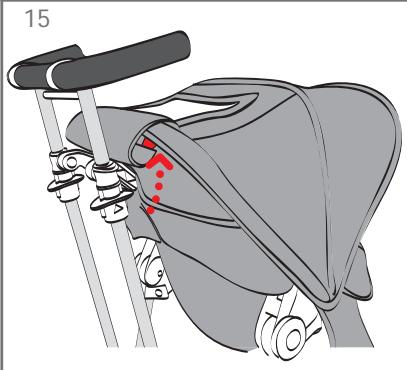
- The hood is equipped with a sunshade and a window whose fold back flap can be held in place with Velcro as shown (15).
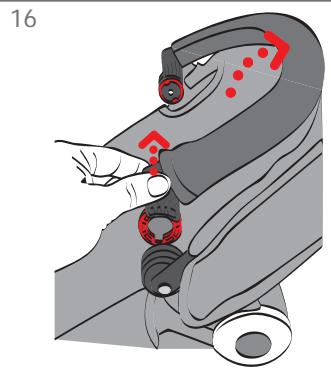
- The bumper bar can be removed from the hood:
Push it upwards as high as possible then push one side inwards to release the articulation (16).
To replace it, inverse the procedure.
PLEASE NOTE: The bumper bar cannot be installed without the hood.
HANDLE
The handle position can be adjusted.
- With the hexagonal Allen key included, loosen the two handlebar clamps on the handle (17), adjust the height position then retighten them.
4. ACCESSORIES (included with the stroller)
The stroller includes a pump, an inner tube and a hexagonal Allen key for adjusting the handle.
IMPORTANT: CONDITIONS GENERALES DE SECURITE
1. USING FOR THE 1st TIME
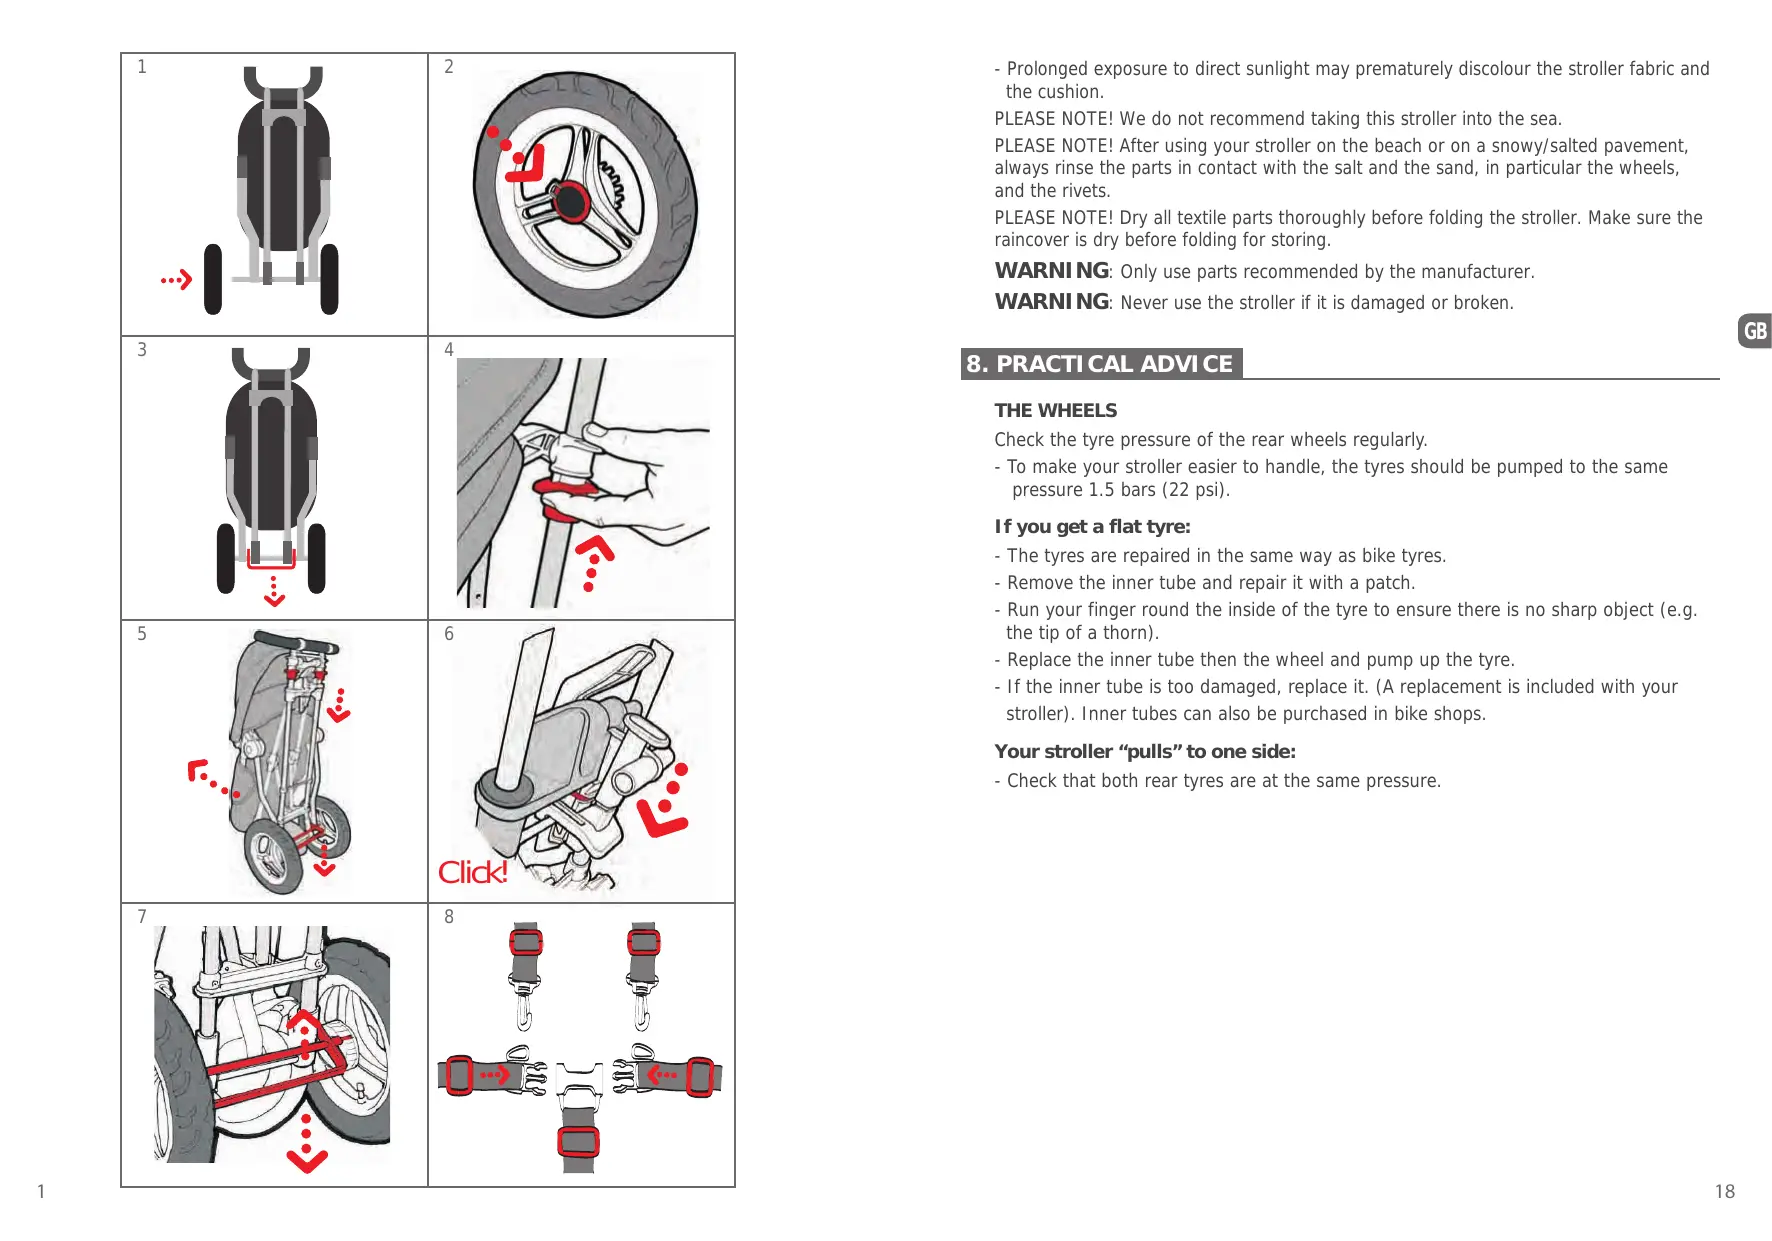
Having unpacked the stroller, remove and discard the protective covers from each end of the rear axle.
ATTACHING THE WHEELS
REAR WHEELS:
- Slide each wheel onto the axle (1) and push the wire clip down, towards the centre of the wheel (2).
- To remove the wheels, push down on the same wire clip (2) (in the middle of the wheel), then pull on the wheel.
WARNING: Always check that the wheels are firmly connected on the axle.
- Stand the stroller upright and apply the parking brake (see to chapter 2) (3).
- To open the stroller, squeeze and press down on the 2 pistons located on either side of the chassis (4, 5) then push the folding mechanism downwards (6). Check that the latch has properly engaged with the bar, "click" heard.
WARNING: Always make sure that the stroller is opened correctly and secured in position and that the parking brake is applied before placing the child in the stroller.
2. PARKING BRAKE
- To apply the parking brake, press on the horizontal bar with your foot. This will lock the rear wheels (7).
WARNING: Check that the rear wheels are locked properly.
WARNING: Never leave the child alone unattended, even if the parking brake is engaged. - To release the brake, lift up the horizontal bar with your foot (7).
3. ADJUSTMENTS
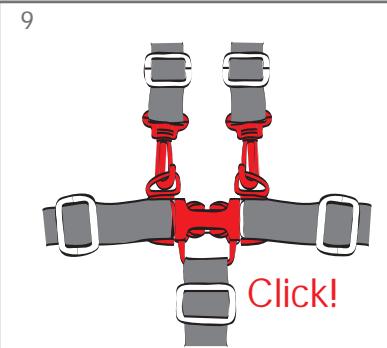
SAFETY HARNESSE
- The MICRALITE stroller is equipped with a 5-point safety harness.
- For a correct fit, adjust the length of each strap to fit the child. Attach the waist and shoulder straps to the crotch strap. Make sure that they are taut (8).
- Fasten the safety harness (9).
- Supplementary D rings are included for the attachment of a separate harness.
PLEASE NOTE! Any separate harness must conform to the EN 13210 safety standard.
WARNING: The crotch strap must ALWAYS be used with the safety harness.
WARNING: Use a safety harness as soon as the child is able to sit up unaided.
GENERAL INSTRUCTIONS
- To avoid the risk of suffocation, keep all plastic bags away from and out of the reach of children.
- Always attach your child with the 5-point safety harness correctly adjusted to fit him whenever you use the stroller.
- An additional safety harness can be fixed on the D rings. Any additional harness must conform to the EN 13210 safety standard.
Children should always be kept clear of detachable parts when adjustments are made and when opening and closing the stroller. - When the stroller is folded and upright, keep children clear to avoid their being injured should the stroller fall.
Should the stroller be used by someone unfamiliar with it, always show them the correct way to use it. - To avoid the risk of strangulation, NEVER attach strings, ribbons or cords onto the stroller or on your child.
- The stroller should always open and close without difficulty. If it doesn't, do not force the mechanisms and refer to the Instruction manual.
- Ensure that all safety mechanisms are engaged before use and that they are used correctly.
For maximum stability, regularly check the tyre pressure. The ideal pressure is 1.5 bars (22 psi). - Never lift up the combination stroller/car seat by the infant car seat, but by the stroller chassis only.
- Overloading, incorrect folding and the use of accessories non-approved by the manufacturer may seriously damage or break the stroller (in particular the use of buggy boards).
- Never place any item on the stroller hood.
- Never place a load on the foot rest.
- Never allow children to climb onto or sit on the foot rest.
- Do not use the raincover indoors, during warm weather or near a source of heat. Your child may become too hot.
- When going up or down stairs or when using an escalator or a lift/elevator, always remove your child from the stroller.
- Step over obstacles (pavements etc ...) with care. Bumping your stroller up and down repeatedly may damage it.
INSTRUCTIONS GENERALES
The MICRALITE stroller meets the European Safety Standard EN 1888 and conforms to security requirements. It has been laboratory tested according to the decree 91-1992 (December 1991).
WARNING: PLEASE READ these instructions CAREFULLY BEFORE USING your stroller. Keep them for future reference. YOUR CHILD'S SAFETY COULD BE AFFECTED if you do not follow these instructions.
WARNING: The seat unit of the MICRALITE stroller is not to be used for children under 6 months old.
WARNING: You are responsible for your child's safety.
WARNING: Ensure that all safety mechanisms are engaged before use.
WARNING: It may be dangerous to leave your child unattended and alone in the stroller.
WARNING: When using your stroller, under all circumstances, attach the child with the 5-point safety harness adjusted to fit him correctly. Always use the crotch strap with the safety harness, even when using a footmuff in the stroller.
WARNING: Attaching a bag or other items to the handle of the stroller may affect its stability.
WARNING: This product is not suitable for running or skating.
WARNING: Always use the rear foot brake to immobilise the stroller.
WARNING: Before using your stroller, and every time you use it, always check first that all safety mechanisms for the car seat or the stroller seat are correctly engaged and secured.
WARNING: Make sure that any valve caps, the wire clips or other detachable parts are firmly screwed on the wheels to avoid the danger of them being swallowed. The pump must also be kept out of children's reach.
WARNING: Never use the crotch strap without the safety belt.
GENERAL INSTRUCTIONS
- This stroller is intended to transport a child from age 6 months and up to a maximum weight of 15Kgs as well as an additional weight of 2Kgs in the basket beneath the stroller.
- The stroller can be used for a child from birth when combined with the RED CASTLE SPORT / RECARO car seat, up to a weight of 13kgs.
- Never transport more than one child in the MICRALITE stroller.
- The correct assembly of this product is essential. Neither RED CASTLE FRANCE nor their distributors can be held responsible should this not be the case. Please note that incorrect use of the stroller could damage the stroller and be dangerous for your child.
- Never use this stroller before your child is able to sit up alone unaided (from 6 months old).
- Do not use replacement parts or accessories other than those recommended by RED CASTLE FRANCE.