
PRO TRACK - Portable audio recorder ALESIS - Free user manual and instructions
Find the device manual for free PRO TRACK ALESIS in PDF.
| Product Type | Portable audio recorder with iPod dock |
| Brand | Alesis |
| Model | Pro Track |
| iPod Compatibility | iPod Classic, iPod 5th generation, iPod nano 2nd and 3rd generation |
| Recording Resolution | 16-bit, 44.1 kHz |
| Built-in Microphones | 2 stereo condenser microphones |
| Audio Inputs | 2 combo XLR / 6.35 mm (1/4") jacks with switchable 48V phantom power |
| Headphone Output | 3.5 mm jack with volume control |
| Power Supply | 4 AAA batteries (2.5 h) or AC adapter (center positive) |
| VU Meters | Dual-channel LED with low battery indicator |
| Functions | Built-in limiter, Mono/Stereo mode, direct monitoring, iPod charging (via AC) |
| Dimensions (approx.) | 15 x 8 x 3 cm |
| Weight (approx.) | 200 g (with batteries) |
| Maintenance | Clean with a soft, dry cloth. Avoid moisture. |
| Battery Safety | Observe polarity, use same type batteries, remove if not used for extended periods |
| Included Accessories | Protective case (large and small), foam insert, AC adapter |
| Repairability | Repair by qualified technician. Use original spare parts. |
Frequently Asked Questions - PRO TRACK ALESIS
User questions about PRO TRACK ALESIS
0 question about this device. Answer the ones you know or ask your own.
Ask a new question about this device
Download the instructions for your Portable audio recorder in PDF format for free! Find your manual PRO TRACK - ALESIS and take your electronic device back in hand. On this page are published all the documents necessary for the use of your device. PRO TRACK by ALESIS.
USER MANUAL PRO TRACK ALESIS
ProTrack16-BIT REMOTE REORDER FOR iPod
QUICKSTART GUIDE
ENGLISH (1-3)
MANUAL DE INICIO RÁPIDO
ESPANOL(5-7)
GUIDE D'UTILISATION RAPIDE
FRANÇAIS (9-11)
KURZANLEITUNG
DEUTSCH(13-15)
GUIDA RAPIDA
ITALIANO (17-19)
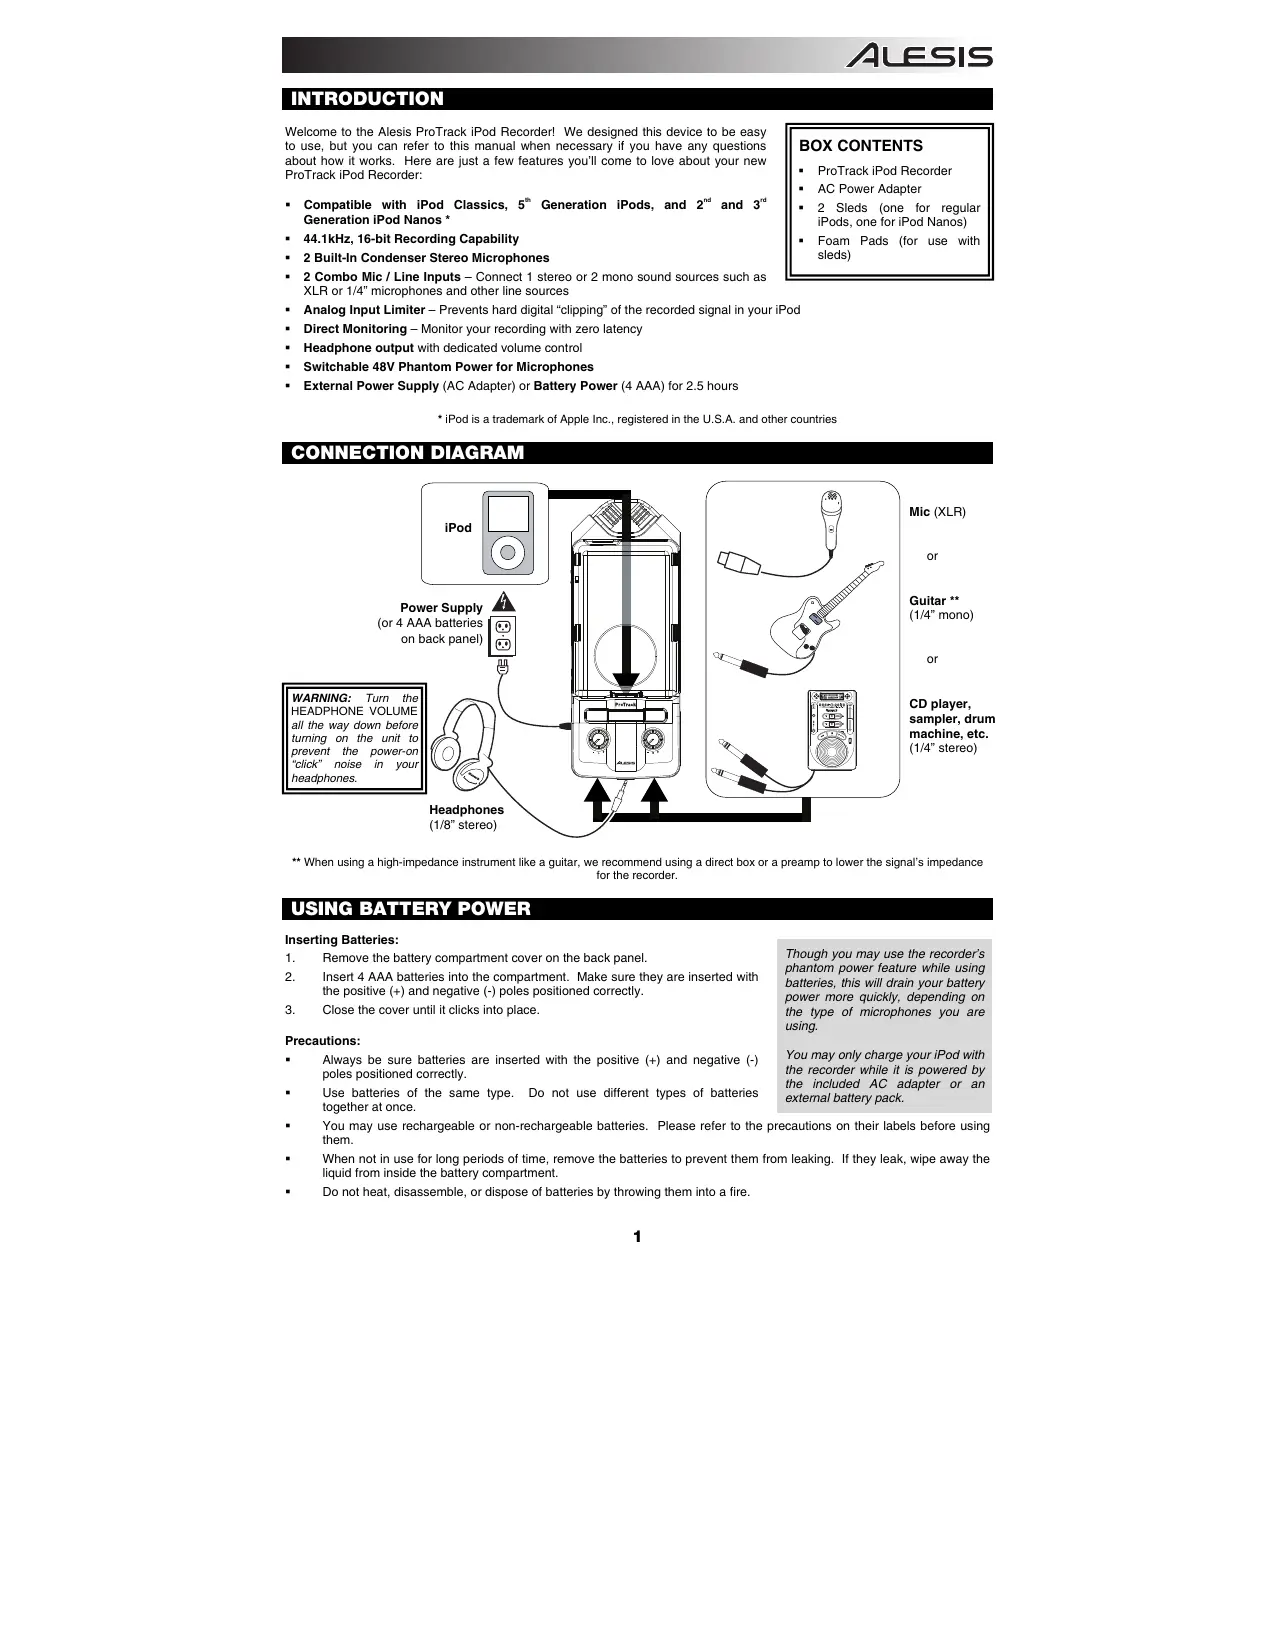
INTRODUCTION
Welcome to the Alesis ProTrack iPod Recorder! We designed this device to be easy to use, but you can refer to this manual when necessary if you have any questions about how it works. Here are just a few features you'll come to love about your new ProTrack iPod Recorder:
- Compatible with iPod Classics, 5^th Generation iPods, and 2^nd and 3^rd Generation iPod Nanos *
44.1kHz, 16-bit Recording Capability
2 Built-In Condenser Stereo Microphones - 2 Combo Mic / Line Inputs - Connect 1 stereo or 2 mono sound sources such as XLR or 1/4^* microphones and other line sources
- Analog Input Limiter - Prevents hard digital "clipping" of the recorded signal in your iPod
- Direct Monitoring - Monitor your recording with zero latency
- Headphone output with dedicated volume control
- Switchable 48V Phantom Power for Microphones
-
External Power Supply (AC Adapter) or Battery Power (4 AAA) for 2.5 hours
-
iPod is a trademark of Apple Inc., registered in the U.S.A. and other countries
CONNECTION DIAGRAM
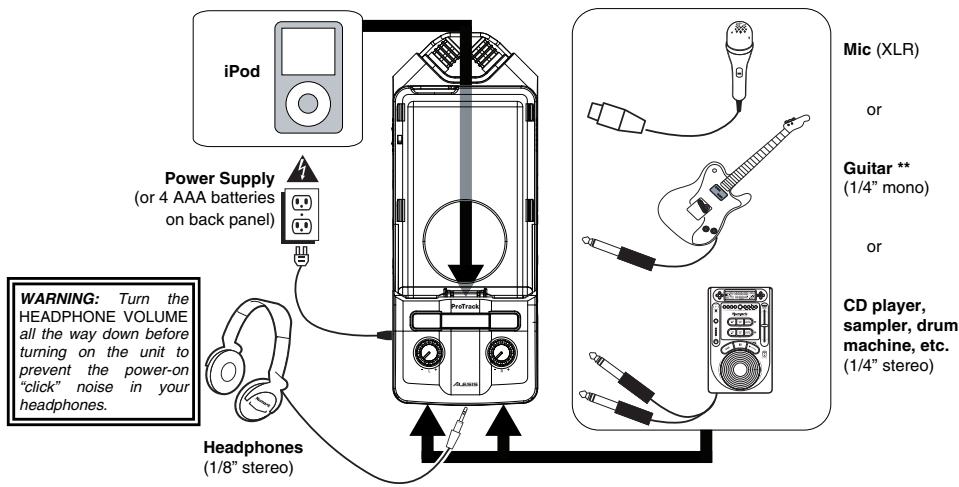
** When using a high-impedance instrument like a guitar, we recommend using a direct box or a preamp to lower the signal's impedance for the recorder.
USING BATTERY POWER
Inserting Batteries:
- Remove the battery compartment cover on the back panel.
- Insert 4 AAA batteries into the compartment. Make sure they are inserted with the positive (+) and negative (-) poles positioned correctly.
- Close the cover until it clicks into place.
Precautions:
Always be sure batteries are inserted with the positive (+) and negative (-) poles positioned correctly.
- Use batteries of the same type. Do not use different types of batteries together at once.
You may use rechargeable or non-rechargeable batteries. Please refer to the precautions on their labels before using them.
- When not in use for long periods of time, remove the batteries to prevent them from leaking. If they leak, wipe away the liquid from inside the battery compartment.
- Do not heat, disassemble, or dispose of batteries by throwing them into a fire.
You may only charge your iPod with the recorder while it is powered by the included AC adapter or an external battery pack.
Though you may use the recorder's phantom power feature while using batteries, this will drain your battery power more quickly, depending on the type of microphones you are using.
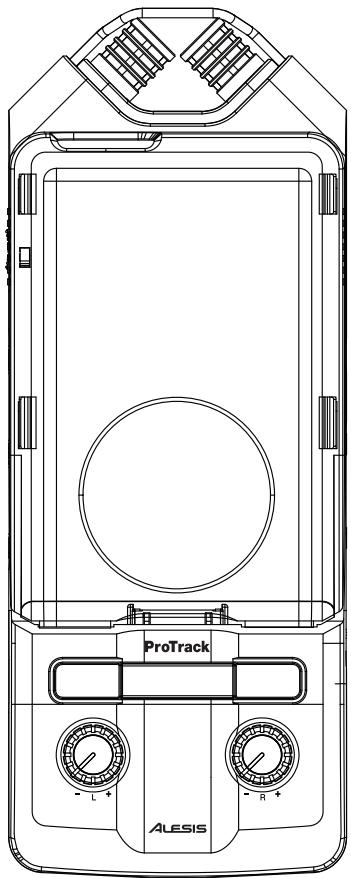
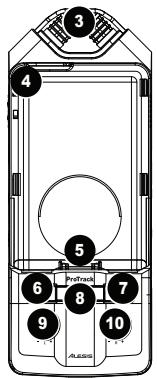
BOTTOM, TOP & BACK PANEL FEATURES
- CH 1/2 INPUTS - Connect your external sound sources to these inputs. Each input can accept a 1 / 4 or XLR connection. This allows for several connection options:
a. 2 microphones
b. 1 stereo source (such as a CD player, sampler, or drum machine).
c. 1 or 2 mono sources (such as guitars). (Note: When using a high-impedance instrument like a guitar, we recommend using a preamp to lower the signal's impedance for the recorder.)
If you only use one of these two inputs, you may want to set the RECORD MODE switch to "Mono" and turn down the gain knob of the unused input.
The recorder's built-in microphones will not be used while something is connected to one or both of the CH 1/2 INPUTS.
- HEADPHONE OUTPUT - Connect your headphones using a 1/8'' stereo connector to this output. The headphone volume is controlled by the HEADPHONE VOLUME wheel on the right side panel. During playback only the iPod will be heard. All other times, the inputs will be heard.
WARNING: Turn the HEADPHONE VOLUME all the way down before turning on the unit to prevent the power-on "click" noise in your headphones.
- MICROPHONES - Record your source with these built-in condenser microphones if you are not using the CH 1/2 INPUTS.
- SLED - This plastic cover slides and snaps onto the recorder to protect and secure the iPod while it is docked.
- DOCK - Connect your iPod here before attaching the SLED.
- MENU - Acts as the "Menu" button of your iPod.
- ENTER - Acts as the "Enter" button of your iPod.
- LED METERS - Measures audio signal levels. While recording, these meters measure the input levels of the CH 1/2 INPUTS or built-in MICROPHONES. (If the LIMITER is on, these readings are taken after the LIMITER has processed the signal.) During playback, these meters measure the iPod playback level. Also, the top two red LEDs will flash simultaneously when the batteries are getting low.
- CHANNEL 1/L GAIN - Adjusts the input gain for Channel 1.
- CHANNEL 2/R GAIN - Adjusts the input gain for Channel 2.
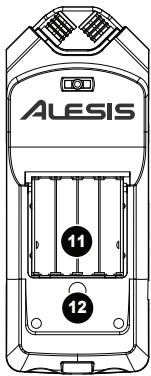
- BATTERY COMPARTMENT - Insert 4 AAA batteries here for up to 2.5 hours of power. The top two red LEDs will flash simultaneously when the batteries are getting low.
- STAND MOUNT - You can use this hole to mount the iPod Recorder on a stand, such as a standard camera stand, allowing for hands-free recording.
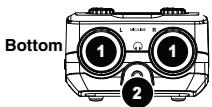
SIDE PANEL FEATURES
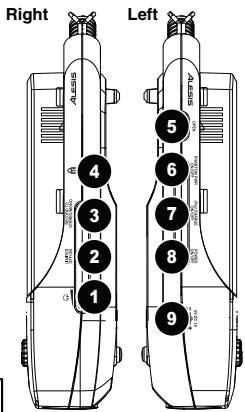
- HEADPHONE VOLUME - Adjusts the level of the headphone output.
Note: Feedback can occur if the CHANNEL GAIN knobs are turned up high with the headphones connected. Decrease the gain or HEADPHONE VOLUME if this happens. - LIMITER - Engages the stereo limiter. This prevents hard "clipping" of the recorded signal in your iPod. However, it is still possible to overdrive the LIMITER with too hot of a signal, resulting in an unpleasant "pumping" sound or even distortion. Decrease the CHANNEL GAIN levels if you experience noticeable Limiter artifacts.
- RECORD MODE - Specifies whether the two analog inputs will be recorded to the iPod in stereo or mono (summed). When recording mono input sources, such as a guitar or microphone, we recommend setting this switch to "Mono".
- KENSINGTON LOCK SLOT - You may use this Kensington lock slot to secure the iPod Recorder to a table or other surface.
- OPEN - Pull this switch towards the bottom of the recorder to unlock and remove the plastic sled from the recorder when you want to remove your iPod.
- PHANTOM POWER - This switch activates and deactivates phantom power. When activated, phantom power supplies +48V to both XLR mic inputs. Most dynamic microphones do not require phantom power, but most condenser microphones do. Consult your microphone's documentation to find out whether it needs phantom power.
WARNING: Do not turn on PHANTOM POWER unless your microphones require it.
- iPOD CHARGE ON/OFF - Enables or disables the iPod Recorder's ability to charge your iPod while it is docked. You may only charge your iPod with the recorder while it is powered by the included AC adapter or an external battery pack.
- POWER SWITCH - Turns the iPod Recorder on and off. Be sure to turn off your recorder when not in use to conserve battery power.
- POWER INPUT - This is where you may plug in the included power adapter. Connect it to the recorder before you plug the power adapter into an electrical outlet.
We recommend leaving the iPOD CHARGE feature off while recording. Charging may introduce low-level noise into your recordings.
Note: If you are using an external power adapter, such as a battery pack, its polarity must be center positive. See TECHNICAL SPECIFICATIONS for more information on external battery packs.
Top
Back
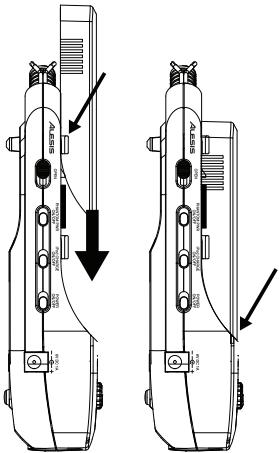
ATTACHING & REMOVING THE SLED
Before getting started, follow these simple steps to prepare the ProTrack for use with your iPod:
- Apply the proper foam backing for your iPod. Use the thicker pad for a regular-sized iPod (Classic or 5^th Generation) or the thinner one for an iPod nano ( 2^nd or 3^rd Generation).
- Place the foam pad on the center of the flat surface above the DOCK. This will help secure your iPod while it is docked.
- Connect your iPod to the DOCK by gently inserting the DOCK's connector into the slot at the base of your iPod.
- Slide the SLED over the recorder so it covers the iPod. The edges of the SLED should slide under the tabs on both edges of the recorder.
Note: We have included two different sleds for use with the iPod Recorder: one fits the regular iPod while the other fits the iPod Nano.
- Snap the SLED into place at the bottom.
- To remove the SLED, pull the OPEN switch on the left panel towards the bottom of the recorder (see SIDE PANEL FEATURES), then slide it off the recorder.
- To remove your iPod, gently rock it back and forth until it is loose from the DOCK.
RECORDING
The iPod Recorder is compatible with the following iPod models:
iPod Classic
5th Generation iPod
3rd Generation iPod Nano
2nd Generation iPod Nano
You can record to the iPod Recorder using the built-in condenser microphones, external microphones, or other audio sources connected to the recorder's CH 1/2 INPUTS. There are a few important factors and suggestions you should consider before diving into recording:
Take some time to balance the levels of your sources by monitoring the LED METERS on the top panel. We recommend that the levels enter the top (red) LED lights only occasionally, if at all, to ensure the recording does not "clip" or distort.
- Use the built-in LIMITER to prevent hard "clipping" of the recorded signal in your iPod. However, be careful when using the LIMITER - if your input levels are too high, it can cause unwanted audio artifacts or even distortion. There is a fine line between a good, loud recording, and a recording which is overly limited, resulting in poor dynamic range and clarity. Be careful when you set your levels, and decrease the CHANNEL GAIN if necessary.
We recommend leaving the iPOD CHARGE feature off while recording. Charging may introduce low-level noise into your recordings.
Use the RECORD MODE switch to select stereo vs. mono recording. If you are using mono input sources, such as guitars and microphones, you may wish to record in mono.
If you are only using one input, you should decrease the CHANNEL GAIN of the unused input to reduce unwanted noise.
Your recordings will be stored as "Voice Memo" files on your iPod.
Once you have finished recording a "memo," it will be placed in Main Menu >Extras >Voice Memos.
After you connect to your computer and transmit the Voice Memos, they will be located in Main Menu > Music > Playlists > Voice Memos.
Out of the box, your iPod is formatted to work with a Mac, rather than a Windows computer. If you want to transfer your recordings to a Windows computer, connect your iPod to your Windows computer and allow iTunes to format it BEFORE you record for the first time.
If you record to your iPod before you ever connect it to iTunes, your recordings will be stored in Mac's HFS format. They will only be readable by plugging your iPod into a Mac, not a Windows computer.
Note that, if you reformat your iPod for the Windows or Mac platform, you may lose any recordings prior to this.
INTRODUCCION
| Gain: | Internal Mic Inputs: | +6dB to 49.3dB |
| External Inputs (XLR): | +6dB to 49.3dB | |
| External Inputs (1/4"): | -11.3dB to +32dB | |
| THD+N | 2nd& 3rdGen. iPod Nano: | 0.01% @ 92dB SNR A-weighted (charge off, min. gain) |
| 5thGen. iPod / iPod Classic: | 0.014% @ 88dB SNR A-weighted (charge off, min. gain) |
DIGITAL CIRCUITRY
Bit Depth: 16-bit
Sample Rates: 44.1kHz (high); 22.05kHz (low)
MAIN OUTPUTS
Max Level: +0.3dBu Maximum
THD+N (max output): < 0.02% @ 1kHz
HEADPHONE OUTPUTS
Max Level: 75Ω output impedance, 40mW into 32Ω
BATTERY LIFE
Without phantom power >3 hours
Using phantom power >2 hours
EXTERNAL BATTERY PACK REQUIREMENTS
6V DC
2mm diameter (center pin); 5.5mm outside diameter
Wired as center positive
Specifications are subject to change without notice.
7-51-0270-A
www.alesis.com