
MARKNET - Network printer LEXMARK - Free user manual and instructions
Find the device manual for free MARKNET LEXMARK in PDF.
| Product Type | Internal Print Server |
| Brand | Lexmark |
| Model | MarkNet N2000 Series (N2000, N2001, N2002, N2003fx, N2004f1) |
| Network Interfaces | Ethernet 10/100BaseTX, Token-Ring 4/16, Fiber optic 100BaseFX, 10BaseFL |
| Supported Protocols | TCP/IP, DHCP, AppleTalk, IPX/SPX, NetBEUI |
| Operating Systems | Windows (95/98/Me, NT4, 2000, XP), Mac OS 8.6-9.x, Mac OS X, UNIX/Linux (Sun Solaris, Red Hat), Novell NetWare |
| Installation | Internal in an optional printer slot |
| IP Configuration | Automatic via DHCP or manual via printer control panel |
| Power | Powered by the printer via internal bus |
| Dimensions | Approximately 10 x 12 cm (standard internal card) |
| Weight | Approximately 50 g |
| Operating Temperature | 10 to 40 °C |
| Operating Humidity | 20 to 80% non-condensing |
| Certifications | FCC Class A, CE, VCCI, Industry Canada |
| Maintenance | No special maintenance required |
| Safety | Complies with electrical safety and EMC standards |
Frequently Asked Questions - MARKNET LEXMARK
User questions about MARKNET LEXMARK
0 question about this device. Answer the ones you know or ask your own.
Ask a new question about this device
Download the instructions for your Network printer in PDF format for free! Find your manual MARKNET - LEXMARK and take your electronic device back in hand. On this page are published all the documents necessary for the use of your device. MARKNET by LEXMARK.
USER MANUAL MARKNET LEXMARK
Edition: October 2001
The following paragraph does not apply to any country where such provisions are inconsistent with local law:
LEXMARK INTERNATIONAL, INC., PROVIDES THIS PUBLICATION "AS IS" WITHOUT WARRANTY OF ANY KIND, EITHER EXPRESS OR IMPLIED, INCLUDING, BUT NOT LIMITED TO, THE IMPLIED WARRANTY OF MERCHANTABILITY OR FITNESS FOR A PARTICULAR PURPOSE. Some states do not allow disclaimer of express or implied warranties in certain transactions; therefore, this statement may not apply to you.
This publication could include technical inaccuracies or typographical errors. Changes are periodically made to the information herein; these changes will be incorporated in later editions. Improvements or changes in the products or the programs described may be made at any time.
Comments about this publication may be addressed to Lexmark International, Inc., Department F95/035-3, 740 West New Circle Road, Lexington, Kentucky 40550, U.S.A. In the United Kingdom and Eire, send to Lexmark International Ltd., Marketing and Services Department, Westhorpe House, Westhorpe, Marlow Bucks SL7 3RQ. Lexmark may use or distribute any of the information you supply in any way it believes appropriate without incurring any obligation to you. You can purchase additional copies of publications related to this product by calling 1-800-553-9727. In the United Kingdom and Eire, call 0628-481500. In other countries, contact your point of purchase.
References in this publication to products, programs, or services do not imply that the manufacturer intends to make these available in all countries in which it operates. Any reference to a product, program, or service is not intended to state or imply that only that product, program, or service may be used. Any functionally equivalent product, program, or service that does not infringe any existing intellectual property right may be used instead. Evaluation and verification of operation in conjunction with other products, programs, or services, except those expressly designated by the manufacturer, are the user's responsibility.
Lexmark and Lexmark with diamond design and MarkNet are trademarks of Lexmark International, Inc., registered in the United States and/or other countries. PostScript® is a registered trademark of Adobe Systems Incorporated.
Other trademarks are the property of their respective owners.
Copyright 2001 Lexmark International, Inc.
All rights reserved.
UNITED STATES GOVERNMENT RESTRICTED RIGHTS
This software and documentation are provided with RESTRICTED RIGHTS. Use, duplication or disclosure by the Government is subject to restrictions as set forth in subparagraph (c)(1)(ii) of the Rights in Technical Data and Computer Software clause at DFARS 252.227-7013 and in applicable FAR provisions: Lexmark International, Inc., Lexington, KY 40550.
Warranty
The limited warranty you received with your printer gives warranty terms and conditions. For installation and safety information, refer to the setup documentation that shipped with your printer.
MarkNet N2000 Series Internal Print Servers
Quick Reference
Step 1: Install the print server .2
Step 2: Attach a network cable . 2
Step 3: Assign an IP address. 4
Step 4: Print a network setup page .5
Step 5: Configure the network printer. 6
Electronic emissions notices. 9
Step 1: Install the print server
Install the Lexmark™MarkNet™ internal print server in an open option card slot inside your printer.
If you need help, refer to the Setup Guide that shipped with your printer for instructions about accessing the printer system board, installing option cards, and reinstalling the printer system board.
Copies of your printer publications are available on Lexmark's Web site at www.lexmark.com.
Step 2: Attach a network cable
Note: The print server inside the printer automatically adjusts itself for the network speed.
Attach the printer to your network using an Ethernet or Token-Ring network cable.
1 Make sure the printer is turned off and unplugged.
2 Connect the printer to a LAN drop or hub. Use network cabling that is compatible with your network and your print server.
See the following illustrations for information about ports and cables.
Important: Use only one network port on the MarkNet card even if multiple ports are available.
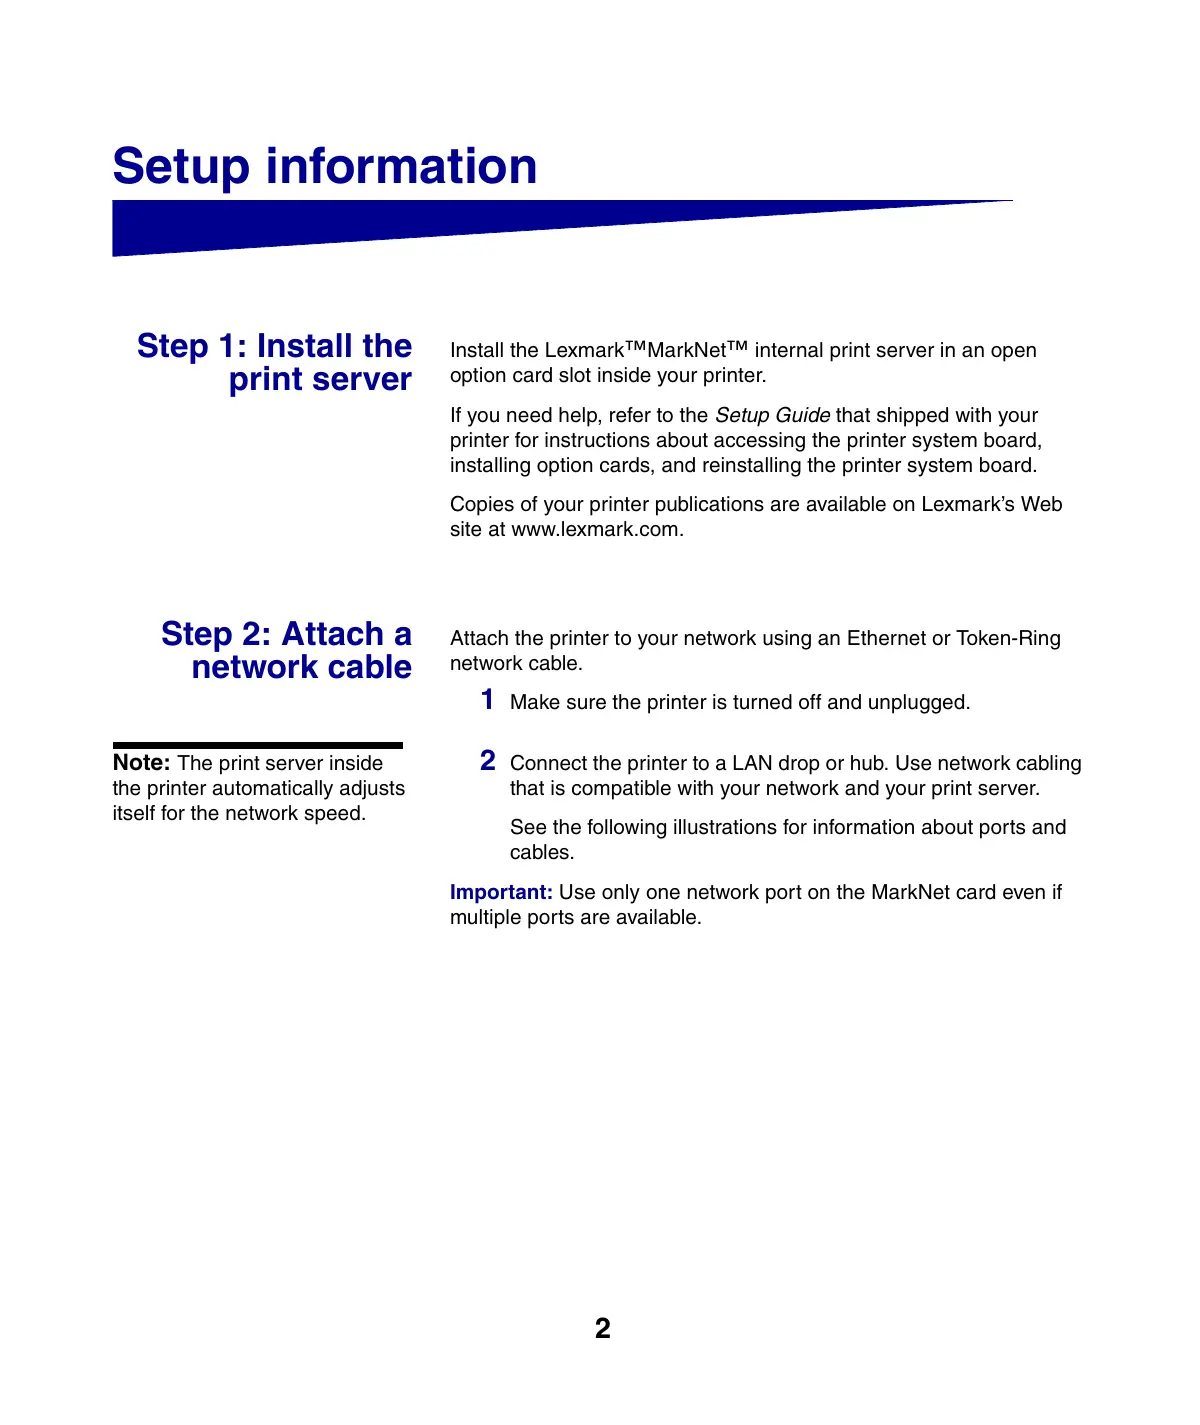
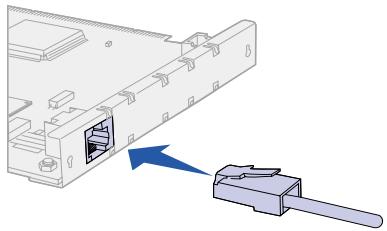
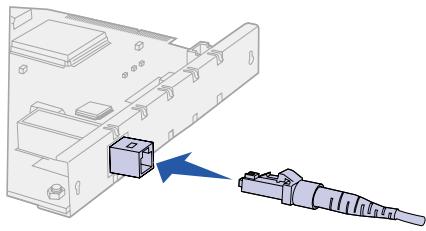
MarkNet N2000, N2001, and N2002 models
Use these print servers to attach printers to an Ethernet or a Token-Ring network.
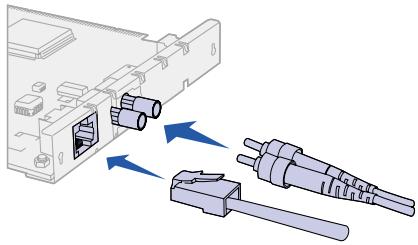
Important: If you choose not to use the BNC port on the MarkNet N2002e, leave the end cap on the port to protect the card from electrostatic discharge (ESD).
MarkNet N2001e
10/100BaseTX Ethernet
MarkNet N2002e
10BaseTX or 10BaseT/2 Ethernet

MarkNet N2000t
4/16 Token-Ring
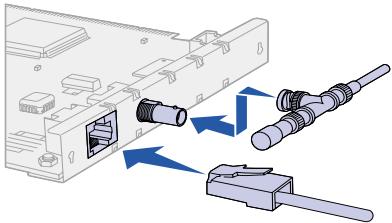
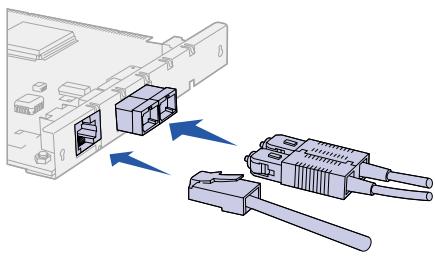
MarkNet N2003fx models
Use these print servers to attach printers to a 100Base FX fiber optic network.
MarkNet N2003fx-SC

MarkNet N2003fx-ST
MarkNet N2003fx-MTRJ
MarkNet N2004f1 models
Use these print servers to attach printers to a 10Base FL fiber optic network or an Ethernet 10BaseTX network.
MarkNet N2004fl-SC
MarkNet N2004fl-ST
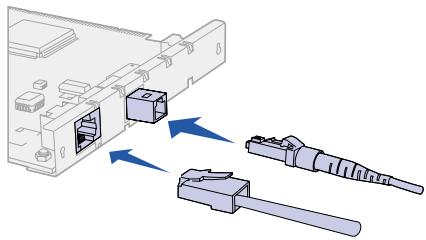
MarkNet N2004fl-MTRJ
Step 3: Assign an IP address
You must assign an IP address, netmask, and gateway to each print server you install in order for other network devices to find the printer on the network.
If your network is using DHCP, address values are automatically assigned. To verify the address assignment, print a network setup page and make sure the IP address, netmask, and gateway appear as non zero. Go to "Step 4: Print a network setup page" on page 5.
If your network is not using DHCP, then you must manually assign an IP address. One of the easiest ways is to use the printer operator panel.
To set the printer IP address, netmask, and gateway:
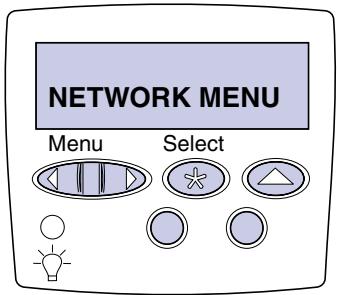
1 Press Menu until you see Network Menu, and then press Select.
2 Press Menu until you see Network Option 1 (or 2), and then press Select.
3 Press Menu until you see Network 1 Setup (or 2), and then press Select.
4 Press Menu until you see TCP/IP, and then press Select.
5 Press Menu until you see Set IP Address (or Set IP Netmask or Set IP Gateway), and then press Select.
6 To set the address, netmask, or gateway:
a Press Menu to increase (or decrease) each number.
b Press Select to move to the next segment.
C Press Select again when you are finished. The message Saved appears briefly.
7 Press Go to return the printer to the Ready state.
Step 4: Print a network setup page
Use the printer operator panel to print a network setup page to verify your IP settings.
1 Press Menu until you see Utilities, and then press Select.
2 Press Menu until you see Print Net1 Setup (or Print Net2 Setup), and then press Select.
3 Look under the TCP/IP heading on the network setup page to verify that your IP address, netmask, and gateway settings are non zero.
The printer returns to the Ready state.
Step 5: Configure the network printer
After you have assigned and verified the TCP/IP settings, you are ready to configure the printer and set up your network clients to print to it.
Windows
In Windows environments, your network printers can be configured for direct printing or for shared printing.
Supported printing methods
- Direct IP printing—when you want to print directly to a printer on your network
- Shared printing (point and print, and peer-to-peer)—when you need to centrally manage network printers
Detailed information about using each of these printing methods is on the drivers CD. Click View Documentation and look for information about network printer installation.
Supported network printer ports
- Microsoft IP port (Windows NT 4.0, Windows 2000, Windows XP)
- Lexmark network port (Windows 95/98/Me, Windows NT 4.0, Windows 2000, Windows XP)
Note: Using a custom printer driver and a custom network port provides enhanced functionality, such as printer status alerts.
Supported printer drivers
- Windows system printer drivers
- Lexmark custom printer drivers
System drivers are built into Windows operating systems. Custom drivers are available on the drivers CD.
Updated system and custom drivers are available on Lexmark's Web site at www.lexmark.com.
Creating ports and installing drivers
Read the detailed instructions on the drivers CD. Click View Documentation and look for information about network printer installation for your specific Windows environment.
If you choose to install without using the instructions on the drivers CD, you need a basic understanding of network printing on TCP/IP networks, installing printer drivers, and the process involved in creating new network ports.
Macintosh
Your printer connects automatically to AppleTalk networks and becomes readily visible to other network clients.
Note: A PostScript Printer Description (PPD) file provides detailed information about the capabilities of a printer to UNIX or Macintosh drivers or applications.
For Mac OS 8.6 - 9.x, you must create a printer object (icon) on the desktop of each network client using the LaserWriter 8 printer driver and the custom printer PPD file. For Mac OS X, select Add Printer to create a queue in the print center, using the PostScript Printer Module and the custom printer PPD file.
Information about creating the printer object on your AppleTalk clients is on the drivers CD that shipped with your printer.
A PPD installer is in the downloadable Web package available on Lexmark's Web site at www.lexmark.com.
Depending upon which version of the drivers CD shipped with your printer, you may also find this software on the drivers CD. Launch the PPD installer and follow the instructions to install the PPDs.
UNIX/Linux
Your printer supports many UNIX and Linux platforms, such as Sun Solaris and Red Hat.
Note: The Sun Solaris package is located both on the drivers CD and on Lexmark's Web site at www.lexmark.com.
Lexmark provides a printer driver package for each supported UNIX and Linux platform. The package contains all the necessary drivers and PPDs. The User's Guide in each package gives detailed instructions for installing and using Lexmark printers in UNIX and Linux environments.
You can download these printer driver packages from Lexmark's Web site at www.lexmark.com. Depending on which version of the drivers CD shipped with your printer, you may also find the driver package you need on the CD.
NetWare
Your printer works with both Novell Distributed Print Services (NDPS) and regular queue-based NetWare environments.
NDPS
If you have an NDPS environment, we recommend you install the Lexmark NDPS IP Gateway. The gateway tightly integrates your printers with NDPS so you can easily monitor, control, and print to them.
You can get the gateway, snap-ins, support files, and a white paper with installation instructions from Lexmark's Web site at www.lexmark.com/networking/ndps.html.
Other information about installing network printers in NetWare environments is on the drivers CD that shipped with your printer. Click View Documentation and look for information about network printer installation.
Non-NDPS (queue-based)
For the latest information about Lexmark support for non-NDPS environments, click View Documentation on the drivers CD and look for information about network printer installation.
Electronic emissions notices
Federal Communications Commission (FCC) Compliance Information Statement
The MarkNet internal print server has been tested and found to comply with the limits for a Class A digital device, pursuant to Part 15 of the FCC Rules. Operation is subject to the following two conditions: (1) this device may not cause harmful interference, and (2) this device must accept any interference received, including interference that may cause undesired operation.
The FCC Class A limits are designed to provide reasonable protection against harmful interference when the equipment is operated in a commercial environment. This equipment generates, uses, and can radiate radio frequency energy and, if not installed and used in accordance with the instruction manual, may cause harmful interference to radio communications. Operation of this equipment in a residential area is likely to cause harmful interference, in which case the user will be required to correct the interference at his own expense.
The manufacturer is not responsible for any radio or television interference caused by using other than recommended cables or by unauthorized changes or modifications to this equipment. Unauthorized changes or modifications could void the user's authority to operate this equipment.
Industry Canada Compliance Statement
This Class A digital apparatus meets all requirements of the Canadian Interference-Causing Equipment Regulations.
European Community (EC) Directives Conformity
This product is in conformity with the protection requirements of EC Council directives 89/336/EEC and 73/23/EEC on the approximation and harmonization of the laws of the Member States relating to electromagnetic compatibility and safety of electrical equipment designed for use within certain voltage limits.
A declaration of conformity with the requirements of the Directive has been signed by the Director of Manufacturing and Technical Support, Lexmark International, S.A., Boigny, France.
This product satisfies the Class A limits of EN 55022 and safety requirements of EN 60950.
Warning
This is a Class A product. In a domestic environment, this product may cause radio interference, in which case the user may be required to take adequate measures.
Japanese VCCI Notice
The United Kingdom Telecommunications Act 1984
This apparatus is approved under the approval number NS/G/1234/J/ 100003 for the indirect connections to the public telecommunications systems in the United Kingdom.