
Power PMR 20 - Walkie-talkie AUDIOLINE - Free user manual and instructions
Find the device manual for free Power PMR 20 AUDIOLINE in PDF.


| Product Type | Two-Way Radio (Walkie-Talkie) |
| Brand | Audioline |
| Model | Power PMR 20 |
| Frequency Band | 446 MHz (PMR446) |
| Number of Channels | 8 |
| Maximum Range | Up to 10 km (open area) |
| Transmit Power | 0.5 W (ERP) |
| Power Supply | Rechargeable Ni-MH battery pack or 3 x AA alkaline batteries |
| Battery Life | Approximately 20 hours (typical use) |
| Charging Time | 12-14 hours (for rechargeable batteries) |
| Water Resistance | IPX4 (splash-proof) |
| Dimensions (H x W x D) | 155 x 60 x 35 mm |
| Weight (with batteries) | Approximately 180 g |
| Display | LCD with backlight |
| Keypad Lock | Yes |
| VOX Function | Yes |
| Scan Function | Yes |
| Roger Beep | Yes |
| Maintenance / Cleaning | Wipe with a dry, soft cloth; do not use solvents. Keep dry. |
| Safety Instructions | Keep away from children under 3 years. Do not disassemble. Avoid exposure to extreme heat or moisture. |
| Spare Parts / Repairability | Replacement batteries and chargers available. Contact authorized service center for repairs. |
| Additional Features | Belt clip, headset jack, LED flashlight |
Frequently Asked Questions - Power PMR 20 AUDIOLINE
User questions about Power PMR 20 AUDIOLINE
0 question about this device. Answer the ones you know or ask your own.
Ask a new question about this device
Download the instructions for your Walkie-talkie in PDF format for free! Find your manual Power PMR 20 - AUDIOLINE and take your electronic device back in hand. On this page are published all the documents necessary for the use of your device. Power PMR 20 by AUDIOLINE.
USER MANUAL Power PMR 20 AUDIOLINE
Operating Instructions 17.
D
GB
D
D
Please read this operating instruction manual thoroughly.
Intended use
These walkie-talkies have been conceived for communication with other walkie-talkies complying to the same standards. Any other use is considered unintended use. Unauthorised modification or reconstruction is not permitted. Under no circumstances open the devices or complete any repair work yourself.
Ambient conditions
Prevent excessive exposure to smoke, dust, vibration, chemicals, moisture, heat and direct sunlight.
Do not use the walkie-talkies in potentially explosive areas.
Power supply
Caution: Only use the power adapter plug supplied because other power supplies could destroy the walkie-talkie equipment. Ensure access to the power adapter plug is not obstructed by furniture or such.
Rechargeable battery pack
Caution: Do not throw batteries into a fire or immerse them in water.
Medical equipment
Caution: Never use the walkie-talkies in the vicinity of medical equipment. It cannot be fully ruled out that they will not affect equipment. Walkie-talkies can cause an unpleasant humming sound in hearing aids.
Disposal
You are obliged to dispose of consumable goods according to legal requirements. The adjacent symbol indicates that electrical and electronic apparatus and batteries no longer required must be disposed of separate from domestic waste.
Electrical and electronic devices must be disposed of at suitable collection points provided by the public waste authorities.
Batteries must be disposed of at the point of sale or at the appropriate collection points provided by the public waste authorities.
Packaging materials must be disposed of according to local regulations.


Declaration of Conformity
This device fulfils the requirements stipulated in the EU directive: 1999/5/EU directive on radio equipment and telecommunications terminal equipment and the mutual recognition of their conformity. Conformity with the above mentioned directive is confirmed by the CE symbol on the device.
To view the complete Declaration of Conformity, please refer to the free download available on our web site www.audioline.de.
This product has been developed for use within Germany. It operates on an EU-harmonised frequency band (446MHz) and, thus, may be used outside Germany in all other EU member states.
CE
GB
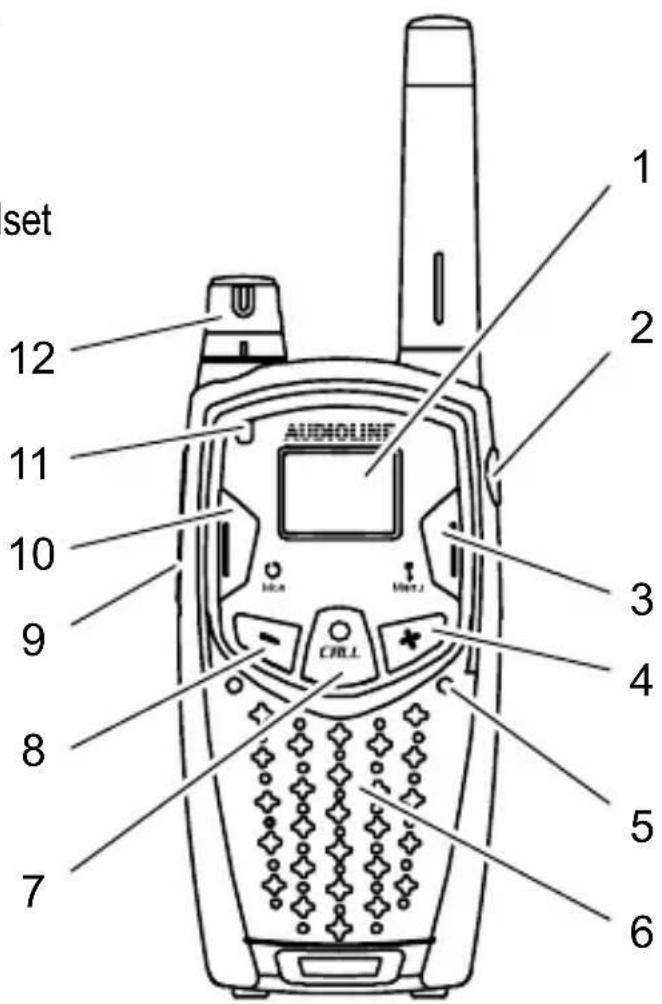
Operating Elements
2 Operating Elements 1
Handset
1 Display
2 Connection socket, headset
3 Menu / Key lock
4 Increase setting
5 Microphone
6 Loudspeaker
7 Transmit ringing
tones
8 Decrease setting
9 PTT - Talk button
10 Channel search / Monitor
11 Ready LED
12 On / Off / Volume
Display indicators
13 Send / Receive
14 Key lock
15 Channel search
16 Roger beep
17 CTCSS code
18 VOX mode
19 Channel
20 Battery charge capacity

1 The buttons in this operating manual are depicted with a uniform contour. It is possible that the symbols on the walkie-talkie buttons vary slightly from those depicted here.
Preparing the Walkie-Talkies for Use
3 Preparing the Walkie-Talkies for Use
Safety information
Caution: It is essential to read the Safety Information in Chapter 1 before starting up.
Checking the contents of the package
The package contains:
- two walkie-talkies with belt clip - two rechargeable battery packs
- two headsets - a charging station
- an operating manual - a power adapter plug
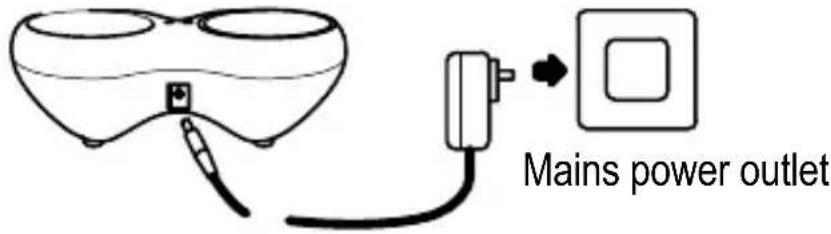
Connecting the charging station
Connect the charging station as illustrated in the diagram. For safety reasons, only use the power adapter plug supplied.
Inserting the battery pack
Open the battery compartment cover. Insert the battery pack supplied. Pay attention to correct polarity. Close the battery compartment cover.
Caution: Standard rechargeable batteries and power packs cannot be charged in the charging station. Only use the battery pack supplied or ones of the same type.

GB
Preparing the Walkie-Talkies for Use
Charging the battery pack
Before using the walkie-talkies for the first time, place them in the charging station for at least 14 hours. When the walkie-talkies are inserted correctly in the charging station, the red LEDs light up. The red LEDs also light up when the battery packs are fully charged.
Do not charge the walkie-talkies with charging units from other manufacturers.
The battery capacity is indicated in the display by the icon.
Full Half empty Low Empty




As soon as the indicator flashes in the display and acoustic warning signals are issued, the battery pack needs to be recharged.
Attaching the belt clips
Insert the belt clip in the opening from the top until it audibly snaps into place. To remove the belt clip, press on it and pull it from the opening.

4 Operating the Walkie-Talkies
Display and explanation of operation sequences
| PTT | Press the button displayed |
| , | Press and hold the button displayed |
| , | Release the button displayed |
| Display indicator flashes | |
| Speak into the microphone | |
Switching the walkie-talkies on/off
Switching on
Turn the volume control clockwise. An acoustic signal is issued. The currently active channel appears in the display and the Ready LED flashes.
Switching off
Turn the volume control anticlockwise until the display content disappears.
Volume control
Turn the volume control until the required volume is set.
Transmitting and receiving
Send
After pressing the PTT button, the Ready LED lights up. If the PTT button is pressed longer than 60 seconds, a warning signal is issued. Transmission is interrupted.
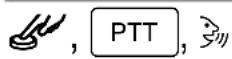
Transmit
Hold the walkie-talkie approx. 5 to 7 cm from your mouth and speak at a normal volume. In order to talk to other subscribers, the respective walkie-talkies must be set to the same channel and CTCSS code.
Receiving


Radio signals cannot be received when the PTT button is being pressed.
Selecting a channel

Select the channel and confirm
| Channel Frequency (MHz) Channel Frequency (MHz) | |||
| 1 446.00625 5 446.05625 | |||
| 2 446.01875 6 446.06875 | |||
| 3 446.03125 7 446.08125 | |||
| 4 446.04375 8 446.09375 | |||
Selecting the CTCSS code
CTCSS = Continuous Tone Coded Squelch System.
All the calls on walkie-talkies which occur within the range of reception are signalled. A condition for this is that all the walkie-talkies are set to the same channel. To prevent mutual interference, a CTCSS code can be defined for the set channel.

Select the CTCSS code and
Each CTCSS code complies to a specific audio frequency transmitted by the walkie-talkie. Communication between the subscribers is only then possible when both parties are using the same channel and CTCSS code. An exception is CTCSS code “0”. In the case of this setting, all the calls on the set channel can be heard regardless of the CTCSS code. To be able to participate in the radio communication, it may be necessary to switch from CTCSS code “0” to the CTCSS code being used.
If you want to communicate with the walkie-talkies which are not using a CTCSS code, you must select CTCSS code "0" on your walkie-talkie.
Searching for a channel
Signals are searched for in the eight channels in a continuous cycle. The icon appears in the display. If an active channel is detected, the channel search stops. The Ready LED flashes once per second. Press the PTT button to enable radio communication. If the PTT button is not pressed, channel search resumes after five seconds.
Start / End channel search
MON Start/End the channel search
Resuming search for a channel
+ Continue the search for a channel
Excluding a channel
If a channel found during the channel search process should not be considered for subsequent use, it can be excluded. All the channels are taken into consideration again when a new channel search is started.
W, — The channel is excluded and the
channel search automatically resumed
The channel set at the beginning of a channel search cannot be excluded.
Sending ringing tones
The ringing tones indicate to other subscribers that you want to talk to them. A condition for this is that the other subscribers are using the same channel and CTCSS code.
CALL Send the ringing tone
CALL Send up to ten ringing tones
Selecting/Deactivating ringing tones
There are 10 ringing tones available for selection. To deactivate the ringing tone, select the setting "0".

Select the ringing tone and confirm it
Monitor
The Monitor function enables the search for weak signals on the channel currently set. If a weak signal is received, switch to a free channel. Always communicate with other subscribers on a free channel to prevent interference.
MON Monitor the channel
W, MON End the monitoring function
Operating the Walkie-Talkies
Key lock
The key lock function prevents inadvertent modification of settings. When the key lock function is activated, the 🔒 icon appears in the display.
, MENU Activate/Deactivate the key lock
Confirmation tone
The confirmation tone is issued when you release the PTT, button. This signals to the caller that you have ended transmission.
Switching the confirmation tone on/off
Switch the walkie-talkie off. Press and hold the + button and, at the same time, switch the walkie-talkie back on.
When the confirmation tone is activated, the icon appears in the display.
VOX mode (handsfree)
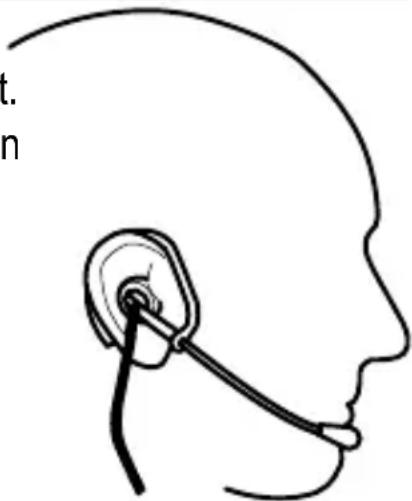
VOX mode is automatically activated when the headset supplied is used. When your voice or another noise is detected by the headset microphone, the walkie-talkie automatically starts to transmit. It is not necessary to press the PTT button.
When you start to speak, there is a slight delay before the walkie-talkie starts to transmit.
Activating/Deactivating VOX mode
Switch off PMR before inserting the headset jack plug.
- Switch the walkie-talkie off.
- Raise the cover of the connection socket.
- Insert the plug on the headset supplied in the connection socket.
- Switch the walkie-talkie on. The VOX icon appears in the display.
To deactivate VOX mode, pull the headset plug out of the connection socket.
Operating the Walkie-Talkies
Selecting the VOX sensitivity
There are three sensitivity levels available for operation in VOX mode which can be selected according to the ambient noise.
| Level 1 Level 2 | Level 3 | |
| High ambient noise | Normal ambient noise Low | ambient noise |

Select the sensitivity and confirm it
GB
5 Troubleshooting
Should problems arise with the walkie-talkies, please refer to the following information first. In the case of claims under the terms of guarantee, contact your sales outlet. There is a 2-year period of guarantee.
IMPORTANT INFORMATION ON RANGE:
Obstructions such as trees, buildings and road traffic as well as electro smog in the environment can reduce the range considerably.
Problems and solutions
Problems Solutions
Equipment does not function
- Battery pack has not been charged
- Key lock has been activated
Transmission not possible
- Press PTT in fully to transmit
- Channel is being used by other subscribers
No reception - Release PTT
- Volume setting is too low
- You are outside the range of reception, change your position
- Obstructions, such as trees and buildings, impair the range
- CTCSS code set is not identical to that of the other party
- Channel is being used by other subscribers
Technical data
Feature Value
| Output power 0.5 W | |
| Range Over 5 km in ideal conditions | |
| Rechargeable battery pack NiMh | 3.6V, 600 mAh |
6 Maintenance / Guarantee
Maintenance
- Clean the housing surfaces with a soft, fluff-free cloth.
- Never use cleaning agents or solvents.
Guarantee
AUDIOLINE equipment is produced and tested according to the latest production methods. The implementation of carefully chosen materials and highly developed technologies ensure trouble-free functioning and a long service life. The terms of guarantee do not apply to the batteries or power packs used in the products. The period of guarantee is 24 months from the date of purchase.
All deficiencies resulting from material or production faults which occur during the period of guarantee will be eliminated free of charge. Rights to claims under the terms of guarantee are annulled following intervention by the purchaser or third parties. Damage caused as a result of improper handling or operation, incorrect positioning or storing, improper connection or installation, Acts of God or other external influence are not covered by the terms of guarantee. In the case of complaints, we reserve the right to repair or replace defect parts or provide a replacement device. Replacement parts or devices become our property. Rights to compensation in the case of damage are excluded where there is no evidence of intent or gross negligence by the manufacturer.
If your device shows signs of defect during the period of guarantee, please return it to the sales outlet in which you purchased the AU-DIOLINE device together with the purchase receipt. All rights to claims under the terms of guarantee in accordance with this agreement must be asserted exclusively with regard to your sales outlet. Two years after the purchase and transfer of our products, claims under the terms of guarantee can no longer be asserted.
GB
7 Index
A
Attaching the belt clips, 22
C
Charging the battery pack, 22
Confirmation tone, 26
Connecting the charging station, 21
D
Declaration of Conformity, 19
Display, 23
E
Explanations, 23
G
Guarantee, 29
|
Inserting the battery pack, 21
K
Key lock, 26
M
Maintenance, 29
Monitor, 25
0
Operating elements, 20
Operating the walkie-talkies, 23
P
Package contents, 21
Preparing the walkie-talkies, 21
Problems and solutions, 28
S
Safety information, 18
Searching for a channel, 24
Selecting a channel, 24
Selecting the CTCSS code, 24
Selecting/Deactivating ringing tone, 25
Sending ringing tones, 25
Switching the walkie-talkies on/off, 23
T
Technical data, 28
Transmitting and receiving, 23
V
Volume control, 23
VOX (handsfree), 26


- INTENDED USE
- AMBIENT CONDITIONS
- POWER SUPPLY
- RECHARGEABLE BATTERY PACK
- MEDICAL EQUIPMENT
- DISPOSAL
- DECLARATION OF CONFORMITY
- OPERATING ELEMENTS
- 2 OPERATING ELEMENTS 1
- HANDSET
- DISPLAY INDICATORS
- PREPARING THE WALKIE-TALKIES FOR USE
- 3 PREPARING THE WALKIE-TALKIES FOR USE
- SAFETY INFORMATION
- CHECKING THE CONTENTS OF THE PACKAGE
- CONNECTING THE CHARGING STATION
- INSERTING THE BATTERY PACK
- CHARGING THE BATTERY PACK
- ATTACHING THE BELT CLIPS
- 4 OPERATING THE WALKIE-TALKIES
- DISPLAY AND EXPLANATION OF OPERATION SEQUENCES
- SWITCHING THE WALKIE-TALKIES ON/OFF
- SWITCHING ON
- SWITCHING OFF
- VOLUME CONTROL
- TRANSMITTING AND RECEIVING
- RECEIVING
- SELECTING A CHANNEL
- SELECTING THE CTCSS CODE
- SEARCHING FOR A CHANNEL
- SENDING RINGING TONES
- SELECTING/DEACTIVATING RINGING TONES
- MONITOR
- OPERATING THE WALKIE-TALKIES
- KEY LOCK
- CONFIRMATION TONE
- VOX MODE (HANDSFREE)
- SELECTING THE VOX SENSITIVITY
- 5 TROUBLESHOOTING
- PROBLEMS AND SOLUTIONS
- PROBLEMS SOLUTIONS
- TECHNICAL DATA
- 6 MAINTENANCE / GUARANTEE
- MAINTENANCE
- GUARANTEE
- 7 INDEX
- A
- C
- D
- E
- G
- K
- M
- 0
- P
- S
- T
- V
Brand : AUDIOLINE
Model : Power PMR 20
Category : Walkie-talkie