
PMR 005 - Walkie-talkie AUDIOLINE - Free user manual and instructions
Find the device manual for free PMR 005 AUDIOLINE in PDF.


| Product Type | Walkie-Talkie (PMR446) |
| Brand | Audioline |
| Model | PMR 005 |
| Frequency Band | 446 MHz (PMR446) |
| Number of Channels | 8 |
| Maximum Range | Up to 10 km (depending on conditions) |
| Power Output | 0.5 W |
| Power Supply | 3 x AAA batteries (1.5V each) |
| Battery Life | Approximately 20 hours (standby) / 10 hours (continuous use) |
| Dimensions (HxWxD) | 125 x 55 x 32 mm |
| Weight (without batteries) | 85 g |
| VOX Function | Yes (hands-free operation) |
| Scan Function | Yes |
| Roger Beep | Yes (end of transmission tone) |
| Keypad Lock | Yes |
| Headset Jack | Yes (3.5 mm) |
| Display | LCD with channel number and battery indicator |
| Cleaning Instructions | Wipe with a dry, soft cloth. Do not use solvents. |
| Safety Warnings | Do not disassemble. Keep away from children. Avoid exposure to moisture. |
| Spare Parts Availability | Replacement batteries and chargers sold separately. |
Frequently Asked Questions - PMR 005 AUDIOLINE
User questions about PMR 005 AUDIOLINE
0 question about this device. Answer the ones you know or ask your own.
Ask a new question about this device
Download the instructions for your Walkie-talkie in PDF format for free! Find your manual PMR 005 - AUDIOLINE and take your electronic device back in hand. On this page are published all the documents necessary for the use of your device. PMR 005 by AUDIOLINE.
USER MANUAL PMR 005 AUDIOLINE
Operating instructions ____ 15
3.1 Check contents of pack.... 19
3.2 Fitting the batteries.... 19
3.3 Removing and fitting the belt clip 19
3.4 Changing the moulded grip 20
4 Operation.... 21
4.1 Switching the radios on and off.... 21 4.2 Volume control 21 4.3 Channel selection.... 21 4.4 Calls between radios.... 22 4.5 Sending a call signal 22 4.6 Range of the radios.... 23 4.7 Increasing the maximum range.... 23 4.8 Channel search (scan mode).... 23
5 Important information.... 24
5.1 Technical data.... 24 5.2 Warranty.... 25 5.3 Declaration of Conformity/CE mark.... 26
- Important information -
1 Important information
Please read these operating instructions carefully. If you should have any questions, please contact our Service Department on the Hotline number 0180 5 00 13 88. Under no circumstances open the unit yourself and do not try to carry out your own repairs. For any claims under the warranty, please refer to your dealer.
Batteries
Please always use only type AAA 1.5V alkaline batteries. Do not throw batteries into the fire or immerse in water. Do not dispose of old or defective batteries with the normal household waste. Be sure to remove the batteries from the unit if you do not intend to use it for more than 1 month. Batteries that have been left in the unit can discharge in a few months. Flat batteries can leak, which can damage the contacts or the sensitive electronics in the unit.
Disposal
If the useful life of the batteries or the radios has expired, please dispose of these carefully in accordance with the statutory requirements and in a manner friendly to the environment.
Cleaning and care
The surface of the case can be cleaned with a soft, dry, lint-free cloth. Never use cleaning agents, particularly aggressive solvents. No attention is necessary apart from cleaning the case occasionally. Never leave the unit in a damp or dusty place. Avoid proximity to sources of heat such as radiators and do not expose the unit to direct sunlight.
- Important information -
Important safety information
- Do not use the radios in areas where there is a risk of explosion, such as fuel stores, blasting areas, chemical stores or areas in which chemicals or other solids are present in the air. Always follow all information signs. Areas at risk of explosion are not always clearly marked however.
- Changing batteries in areas at risk of explosion means a danger to life.
- If the radio becomes wet, switch it off immediately and remove the batteries. Do not use the radio until it is completely dry.
- When transmitting, always hold the radio vertically and approximately 2.5 to 5 cm from your mouth.
- When receiving, hold the radio at least 2.5 cm from your head.
- In order to avoid electromagnetic conflicts, switch the radios off if requested to do so by an information sign.
- If you are not sure whether the use of radios is permitted (aeroplanes, boats, hospitals, etc.) ask a responsible person before using the radios.
- In the car, never place radios above an airbag, as loose objects are flung away with force when the airbag is released and present a risk of injury.
- Excessive exposure to smoke, dust, vibrations, chemicals, moisture, heat or the direct rays of the sun must be avoided.
2 User controls
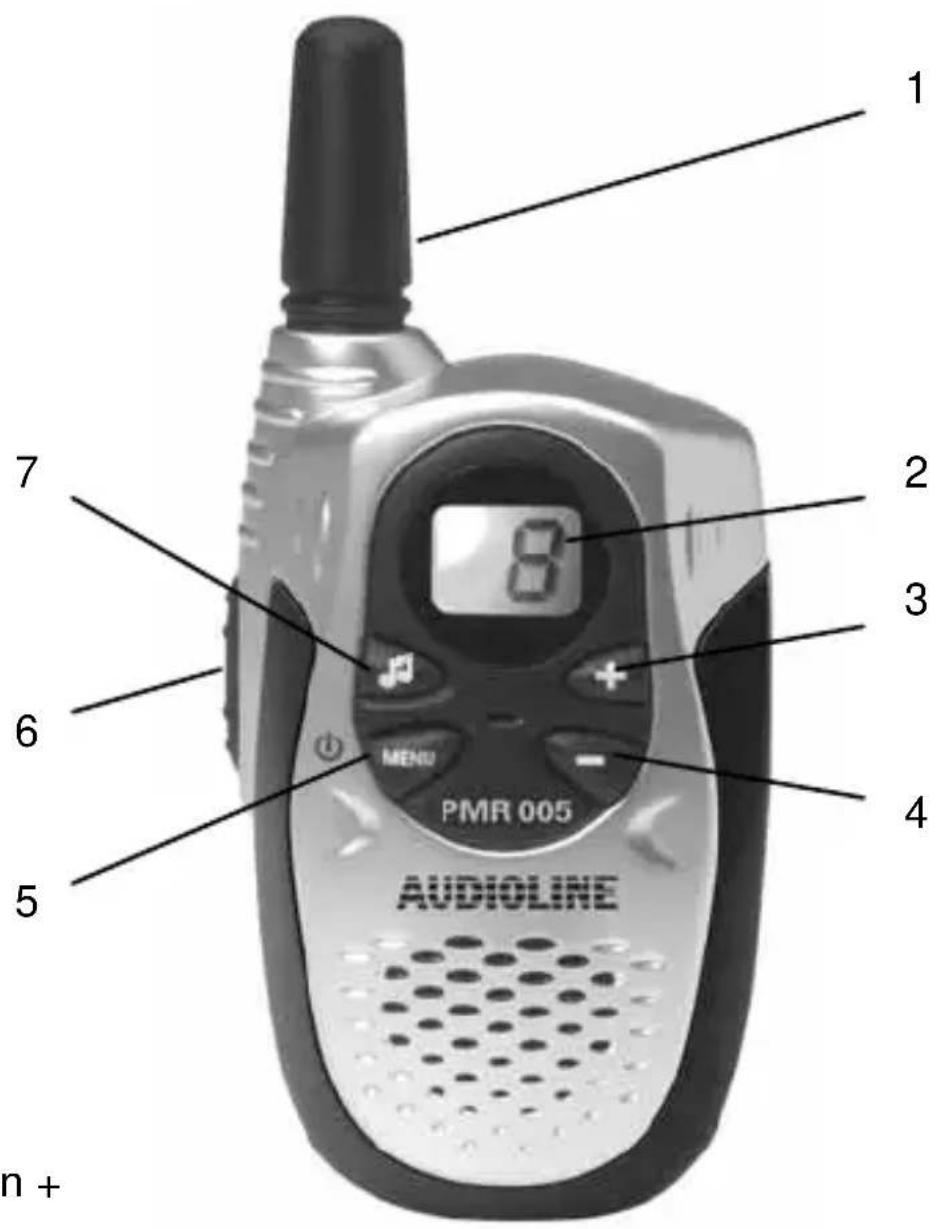
- Aerial
- Display
- Selector button +
- Selector button –
- Menu and On/Off-button
- Talk button PTT
- Call button
- Setting up -
3 Setting up
3.1 Check contents of pack
The following items are supplied:
| two radios with belt clip three | e moulded grips in different colours for each radio |
| one instruction manual Dep | ending on the model, the batteries may already be included with the unit. |
3.2 Fitting the batteries
For each unit you will require three type AAA 1.5V batteries. Please use new high-quality alkaline batteries.
Note: You can also use rechargeable NiMH batteries with a capacity of 600mAh. Rechargeable batteries cannot be charged while in the radios.
- To release the belt clip, pull gently on the upper tab and slide the belt clip upwards (see 3.3).
- Then open the compartment by sliding the cover downwards.
- Now insert the batteries, taking care to ensure that the polarity is correct. Incorrect polarity can damage the unit.
- Close the battery compartment and re-fix the belt clip (see 3.3).
If the batteries are discharged, you will hear signal tones or it will no longer be possible to switch the radio on.
3.3 Removing and fitting the belt clip
To release the belt clip, pull gently on the upper tab (1) and slide the belt clip upwards (2).
Slide the belt clip into the guide from above until it audibly engages (2).
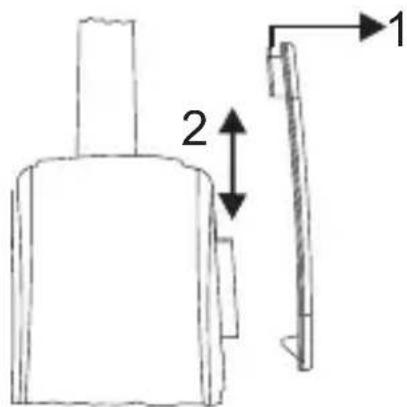
If the belt clip should not engage firmly, press the small latch with the fingernail against the back of the radio.
- Setting up -
3.4 Changing the moulded grip
Your radios are each supplied with three coloured moulded grips, which you can change as required. To change the moulded grip, proceed as follows:
Removing the grip
- Remove the belt clip (see 3.3) and open the battery compartment.
- Now carefully lever the moulded grip out of the fixing at position 1 using a screwdriver.
- Repeat this procedure at positions 2 and 3.
- You can then remove the moulded grip.

Fitting the grip
- Take the new grip and push the two upper ends into the openings provided.
- You can then push the grip home at the other positions.
- Close the battery compartment and re-fit the belt clip.
- Operation -
4 Operation
4.1 Switching the radios on and off
To switch on the radio, hold the On/Off button ⏻MENU pressed until a signal tone sounds. The display will show the currently selected channel between 1 and 8.
To switch the radio off, hold the On/Off button ⏻ MENU pressed once more until a signal tone sounds.
4.2 Volume control
The volume of the built-in loudspeaker can be displayed in 15 volume steps using the + and buttons. The selected volume will be shown in the display with v1 to v15.
4.3 Channel selection
The radios have 8 different transmission channels, which are approved by the European Committee for Radio Communications as "Private Mobile Radio" channels, known as PMR for short.

In order to be able to speak between two radios, both units must be set to the same channel.
- Press the MENU button once. The display will flash with the selected channel.
- Select the required channel using the + and buttons.
- Confirm the selection with the PTT talk button on the left-hand side.
- Operation -
4.4 Calls between radios
To speak yourself, press the PTT talk button on the left-hand side. Hold the unit about 5 cm from your mouth and speak in a normal voice. When you have finished, release the talk button. The person you are speaking to will hear a signal tone (Roger beep) when you have released the talk button. This will indicate to the other subscriber that you have finished speaking and are waiting for a reply.

Note: Remember that all radios, which are set to the same channel and are within receiving range, will be able to hear your call at the same time.
15 volume levels can be set using the + and buttons.

Note:
- While you are holding the talk button, you will not be able to hear any incoming calls. As is usual with radio units, only one of the two participants in the call can speak at any one time.
- In order that a radio channel is not engaged for too long, you can keep the PTT talk button pressed for up to 60 seconds. After this, the radio will switch off the transmission and you will hear a signal tone.
Therefore, always wait until you hear the signal tone before pressing the talk button again.
4.5 Sending a call signal
You can summon the attention of the person you are calling by means of the call signal. Press the call button once. A signal tone will sound on the unit called. Remember that call signals will sound on all radios that are within receiving range. Now wait until the person called answers.
- Operation -
4.6 Range of the radios
The radios have a range of up to 3 km outdoors. This maximum range can be reduced under certain circumstances. You can achieve maximum range in open, flat conditions. If there are buildings or trees in the signal path then the range will be reduced. The range is even further reduced in hilly terrain.
4.7 Increasing the maximum range
The radios are equipped with a so-called Auto-Squelch system, by means of which weak transmissions and undesirable noises are automatically filtered out during use. This Auto-Squelch system can be temporarily switched off in order to increase the range.
Press the MENU button three times. The automatic suppression will be switched off and it will now be possible for even very weak signals to be received for a few seconds. The radio will then switch back to the normal mode.
4.8 Channel search (scan mode)
When channel search (scan) is switched on, all 8 channels are continuously polled until the radio finds a channel that is being used for speech.
- Press the MENU button twice. The indicator will appear in the display.
- Channel search is started by means of the + button. After a few seconds, all channels will be searched one after the other. If a channel is found, which is being used for speech, the channel search will stop and you will be able to hear the conversation. If the channel that has been found is no longer being used for speech, the channel search will automatically be continued after a few seconds.
- To deactivate this function once more, press the MENU button twice and then the - button. Confirm with the PTT talk button on the left-hand side.
- Important information -
5 Important information
5.1 Technical data
PMR channel frequencies (MHz):
| Channel 1: 446.00625 Channel 5: 446.05625 |
| Channel 2: 446.01875 Channel 6: 446.06875 |
| Channel 3: 446.03125 Channel 7: 446.08125 |
| Channel 4: 446.04375 Channel 8: 446.09375 |
Channel separation 12.5 kHz
Transmitter power: 500 mW
Audio output: 80 dB SPL minimum
Battery life in mixed operation: approx. 12 hours
Technical data are subject to change without prior notice.
Important information
5.2 Warranty
AUDIOLINE equipment is manufactured and tested in accordance with the most up-to-date production methods. Selected materials and highly developed technology ensure trouble-free operation and long life. If your unit should develop a fault within the guarantee period, however, please contact the shop where you bought your AUDIOLINE equipment exclusively and have your purchase receipt available for inspection. The warranty period is 24 months from the day of purchase. The warranty does not apply to batteries or rechargeable batteries even when these are included with the unit.
Warranty conditions: Within the guarantee period, all defects due to material or manufacturing faults will be repaired free of charge. The guarantee is invalidated if the equipment has been tampered with by the purchaser or third parties. Any damage caused by improper handling or operation, by incorrect positioning or storage, by improper connection or installation, or by excessive force or other external influences is not covered by the guarantee. In the case of complaint, we reserve the right to repair or replace defective parts or to exchange the equipment.
Exchanged parts or exchanged equipment become our property. Claims for compensation are excluded insofar as they do not relate to criminal intent or gross negligence on the part of the manufacturer. All guarantee claims according to these conditions must be raised exclusively with your dealer. Rights under the guarantee can no longer be enforced after the expiry of 24 months from purchase and delivery of our products. In the case of unnecessary or unjustified demands on the customer service department, we will levy our usual service charges for materials, time, postage and packing. Any complaints must be reported as soon as a problem is found. The guarantee is valid within the German Federal Republic.
5.3 Declaration of Conformity/CE mark
The radios comply with the basic requirements of the R&TTE Directive "1999/5/EC". This is confirmed by the CE mark.
Please refer to the free download on our website www.audioline.de for the complete declaration of conformity.
This product has been developed for use within Germany. It operates on an EU-harmonised frequency band (446 MHz) and, thus, may be used outside Germany in all other EU member states.


- IMPORTANT INFORMATION
- 1 IMPORTANT INFORMATION
- BATTERIES
- DISPOSAL
- CLEANING AND CARE
- IMPORTANT SAFETY INFORMATION
- 2 USER CONTROLS
- SETTING UP
- 3 SETTING UP
- 3.1 CHECK CONTENTS OF PACK
- 3.2 FITTING THE BATTERIES
- 3.3 REMOVING AND FITTING THE BELT CLIP
- 3.4 CHANGING THE MOULDED GRIP
- REMOVING THE GRIP
- FITTING THE GRIP
- OPERATION
- 4 OPERATION
- 4.1 SWITCHING THE RADIOS ON AND OFF
- 4.2 VOLUME CONTROL
- 4.3 CHANNEL SELECTION
- 4.4 CALLS BETWEEN RADIOS
- NOTE
- 4.5 SENDING A CALL SIGNAL
- 4.6 RANGE OF THE RADIOS
- 4.7 INCREASING THE MAXIMUM RANGE
- 4.8 CHANNEL SEARCH (SCAN MODE)
- 5 IMPORTANT INFORMATION
- 5.1 TECHNICAL DATA
- 5.2 WARRANTY
- 5.3 DECLARATION OF CONFORMITY/CE MARK
Brand : AUDIOLINE
Model : PMR 005
Category : Walkie-talkie