
XE-A302 - Cash register SHARP - Free user manual and instructions
Find the device manual for free XE-A302 SHARP in PDF.


| Product Type | Electronic Cash Register |
| Brand | Sharp |
| Model | XE-A302 |
| Dimensions (W x D x H) | Approximately 340 x 310 x 220 mm |
| Weight | Approximately 4.5 kg |
| Power Supply | AC 120V 60Hz (or 220-240V 50/60Hz) via adapter |
| Power Consumption | 20W (max) |
| Display | 2-line alphanumeric LCD with 10-digit operator display |
| Printer | Dot matrix impact printer with roll paper (57.5mm width) |
| Drawer | Lockable cash drawer with 4 coin compartments and 5 bill compartments |
| Key Functions | Up to 250 PLU departments, 8 clerk totals, tax calculations, discount, subtotal, void, refund |
| Programming | Store-and-forward, program by keyboard or PC link (optional) |
| Connectivity | RS-232 serial port for PC or peripherals |
| Memory Backup | Battery-backed RAM for data retention (approx. 1000 hours) |
| Maintenance | Clean exterior with dry cloth; avoid solvents; periodic printer head cleaning recommended |
| Safety Features | Power surge protection, drawer locking, key operator control |
| Spare Parts & Repairability | Common spare parts (printer, drawer, power adapter) available; repairs by authorized technician recommended |
| General Information | For retail use; manual available in PDF; supports multiple languages |
Frequently Asked Questions - XE-A302 SHARP
User questions about XE-A302 SHARP
0 question about this device. Answer the ones you know or ask your own.
Ask a new question about this device
Download the instructions for your Cash register in PDF format for free! Find your manual XE-A302 - SHARP and take your electronic device back in hand. On this page are published all the documents necessary for the use of your device. XE-A302 by SHARP.
USER MANUAL XE-A302 SHARP
WARNING
FCC Regulations state that any unauthorized changes or modifications to this equipment not expressly approved by the manufacturer could void the user's authority to operate this equipment.
Note: This equipment has been tested and found to comply with the limits for a Class A digital device, pursuant to Part 15 of the FCC Rules. These limits are designed to provide reasonable protection against harmful interference when this equipment is operated in a commercial environment.
This equipment generates, uses, and can radiate radio frequency energy and, if not installed and used in accordance with the instruction manual, may cause harmful interference to radio communications. Operation of this equipment in a residential area is likely to cause harmful interference in which case the user will be required to correct the interference at his own expense.
CAUTION
The AC power socket-outlet should be installed near the equipment and should be easily accessible.
FOR YOUR RECORDS
Please record below the model number and serial number for easy reference in case of loss or theft. These numbers are located on the right side of the unit. Space is provided for further pertinent data.
Model Number
Serial Number
Date of Purchase
Place of Purchase
INTRODUCTION
Thank you very much for your purchase of the SHARP Electronic Cash Register, Model XE-A302.
Please read this manual carefully before operating your machine in order to gain full understanding of functions and features.
Please keep this manual for future reference. It will help you if you encounter any operational problems.
CAUTION!
Be sure to initialize the cash register before you start operating the cash register. Otherwise, distorted memory contents and malfunction of the cash register will occur. For this procedure, please refer to page 8.
IMPORTANT
- On the printer cover, a paper cutter is mounted. Be careful not to cut yourself on the paper cutter. Install your register in a location that is not subject to direct radiation, unusual temperature changes, high humidity, or exposed to water sources. Please keep the register away from heat and magnetic sources.
Installation in such locations could cause damage to the cabinet and the electric components.
- Never operate the register with wet hands. The water could seep into the interior of the register and cause component failure.
- When cleaning your register, use a dry, soft cloth. Never use solvents, such as benzine and/or thinner.
The use of such chemicals will lead to discoloration or deterioration of the cabinet.
- The register plugs into any standard wall outlet (120V AC ±10%) with a dedicated earth-guard. Other electrical devices on the same electrical circuit could cause the register to malfunction.
- If the register malfunctions, call 1-800-BE-SHARP for service - do not try to repair the register yourself.
- For complete electrical disconnection, remove the AC power cord from the wall outlet.
PRECAUTION
This Electronic Cash Register has a built-in memory protection circuit which is operated by rechargeable batteries.
Please note that all batteries will, in time, dissipate their charge even if not used. Therefore to insure an adequate initial charge in the protection circuit, and to prevent any possible loss of memory upon installation, it is recommended that each unit be allowed to recharge for a period of 24 to 48 hours prior to use by the customer.
After installation, the rechargeable batteries are charged when the machine is plugged in and its mode switch is set to the ON position (other than OFF position). This recharging precaution can prevent unnecessary initial service calls.
Customer Service Hotline 1-800-BE-SHARP
For Easy Set-up, see "GETTING STARTED" (page 8).
PARTS AND THEIR FUNCTIONS....4
1 External View 4 2 Printer 4 3 Mode Switch and Mode Keys....5 4 Keyboard....5 5 Displays....6 6 Drawer Lock Key 6
GETTING STARTED....8
FOR THE OPERATOR
OVERVIEW OF FLOW OF DAILY SALES ENTRIES 12
BASIC SALES ENTRY 13
1 Basic Sales Entry Example ....13 2 Error Warning 14 3 Item Entries 15
Single item entries 15 Repeat entries 16 Multiplication entries 16 Split pricing entries 17 Single item cash sale (SICS) entry....18
4 Displaying Subtotals....18 5 Finalization of Transaction 18
Cash or check tendering....18 Cash or check sale that does not require tender entry....19 Charge (credit) sale....19 Mixed-tender sale 19
6 Tax Calculation....20
Automatic tax....20 Manual tax 20 Tax delete....20 Tax status shift 21
OPTIONAL FEATURES....22
1 Auxiliary Entries....22
Discount and premium entries using the percent key....22 Discount and premium entries using the discount key 22 Refund entries 23 Non-add code number entries and printing 23
2 Auxiliary Payment Treatment 24
Currency conversion....24 Received-on account and paid-out entries 25 No sale (exchange) 25 Bottle return 25
3 Automatic Sequence Key ( [AUTO] key) Entries....25
CORRECTION 26
1 Correction of the Last Entry (direct void)....26 2 Correction of the Next-to-last or Earlier Entry (indirect void)....26 3 Subtotal Void 27 4 Correction of Incorrect Entries not Handled by the Direct or Indirect Void Function 27
FOR THE MANAGER
PRIOR TO PROGRAMMING 28
BASIC FUNCTION PROGRAMMING (For Quick Start)....28
1 Date and Time Programming ....28 2 Tax Programming for Automatic Tax Calculation Function 29
Tax programming using a tax rate....29 The tax table (applicable to the add-on tax)....30 Quantity for doughnut tax exempt (for Canadian tax system) ....32
AUXILIARY FUNCTION PROGRAMMING ....33
1 Department Programming....33 2 PLU (Price Look-Up) and Subdepartment Programming....35 3 Commission Rate Programming ....36 4 Miscellaneous Key Programming....37
Rate for %1, %2 and CONV ....37 Amount for ⊖ ....37 Percent rate limitation for %1 and %2 38 Function parameters for %1, %2 and - 38 Function parameters for CONW 39 Entry digit limit for RA, RCPTIPO and TAX 39 Function parameters for CHK, CH1, CH2 and CA/AT (when using as CA key).....40
5 Text Programming....41
ADVANCED PROGRAMMING....48
1 Register Number and Consecutive Number Programming....48 2 Various Function Selection Programming 1 ....48
Function selection for miscellaneous keys ......49 Print format 49 Receipt print format ....50 Electronic journal (EJ) function parameters....50 Function selection for tax....51 Other programming ....51
3 Various Function Selection Programming 2....54
Power save mode....54 Logo message print format....54 High amount lockout (HALO) for cash in drawer (CID) (sentinel)....55 RS-232C interface 55 Thermal printer density....56 Language selection ....56 Training clerk specification for training mode 57 AUTO key programming....57
4 Reading Stored Programs....57
TRAINING MODE 59
READING (X) AND RESETTING (Z) OF SALES TOTALS ....60
EJ REPORT READING AND RESETTING....66
OVERRIDE ENTRIES....67
CORRECTION AFTER FINALIZING A TRANSACTION (Void mode)....67
1 In Case of Power Failure....68 2 In Case of Printer Error 68 3 Cautions in Handling the Printer and Recording Paper....68 4 Replacing the Paper Roll....69 5 Removing a Paper Jam....71 6 Cleaning the Printer (Print Head / Sensor / Roller) 71 7 Removing the Till and the Drawer....72 8 Opening the Drawer by Hand....72 9 Before Calling for Service....73
SPECIFICATIONS ....74
PARTS AND THEIR FUNCTIONS
1 External View
■ Front view Rear view
2 Printer

The printer is a one-station thermal printer, so it does not require any type of ink ribbon or cartridge.
Lift the rear of the printer cover to remove it. To reinstall, hook the pawls on the cabinet and close.
Caution: The paper cutter is mounted on the printer cover. Be careful not to cut yourself.

Do not attempt to remove the paper roll while the print roller arm is locked. This may result in damage to the printer and print head.
3 Mode Switch and Mode Keys
The mode switch can be operated by inserting one of the two supplied mode keys - manager (MA) and operator (OP) keys. These keys can be inserted or removed only in the “REG” or “OFF” position.
![graph TD A["Manager key (MA)"] --> B["OPX/Z"] B --> C["REG"] C --> D["MGR"] D --> E["X1/Z1"] E --> F["X2/Z2"] F --> G["OPX/Z"] G --> H["OFF"] H --> I["VOID"] I --> J["PGM"] J --> K["OPX/Z"] style A fill:#f9f,stroke:#333 style K fill:#f9f,stroke:#333 style B fill:#ccf,stroke:#333 style C fill:#cfc,st…](/content/2026/06/1310334/images/2ebfbaf1510fa72384647a06746568ff1bfd02250026f42de1cf085e2c195b4b.jpg)
The mode switch has these settings:
OFF: This mode locks all register operations. (AC power turns off.) No change occurs to register data.
OP X/Z: To take individual clerk X or Z reports, and to take flash reports. It can be used to toggle receipt state "ON" and "OFF" by pressing the [RCPT:PO] key.
REG: For entering sales.
PGM: To program various items.
VOID: Enters into the void mode. This mode allows correction after finalizing a transaction.
MGR: For manager's entries. The manager can use this mode for an override entry.
X1/Z1: To take the X/Z report for various daily totals.
X2/Z2: To take the X/Z report for periodic (weekly or monthly) consolidation.
4 Keyboard
■ Keyboard layout
| ↑ | E/J PRINT | 67 | 68 69 70 | 71 72 73 74 75 | CLK # | 2 | 4 | 6 | AUTO | ESC | |||||
| 56 | 57 58 59 | 60 61 62 | 63 64 | 65 66 | DEPT # | 1 | 3 | 5 | RCPT /PO | RA | |||||
| 45 | 46 47 48 | 49 50 51 | 52 53 | 54 55 | %1 | PLU/ SUB | @/ FOR | CL | TAX | CONV | |||||
| 34 | 35 36 37 | 38 39 40 | 41 42 | 43 44 | %2 | 7 | 8 | 9 | TAX1 SHIFT | TAX2 SHIFT | |||||
| 23 | 24 25 26 | 27 28 29 | 30 31 | 32 33 | ⊖ | 4 | 5 | 6 | CH1 | CH2 | |||||
| 12 | 13 14 15 | 16 17 18 | 19 20 | 21 22 | RFND | 1 | 2 | 3 | MDSE SBTL | CHK | |||||
| 1 | 2 | 3 | 4 | 5 | 6 | 7 | 8 | 9 | 1 | 0 | VOID1 | 0.100 | - | #/TM SBTL | CA/AT |
■ Key names
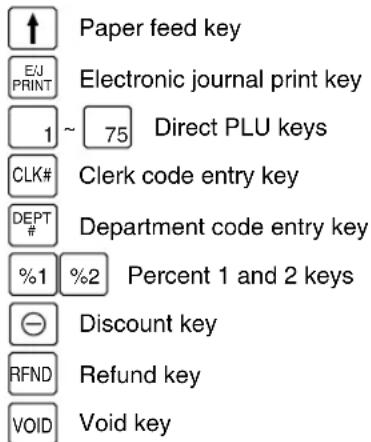

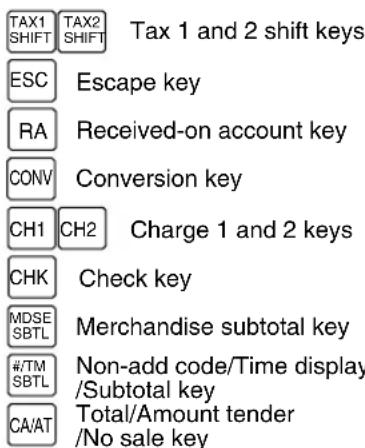
Note: In this manual, key tops are shown in one line, such as PLU/SUB for easy reading. Department keys are shown like 1, and numeric keys are indicated with simple number indication, such as 1, unless otherwise specified.
■ Keyboard sheet
Two types of keyboard sheets are installed on the cash register; one for ordinal use and one for text programming.
To reinstall the keyboard sheet or a new sheet, please follow the procedure below.

① Turn over the keyboard cover. ② Insert the keyboard sheet into a slit.

③ Close the keyboard cover.
Note
- Do not spread the keyboard cover too far as it might tear the tabs.
- Replace the keyboard sheet with a new one if it gets wet. Using a wet keyboard sheet may cause problems.
- Be sure to use only SHARP-supplied keyboard sheets. Thick or hard sheets can make key operations difficult.
- Place the keyboard sheet evenly under the keyboard cover.
- If you require a new keyboard sheet, please call the customer service hotline.
- The keyboard cover will eventually wear out. If your keyboard cover is dirty or broken, replace the cover with a new one. For details, please call the customer service hotline.
5 Displays
■ Operator display
- Clerk code or Mode name
The mode you are in is displayed. When a clerk is assigned, the clerk code is displayed in the REG or OP X/Z mode. For example, “*01*” is displayed when clerk 01 is assigned.
- Repeat
The number of repeats is displayed, starting at "2" and incrementing with each repeat. When you have registered ten times, the display will show "0". (2 → 3 .....9 → 0 → 1 → 2...)
- Sentinel mark
When the amount in the drawer reaches the amount you preprogrammed, the sentinel mark "X" is displayed advising you to remove the money to a safe place.
- Power save mark
When the cash register goes into the power save mode, the power save mark (decimal point) lights up.
• Function message display area
Item labels of departments and PLU/subdepartments and function texts you use, such as %1, (-) and CASH are displayed. For the details of function texts, please refer to pages 45 and 46.
When an amount is to be entered or has been entered, "AMOUNT" is displayed: When an amount is to be entered, ---- is displayed at the numeric entry area with "AMOUNT". When a preset price has been set, the price is displayed at the numeric entry area with "AMOUNT".
- Numeric entry display area
Numbers entered using numeric keys are displayed here.
Date and time display
Date and time appear on the display in the OP X/Z, REG, or MGR mode. In the REG or MGR mode, press the #/TM/SBTL key to display the date and time.
Error message
When an error occurs, the corresponding error message is displayed in the function message display area. For details of error messages, please refer to "Error message table" on page 73.
■ Customer display (Pop-up type)

Power save mark (Mark only lights up in the power save mode.)
6 Drawer Lock Key
This key locks and unlocks the drawer. To lock it, turn 90 degrees counterclockwise. To unlock it, turn 90 degrees clockwise.

GETTING STARTED
Please follow the procedure shown below.
1 Installing the cash register
Find a stable surface near an AC outlet where the cash register will not be subject to water sources or direct sunlight. Unpack the cash register and make sure all accessories are included. For details of accessories, please refer to the "Specifications" section.
2 Initializing the cash register
In order for the cash register to operate properly, you must initialize it before operating for the first time. Follow this procedure.
- Make sure the power cord plug is not plugged into the AC outlet.
- Insert the manager (MA) key into the mode switch and turn it to the PGM position.

- While holding down both the ↑ key and the 67 key, insert the plug into the AC outlet. The buzzer will sound three times and "*** MRS. ***" will be displayed.

- The cash register has now been initialized. The register display will now show "0.00" with "PGM".

Note
If the buzzer does not sound when the plug is inserted, the initialization has not been done successfully. (This will occur when the voltage is high because you operated the cash register before starting initialization.) Wait at least ten seconds after pulling out the plug and initialize the cash register again.
Caution
The cash register has a built-in memory protection circuit which is operated by rechargeable batteries. Since the rechargeable batteries have been discharged, please charge the batteries for one or two days before using the cash register for the first time. To charge the batteries, set the mode switch to a position other than "OFF" with the power cord plugged into the AC outlet. Unless the batteries have been charged, all of the programmed data and sales data is not saved.
Note
If you press a key by mistake, an error message such as "HEAD UP" or "PAPER EMPTY" may be displayed. Press the CL key to clear the message after installing a paper roll.
3
Installing a paper roll
Precaution: The paper cutter is mounted on the printer cover. Take caution when installing paper rolls.
The register can print receipts or journals. For the printer, you must install the paper roll provided with the register.
Install the paper roll according to the procedure shown below with the power cord connected and the mode switch set to the PGM position:
- Push the printer cover forward and detach it.
- Lift up the print roller release lever to unlock and open the print roller arm.

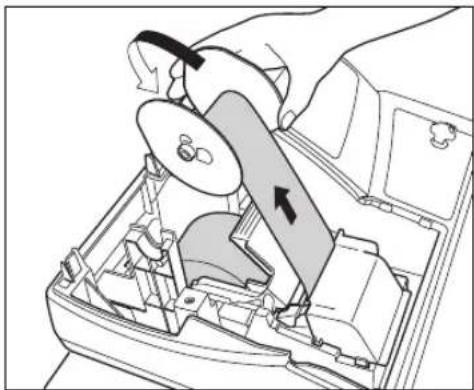
- Set a paper roll in the paper roll cradle as illustrated at the right.

- Feed the end of the paper along with the paper positioning guides as illustrated at the right.

- While holding down the paper, slowly close the print roller arm, and push down the arm until you hear a click locking the arm. Make sure securely you push down the center of the wing part of the arm as illustrated at the right. The paper will be fed automatically.

Note
If the print roller arm is not securely locked, printing is not done right. If this problem occurs, open the arm, and close the arm as instructed above.
6. When not using the take-up spool (using as receipt paper):
- Cut off the excess paper using the edge of the inner cover, and replace the printer cover. Press the ↑ key to make sure the paper end comes out of the printer cover and clean paper appears.
If the paper end does not come out, open the printer cover, and pass the paper end between the paper cutter and the paper guide of the printer cover, and replace the cover.

When using the take-up spool (using as journal paper):
- Insert the end of the paper into the slit in the spool. (Press the ↑ key to feed more paper if required.)
- Wind the paper two or three turns around the spool shaft.
- Set the spool on the bearing, and press the ↑ key to take up excess slack in the paper.
- Replace the printer cover.

When using a paper roll as journal paper, you must change the printing style. Refer to "Print Format" in "Various Function Selection Programming 1" section (Job code 6) for changing the printing style.
4
Programming date, time and tax

The cash register provides text languages of English, French and Spanish. It is preset to English. If you want to change the language, you must change it before programming. Refer to “Language selection” in “Various Function Selection Programming 2” section for changing the language.
Before you can proceed with registration of sales, you must program:
- date • time • tax
Please refer to the BASIC FUNCTION PROGRAMMING section for details (page 28).
5
Programming other necessary items
While the cash register is pre-programmed to be used with minimal setup, it does provide you with optional functions. Before you start programming, please read through the sales operations section to understand optional functions. The main optional functions are listed below:
- PLU (price lookup)/subdepartment • Consecutive number
- Machine number
- Power save mode (factory setting: goes into power save mode after 30 minutes) • Electronic Journal (EJ)
- Text programming for clerk names, department items, PLU/subdepartment items, logo messages printed on the top or bottom of receipts, function texts and foreign currency symbol
- Bottle return department
- Split pricing entry
This is not factory preset. You must enable this function.
• Foreign currency conversion rate You must set a conversion rate to use CONV key. - Preset unit price for departments - Preset amount for ⊖ - Preset rates for %1 and %2
You do not have to program these preset prices/amount/rates since they can be entered at registration. It might be convenient to preset so you do not have to re-enter every time.
- Amount entry digit limit for PO amount, RA amount, Manual tax amount The factory setting makes the maximum amount you can enter. You can program to limit the amount.
- Sentinel - High amount lockout (HALO) for cash in drawer (CID)
- Department group
You can classify departments into a maximum of 9 groups (0 to 9 groups: 0: non-group is assigned).
Sales in each group can later be printed on an individual group total report and full group total report.
- Commission
If you program commission rates (up to two) and classify departments and PLUs/subdepartments into commission groups (0 to 2 groups: 0: non-commission), commission sales and amount in each commission group can later be printed on individual and full clerk reports.
• Key sequence for AUTO key • RS-232C programming • Specification of clerk to be trained
Department programming:
The cash register is pre-programmed for departments as follows:
Department: Allow open price entry in normal department (group: 0, commission group: 0), taxable status-taxable 1 for department 1 to 6, and non taxable for department 7 to 99
When you use department 7 or above, and/or you apply taxable status other than taxable 1 for department 1 to 6, you must change department settings. Please refer to the department programming section for programming details.
PLU/subdepartment programming:
The cash register is preprogrammed for PLUs/subdepartments as follows:
PLU/subdepartment selection: PLU is selected for all PLU codes so that you only have to program unit prices and associated departments for them (by default, unit price is set to 0 and associated department is set to department 1). Function parameters including tax status depend on the status of associated department.
- For direct PLU keys, PLU codes 1 through 75 are assigned for PLU 1 through 75 keys respectively.

Starting sales entries
Now you are ready for sales registration.
OVERVIEW OF FLOW OF DAILY SALES ENTRIES
Things to do before starting sales entries:
- Make sure the power cord is securely connected to the AC outlet.
- Turn the mode switch to OP X/Z position and check if date and time are correctly set.
- Replace the till, if removed for safety.
- Check if there is enough paper on the roll.
- Select receipt ON/OFF function.
- Make any necessary programming for the day in PGM mode.
For details, refer to BASIC SALES ENTRY, page 13. For the till and paper roll, refer to OPERATOR MAINTENANCE, page 68 and for programming, refer to programming sections.
Things you can do for sales entries:
- Item entries
- Item repeat entries
- Item multiplication entries
- Single item cash sale (SICS), if programmed.
- Split pricing entries, if programmed.
- Displaying subtotals • Cash/Check/Charge sale
- Cash tendering in a foreign currency, if the currency conversion rate is programmed.
- Manual tax entry
- Discount or premium using %1, %2, and ⊖ keys
- Refund entry
- No sale
- Paid-out entries • Received on account entries
- Printing non-add code number
- Making corrections
- Checking sales reports
For details of sales entry method, refer to BASIC SALES ENTRY (page 13) and OPTIONAL FEATURES (page 22). For details of correcting sales entries, refer to CORRECTION (page 26). For details on reading sales information, refer to READING (X) AND RESETTING (Z) OF SALES TOTAL (page 60).
Things to do after close of business:
- Print sales reports, and clear sales data for the day.
- Print Electronic Journal (EJ) reports, and clear Electronic Journal (EJ) data, if necessary.
- Account money - comparing it with the amount in cash in drawer printed on the general report.
- Remove the till for safety.
- Turn the mode switch to OFF position.
For details of reading sales information, refer to READING (X) AND RESETTING (Z) OF SALES TOTAL (page 60) and EJ REPORT READING AND RESETTING (page 66). For details of removing the till and maintenance details, refer to OPERATOR MAINTENANCE (page 68).
BASIC SALES ENTRY
1 Basic Sales Entry Example
Listed below is a basic sales entry example when selling items by cash. For operation details, please refer to each section.
Mode switch setting
- Turn the mode switch to the REG position.
Clerk assignment
- Enter your clerk code. (For example, clerk code is 1. Enter 1 using the numeric key and press the CLK# key.) The clerk code 1 is automatically selected just after initialization of the cash register.

Item entries
- Enter the price for the first department item. (For example, for 15.00, enter 1500 using the numeric keys, and press the appropriate department key.)
For department 7 and above, enter the department code using numeric keys, and press the DEPT# key, then enter the price and press the DEPT# key again.
- Repeat step 3 for all department items.
Displaying subtotals
- Press the #/TM/SBTL key to display the amount due.
Finalizing the transaction
- Enter the amount received from the customer. (You can omit this step if the amount tendered is the same as the subtotal.)
- Press the CA/AT key, and the change due is displayed (when the amount received was not entered, the total amount is displayed) and the drawer is opened.
- Tear off the receipt and give it to the customer with his or her change.
- Close the drawer.
![graph TD A["Clerk assignment"] --> B["1 CLK#"] C["Item entries"] --> D{1500 1*} C --> E{2300 2*} D --> F["DEPT.01 *01* -01.00"] E --> G["DEPT.02 *01* 15.00 -23.00"] H["Displaying subtotal"] --> I["#TM/SBTL"] I --> J["SUBTOTAL *01* 40.38"] K["Finalizing the transaction"] --> L["CA/AT *01* 5000 -9.62"…](/content/2026/06/1310334/images/03bb3439be2b5af86604ca43a85b9f2815b17dd594fdc912f48901beda1c2220.jpg)
* 1 2 : indicate department keys. (In this example, the tax rate is set to 6.25%.)
Receipt printKey operation example
Clerk assignment
Prior to any item entries, clerks must enter their clerk codes into the register. However, the code entry may not be necessary when the same clerk handles consecutive transactions.
■ Sign-on (in REG, MGR, VOID mode)![graph TD A["To display the signed-on clerk code"] --> B["Clerk code 1 to 40"] B --> C["CLK#"]](/content/2026/06/1310334/images/e2344b1790e7445b9537fcc3534336b0644523a9f2f4420653e1b400203eeab9.jpg)
■ Sign-off (in REG, MGR, VOID mode)
Receipt ON/OFF function
You can disable receipt printing in the REG mode to save paper using the receipt ON/OFF function. To disable receipt printing, press the RCPT/PO key in the OP X/Z position. This key toggles the receipt printing status ON and OFF.
To check the receipt printing status, turn the mode switch to the OP X/Z position or press the CL key in the REG mode. When the function is in the OFF mode, the receipt off indicator “_” is illuminated.
The register will print reports regardless of the receipt state, so the paper roll must be installed.
To issue a receipt when receipt ON/OFF function is set to OFF:
If your customer wants a receipt after you finalized a transaction with the receipt ON/OFF function in the OFF mode, press the RCPTIPO key. This will produce a receipt. If more than 30 items were entered, the receipt will be issued in a summary receipt format.
Power Save Mode
The register will enter into power save mode when no entries are performed based on the pre-programmed time limit (by default, 30 minutes).
When the register goes to the power save mode, all display lights will turn off except the decimal point at the leftmost position of the lower line. The register will return to normal operation mode when any key is pressed or a mode is changed with the mode key. Please note when the register is recovered by a key entry, its key entry is invalid. After the recovery, start the key entry from the beginning.
2 Error Warning
In the following examples, your register will go into an error state accompanied with a warning beep and a corresponding error message. Clear the error state by pressing the CL key and take proper action. Please refer to the error message table on page 73.
- Enter over a 32-digit number (entry limit overflow): Cancel the entry and re-enter the correct number.
- An error in key operation: Clear the error and continue operation.
- An entry beyond a programmed amount entry limit: Check to see if the entered amount is correct. If it is correct, it can be rung up in the MGR mode. Contact your manager.
- An including-tax subtotal exceeds eight digits: Delete the subtotal by pressing the CL key and press the CA/AT, CHK, CH1 or CH2 key to finalize the transaction.
Error escape function
To quit a transaction due to an error or an unforeseen event, use the error escape function as shown below:
![graph TD A["Transaction"] --> B["CL"] B --> C["ESC"] C --> D["ESC"] style B fill:#f9f,stroke:#333 note right of B: To clear the error state](/content/2026/06/1310334/images/da2ae669236013eb99797b0dc69201ec4162ddfecdd09c2a0656a0e9b0bf1943.jpg)
The transaction is voided (treated as a subtotal void) and the receipt is issued by this function. If you have already entered a tendered amount, the operation is finalized as a cash sale.
3 Item Entries
■ Single item entries
Department entries
The cash register provides a maximum of 99 departments for a merchandise classification. Group attributes, such as taxable status, are applied to items when they are entered to the departments.
- When using the department keys (for department 1 to 6)
For department 1 to 6, enter a unit price and press a department key. If you use a programmed unit price, press a department key only.
When using a programmed unit price
![graph TD A["(max. 7 digits)"] --> B["Department keyUnit price *"]](/content/2026/06/1310334/images/49288da6fc034c6e73fc58b44a6e926ec5396256cd6285314454e8beff1f5cca.jpg)
* Less than the programmed upper limit amounts. When zero is entered, only the sales quantity is added.
- When using the department code entry key
Enter a department (dept.) code and press the DEPT# key, then enter a unit price and press the DEPT# key again. If the dept. code is programmed to preset price entry style and a unit price is preset, the cash register will finish its registration operation.
![graph TD A["Dept. code (1 to 99)"] --> B["DEPT#"] B --> C["Unit price * (max. 7 digits)"] C --> D["DEPT#"] B --> E["(In case only preset price entry is allowed)."] style B fill:#f9f,stroke:#333 style D fill:#ccf,stroke:#333](/content/2026/06/1310334/images/d25c6f673bb35023b71ef1beb2fe9b90ac1a4f7ff617dea94a9119c7ea59d87b.jpg)
* Less than the programmed upper limit amounts. When zero is entered, only the sales quantity is added.
PLU/subdepartment entries
For another merchandise classification, the cash register provides a maximum of 1800 PLUs/subdepartments.
PLUs are used to call up preset prices by pressing direct PLU keys or entering PLU codes with a press of the PLU/SUB key. Subdepartments are used to classify merchandise into smaller groups under the departments.
Every PLU and subdepartment has a code from 1 to 1800, and should belong to a department to obtain attributes of that department.
The cash register is pre-programmed to PLU mode (belonging to dept. 1) and zero for unit price. To use PLU entries, their preset unit prices should be previously programmed. (Refer to page 35.)
To use subdepartment entries, change to subdepartment mode for the PLU codes.
- PLU entries
![graph LR A["Direct PLU key"] --> B["PLU SUB"] C["PLU code (1 to 1800)"] --> B B --> D["PLU code entry"]](/content/2026/06/1310334/images/664afc857c0ff8e43d85761f1f6acb1058cf39e2b742290ffbd73021a98fa569.jpg)
- Subdepartment (open PLU) entries
![graph LR A["Unit price * (max. 7 digits)"] --> B["Direct PLU key"] B -.-> C["Direct key entry"] D["PLU code (1 to 1800)"] --> E["PLU/SUB"] E --> F["Unit price * (max. 7 digits)"] F --> G["PLU/SUB"] G -.-> H["PLU code entry"]](/content/2026/06/1310334/images/c3560f7cad98bbaaf182f4215a34f8cea28584abed5551bbc9c23d1972206f9a.jpg)
* Less than the programmed upper limit amounts
When zero is entered, only the sales quantity is added.
Example: Selling a dept. 2 item (\12.00), a dept. 4 item (using preset price), a dept. 50 item (\15.00), a dept. 41 item (using preset price), a PLU 11 item (PLU entry using a direct key), a PLU 80 item (PLU entry with a code entry), a PLU 15 item (subdept. entry using a direct key, \5.00) and a PLU 85 item (subdept. entry with a code entry, \12.00)

Receipt print / Key operation example
■ Repeat entries
You can use this function for entering a sale of two or more of the same items. Consecutive pressing of a department key, DEPT# key, a direct PLU key or PLU/SUB key is as shown on key operation example below.

Receipt print / Key operation example
■ Multiplication entries
When selling a large quantity of items, it is convenient to use the multiplication entry method. Enter quantity using numeric keys and press the ⏻/FOR key before starting item entry as shown in the example on the following page.
Note
When programmed to allow fractional quantity entries, you can enter up to four integers and three digit decimal, though the quantity is counted as one for sales reports. To enter a fractional quantity, use the decimal point key between integer and decimal.

Receipt print / Key operation example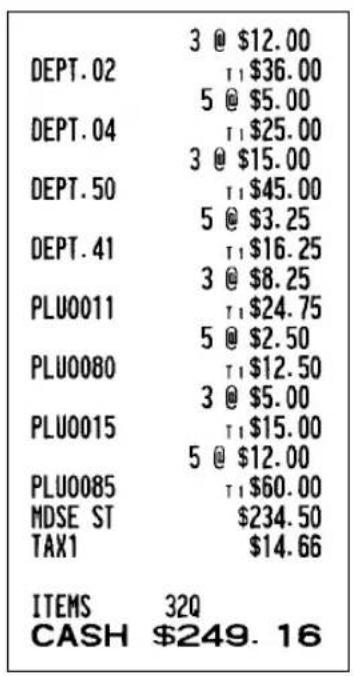
Split pricing entries
This function is practical when the customer wants to purchase items normally sold in bulk.
To realize this function, you must change the programmed setting. Refer to "Various Function Selection Programming 1" (job code 70) for programming details.
To make split pricing entries, follow the procedure below:
![graph TD A["Selling q'ty (Up to 4 digits)"] --> B["@/FOR"] B --> C["Base q'ty (Up to 2 digits)"] C --> D["@/FOR"] D --> E["When using a programmed unit price"] E --> F["Unit price per base q'ty"] F --> G["Department key"] E --> H["Dept. code"] H --> I["DEPT#"] I --> J["Unit price per base q'ty (Only…](/content/2026/06/1310334/images/7888cc4b3e491d870f18ea75edc4a52e377efaad2b7ff291424f5825dbd979e9.jpg)

Receipt printKey operation example
■ Single item cash sale (SICS) entry
- This function is useful when a sale is for only one item and is for cash. This function is applicable only to those departments that have been set for SICS or to their associated PLUs or subdepartments.
- The transaction is complete and the drawer opens as soon as you press the department key, DEPT# key, the direct PLU key or PLU/SUB key.
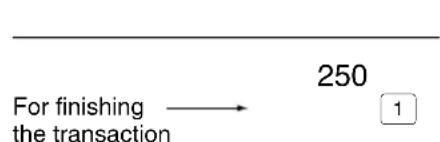

If an entry to a department or PLU/subdepartment set for SICS follows the ones to departments or PLUs/subdepartments not set for SICS, it does not finalize and results in a normal sale.
4 Displaying Subtotals
The register provides three types of subtotals:
Merchandise subtotal
Press the MDSE\$BTL key at any point during a transaction. The net sale subtotal - not including tax - will appear in the display with the function message "MDSE ST".
Taxable subtotal
Taxable 1 subtotal
Press the TAX1SHIFT and #'TM/SBTL keys in this order at any point during a transaction. The sale subtotal of taxable 1 items will appear in the display with the function message "TAX1 ST".
Taxable 2 subtotal
Press the TAX2SHIFT and #'TM/SBTL keys in this order at any point during a transaction. The sale subtotal of taxable 2 items will appear in the display with the function message "TAX2 ST".
Including-tax subtotal (complete subtotal)
Press the #/TM/SBTL key at any point during a transaction. The sale subtotal including tax will appear in the display with the function message "SUBTOTAL".
5 Finalization of Transaction
■ Cash or check tendering
Press the #/TM/SBTL key to get a complete tax subtotal, enter the amount tendered by your customer, then press the CA/AT key if it is a cash tender or press the CHK key if it is a check tender. When the amount tendered is greater than the amount of the sale, the register will show the change due amount with the function message "CHANGE". Otherwise the register will show a deficit with the function message "DUE". You now must make a correct tender entry.
Cash tendering


Check tendering
Receipt printKey operation example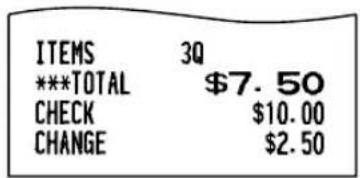
■ Cash or check sale that does not require entry
Enter items and press the CA/AT key if it is a cash sale or press the CHK if it is a check sale. The register will display the total sale amount.

Receipt printKey operation example
■ Charge (credit) sale
Enter items and press a charge key (CH1 or CH2).

Receipt printKey operation example
■ Mixed-tender sale
You can perform mixed-tendering of check and cash, cash and charge, and check and charge.
Example: The customer pays 9.50 in cash and40.00 by charge 2 for an including-tax subtotal of $49.50.
Receipt print Key operation example

6 Tax Calculation
■ Automatic tax
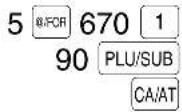
When the register is programmed with a tax rate (or tax table) and the tax status of an individual department is set for taxable, it computes the automatic tax on any item that is entered directly into the department or indirectly via a related PLU.
Example: Selling five 6.70 items (dept. 1, taxable 1) and one7.15 item (PLU 90, taxable 2) for cash
Receipt print Key operation example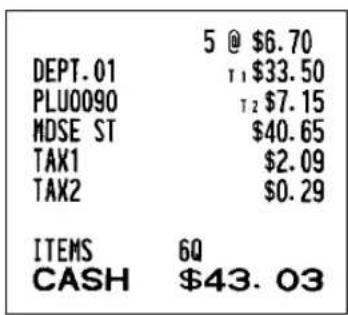
■ Manual tax
The machine allows you to enter tax manually after it finalizes an item entry.
Example: Selling an $8.00 item (dept. 12) for cash with 50 cents as tax

Receipt print Key operation example
■ Tax delete
You can delete the automatic tax on the taxable 1 and taxable 2 subtotal of each transaction by pressing the TAX key after the subtotal is displayed.
To delete taxable 1 subtotal, press TAX1SHIFT, #TM/SBTL to get taxable 1 subtotal, and then press TAX to delete the subtotal.
To delete taxable 2 subtotal, press TAX2SHIFT, #:TM/SBTL to get taxable 2 subtotal, and then press TAX to delete the subtotal.
To delete all taxable (1-4) subtotals, press TAX1SHIFT, TAX2SHIFT and #TM/SBTL ("TAX ST 0.00" is displayed) and press TAX to delete all the taxable subtotals.
Example: Selling a \7.25 item (dept. 1, taxable 1) and another \5.15 item (dept. 11, taxable 2) for cash and entering the sale as non-taxable
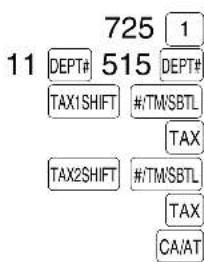
Receipt printKey operation example
■ Tax status shift
The machine allows you to shift the programmed tax status of each department or PLU/subdepartment by pressing the TAX1SHIFT and/or TAX2SHIFT keys before those keys. After each entry is completed, the programmed tax status of each key is resumed.
Example: Selling the following items for cash with their programmed tax status reversed
- One \$13.45 item of dept. 6 (non-taxable) as a taxable 1 item
- One \$7.00 item of PLU 25 (non-taxable) as a taxable 1 and 2 item
- One \$4.00 item of dept. 11 (taxable 2) as a non-taxable item
- Two \$10.50 items of dept. 1 (taxable 1) as taxable 2 items
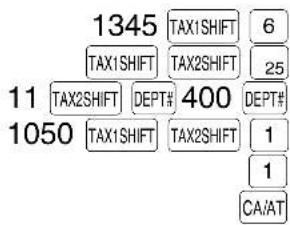
Receipt printKey operation example
| DEPT.06 | T1 13.45 |
| PLU0025 | T_{12}7.00 |
| DEPT.11 | 4.00 |
| DEPT.01 | T_{2}10.50 |
| DEPT.01 | T2 10.50 |
| MDSE ST | 45.45 |
| TAX1 | 1.28 |
| TAX2 | 1.12 |
| ITEMS | 5Q |
| CASH | $47.85 |
Note
When Canadian tax system is applied:
When using a tax status shift, the entry of a multi-taxable item for PST or GST will be prohibited. Please see below:
| In case of; Tax 1: PST, Tax 2: PST, Tax 3: PST, Tax 4: GST |
| Taxable 1 and 2 item ...... prohibited |
| Taxable 1 and 3 item...... prohibited |
| Taxable 2 and 3 item ...... prohibited |
| Taxable 1 and 4 item ...... allowed |
| Taxable 2 and 4 item ...... allowed |
| Taxable 3 and 4 item ...... allowed |
| In case of; Tax 1: PST, Tax 2: PST, Tax 3: GST, Tax 4: GST |
| Taxable 1 and 2 item ...... prohibited |
| Taxable 1 and 3 item ...... allowed |
| Taxable 2 and 3 item ...... allowed |
| Taxable 1 and 4 item ...... allowed |
| Taxable 2 and 4 item ...... allowed |
| Taxable 3 and 4 item ...... prohibited |
OPTIONAL FEATURES
1 Auxiliary Entries
■ Discount and premium entries using the percent key
The percent key is used to apply a manually entered or preset discount or premium percent rate to individual items or to a merchandise subtotal. In the default setting, you can manually enter a discount percent rate to both individual items and merchandise subtotal. For manual entry of discount or premium percent rate, enter the rate (up to 100.00) with the numeric keys (you need a decimal point when you enter a fractional percent rate), and press a percent key. When using a preset rate (if programmed), press a percent key. When entry limit is programmed for a percent key, you can not enter a rate over the limit.
Percent calculation for merchandise subtotal

Receipt print / Key operation example
Percent calculation for item entries
(When premium and 15% are programmed for the %2 key)
Receipt print / Key operation example
| DEPT. 06 | T1 $8.00 -7.5% |
| %1 | -0.60 |
| PLU0015 | T1 $5.00 15.00% |
| %2 | 0.75 |
| MDSE ST | 13.15 |
| TAX1 | 0.81 |
| ITEMS | 2Q |
| CASH | 13.96 |
■ Discount and premium entries using the discount key
The discount key is used to apply a manually entered or preset discount or premium amount to individual items or to a merchandise subtotal. In the default setting, you can manually enter a discount amount to both individual items and merchandise subtotal. For manual entry of discount or premium amounts, enter the amount with the numeric keys, and press the discount key. When using a preset amount (if programmed), press the discount key.
When entry digit limit is programmed for the discount key, you can not enter an amount over the limit.
Discount for merchandise subtotal

Receipt print / Key operation example
| DEPT.06 | 5.75 |
| PLU0010 | 7.15 |
| MDSE ST | 12.90 |
| (一) | -1.00 |
| MDSE ST | 11.90 |
| TAX1 | 0.81 |
| ITEMS | 2Q |
| CASH | 12.71 |
Discount for item entries

(When a discount amount of $0.75 is programmed.)
Receipt print Key operation example
| DEPT.07 | 6.75 |
| (一) | -0.75 |
| MDSE ST | 6.00 |
| TAX1 | 0.42 |
| ITEMS | 10 |
| CASH | 6.42 |
■ Refund entries
For departments 1 to 6, enter the refund amount and press the RFND key, then press the corresponding department key (when using the preset price, omit entering the amount). For departments 7 to 99, enter the department code and press the RFND and DEPT# keys, then enter the refund amount and press the DEPT# key if necessary.
For a refund of a PLU item, press the RFND key and the corresponding direct PLU key, or enter the PLU code and press the RFND key, then press the PLU/SUB key.
For a refund of a subdepartment item, enter the refund amount and press the RFND key, then press the corresponding direct PLU key, or enter the PLU code and press the RFND and PLU/SUB keys, then enter the refund amount and press the PLU/SUB key.

Receipt print Key operation example
| DEPT.06 | 11R-2.50 |
| DEPT.40 | 11R-1.00 |
| -7 @ 2.10 | |
| PLU0013 | 11R-14.70 |
| PLU0085 | 11R-1.50 |
| MDSE ST | -19.70 |
| TAX1 | -1.23 |
| ITEMS | 0Q |
| CHANGE | 20.93 |
■ Non-add code number entries and printing
You can enter a non-add code number such as a customer's code number and credit card number, a maximum of 16 digits, at any point during the entry of a sale. The cash register will print it at once.
To enter a non-add code number, enter the number and press the #/TM/SBTL key.

Receipt print Key operation example
2 Auxiliary Payment Treatment
■ Currency conversion
The register allows payment entries in a foreign currency (only cash payment is available). Pressing the CONV key creates a subtotal in the foreign currency.
When using a programmed currency conversion rate, press the CONV key after item entries, then enter the tendered amount in foreign currency if not exact amount payment, and press the CA/AT key.
When making a manual entry of a currency conversion rate, after item entries, enter the conversion rate (0.0000 to 9999.9999; you need a decimal point when entering a fractional conversion rate) and press the CONV key, then enter the tendered amount in foreign currency if not exact amount payment, and press the CA/AT key.
In both cases, the change due will be displayed in domestic currency, and when the amount tendered is short, the deficit is shown in domestic currency.

- Press the CL key after pressing the CONV key to cancel payment in a foreign currency.
- If programmed, a foreign currency symbol is printed when you use a preset rate.
Applying preset conversion rate
(When a currency conversion rate of 0.9275 is programmed for the CONV key.)
Receipt printKey operation example
Foreign currency symbol (Printed if programmed)
Applying manual conversion rate
Receipt printKey operation example
■ Received-on account and paid-out entries
When you receive on account from a customer or when you pay an amount to a vendor, use the RA key or the RCPT/PO key respectively.
For the received-on-account (RA) entry, enter the amount, and press the RA key.
For the paid-out (PO) entry, enter the amount and press the RCPT:PO key.
Note
Cash tendering only available for RA and PO operation.
12345#/TM/SBTL
4800 RA
Receipt printKey operation example
■ No sale (exchange)
When you need to open the drawer with no sale, press the CA/AT key. The drawer will open and printer will print "NO SALE" on the receipt or journal. If you let the machine print a non-add code number before pressing the CA/AT key, a no sale entry is achieved and a non-add code number is printed.
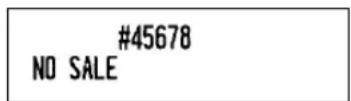
■ Bottle return
This function is used to handle the deposit and payment (paid out) for returned empty bottles or cans. This function is applicable only to those departments that have been set for bottle return departments or their associated PLUs or subdepartments.

(When dept. 50 is preprogrammed as a bottle return dept. and also a negative dept.)
Receipt printKey operation example
3 Automatic Sequence Key (AUTO key) Entries
You can achieve a programmed transaction by pressing the AUTO key.
AUTO
Receipt printKey operation example
CORRECTION
1 Correction of the Last Entry (direct void)
If you make an incorrect entry relating to a department, PLU/subdepartment, percentage (%1 and %2), discount (⊖) or refund, you can void this entry by pressing the VOID key immediately after the incorrect entry.
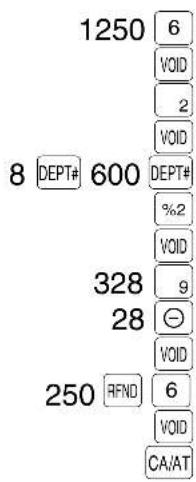
Receipt print Key operation example
2 Correction of the Next-to-last or Earlier Entry (indirect void)
You can void any incorrect department entry, PLU/subdepartment entry or item refund entry made during a transaction if you find it before finalizing the transaction (e.g. pressing the CA/AT key). This function is applicable to department, PLU/subdepartment and refund entries only.
Press the VOID key just before you press a department key, DEPT# key (before the first depression of the DEPT# key in case open and preset entries are allowed), direct PLU key or PLU/SUB key. For the refund indirect void, press the VOID key after you press the RFND key.
![graph TD A["Correction of a department entry"] --> B["250 RFND 6"] A --> C["250 RFND 825 3"] A --> D["1310 1310 7 DEPT# 1755 DEPT#"] E["Correction of a PLU entry"] --> F["250 RFND 6"] E --> G["CA/AT 1310 1310 6"] H["Correction of a refund entry"] --> I["250 RFND 6"]](/content/2026/06/1310334/images/73e4efc2f311b85db5c97428adc95b21b3f3a380d5d9aa1d43c0469d9a0ca334.jpg)
Receipt print Key operation example
3 Subtotal Void
You can void an entire transaction. Once subtotal void is executed, the transaction is aborted and the register issues a receipt. This function does not work when more than 30 items have been entered.

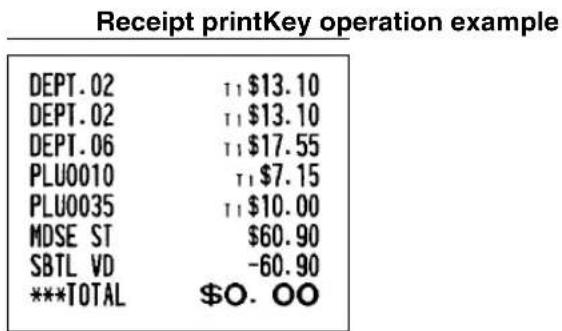
4 Correction of Incorrect Entries not Handled by the Direct or Indirect Void Function
Any errors found after the entry of a transaction has been completed or during an amount tendered entry cannot be voided. These errors must be corrected by the manager.
The following steps should be taken:
- If making the amount tendered entry, finalize the transaction.
- Make correct entries from the beginning.
- Hand the incorrect receipt to the manager for its cancellation.
PRIOR TO PROGRAMMING
Before starting sales entries, you must first program necessary items so the cash register suits your sales needs. In this manual, there are three sections: BASIC FUNCTION PROGRAMMING where required items must be programmed, AUXILIARY FUNCTION PROGRAMMING where you can program for more convenient use of keys on the keyboard, and ADVANCED PROGRAMMING where various optional programming features are provided. Find the appropriate features for your needs, and make the necessary programming.
Note
You can select the language of text (English, French or Spanish) printed on receipts or journals. For the language selection, please refer to "Language Selection" described later in this section.
Procedure for programming
- Check to see whether a paper roll is present in the machine. If there is not enough paper on the roll, replace it with a new one (refer to MAINTENANCE section for the replacement).
- Put the manager key in the mode switch and turn it to the PGM position.
- Program necessary items into the cash register. Every time you program an item, the cash register will print the setting. Please refer to print samples in each section.
- If necessary, issue programming reports for your reference.

Note
- On the procedures and key operation examples shown in the programming details, numbers such as "08262003" indicates the parameter which must be entered using the corresponding numeric keys.
- Asterisks in the tables shown in the programming details indicate default settings.
BASIC FUNCTION PROGRAMMING
(For Quick Start)

Date and Time Programming
Date
For setting the date, enter the date in 8 digits using the month-day-year (MM/DD/YYYY) format, then press the #/TM/SBTL key.
Procedure

08262003 #/TM/SBTL
(Aug. 26, 2003)
PrintKey operation example
*PGM*
08/26/2003
Date
Note
You can use the date format of day-month-year (DD/MM/YYYY) or year-month-day (YYYY/MM/DD) format. To change the format, refer to “Various Function Selection Programming 1” section (Job code 61).
Time
For setting the time, enter the time in 4 digits using the 24-hour format. For example, when the time is set to 2:30 AM, enter 230; and when it is set to 2:30 PM, enter 1430.
Procedure
Time(max. 4 digits in 24-hour format) → #/TM/SBTL
PrintKey operation example

Note
For display and print, 12-hour format is applied by default. To change it to 24-hour format, refer to "Various Function Selection Programming 1" section (Job code 61).
2 Tax Programming for Automatic Tax Calculation Function
Note
The cash register can support US and Canadian tax systems. If you use the Canadian tax system, you must first change the tax system, then program the tax rate or tax table and quantity for doughnut exempt which are described in this section. For changing the cash register's tax system, please refer to "Various Function Selection Programming 1" section (job code 70).
Before you can proceed with registration of sales, you must first program the tax that is levied in accordance with the law of your state. The cash register comes with the ability to program four different tax rates. In most states, you will only need to program Tax 1. However if you live in an area that has a separate local tax (such as a Parish tax) or a hospitality tax, the register can be programmed to calculate these separate taxes.
When you program the tax status for a department, tax will automatically be added to sales of items assigned to the department according to the programmed tax status for the department. You can also enter tax manually.
There are two tax programming methods. The tax rate method uses a straight percentage rate per dollar. The tax table method requires tax break information from your state or local tax offices. Use the method which is acceptable in your state. You can obtain necessary data for tax programming from your local tax office.
■ Tax programming using a tax rate
The percent rate specified here is used for tax calculation on taxable subtotals.
Procedure
![graph TD A["#/TM/SBTL"] --> B["9"] B --> C["@/FOR"] C --> D["Tax number (1 to 4)"] D --> E["@/FOR"] E --> F["Tax rate (0.0000 to 100.0000)"] F --> G["@/FOR"] G --> H["#/TM/SBTL"] H --> I["Lowest taxable amount (0.01 to 999.99)"] I --> J["End"] style F fill:#f9f,stroke:#333 style H fill:#f9f,stroke:#…](/content/2026/06/1310334/images/33e44c4a433e012646b8adb2f7ed46b4bcd060774f9c5734637cbdeac0fa05ae.jpg)
To delete a tax rate, use the following sequence:
![graph LR A["#/TM/SBTL"] --> B["@/FOR"] B --> C["VSD"] C --> D["CA/AT"] D --> E["@/FOR"] E --> F["Tax number (1 to 4)"] F --> G["→"] G --> H["→"]](/content/2026/06/1310334/images/73afea92a1785dd6e9f1b9938474e5f51159fed705936e280c52e29137cef093.jpg)
Example: Programming the tax rate 4% as tax rate 2 with tax exempt as 12¢
PrintKey operation example

Note
- If you make an incorrect entry before pressing the third @FOR key in programming a tax rate, cancel it with the CL key.
- You do not need to enter the trailing zeros of a tax rate (after the decimal point), but you do need to enter the decimal for fractions.
- The lowest taxable amount setting is ignored when you select VAT system for Canadian tax.
■ The tax table (applicable to the add-on tax)
If you are in an area that uses a tax table for tax calculation, you can program the cash register accordingly. Tax table programming can be performed for Tax 1 through Tax 4.
Sample tax table
New Jersey tax table: 6%
| Range of sales amount | |||
| Taxes | Minimum breakpoint | Maximum breakpoint | |
| .00 | .01 | to | .10 |
| .01—T | .11—Q | to | .22 |
| .02 | .23 | to | .38 |
| .03 | .39 | to | .56 |
| .04 | .57 | to | .72 |
| .05 | .73 | to | .88 |
| .06 | .89 | to | 1.10 |
| .07 | 1.11—M1 | to | 1.22 |
| .08 | 1.23 | to | 1.38 |
| .09 | 1.39 | to | 1.56 |
| .10 | 1.57 | to | 1.72 |
| .11 | 1.73 | to | 1.88 |
| .12 | 1.89 | to | 2.10 |
| .13 | 2.11—M2 | to | 2.22 |

| A: Difference between the minimum breakpoint and the next one (¢) | |
| -10 (0.11 - 0.01) | B: Non-cyclic↑C: Cyclic-1↑D: Cyclic-2↑ |
| 12 (0.23 - 0.11) | |
| 16 (0.39 - 0.23) | |
| 18 (0.57 - 0.39) | |
| 16 (0.73 - 0.57) | |
| 16 (0.89 - 0.73) | |
| 22 (1.11 - 0.89) | |
| 12 (1.23 - 1.11) | |
| 16 (1.39 - 1.23) | |
| 18 (1.57 - 1.39) | |
| 16 (1.73 - 1.57) | |
| 16 (1.89 - 1.73) | |
| 22 (2.11 - 1.89) |
To program a tax table, first make a table like the one shown above right.
From the tax table, calculate the differences between a minimum break point and the next one (A). Then, from the differences, find irregular cycles (B) and regular cycles (C and D). These cycles will show you the following items necessary to program the tax table:
T: The tax amount collected on the minimum taxable amount (Q) Q: The minimum taxable amount M1: The maximum value of the minimum breakpoint on a regular cycle (C) We call this point "MAX point." M2: The maximum value of the minimum breakpoint on a regular cycle (D) We call this point "MAX point." M: Range of the minimum breakpoint on a regular cycle: difference between Q and M1 or between M1 and M2
Procedure
![graph LR A["#/TM/SBTL"] --> B["@/FOR"] B --> C["@/FOR"] C --> D["One- or two-*1 digit number"] D --> E["@/FOR"] E --> F["Rate*2 max. six digits (0.0001 - 99.9999%)"] F --> G["M max. four digits"] G --> H["CA/AT"] H --> I["Repeat until the MAX point is entered."] I --> J["Minimum breakpoint max. five…](/content/2026/06/1310334/images/c115abf797e73ea9b3ad37446e6bf4e41f21a145e564ec8f259d31b61206d2e7.jpg)
To delete a tax table, use the following sequence:
![graph LR A["#/TM/SBTL"] --> B["@/FOR"] B --> C["8TM/SBTL2/FOR"] C --> D["One- or two-*1 digit number"] D --> E["@/FOR"] E --> F["Rate*2 max. six digits (0.0001 - 99.9999%)"] F --> G["M"] G --> H["max. four digits"]](/content/2026/06/1310334/images/d21f500c1a01f6fefdedae3e1bb4fd14de57bd733e74626ae10fa6c7d86a96c2.jpg)
*1 First figure: (1 or 0) The first figure to be entered depends upon whether the difference between a minimum breakpoint to be entered and the preceding minimum breakpoint is not less than 1.00 or more than 99¢. When the difference is not less than1.00, enter "1," and when it is not more than 99¢, enter "0" or nothing.
Second figure: The second figure depends upon whether your tax table is to be programmed as tax table 1, 2, 3, or 4.
*2 If the rate is fractional (e.g., 4-3/8%), then the fractional portion (3/8) would be converted to its decimal equivalent (i.e., .375) and the resulting rate of 4.375 would be entered. Note that the nominal rate (R) is generally indicated on the tax table.
Note
If you make an incorrect entry before entering the M in programming a tax table, cancel it with the CL key; and if you make an error after entering the M, cancel it with the #/TM/SBTL key. Then program again from the beginning.
- Limitations to the entry of minimum breakpoints
The register can support a tax table consisting of no more than 72 breakpoints. (The maximum number of breakpoints is 36 when the breakpoint difference is $1.00 or more.) If the number of breakpoints exceeds the register's table capacity, then the manual entry approach should be used.
Example: Programming the sample tax table shown on the previous page as tax table 1
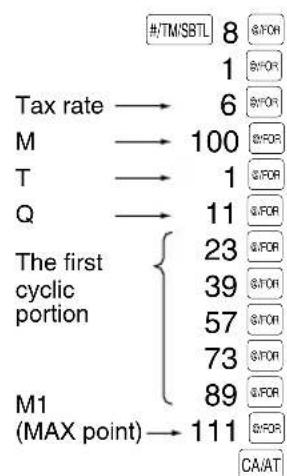
PrintKey operation example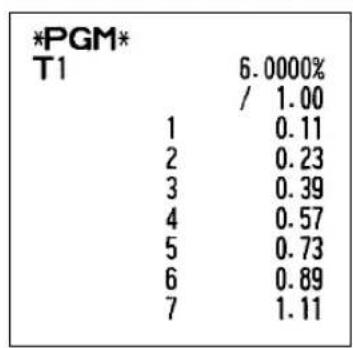
Note
You do not need to enter the trailing zeros of a tax rate (after the decimal point) but you do need to enter the decimal point for fractions.
- If the tax is not provided for every cent, modify the tax table by setting the tax for every cent in the following manner.
When setting the tax, consider the minimum breakpoint corresponding to unprovided tax to be the same as the one corresponding to the tax provided on a large amount.
Sample tax table Modification of the left tax table Example 8%
| Tax | Minimum breakpoint |
| .00 | .01 |
| .01 | .11 |
| .02 | .26 |
| .03 | .47 |
| .04 | .68 |
| .06 | .89 |
| .09 | 1.11 |
| .10 | 1.26 |
| .11 | 1.47 |
| .12 | 1.68 |
| .14 | 1.89 |
| .17 | 2.11 |
| Tax | Minimum breakpoint |
| .00 | .01 |
| .01-T | .11-Q |
| .02 | .26 |
| .03 | .47 |
| .04 | .68 |
| .05 | .89 |
| .06 | .89 |
| .07 | 1.11-M1 |
| .08 | 1.11 |
| .09 | 1.11 |
| .10 | 1.26 |
| .11 | 1.47 |
| .12 | 1.68 |
| .13 | 1.89 |
| .14 | 1.89 |
| .15 | 2.11-M2 |
| .16 | 2.11 |
| .17 | 2.11 |

| Breakpoint difference (c) | |
| 110 (0.11-0.01) | B: Non-cyclic |
| 15 (0.26-0.11)21 (0.47-0.26)21 (0.68-0.47)21 (0.89-0.68)0 (0.89-0.89)22 (1.11-0.89)0 (1.11-1.11)0 (1.11-1.11) | C: Cyclic-1 |
| 15 (1.26-1.11)21 (1.47-1.26)21 (1.68-1.47)21 (1.89-1.68)0 (1.89-1.89)22 (2.11-1.89)0 (2.11-2.11)0 (2.11-2.11) | D: Cyclic-2 |
From the modified tax table above;
Rate = 8(%), T = 0.01 = 1¢, Q =0.11 = 11¢, M1 = 1.11, M2 = 2.11, M = 100
■ Quantity for doughnut tax exempt (for Canadian tax system)
This option is available only when the Canadian tax system is selected.
Procedure
![graph LR A["#/TM/SBTL"] --> B["@/FOR"] B --> C["#/13BTL"] C --> D["CA/AT"] D --> E["Q'ty for doughnut tax exempt (max. 2 digits: 1 to 99)"] E --> F["To program zero"]](/content/2026/06/1310334/images/bdb0abd972a9d76c27f4f5ac2ae223d69c049e4577e654ceee78866b627feecb.jpg)
Example: To program the quantity "6"

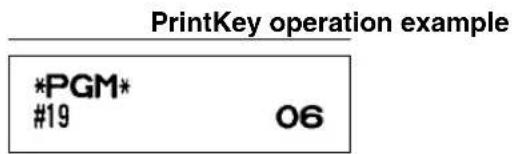
AUXILIARY FUNCTION PROGRAMMING
1 Department Programming
Merchandise can be classified into a maximum of 99 departments. Items sold using the department keys can later be printed on a report shown as the quantities sold and sales amounts classified by department. The data is useful for making purchasing decisions and other store operations. Departments can be assigned to articles whose prices were set using PLU/subdepartment function.
When using a department key, you must set the parameters to specify the department status, such as positive or negative department. Prices can be assigned directly to departments for frequently purchased items, which enables you to enter the prices by simply pressing the department keys or dept. code entries.
■ Department status
Procedure
![graph LR A["To set all zeros"] --> B["* ABCDEFGHIJK"] B --> C["@/FOR"] C --> D["Dept. key"] D --> E["CA/AT"]](/content/2026/06/1310334/images/5ead7de9bbecc209c8dd2016f13cdc21c0663d2c8f48a2b8ed20833435772a4c.jpg)
For department 7-99:
![graph LR A["Dept. code"] --> B["DEPT#"] B --> C["*ABCDEFGHIJKLMNOPQRSTUVWXYZ"] C --> D["@/FOR"] D --> E["CA/AT"] C --> F["10-24-25-30"]](/content/2026/06/1310334/images/5b79e19273fe0ad0057c92ba558e0623fc0496be68810193042a4323123ebe8c.jpg)
To program another department, start from the beginning without pressing the CA/AT key.
*: Item: Selection: Entry:
| A Type Bottle return 1 | ||
| Normal* 0 | ||
| B Group number 0-9 (0:Non group) (default: 0) | ||
| C Commission group number 0-2 (0:Non commission) (default: 0) | ||
| D Tax 4 status Taxable 1 | ||
| Non-taxable* 0 | ||
| E Tax 3 status Taxable 1 | ||
| Non-taxable* 0 | ||
| F Tax 2 status Taxable 1 | ||
| Non-taxable* 0 | ||
| G Tax 1 status Taxable (*for dept. 1 thru 6) | 1 | |
| Non-taxable (*for dept. 7 and above) 0 | ||
| H SICS / Normal | SICS | 1 |
| Normal* 0 | ||
| I Sign | Negative department 1 | |
| Positive department* 0 | ||
| J Entry digit limit | 0-7 (default: 7) | |
| K Type of unit price entry | Open and preset 3 | |
| Preset only 2 | ||
| Open only* 1 | ||
| Inhibit department key 0 | ||
Type
- Select the department as normal or for bottle return.
Group number
- If group setting (0 to 9, 0: non group) is done, items sold using the department keys and the associated PLUs and subdepartments can be classified into groups for reporting the sales.
Commission group number
- A commission group (0 to 2, 0: non commission) can be assigned to each department for commission for clerks. The commission amount for each clerk is calculated based on a programmed commission rate and later printed on clerk reports.
Tax status (taxable 1 through 4 / non-taxable)
- When any entry of a taxable department is made in a transaction, tax is automatically computed according to the associated tax table or rate.
SICS (Single Item Cash Sale)
- If an entry of a department programmed for SICS is made first, the sale will be finalized as a cash sale as soon as the department key is pressed. If the entry is made after entering a department not programmed for SICS, the sale will not be finalized until the CA/AT key is pressed.
Entry digit limit
- Set the number of allowable digits for the maximum entry amount for each department. The limit is effective for operations in the REG mode and can be overridden in the MGR mode.
Example: Programming department 2 as normal dept. group 1, commission group 1, taxable 1, SICS, negative department, entry digit limit - 7 digits, and allowing open & preset entry.
(ABCDEFGHIJK: 01100011173)


■ Preset unit price
Procedure
![graph LR A["Unit price (max. six digits)"] --> B["Dept. key"] B --> C["CA/AT"] D["To program zero"] --> A](/content/2026/06/1310334/images/1026c4e2d2b1453cb85a09bb764c824a58284ac9a340d265b0374652bfcc0694.jpg)
![graph LR A["Dept. code"] --> B["DEPT#"] B --> C["Unit price (max. six digits)"] C --> D["#/TM/SBTL"] D --> E["CA/AT"] F["To program zero"] --> C G["For department 7-99:"] --> H["End"]](/content/2026/06/1310334/images/3bdf6639b76a7ec709f4a79261ecf3476b88eaae8d7e32e646316bc9d0187eef.jpg)
To program another department, start from the beginning without pressing the CA/AT key.


Note
If a department is not programmed to allow the entry of preset unit prices in functional programming, the department is automatically changed to allow the entry of preset unit prices by this programming entry.
2 PLU (Price Look-Up) and Subdepartment Programming
The PLU function allows speedy key entries whereby a price is automatically called up when a direct PLU key is pressed or a code is entered. The subdepartment is a kind of “open PLU”, which requires you to enter a price before a direct PLU key is pressed or after the PLU code is entered. A maximum of 1800 PLU/subdepartment settings are possible. Each one belongs to a department and acquires the department’s parameters (dept. type (normal or bottle return), dept. group, tax status, SICS and sign).
A commission group (0 to 2, 0: No commission is applied) can be assigned to each PLU/subdepartment for commission for clerks. Each commission amount for individual clerk is calculated based on the corresponding programmed commission rate and printed later on clerk reports.
The cash register is preprogrammed so all 1800 codes are assigned as PLUs (commission group: 0) associated with department 1 and preset unit price "0".
Totally 75 direct PLU keys are provided on the keyboard for PLU and subdepartment entries, and PLU codes 1 thru 75 are previously allocated for direct PLU 1 key thru PLU 75 key respectively.
■ Unit price and associated department assignment
Procedure
![graph LR A["PLU code (1-1800)"] --> B["PLU/SUB"] C["Direct PLU key"] --> B B --> D["* Unit price (max. six digits)"] D --> E["Associated Dept. key"] E --> F["CA/AT"] D --> G["To program zero"]](/content/2026/06/1310334/images/a55d56951fa0549a058a276bfb26c8ae6f8e969318f6e93c0c4024a25ac5dee3.jpg)
When the associated department is department 7-99:
![graph LR A["PLU code (1-1800)"] --> B["PLU/SUB"] C["Direct PLU key"] --> B B --> D["Associated dept. code (1 to 99)"] D --> E["DEPT#"] E --> F["* Unit price (max. six digits)"] F --> G["#/TM/SBTL"] G --> H["CA/AT"] F --> I["To program zero"]](/content/2026/06/1310334/images/3ee48112988577025e0f0833854a0b0c7d86ad159945b84a2613db419744d78b.jpg)
*: For a subdepartment, set the limit amount of unit price entry.
To program the following PLU, start from entering a unit price or an associated department code without pressing the CA/AT key.
To program another PLU, start from the beginning without pressing the CA/AT key.

To delete a PLU code, use the following sequence:
Procedure
![graph TD A["PLU code (1-1800)"] --> B["PLU/SUB"] C["Direct PLU key"] --> B B --> D["VOID"] D --> E["CA/AT"] F["To delete the following PLU"] --> D G["To delete another PLU"] --> D](/content/2026/06/1310334/images/22b215b60f50840b4189cb3361e1d0bcd02af921dd11afd83c13b768558f042c.jpg)
■ Function selection

![graph TD A["PLU code (1-1800)"] --> B["PLU/SUB"] C["Direct PLU key"] --> B B --> D["*AB"] D --> E["#/TM/SBTL"] E --> F["CA/AT"] G["To program '00'"] --> D H["To program the following PLU"] --> D I["To program another PLU"] --> D](/content/2026/06/1310334/images/0fef1ecbcfe87b3a495a57b57c10860285d9fea9f266adb5d6e94babf1a1f7f4.jpg)
*: Item: Selection: Entry:
A Commission group number 0-2 (0: Non commission) (default: 0)
B PLU/subdepartment selection Subdepartment 0
PLU* 1

PrintKey operation example
Note
When you program the last PLU code, the programming sequence will be complete with a press of the #/TMSBTL key.
3 Commission Rate Programming
Based on each clerk's sales total of each commission group and the corresponding commission rate, the commission amounts are calculated, and printed on clerk reports.
■ Commission rate

![graph LR A["#/TM/SBTL"] --> B["28"] B --> C["Commission number (1 or 2)"] C --> D["@/FOR"] D --> E["@/FOR"] E --> F["Commission rate (0.00-999.99)"] F --> G["PrintKey operation example"] H["#/TM/SBTL 28 @/FOR 1 @/FOR 15 #/TM/SBTL CA/AT"] --> I["*PGM* F56 COM. SAL1 15.00%"]](/content/2026/06/1310334/images/af870bb1c16a96a380870f5aaea775961537443f454501e91cd415b68a1230a9.jpg)
Note
You must use a decimal point when setting a fractional rate.
4 Miscellaneous Key Programming
The cash register provides miscellaneous keys such as %1, %2, ⊖, RFND, RA, RCPTPO, CONV, TAX, CHK, CH1, CH2, and CA/AT. While the cash register is pre-programmed so you can use these keys, you must set a currency conversion rate to use the CONV key. You can also program these keys for more convenient use. Please refer to the data below for programming these keys. Factory setting is indicated with parentheses.
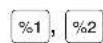
Percent rate (0.00%), tax status (non-taxable), sign (minus), item % and subtotal % entry* (both are allowed), percent rate limitation (100%)

Amount (0.00), tax status (non-taxable), sign (minus), item ⊖ and subtotal ⊖ entry* (both are allowed), entry digit limit (7 digits)

Not necessary to program

Entry digit limit (9 digits)

Currency conversion rate (0.0000), currency conversion rate entry method - open or preset (both are enabled)


Compulsory entry of amount tender (not compulsory), entry digit limit (8 digits), footer printing (not printed)
TAX (Manual tax) Entry digit limit (7 digits)
* Item %/Item ⊖: Percent/discount calculation is applied to individual department and PLU/subdepartment. * Subtotal %/Subtotal ⊖: Percent/discount calculation is applied to subtotals.
■ Rate for %1, %2 and CONV
![graph TD A["To program zero"] --> B["*Rate or"] B --> C["%1"] B --> D["CONV"] C --> E["CA/AT %2"] D --> E E --> F["Output"]](/content/2026/06/1310334/images/dab7af115a15933228d333bfaa7f10abe7e1ee15678ccabebb81b335192661b2.jpg)
To program another rate
*: Rate
0.00 — 100.00 (% rate) 0.0000 — 9999.9999 (Currency conversion rate)

PrintKey operation example
Note You must use a decimal point when setting fractional rates.
■ Amount for ⊖
![graph LR A["Discount amount (max. six digits)"] --> B["⊕"] C["To program zero"] --> A B --> D["CA/AT"]](/content/2026/06/1310334/images/dd5c99e47907840b8b81024bd6c3afe1f966c660d566bc5da9f35b7c47e112f9.jpg)
Key operation example
Print
■ Percent rate limitation for %1 and %2
Procedure
![graph LR A["#/TM/SBTL"] --> B["29"] B --> C["@/FOR"] C --> D["Percentage limit (0.00 -100.00%)"] D --> E["%1 or %2"] E --> F["CA/AT"] D -->|To program zero| C D -->|To program for another percent key| C](/content/2026/06/1310334/images/81989fd612e0dd557e3b74047614d5a5b454a48ca20165e7ace70fcf66d38204.jpg)
Note
- Percent entries that exceed the upper limit may be overridden in the MGR mode.
- You must use a decimal point when setting fractional rates.
Key operation example
Print
■ Function parameters for %1, %2 and ⊖
Procedure
![graph TD A["To program "0" for all items"] --> B["*ABCDEFGH or"] B --> C["@/FOR"] C --> D["%1"] C --> E["-"] D --> F["%2"] E --> F F --> G["CA/AT"] G --> H["Output"]](/content/2026/06/1310334/images/bd7a630b6fa5d8ad360604e660feb3e604ceb333fc5d6ff39185f2c25f2da558.jpg)
To program for another key
*: Item: Selection: Entry:
| A Tax 4 status Taxable 1 | |
| Non-taxable* 0 | |
| B Tax 3 status Taxable 1 | |
| Non-taxable* 0 | |
| C Tax 2 status Taxable 1 | |
| Non-taxable* 0 | |
| D Tax 1 status Taxable 1 | |
| Non-taxable* 0 | |
| E +/- sign + (premium) sign 0 | |
| - (discount) sign* 1 | |
| F Item % / Item ⊖ | Allow* 0 |
| Disallow 1 | |
| G Subtotal % / Subtotal ⊖ | Allow* 0 |
| Disallow 1 | |
| H Entry digit limit for discount key 0-7 (default: 7) | |
When programming for percent keys, always enter 0 for H.
Tax status (taxable 1 through 4 / non-taxable)
- When taxable is selected, tax is applied to the amount obtained after premium or discount calculation.
+/- sign
- Programming of the +/- sign assigns the premium or discount function for each key.
Entry digit limit (For discount key only)
- The entry digit limit is in effect for the REG mode operations but can be overridden in the MGR mode. The entry digit limit is represented by the number of allowable digits for the maximum entry amount for discount key. If "0" is set, open price entry is prohibited.
Example: Programming the discount key as taxable 1, discount (minus sign), allowing both of item and subtotal (-), and entry digit limit - 6 digits. (ABCDEFGH: 00011006)
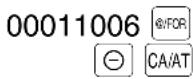

■ Function parameters for CONV
Procedure
![graph LR A["*AB"] --> B["@/FOR"] B --> C["CONV"] C --> D["CA/AT"] E["To program "0" for all items"] --> A](/content/2026/06/1310334/images/05837e77395b014344a710726758ef2dbae5e5bbdde838ebef94a5ddbe89fe3d.jpg)
*: Item: Selection: Entry:
A Open rate entry Allow* 0
Disallow 1
B Preset rate entry Allow* 0
Disallow 1

PrintKey operation example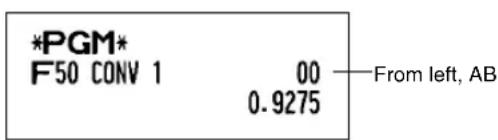
■ Entry digit limit for RA, RCPTIPO and TAX
Procedure
![graph LR A["* Entry digit limit"] --> B["@/FOR"] B --> C["RA"] C --> D["RCPT/PO"] D --> E["TAX"] E --> F["CA/AT"] G["(only for manual entry)"] --> E](/content/2026/06/1310334/images/2134a0f7fae21056d5d195bd95a672027a0ee2fd2fef57a987bb9cfb685a410f.jpg)
*: For RA and RCPTIPO, enter 0 to 9 (digits), and for TAX (manual tax), enter 0 to 7 (digits). By default, 9 for RA and RCPTIPO and 7 for TAX are set.
- Entry digit limit is in effect for REG mode operation but can be overridden in the MGR mode. The entry digit limit is represented by the number of allowable digits for maximum entry or total amount. When “0” is set, the operation of the corresponding key is prohibited.


■ Function parameters for CHK, CH1, CH2 and CA/AT (when using as CA key)
Procedure
![graph TD A["To program "0" for all items"] --> B["*1ABC"] B --> C["@/FOR"] C --> D["#/TM/SBTL, CHK, CH1 or CH2"] D --> E["CA/AT"] F["To program for another key"] --> B G["*2:Press #TTM/SBTL key for CA key setting."] --> D](/content/2026/06/1310334/images/70e4095204e16e547c60523acacc4ee1bf3ab771d620afe780cc6f8cad8f2f61.jpg)
| *1:Item: | Selection: | Entry: | |
| A | Footer printing | Allow | 1 |
| Disallow* | 0 | ||
| B | Amount tendered entry | Compulsory | 1 |
| Non-compulsory (for the CA or CHK keys)* | 0 | ||
| Inhibit (for the CH1 or CH2 key)* | 0 | ||
| C | Entry digit limit | 0-8 (default: 8) | |
Footer printing
- This programming decides whether or not the machine should print a message at the foot of a receipt when a specified media key is used. With regard to programming method of footer logo message, refer to “Logo messages” section on page 46.
Amount tendered entry
- You may select amount tendered, compulsory or optional, for the CA/AT and CHK keys.
- You may select amount tendered, compulsory or inhibited, for the CH1 and CH2 key.
Entry digit limit
- For the CH1, CH2 and CHK keys, program upper limit entry amount for the tendered amount. For the CA/AT key, program upper limit entry for total cash amount which can be handled on the register. The entry digit limit is in effect for REG mode operation but can be overridden in the MGR mode. The entry digit limit is represented by the number of allowable digits for the maximum entry or total amount. When “0” is set, the operation of the corresponding key is prohibited.
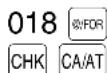
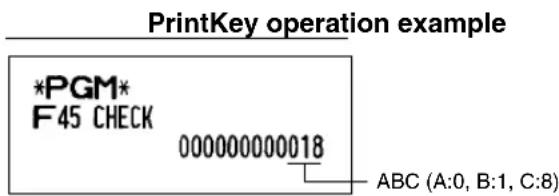
5 Text Programming
The register allows you to program text for clerk names, department item names, PLU/subdepartment item names, if necessary. Place the keyboard sheet for text programming over the keyboard sheet for ordinal use. For the placement, please refer to "Keyboard sheet" section on page 6.
There are two ways for programming text; using character keys (shaded area shown below on the keyboard sheet for text programming) or entering character codes with numeric keys on the keyboard.
Keyboard sheet for text programming
![↑ ! @ # $ % ^ & * ( ) ' ? < > [ ] (ESC) 1 2 3 4 5 6 7 8 9 0 + - @/FOR CL Q W E R T Y U I O P _ 7 8 9 A S D F G H J K L / = 4 5 6 Z X C V B N M ; : 1 2 3 (SHIFT) (DC) (SPACE) (SPACE) (SPACE) (SPACE) (SPACE) , . 0 00 • SBTL CA/AT](/content/2026/06/1310334/images/56d321e93ee388b379b997fc47712fabf5dffd09aa040655a7b7180dfd350123.jpg)
Please note that the character keys used for entering numbers (shaded area) are different from numeric keys. The following are used as control keys for text programming.
(SHIFT) Toggles between upper-case and lower-case letters. By default, the upper-case letter is selected. Once the (SHIFT) key is pressed, you are locked in for entering lower-case letters. "a" is displayed when lower-case letters entry is selected as shown in the operator display example below.
(DC) Toggles between single-size and double-size characters. By default, the single-size character is selected. Once the (DC) key is pressed, you are locked in for entering double size characters. "W" is displayed when double-size characters entry is selected as shown in the operator display example below.
BACK SPACE Backs up the cursor, erasing the character to the left.
Using character keys (Keys on the shaded area)
To enter numerals, letters and symbols, simply press the corresponding character on the shaded area on the keyboard.
Operator display (Example)

Example
To program the word "Clerk01" with the letter "C" being double size.
To make the letter "C" double size character
To make character size return to normal size
To toggle the characters to lower-case letters


Entering character codes with numeric keys on the keyboard
To enter a numeral, letter or symbol, enter a character code using numeric keys and press the numeric key 00. For the character codes, please refer to the alphanumeric character code table on the next page. By doing this, you can program characters other than those on the key tops.
- Double-size characters can be made by entering the character code 253 or pressing the (DC) key. "W" is displayed when double-size characters entry is selected as shown in the operator display example below.
- All three digits of the character code MUST be entered (even if it starts with zero).
Operator display (Example)![graph LR A["Press of 253 00 065"] --> B["Cursor"] B --> C["PGM"] C --> D["Character code"] D --> E["Department code, PLU code, function number, clerk code or logo message line number is displayed here."] E --> F["Press of 00"] F --> G["Characters: Indicating double size character of "A""]…](/content/2026/06/1310334/images/33de6d484f8ef70e7131e0b9780b617892b36ced48ea1562f69922b01386fb98.jpg)
Characters entered are displayed here.
Example
To program the word "SHARP" in double-size characters

When you press an appropriate number key (job code number) and press the key for text entry just after you start programming with the #:TM/SBTL key, the cash register will automatically be ready for text entry.
Alphanumeric character code table
| Code | Character | Code | Character | Code | Character | Code | Character | Code | Character |
| 001 | á | 046 | . | 091 | Ä | 136 | → | 193 | j |
| 002 | ä | 047 | / | 092 | Ö | 137 | ∞ | 194 | G |
| 003 | ê | 048 | 0 | 093 | Ü | 138 | ∞ | 195 | S |
| 004 | î | 049 | 1 | 094 | ^ | 139 | ◀ | 196 | G |
| 005 | ì | 050 | 2 | 095 | _ | 140 | ▶ | 197 | g |
| 006 | í | 051 | 3 | 096 | ' | 141 | F | 198 | K |
| 007 | ô | 052 | 4 | 097 | a | 142 | T | 199 | k |
| 008 | ó | 053 | 5 | 098 | b | 143 | ↓ | 200 | L |
| 009 | û | 054 | 6 | 099 | c | 144 | ç | 201 | J |
| 010 | ú | 055 | 7 | 100 | d | 145 | ° | 202 | Ž |
| 011 | œ | 056 | 8 | 101 | e | 146 | ¿ | 203 | D |
| 012 | ú | 057 | 9 | 102 | f | 147 | ù | 204 | d |
| 013 | ú | 058 | : | 103 | g | 148 | à | 205 | Č |
| 014 | ó | 059 | ; | 104 | h | 149 | Æ | 206 | ć |
| 015 | ó | 060 | < | 105 | i | 150 | ø | 207 | € |
| 016 | ʌ | 061 | = | 106 | j | 151 | Å | 208 | P |
| 017 | Ψ | 062 | > | 107 | k | 152 | Ω | 209 | ` |
| 018 | Γ | 063 | ? | 108 | l | 153 | é | 210 | ě |
| 019 | " | 064 | @ | 109 | m | 154 | è | 211 | š |
| 020 | Ω | 065 | A | 110 | n | 155 | Pt | 212 | č |
| 021 | Δ | 066 | B | 111 | o | 156 | i | 213 | ž |
| 022 | θ | 067 | C | 112 | p | 157 | Ñ | 214 | ý |
| 023 | Ξ | 068 | D | 113 | q | 158 | ò | 215 | ü |
| 024 | Π | 069 | E | 114 | r | 159 | £ | 216 | ň |
| 025 | Σ | 070 | F | 115 | s | 160 | ¥ | 217 | ~ |
| 026 | Υ | 071 | G | 116 | t | 161 | 。 | 218 | ` |
| 027 | Φ | 072 | H | 117 | u | 162 | Γ | 219 | ř |
| 028 | Ú' | 073 | I | 118 | v | 163 | 」 | 224 | * |
| 029 | Ú | 074 | J | 119 | w | 164 | 、 | 225 | § |
| 030 | Ó' | 075 | K | 120 | x | 165 | . | 226 | ∅ |
| 031 | Ó | 076 | L | 121 | y | 177 | Á | 227 | ^ |
| 032 | (space) | 077 | M | 122 | z | 178 | í | 228 | ↑ |
| 033 | ! | 078 | N | 123 | { | 180 | Ä | 229 | ] |
| 034 | " | 079 | O | 124 | | | 181 | ā | 230 | [ |
| 035 | # | 080 | P | 125 | } | 182 | É | 231 | " |
| 036 | 081 | Q | 126 | ß | 183 | ē | 232 | ä | |
| 037 | % | 082 | R | 127 | ¢ | 184 | ī | 233 | ö |
| 038 | & | 083 | S | 128 | !! | 185 | ī | 234 | ü |
| 039 | ' | 084 | T | 129 | 1 | 186 | ū | 235 | æ |
| 040 | ( | 085 | U | 130 | 2 | 187 | ū | 236 | å |
| 041 | ) | 086 | V | 131 | 3 | 188 | N | 237 | É |
| 042 | * | 087 | W | 132 | 4 | 189 | ŋ | 238 | ñ |
| 043 | + | 088 | X | 133 | 1/2 | 190 | Č | 253 | *(DC) |
| 044 | , | 089 | Y | 134 | F_T$ | 191 | Š | ||
| 045 | - | 090 | Z | 135 | ← | 192 | Ç |
*(DC): Double-size character code : The shaded character cannot be displayed (displayed as space).

The character “!!” (code 128) cannot be displayed (displayed as “!”).
■ Department text (item label)
Procedure
![graph LR A["#/TM/SBTL"] --> B["1"] B --> C["•"] C --> D["Dept. key"] D --> E["Character keys (max.16 digits)"] E --> F["#/TM/SBTL"] F --> G["CA/AT"] G --> H["DEPT#"] H --> I["Dept. code (1 to 99)"] I --> C E --> J["To keep current setting"]](/content/2026/06/1310334/images/1dddfaff4d7699e1cc49c528689b740969aba25a661a729fb299de942f59dffd.jpg)
To program another dept.

(Programming FRUIT for dept.1)
■ PLU text (item label)
Procedure
![graph TD A["#/TM/SBTL"] --> B["PLU/SUB"] B --> C["PLU code (1-1800)"] C --> D["Character keys (max.16 digits)"] D --> E["#/TM/SBTL"] E --> F["CA/AT"] F --> G["When the next PLU code immediately follows the one just entered"] G --> H["To program another PLU"] H --> I["To keep current setting"] I -->…](/content/2026/06/1310334/images/76021357c04336a38ac17c71f1be05b80cff0523c5cebc135deb1feaa72f6ce3.jpg)

(Programming MELON to PLU1)
■ Function text
Procedure
![graph LR A["/TM/SBTL"] --> B["•"] B --> C["FOR"] C --> D["*Function no. (max. 2 digits)"] D --> E["Character keys (max. 8 digits)"] E --> F["/TM/SBTL"] F --> G["CA/AT"] H["To keep the current setting"] --> E](/content/2026/06/1310334/images/6b0795e52451209a054d7926ad553e4c8eb24a0d61525007308558bbe37043eb.jpg)
To program another function text * Function no.: See "List of function texts" shown on the following page.
Key operation example (Programming CARD for gross charge 1)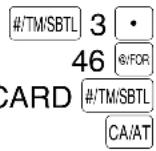
Print
■ List of function texts
| Function no. | Key or function | Default setting |
| 1 | ⊖ | (-) |
| 2 | %1 %1 | |
| 3 | %2 %2 | |
| 4 | Net sales total NET1 | |
| 5 | Net taxable 1 subtotal TAX1 T | |
| 6 | Gross tax 1 total GRS TAX1 | |
| 7 | Tax 1 total of refund entries RFD TAX1 | |
| 8 | Net tax 1 total TAX1 | |
| 9 | Exempt tax 1 TX1 EXPT | |
| 10 | Net taxable 2 subtotal TAX2T | |
| 11 | Gross tax 2 total GRS TAX2 | |
| 12 | Tax 2 total of refund entries RFD TAX2 | |
| 13 | Net tax 2 total TAX2 | |
| 14 | Exempt tax 2 TX2 EXPT | |
| 15 | Net taxable 3 subtotal TAX3 ST | |
| 16 | Gross tax 3 total GRS TAX3 | |
| 17 | Tax 3 total of refund entries RFD TAX3 | |
| 18 | Net tax 3 total TAX3 | |
| 19 | Exempt tax 3 TX3 EXPT | |
| 20 | Net taxable 4 subtotal TAX4 $T | |
| 21 | Gross tax 4 total GRS TAX4 | |
| 22 | Tax 4 total of refund entries RFD TAX4 | |
| 23 | Net tax 4 total TAX4 | |
| 24 | Exempt tax 4 TX4 EXPT | |
| 25 | Gross manual tax total GRS MTAX | |
| 26 | Refund manual tax total RFD MTAX | |
| 27 | Net manual tax total M-TAX | |
| * 28 | Exempt total from GST GST EXPT | |
| * 29 | PST total PST TTL | |
| * 30 | GST total GST TTL | |
| 31 | Tax total TTL TAX | |
| 32 | Net | NET |
| 33 | Sales total including tax total | NET2 |
| 34 | Refund | REFUND |
| 35 | Item void | VOID |
| 36 | Void mode | VOID |
| 37 | Manager void | MGR VD |
| Function no. | Key or function | Default setting |
| 38 | Subtotal void | SBTL VD |
| 39 | No sale | NO SALE |
| 40 | RA | *** RA |
| 41 | PO | *** PO |
| 42 | Customer counter | TRANS CT |
| 43 | Sales total | NET3 |
| 44 | Cash | CASH |
| 45 | Check | CHECK |
| 46 | Gross charge 1 | CHARGE |
| 47 | Refund charge 1 | CHARGE- |
| 48 | Gross charge 2 | CHARGE2 |
| 49 | Refund charge 2 | CHARGE2- |
| 50 | Currency conversion1 (Preset) | CONV 1 |
| 51 | Currency conversion2 (Open) | CONV 2 |
| 52 | Cash in drawer | ****CID |
| 53 | Cash+check in drawer CA+CH ID | |
| 54 | Check change | CHK/CG |
| 55 | Exempt VAT | VAT EXPT |
| 56 | Commission sale 1 | COM. SAL1 |
| 57 | Commission sale 2 | COM. SAL2 |
| 58 | Non commission sale | NON COM. |
| 59 | (+)Dept. total | * DEPT TL |
| 60 | (-)Dept. total | DEPT(-) |
| 61 | (+)Bottle return dept. total | * BTTL TL |
| 62 | (-)Bottle return dept. total | BTTL(-) |
| 63 | Subtotal | SUBTOTAL |
| 64 | Merchandise subtotal | MDSE ST |
| 65 | Total | *** TOTAL |
| 66 | Change | CHANGE |
| 67 | Items | ITEMS |
| 68 | Commission amount 1 COM. | AMT1 |
| 69 | Commission amount 2 COM. | AMT2 |
| 70 | Commission amount total | COM. TTL |
| 71 | Department report title | DEPT |
| 72 | PLU report title | PLU |
| 73 | Transaction report title | TRANS. |
| 74 | Clerk report title | CLERK |
| 75 | Hourly report title HOURLY | |
| 76 | Daily report title DAILY | |
| 77 | Group report title GROUP | |
| 78 | Total in drawer TL-ID | |
| 79 | Non add symbol # | |
| 80 | Copy receipt title | COPY |
| 81 | EJ report title EJ | |
| 82 | EJ report end title EJ | END |
| 83 | Group 1 | GROUP01 |
| 84 | Group 2 | GROUP02 |
| Function no. | Key or function | Default setting |
| 85 | Group 3 | GROUP03 |
| 86 | Group 4 | GROUP04 |
| 87 | Group 5 | GROUP05 |
| 88 | Group 6 | GROUP06 |
| 89 | Group 7 | GROUP07 |
| 90 | Group 8 | GROUP08 |
| 91 | Group 9 | GROUP09 |
| ** 92 | Change due | DUE |
| ** 93 | Taxable ST for all tax delete | TAX ST |
| ** 94 | Amount entry | AMOUNT |
Note
- The items marked with “*” are for Canada only.
- The items marked with “**” are for display only.
- The function no. 55 “Exempt VAT” is only effective for the Canadian tax system (2 GST, VAT type).
Clerk names
Procedure
![graph LR A["#TM/SBTL"] --> B["•"] B --> C["#TM/SBTL @/FOR"] C --> D["Clerk code (1-40)"] D --> E["Character keys (max. 8 digits)"] E --> F["CA/AT"] G["To program another clerk"] --> D H["To keep current setting"] --> E](/content/2026/06/1310334/images/abd6955d6bc3f18889f350674a83c71f201f7345fa745e744b399cd5107a1c4b.jpg)

■ Logo messages
The register can print programmed messages on every receipt. On the standard model, the graphic logo is printed on the receipt. If you want to print logo messages, please change the logo message print format. (See page 54 for the programming details.) The options are listed below:
Procedure
![graph LR A["/TM/SBTL"] --> B["•"] B --> C["4 FOR"] C --> D["*Line number (1-6)"] D --> E["Character keys (max. 24 digits)"] E --> F["#/TM/SBTL"] F --> G["CA/AT"] H["To program another line"] --> E I["To keep the current setting"] --> E](/content/2026/06/1310334/images/ab36ccd96f41cd79aec0c3f08e1f70947158f626dd5f8f377b50943303a78c20.jpg)
* "Header 3-line message" type: 1 to 3
"Footer 3-line message" type: 4 to 6
"Header 6-line message" type: 1 to 6
"Header 3-line and footer 3-line message" type: 1 to 6 (1 to 3 as header, 4 to 6 as footer)
Logo print format (6 types)
![graph TD A["Graphic logo"] --> B["Default setting"] B --> C["Header 3-line message Footer 3-line message"] C --> D["Text 1st line"] C --> E["Text 2nd line"] C --> F["Text 3rd line"] C --> G["Text 1st line"] C --> H["Text 2nd line"] C --> I["Text 3rd line"] C --> J["Text 4th line"] C --> K["Text 5th…](/content/2026/06/1310334/images/72741aa51461d301476f190dbbc2c4ec4f0bdccad751c28ace08944d6611bca8.jpg)
To print the logo message "THANK YOU" using double sized characters and centering on the third line.
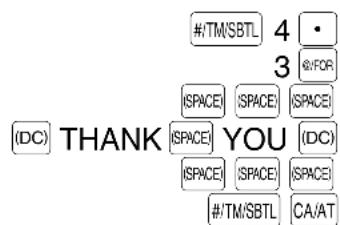
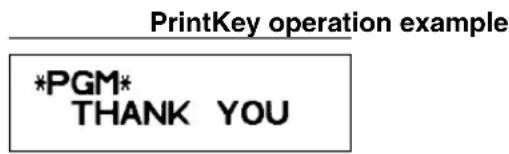
Note: A 6-line logo message is preprogrammed when shipped. Please start entering from the first line when you first program a logo message.
■ Foreign currency symbol
Foreign currency symbol for the CONW key is printed with a foreign currency exchange amount.
![graph TD A["#/TM/SBTL"] --> B["6"] B --> C["•"] C --> D["Character keys (max. 4 digits)"] D --> E["#/TM/SBTL"] E --> F["CA/AT"] G["Entry using character code"] --> H["#/TM/SBTL 6 • SPACE | SPACE | SPACE"] H --> I["207 00"] I --> J["#/TM/SBTL CA/AT"] K["To keep the current setting"] --> D L["PrintKey…](/content/2026/06/1310334/images/5dd3ddee4d29a62082dda12a84277c89b7f43a2c027c42f27faf43eb8f32c6a6.jpg)
ADVANCED PROGRAMMING
1 Register Number and Consecutive Number Programming
The register number and consecutive numbers are printed on every receipt or journal.
When your store has two or more registers, it is practical to set separate register numbers for identification. The consecutive number is increased by one each time a receipt is issued or when a journal print occurs.
For consecutive number programming, enter a number (max. 4 digits) that is one less than the desired starting number.
Register number
Procedure
![graph LR A["#/TM/SBTL"] --> B["1"] B --> C["@/FOR"] C --> D["Register number (one to six digits)"] D --> E["#/TM/SBTL"] E --> F["CA/AT"] G["To set the register number "0""] --> D H["PrintKey operation example"] --> I["*PGM* #1 123456"] I --> J["Register number"]](/content/2026/06/1310334/images/f198ae10eeb54988ab21127f01c4778e9a064d0c3226e086e3451726ed4f0b21.jpg)
■ Consecutive numbers
Procedure
![graph LR A["#/TM/SBTL"] --> B["2"] B --> C["@/FOR"] C --> D{To begin the count from 0001} D --> E["A number (one to four digits) that is one less than the desired starting number"] E --> F["#/TM/SBTL"] F --> G["CA/AT"] H["#/TM/SBTL 2 @/FOR 1000"] --> I["2"] I --> J["CA/AT"] K["*PGM* #2"] --> L["1000…](/content/2026/06/1310334/images/4a08af042622b49ccbe6d0d9100c2ba9751912b8da772d8dcda891546f3ecc9d.jpg)
2 Various Function Selection Programming 1
The cash register provides various detailed functions listed below.
• Function selection for miscellaneous keys - Print format - Receipt print format • Electronic journal (EJ) function parameters • Function selection for tax - Others
For this programming, the job code entry style is applied. You can continue programming until you press the CA/AT key for the programming described in this section. To continue programming, repeat from a job code entry.
![graph LR A["#/TM/SBTL"] --> B["*1Job code"] B --> C["@/FOR"] C --> D["*2ABCDEFGHIJKLMNOPQRSTUVWXYZH"] D --> E["#/TM/SBTL"] E --> F["CA/AT"] G["To set "00000000""] --> D](/content/2026/06/1310334/images/89d325ac04d281ae985eca41e345f5768fafb802532a44856a45afd19212b9ec.jpg)
*1 Enter job code using numeric keys specified in each section below. *2 Data entry details are listed on each table in each section below.
Example: When programming for job code 5 as ABCDEFGH: 00000100.
Key operation example
| 00000100 | #/TM/SBTL | 5 | @:FOR |
| #/TM/SBTL | CA/AT |
| *PGM* | |
| #5 | 00000100 |
■ Function selection for miscellaneous keys
Job code: 5
* Item: Selection: Entry:
| A PO in REG mode Allow the PO operation in REG mode* 0 | ||
| Disallow it 1 | ||
| B RA in REG mode Allow the RA operation in REG mode* 0 | ||
| Disallow it 1 | ||
| C Subtotal void in REG mode Allow the REG mode subtotal void* 0 | ||
| Disallow it 1 | ||
| D Indirect void in REG mode Allow the REG mode indirect void* 0 | ||
| Disallow it 1 | ||
| E Direct void in REG mode Allow the REG mode direct void* 0 | ||
| Disallow it 1 | ||
| F | Refund key availability | Allow the REG mode refund entry* 0 |
| Disallow it 1 | ||
| G | No sale in REG mode | Allow the no sale operation in REG mode* 0 |
| Disallow it 1 | ||
| H | Fractional quantity availability | Allow fractional quantity entry 0 |
| Disallow it* 1 | ||
■ Print format
Job code: 6
* Item: Selection: Entry:
| A Printing style | Journal printing | 0 | |
| Receipt printing* | 1 | ||
| B Receipt print form | Total | 0 | |
| Detailed* | 1 | ||
| C | Time print on all receipts | Allow time printing* | 0 |
| Disallow it 1 | |||
| D | Date print on all receipts | Allow date printing* | 0 |
| Disallow it 1 | |||
| E | Consecutive no. print on all receipts | Allow consecutive no. printing* | 0 |
| Disallow it 1 | |||
| F | Always enter 0. | (Fixed position) | 0 |
| G | Zero skip for PLU report | Disallow zero skip | 0 |
| Allow zero skip* | 1 | ||
| H | Zero skip for general, clerk, hourly and daily net sales reports | Disallow zero skip | 0 |
| Allow zero skip* | 1 | ||
Printing style
- Even when receipt printing is selected, the journal rewind motor will be driven in PGM, OP X/Z, X1/Z1 and X2/Z2 modes so you can wind sales and programming reports.
■ Receipt print format
Job code: 7
* Item: Selection: Entry:
| A Always enter 0. (Fixed position) 0 | |
| B Always enter 0. (Fixed position) 0 | |
| C Subtotal print with a press of subtotal key Disallow subtotal printing* 0 | |
| Allow it 1 | |
| D Merchandise subtotal print with a press of merchandise subtotal key Allow it 1 | |
| E Always enter 0. (Fixed position) 0 | |
| F Always enter 0. (Fixed position) 0 | |
| G Always enter 0. (Fixed position) 0 | |
| H Number of purchases print Allow printing of number of purchases* 0 | |
| Disallow it 1 | |
■ Electronic journal (EJ) function parameters
Job code: 68
* Item: Selection: Entry:
| A Always enter 0. (Fixed position) 0 | |||
| B Always enter 0. (Fixed position) 0 | |||
| C | Temporary EJ printing during a transaction | Disallow temporary EJ printing | 0 |
| Allow it* | 1 | ||
| D | EJ printing and clearing EJ data when issuing general Z1 report | Disallow EJ printing and clearing EJ data* | 0 |
| Allow it 1 | |||
| E | PGM mode operation records type | Details* | 0 |
| Header information only | 1 | ||
| F | REG/MGR/VOID modes operation records type | Details* | 0 |
| Total | 1 | ||
| G | Compression printing for EJ data | No (normal size) | 0 |
| Yes (small size)* | 1 | ||
| H | Action when EJ memory area is full | Continue | 0 |
| Continue and warn (near full warning)* | 1 | ||
| Lock and warn (with near full warning) | 2 | ||
Temporary EJ printing during a transaction
- You can print journal data of a current transaction recorded in EJ memory by pressing the RCPT/PC key during the transaction. To realize this function completely, the cash register is programmed to receipt printing and set Receipt ON/OFF function to OFF.
PGM mode operation records type
- The header information only is printed during the program reading operation.
The header information only is printed for X/Z reports.
(Receipt sample for Header Information only)

Action when EJ memory area is full
- By default, when the memory for EJ becomes nearly full, the cash register shows “N” at the 14th position of the display (EJ memory nearly full message), and the cash register keeps storing new data while erasing the oldest data. When “0” is selected, the cash register will no longer show EJ memory nearly full message. When “2” is selected, the cash register shows EJ memory nearly full message and when the memory is totally full, the cash register locks the sales/data entry with a display of the memory full message “EJ DATA FULL”. You will only be able to issue an EJ report.
■ Function selection for tax
Job code: 15
* Item: Selection: Entry:
| A Always enter 0. (Fixed position) 0 |
| B Always enter 0. (Fixed position) 0 |
| C Always enter 0. (Fixed position) 0 |
| D Always enter 0. (Fixed position) 0 |
| E Always enter 0. (Fixed position) 0 |
| F Always enter 0. (Fixed position) 0 |
| G Tax delete in REG mode availability Allow tax delete in REG mode* 0 |
| Disallow it 1 |
| H Manual tax entry in Allow manual tax entry in REG mode* 0 |
| REG mode availability Disallow it 1 |
■ Other programming
Job code: 61
* Item: Selection: Entry:
| A | Always enter 0. | (Fixed position) | 0 |
| B | Always enter 0. | (Fixed position) | 0 |
| C | Minus dept. and PLU/subdept. availability | Disallow to program minus dept. and PLU/subdept. | 0 |
| Allow it* | 1 | ||
| D | Fractional treatment | Round off (4 down, 5 up)* | 0 |
| Raising to unit | 1 | ||
| Disregarding fractional treatment | 2 | ||
| E | Use of 00 key Use | 00 key as 00 key* | 0 |
| Use 00 key as 000 key | 1 | ||
| F | Time format | Use 12-hour format* | 0 |
| Use 24-hour format | 1 | ||
| G | Date format | Use month-day-year format* | 0 |
| Use day-month-year format | 1 | ||
| Use year-month-day format | 2 | ||
| H | Position of decimal point (from right) (TAB) | 0 to 3 (default 2) | |
* Item: Selection: Entry:
| A Always enter 0. (Fixed position) 0 | |||
| B Error beep activation By lock error* 0 | |||
| By misoperation 1 | |||
| C Key touch sound availability Allow to sound* 0 | |||
| Disallow it 1 | |||
| D Buffered keyboard Yes* 0 | |||
| No | 1 | ||
| E | Void mode operation availability | Allow void mode operation* | 0 |
| Disallow it 1 | |||
| F | Void mode entry data print in Z2 reports | Allow printing of void mode entry data in Z2 reports* | 0 |
| Disallow it 1 | |||
| G | Void mode entry data print in Z1 reports | Allow printing of void mode entry data in Z1 reports* | 0 |
| Disallow it 1 | |||
| H | Addition of hourly sales total data in void mode | No* | 0 |
| Yes | 1 | ||
Job code: 66
* Item: Selection: Entry:
| A | Printing a receipt after transaction | Total only | 0 |
| Details* | 1 | ||
| B | Amount printing when PLU/subdept. | Disallow printing* | 0 |
| unit price is zero | Allow it | 1 | |
| C | Subtotal printing for conversion of deficit | Allow printing* | 0 |
| Disallow it | 1 | ||
| D Always enter 0. (Fixed position) | 0 | ||
| E | Compression print on journal at PGM, X1/Z1 and X2/Z2 modes | No (normal size) | 0 |
| Yes (small size)* | 1 | ||
| F | Compression print on journal at REG, MGR and VOID modes | No (normal size) | 0 |
| Yes (small size)* | 1 | ||
| G | Logo message printing on journals | Disallow logo message printing on journals* | 0 |
| Allow logo message printing on journals | 1 | ||
| H | Footer printing | Printing footer on all receipts* | 0 |
| Printing footer with selected function key at the time of finalization | 1 | ||
Compression print on journal
- This selection is valid only when “printing style” (job code 6) is set to “journal printing”.
Job code: 70
* Item: Selection: Entry:
| A Split pricing counting Quantity* | 0 | ||
| Package | 1 | ||
| B | Multiplication/split pricing entry availability | Allow multiplication entry only* | 0 |
| Allow both of multiplication and split pricing 1 | |||
| C Always enter 0. (Fixed position) | 0 | ||
| D Always enter 0. (Fixed position) | 0 | ||
| E | Tax printing when GST is VAT | Allow tax printing* | 0 |
| Disallow it | 1 | ||
| F | GST exempt printing on X/Z reports | Allow printing of GST exempt* | 0 |
| Disallow it | 1 | ||
| GH | Tax calculation system | Auto tax* | 00 |
| Canadian tax (tax type number) | 01 through 11 | ||
Tax calculation system
- For US tax system, select "auto-tax".
- For Canadian tax, from the table below, specify a tax system suitable for your province (if necessary contact your local tax office for correct sales tax information) and for your type of retail business. In the cash register, four kinds of tax can be set and each tax is arranged to match GST or PST as follows:
Tax 1: PST Tax 2: PST Tax 3: PST or GST Tax 4: GST
| Canadian tax type number | Tax 4 method Tax 3 | method Tax 2 and 1 method | ||
| GST GST PST PST | ||||
| 01 VAT VAT - Tax on tax | ||||
| 02 VAT VAT - Tax on base | ||||
| 03 VAT - Tax on tax Tax on tax | ||||
| 04 VAT - Tax on base Tax on base | ||||
| 05 Add on Tax - Tax on tax Tax on Tax | ||||
| 06 Add on Tax - Tax on base Tax on base | ||||
| 07 Add on Tax VAT - Tax on tax | ||||
| 08 Add on Tax VAT - Tax on base | ||||
| 09 Add on Tax Add on Tax | - Tax on tax | |||
| 10 Add on Tax Add on Tax | - Tax on base | |||
| 11 VAT - VAT (Tax on base) | Tax on tax | |||
(The most common type for Canada is type number 06.)
Note
- To program a GST, use Tax 4; and to program two GSTs, use Tax 3 and 4. To program a PST, use Tax 1; to program two PSTs, use Tax 1 and 2; and to program three PSTs, use Tax 1, 2 and 3.
- The entry of a multi-taxable item for PST or GST is prohibited as follows for the Canadian tax system. When programming for departments, avoid programming the prohibited multi-taxable status.
In case of; Tax 1: PST, Tax 2: PST,
Tax 3: PST, Tax 4: GST
In case of; Tax 1: PST, Tax 2: PST,
Tax 3: GST, Tax 4: GST
Taxable 1 and 2 item …… prohibited
Taxable 1 and 2 item …… prohibited
Taxable 1 and 3 item …… prohibited
Taxable 1 and 3 item ...... allowed
Taxable 2 and 3 item …… prohibited
Taxable 2 and 3 item ...... allowed
Taxable 1 and 4 item ...... allowed
Taxable 1 and 4 item ...... allowed
Taxable 2 and 4 item ...... allowed
Taxable 2 and 4 item ...... allowed
Taxable 3 and 4 item ...... allowed
Taxable 3 and 4 item …… prohibited
3 Various Function Selection Programming 2
The cash register provides various options so you can use the register to suit your sales needs.
In this section, you can program the following features (parameters within parentheses indicate default setting):
- Power save mode (entering the power save mode after 30 minutes)
- Logo message print format (graphic logo only)
- High amount lockout (HALO) for cash in drawer (CID) (9999999.99) (sentinel) - When the cash in drawer reaches the amount programmed, the sentinel mark "X" will be displayed at the leftmost position on the lower line of the operator display.
• Thermal printer density (standard density)
- RS-232C interface
• Language selection (English)
- Training clerk specification (none) - If you specify a clerk code who is trained for use on this cash register, the cash register will go into training mode when the clerk code is registered for sales entries. The sales operations done by the trained clerk do not affect sales totals. For details, refer to TRAINING MODE section.
■ Power save mode
Procedure
![graph LR A["#/TM/SBTL"] --> B["10"] B --> C["@/FOR"] C --> D["*ABCD"] D --> E["#/TM/SBTL"] E --> F["CA/AT"]](/content/2026/06/1310334/images/560e23318e3674ea13e7eb28d062453c085a193a1149d5757326e11d2f760a86.jpg)
| * | Item: | Selection: | Entry: |
| A | Entering power save mode when time is displayed | Yes* | 0 |
| No | 1 | ||
| B-D | Time(min.) to entering power save mode since no operation is made | 001-254 or 999(Default 030) |
Note: When 999 is set for B to D, entering into power save mode is inhibited.


■ Logo message print format
You can select the number of lines for your logo message, and the position to print it on receipt.
For details of the logo message type, please refer to "Logo messages" on page 46.
Procedure
![graph LR A["#/TM/SBTL"] --> B["11"] B --> C["@/FOR"] C --> D["*A"] D --> E["#/TM/SBTL"] E --> F["CA/AT"] D -->|To set "0"| E](/content/2026/06/1310334/images/eb24345f84655d0d6293606a34c91137fe41ef6f24cce45999505d23d237b4b2.jpg)
*A: Logo message type
0: Header 3-line message without graphic logo
1: Graphic logo only (default) 2: Footer 3-line message with graphic logo 3: Header 6-line message 4: Header 3-line message with graphic logo 5: Header 3-line message and footer 3-line message

High amount lockout (HALO) for cash in drawer (CID) (sentinel)![graph LR A["#/TM/SBTL"] --> B["20"] B --> C["@/FOR"] C --> D["HALO for CID (max. 9 digits)"] D --> E["#/TM/SBTL"] E --> F["CA/AT"]](/content/2026/06/1310334/images/089203fd9ebe263e71fce3859fe52b5861f2d4a109622005ed065dd1ad274d07.jpg)
Default: 999999999

RS-232C interface
(1) RS-232C terminal number![graph LR A["#/TM/SBTL"] --> B["30"] B --> C["@/FOR"] C --> D["Terminal number (max. 6 digits)"] D --> E["#/TM/SBTL"] E --> F["CA/AT"] G["To set "0""] --> D](/content/2026/06/1310334/images/98282405c794303ed27928997bd606b38df3028910b87839cc6b8003af545ebc.jpg)
Default: 1
(2) RS-232C transmission form![graph LR A["#/TM/SBTL"] --> B["31"] B --> C["@/FOR"] C --> D["*A"] D --> E["#/TM/SBTL"] E --> F["CA/AT"] D -->|To set "0"| G["*A"]](/content/2026/06/1310334/images/ca0a4d77334177e26c7e50b240b017cb001ed36b6453fec4b2948b8d747a9705.jpg)
Item: Selection: Entry: A Transmission line form Full duplex system* 0
Half duplex system 1 (3) RS-232C baud rate![graph LR A["#/TM/SBTL"] --> B["32"] B --> C["@/FOR"] C --> D["*AB"] D --> E["#/TM/SBTL"] E --> F["CA/AT"]](/content/2026/06/1310334/images/2986dfeba45e7710a77367e70e7f38eb35bd0e35560c6be1990dd9cb30b9de38.jpg)
Item: Selection: Entry: A Always enter 0.0 B Baud rate (bps) 2400 3
4800 4
9600* 5
19200 6
(4) RS-232C start code and end code
Procedure
![graph LR A["#/TM/SBTL"] --> B["33"] B --> C["@/FOR"] C --> D["*ABCDEF"] D --> E["#/TM/SBTL"] E --> F["CA/AT"] D -->|To set "000000"| G["*ABCDEF"]](/content/2026/06/1310334/images/05e394c5f231450f03fc6007d92a6a1730d50659eaf115a32754b9dd30a956ee.jpg)
*A-C: Start code 000-127 (default: 002) D-F: End code 000-127 (default: 013)
(5) RS-232C time out setting
Procedure
![graph LR A["#/TM/SBTL"] --> B["35"] B --> C["@/FOR"] C --> D["Time out (1 to 255 sec.)"] D --> E["#/TM/SBTL"] E --> F["CA/AT"]](/content/2026/06/1310334/images/50d2e41ebe654782f79f44366d11ec5cd9b0acc1a3be70057c2f3676a730a43c.jpg)
Default: 007

PrintKey operation example
■ Thermal printer density
Procedure
![graph LR A["/TM/SBTL"] --> B["50"] B --> C["@/FOR"] C --> D["*Printer density (00-99)"] D --> E["/TM/SBTL"] E --> F["CA/AT"] D -->|To set "0"| E](/content/2026/06/1310334/images/207f8876967d5563938b4c7340f524e491402f5922b5d0c157f5fbcfa2f3d40b.jpg)
* 50 is the default setting. To make the print darker, set a larger number, and to make the print lighter, set a smaller number.

PrintKey operation example
■ Language selection
Procedure
![graph LR A["#/TM/SBTL"] --> B["88"] B --> C["@/FOR"] C --> D["*Language (0, 2 or 3)"] D --> E["CA/AT"] D --> F["To set "0""]](/content/2026/06/1310334/images/e92901a6dfb0fd7b82d2d530d3ec7ff89fdec60492bce5045d8ee38e49992f4d.jpg)
*Language: 0: English 2: French 3: Spanish (default: English)

PrintKey operation example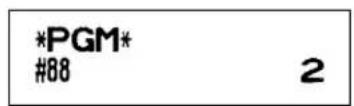
Caution
When you change the language, the texts such as clerk names, logo messages and function texts (refer to page 45), which you programmed, will be reset to the default settings. The language selection must be made before programming clerk names, logo messages and function texts.
■ Training clerk specification for training mode
For the details of clerk training, please refer to "TRAINING MODE" on page 59.
![graph LR A["#/TM/SBTL"] --> B["86"] B --> C["@/FOR"] C --> D["Clerk code (1 to 40)"] D --> E["#/TM/SBTL"] E --> F["CA/AT"] G["#/TM/SBTL 86 @/FOR 20 #/TM/SBTL CA/AT"] --> H["PrintKey operation example"] I["*PGM* #86 20"] --> H style A fill:#f9f,stroke:#333 style B fill:#ccf,stroke:#333 style C fill:#…](/content/2026/06/1310334/images/61042196e136ab97722cf741e23a4c95667c1549a4481f459d102b7b2220052e.jpg)
■ AUTO key programming — Automatic sequence key
If you program frequently performed transactions or report sequences for the AUTO key, you can recall those transactions and/or reports simply by pressing the AUTO key in key operations.
![graph TD A["AUTO"] --> B["Transaction (key entry)"] B --> C["AUTO"] C --> D["CA/AT"] B -->|max. 25 times| B style A fill:#f9f,stroke:#333 style D fill:#f9f,stroke:#333 note right of B Delete](/content/2026/06/1310334/images/e76e9cb4933c20259ea34cb1bfeeb1b1a48f49e3d07173d7ac93eadf3992e4ab.jpg)
Programming for AUTO; entering a PLU 2 item (programmed unit price: 1.50) and a dept. 6 item (unit price: 1.00)
![graph LR A["AUTO setting"] --> B["2"] B --> C["100"] C --> D["AUTO"] C --> E["6"] C --> F["AUTO"] C --> G["CA/AT"]](/content/2026/06/1310334/images/a036e6f29e01e55317791a86ab4fac6858db708d7c238f4e1e854022daf316e3.jpg)
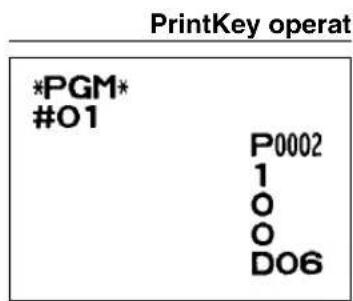
Note
When the AUTO key has been programmed to execute a report job function, the mode switch must be in the appropriate position (OPX/Z for individual clerk reports, X1/Z1 for daily reports or X2/Z2 for weekly or monthly reports).
4 Reading Stored Programs
The machine allows you to read every program stored in the PGM mode.
■ Key sequence for reading stored program
Report name Key sequence
| Programming report 1 | CA/AT | |||
| Programming report 2 | 2 | CA/AT | → | |
| Auto key programming report | 1 | CA/AT | → | |
| Printer density programming report | 3 | CA/AT | → | |
| PLU programming report | Start PLU code → | 3/FOR → End PLU code → | PLU/SUB |
Note
- To stop reading programming report 1 or PLU programming report, turn the mode switch to the MGR position.
- When printing is performed continuously, the printing may be intermitted several seconds. After the intermission, the printing will be restarted.
■ Sample printouts
1 Programming report 1

2 Programming report 2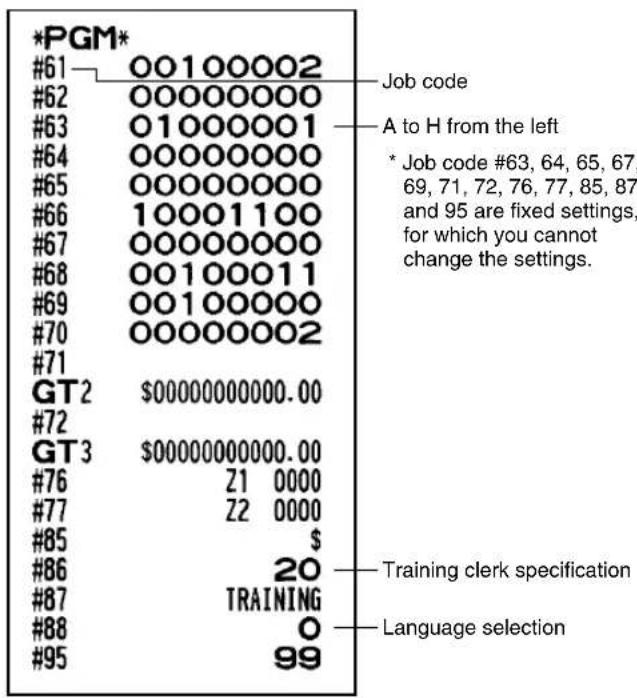
3 Auto key programming report
4 Printer density programming report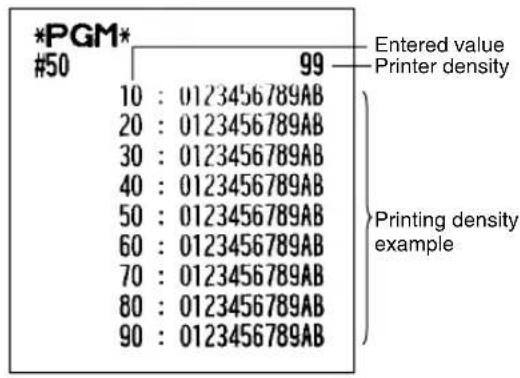
5 PLU programming report
TRAINING MODE
The training mode is used when the operator or the manager practices register operations.
When a clerk in training is selected, the machine automatically enters the training mode. To specify a clerk to be trained, refer to "Training clerk specification for training mode" in "ADVANCED PROGRAMMING" on page 57.
The training operation is valid only in REG, MGR, and VOID modes.
The corresponding clerk memory is only updated in the training mode.
![graph TD A["A clerk set in training"] --> B["20"] B --> C["1000"] C --> D["3"] D --> E["CLK#"] D --> F["1"] D --> G["SPOR"] D --> H["3"] D --> I["CA/AT"]](/content/2026/06/1310334/images/1789f32bb9e6c9b935b78fb3ee20e055f122a4bca6e3e86b05e0dbbc66c8cecd.jpg)
Receipt print key operation example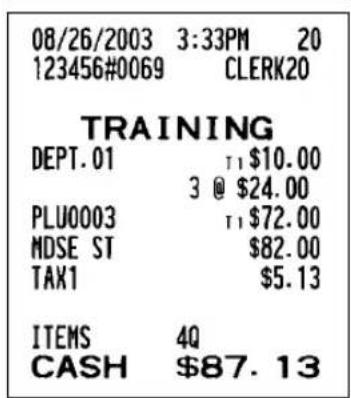
READING (X) AND RESETTING (Z) OF SALES TOTALS
- Use the reading function (X) when you need to take a reading of sales information entered since the last reset. You can take this reading any number of times. It does not affect the register's memory.
- Use the resetting function (Z) when you need to clear the register's memory. Resetting prints all sales information and clears the entire memory except for the GT1 through GT3, Training GT, reset count, and consecutive number.
1 Summary of Reading (X) and Resetting (Z) Reports
X1 and Z1 reports: Daily sales reports
X2 and Z2 reports: Periodic (monthly) consolidation reports
When you take an X or Z report, turn the mode switch to the appropriate position referring to the column of "Mode switch position" shown on the table below, and use the following corresponding key sequence.
| Item | Mode switch position | Key operation | ||
| OPX/Z | X1/Z1 | X2/Z2 | ||
| Flash report:(Only display)To clear thedisplay, press theCLkey or turn themode switch toanother position. | X | - | - | Dept. code : Depa#t sales total[For dept. 1 to 6 : Dept. key ( 1 to 6 ) ] |
| @/FORkey: Amount of cash in drawer | ||||
| CA/ATkey: Sales total | ||||
| Full sales report | - | X1, Z1 | X2, Z2 | Reading: R4A#ting: • → CA/AT |
| Department report | - | X1 X2 | Reading: DEPT# | |
| Individual grouptotal report ondepartment | - | X1 X2 | Reading: Group number → @/FOR → DEPT# | |
| Full group totalreport ondepartment | - | X1 X2 | Reading: 0 → @/FOR → DEPT# | |
| PLU report bydesignated range | - | X1, Z1 | X2, Z2 | All PLUsReading: → Start PLU code → @/FOR → End PLU code → PLU/SUBResetting: All PLUs→ Start PLU code → @/FOR → End PLU code → • → PLU/SUB |
| PLU report byassociateddepartment | - | X1 X2 | Reading: Associated dept. code → DEPT# → PLU/SUB | |
| Transaction report | - | X1 X2 | Reading: 1 → CA/AT | |
| Total in drawer report | - | X1 X2 | Reading: 2 → CA/AT | |
| Individual clerk report | X, Z | - | - | Reading: Resetting: (The report of the current clerk) • → CLK# |
| Full clerk report | - | X1, Z1 | X2, Z2 | Reading: Resetting: • → CLK# |
| Hourly report (full) | - | X1, Z1 | - | Reading: Resetting: • → #/TM/SBTL |
| Hourly report (by range) | - | X1 | - | Reading: Start time End-timeOR (hour) (hour) → #/TM/SBTL |
| Daily net sales report | - | - | X2, Z2 | Reading: Resetting: • → #/TM/SBTL |
Note
- When both sales quantities and sales amounts are zero, printing is skipped. If you do not want to skip, change the programming. (Refer to “Print format” of “Various Function Selection Programming 1”.)
- "X" represents read symbol and "Z" represents reset symbol in the reports.
- To stop reading and resetting the PLU sales report, turn the mode switch to the MGR position. The data will not be erased when you reset.
- When printing is performed continuously, the printing may be intermitted several seconds. After the intermission, the printing will be restarted.
2 Daily Sales Totals
■ Full sales report
- Sample report

*1: When you take X1 report, "X1" is printed. *2: Printed in the Z1 report only. *3: When the Canadian tax system is selected, the following is printed here.
| GST EXPT | 250.95 | — Exempt total from GST |
| PST TTL | 18.00 | — PST total |
| GST TTL | $5.09 | — GST total |

■ Department report
- Sample report
| *X1* | Mode title | |
| *DEPT* | Report title | |
| D01 | 65Q | |
| DEPT.01 | 454.53 | |
| D02 | 21Q | |
| DEPT.02 | 160.50 | |
| D03 | 2Q | |
| DEPT.03 | 16.50 | |
| D04 | 12Q | |
| DEPT.04 | 55.00 | |
| D05 | 4Q | |
| DEPT.05 | 5.60 | |
| D98 | 2Q | |
| DEPT.98 | 24.00 | |
| D99 | 6Q | |
| DEPT.99 | 10.14 | |
| *DEPT TL | 195Q | |
| 1403.22 | ||
| D13 | 10Q | |
| DEPT.13 | -12.06 | |
| DEPT (-) | 10Q | |
| -12.06 | ||
| D58 | 28Q | |
| DEPT.58 | 14.00 | |
| *BTTL TL | 28Q | |
| 14.00 | ||
| D59 | 15Q | |
| DEPT.59 | -7.50 | |
| BTTL (-) | 15Q | |
| -7.50 | ||
■ Individual group total report on department
- Sample report

■ Full group total report on department
- Sample report

■ PLU report by designated range
- Sample report
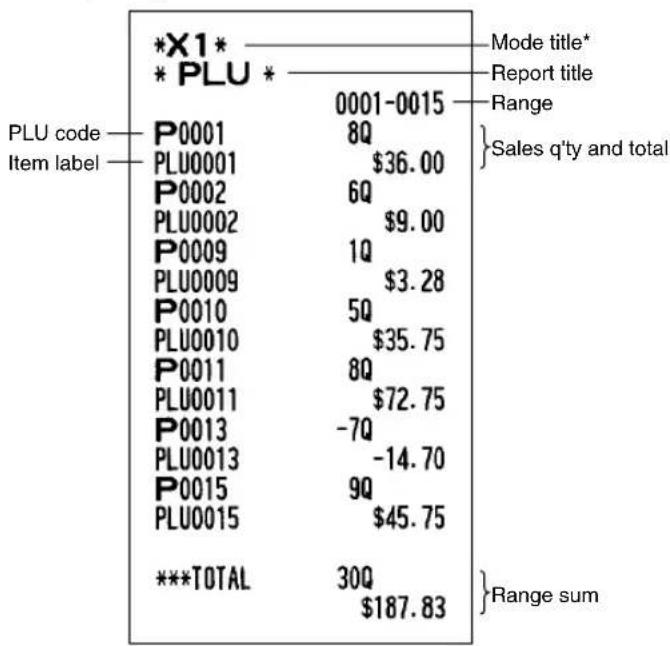
*: When you take Z1 report, "Z1" is printed.
■ PLU report by associated department
- Sample report

■ Transaction report
- Sample report

This report shows the same transaction data as when a full sales report is run.
■ Total in drawer report
- Sample report

Clerk reports
Individual clerk report
- Sample report

*: When you take OPZ report, "OPZ" is printed.
Full clerk report
The printout occurs in the same format as in the sample report of individual clerk, but all clerk's sales data are printed in the order of clerk code number (from #1 to #40).
■ Hourly report
- Sample report

*: When you take Z1 report, "Z1" is printed. When you take an hourly report by range, a report of the specified range of time (hour) is printed.

Periodic Consolidation
■ General information
The periodic reading or resetting reports are the same in format as those in the X1/Z1 report for daily sales. The mode indicator will read "X2" or "Z2".
- Sample X report (Individual group total report on department)
- Sample Z report (Full sales report)

The subsequent printouts are the same in format as those in the X/Z report for daily totals.
■ Daily net sales reports
- Sample report

*: When you take Z report, "Z2" is printed instead of "X2".
EJ REPORT READING AND RESETTING
The cash register provides an electronic journal (EJ) function. This function is intended to record the journal data in a memory instead of journal paper, and print the data as an EJ report. The register records the journal data in REG, PGM, VOID, X1/Z1 and X2/Z2 modes. For details of EJ programming, please refer to “Electronic journal (EJ) function parameters” section (page 50).
■ Printing journal data on the way of a transaction
You can print journal data of a current transaction recorded in EJ memory by pressing the RCPT:PO key during the transaction.

This function is valid when the printing style is programmed to receipt, and the receipt ON/OFF function is set to OFF.
- Sample print

■ Reading and resetting the electronic journal data (Issuing EJ report)
You can read the journal data stored in the EJ memory in the journal format by executing the following procedure in the X1/Z1 or OP X/Z mode.
To read all of the data:
E/J PRINT (X1/Z1 mode only)
700 → @/FOR → CA/AT
To reset all of the data:
700 → • → @/FOR → CA/AT
To read the last 10 records:
Note
- On the EJ memory, a maximum of 3000 lines of data can be stored. When executing all data reading, all of the data stored in the EJ memory will be printed. To save paper, compression print is available.
- To stop reading or resetting the data, turn the mode switch to "MGR" position. The data will not be erased when resetting.
- When printing is performed continuously, the printing may be intermitted several seconds. After the intermission, the printing will be restarted.
- Sample EJ report

OVERRIDE ENTRIES
Programmed limit for functions (such as for maximum amounts) can be overridden by making an entry in the MGR mode.
Procedure
- Turn the mode switch to the MGR position.
- Make an override entry.
Example
In this example, the register has been programmed not to allow discounts entries over \$1.00.
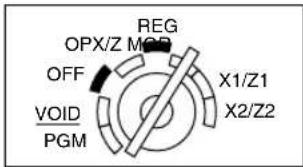
Receipt printKey operation example
REG-mode 1500
entries 250

⊖ ...Error

Turn the mode switch
to the MGR position.
250
Return the mode switch
to the REG position.
CA/AT

DEPT.01
11 \$15.00
(一)
11-2.50
MDSE ST
$12.50
TAX1
$0.78
ITEMS
10
CASH
$13.28
CORRECTION AFTER FINALIZING A TRANSACTION (Void mode)
When you need to void incorrect entries that clerks cannot correct (incorrect entries found after finalizing a transaction or cannot be corrected by direct or indirect void), follow this procedure:
- Turn the mode switch to the VOID position using the manager key (MA), to enter into the void mode.
- Repeat the entries that are recorded on an incorrect receipt. (All data on the incorrect receipt is removed from register memory; the voided amounts are added to the void-mode transaction totalizer.)

| DEPT.04 | 10.00 |
| DEPT.03 | 1.50 |
| MDSE ST | 11.50 |
| TAX1 | 0.72 |
| ITEMS | 2Q |
| CASH | $12.22 |

Cancellation receipt Incorrect receipt
| *VOID* | |
| DEPT.04 | 10.00 |
| DEPT.03 | 1.50 |
| MDSE ST | 11.50 |
| TAX1 | 0.72 |
| ITEMS | 2Q |
| CASH | $12.22 |
1 In case of Power Failure
When power is lost, the machine retains its memory contents and all information on sales entries.
- When power failure is encountered in register idle state or during an entry, the machine returns to normal operation after power recovery.
- When power failure is encountered during a printing cycle, the register prints “==================” and then carries out the correct printing procedure after power recovery. (See the sample print.)

2 In Case of Printer Error
If the printer runs out of paper, the printer will stall, and "PAPER EMPTY" will appear on the display. Key entries will not be accepted. Refer to section 4 in this chapter, install a new roll, then press the CL key. The printer will print the power failure symbol and resume printing.
If the print roller arm comes up, the printer stalls, "HEAD UP" will appear on the display. Key entries will not be accepted. Push down the arm until it is securely locked, then press the CL key. The printer will print the power failure symbol and resume printing.
3 Cautions in Handling the Printer and Recording Paper
■ Cautions in handling the printer
- Avoid dusty and humid environments, direct sunlight and iron powder. (A permanent magnet and electromagnet are used in this machine.)
- Never pull the paper when the print roller arm is locked. First lift up the arm, and then remove the paper.
- Never touch the surface of the print head and print roller.
■ Cautions in handling the recording paper (thermal paper)
- Use only paper specified by SHARP.
- Do not unpack the thermal paper until you are ready to use it.
- Avoid heat. The paper will color at around 70°C .
- Avoid dusty and humid storage places. Avoid direct sunlight.
- The printed text on the paper can discolor under conditions of high humidity and temperature, exposure to the direct sunlight, contact with glue, thinner or a freshly copied blueprint, and heat caused by friction from scratching or other means.
- Be very careful when handling the thermal paper. If you want to keep a permanent record, copy the printed text with a photocopier.
4 Replacing the Paper Roll
Be sure to use paper rolls specified by SHARP.
The use of any other paper rolls other than those specified could cause paper jamming, resulting in register malfunction.
Paper specification
Paper width: 2.25 ± 0.02 in (57.5 ± 0.5 mm)
Max. outside diameter: 3.15 in (80 mm)
Quality: Thermal paper
- Be sure to set the paper roll prior to using your machine, otherwise it may cause a malfunction.
Install the paper roll in the printer. Be careful to set the roll correctly.
(How to set the paper roll)

■ Removing the paper roll
When a red dye appears on the paper roll, it is time to replace it. Replace the paper roll with a new one. If you plan on not using the register for an extended period of time, remove the paper roll, and store it in an appropriate place.
Caution: The paper cutter is mounted on the printer cover. Be careful not to cut yourself.
When not using the take-up spool (using as receipt paper):

- Remove the printer cover.
- Lift up the print roller release lever to unlock and open the print roller arm.
- Remove the paper roll from the paper roll cradle.

Do not pull the paper through the printer.
When using the take-up spool (using as journal paper):

- Turn the mode switch to a position other than OFF with the power cord connected.
- Remove the printer cover.
- Press the up arrow key to advance the journal paper until its printed part is out of the way.
- Cut the paper and remove the take-up spool.
- Lift up the print roller release lever to unlock and open the print roller arm.
- Remove the paper roll from the paper roll cradle.

Do not pull the paper through the printer.
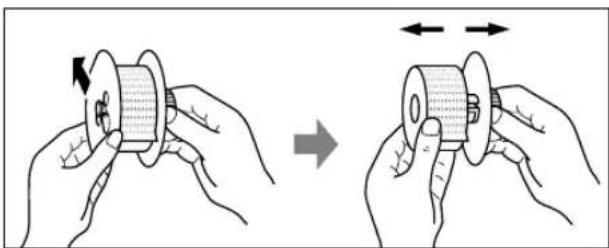
- Remove the outer side of the take-up spool as shown on the left.
- Remove the printed journal roll from the take-up spool.
Installing the paper roll
Caution: The paper cutter is mounted on the printer cover. Be careful not to cut yourself.
Installing the receipt paper roll:

- Turn the mode switch to a position other than OFF with the power cord connected.
- Remove the printer cover.
- Lift up the print roller release lever to unlock and open the print roller arm.
- Set the paper correctly in the paper roll cradle.
- Feed the end of the paper along with the paper positioning guides.

- While holding down the paper, slowly close the print roller arm, and push down the arm until you hear a click locking the arm. Make sure securely you push down the center of the wing part of the arm as illustrated at the left. The paper will be fed automatically.
Note
If the print roller arm is not securely locked, printing is not done right. If this problem occurs, open the arm, and close the arm as instructed above.

- Cut off the excess paper using the edge of the inner cover, and replace the printer cover. Press the ↑ key to make sure the paper end comes out of the printer cover and clean paper appears.
Note
If the paper end does not come out, open the printer cover, and pass the paper end between the paper cutter and the paper guide of the printer cover, and replace the cover.

Installing the journal paper roll:

- Turn the mode switch to a position other than OFF with the power cord connected.
- Remove the printer cover.
- Lift up the print roller release lever to unlock and open the print roller arm.
- Set the paper correctly in the paper roll cradle.
- Feed the end of the paper along with the paper positioning guides.
- While holding down the paper, slowly close the print roller arm, and push down the arm until you hear a click locking the arm. Make sure you securely push down the center of the wing part of the arm as illustrated at the left. The paper will be fed automatically.
- Insert the end of the paper into the slit in the spool. (Press the ↑ key to feed more paper if required.)
- Wind the paper two or three turns around the spool shaft.
- Set the spool on the bearing, and press the ↑ key to take up excess slack in the paper.
- Replace the printer cover.
Note
You can wind the roll paper in OP X/Z, X1/Z1, and X2/Z2 modes even if you programmed so that the printer is used for issuance of receipts. This may be convenient to wind reports. In this case, set the roll paper to the take-up spool.
5 Removing a Paper Jam
Caution: The paper cutter is mounted on the printer cover. Be careful not to cut yourself. Never touch the print head immediately after printing, as the head may still be hot.
- Remove the printer cover.
- Lift up the print roller release lever to unlock and open the print roller arm.
- Remove the paper jam. Check for and remove any shreds of paper that may remain in the printer.
- Reset the paper roll correctly by following the steps in "Installing the paper roll".
6 Cleaning the Printer (Print Head / Sensor / Roller)
When the printed text is getting dark or faint, paper dust may be stuck to the print head, sensor and/or roller. Clean them as follows:
Caution:
- Never touch the print head with a tool or anything hard as it may damage the head.
- The paper cutter is mounted on the printer cover. Be careful not to cut yourself.

- Turn the mode switch to the OFF position.
- Remove the printer cover.
- Lift up the print roller release lever to unlock and open the print roller arm.
- Remove the paper roll referring to the "Removing the paper roll" section.
- Clean the print head with a cotton swab or soft rag moistened with ethyl alcohol or isopropyl alcohol. Clean the roller and the sensor in the same manner.
- Reset the paper roll correctly by following the steps in "Installing the paper roll".
7 Removing the Till and the Drawer
The till in the register is detachable. After closing your business for the day, remove the till from the drawer and keep the drawer open. To detach the drawer, pull it forward fully with the till removed. And remove it by lifting it up. The 6-denomination coin case is detachable.
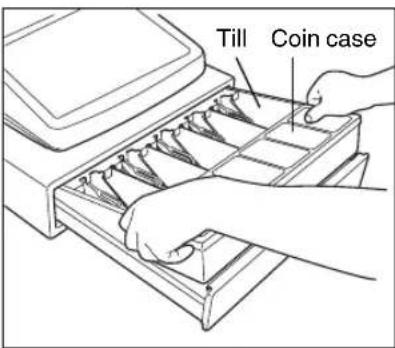

8 Opening the Drawer by Hand

The drawer automatically opens. However, when a power failure occurs or the machine becomes out of order, slide the lever located on the bottom of the machine in the direction of the arrow. (See the figure at the left.) The drawer will not open if it is locked with the key.
9 Before Calling for Service
The malfunctions shown in the left-hand column below, labelled “Fault,” do not necessarily indicate functional faults of the machine. It is therefore advisable to refer to “Checking” shown in the right-hand column before calling for service.
| Fault Checking | |
| (1) The display shows symbols that do not make sense. • Has the machine been initialized properly as shown in “GETTING STARTED”?(Note that initialization clears all the data and programmed settings stored in memory.) | |
| (2) The display won’t illuminate even when the mode switch is turned to any other position than “OFF”. | • Is power supplied to the electrical outlet?• Is the power cord plug out or loosely connected to the AC outlet? |
| (3) The display is illuminated, but the whole machine refuses registrations. | • Is a clerk code assigned to the register?• Is the mode switch set properly at the “REG” position? |
| (4) No receipt is issued. • Is the paper roll properly installed? | • Is there a paper jam?• Is the receipt function in the “OFF” status?• Is the print roller arm securely locked? |
| (5) No journal paper is taken up. • Is the take-up spool installed | ed on the bearing properly?• Is there a paper jam? |
| (6) Printing is unusual. • Is the paper roll properly installed? | • Is the print roller arm securely locked?• Are the print head/sensor/roller clean? |
■ Error message table
When the following error messages are displayed, press the [CL] key and take a proper action according to the table below.
| Error message Error status Action | ||
| ENTRY ERROR Registration error Make a correct key entry. | ||
| MISOPERATION Misoperation error Make a correct key entry. | ||
| NO RECORD Undefined code is entered. Enter a correct code. | ||
| MEMORY FULL Memory is full (in the AUTO key programming). Program the AUTO key within 25 steps. | ||
| SBTL COMPUL. Compulsory depression of the #/TM/SBTL key for direct finalization | Press the #/TM/SBTL key and continue the operation. | |
| TEND COMPUL. | Compulsory tendering | Make a tendering operation. |
| NOT ASSIGNED | No entry of a clerk code | Make a clerk code entry. |
| OVER LIMIT. | Overflow limitation error | Make a registration within a limit of entry. |
| INH. OPEN PR | The open price entry is inhibited. | Make a preset price entry. |
| INH. UNIT PR | The preset price entry is inhibited. | Make an open price entry. |
| NOT NON-TEND The direct finalization is inhibited. | Make a tendering operation. | |
| BUFFER FULL | Subtotal void is not allowed. | Finalize the transaction, and correct the wrong entries in the void mode. |
| HEAD UP | Print roller arm is lifted up. | Make sure the print roller arm is surely locked. |
| PAPER EMPTY | Receipt or journal paper roll is not installed or empty. | Install a receipt or journal paper. |
SPECIFICATIONS
| Model: XE-A302 | ||
| Dimensions: 16.6 (W) x 16.9 (D) x 11.7 (H) in. (421 (W) x 429 (D) x 297 (H) mm) | ||
| Weight: 27.6 lb (12.5 kg) | ||
| Power source: 120V AC ± 10%, 60 Hz | ||
| Power consumption: Stand-by 8 WOperating 30 W (max.) | ||
| Working temperature: 32 °F to 104 °F (0 °C to 40 °C) | ||
| Electronics: LSI (CPU) etc. | ||
| Built-in battery: Rechargeable batteries, memory holding time about 1 month(with fully charged built-in batteries, at room temperature) | ||
| Display:Operator display: Dot matrix display (16 positions and 2 lines)Customer display: 7-segment display (7 positions) | ||
| Printer:Type: One-station thermal printerPrinting speed: Approx. 14 lines/secondPrinting capacity: 24 digits for receipt/journal paperOther functions: • Graphic logo printing function• Logo message function• Receipt (ON-OFF) function• Compression printing function | ||
| Paper roll: Width: 2.25 ± 0.02 in (57.5 ± 0.5 mm)Max. diam.: 3.15 in (80 mm)Quality: High quality (0.06 to 0.08 mm thickness) | ||
| Cash drawer: 5 slots for bill and 6 for coin denominations | ||
| Accessories: | Manager key | 2 |
| Operator key | 2 | |
| Drawer lock key | 2 | |
| Paper roll | 1 | |
| Take-up spool | 1 | |
| RS-232C cable (QCNWG3190BHZZ) | 1 | |
| Fixing tape for peripherals | 1 set | |
| Keyboard sheet | 1 (mounted on the keyboard) | |
| Keyboard sheet for text programming | 1 (mounted on the keyboard) | |
| Customer support tool | 1 disk | |
| Quick Start Guide | 1 copy | |
| Instruction manual | 1 copy | |
* Specifications and appearance subject to change without notice for improvement.
Programming sheet for departments (Please make copies of this sheet.)
| Dept. code | Function | TextUnit price | |||||||||||
| BR | G | CM | T4 | T3 | T2 | T1 | SICS | SIGN | LMT | ENT | |||
| A | B | C | D | E | F | G | H | I | J | K | |||
| Ex. 5 | 100 | 0 | 1 | 0 | 0 | 0 | 0 | 1 | 0 | 0 | 5 | 3 | FRUIT |
For details of programming, refer to pages 33, 34, and 44.
Unit price Max. 6 digits
Function
A BR (bottle return) Bottle return: 1, Normal: 0
B G (group number) 0 to 9 (0: non group)
C CM (commission group number) 0 to 2 (0: non commission)
D-G T4 - T1 (taxable 4 - taxable 1) Taxable: 1, Non-taxable: 0
H SICS (single item cash sale) SICS: 1, Normal: 0
I SIGN
Negative dept.: 1, Positive dept.: 0
J LMT (entry digit limit)
0 to 7 digits
K ENT (entry method)
Open and preset: 3, Preset only: 2, Open only: 1, Inhibit: 0
Text Max. 16 digits
Programming sheet for PLUs/subdepartments (Please make copies of this sheet.)
| PLU code | Unit price/ Limit amount | Associated dept. | Function | Text | |
| CM | TYPE | ||||
| A | B | ||||
| Ex. 1 | 125 | 1 | ☐ 1☐ | 1 | MELON |
For details of programming refer to pages 35, 36 and 44.
Unit price/Limit amount Max. 6 digits
Enter unit price for PLUs.
Enter entry limit amount for subdepartments.
Function
A CM (commission group number) 0 to 2 (0: non commission)
B TYPE (PLU/subdepartment selection) 1: PLU, 0: Subdepartment
Text Max. 16 digits
INTRODUCTION
700 → • → @/FOR → CA/AT
8 Manual drawer opening

SHARP ELECTRONICS CORPORATION warrants to the first consumer purchaser that this Sharp brand product (the "Product"), when shipped in its original container, will be free from defective workmanship and materials and agrees that it will, at its option, either repair the defect or replace the defective Product or part thereof at no charge to the purchaser for parts or labor for the time period(s) set forth below.
This warranty does not apply to any appearance items of the Product nor to the additional excluded item(s) set forth below nor to any product the exterior of which has been damaged or defaced, which has been subjected to misuse, abnormal service or handling or which has been altered or modified in design or construction.
In order to enforce the rights under this limited warranty, the purchaser should follow the steps set forth below and provide proof of purchase to the servicer.
The limited warranty described herein is in addition to whatever implied warranties may be granted to purchasers by law. ALL IMPLIED WARRANTIES INCLUDING THE WARRANTIES OF MERCHANTABILITY AND FITNESS FOR USE ARE LIMITED TO THE PERIOD(S) FROM THE DATE OF PURCHASE SET FORTH BELOW. Some states do not allow limitations on how long an implied warranty lasts, so the above limitation may not apply to you.
Neither the sales personnel of the seller nor any other person is authorized to make any warranties other than those described herein or to extend the duration of any warranties beyond the time period described herein on behalf of Sharp.
The warranties described herein shall be the sole and exclusive warranties granted by Sharp and shall be the sole and exclusive remedy available to the purchaser. Correction of defects, in the manner and for the period of time described herein, shall constitute complete fulfillment of all liabilities and responsibilities of Sharp to the purchaser with respect to the Product and shall constitute full satisfaction of all claims, whether based on contract, negligence, strict liability or otherwise. In no event shall Sharp be liable, or in any way responsible, for any damages or defects in the Product which were caused by repairs or attempted repairs performed by anyone other than an authorized servicer. Nor shall Sharp be liable, or in any way responsible, for any incidental or consequential economic or property damage. Some states do not allow the exclusion or incidental or consequential damages, so the above exclusion may not apply to you.
THE WARRANTY GIVES YOU SPECIFIC LEGAL RIGHTS. YOU MAY ALSO HAVE OTHER RIGHTS WHICH VARY FROM STATE TO STATE.
| Your Product: | XE series Electronic Cash Register |
| Warranty Period of this Product: | One (1) year for parts and ninety (90) days parts and labor from the date of purchase. |
| Additional items excluded from warranty coverage: | Any consumable items such as paper supplied with the Product. |
| Where to obtain service: At a Sharp Authorized Servicer located in the United States. To find the location of the nearest Sharp Authorized Servicer, call toll free at 1-800-BE-SHARP. | |
| What to do to obtain service: | Ship (prepaid) or carry your Product to a Sharp Authorized Servicer. Be sure to have proof of purchase available. If you ship or mail the Product, be sure it is packaged carefully. |
SHARP®
SHARP ELECTRONICS CORPORATION
Sharp Plaza, Mahwah, New Jersey 07430-2135
1-800-BE-SHARP
http://www.sharp-usa.com
SHARP CORPORATION
- WARNING
- CAUTION
- FOR YOUR RECORDS
- INTRODUCTION
- IMPORTANT
- PRECAUTION
- FOR THE MANAGER
- PRIOR TO PROGRAMMING
- BASIC FUNCTION PROGRAMMING (FOR QUICK START)
- AUXILIARY FUNCTION PROGRAMMING
- ADVANCED PROGRAMMING
- TRAINING MODE
- READING (X) AND RESETTING (Z) OF SALES TOTALS
- EJ REPORT READING AND RESETTING
- OVERRIDE ENTRIES
- CORRECTION AFTER FINALIZING A TRANSACTION (VOID MODE)
- SPECIFICATIONS
- PARTS AND THEIR FUNCTIONS
- EXTERNAL VIEW
- PRINTER
- MODE SWITCH AND MODE KEYS
- KEYBOARD
- KEYBOARD LAYOUT
- KEY NAMES
- KEYBOARD SHEET
- NOTE
- DISPLAYS
- DATE AND TIME DISPLAY
- ERROR MESSAGE
- CUSTOMER DISPLAY (POP-UP TYPE)
- DRAWER LOCK KEY
- GETTING STARTED
- INSTALLING THE CASH REGISTER
- INITIALIZING THE CASH REGISTER
- INSTALLING A PAPER ROLL
- WHEN NOT USING THE TAKE-UP SPOOL (USING AS RECEIPT PAPER)
- WHEN USING THE TAKE-UP SPOOL (USING AS JOURNAL PAPER)
- PROGRAMMING DATE, TIME AND TAX
- PROGRAMMING OTHER NECESSARY ITEMS
- STARTING SALES ENTRIES
- OVERVIEW OF FLOW OF DAILY SALES ENTRIES
- THINGS TO DO BEFORE STARTING SALES ENTRIES
- THINGS YOU CAN DO FOR SALES ENTRIES
- THINGS TO DO AFTER CLOSE OF BUSINESS
- BASIC SALES ENTRY
- BASIC SALES ENTRY EXAMPLE
- MODE SWITCH SETTING
- CLERK ASSIGNMENT
- ITEM ENTRIES
- DISPLAYING SUBTOTALS
- FINALIZING THE TRANSACTION
- RECEIPT ON/OFF FUNCTION
- TO ISSUE A RECEIPT WHEN RECEIPT ON/OFF FUNCTION IS SET TO OFF
- POWER SAVE MODE
- ERROR WARNING
- ERROR ESCAPE FUNCTION
- SINGLE ITEM ENTRIES
- DEPARTMENT ENTRIES
- WHEN USING THE DEPARTMENT KEYS (FOR DEPARTMENT 1 TO 6)
- WHEN USING THE DEPARTMENT CODE ENTRY KEY
- PLU/SUBDEPARTMENT ENTRIES
- PLU ENTRIES
- SUBDEPARTMENT (OPEN PLU) ENTRIES
- REPEAT ENTRIES
- MULTIPLICATION ENTRIES
- SPLIT PRICING ENTRIES
- SINGLE ITEM CASH SALE (SICS) ENTRY
- MERCHANDISE SUBTOTAL
- TAXABLE SUBTOTAL
- INCLUDING-TAX SUBTOTAL (COMPLETE SUBTOTAL)
- FINALIZATION OF TRANSACTION
- CASH OR CHECK TENDERING
- CASH OR CHECK SALE THAT DOES NOT REQUIRE ENTRY
- CHARGE (CREDIT) SALE
- MIXED-TENDER SALE
- TAX CALCULATION
- AUTOMATIC TAX
- MANUAL TAX
- TAX DELETE
- TAX STATUS SHIFT
- OPTIONAL FEATURES
- AUXILIARY ENTRIES
- DISCOUNT AND PREMIUM ENTRIES USING THE PERCENT KEY
- PERCENT CALCULATION FOR MERCHANDISE SUBTOTAL
- PERCENT CALCULATION FOR ITEM ENTRIES
- DISCOUNT AND PREMIUM ENTRIES USING THE DISCOUNT KEY
- DISCOUNT FOR MERCHANDISE SUBTOTAL
- DISCOUNT FOR ITEM ENTRIES
- REFUND ENTRIES
- NON-ADD CODE NUMBER ENTRIES AND PRINTING
- AUXILIARY PAYMENT TREATMENT
- CURRENCY CONVERSION
- RECEIVED-ON ACCOUNT AND PAID-OUT ENTRIES
- NO SALE (EXCHANGE)
- BOTTLE RETURN
- AUTOMATIC SEQUENCE KEY (AUTO KEY) ENTRIES
- CORRECTION
- CORRECTION OF THE LAST ENTRY (DIRECT VOID)
- CORRECTION OF THE NEXT-TO-LAST OR EARLIER ENTRY (INDIRECT VOID)
- SUBTOTAL VOID
- CORRECTION OF INCORRECT ENTRIES NOT HANDLED BY THE DIRECT OR INDIRECT VOID FUNCTION
- PROCEDURE FOR PROGRAMMING
- BASIC FUNCTION PROGRAMMING
- (FOR QUICK START)
- DATE AND TIME PROGRAMMING
- DATE
- PROCEDURE
- PRINTKEY OPERATION EXAMPLE
- TIME
- TAX PROGRAMMING FOR AUTOMATIC TAX CALCULATION FUNCTION
- TAX PROGRAMMING USING A TAX RATE
- THE TAX TABLE (APPLICABLE TO THE ADD-ON TAX)
- SAMPLE TAX TABLE
- LIMITATIONS TO THE ENTRY OF MINIMUM BREAKPOINTS
- SAMPLE TAX TABLE MODIFICATION OF THE LEFT TAX TABLE EXAMPLE
- QUANTITY FOR DOUGHNUT TAX EXEMPT (FOR CANADIAN TAX SYSTEM)
- DEPARTMENT PROGRAMMING
- DEPARTMENT STATUS
- TYPE
- GROUP NUMBER
- COMMISSION GROUP NUMBER
- TAX STATUS (TAXABLE 1 THROUGH 4 / NON-TAXABLE)
- SICS (SINGLE ITEM CASH SALE)
- ENTRY DIGIT LIMIT
- PRESET UNIT PRICE
- PLU (PRICE LOOK-UP) AND SUBDEPARTMENT PROGRAMMING
- UNIT PRICE AND ASSOCIATED DEPARTMENT ASSIGNMENT
- FUNCTION SELECTION
- ITEM: SELECTION: ENTRY
- COMMISSION RATE PROGRAMMING
- COMMISSION RATE
- MISCELLANEOUS KEY PROGRAMMING
- PERCENT RATE LIMITATION FOR %1 AND
- FUNCTION PARAMETERS FOR %1, %2 AND ⊖
- SIGN
- ENTRY DIGIT LIMIT (FOR DISCOUNT KEY ONLY)
- FUNCTION PARAMETERS FOR CONV
- ENTRY DIGIT LIMIT FOR RA, RCPTIPO AND TAX
- FUNCTION PARAMETERS FOR CHK, CH1, CH2 AND CA/AT (WHEN USING AS CA KEY)
- FOOTER PRINTING
- AMOUNT TENDERED ENTRY
- TEXT PROGRAMMING
- KEYBOARD SHEET FOR TEXT PROGRAMMING
- USING CHARACTER KEYS (KEYS ON THE SHADED AREA)
- OPERATOR DISPLAY (EXAMPLE)
- EXAMPLE
- ENTERING CHARACTER CODES WITH NUMERIC KEYS ON THE KEYBOARD
- DEPARTMENT TEXT (ITEM LABEL)
- PLU TEXT (ITEM LABEL)
- FUNCTION TEXT
- CLERK NAMES
- LOGO MESSAGES
- LOGO PRINT FORMAT (6 TYPES)
- FOREIGN CURRENCY SYMBOL
- REGISTER NUMBER AND CONSECUTIVE NUMBER PROGRAMMING
- REGISTER NUMBER
- CONSECUTIVE NUMBERS
- VARIOUS FUNCTION SELECTION PROGRAMMING
- FUNCTION SELECTION FOR MISCELLANEOUS KEYS
- PRINT FORMAT
- PRINTING STYLE
- RECEIPT PRINT FORMAT
- ELECTRONIC JOURNAL (EJ) FUNCTION PARAMETERS
- TEMPORARY EJ PRINTING DURING A TRANSACTION
- PGM MODE OPERATION RECORDS TYPE
- ACTION WHEN EJ MEMORY AREA IS FULL
- FUNCTION SELECTION FOR TAX
- OTHER PROGRAMMING
- JOB CODE
- COMPRESSION PRINT ON JOURNAL
- TAX CALCULATION SYSTEM
- LOGO MESSAGE PRINT FORMAT
- RS-232C INTERFACE
- RS-232C START CODE AND END CODE
- RS-232C TIME OUT SETTING
- THERMAL PRINTER DENSITY
- LANGUAGE SELECTION
- TRAINING CLERK SPECIFICATION FOR TRAINING MODE
- AUTO KEY PROGRAMMING — AUTOMATIC SEQUENCE KEY
- READING STORED PROGRAMS
- KEY SEQUENCE FOR READING STORED PROGRAM
- SAMPLE PRINTOUTS
- SUMMARY OF READING (X) AND RESETTING (Z) REPORTS
- DAILY SALES TOTALS
- FULL SALES REPORT
- DEPARTMENT REPORT
- INDIVIDUAL GROUP TOTAL REPORT ON DEPARTMENT
- FULL GROUP TOTAL REPORT ON DEPARTMENT
- PLU REPORT BY DESIGNATED RANGE
- PLU REPORT BY ASSOCIATED DEPARTMENT
- TRANSACTION REPORT
- TOTAL IN DRAWER REPORT
- CLERK REPORTS
- INDIVIDUAL CLERK REPORT
- FULL CLERK REPORT
- HOURLY REPORT
- PERIODIC CONSOLIDATION
- GENERAL INFORMATION
- DAILY NET SALES REPORTS
- PRINTING JOURNAL DATA ON THE WAY OF A TRANSACTION
- SAMPLE PRINT
- READING AND RESETTING THE ELECTRONIC JOURNAL DATA (ISSUING EJ REPORT)
- IN CASE OF POWER FAILURE
- IN CASE OF PRINTER ERROR
- CAUTIONS IN HANDLING THE PRINTER AND RECORDING PAPER
- CAUTIONS IN HANDLING THE PRINTER
- CAUTIONS IN HANDLING THE RECORDING PAPER (THERMAL PAPER)
- REPLACING THE PAPER ROLL
- PAPER SPECIFICATION
- REMOVING THE PAPER ROLL
- INSTALLING THE PAPER ROLL
- INSTALLING THE JOURNAL PAPER ROLL
- REMOVING A PAPER JAM
- CLEANING THE PRINTER (PRINT HEAD / SENSOR / ROLLER)
- REMOVING THE TILL AND THE DRAWER
- OPENING THE DRAWER BY HAND
- BEFORE CALLING FOR SERVICE
- ERROR MESSAGE TABLE
- FUNCTION
- MANUAL DRAWER OPENING
- SHARP®
- SHARP ELECTRONICS CORPORATION
Brand : SHARP
Model : XE-A302
Category : Cash register