
ER-A450S - Cash register SHARP - Free user manual and instructions
Find the device manual for free ER-A450S SHARP in PDF.


| Product Type | Electronic Cash Register |
| Brand | Sharp |
| Model | ER-A450S |
| Dimensions (W x D x H) | Approx. 400 x 420 x 250 mm |
| Weight | Approx. 7.5 kg |
| Power Supply | AC 120V/60Hz or AC 220-240V/50Hz (adaptable) |
| Power Consumption | Approx. 50 W |
| Display | Operator and customer LCD displays |
| Printer Type | Thermal receipt printer |
| Paper Roll Width | 57 mm |
| Key Functions | Department keys, PLU, tax calculation, discount, subtotal, total, cash/check |
| Memory Protection | Battery backup for data retention |
| Programming | Configurable tax rates, department prices, and reports |
| Reports | Daily totals, department sales, tax reports, cash declarations |
| Interface | RS-232C for optional peripheral connection |
| Drawer | Built-in cash drawer with lock |
| Maintenance | Clean exterior with dry cloth; use thermal paper only |
| Safety | Do not expose to liquids; unplug during storms |
| Spare Parts | Thermal paper rolls, printer head, power adapter |
| Reparability | User-replaceable paper roll; professional service for electronic components |
| General Information | Designed for small to medium retail businesses |
Frequently Asked Questions - ER-A450S SHARP
User questions about ER-A450S SHARP
0 question about this device. Answer the ones you know or ask your own.
Ask a new question about this device
Download the instructions for your Cash register in PDF format for free! Find your manual ER-A450S - SHARP and take your electronic device back in hand. On this page are published all the documents necessary for the use of your device. ER-A450S by SHARP.
USER MANUAL ER-A450S SHARP
CAUTION:
The cash register and the remote drawer should be securely fitted to the supporting platforms to avoid instability when the drawers are open.
CAUTION:
The socket-outlet shall be installed near the equipment and shall be easily accessible.
CAUTION:
For a complete electrical disconnection, pull out the mains plug.
CAUTION:
This equipment complies with the requirements of Directives 89/336/EEC and 73/23/EEC as amended by 93/68/EEC.
Thank you very much for your purchase of the SHARP Electronic Cash Register, Model ER-A450S.
Please read this manual carefully before operating your machine in order to gain full understanding of functions and features.
Please keep this manual for future reference. It will help you if you encounter any operational problems.
IMPORTANT
• Install your register in a location that is not subject to direct sunlight, unusual temperature changes, high humidity or exposure to water sources and keep away from heat and magnetic sources. Installation in such locations could cause damage to the cabinet and the electronic components. - The register should not be operated by an individual with wet hands. The water could seep into the interior of the register and cause component failure. - When cleaning your register, use a dry, soft cloth. Never use solvents, such as benzine and/or thinner. The use of such chemicals will lead to discoloration or deterioration of the cabinet. - The register plugs into any standard wall outlet (Official (nominal) voltage). Other electrical devices on the same electrical circuit could cause the register to malfunction. - If the register malfunctions, call your local dealer for service - do not try to repair the register yourself. - For a complete electrical disconnection, pull out the mains plug.
PRECAUTION
This Electronic Cash Register has a built-in memory protection circuit which is operated by rechargeable batteries.
As you know, all batteries will, in time, dissipate their charge even if not used. Therefore, to ensure an adequate initial charge in the protection circuit, and to prevent any possible loss of memory upon installation, it is recommended that each unit be allowed to recharge for a period of 24 to 48 hours prior to use by the customer. In order to charge the batteries, the machine must be plugged in. This recharging precaution can prevent unnecessary initial service calls.
CONTENTS
INTRODUCTION....1
IMPORTANT 1
PRECAUTION....1
CONTENTS 2
EXTERNAL VIEW 7
Front view 7
Rear view....7
PRINTER 8
KEYBOARD 9
1 Standard keyboard layout....9 2 Standard key number layout....10
KEYS AND SWITCHES 11
1 Mode switch and mode keys 11 2 Drawer lock key 11
DISPLAYS 12
Machine state symbols 12
FOR THE MANAGER
PRIOR TO PROGRAMMING....13
1 General instructions....13 2 How to program alphanumeric characters....13
Using character keys on the keyboard 13 Entering character codes....14
PROGRAMMING 16
Preparations for Programming 16
Direct Programming 16
1 Setting the date and time....16
Date 16 Time....17
2 Programming for departments 17
Unit price 17 Functional selection....18
3 Price lookup (PLU) programming 20
Unit price 20 Functional selection 20 PLU assignment to departments 22
4 European Article Number(EAN)/Universal Product Code(UPC) programming 23
Unit price 23 Functional selection 24 EAN assignment to departments 26
5 Programming for discount keys 27
Deduction amount (⊖) 27 High amount lockout (HALO) and +/- sign (⊖)....28
6 Programming for percent keys 29
Percent rate ( % ) 29 Sign (+/-) ( % ) 29
7 Programming for exchange keys 30
Currency exchange rate (EX) 30
8 Programming for the [CA2], [RA], [PO], [CH] and [CR] keys....30
High amount lockout (HALO) ( CA2 , RA , PO , CH , and CR ) ……30
9 Programming the tax rate 31
Tax rate 31
Job-Code-Based Programming 32
1 Setting the date and time....32
Setting the date (#2610) 32
Setting the time (#2611) 32
2 Setting the register and consecutive numbers 33
Setting the register number (#2612)....33
Setting the consecutive number (#2613)....33
3 Programming the tax rate 34
Tax rate (#2711) 34
4 Programming for departments....35
Functional programming (#2110) 35
Tax status (#2111) 36
A limit amount (HALO) of entry (#2112) 37
Alphanumeric characters (#2114) 38
Unit price (#1110) 38
Commission group assignment (#2115)....39
Group number (#2116) 40
Department key positioning (#2119)....41
5 Price lookup (PLU) programming 42
Department assignment (#1200, 2230) 43
Unit prices (#1210) 44
Base quantity (#1211) 44
PLU/subdepartment mode (#2210, 2231) 45
Sign (+/-) and tax status (#2211, 2232)......46
Alphanumeric characters (#2214) 47
Assigning of PLUs to commission groups (#2215, 2235)....48
Link PLU (#2220) 49
Direct PLU key positioning (#2219) 49
6 European Article Number (EAN) or Universal Product Code (UPC) programming....50
EAN or UPC code 50
Add-on code 52
EAN/UPC programming 52
Department assignment (#1000) 53
Unit prices (#1010) 54
Base quantity (#1011) 54
Delete method (#2010) 55
Sign (+/-) and tax status (#2011) 56
Alphanumeric characters (#2014) 57
Assigning of EANs to commission group (#2015) 57
EAN link (#2030) 58
Delete period for non-accessed EAN codes (#2029) 58
Programming Non-PLU code format (#2025)....59
Press code functional programming (#2035)....60
7 Programming for miscellaneous keys....61
Programming the rate (%, EX, commission) and the deduction (⊖) (#1310)....61
Programming the number of digits after decimal point for exchange keys (#2330) 62
Currency description text programming (#2334) 62
Assigning the drawer number to the drawer for foreign currency (#2680) 63
A limit amount (HALO) of entry (⊖, RA, PO) (#2312)....63
+/- sign ( % , ) (#2311) 64
Item % or subtotal % selection ( % ) (#2315)....65
Percent rate limitation ( % ) (#2313)....65
Item ⊖ or subtotal ⊖ selection (⊖) (#2316) 66
8 Programming for the TL, CA2, CH1 through CH4, and CR1 through CR4 keys....67
Functional programming (#2320) 67
High amount lockout (HALO) for cheque change, cheque cashing, and cash in drawer (#2321)....68
High amount lockout (HALO) of entry for media keys (#2322) 69
9 Programming of function text....69
Programming (#2314)......69
List of function texts....70
10 Cashier and clerk programming 71
Cashier code (#1500) 71
Cashier name (#1514) 72
Functional programming for cashiers (#2510)....72
Clerk code (#1400) 73
Clerk name (#1414)....73
11 Programming various functions 74
Programming for optional feature selection (#2616) 74
Programming feed line after printing of a difference subtotal (#2615)....78
Programming alarm length of time with drawer opening (#2617)....79
Programming of logo messages (#2614) 80
Selection of X1/Z1 and X2/Z2 reports to be printed in the stacked report sequence (#2620)....81
Setting the time range for hourly reports (#2619) 82
RS-232C channel assignment (#2690) 82
Barcode reader programming (#2691) 83
Secret codes to control access to the PGM1 mode, X1/Z1 mode and X2/Z2 mode
(#2630, 2631, 2632) 84
Functional programming for the printer (#2990) 85
Setting the AUTO key - Automatic sequencing key - (#2900) 86
12 Reading stored programs 87
Program details and procedures for their reading 87
Sample printouts....88
13 Training mode....94
READING (X) AND RESETTING (Z) OF SALES TOTALS 95
1 Summary of reading (X) and resetting (Z) reports and the key operations to obtain the reports ......95
2 Daily sales totals....98
Full reading and resetting of sales totals 98
Cashier reading and resetting 102
Clerk reading and resetting 104
Reading and resetting of hourly sales information 105
Full department reading 106
Individual group reading 107
Full group reading....107
Reading and resetting of sales information for a range of PLUs/subdepartments 108
Reading of sales information on PLUs/subdepartments associated with an individual department…109
Reading of PLUs/subdepartments whose sales amounts are zeros....109
Reading of PLUs/subdepartments whose sales amounts are zeros (by associated department) .....109
Reading of sales information for the price amount range of PLUs/subdepartments 109
Reading and resetting of sales information for EANs 110
Reading and resetting of sales information for EANs associated with an individual department……111
Reading of EANs whose sales amounts are zero 111
Reading of EANs whose sales amounts are zeros (by associated department)....111
Reading of commission sales information 112
Transaction reading....112
Total in drawer reading....112
Reading and resetting of a stacked report....113
Deleting of non-accessed EANs....113
3 Periodic consolidation....114
Generality 114
Reading and resetting of daily net totals 115
Reading and resetting of a stacked report....115
COMPULSORY CASH/CHEQUE DECLARATION 116
PROGRAMMING FOR EURO 118
Automatic modification of register system for introduction of EURO....119
Optional programming for the introduction of EURO 120
OVERRIDE ENTRIES 121
CORRECTION AFTER FINALIZING A TRANSACTION (AFTER GENERATING A RECEIPT)....122
FOR THE OPERATOR
PRIOR TO ENTRIES 123
1 Preparations for entries 123
Receipt and journal paper rolls 123
Receipt ON/OFF function 123
Cashier and clerk assignment 123
2 Error warning 124
ENTRIES 125
1 Item entries 125
Single item entries 125
Repeat entries 126
Multiplication entries 127
Successive multiplication entries 128
Split-pricing entries 129
Single item cash sale (SICS)/single item finalize (SIF) entries 130
Link PLU/EAN link entries 130
EAN learning function 131
Price inquiry (view) function (for EANs) 132
Price change function (for EANs) 133
2 Displaying subtotals....135
Normal subtotal 135
Difference subtotal (Differ ST) 135
3 Finalization of transaction....136
Cash or cheque tendering 136
Mixed tendering (cheque + cash) 136
Cash or cheque sale that does not need any tender entry 136
Credit sale 137
Mixed-tender sale (cash or cheque tendering + credit tendering)....137
4 Computation of VAT (Value Add Tax)/tax 137
VAT/tax system 137
VAT shift entries 139
5 Auxiliary entries 139
Percent calculations (premium or discount) 139
Deduction entries....140
Refund entries 140
Printing of non-add code numbers 141
6 Payment treatment 141
Currency exchange 141
Received on account entries 142
Paid out entries 142
No sale (exchange) 143
Cashing a cheque 143
7 Automatic sequencing key (AUTO key) entries 143
CORRECTION 144
1 Correction of the last entry (direct void) 144 2 Correction of the next-to-last or earlier entries (indirect void) 144 3 Subtotal void 145 4 Correction of incorrect entries not handled by the direct or indirect void function 145
SPECIAL PRINTING FUNCTIONS 146
1 Copy receipt printing 146 2 Guest check copy 147 3 Printing of header and footer graphic logos 147
OVERLAPPED CASHIER ENTRY 148
1 In case of power failure 149 2 In case of printer error 149 3 Thermal printing 149
Cautions in handling the printer 149 Cautions in handling the recording paper (thermal paper) 150
4 Paper roll near-end sensing function (only for the journal paper) 150 5 Installing and removing the paper roll 151
Recording paper specifications 151 Installing the paper roll 151 Removing the paper roll 153 Removing a paper jam 154
6 Cleaning the print head 155
7 Removing the till and the drawer 156 8 Opening the drawer by hand 156 9 Installing the fixing angle bracket 157 0 Before calling for service 158
Error code table 158
LIST OF OPTIONS 159
SPECIFICATIONS 160
EXTERNAL VIEW
■ Front view
■ Rear view

PRINTER
The printer is a receipt/journal dual station type thermal printer, and therefore it does not require any type of ink ribbon or cartridge. The average life of the printer is approximately 5 million lines.
When removing the printer cover, lift up its rear. When installing the printer cover, hook it on the pawls on the cabinet and shut it.
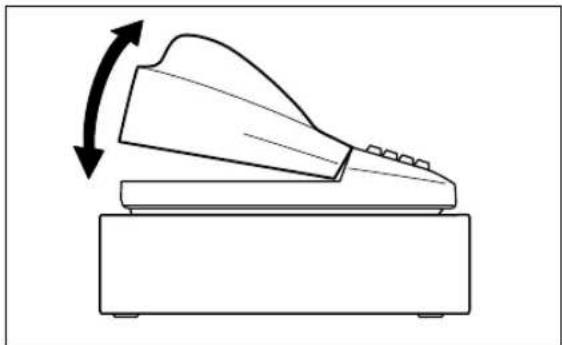
Your register is shipped with the print head release lever held by a white retainer in the lifted up position. Be sure to remove this retainer (see the figure at the right) and push down the print head release lever before you use the register.


Print head release lever
The print head can be lifted by the green lever on the right side of the printer. Pulling the lever forward lifts the print head up. If the paper becomes jammed and you need to move the head farther forward, you can pull the lever even further toward you and proceed with the removal of the jammed paper.

Do not attempt to remove the paper roll with the head in the down position. This may result in damage to the printer and print head.
KEYBOARD
1 Standard keyboard layout


Note
All the keys but the receipt paper feed and journal paper feed keys can be re-positioned. If you want to change the layout, consult your dealer.


Note The standard keyboard is not equipped with those keys that are marked with (*).
2 Standard key number layout
These key numbers are used for positioning of department keys and direct PLU keys. Refer to pages 41 and 49. This layout can be changed by your dealer.

KEYS AND SWITCHES
1 Mode switch and mode keys
The mode switch can be operated by inserting one of the three supplied mode keys - manager (MA), submanager (SM), and operator (OP) keys. These keys can be inserted or removed only when the switch is in the "REG" or "position.
![graph TD A["PGM1"] --> B["OP X/Z"] C["PGM2"] --> D["OP"] E["REG"] --> F["MGR"] G["MA"] --> H["S M"] I["X1/Z1"] --> J["MGR"] K["X2/Z2"] --> L["MGR"] style A fill:#f9f,stroke:#333 style C fill:#f9f,stroke:#333 style E fill:#f9f,stroke:#333 style G fill:#f9f,stroke:#333 style I fill:#f9f,stroke:#333 st…](/content/2026/06/1310341/images/81ed3a383d007ce290e9f04fd527709f257688a8ecbd6a78b45bfbc1c6d63836.jpg)

The mode switch has these settings:
: This mode locks all register operations. No change occurs to register data.
OP X/Z: This setting allows cashiers/clerks to take X or Z reports for their sales information. (This setting may be used only when your register has been programmed for "OP X/Z mode available" in the PGM2 mode.) And it can be used to toggle receipt state "ON" and "OFF" by pressing the ROFT key.

REG: For entering sales
PGM1: To program those items that need to be changed often: e.g., unit prices of departments, PLUs or EANs, and percentages
PGM2: To program all PGM1 items and those items that do not require frequent changes: e.g., date, time, or a variety of register functions
MGR: For manager's and submanager's entries The manager can use this mode to make entries that are not permitted to be made by cashiers - for example, after-transaction voiding and override entry.
X1/Z1: To take the X/Z report for various daily totals
X2/Z2: To take the X/Z report for various periodic (weekly or monthly) consolidation
2 Drawer lock key
This key locks and unlocks the drawer. To lock it, turn 90 degrees counterclockwise. To unlock it, turn 90 degrees clockwise.


DISPLAYS
Operator display Customer display (Pop-up type)

Amount: Appears in the far-right eight (max.) positions.
Cashier code: Appears in the second and third positions (two digits).
Clerk code: Appears in the second and third positions (two digits) with "C" in the fifth position.
Number of repeats for repetitive registrations:
The number of repeats is displayed, starting at "2" and incremented with each repeat. When you have registered ten times, the display will show "0." Example: (2 → 3 → 4 ... 9 → 0 → 1 → 2 ...)
Receipt function status:
The indicator “_” appears in the ninth position when the receipt function is set to OFF.
Time: Appears in the second to sixth positions (using 24-hour format) in the OP X/Z, REG, or MGR mode. In the REG or MGR mode, press the # key to display the time.
■ Machine state symbols
P: Appears in the tenth place during programming.
E: Appears in the tenth place when an error is detected.
– (Floating): Appears when a minus department, PLU/subdepartment or EAN entry is made, or when a discount, refund, or void entry is made.
☐: Appears in the tenth place when the subtotal is displayed or when the amount tendered is smaller than the sale amount.
C: Appears in the tenth place when the foreign currency.
F: Appears in the tenth place when a transaction is finalized by pressing the 4 , or 1 through 4 key.
: Appears in the tenth place when the change due amount is displayed or when the cash/cheque declaration is compulsory.
U: Appears in the tenth place when the ∞ key is pressed in the MGR mode, indicating the entry into the VOID mode. While your register is in the VOID mode, this symbol continues to be in the display except when department codes, PLU codes or subtotals are displayed. Also appears when a subtotal void is made.
-: Appears right below the tenth place when the cash in drawer amount exceeds a programmed sentinel amount. The sentinel check is performed for the total cash in drawer. Also appears right below the eighth place when the VAT shift is effective.
PRIOR TO PROGRAMMING
1 General instructions
This chapter illustrates how to program your cash register.
All the programming items can be programmed by the Job-Code-Based Programming described later.
However, your machine allows you to program some items using the Direct Programming, which does not require you to enter the job code.
Job-Code-Based Programming
Simplified procedure![graph LR A["XXXX (Job code)"] --> B["•"] B --> C["⊗"] C --> D["Data entry"] D --> E["TL"]](/content/2026/06/1310341/images/3918d01310882bcde51aa19cf0bc5ed6a708dcc234505afea93c66b885c06cc1.jpg)
Direct Programming
Sample procedure![graph LR A["Object key"] --> B["Data entry"] B --> C["TL"]](/content/2026/06/1310341/images/5445032b16b2a6619e6bd4f7c78b51609a67cce4df001a1381f4a4e2ad19d229.jpg)
2 How to program alphanumeric characters
You can program alphanumeric characters for departments, PLUs, EANs functions and so on in the character entry mode.
There are two ways for programming characters: using character keys on the keyboard and entering character codes with numeric keys on the keyboard.
■ Using character keys on the keyboard
Enter a character according to the position of the figure shown below.

[Ex.]![To enter the letter “#”, press [SHIFT-2] * K To enter the upper-case letter “K”, press * K To enter the lower-case letter “k”, press [SHIFT] * K](/content/2026/06/1310341/images/ca8e11257a5bbfc15035c03bb8b43594dff021b001488595f9b69bef4edff06d.jpg)
- Numerals, letters and symbols are programmable simply by pressing the corresponding keys.
- Characters may only be entered in single size or in double size. By default, the single-size character mode is selected. To enter a character in double size, press the (DC) key before you enter the corresponding character.
Example
To program the word "SHARP" in double size, do the following key-in.

- Letters of alphabets "A" through "Z", "∅" and "Æ" are possible to be entered in lower case or in upper case. By default, the upper-case letter mode is selected. To enter a character in lower case, press the [SHIFT] key before you enter the character. To return to the upper-case letter mode, press the [SHIFT] key again.
Example
To program the word "Sharp", do the following key-in.

- Symbols and special letters are programmable by using the [SHIFT-2] key. To enter a character, press the [SHIFT-2] key before you enter the corresponding character.
Example
To program letters "# Ä Å" with the letter "#" being double size

Editing the characters
You can edit the characters you entered. Pressing a character key replaces the current character with a new one. To edit the characters, use the [BACK1] key.

: Backs up the cursor, erasing the character to the left.
■ Entering character codes
- Numerals, letters and symbols are programmable by entering character codes and the 00 key. See the alphanumeric character code table on the next page. In this way, you can program characters other than the characters on the programming key sheet.

- Double-size characters can be made by entering the character code 253.
Example
To program the word "SHARP" with the letter "S" being double size

Alphanumeric character code table
| Code | Character | Code | Character | Code | Character | Code | Character | Code | Character |
| 001 | á | 046 | . | 091 | Ä | 136 | → | 193 | i |
| 002 | â | 047 | / | 092 | Ö | 137 | ∽ | 194 | G |
| 003 | ê | 048 | 0 | 093 | Ü | 138 | ≅ | 195 | S |
| 004 | î | 049 | 1 | 094 | ^ | 139 | ◀ | 196 | G |
| 005 | ì | 050 | 2 | 095 | _ | 140 | ▶ | 197 | g |
| 006 | í | 051 | 3 | 096 | ' | 141 | F | 198 | K |
| 007 | ô | 052 | 4 | 097 | a | 142 | T | 199 | k |
| 008 | ó | 053 | 5 | 098 | b | 143 | ↓ | 200 | L |
| 009 | û | 054 | 6 | 099 | c | 144 | ç | 201 | ↓ |
| 010 | ú | 055 | 7 | 100 | d | 145 | ° | 202 | Ž |
| 011 | œ | 056 | 8 | 101 | e | 146 | ¿ | 203 | D |
| 012 | ú | 057 | 9 | 102 | f | 147 | Ù | 204 | d |
| 013 | ú | 058 | : | 103 | g | 148 | à | 205 | Č |
| 014 | ó | 059 | ; | 104 | h | 149 | Æ | 206 | ć |
| 015 | ó | 060 | < | 105 | i | 150 | ø | 207 | € |
| 016 | ʌ | 061 | = | 106 | j | 151 | Å | 208 | P |
| 017 | Ψ | 062 | > | 107 | k | 152 | α | 209 | ` |
| 018 | Γ | 063 | ? | 108 | l | 153 | é | 210 | ě |
| 019 | .. | 064 | @ | 109 | m | 154 | è | 211 | š |
| 020 | Ω | 065 | A | 110 | n | 155 | Pt | 212 | č |
| 021 | Δ | 066 | B | 111 | o | 156 | i | 213 | ž |
| 022 | θ | 067 | C | 112 | p | 157 | Ñ | 214 | ý |
| 023 | Ξ | 068 | D | 113 | q | 158 | ò | 215 | ù |
| 024 | Π | 069 | E | 114 | r | 159 | £ | 216 | ñ |
| 025 | Σ | 070 | F | 115 | s | 160 | ¥ | 217 | ~ |
| 026 | Υ | 071 | G | 116 | t | 161 | 。 | 218 | ` |
| 027 | Φ | 072 | H | 117 | u | 162 | Γ | 219 | ř |
| 028 | Ú | 073 | I | 118 | v | 163 | 」 | 224 | * |
| 029 | Ú | 074 | J | 119 | w | 164 | 、 | 225 | § |
| 030 | Ó | 075 | K | 120 | x | 165 | · | 226 | ∅ |
| 031 | Ó | 076 | L | 121 | y | 177 | Á | 227 | ^ |
| 032 | (space) | 077 | M | 122 | z | 178 | í | 228 | ↑ |
| 033 | ! | 078 | N | 123 | { | 180 | Ä | 229 | ] |
| 034 | " | 079 | O | 124 | | | 181 | ā | 230 | [ |
| 035 | # | 080 | P | 125 | } | 182 | É | 231 | " |
| 036 | $ | 081 | Q | 126 | β | 183 | ē | 232 | ä |
| 037 | % | 082 | R | 127 | ¢ | 184 | ī | 233 | ö |
| 038 | & | 083 | S | 128 | !! | 185 | ī | 234 | ü |
| 039 | ' | 084 | T | 129 | 1 | 186 | ū | 235 | æ |
| 040 | ( | 085 | U | 130 | 2 | 187 | ū | 236 | å |
| 041 | ) | 086 | V | 131 | 3 | 188 | N | 237 | É |
| 042 | * | 087 | W | 132 | 4 | 189 | ŋ | 238 | ñ |
| 043 | + | 088 | X | 133 | 1/2 | 190 | Č | 253 | *(DC) |
| 044 | , | 089 | Y | 134 | F/T | 191 | Š | ||
| 045 | - | 090 | Z | 135 | ← | 192 | Ç |
*(DC): Double-size character code
PROGRAMMING
Your machine allows you to program in two modes: PGM1 and PGM2. The PGM1 mode is for programming those items that need to be changed often: unit prices of departments/PLUs/EANs and percentages. The PGM2 mode is used for programming all PGM1-mode programs and those items that require less frequent changes: date, time, tax rate, and the functions of each key. We describe below the programming or setting procedures of various items.
Program every item necessary for your store following the appropriate procedures.
* To set the mode switch to the PGM1 position, use the manager or submanager key; and to set to the PGM2 position, use the manager key.
■ Preparations for Programming
- Plug your machine into a standard wall outlet.
- Put the manager or submanager key in the mode switch and turn it to the PGM1 or PGM2 position depending upon the programming you are about to do.
- Check to see whether both journal and receipt rolls are present in the machine. If they are missing, install journal and receipt paper rolls correctly referring to the procedure in "4. Installing and removing the paper roll" under "OPERATOR MAINTENANCE".
- Program necessary items into your machine.
Direct Programming
1 Setting the date and time
Date PGM 2
Enter the day (one or two digits), month (two digits), and year (two digits) in this sequence.
![graph LR A["Procedure"] --> B["Date (five or six digits)"] B --> C["#"]](/content/2026/06/1310341/images/4977e329f4a4b018b91191cdf49cb43861c0ce0434a50a052e23660274ebbdab.jpg)
Example August 26, 2001
260801 #

Time PGM 2
Set the time using the 24-hour format. For example, when the time is set to 2:30 AM, enter 230; and when it is set to 2:30 PM, enter 1430. Once you set the time, the internal clock unit will continue to run as long as the built-in battery is alive and update the date (day, month, year) properly.
Procedure

Example
Setting the time as 2:30 PM (14:30)
1430 #

2 Programming for departments
Your machine is equipped with 20 standard departments and up to 50 optional departments. Your machine allows you to perform the following programming for each department:
Unit price
PGM 2PGM 1
Procedure
![graph TD A["Department key"] --> B["Dept. code"] B --> C["X X"] C --> D["*1"] D --> E["DEPT #"] E --> F["To keep the current setting"] F --> G["*2 Unit price"] G --> H["ST"] H --> I["TL"] I --> J["To program for the following dept."] J --> K["To program for another dept."] K --> L["St"] L --> M["TL"…](/content/2026/06/1310341/images/5ce5fc0b11ca0c4ce9b1e0017a699db9ec81ff54a47daf5869a01bc7d9c7b687.jpg)
*1 Department code: 1 to 50
*2 Unit price: max. six digits (9999.99)
Example
Programming the unit price 10.00 for department 1
- Press the department 1 key. • The current unit price will be displayed.
1
0 1 0 . 0 0
- Enter the unit price "1000." 1000
- Press the ST key to program this setting.
ST
01 1000
- Press the TL key to finalize the programming and generate a programming report.
TL
02 0.00
0.00
Print
■ Functional selection PGM 2
Procedure
![graph TD A["Department key"] --> B["Department key"] B --> C["DEPT #"] C --> D["DEPT #"] D --> E["To keep the current setting"] E --> F["×"] F --> G["TL"] H["Department key"] --> I["Department key"] I --> J["DEPT #"] J --> K["To program for the following dept."] K --> L["CL"] L --> M["To program for…](/content/2026/06/1310341/images/9b52c5c8a582fb75f9f6dc934be7f9927473c81323d6fda0ffaa940e3a0d3972.jpg)
*1 Department code: 1 to 50 *2 Item: Selection: Entry:
A Always enter 0.0
B VAT6 or TAX6 No 0
Yes 1
C VAT5 or TAX5 No 0
Yes 1
D VAT4 or TAX4 No 0
Yes 1
E VAT3 or TAX3 No 0
Yes 1
F VAT2 or TAX2 No 0
Yes 1
G VAT1 or TAX1 No 0
Yes 1
H Normal/SICS (Single Item Cash Sale)/ Normal 0
SIF (Single Item Finalization) SICS 1
SIF 2
I Significant digit for HALO
1 through 9
J Number of zeros to follow the significant digit for HALO
0 through 8
Note
Tax status
- The tax system of your machine has been factory-set to automatic VAT1–6. If you desire to select any of automatic tax 1–6, manual VAT1–6, manual VAT1, manual tax 1–6, and the combination of the automatic VAT 1–3 and the automatic tax 4–6, consult your dealer.
- When the combination of the automatic VAT1–3 and automatic tax 4–6 system is selected, one of the VAT1(G), VAT2(F) and VAT3(E) can be selected in combination with tax 4–6. Example: BCDEFG= 100100, 110100, 111010
Normal department/SICS (Single Item Cash Sale) / SIF (Single Item Finalization)
- If an entry of a department programmed for SICS is made first, the sale will be finalized as soon as the department key is pressed. If the entry is made after entering a department not programmed for SICS, the sale will not be finalized until the TL key is pressed.
- Whenever a sale is made to a department set for SIF, the sale is finalized as soon as the department key is pressed.
HALO (High Amount Lockout)
- You can set an upper limit amount (HALO) for each department. The limit is effective for the REG-mode operations and can be overridden in the MGR mode.
- IJ is the same as I × 103 . For example, presetting 14 (100.00) here means that amount entries of up to 100.00 are allowed in the REG mode. When you preset 18, however, the upper limit amount is 999999.99.
Example
Programming for department 4 as follows: A=0, B=0, C=0, D=0, E=0, F=0, G=1, H=0, I=9 and J=5.
ABCDEFGHIJKLMNOPQRSTUVWXYZ
- Press the department 4 key twice.
- The current parameter setting will be displayed.
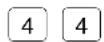

- Set the parameters as follows:
- You can change the value at the blinker.
Go to the desired position with the following keys:
•……Moves the blinker to the right.


00……Moves the blinker to the left.


- Enter the figure. 0000001095

- Press the ☒ key to program this setting.


- Press the TL key to finalize the programming and generate a programming report.


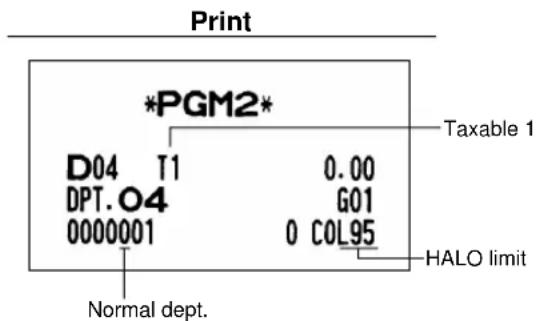
3 Price lookup (PLU) programming
A PLU code can be up to six digits (free code).
■ Unit price PGM 2PGM 1
![graph TD A["Procedure"] --> B["Direct PLU key"] B --> C["PLU/SUB"] C --> D["* Unit price"] D --> E["ST"] E --> F["TL"] C --> G["To keep the current setting"] G --> D C --> H["XXXXXX PLU code"]](/content/2026/06/1310341/images/6b02181a451e20dc3d363a32378158a0672bab806fdc8ed2eb8f0ac2e6e85a92.jpg)
*Unit price: max. six digits (9999.99)
Example Programming the unit price 1.25 for PLU code 1
- Enter the PLU code "1" and press the PLU/SUB key. 1 PLU/SUB
- Enter the unit price "125." 125
- Press the ST key to program this setting.
- Press the TL key to finalize the programming and generate a programming report.
| 0 0 0 0 0 1 | 0.00 |
| 0 0 0 0 0 1 | 125 |
| 0 0 0 0 0 2 | 0.00 |
| 0.00 |

■ Functional selection PGM 2
![graph TD A["Procedure"] --> B["XXXXXX PLU code"] A --> C["Direct PLU key"] B --> D["PLU/SUB"] B --> E["PLU/SUB"] D --> F["To keep the current setting"] E --> F F --> G["* ABCDEFGH"] G --> H["⊗"] H --> I["TL"] C --> J["Direct PLU key"] J --> K["PLU/SUB"] K --> L["CL"] L --> M["XXXXXX PLU code"] K -->…](/content/2026/06/1310341/images/b0d85223a05af0ddb74e57d72ac067170ed973bf7cd6f8891cba5fcdf36f9218.jpg)
* Item: Selection: Entry:
| A Sign (plus/minus) Plus 0 | |
| Minus 1 | |
| B VAT6 or TAX6 No 0 | |
| Yes 1 | |
| C VAT5 or TAX5 No 0 | |
| Yes 1 | |
| D VAT4 or TAX4 No 0 | |
| Yes 1 | |
| E VAT3 or TAX3 No 0 | |
| Yes 1 | |
| F VAT2 or TAX2 No 0 | |
| Yes 1 | |
| G VAT1 or TAX1 No 0 | |
| Yes 1 | |
| H Mode Prohibit mode 0 | |
| Subdepartment mode 1 | |
| PLU mode 2 | |
| PLU/subdepartment mode 3 | |
| Delete mode 4 |
Note
Sign (plus/minus)
The function of every PLU/subdepartment varies according to the combination of its sign and the sign of its associated department as follows:
| Sign | Function of PLU/subdepartment | |
| Department | PLU/subdepartment | |
| + | + | Serves as a normal plus PLU/subdepartment |
| - | - | Serves as a normal minus PLU/subdepartment |
| + | - | Accepts store coupon entries, but not split-pricing entries |
| - | + | Not valid; not accepted |
Tax status
- The tax system of your machine has been factory-set to automatic VAT1–6. If you desire to select any of automatic tax 1–6, manual VAT1–6, manual VAT1, manual tax 1–6, and the combination of the automatic VAT 1–3 and the automatic tax 4–6, consult your dealer.
- When the combination of the automatic VAT1–3 and automatic tax 4–6 system is selected, one of the VAT1(G), VAT2(F) and VAT3(E) can be selected in combination with tax 4–6. Example: BCDEFG= 100100, 110100, 111010
- A PLU not programmed for any of these tax statuses is registered depending on the tax status of the department which the PLU belongs to.
Mode parameter
- PLU mode: Allows a PLU entry to be made by entering an assigned PLU code and depressing the [PLU/SUB] key.
- Subdepartment mode: Allows a subdepartment entry to be made by entering a unit price, pressing the AMT key, assigned PLU code and then pressing the PLU/SUB key.
- PLU/subdepartment mode: Allows PLU entries to be made in both the PLU and subdepartment modes.
- Delete mode: Deletes program data for each PLU.
- Prohibit mode: Prohibits the entry of any assigned PLU code. This mode does not clear the PLU/subdepartment program data.
Example
Programming for PLU code 1 as follows: A=0, B=0, C=0, D=0, E=0, F=0, G=1, and H=2
- Enter the PLU code "1"
and press the [PLU/SUB] key twice. 1
A B C D E F G H
| P | 0 | 0 | 0 | 0 | 0 | 0 | 0 | 2 |
| P | 0 | 0 | 0 | 0 | 0 | 0 | 1 | 2 |
- Set the parameters A to H. 00000012
- You can go to the desired position with the 00 or • key.

| P | 0 | 0 | 0 | 0 | 0 | 0 | 0 | 2 |
- Press the ☒ key to program this setting.
- Press the TL key to finalize the programming and generate a programming report.

| 0.00 |
Print
■ PLU assignment to departments
PGM 2PGM 1
Procedure
![graph TD A["Procedure"] --> B["XXXXXX PLU code"] A --> C["Direct PLU key"] A --> D["Direct PLU key"] A --> E["Direct PLU key"] B --> F["PLU/SUB"] B --> G["PLU/SUB"] B --> H["PLU/SUB"] C --> I["To delete the entered PLU"] D --> J["To keep the current setting"] E --> K["To continue to delete the enter…](/content/2026/06/1310341/images/4bd780d68dd5a6eb583502ab7b61b32abe6a947c7c25c001d130255213f3c9c0.jpg)
*Department key to be associated with the entered PLU
Note
- The following functions of the PLU depend on the programming for its associated department:
- Grouping (Group 1 through 14) • SICS (Single Item Cash Sale)/SIF (Single Item Finalization)/Normal • HALO (high amount lockout)
Example
Assigning PLU codes 1 and 2 to department 2
- Enter the PLU code "1"
and press the [PLU/SUB] key three times. 1
PLU/SUB PLU/SUB PLU/SUB
0 0 0 0 0 1 0 1
- Press the department 2 key to assign
PLU code 1 to department 2.

0 0 0 0 0 2 0 1
- Press the department 2 key to assign PLU code 2 to department 2.


- Press the TL key to finalize the programming and generate a programming report.


4 European Article Number(EAN)/Universal Product Code(UPC) programming
Unit price PGM 2PGM 1
Procedure
![graph TD A["Scan EAN code"] --> B["EAN"] B --> C["Unit price"] C --> D["ST"] D --> E["TL"] F["To keep the current setting"] --> C G["EAN code (max.13 digits)"] --> B](/content/2026/06/1310341/images/b84165c141123f25b6fa2b4a2b97f857bb377d1bab2aac266bfde8ff2dd3d24c.jpg)
*Unit price: max. six digits (9999.99)
Note
- The entry of a EAN (or UPC) code through the scanner is indicated by .
Example
Programming the unit price 2.50 for EAN code 5012345678900.
- Scan the EAN code, or enter the EAN code "5012345678900" or and press the EAN key. 5012345678900


- Enter the unit price "250." 250


- Press the ST key to program this setting.

- Press the TL key to finalize the programming and generate a programming report.


■ Functional selection PGM 2
Procedure![graph LR A["Scan EAN code"] --> B["EAN"] C["EAN code (max.13 digits)"] --> B B --> D["*ABCDEFGH"] D --> E["×"] E --> F["TL"] G["To keep the current setting"] --> D H["Scan EAN code"] --> I["EAN"] I --> J["×"] J --> K["EAN"] K --> L["To keep the current setting"] M["EAN code (max.13 digits)"] --> J](/content/2026/06/1310341/images/978abf703ad8710cb8ba7ac72c2b4f2ce53e72842ac4824eda3bee420e08a14f.jpg)
* Item: Selection: Entry:
| A Sign (plus/minus) Plus 0 | |
| Minus 1 | |
| B VAT6 or TAX6 No 0 | |
| Yes 1 | |
| C VAT5 or TAX5 No 0 | |
| Yes 1 | |
| D VAT4 or TAX4 No 0 | |
| Yes 1 | |
| E VAT3 or TAX3 No 0 | |
| Yes 1 | |
| F VAT2 or TAX2 No 0 | |
| Yes 1 | |
| G VAT1 or TAX1 No 0 | |
| Yes 1 | |
| H Delete method Delete in non-accessed EAN 0(To erase from the EAN file) | deleting job (#105 in Z1 mode) |
| Inhibit to delete in non-accessed 1EAN deleting job (#105 in Z1 mode) | |
| Delete now 4 | |
Note
Sign (plus/minus)
The function of every EAN varies according to the combination of its sign and the sign of its associated department as follows:
| Sign | Function of EAN | |
| Department | EAN | |
| + | + | Serves as a normal plus EAN |
| - | - | Serves as a normal minus EAN |
| + | - | Accepts store coupon entries, but not split-pricing entries |
| - | + | Not valid; not accepted |
Tax status
- The tax system of your machine has been factory-set to automatic VAT1–6. If you desire to select any of automatic tax 1–6, manual VAT1–6, manual VAT1, manual tax 1–6, and the combination of the automatic VAT 1–3 and the automatic tax 4–6, consult your dealer.
- When the combination of the automatic VAT1–3 and automatic tax 4–6 system is selected, one of the VAT1(G), VAT2(F) and VAT3(E) can be selected in combination with tax 4–6. Example: BCDEFG= 100100, 110100, 111010
- An EAN code not programmed for any of these tax statuses is registered depending on the tax status of the department which the EAN code belongs to.
Delete method
- When you select "delete now", the programmed data of the EAN code you specified is deleted with this programming.
- When you select "Delete in non-accessed EAN deleting job", you can delete EANs that has not been accessed during the period that is programmed in the job #2029 with the execution of EAN deleting job (#105 in Z1 mode).
Example
Programming for EAN code 5012345678900 as follows: A=0, B=0, C=0, D=0, E=0, F=0, G=1, and H=1.
- Scan the EAN code and press the EAN key, or enter the EAN code "5012345678900" or and press the EAN key twice. 5012345678900

EAN
A B C D E F G H

- Set the parameters A to H. 00000011 • You can go to the desired position with the 00 or • key.

- Press the ☒ key to program this setting.


- Press the TL key to finalize the programming and generate a programming report.


When "delete now" is selected:

Procedure
![graph TD A["Scan EAN code"] --> B["EAN EAN"] C["EAN code (max.13 digits)"] --> D["EAN EAN EAN"] B --> E["Department key"] D --> E E --> F["TL"] G["To delete the entered EAN code"] --> H["∞"] I["To keep the current setting"] --> J["Associated dept. code (1 to 50)"] J --> K["ST or DEPT #"] K --> L["TL…](/content/2026/06/1310341/images/dbbbb3241413909be150341f16c8bc441e50847d93a299f9bb656b93a6cc13cb.jpg)
*Department key to be associated with the entered EAN code
Note
- The following functions of the EAN code depend on the programming for its associated department:
• Grouping (Group 1 through 14) • SICS (Single Item Cash Sale)/SIF (Single Item Finalization)/Normal • HALO (high amount lockout)
Example
Assigning EAN code 5012345678900 to department 2
- Scan the EAN code and press the EAN key twice, or enter the EAN code "5012345678900" and press the EAN key three times.



- Press the department 2 key to assign EAN code 5012345678900 to department 2.


- Press the TL key to finalize the programming and generate a programming report.


5 Programming for discount keys
■ Deduction amount (⊖) PGM 2PGM 1
Procedure![graph TD A["⊖"] --> C["* Deduction amount"] B["⊖4"] --> C C --> D["ST"] D --> E["TL"] F["To keep the current setting"] --> C](/content/2026/06/1310341/images/741b25fbb0bf2b4a141dd4f0819449f6463d740fd1a3685a171f82f35ee9fdd6.jpg)
*Deduction amount: 0 - 999999
Example
Assigning "10.00" to the key
- Press the ☑ key.


- Enter the deduction amount "1000." 1000

- Press the ST key to program this setting.


- Press the TL key to finalize the programming and generate a programming report.


■ High amount lockout (HALO) and +/- sign (⊖) PGM 2
Procedure
![graph TD A["⊖"] --> B["⊖4"] C["⊖"] --> D["⊖4"] B --> E["To keep the current setting"] D --> E E --> F["*ABC"] F --> G["⊗"] G --> H["TL"] H --> I["Feedback to Θ4"]](/content/2026/06/1310341/images/4131d0a8b806ffb089d482ee76a903d29c9d47277ef4289085e10df89a5b9215.jpg)
* Item: Selection: Entry:
A Sign (plus/minus) Plus 0
Minus 1
B Significant digit for HALO 1 through 9 C Number of zeros to follow the significant digit for HALO 0 through 8
Note
HALO (High Amount Lockout)
BC is the same as B × 10c .
For example, presetting 14 (100.00) here means that amount entries of up to 100.00 are allowed in the REG mode. When you preset 18, however, the upper limit amount is 999999.99.
Example
Programming for the ☑ key as follows: A=1, B=1, and C=3
- Press the ☑ key twice.

ABC
| 0 0 1 | 1 1 8 |
- Set the parameters A to C. 113
- You can go to the desired position with the 00 or • key.
| 0 0 1 | 1 1 3 |
- Press the ☒ key to program this setting.

| 0 0 1 | 1 1 3 |
- Press the TL key to finalize the programming and generate a programming report.

| 0.00 |
Print
6 Programming for percent keys
Percent rate ( % ) PGM 2PGM 1
Procedure![graph TD A["%1"] --> C["To keep the current setting"] B["%4"] --> C C --> D["* Percent rate"] D --> E["ST"] E --> F["TL"] F --> G["End"] H["Start"] --> A I["Start"] --> B](/content/2026/06/1310341/images/1681a1a35ee074918fd03cb0b9ab61ee1652292139c315e26e7f1a88fcb698d8.jpg)
* Percent rate: 0.00 - 100.00
Note You must use a decimal point when setting percentage rates that are fractional.
Example Assigning 10.25% to the %1 key
PrintKey operation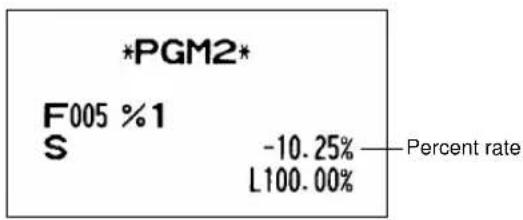
■ Sign (+/-) ( % ) PGM 2
Procedure![graph TD A["To keep the current setting"] --> B["×"] B --> C["TL"] D["%1"] --> E["×"] F["%4"] --> G["×"] H["%1"] --> I["×"] J["%4"] --> K["×"] L["A"] --> M["×"] N["×"] --> O["TL"]](/content/2026/06/1310341/images/c343e85966440899477908fe18fb908e392ad8963c1040f9d3ef81033fcbc568.jpg)
* Item: Selection: Entry: A Sign (plus/minus) Plus (premium) 0 Minus (discount) 1
Example Programming minus sign for the %1 key

PrintKey operation
7 Programming for exchange keys
■ Currency exchange rate (EX) PGM 2PGM 1
Procedure
![graph TD A["EX1"] --> B["EX3"] B --> C["* Exchange rate"] C --> D["ST"] D --> E["TL"] F["To keep the current setting"] --> C G["->"] --> D](/content/2026/06/1310341/images/a72c5d4f28c8976a5264a343db1f1c4dcc4f3dca0bdb4b83b82b624eff110c68.jpg)
* Currency exchange rate: 0.000000 - 999.999999
Note
You must use a decimal point when setting conversion rates that are fractional.
Example
Assigning 0.6068 to the EX1 key

PrintKey operation
8 Programming for the CA2, RA, PO, CH and CR keys
■ High amount lockout (HALO) (CA2, RA, PO and CR) PGM 2
Procedure
![graph TD A["To keep the current setting"] --> B["* A B Corresponding key"] B --> C["TL"] C --> D["End"]](/content/2026/06/1310341/images/7d15a4c805b342719fe56eb33a7395de4c00dc90669ddef275dd82917821d16a.jpg)
* AB is the same as A x 10^B
A: Significant digit (1 through 9) B: Number of zeros to follow the significant digit (0 through 8)
Example
Programming a HALO limit of 1000.00 (15) for the CR2 key

PrintKey operation
9 Programming the tax rate
Tax rate PGM 2
Procedure
![graph TD A["VAT"] --> B["*A 1-6"] B --> C["⊗"] C --> D["**Sign and tax rate"] D --> E["Lowest taxable amount"] E --> F["TL"] E --> G["ST"] H["When the lowest taxable amount is zero"] --> E I["max. five digits: 0.00 to 999.99"] --> E J["To delete"] --> E](/content/2026/06/1310341/images/718ff8ffe978d4b61a0b35619a44a6a330402d1795d67a8f1f446dac23fae70d.jpg)
* A: Enter a corresponding tax rate number. For example, when you program a tax rate as tax rate 1, enter "1", and when you program it as tax rate 6, enter "6". ** Sign and tax rate: XYYY.YYYY [Tax rate= 0.0001 to 100.0000 Sign + = 1, - = 0
Note
- The lowest taxable amount is valid only when you select add on tax system. If you select VAT (Value added tax) system, it is ignored.
- If you make an incorrect entry before pressing the second ☑ key in programming a tax rate, cancel it with the CL key; and if you make an error after pressing the second ☑ key, cancel it with the ST key. Then program again from the beginning.
- If you select VAT system, the sign which you program is ignored.
Example
Programming the tax rate (+4%) as tax rate 2 with lowest taxable income as 0.12
- Press the VAT key.
VAT
P 0.00
- Enter the tax rate "2". 2 ☒
2 0.00
- Enter the tax rate "+4%." 4
×
2 0.00
- Enter the lowest taxable amount "12."
12
2 1 2
- Press the TL key to finalize the programming and generate a programming report.
TL
0.00

Job-Code-Based Programming
This section illustrates how to program items using job codes. Using job codes allows you to program a wide variety of items in comparison with direct programming.
Start this programming by entering a corresponding job code as shown below.

All the items which can be programmed by the job-code-based programming are listed on this page and the following, and those which can also be programmed by the direct programming are marked with the symbol "Dhacf" follows job codes.

When setting the parameters for a job code, the digit that is blinking is the one that can be changed. To go to the position of the parameter that you want to change, press either of the following keys:
• Moves the blinker to the right.
00 Moves the blinker to the left.
1 Setting the date and time
■ Setting the date PGM 2 Direct
Enter day (one or two digits), month (two digits), and year (two digits) in this sequence.
![graph LR A["Procedure"] --> B["2610"] B --> C["•"] C --> D["⊗"] D --> E["Date (five or six digits)"] E --> F["TL"]](/content/2026/06/1310341/images/6eb187ac8643b5028991f4a1408559ba973038891fbc1f85b7617bbb1d4d8dfe.jpg)
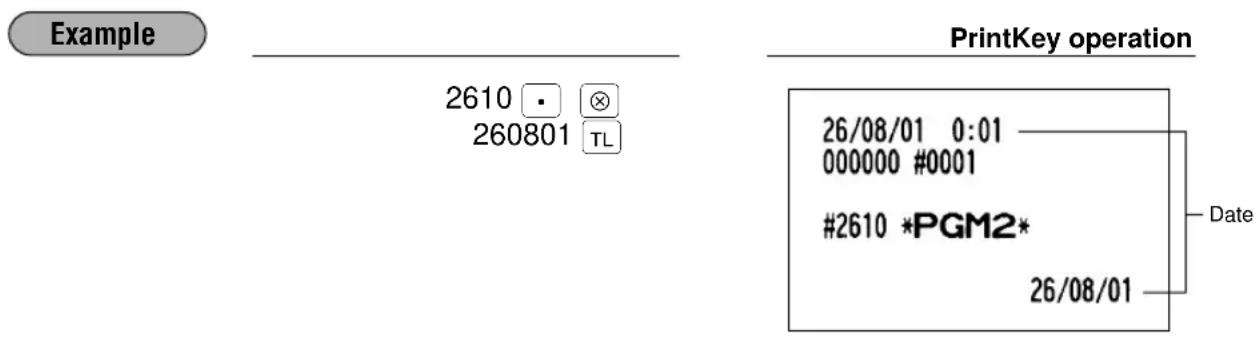
■ Setting the time PGM 2 Direct?
Set the time using the 24-hour format. For example, when the time is set to 2:30 AM, enter 230; and when it is set to 2:30 PM, enter 1430.
![graph LR A["Procedure"] --> B["2611"] B --> C["•"] C --> D["⊗"] D --> E["Time (max. four digits)"] E --> F["TL"]](/content/2026/06/1310341/images/77e9db74b0553402f4bd2851887ee57b7c6218c7e9fad4f32cad9c575731bdcb.jpg)

2 Setting the register and consecutive numbers
Setting the register number PGM 2 2612
When your store has two or more registers, it is practical to set separate register numbers for their identification. You may set them in a maximum of six digits.
Procedure
![graph LR A["2612"] --> B["•"] B --> C["⊗"] C --> D["Register number (one to six digits)"] D --> E["TL"] F["To set the register number "0""] --> D](/content/2026/06/1310341/images/c1d3cd033620b0044a08bd1534b0e7acf0a36d8a3a4629eb590c57cb76cc6c45.jpg)
Example

PrintKey operation
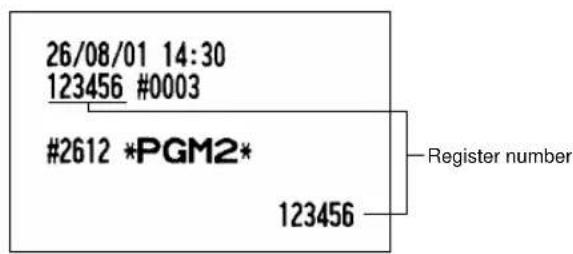
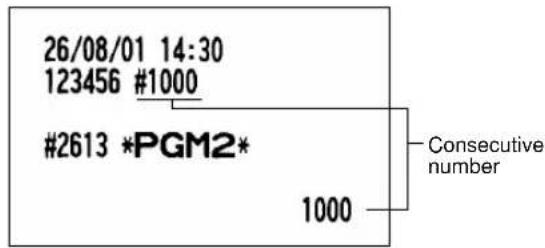
Setting the consecutive number PGM 2 2613
The consecutive number is increased by one each time a receipt is issued.
Enter a number (one to four digits) that is one less than the desired starting number.
Procedure
![graph LR A["2613"] --> B["•"] B --> C["⊗"] C --> D["A number (one to four digits) that is one less than the desired starting number"] D --> E["TL"] F["To begin the count from 0001"] --> D](/content/2026/06/1310341/images/bcd8dd05b580e26b880789c70caa704dcf5218cebe9f90725060972e9d6de1eb.jpg)
Example

PrintKey operation
3 Programming the tax rate

Tax rate
PGM 2
Direct
Procedure
![graph LR A["2711"] --> B["•"] B --> C["⊗"] C --> D["A* 1 to 6"] D --> E["⊗"] E --> F["**Sign and tax rate"] F --> G["⊗"] G --> H["Lowest taxable amount"] H --> I["TL"] H --> J["ST"] H --> K["To delete"] F --> L["When the lowest taxable amount is zero"] L --> H H --> M["max. five digits: 0.00 to 999.…](/content/2026/06/1310341/images/f96018b407db2e68066695debdb34f86416442a10d85b9e94032742d99757fbb.jpg)
*A: Enter a corresponding tax rate number. For example, when you program a tax rate as tax rate 1, enter 1 and when you program it as tax rate 6, enter 6.
** Sign and tax rate: XYYY.YYYY Tax rate = 0.0001 to 100.0000 \ Sign -/+ = 1/0
Example

PrintKey operation

Note
- The lowest taxable amount is valid only when you select add on tax system. If you select VAT (Value added system), it is ignored.
- If you make an incorrect entry before pressing the third key in programming a tax rate, cancel it with the CL key; and if you make an error after pressing the third key, cancel it with the ST key. Then program again from the beginning correctly.
- If you select VAT system, the sign which you program is ignored.
4 Programming for departments
Your machine is equipped with 20 standard departments and up to 50 optional departments.
Your machine allows you to perform the following programming for each department:
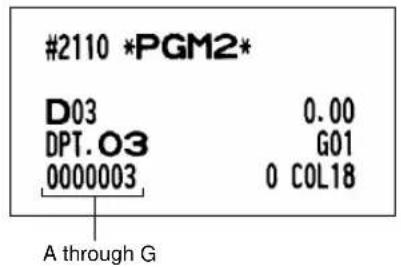
■ Functional programming PGM 2 2110
You can set each department for:
SICS (Single Item Cash Sale) / SIF (Single Item Finalization)
• SICS
If the first registration is to a department set for SICS, the sale is finalized as soon as the department key is pressed. If the sale is preceded by registrations to departments not set for SICS, a sale to a department set for SICS does not finalize and can be repeated until the TL key is pressed.
• SIF
Whenever a sale is made to a department set for SIF, the sale is finalized as soon as the department key is pressed.
Type of unit price entry
You may select one of the following four types of unit price entry for each department.
- Open and preset
- Preset only
- Open only • Inhibit department key
Procedure
![graph LR A["2110"] --> B["•"] B --> C["⊗"] C --> D["Dept. code"] D --> E["⊗"] E --> F["*ABCDEFG"] F --> G["ST"] G --> H["TL"] H --> I["CL"] I --> J["To program for the dept. other than the following dept."] E --> K["The current setting is displayed."] F --> L["To program for the following dept."] L…](/content/2026/06/1310341/images/722f0d88698ba85727d00f167b283d090a288900557e7dce0202820d03333fe5.jpg)
* Item: Selection: Entry:
| A to D Always enter 0.0 | ||
| E SIF/SICS /Normal SIF 2 | ||
| SICS 1 | ||
| Normal 0 | ||
| F Always enter 0.0 | ||
| G Type of unit price entry Open and preset 3 | ||
| Preset only 2 | ||
| Open only 1 | ||
| Inhibit department key | 0 | |

■ Tax status PGM 2 Direct?
Assign a tax status to each department. When entries are made into taxable departments in a transaction, tax is automatically computed according to the associated tax rate as soon as the transaction is completed.
Procedure
![graph LR A["2111"] --> B["•"] B --> C["⊗"] C --> D["Dept. code"] D --> E["⊗"] E --> F["*ABCDEFG"] F --> G["ST"] G --> H["TL"] H --> I["CL"] I --> J["To program for the dept. other than the following dept."] F --> K["To program for the following dept."] L["The current setting is displayed."] -.-> E M…](/content/2026/06/1310341/images/239814dd4553154cf949328d3ab2e5d0a460ed51bf26e119d024b0b784ad6c09.jpg)
* Item: Selection: Entry:
| A Always enter 0.0 | ||
| B VAT6 or TAX6 Yes 1 | ||
| No | 0 | |
| C VAT5 or TAX5 Yes 1 | ||
| No | 0 | |
| D VAT4 or TAX4 Yes 1 | ||
| No | 0 | |
| E VAT3 or TAX3 Yes 1 | ||
| No | 0 | |
| F VAT2 or TAX2 Yes 1 | ||
| No | 0 | |
| G VAT1 or TAX1 Yes 1 | ||
| No | 0 | |
Note
- The tax system of your machine has been factory-set to automatic VAT1–6. If you desire to select any of automatic tax 1–6, manual VAT1–6, manual VAT1, manual tax 1–6, and the combination of the automatic VAT 1–3 and the automatic tax 4–6, consult your dealer.
- When the combination of the automatic VAT1–3 and automatic tax 4–6 system is selected, one of the VAT1(G), VAT2(F) and VAT3(E) can be selected in combination with tax 4–6. Example: BCDEFG= 100100, 110100, 111010
Example
PrintKey operation


■ A limit amount (HALO) of entry PGM 2 Direct
You can set upper limit amounts (HALO: High Amount Lockout) for each department. The limit is effective for the REG-mode operations and can be overridden in the MGR mode. HALO limit is represented by two figures as follows:
Procedure
![graph LR A["2112"] --> B["•"] B --> C["⊗"] C --> D["Dept. code"] D --> E["⊗"] E --> F["*AB"] F --> G["ST"] G --> H["TL"] H --> I["CL"] I --> J["To keep the current setting"] E -.-> K["The current setting is displayed."]](/content/2026/06/1310341/images/f9e2709bf1d6b2ba59456864376271174ef02a7e0bc7fa18ae18b7604d3037ce.jpg)
* AB is the same as A x 10 8 .
A: Significant digit (1 through 9) B: Number of zeros to follow significant digit (0 through 8)
For example, presetting 14 (100.00) here means that amount entries of up to 100.00 are allowed in the REG mode. But when you preset 18, the upper limit amount is 999999.99.
Example

PrintKey operation

■ Alphanumeric characters PGM 2 2114
You can program a maximum of 16 characters (item label) for each department. (However, the default setting is for a 12-character label.)
Select the characters you want to program, referring to section "2 How to program alphanumeric characters" in chapter "PRIOR TO PROGRAMMING".
![graph TD A["Procedure"] --> B["•"] B --> C["⊗"] C --> D["Dept. code"] D --> E["⊗"] E --> F["Character keys (max. 16 digits)"] F --> G["ST"] G --> H["TL"] I["To program spaces"] --> F J["CL"] --> F K["Example"] --> L["2114 • 1 FRUITS ST TL"] M["PrintKey operation"] --> N["#2114 *PGM2*"] N --> O["D01…](/content/2026/06/1310341/images/344d7026854a168cc2ad05c9e0194280ea99d20bc7c06acb72388a4b8a5b8e1d.jpg)
Unit price PGM 2PGM Direct
You can program unit prices up to a maximum of six digits (9999.99). Even if a department is not programmed to allow the entry of preset unit prices in functional programming (job 2110), the department is automatically changed to allow the entry of preset unit prices by this programming entry.
![graph TD A["Procedure"] --> B["•"] B --> C["⊗"] C --> D["Dept. code"] D --> E["⊗"] E --> F["Unit price (max. six digits)"] F --> G["ST"] G --> H["TL"] H --> I["CL"] I --> E J["The current setting is displayed."] -.-> E K["To keep the current setting"] --> F L["Example"] --> M["PrintKey operation"] M…](/content/2026/06/1310341/images/ad7c52bca7f0e8bce8dc86386efc7a27e0189555f51c1b8751a4d54357a9f5b1.jpg)
■ Commission group assignment PGM 2 2115
Your machine allows you to assign a commission group (1-9) to each department.
Procedure
![graph LR A["2115"] --> B["•"] B --> C["⊗"] C --> D["Dept. code"] D --> E["⊗"] E --> F["*A"] F --> G["ST"] G --> H["TL"] H --> I["CL"] I --> J["To program for the following dept."] J --> K["To keep the current setting"] K --> E style A fill:#f9f,stroke:#333 style H fill:#f9f,stroke:#333 style I fill:…](/content/2026/06/1310341/images/882ab4a073490af110a9958d275323d655774ab4c1581d408110ce43c465d0d9.jpg)
* A: Commission group 0-9 (0 = no commission)
Example

PrintKey operation

■ Group number PGM 2 2116
You can assign departments to a maximum of 14 groups (1 through 14). This programming enables you to take group department sales reports.
Procedure
![graph LR A["2116"] --> B["•"] B --> C["⊗"] C --> D["Dept. code"] D --> E["⊗"] E --> F["*Group no. (1 through 14)"] F --> G["ST"] G --> H["TL"] H --> I["CL"] I --> C F --> J["To keep the current setting"] J --> F style A fill:#f9f,stroke:#333 style H fill:#ccf,stroke:#333](/content/2026/06/1310341/images/c326fda81b51358a20cee72d5588680a4a249568735e20c8c6a57b105fdb42db.jpg)
* Group number: Dept. (+) 1 through 9 (groups 1 through 9)
Dept. (−) 10
Hash (+) dept. 11
Hash (−) dept. 12
Bottle return (+) dept. 13
Bottle return (−) dept. 14
Note
The standard model provides no hash dept./bottle return dept. If you need them, please consult your dealer.
Example

PrintKey operation

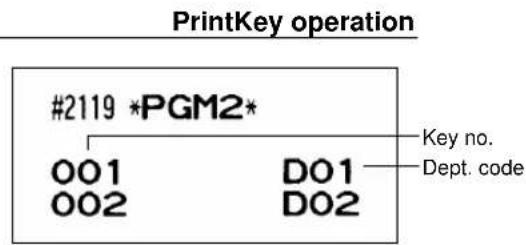
■ Department key positioning PGM 2 2119
You can assign a department number to each key position. Each key position has a corresponding key number.
Departments may be freely selected for the number of department keys and their positions.
To assign the department to a key position, select the key number of the position.
For key number position, refer to section "2 Standard key number layout" in chapter "KEYBOARD".
Procedure
To program for the key number other than the following key number![graph LR A["2119"] --> B["•"] B --> C["⊗"] C --> D["Key no. AB (1 through 68)"] D --> E["⊗"] E --> F["To program for the following key number"] F --> G["ST"] G --> H["TL"] D --> I["*1"] I --> J["Cancellation"] J --> K["*2"] K --> F](/content/2026/06/1310341/images/631fe8c737fa5634116b05602de2064643eb1ec1a1d697be72e21bbd01e3a51c.jpg)
*1 The key number placement is determined by your local Authorized SHARP Dealer. *2 AB is a department code.
Example

5 Price lookup (PLU) programming
Your machine has two kinds of PLU registration methods.
Direct PLU registration: Accomplished by depressing item key (direct PLU key) directly.
Indirect PLU registration: Accomplished by making an entry of PLU code and pressing the PLU/SUB key.
Each PLU requires you to program the following:
PLU code (six digits)
Associated department
When a PLU is associated with a department, the following functions of the PLU depend on the programming for the corresponding department.
- Grouping (Group 1 through 14) • HALO (only for the subdepartment)
- Single item cash sale/Single item finalization
Unit price (max. six digits)
You will usually have unit prices programmed for individual PLUs as PLU preset unit prices. If you program unit price "0" for a PLU, you can enter only the selling quantity of the PLU, i.e. the PLU can be used only as a counter.
Base quantity for split-pricing entries - two digits
Program a base quantity for each PLU/subdepartment dedicated to split-pricing entries.
PLU, subdepartment, PLU/subdepartment, delete, or prohibit mode
- If the PLU mode (i.e., automatic preset unit price entry) is selected, individual PLU entries can be made by entering the assigned code and pressing the PLU/SUB key (or by pressing a direct PLU key without any PLU code entry).
- If the subdepartment mode is selected, the AMT key must be pressed after the price entry, followed by the PLU code entry. The entry is finalized by pressing the PLU/SUB key.
- If the PLU/subdepartment mode is selected, entries in both the PLU and subdepartment modes are available.
- If the delete mode is selected, the corresponding program data for each PLU is deleted.
- If the prohibit mode is selected, the assigned PLU code cannot be entered. This mode does not clear the PLU/subdepartment program data.
Sign (+/-)
The function of every PLU/subdepartment varies according to the combination of its sign and its associated department's sign as follows:
| Sign | Function of PLU/subdepartment | |
| Dept. | PLU/subdept. | |
| + Serves | as a normal plus PLU/subdept. | |
| - Serves | as a normal minus PLU/subdept. | |
| + Accepts | store coupon entries, but not split-pricing entries. | |
| - | + Not valid; not accepted. | |
Tax status
Item label (12 characters) (option: max. 16 characters)
Commission group (1 to 9)
Link PLU
Any PLU is able to link to any other PLU (e.g., bottle deposit). However, the number of links is a maximum of
- Even if more than 5 PLUs are linked, the sixth or higher link is not actualized.
Direct PLU key positioning
Note
For some items, you can program in two ways: programming an individual PLU code and for a range of sequential PLU codes. The procedure marked "For each PLU" shows individual PLU programming. "For a range of PLUs" shows sequential range PLU programming.
Department assignment
PGM 2PGN
Direct
Procedure
For each PLU![graph LR A["1200"] --> B["•"] B --> C["⊗"] C --> D["PLU code AB"] D --> E["⊗"] E --> F["ST"] F --> G["TL"] G --> H["CL"] H --> I["To program for the following PLU"] I --> J["To keep the current setting"] J --> K["The current setting is displayed."] K --> D](/content/2026/06/1310341/images/d578e7f365096a595b3ae465dd5ed3b90ad6e08156ba6bfc48d8cabc6fb29b79.jpg)
Note
As soon as the programming is completed for one PLU, the next PLU code appears in the display.
For a range of PLUs![graph TD A["2230"] --> B["•"] B --> C["⊗"] C --> D["Start PLU code"] D --> E["⊗"] E --> F["End PLU code"] F --> G["⊗"] G --> H["AB"] H --> I["ST"] I --> J["TL"] K["*2 *3"] --> D L["The current setting of start PLU code is displayed."] -.-> G M["*4"] --> H N["To apply the current setting of start PLU…](/content/2026/06/1310341/images/204f1918a75334510b03a7912e988cfe30c0d4e14e328f03a7cdf8c68ffe8a8b.jpg)
*1, 2, 3: 1 to 999999 (free code) *4: AB: Associated department code
Example
For each PLU
PrintKey operation
For a range of PLUs
PrintKey operation
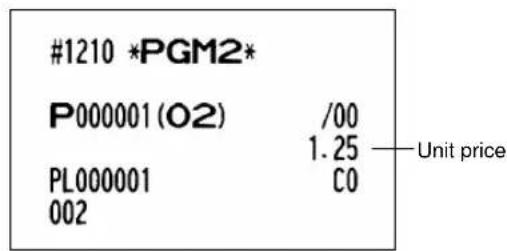
Unit prices
PGM 2PGM
Direct
Procedure
![graph LR A["1210"] --> B["•"] B --> C["⊗"] C --> D["PLU code"] D --> E["⊗"] E --> F["Unit price (max. six digits)"] F --> G["ST"] G --> H["TL"] H --> I["CL"] I --> J["To keep the current setting"] J --> F style A fill:#f9f,stroke:#333 style H fill:#f9f,stroke:#333](/content/2026/06/1310341/images/f241636ff8926bbca7633c20565f93db7099bfc22a6cf7cd2981abfbc5abb4f1.jpg)
Example

PrintKey operation
Base quantity
PGM 2PGM 1211
Procedure
![graph LR A["1211"] --> B["•"] B --> C["⊗"] C --> D["PLU code"] D --> E["⊗"] E --> F["Base q'ty (max. 2 digits)"] F --> G["ST"] G --> H["TL"] H --> I["CL"] I --> C F --> J["To keep the current setting"] J --> F style A fill:#f9f,stroke:#333 style H fill:#f9f,stroke:#333](/content/2026/06/1310341/images/a8fcc7fc9cd5efdf0e21aa21b65c7af6ff876f37f4279bb4e0dac77548c19171.jpg)
Example

PrintKey operation

■ PLU/subdepartment mode PGM 2 2210 2231 Direct
Procedure
For each PLU![graph LR A["2210"] --> B["•"] B --> C["⊗"] C --> D["PLU code ABC"] D --> E["⊗"] E --> F["ST"] F --> G["TL"] H["CL"] --> E I["The current setting is displayed."] -.-> E J["To keep the current setting"] --> K["*4"] K --> F](/content/2026/06/1310341/images/1200a1619a70f027b6923f37c3230163849c9a1412c664401400c0e2be61a729.jpg)
For a range of PLUs![graph TD A["Start PLU code"] --> B["End PLU code"] B --> C["Block"] C --> D["×"] D --> E["ABC"] E --> F["ST"] F --> G["TL"] H["2231"] --> I["•"] I --> J["⊗"] J --> K["×"] K --> L["To apply the current setting of start PLU code to PLUs within the range"] M["*2 *3"] --> N["Start PLU code"] O["*4"] -->…](/content/2026/06/1310341/images/11574abe04e3c7fc6a9ee73e626953d46b5bb31e0f3b17b4bce968cac6dc0862.jpg)
*1,2,3: 1 through 999999
*4: Item: Selection: Entry:
| A and B Always enter 0.0 | |
| C Mode parameter Prohibit mode 0 | |
| Subdept. mode 1 | |
| PLU mode 2 | |
| PLU/subdept. mode 3 | |
| Delete mode 4 | |
Example
For each PLU
PrintKey operation
For a range of PLUs
PrintKey operation
Procedure
For each PLU![graph LR A["2211"] --> B["•"] B --> C["⊗"] C --> D["PLU code"] D --> E["⊗"] E --> F["+4 ABCDEFG"] F --> G["ST"] G --> H["TL"] H --> I["CL"] I --> D style D fill:#f9f,stroke:#333 style F fill:#ccf,stroke:#333 note right of D The current setting is displayed. note right of F To keep the current settin…](/content/2026/06/1310341/images/75bc1b2d6c186b3cecb5bfea8bcdaade7e9812e4d011038a4be4605f663489b1.jpg)
For a range of PLUs![graph TD A["Start PLU code"] --> B["End PLU code"] B --> C["Block"] C --> D["×"] D --> E["ABCDEFG"] E --> F["ST"] F --> G["TL"] H["2232"] --> I["•"] I --> J["⊗"] J --> K["×"] K --> L["×"] L --> M["*4"] M --> N["To apply the current setting of start PLU code to PLUs within the range"] K --> O["*2 *3"…](/content/2026/06/1310341/images/e10de24fcdec6e4a9dfd9ba98e23865fa3b83f0051386e7342a1242f373f2eb8.jpg)
*1,2,3: 1 through 999999
*4: Item: Selection: Entry:
| A Sign (+/-) Minus PLU 1 | ||
| Plus PLU 0 | ||
| B VAT6 or TAX6 Yes 1 | ||
| No | 0 | |
| C VAT5 or TAX5 Yes 1 | ||
| No | 0 | |
| D VAT4 or TAX4 Yes 1 | ||
| No | 0 | |
| E VAT3 or TAX3 Yes 1 | ||
| No | 0 | |
| F VAT2 or TAX2 Yes 1 | ||
| No | 0 | |
| G VAT1 or TAX1 Yes 1 | ||
| No | 0 | |
Note
- The tax system of your machine has been factory-set to automatic VAT1–6. If you desire to select any of automatic tax 1–6, manual VAT1–6, manual VAT1, manual tax 1–6, and the combination of the automatic VAT 1–3 and the automatic tax 4–6, consult your dealer.
- When the combination of the automatic VAT1–3 and automatic tax 4–6 system is selected, one of the VAT1(G), VAT2(F) and VAT3(E) can be selected in combination with tax 4–6. Example: BCDEFG= 100100, 110100, 111010
- A PLU not programmed for any of these tax statuses is registered depending on the tax status of the department which the PLU belongs to.
Example
For each PLU

PrintKey operation
For a range of PLUs

PrintKey operation
■ Alphanumeric characters PGM 2 2214
You can program a maximum of 16 characters (item label) for each PLU or subdepartment. (However, the default setting is for a 12-character label.) Select the characters you want to program, referring to section "2 How to program alphanumeric characters" in chapter "PRIOR TO PROGRAMMING".
Procedure
![graph LR A["2214"] --> B["•"] B --> C["⊗"] C --> D["PLU code"] D --> E["⊗"] E --> F["Character keys (max. 16 digits)"] F --> G["ST"] G --> H["TL"] H --> I["CL"] I --> C F --> J["To program spaces"]](/content/2026/06/1310341/images/d7704caba482b82f8bc03981fee37be087462952531c0cf0818e63ce4cab01d8.jpg)
Example

PrintKey operation
■ Assigning of PLUs to commission groups
PGM 2
You can assign PLUs (or subdepartments) to commission groups.
Procedure
For each PLU![graph LR A["2215"] --> B["•"] B --> C["⊗"] C --> D["PLU code"] D --> E["⊗"] E --> F["*A"] F --> G["ST"] G --> H["TL"] H --> I["CL"] I --> J["To program for the following PLU"] D -.-> K["The current setting is displayed."] F --> L["To keep the current setting"]](/content/2026/06/1310341/images/b40ab1f7b876defd728bb81401c7f64cdc98ab1c2d10b53fcdeec26e6862b68b.jpg)
For a range of PLUs![graph TD A["Start PLU code"] --> B["End PLU code"] B --> C["×"] C --> D["ST"] D --> E["TL"] F["2235"] --> G["•"] G --> H["⊗"] H --> I["*2"] I --> J["Start PLU code"] K["The current setting is displayed."] -.-> L["To apply the current setting of start PLU code to PLUs within the range"] M["*3"] --> N…](/content/2026/06/1310341/images/7443e3975d59f05cf3b76e9793148a24655a306b2aceb649fc4660876dc6ac87.jpg)
*1,2,3 : 1 through 999999 *A : Commission group 0-9 (0=no commission)
Example
For each PLU
PrintKey operation
For a range of PLUs
PrintKey operation
Link PLU PGM 2 2220
Procedure
![graph LR A["2220"] --> B["•"] B --> C["⊗"] C --> D["PLU code"] D --> E["Linked PLU code"] E --> F[" "] F --> G["ST"] G --> H["TL"] I["Cancellation"] --> F J["To repeat up to 5 times"] --> F](/content/2026/06/1310341/images/b39bed7efab52943211b2c5ef09ce5a5d8293d970fccee9130d13a0873ecbc3d.jpg)
Note
• To program this function, please consult your dealer. - PLU codes must have already been defined.
Example

PrintKey operation
Direct PLU key positioning
PGM 2
2219
You can assign a PLU code to each key position. PLUs may be selected for the number of direct PLU keys and their positions. For key number positions, refer to section "2 Standard key number layout" in the chapter "KEYBOARD".
Procedure
![graph LR A["2219"] --> B["•"] B --> C["⊗"] C --> D["* Key no. (1 through 68)"] D --> E["⊗"] E --> F["PLU code"] F --> G["ST"] G --> H["TL"] H --> I["To program for the following key number"] I --> J["To program for the key number other than the following key number"] J --> K["Cancellation"] K --> F](/content/2026/06/1310341/images/771bc0a03dfb155085272c62d1193ca8a339d55f349363ea22bd32b6d7137dce.jpg)
* The key number placement is determined by your local Authorized SHARP Dealer.
Example

PrintKey operation
6 European Article Number (EAN) or Universal Product Code (UPC) programming
■ EAN or UPC code
Your machine can transact the following codes:
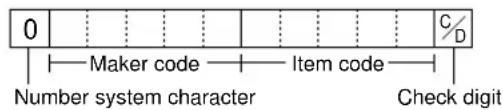
- UPC-A (Number system character: 0, 2, 3, 4) • UPC-E
- EAN-8
- EAN-13
- Internal code EAN-8/EAN-13
For the codes used in in-store marking, there are two types: PLU type (treated as a code like PLU code) and Non-PLU type (price/quantity information is included in the code).
When a code is non-PLU type, the price/quantity in the code is read for sales entry (in case of quantity, “quantity multiplied by preset unit price” is processed to obtain price.)
UPC-A
- Number system character: 0 • Number system character: 3
For entry, a full 12-digit number or 11-digit number (omitting the check digit) must be entered.
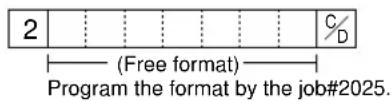
- Number system character: 2 You can program the format by the job #2025.
- Number system character: 4
For entry, a full 12-digit number, 11-digit number (omitting the check digit), or a leading zero plus 12-digit number must be entered. (Any numbers are allowed for the digits marked with *, and on the receipt/journal, non-PLU type code is printed like 2020008**** (****: price information).)



UPC-E
- UPC-E is a zero-suppressed version of UPC-A that conforms to the UPC-E Standards. This code is used for marking small packages.

For entry, a 6-digit number or a leading zero plus 6-digit number must be entered.
EAN-8
- Ordinary EAN-8 code (flag: neither 0 nor 2)
For entry, a full 8 digits number must be entered.
- Internal code (flag 2) Program the format by the job #2025.
- Internal code (flag 0)
For entry, a full 8 digits number must be entered. On the receipt/journal, non-PLU type code is printed like 208**** (****: price/quantity information)


EAN-13
- Ordinary EAN-13 code (used in the source marking)
- Specific EAN-13 code (flag 977, 978, 979) (used in the source marking: ISBM, ISSN)

For entry, you must enter a full of 13 digits number.
- Internal code (used in the in-store marking, the flag character number: 20 through 29 and 02) Program the format by the job# 2025.

• EAN press code (used for press articles)
For a press article, you must use a 13 digits number EAN code plus a 2-digit or 5-digit add-on code, though your register can register 13 digits number EAN code without an add-on code.
Note
The format for press articles is decided unique by each country. For the formats for other countries than the ones shown below, please ask your dealer.
German type 1
Currency for price is DM. (The price is not converted automatically according to EURO status.)

German type 2
(EURO code - The price is coded in EURO from January 2002)
Currency for price is EURO.

United Kingdom
Currency for price is GBP.

France
Currency for price on the prefix code 378 is EURO, and 379 is FFr. (The price is converted automatically according to EURO status.)

Sweden
Currency for price is SKr.

Note
- The availability of these press codes on your register depends on the programming (job #2035).
- Since the price in a press code is read for sales entries, and the currency is decided by the code, note that the code you enter for sales matches your domestic currency.
■ Add-on code
UPC-A and EAN-13 may be followed by a two digits number or a five digits number as add-on code, excepting UPC-A without a check digit plus two or five digits add-on code.
Therefore, the total number of digits enterable for sales entries are as shown below:
| Code entry No add-on | code 2-digit add-on | code 5-digit add-on code |
| UPC-A 12 14 17 | ||
| UPC-A w/leading zero 13 15 18 | ||
| UPC-A w/o check digit 11 - | - | |
| UPC-E 6 - | - | |
| EAN-8 8 - | - | |
| EAN-13 13 15 18 |
Note
Your register automatically judges the add-on code in an EAN code entered from the total number of digits and the flag.
■ EAN/UPC programming
Each EAN or UPC code (hereinafter referred to as EAN) requires you to program the following.
• EAN code (max. 13 digits) • Associated department (1-50)
When an EAN is associated with a department, the following functions of the EAN depend on the programming for the department.
• Grouping (Group 1 through 14) • HALO (only for the subdepartment) - Single item cash sale/Single item finalization
EAN code delete method
You can program how you delete EAN codes; deleting in the programming, inhibit deleting, or deleting the EAN codes that have not been accessed for a certain period, which can be programmed (up to 99 days) when you execute #105 in Z1 mode.
Unit price (max. six digits)
Base quantity for split-pricing entries
Sign (+/-)
Tax status
If you do not program tax status for an EAN, the tax status of the EAN follows to the status of the associated department.
Item label (12 characters) (option max. 16 characters)
Commission group (1-9)
EAN link
System programming for EAN function
Delete period for non-accessed EAN codes
Non-PLU code format
Type of press code
Price entry method for press code
Label of record in EAN file
■ Department assignment
PGM 2PGI
Direct
Procedure
![graph LR A["1000"] --> B["•"] B --> C["⊗"] C --> D["EAN code (max.13 digits)"] D --> E["⊗"] E --> F["To keep the current setting"] F --> G["Associated dept. code (1 to 50)"] G --> H["ST"] H --> I["TL"] D --> J["Scan EAN code"] J --> K["The current setting is displayed."] K --> L["To keep the current…](/content/2026/06/1310341/images/7bd2ea4e9d9e09c17cff81e44388c10f70a94e23e11c38053b9157380227d4b2.jpg)
Example

PrintKey operation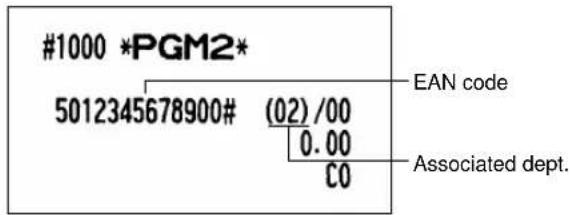
■ Unit prices □ PGM 2PGM □ Direct
Procedure
![graph LR A["1010"] --> B["•"] B --> C["⊗"] C --> D["EAN code (max.13 digits)"] D --> E["⊗"] E --> F["Unit price (max.6 digits)"] F --> G["ST"] G --> H["TL"] I["Scan EAN code"] --> D J["The current setting is displayed."] -.-> F K["To keep the current setting"] --> F](/content/2026/06/1310341/images/99f54654dc59f0be0a6f8ae50d92257fff3f87b51f5b884a5621681e6fae6a0e.jpg)
Example

PrintKey operation
Base quantity
PGM 2PGM 1011
Procedure
![graph LR A["1011"] --> B["•"] B --> C["⊗"] C --> D["EAN code (max.13 digits)"] D --> E["⊗"] E --> F["Base q'ty (max.2 digits)"] F --> G["ST"] G --> H["TL"] D --> I["Scan EAN code"] I --> J["The current setting is displayed."] F --> K["To keep the current setting"] K --> F](/content/2026/06/1310341/images/9a091db054a20bbae2ebde5279587d1c25a349fecbb24b410b298776f196c1d5.jpg)
Example

PrintKey operation
■ Delete method PGM 2 2010
Procedure
![graph LR A["2010"] --> B["•"] B --> C["⊗"] C --> D["EAN code (max.13 digits)"] D --> E["⊗"] E --> F["Delete method"] F --> G["ST"] G --> H["TL"] I["Scan EAN code"] --> D J["The current setting is displayed."] -.-> F K["To keep the current setting"] --> F](/content/2026/06/1310341/images/70b449e1dc3b778f6b912b77e6074f83c7762b1f21241e83b7b3b7f5305f3b74.jpg)
* Delete method
4: Delete now
1: Inhibit to delete in non-accessed EAN deleting job (#105 in Z1 mode) 0: Delete in non-accessed EAN deleting job (#105 in Z1 mode)
With the execution of EAN deleting job, you can delete EANs that have not been accessed during the period that is programmed in the job #2029.
Example
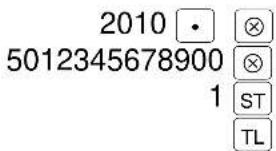
PrintKey operation

Delete method
(Inhibit to delete by job#105 in Z1 mode)
In case of "delete", no mark is printed.
When "delete now" is selected:

Procedure
![graph LR A["2011"] --> B["•"] B --> C["⊗"] C --> D["EAN code (max.13 digits)"] D --> E["⊗"] E --> F["ABCDEFG"] F --> G["ST"] G --> H["TL"] D --> I["Scan EAN code"] I --> D F --> J["*"] J --> F style D fill:#f9f,stroke:#333 style F fill:#ccf,stroke:#333 note right of D The current setting is displaye…](/content/2026/06/1310341/images/50ca95b41ea798a629ee600837a06a9f80f4d241e5ae808a8f84552e17de3e4d.jpg)
*: Item: Selection: Entry:
| A Sign (+/-) Minus 1 | ||
| Plus 0 | ||
| B VAT6 or TAX6 Yes 1 | ||
| No | 0 | |
| C VAT5 or TAX5 Yes 1 | ||
| No | 0 | |
| D VAT4 or TAX4 Yes 1 | ||
| No | 0 | |
| E VAT3 or TAX3 Yes 1 | ||
| No | 0 | |
| F VAT2 or TAX2 Yes 1 | ||
| No | 0 | |
| G VAT1 or TAX1 Yes 1 | ||
| No | 0 | |
Note
- The tax system of your machine has been factory-set to automatic VAT1–6. If you desire to select any of automatic tax 1–6, manual VAT1–6, manual VAT1, manual tax 1–6, and the combination of the automatic VAT 1–3 and the automatic tax 4–6, consult your dealer.
- When the combination of the automatic VAT1–3 and automatic tax 4–6 system is selected, one of the VAT1(G), VAT2(F) and VAT3(E) can be selected in combination with tax 4–6. Example: BCDEFG= 100100, 110100, 111010
- An EAN not programmed for any of these tax statuses is registered depending on the tax status of the department which the EAN belongs to.
Example

PrintKey operation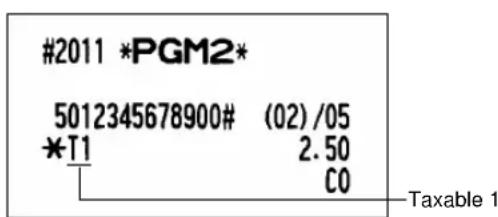
■ Alphanumeric characters PGM 2 2014
You can program a maximum of 16 characters (item label) for each EAN. (However, the default setting is for a 12-character label.) Select the characters you want to program, referring to section "2 How to program alphanumeric characters" in chapter "PRIOR TO PROGRAMMING".
Procedure![graph LR A["2014"] --> B["•"] B --> C["⊗"] C --> D["EAN code (max.13 digits)"] D --> E["⊗"] E --> F["Character keys (max. 16 digits)"] F --> G["ST"] G --> H["TL"] D --> I["Scan EAN code"] F --> J["To keep the current setting"] I --> D J --> F](/content/2026/06/1310341/images/8cd3cc768bae47cbaf32c0ad3645ca0c32e774221e4ffab5236ef7517dcf95a6.jpg)
Example

PrintKey operation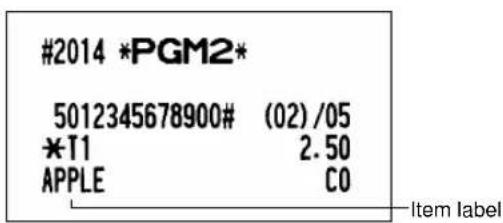
■ Assigning of EANs to commission groups PGM 2 2015
You can assign EANs to commission groups.
Procedure![graph LR A["2015"] --> B["•"] B --> C["⊗"] C --> D["EAN code (max.13 digits)"] D --> E["⊗"] E --> F["A"] F --> G["ST"] G --> H["TL"] I["Scan EAN code"] --> D J["The current setting is displayed."] -.-> F K["To keep the current setting"] --> F](/content/2026/06/1310341/images/049940769f980061c56d50154d512e840ea6c4b77f52b3150040aace803c9a1b.jpg)
*A : Commission group 0-9 (0=no commission)
Example
PrintKey operation
EAN link PGM 2 2030
Procedure
![graph LR A["2030"] --> B["•"] B --> C["⊗"] C --> D["EAN code (max.13 digits)"] D --> E["⊗"] E --> F["Linked PLU code"] F --> G["ST"] G --> H["TL"] I["Scan EAN code"] --> D J["Cancellation"] --> F K["*To repeat up to 5 times"] --> F](/content/2026/06/1310341/images/8bc1712bccb25064bb02294b08040fee5a3871db58a907646a03e653435607f5.jpg)
* The programmed number of linked PLUs is shown on the display like "P 1". (Incremented one every time you program a linked PLU.)
Note
• To program this function, please consult your dealer. • EAN code and PLU code must have been already defined.
Example


■ Delete period for non-accessed EAN codes PGM 2 2029
You can delete the EAN codes which have not been accessed during the period you set in this program when you execute the job #105 in Z1 mode when you set "Delete in non-accessed EAN deleting job" in the EAN delete method (#2010).
Procedure
![graph LR A["2029"] --> B["×"] B --> C["Delete period (1 to 99 days)"] C --> D["TL"] C -->|To program "00"| E["•"]](/content/2026/06/1310341/images/8d6a4c75c243c2fc889560593978c734e85fd782ca10523b5e04cdc016987d55.jpg)
* When you select "00" for the period, no EAN code is deleted by the non-accessed EAN deleting job.
Example


■ Programming Non-PLU code format PGM 2 2025
The register allows you to specify the Non-PLU code format (flag code: 2, 02, 20 -29). The format data is as follows:
![graph TD A["Field 1"] --> B["Free format area"] C["Field 2"] --> D["Price check digit"] E["Flag (02 or 20-29)"] --> F["Free format"] G["Flag"] --> H["Free format"] I["C/D %"] --> J["Free format"] K["2"] --> L["Free format"]](/content/2026/06/1310341/images/d6a638618e4c76420c04b7073f822eb042bb6834ae1a9862c14b40bdcd97dccb.jpg)
Procedure
![graph LR A["2025"] --> B["•"] B --> C["⊗"] C --> D["Flag code (max. 2 digits)"] D --> E["⊗"] E --> F["ABCDEF"] F --> G["ST"] G --> H["TL"] D -->|*1| I F -->|*2| J J --> G style D fill:#f9f,stroke:#333 style F fill:#ccf,stroke:#333 style G fill:#cfc,stroke:#333 note right of D "Flag code (max. 2 digi…](/content/2026/06/1310341/images/536a49fd6e657e59a2e7a9989086a89f2847fc681c3c3913a899531d8db0f3c5.jpg)
*1 Flag code: 2, 02, 20 - 29 *2 Item: Selection: Entry:
A Length of field 1 (number of digits) 0 - 9
B Length of field 2 (number of digits) 0 - 9
C Meaning of field 1* 3 Free code 2
Dept. code 1
PLU code 0
D Meaning of field 2* 4 Quantity 2
Price 0
E Price check digit used Yes 1
No 0
F TAB or decimal point of field 2 (0, 1, 2, 3) 0 - 3
*3: When you select Dept. code, the sales are counted up as the sales of the department (associated department assignment is ignored.), and when you select PLU code, the sales are counted up as the sales of the PLU code, while they are counted up as EAN sales for sales reports. *4: When you select quantity, the sales amount is calculated as follows: quantity x unit price programmed in #1010.

PrintKey operation


■ Press code functional programming PGM 2 2035
Procedure
![graph LR A["2035"] --> B["•"] B --> C["⊗"] C --> D["A"] D --> E["⊗"] E --> F["ABC"] F --> G["ST"] G --> H["TL"] I["The current setting is displayed."] -.-> E J["To keep the current setting"] --> F K["+1"] --> D L["+2"] --> F](/content/2026/06/1310341/images/8a93d1b3689d4b08d152aa6160c973459f116bf9e91cd5428e44705d8c8e6561.jpg)
*1 Type of prefix code
1: German type 1 (prefix code: 434/439) 2: U.K. (prefix code: 988/989) 3: France (prefix code: 378/379) 4: Sweden (prefix code: 7388) 5: German type 2 (prefix code: 414/419)
*2 Item: Selection: Entry:
| A Type of code Normal EAN code 0 | |
| Press code 1 | |
| B Price entry method for press code*3 | Using the encoded price 0 |
| Using the EAN programmed price 1in the job #1010 | |
| Compulsory 2 | |
| C Label of record in EAN file*3*4 | Prefix only 0 |
| Prefix + article code 1 | |
*3: This setting is valid only when "press code" is set for item A. *4: Select "prefix only" when you want to summarize the sales of items having press codes by category. Select "prefix + article code" when you want to summarize the sales of items having press codes by each item.
Example

PrintKey operation
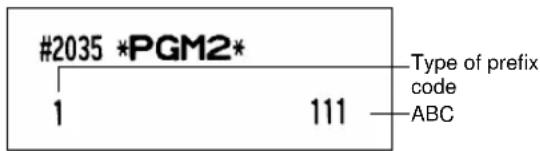
7 Programming for miscellaneous keys
Only function keys which you have programmed on the keyboard will allow the programming.
■ Programming the rate (%, EX, commission) and the deduction (⊖) PGM 1
PGM 2 Direct
You can program percent rates, currency exchange rates, deduction amounts and commission rates.
Procedure
![graph LR A["1310"] --> B["•"] B --> C["⊗"] C --> D["Function no. Rate or amount"] D --> E["To keep the current setting"] E --> F["ST"] F --> G["TL"] D --> H["*1 *2"] H --> I["The current setting is displayed."]](/content/2026/06/1310341/images/08c2b6cdbb00673585691a46bf3ebd29c7df671e171a72236a8b1e1a13474f59.jpg)
*1: Function no.
1: For the ☑ key 8: For the %4 key 78: For the commission sale 4 2: For the Θ2 key 52: For the EX1 key 79: For the commission sale 5 3: For the Θ3 key 53: For the EX2 key 80: For the commission sale 6 4: For the ☑4 key 54: For the EX3 key 81: For the commission sale 7 5: For the %1 key 75: For the commission sale 1 82: For the commission sale 8 6: For the %2 key 76: For the commission sale 2 83: For the commission sale 9 7: For the %3 key 77: For the commission sale 3
*2: Rate or amount
0 — 999999 (Deduction amount)
0.00 — 100.00 (% rate)
0.000000 — 999.999999 (Currency exchange rate)
0.00 — 999.99 (Commission rate)
Note
- When you introduce EURO, set the EURO conversion rate on the EX1 key for the period 1 and the period 2.
- You must use a decimal point when setting percentage rates that are fractional.
Example

PrintKey operation
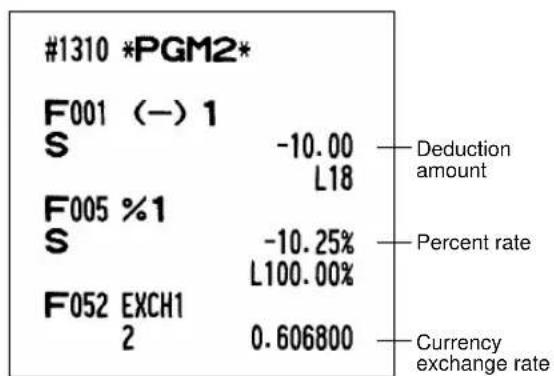
■ Programming the number of digits after decimal point for exchange keys
PGM 2 2330
Note
When you introduce EURO on your register, this setting for the EX1 key is automatically programmed by execution of Job #800 in the X2/Z2 mode.
Procedure
![graph LR A["2330"] --> B["•"] B --> C["⊗"] C --> D["*Function no."] D --> E["ST"] E --> F["Number of digits after decimal point (0-3)"] F --> G["Output"]](/content/2026/06/1310341/images/9b3244250bfc68b117e428d7d3ef36f4b27774362c50609a107b88429c76f6a4.jpg)
*: Function no.
52: For the EX1 key 53: For the EX2 key 54: For the EX3 key 55: For the EX4 key
Example

PrintKey operation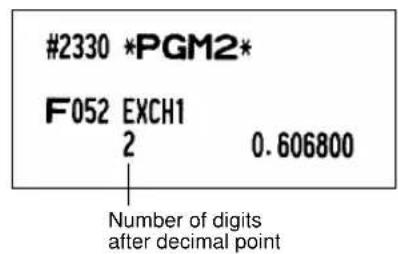
Currency description text programming PGM 2 2334
You can program a maximum of 4 characters for each of the EX1 through EX4 keys.
Procedure
![graph LR A["2334"] --> B["•"] B --> C["⊗"] C --> D["*Function no."] D --> E["⊗"] E --> F["Character keys (max. 4 digits)"] F --> G["ST"] G --> H["TL"] F --> I["To program spaces"] I --> D](/content/2026/06/1310341/images/f74810d700b63aa7c29d7767040e283ba6b177d141e61946e3bb7ac5f486f156.jpg)
*: Function no.
52: For the EX1 key 54: For the EX3 key 53: For the EX2 key 55: For the EX4 key
Example

PrintKey operation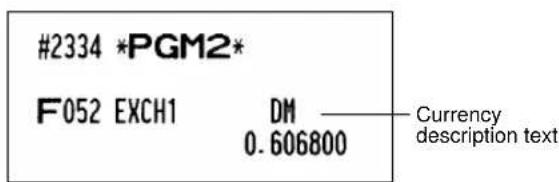
■ Assigning the drawer number to the drawer for foreign currency PGM 2 2680
You can assign a number of the drawer which opens when one of the following operations is performed.
- One of EX1 through EX4 is pressed without any entry.
- A transaction is completed with a payment entry of foreign currency.
- An X/Z report is issued.
Procedure
![graph LR A["2680"] --> B["•"] B --> C["⊗"] C --> D["*Drawer no."] D --> E["TL"]](/content/2026/06/1310341/images/03f9570f3c96d9c4b3fb65e78fc4931628e8361e05359abfab0cbedafebcfc50.jpg)
*Drawer no.: 0: Inhibit (No drawer opens.) 1: Drawer no. 1 2: Drawer no. 2
Example
2680

PrintKey operation
2680 *PGM2*
2
Note
To perform this programming, an optional drawer must be connected with your register.
■ A limit amount (HALO) of entry (⊖, RA, PO) PGM 2 Direct
The HALO limit is in effect for the REG-mode operations but can be overridden in the MGR mode. The HALO limit is represented by two figures as follows:
Procedure
![graph LR A["2312"] --> B["•"] B --> C["⊗"] C --> D["Function no. AB"] D --> E["⊗"] E --> F["ST"] F --> G["TL"] H["The current setting is displayed."] -.-> E I["To keep the current setting"] --> F J["*1 *2"] --> D](/content/2026/06/1310341/images/39497e8145b29562ca46740d99c1d96e45160bc29465c4ebe8d161fc363b4dba.jpg)
*1: Function no. 1: For the ☑ key 37: For the RA key 2: For the 2 key 38: For the RA2 key 3: For the ☉3 key 39: For the PO key 4: For the 4 key 40: For the PO2 key
*2: AB is the same as A x 10 B . A: Significant digit (0 through 9) B: Number of zeros to follow significant digit (0 through 8)
For example, presetting 13 (10.00) here means that amount entries of up to 10.00 are allowed in the REG mode. When you press 18, however, the upper limit amount is 999999.99.
Example
PrintKey operation
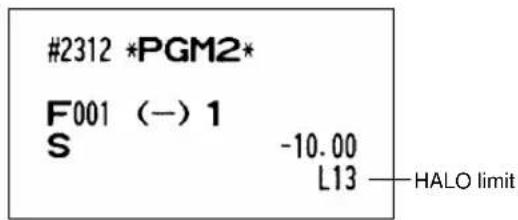
■ +/- sign (%, ⊖) PGM 2 Direct
Programming of the +/- sign assigns the premium or discount function for each key.
Procedure
![graph LR A["2311"] --> B["•"] B --> C["⊗"] C --> D["Function no. ABCDE"] D --> E["To keep the current setting"] E --> F["ST"] F --> G["TL"] H["The current setting is displayed."] -.-> D I["*1 *2"] --> D](/content/2026/06/1310341/images/61ca62c3e792fee4e454db26f998511604f02a1519209fae75c477b8ecc398c9.jpg)
*1: Function no.
1: For the ☑ key 5: For the 2: For the 2 key 6: For the 3: For the 3 key 7: For the 4: For the 4 key 8: For the %1 key [%2] key [%3] key %4 key
*2:
Item: Selection: Entry:
A +/- sign + (premium) sign 0
- (discount) sign 1
B to G Always enter 0.0
Example
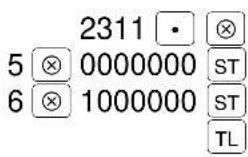
PrintKey operation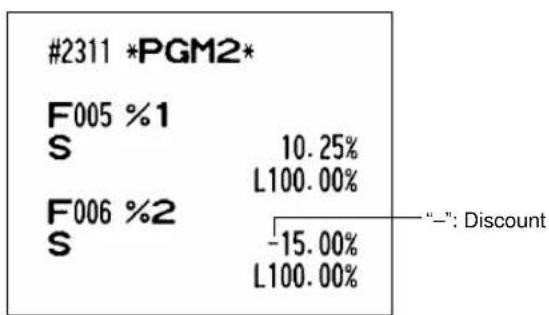
■ Item % or subtotal % selection ( % ) PGM 2 2315
Item %
Select this when a percent calculation is desired for the individual department, PLU and EAN. Subtotal %
Select this when a percent calculation is desired for subtotals.
Procedure
![graph LR A["2315"] --> B["•"] B --> C["⊗"] C --> D["Function no."] D --> E["⊗"] E --> F["*A"] F --> G["ST"] G --> H["TL"] H --> I["To repeat"] I --> D D --> J["The current setting is displayed."] J --> K["To keep the current setting"] K --> F](/content/2026/06/1310341/images/4f62afad99f8a118d5591db8fa01e82c717b2b0026ac1dc040373ce571877575.jpg)
*: Function no. *A:
5: For the %1 key 0: Subtotal % 6: For the %2 key 1: Item % 7: For the %3 key 8: For the %4 key
Example

PrintKey operation
■ Percent rate limitation ( % ) PGM 2 2313
You can program the upper limit of percent rates for percent entries.
(Percent entries that exceed the upper limit may be overridden in the MGR mode.)
Procedure
![graph LR A["2313"] --> B["•"] B --> C["⊗"] C --> D["Function no. Rate"] D --> E["⊗"] E --> F["ST"] F --> G["TL"] H["The current setting is displayed."] -.-> D I["To keep the current setting"] --> F J["*1 *2"] --> C](/content/2026/06/1310341/images/ce28bca7f18151dc3bf4acd71dda28c5a80dc8b95fe86c5c0605901e2fa9ee12.jpg)
*1: Function no.
5: For the %1 key 6: For the %2 key 7: For the %3 key 8: For the %4 key
*2: Rate
0.00 - 100.00 (Entering 0.00 inhibits the open percent rate entry.)
Note
10.00% can be entered as 1 0 or 1 0 • 0 0. The • key is needed only for fractional entry.
Example
PrintKey operation

■ Item ⊖ or subtotal ⊖ selection (☐) PGM 2 2316
Item ⊖
Select this when a deduction calculation is desired for the individual department, PLU and EAN. Subtotal ⊖
Select this when a deduction calculation is desired for subtotals.
Procedure
![graph LR A["2316"] --> B["•"] B --> C["⊗"] C --> D["Function no."] D --> E["⊗"] E --> F["*A"] F --> G["ST"] G --> H["TL"] D --> I["The current setting is displayed."] F --> J["To keep the current setting"] H --> K["Feedback to Function no."]](/content/2026/06/1310341/images/54ab870b4b0ea532f9f2e3158983f4e4574341fb02a0e1c0b0b0eb60d4a03498.jpg)
*: Function no. *A:
1: For the ⊖ key 0: Subtotal 2: For the Θ2 key 1: Item 3: For the Θ3 key 4: For the Θ4 key
Example

PrintKey operation![graph TD A["#2316 *PGM2*"] --> B["F001 (-) 1"] B --> C["I"] C --> D["-10.00 L13"] E["F002 (-) 2"] --> F["S"] F --> G["-0.00 L18"] H["Item"] --> I J["Subtotal"] --> K](/content/2026/06/1310341/images/88a4dcb48d0da222c91deb995fee20b5c05252248477dfc6e9288a6f2c3f4e57.jpg)
8 Programming for the TL, CA2, CH1 through CH4, and CR1 through CR4 keys
■ Functional programming PGM 2 2320
You can set each media for:
Footer printing
This programming decides whether or not your machine should print a message at the foot of a receipt when a specified media key is used.
Non-add code compulsory
You can enforce the non-add code entry when a media entry is made.
Either change enable or disable can be selected for a corresponding media key.
Drawer open
You can program each media key to open or not open the drawer.
Amount tendered compulsory
You may select amount tendered compulsory or optional for the TL, CA2, and CH1 through CH4 keys. You may select amount tendered compulsory or inhibited for the CR1 through CR4 keys.
Procedure
![graph LR A["2320"] --> B["•"] B --> C["⊗"] C --> D["Function no."] D --> E["⊗"] E --> F["ABCDEFG"] F --> G["ST"] G --> H["TL"] I["The current setting is displayed."] -.-> E J["To keep the current setting"] --> F K["*1"] --> D L["*2"] --> F](/content/2026/06/1310341/images/9ef16985b37e7aefb5b66e4056b5f87f48a9d0e4d9ada107270c1288417a532b.jpg)
*1: Function no.
| 42: For the key 46: For the | 3 key 50: For the | 3 key |
| 43: For the 2 key 47: For the | 4 key 51: For the | 4 key |
| 44: For the 1 key 48: For the | 1 key | |
| 45: For the 2 key 49: For the | 2 key |
*2 Item: Selection: Entry:
| A Always enter 0.0 | |||
| B Footer print Yes 1 | |||
| No | 0 | ||
| C Non-add code Compulsory 1 | |||
| Non-compulsory 0 | |||
| D Change due Disable | 1 | ||
| Enable | 0 | ||
| E | Always enter 0.0 | ||
| F | Drawer open No 1 | ||
| Yes 0 | |||
| G | Amount tendered entry | Compulsory 1 | |
| Non-compulsory for TL, CA2 or CH1 through CH4 keys | 0 | ||
| Inhibit for the CR1 through CR4 keys | 0 | ||
Example
PrintKey operation

■ High amount lockout (HALO) for cheque change, cheque cashing, and cash in drawer PGM 2 2321
You can program the upper limit amounts for cheque change, cheque cashing, and cash in drawer.
Procedure
![graph LR A["2321"] --> B["•"] B --> C["⊗"] C --> D["Function no."] D --> E["⊗"] E --> F["Limit amount"] F --> G["ST"] G --> H["TL"] I["The current setting is displayed."] -.-> E J["*1"] --> D K["*2"] --> F L["To keep the current setting"] --> F](/content/2026/06/1310341/images/c8d6e741cfde46c11c24a175397e352b49abbbd967da959345fdd933bfedb1a1.jpg)
*1: Function no.
41: For cheque cashing 66: For cheque change 63: For cash in drawer (Sentinel)
*2: Limit amount
0 through 999999.99 (Cheque change and cheque cashing) 0 through 9999999.99 (Cash in drawer)
Example

PrintKey operation
■ High amount lockout (HALO) of entry for media keys PGM 2 Direct?
The HALO limit is in effect for REG-mode operations but can be overridden in the MGR mode. The HALO limit is represented by two figures as follows:
Procedure
![graph LR A["2322"] --> B["•"] B --> C["⊗"] C --> D["Function no. AB"] D --> E["⊗"] E --> F["ST"] F --> G["TL"] H["The current setting is displayed."] -.-> E I["To keep the current setting"] --> F J["*1 *2"] --> C](/content/2026/06/1310341/images/d8ff206353dec9f577d1ad158161b99c19ced22836ff3c3e31dcaa843d5171c8.jpg)
*1: Function no.
42: For the TL key 48: For the CR1 key 43: For the CA2 key 49: For the CR2 key 44: For the CH1 key 50: For the CR3 key 45: For the CH2 key 51: For the CR4 key 46: For the CH3 key 47: For the CH4 key
*2: AB is the same as A x 10^B.
A: Significant digit (1 through 9) B: Number of zeros to follow significant digit (0 through 8)
When you press 18, however, the upper limit amount is 999999.99.
Example

PrintKey operation

9 Programming of function text
■ Programming PGM 2 2314
You can program a maximum of 8 characters for each function key and other functions using the table on the following pages. Select the characters you want to program referring to section "2 How to program alphanumeric characters" in chapter "PRIOR TO PROGRAMMING."
Procedure
![graph LR A["2314"] --> B["•"] B --> C["⊗"] C --> D["Function no. (max. 3 digits)"] D --> E["⊗"] E --> F["Character keys (max. 8 digits)"] F --> G["ST"] G --> H["TL"] F --> I["To program spaces"] I --> D](/content/2026/06/1310341/images/fff516b967023d8a50dfbb666b1af87ac080bb5dcd5d926b2ae822562b6a4148.jpg)
* Function no.: See "List of function texts" on the following pages.
Example

PrintKey operation

■ List of function texts
| Function no. | Key or function | Default setting |
| 1 | (➋)1 | |
| 2 | 2 (➋)2 | |
| 3 | 3 (➋)3 | |
| 4 | 4 (➋)4 | |
| 5 | % 1 %1 | |
| 6 | % 2 %2 | |
| 7 | % 3 %3 | |
| 8 | % 4 %4 | |
| 9 Differ DIFFER | ||
| 10 Taxable 1 subtotal TAX1 ST | ||
| 11 Taxable 2 subtotal TAX2 ST | ||
| 12 Taxable 3 subtotal TAX3 ST | ||
| 13 Taxable 4 subtotal TAX4 ST | ||
| 14 Taxable 5 subtotal TAX5 ST | ||
| 15 Taxable 6 subtotal TAX6 ST | ||
| 16 VAT/tax 1 VAT 1 | ||
| 17 VAT/tax 2 VAT 2 | ||
| 18 VAT/tax 3 VAT 3 | ||
| 19 VAT/tax 4 VAT 4 | ||
| 20 VAT/tax 5 VAT 5 | ||
| 21 VAT/tax 6 VAT 6 | ||
| 22 Net 1 | NET1 | |
| 23 Net 2 NET2 | ||
| 24 Coupon-like PLU CP PLU | ||
| 25 Refund REFUND | ||
| 26 Void | ∞ | |
| 27 Void mode total MODE | ∞ | |
| 28 MGR void MGR | ∞ | |
| 29 Subtotal void SBTL | ∞ | |
| 30 Hash void HASH | ∞ | |
| 31 Hash refund HASH RF | ||
| 32 VAT shift VAT SFT | ||
| 33 VAT/tax delete TAX DELE | ||
| 35 No sale NO SALE | ||
| 36 Guest check counter G.C. CNT | ||
| 37 RA | *RA* | |
| 38 RA2 | *RA8 | |
| 39 PO | *PO* | |
| 40 PO2 | *PO# | |
| 41 Cheque cashing CA/CHK | ||
| 42 Cash | CASH | |
| 43 Cash 2 | CASH2 | |
| 44 Cheque 1 CHECK | ||
| 45 Cheque 2 CHECK2 | ||
| 46 Cheque 3 CHECK3 | ||
| 47 Cheque 4 CHECK4 | ||
| 48 Credit 1 CREDIT1 | ||
| Function no. | Key or function | Default setting | |
| 49 Credit 2 | CREDIT2 | ||
| 50 Credit 3 | CREDIT3 | ||
| 51 Credit 4 | CREDIT4 | ||
| 52 Exchange 1 | EXCH1 | ||
| 53 Exchange 2 | EXCH2 | ||
| 54 Exchange 3 | EXCH3 | ||
| 55 Exchange 4 | EXCH4 | ||
| 56 Exchange 1 is | EXCH1 IS | ||
| 57 Exchange 2 is | EXCH2 IS | ||
| 58 Exchange 3 is | EXCH3 IS | ||
| 59 EX1 check sale | EX1 CHK | ||
| 60 | Domestic currency for EX1 check sale | DOM.CUR1 | |
| 61 EX1 credit sale | EX1 CR. | ||
| 62 | Domestic currency for EX1 credit sale | DOM. CUR | |
| 63 Cash in drawer | **OID* | ||
| 64 Cash/cheque is | CA/CH IS | ||
| 65 Cash/cheque in drawer | CA/CH ID | ||
| 66 Change for cheque | CHK/CG | ||
| 67 Customer | GUEST | ||
| 68 Order total | ORDER TL | ||
| 69 Paid total | PAID TL | ||
| 70 Domestic currency 1 | DOM.CUR1 | ||
| 71 Domestic currency 2 | DOM.CUR2 | ||
| 72 Domestic currency 3 | DOM.CUR3 | ||
| 73 Domestic currency 4 | DOM.CUR4 | ||
| 74 Cheque in drawer | CH*D | ||
| 75 Commission sale 1 | COM.SAL1 | ||
| 76 Commission sale 2 | COM.SAL2 | ||
| 77 Commission sale 3 | COM.SAL3 | ||
| 78 Commission sale 4 | COM.SAL4 | ||
| 79 Commission sale 5 | COM.SAL5 | ||
| 80 Commission sale 6 | COM.SAL6 | ||
| 81 Commission sale 7 | COM.SAL7 | ||
| 82 Commission sale 8 | COM.SAL8 | ||
| 83 Commission sale 9 | COM.SAL9 | ||
| 84 Non commission sale | NON.COM | ||
| 85 (+) Dept total DEPT TL | * | ||
| 86 (-) Dept total | DEPT (-) | ||
| 87 Hash (+) total | HASH TL | ||
| 88 Hash (-) total HASH (-) | |||
| 89 Bottle return (+) total | BTTL TL | ||
| 90 Bottle return (-) total | BTTL (-) | ||
| 91 Net 1 (Taxable 1 - VAT/tax 1) | NET 1 | ||
| 92 Net 2 (Taxable 2 - VAT/tax 2) | NET 2 | ||
| 93 Net 3 (Taxable 3 - VAT/tax 3) | NET 3 | ||
| 94 Net 4 (Taxable 4 - VAT/tax 4) | NET 4 | ||
| 95 Net 5 (Taxable 5 - VAT/tax 5) | NET 5 | ||
| Function no. | Key or function | Default setting |
| 96 Net 6 (Taxable 6 - VAT/tax 6) NET 6 | ||
| 97 Subtotal SUBTOTAL | ||
| 98 Merchandise subtotal MDSE ST | ||
| 99 Difference subtotal DIFF ST | ||
| 100 Total TOTAL | *** | |
| 101 Change CHANGE | ||
| 102 Sales q'ty ITEMS | ||
| 103 | Link PLU and EAN link subtotal | ITEM ST |
| 104 Copy receipt title | COPY | |
| 105 Guest check copy title G.C COPY | ||
| 106 Average AVE. | ||
| 107 Group 1 for departments | GROUP01 | |
| 108 Group 2 for departments | GROUP02 | |
| 109 Group 3 for departments | GROUP03 | |
| 110 Group 4 for departments | GROUP04 | |
| 111 Group 5 for departments | GROUP05 | |
| 112 Group 6 for departments | GROUP06 | |
| 113 Group 7 for departments | GROUP07 | |
| 114 Group 8 for departments | GROUP08 | |
| 115 Group 9 for departments | GROUP09 | |
| 116 CCD | CCD | |
| 117 CCD differ CCD DIF. | ||
| 118 CCD differ total DIF. TL | ||
| 119 Order total-Paid total | O - P | |
| 120 Total tax TTL TAX | ||
| 121 Net without tax | NET | |
| Function no. | Key or function | Default setting |
| 122 Commission amount 1 COM.AMT1 | ||
| 123 Commission amount 2 COM.AMT2 | ||
| 124 Commission amount 3 COM.AMT3 | ||
| 125 Commission amount 4 COM.AMT4 | ||
| 126 Commission amount 5 COM.AMT5 | ||
| 127 Commission amount 6 COM.AMT6 | ||
| 128 Commission amount 7 COM.AMT7 | ||
| 129 Commission amount 8 COM.AMT8 | ||
| 130 Commission amount 9 COM.AMT9 | ||
| 131 Commission amount total COM.TTL | ||
| 132 Department report title | DEPT | |
| 133 Group report title | GROUP | |
| 134 PLU report title | PLU | |
| 135 Transaction report title TRANS. | ||
| 136 Total in drawer report title | TL-ID | |
| 137 Clerk report title | CLERK | |
| 138 Cashier report title | CASHIER | |
| 139 Hourly report title | HOURLY | |
| 140 Daily net report title | DAILY | |
| 141 PLU zero sales report title | ZERO SAL | |
| 142 PLU price category report title | CATEGORY | |
| 143 Commission sales report title | SALES | |
| 144 EAN report title | EAN | |
| 145 EAN price change | PR.CHNG | |
| 146 | Non accessed EAN report title | DELETE |
10 Cashier and clerk programming
Cashier code PGM 2PGM 1500
You can assign a cashier code to each cashier. (If the cashier's file is upgraded, a maximum of 99 cashiers can be programmed. Consult your dealer.)
Procedure
![graph LR A["1500"] --> B["•"] B --> C["⊗"] C --> D["Cashier no. (1 to 99)"] D --> E["⊗"] E --> F["*Cashier code (0 - 99)"] F --> G["ST"] G --> H["TL"] H --> I["The current setting is displayed."] I --> D F --> J["To keep the current setting"]](/content/2026/06/1310341/images/0aef642315427762f078e84849d9aaa0fb550ac1a173721248f9c6464a9f72eb.jpg)
* Programming cashier code "0" inhibits entries of the cashier code.

■ Cashier name PGM 1 PGM 2 1514
You can program a maximum of 8 characters (cashier name) for each cashier. Select the characters you want to program referring to section "2 How to program alphanumeric characters" in chapter "PRIOR TO PROGRAMMING."
![graph LR A["1514"] --> B["•"] B --> C["⊗"] C --> D["Cashier code (1 - 99)"] D --> E["⊗"] E --> F["Character keys (max. 8 digits)"] F --> G["ST"] G --> H["TL"] F --> I["To program spaces"] I --> D](/content/2026/06/1310341/images/9627488bdb151d7091f75b7e60f0c8aa0873cf49f6419561ff06ae715adb43d8.jpg)
*: A cashier code you have programmed for the cashier by job code 1500

■ Functional programming for cashiers PGM 2 2510
![graph LR A["2510"] --> B["•"] B --> C["⊗"] C --> D["Cashier code (1 - 99)"] D --> E["⊗"] E --> F["**ABCDE"] F --> G["ST"] G --> H["TL"] I["To keep the current setting"] --> F J["The current setting is displayed."] --> D](/content/2026/06/1310341/images/d197d64e0d607f5ec5c6d341fcf8c1624c0477e69a54d1f549ed87f8c997dde4.jpg)
*: A cashier code you have programmed for the cashier by job code 1500
** Item: Selection: Entry:
| A Guest check copy Disable 1 | ||
| Enable 0 | ||
| B VAT shift Yes 1 | ||
| No | 0 | |
| C and D Always enter 0. 0 | ||
| E Drawer Set the drawer no. 1 or 2 1 or 2 | ||
| Use no drawer 0 | ||

Clerk code PGM 2PGM 1400
You can assign a clerk code to each of 99 clerks. The standard machine has no clerk function. If you need this function, consult your dealer.
![graph LR A["1400"] --> B["•"] B --> C["⊗"] C --> D["Clerk no. (1 to 99)"] D --> E["⊗"] E --> F["*Clerk code (0 - 99)"] F --> G["ST"] G --> H["TL"] I["To keep the current setting"] --> F J["The current setting is displayed."] --> B](/content/2026/06/1310341/images/1e9fab87b1bae9cd4d51641193be723164a6ff10d79212b64ff7045a25650ccd.jpg)
*: Programming clerk code "0" inhibits entries of the clerk code.
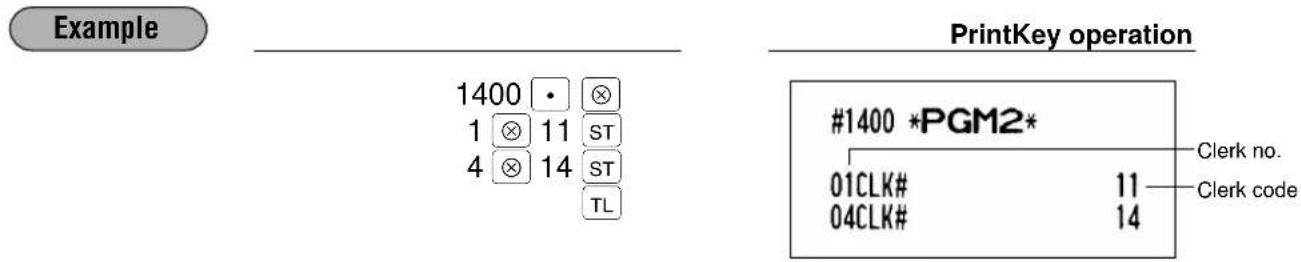
Clerk name PGM 2PGM 1414
You can program a maximum of 8 characters (clerk name) for each clerk. Select the characters you want to program referring to section "2 How to program alphanumeric characters" in chapter "PRIOR TO PROGRAMMING."
![graph LR A["1414"] --> B["•"] B --> C["⊗"] C --> D["Clerk code (1 - 99)"] D --> E["⊗"] E --> F["Character keys (max. 8 digits)"] F --> G["ST"] G --> H["TL"] I["*"] --> B J["To program spaces"] --> F](/content/2026/06/1310341/images/4608f366742ac6e9c9f5a4ca0f8cfd2974d87171449e8729d2b5a34a2ad3050d.jpg)
*: A clerk code you have programmed for the clerk by the job code 1400

11 Programming various functions
■ Programming for optional feature selection
PGM 2
2616
OP X/Z mode availability
When a cashier needs to take the cashier/clerk X or Z report, he or she will use the OP X/Z mode. This programming determines whether he or she will be allowed to use this mode.
Note
You can take cashier/clerk X and Z reports in the X1/Z1 mode regardless of the above programming.
Paid out in the REG-mode
Refund key in the REG-mode
Direct void in the REG-mode
Indirect void in the REG-mode
Subtotal void in the REG-mode
First item direct void
Printing of the number of purchased items
Journal print form
You may choose either of the following forms.
- Detailed journal print that shows the details of all entries - the same information as printed on the receipt.
- Summary journal print that shows information about all entries other than normal department entries (entries into “+” departments and their associated “+” PLUs).
Zero skip for various reports
VAT/tax amount, taxable amount and net amount printing on the receipt/journal
VAT shift type
VAT shift by cashier: VAT shift is performed by the operation of a cashier who has been assigned to do the VAT shift operation (Refer to job# 2510).
VAT shift by shift key: VAT shift is performed by pressing the VAT shift key.
No sale in REG-mode
Finalization when the subtotal amount is zero in the REG mode
Exchange 1 calculation method (for EURO settings)
When you do not introduce EURO, keep the default setting (multiplication).
When you introduce EURO, this setting is automatically set by the operation of job #800 in the X2/Z2 mode.
The calculation method is as follows:
In case that "Division" is selected for the period 1,
Domestic currency amount (national currency amount) ÷ Exchange 1 rate (EURO conversion rate) =
Exchange 1 amount (EURO amount)
In case that "Multiplication" is selected for the period 2,
Domestic currency amount (EURO amount) × Exchange 1 rate (EURO conversion rate) = Exchange 1 amount (national currency amount)
Printing of the exchange 1 total amount and change amount on the receipt/journal
Total and change amounts in exchange 1 currency are printed respectively below each of the total and exchange amounts in domestic currency.
When you introduce EURO, this setting is automatically set by the operation of job #800 in the X2/Z2 mode as follows:
On the period 1, EURO amount converted from national currency is printed below the national currency, and on the period 2, national currency converted from EURO amount is printed.
Cash/credit operation for exchange 1
You can set whether you receive foreign currency (exchange 1) amount by cheque or credit or not.
Footer graphic logo printing
Credit counting when received-on-account/paid out finalized with the credit key
Separator line in the report
Link PLU printing on the receipt
EAN learning function
Price change for EAN entry in REG mode
Treatment of EAN 8 code (200XXXXC/D)
Treatment of EAN 13 code (2XXXXXXXXXXXC/D)
Price entry after ISBN or ISSN
Entry of EAN with add-on code when the EAN ADD-ON file is full
Procedure
![graph LR A["2616"] --> B["•"] B --> C["⊗"] C --> D["P (1 to 14)"] D --> E["⊗"] E --> F["*ABCDEFGHIJKLMNOPQRSTUVWXYZH"] F --> G["ST"] G --> H["TL"] H --> I["To keep the current setting"] I --> F D --> J["The current setting is displayed."] J --> K["**"] K --> D](/content/2026/06/1310341/images/b0573d468c6b54af24d49fad63a098aa0469e92bd5c9eca287a6da2ff5d35dd8.jpg)
**P: 1
Item: Selection: Entry:
| A OP X/Z mode Enable 0 | |
| Disable 1 | |
| B Paid-out in REG-mode Enable 0 | |
| Disable 1 | |
| C Always enter 0.0 | |
| D Refund key entry in the REG-mode Enable 0 | |
| Disable 1 | |
| E Direct void in the REG-mode Enable 0 | |
| Disable 1 | |
| F Indirect void in the REG-mode Enable 0 | |
| Disable 1 | |
| G Subtotal void in the REG-mode Enable 0 | |
| Disable 1 | |
| H Always enter 0.0 |
**P: 2
Item: Selection: Entry:
| A The first item direct void Enable | 0 | ||
| Disable | 1 | ||
| B and C Always enter 0. | 0 | ||
| D Printing of the number of purchased items | No | 0 | |
| Yes | 1 | ||
| E Always enter 0. | 0 | ||
| F Journal print form | Detailed | 0 | |
| Limited 1 | |||
| G and H Always enter 0. | 0 | ||
Item: Selection: Entry:
| A Zero skip in EAN report Yes 0 | ||
| No | 1 | |
| B Zero skip in clerk report Yes 0 | ||
| No | 1 | |
| C Zero skip in cashier report Yes 0 | ||
| No | 1 | |
| D Zero skip in transaction report Yes 0 | ||
| No | 1 | |
| E Zero skip in department report Yes 0 | ||
| No | 1 | |
| F Zero skip in PLU report Yes 0 | ||
| No | 1 | |
| G Zero skip in hourly report Yes 0 | ||
| No | 1 | |
| H Zero skip in daily net report Yes 0 | ||
| No | 1 | |
**P: 4
| Item: | Selection: | Entry: | |
| A and B | Always enter 0. | 0 | |
| C | VAT/tax amount printing on the receipt/journal | Yes | 0 |
| No | 1 | ||
| D | Taxable amount printing on the receipt/journal | Yes | 0 |
| No | 1 | ||
| E | Net amount printing on the receipt/journal | Yes | 0 |
| No | 1 | ||
| F to H | Always enter 0. | 0 | |
**P: 5
| Item: | Selection: | Entry: | |
| A to C | Always enter 0. | 0 | |
| D | VAT shift type | By cashier | 0 |
| By shift key | 1 | ||
| E to H | Always enter 0. | 0 | |
**P: 6 (ABCDEFGH: Always enter 0.)
**P: 7
| Item: | Selection: | Entry: | |
| A and B | Always enter 0. | 0 | |
| C | No sale in REG-mode | Enable | 0 |
| Disable | 1 | ||
| D | Finalization in the REG-mode | Enable | 0 |
| when the subtotal amount is zero | Disable | 1 | |
| E to H | Always enter 0. | 0 | |
**P: 8 (ABCDEFGH: Always enter 0.)
**P: 9
Item: Selection: Entry:
| A Always enter 0.0 | ||
| B Exchange 1 calculation method Multiplication 0 | ||
| Division 1 | ||
| C Cheque/credit operation for exchange 1 No 0 | ||
| Yes 1 | ||
| D Printing exchange 1 total amount and change No 0amount on receipt and journal Yes 1 | ||
| E to G Always enter 0.0 | ||
| H Footer graphic logo printing Yes 1 | ||
| No | 0 | |
Note
The items B and D are automatically set by the operation of job #800 in the X2/Z2 mode.
**P: 10
Item: Selection: Entry:
| A and B | Always enter 0. | 0 | |
| C | Learning function for EAN entry | Yes | 0 |
| No | 1 | ||
| D to H | Always enter 0. | 0 |
**P: 11 (ABCDEFGH: Always enter 0.)
**P: 12
Item: Selection: Entry:
| A to G | Always enter 0. | 0 | |
| H | Price change for EAN entry in REG mode | Enable | 0 |
| Disable | 1 |
**P: 13
Item: Selection: Entry:
| A Credit counting when received-on-account/paid Yes 1 out is finalized with the credit key | |||
| No 0 | |||
| B | Separator line in the report | Separator line | 1 |
| 1 line space | 0 | ||
| C | Way to print the information for the link PLU/EAN link on the receipt | Leading link PLU/EAN with total amount | 1 |
| Detailed information | 0 | ||
| D and E | Always enter 0. | 0 | |
| F | Treating the EAN8 code(200XXXXC/D) as PLU type (XXXX:PLU code) | No 1 | |
| Yes 0 | |||
| G | Treatment of the EAN13 code(2XXXXXXXXXXC/D) | Dept. code | 1 |
| PLU code | 0 | ||
| H | Price entry after ISBN or ISSN | Inhibited | 1 |
| Compulsory | 0 | ||
**P: 14
Item: Selection: Entry:
A Always enter 0.0
B Entry of EAN with add-on code when EAN Continued 0
ADD-ON file is full Inhibited 1
C to H Always enter 0.0
Example

PrintKey operation
■ Programming feed line after printing of a difference subtotal
PGM 2
2615
Procedure
![graph LR A["2615"] --> B["•"] B --> C["⊗"] C --> D["*AB"] D --> E["TL"] note["When A and B are zeroes"]](/content/2026/06/1310341/images/7c53698cda8702e1e42928da03329f2c1a804e2df1785c4784fe27535010009a.jpg)
* A: Always enter 0.
B: Feed lines after printing of difference subtotal (0 through 9)
Example
PrintKey operation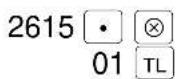
2615 *PGM2*
01
■ Programming alarm length of time with drawer opening PGM 2 2617
If the drawer still remains open when a specified length of time has elapsed, your machine gives the alarm.
Procedure
![graph LR A["2617"] --> B["•"] B --> C["⊗"] C --> D["Time 1 to 255 seconds"] D --> E["TL"] F["To disable the alarm function"] --> D](/content/2026/06/1310341/images/90bd8729d736048d7c003a1b09d1f2ebaf8e93c13132b4961ff8cc89f987c421.jpg)
Example

PrintKey operation
2617 *PGM2*
030
Note
Your machine starts to monitor how long the drawer is kept open the moment the drawer is opened at the end of a transaction in the REG/VOID mode. It stops the time monitoring when a valid key (except the RCPT key) is pressed for the next transaction. It restarts the time monitoring after that transaction is ended. You can stop the buzzer alarm by closing the drawer. No key entries can be made while the buzzer is sounding.
■ Programming of logo messages PGM 2 2614
Your register can print programmed messages for customers on every receipt. On the standard model, only graphic logo is printed on the receipt. (If you want a graphic logo customized for your store, please consult your dealer.)
If you want to print logo message, please consult your dealer. You have five options described below.
Select the characters you want to program, referring to section "2 How to program alphanumeric characters" in chapter "PRIOR TO PROGRAMMING."
Procedure
![graph LR A["2614"] --> B["•"] B --> C["⊗"] C --> D["*Line number (1 to 6)"] D --> E["⊗"] E --> F["Character keys (max. 24 digits)"] F --> G["ST"] G --> H["TL"] H --> I["To program spaces"] I --> D](/content/2026/06/1310341/images/dca4c48899c61ba62ee91ed3fdcc436a284495c0a4e32ff7268d4f4d744590d4.jpg)
* "Header 3-line message" type: 1 to 3
"Footer 3-line message" type : 4 to 6
"Header 6-line message" type: 1 to 6
"Header 3-line and footer 3-line message" type: 1 to 6 (1 to 3 as header, 4 to 6 as footer)
![graph TD A["Graphic logo"] --> B["Default setting"] B --> C["Header 3-line message Footer 3-line message"] C --> D["Graphic logo"] D --> E["Header 6-line message"] E --> F["Header 3-line message and footer 3-line messages"] subgraph Section1 G["Text 1st line"] --> H["Text 2nd line"] --> I["Text 3rd…](/content/2026/06/1310341/images/bfa71cdf943b67fea219466955979636a88442c5fd1c0ade8df36d2419d90023.jpg)
Example
To program the following logo messages by using 3 lines:

PrintKey operation
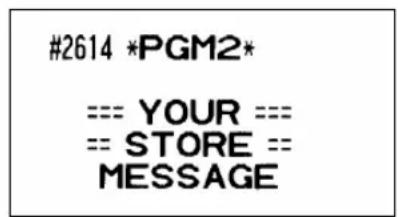
■ Selection of X1/Z1 and X2/Z2 reports to be printed in the stacked report sequence PGM 2 2620
Your register is equipped with the stacked report printing function that enables multiple X/Z reports to be printed in sequence with only a single request, up to a maximum of 15 reports*. This function continuously prints a maximum of 15 kinds of reports with a single operation.
![graph TD A["Procedure"] --> B["2620"] B --> C["•"] C --> D["⊗"] D --> E["To cancel the stacked report sequence"] E --> F["Job no."] F --> G["⊗"] G --> H["Start range parameter"] H --> I["⊗"] I --> J["End range parameter"] J --> K["ST"] K --> L["TL"] L --> M["To repeat*"] M --> F H --> N["*2"] N -->…](/content/2026/06/1310341/images/f27c4e4ad7b7a957626e3ca15be542550522e5c2693c9d8d841778971ebf0ab9.jpg)
*: Maximum 70 steps are programmable. "1 step" means the memory size used for one no-range type job no. The range type job no. needs "8 steps".
Job code numbers to be used are as follows.
*1 *2
| Job no. | Report Available mode Range parameter | |
| 00 | General report | |
| 07 | EAN zero sales report X1/X2 mode only | |
| 09 | Full EAN report | |
| 10 | Full department report X1/X2 mode only | |
| 13 | Full department group report X1/X2 mode only | |
| 20 | PLU report *3 Start PLU code/end PLU code (1 through 999999) | |
| 27 | PLU zero sales report X1/X2 mode only | |
| 29 | PLU price category report X1/X2 mode only *3 Start price amount/end price amount | |
| 30 | Transaction report X1/X2 mode only | |
| 31 | Total in drawer report X1/X2 mode only | |
| 32 | Commission sales report | |
| 40 | Full clerk report | |
| 50 | Full cashier report | |
| 60 | Hourly sales information Range report is available *3 Start time/end time (0 through 2330) only in the X1 mode. | |
| 70 | Daily net report X1/X2 mode only |
*3: Both range setting and full setting are allowed.
Note: When Z of stacked report is initiated, X only reports will be skipped.
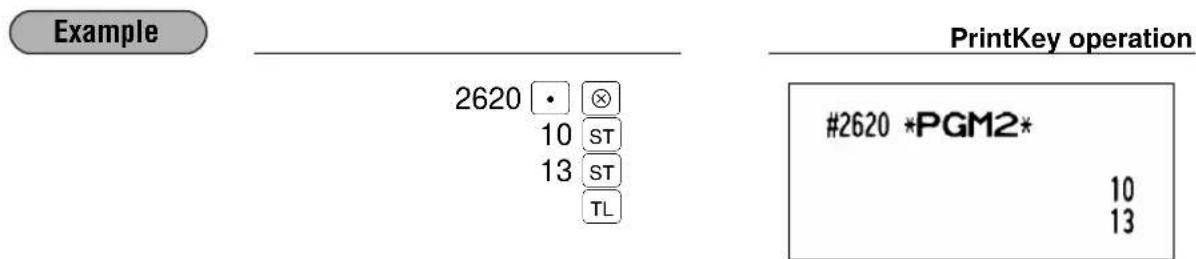
■ Setting the time range for hourly reports
PGM 2
2619
You can set the time range for an hourly report.
Procedure
![graph LR A["2619"] --> B["•"] B --> C["⊗"] C --> D["ABC"] D --> E["TL"] D --> F["When A through C are all zeros"]](/content/2026/06/1310341/images/bb6c0bd382980d3f957d5c35ca0d7b688793399869f63c5bd0a156318f30645d.jpg)
*A: Time range
To set the time range to 30 minutes (in the 24-hour system), enter 0.
To set the time range to 60 minutes (in the 24-hour system), enter 1.
BC: Starting time (hour = 00 to 23)
Example

PrintKey operation
2619 *PGM2*
1 07
Note
To perform this setting, an hourly Z report (# 160) must be done.
RS-232C channel assignment
PGM 2
2690
Your machine is equipped with two RS-232C interfaces. If you use the on-line communication function and/or the barcode reader, the channel number of each RS-232C interface must be programmed by using the following procedure.
To realize the on-line communication and/or to use the barcode reader, consult your dealer.
Procedure
![graph LR A["2690"] --> B["•"] B --> C["⊗"] C --> D["*P"] D --> E["⊗"] E --> F["**ABCD"] F --> G["ST"] G --> H["TL"] I["When A through D are all zeroes"] --> F J["1 to 3"] --> D](/content/2026/06/1310341/images/c196bcfb8b305f06e15f0922cab68332ec7472f36544f151f16b0a88e3d35747.jpg)
*P: 1
** Item: Selection: Entry:
A Channel no. for the ON-LINE communication: Not connected 0, Standard port 2 1
Standard port 1 8
B to D Always enter 0.0
*P: 2
** Item: Selection: Entry:
A Channel no. for the barcode reader: Not connected 0
Standard port 2 1
Standard port 1 8
B to D Always enter 0.0
*P: 3 (ABCD: Not used. Always enter 0.)
Note
Never enter any number other than 0, 1 and 8.
Example
PrintKey operation

■ Barcode reader programming
PGM 2
2691
Procedure
![graph LR A["2691"] --> B["•"] B --> C["⊗"] C --> D["*ABCD"] D --> E["TL"] F["To program zeros"] --> D](/content/2026/06/1310341/images/adff889501cbf356fa0597df8c5a140e5be12d9a4544b0ef9dc3bd2af6aee73f.jpg)
* Item: Selection: Entry:
| A Data bit 7 bits 1 | 8 bits 0 |
| B Parity bit Non parity 2 | Odd parity 1Even parity 0 |
| C Stop bit 1 bit 1 | 2 bits 0 |
| D Transmission speed 19200 bps 2 | 9600 bps 14800 bps 0 |
Example

PrintKey operation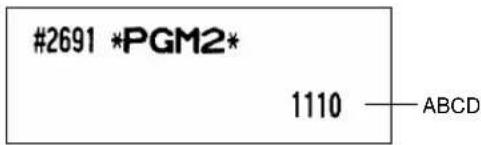
Secret codes to control access to PGM1 mode, X1/Z1 mode and X2/Z2 mode PGM 2 26322
You must enter a secret code according to the following procedure before performing any PGM1-mode, X1/Z1-mode or X2/Z2-mode operation when a secret code has been set for that specific mode operation.
Operating
Procedure

Note
Once a secret code is entered, it does not need to be entered again unless the mode switch setting is changed and any operation is performed.
Programming
Procedure
![graph LR A["2630"] --> B["•"] C["2631"] --> B D["2632"] --> B B --> E["⊗"] E --> F["Secret code"] F --> G["TL"] H["No code (zero)"] --> F I["Max. 4 digits"] --> F](/content/2026/06/1310341/images/7046d845280e33700f1a58d4608c77aa65aad031a2aaa7f17405377718ac7623.jpg)
* 2630 for the PGM1 mode 2631 for the X1/Z1 mode 2632 for the X2/Z2 mode
Example

PrintKey operation
2631 *PGM2*
1234
■ Functional programming for the printer PGM 2 2990
You can program functions for the printer.
![graph LR A["Procedure 2990"] --> B["•"] B --> C["⊗"] C --> D["*ABCD"] D --> E["TL"] F["When A through D are all zeroes"] --> D](/content/2026/06/1310341/images/15d38127670234c94e8a420199e3b3bf7bad1a73875c4d92c5ea7127b8e7eb7d.jpg)
* Item: Selection: Entry:
| A Always enter 1.1 | |||
| B Always enter 0.0 | |||
| C and D | Printing density | ( 80% for standard=00 \\90% for standard=50 \\100% for standard=99 ) | 00-99 |
Example
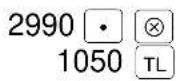

■ Setting the AUTO key — Automatic sequencing key — X2/Z2 2900
If you program frequently performed transactions or report sequences for the AUTO keys, you can call those transactions and/or reports simply by pressing the corresponding AUTO keys in key operations. This programming can be done when your machine is in the X2/Z2 mode.
![graph LR A["Procedure"] --> B["•"] B --> C["⊗"] C --> D["AUTO 4"] C --> E["AUTO 2"] C --> F["AUTO 3"] C --> G["..."] C --> H["AUTO 10"] D --> I["Transaction"] E --> I F --> I G --> I H --> I I --> J["AUTO 4"] I --> K["AUTO 2"] I --> L["AUTO 3"] I --> M["..."] I --> N["AUTO 10"] J --> O["TL"] K --> O…](/content/2026/06/1310341/images/34301e03813e70a5333545420985f83786107658d97edd4f627b85484cd8eb50.jpg)


Note: When the AUTO key has been programmed to execute a report job function, etc., the mode switch must be in the appropriate position (X1/Z1 or X2/Z2).
12
Reading stored programs
Your machine allows you to read every program stored in the PGM1 and PGM2 modes.
■ Program details and procedures for their reading
| Program for: | Mode switch position | Job code no. | Procedure | Related PGM1/PGM2 job code nos. | |
| 1 | Departments | PGM2 or PGM1 | 1100 |  | 1110, 2110, 2111, 2112, 2114, 2115, 2116 |
| 2 | PLUs/subdepartments | PGM2 or PGM1 | 1200 |  | 1200, 1210, 1211, 2210, 2211, 2214, 2215, 2230, 2231, 2232, 2235 |
| 3 | Key nos. for departments and PLUs | PGM2 | 2119 | → 2119 → ☒ → TL | 2119, 2219 |
| 4 | Link PLUs 2220 | PGM2 2220 |  | ||
| EANs5 | PGM1 or PGM2 | 1000 |  | 1000, 1010 1011, 2010 2011, 2014 2015 | |
| 6 | EANs function | PGM2 | 2025 |  | 2025, 2029, 2035 |
| 7 | EAN link | PGM2 | 2030 |  | 2030 |
| 8 | Cashiers | PGM2 or PGM1 | 1500 |  | 1500, 1514, 2510 |
| 9 | Clerks | PGM2 or PGM1 | 1400 |  | 1400, 1414 |
| 10 | Function preset 1 | PGM2 or PGM1 | 1300 |  | 1310, 2311, 2312, 2313, 2314, 2315, 2316, 2320, 2321, 2322, 2330, 2334 |
| 11 | 2600PGM2preset 2 |  | 2614, 2615, 2616, 2617, 2619, 2620, 2630, 2631, 2632, 2680, 2690, 2691 | ||
| 12 | Tax rates | PGM2 | 2700 | → 2700 → ☒ → TL | 2711 |
| 13 | Auto keys | PGM2 | 2900 | → 2900 → ☒ → TL | 2900 |
| Thermal printing14 | PGM2 | 2990 | → 2990 → ☒ → TL | 2990 | |
■ Sample printouts
1 Reading of programmed items for departments (Reading in the PGM1 and PGM2 modes)
2 Reading of programmed items for PLUs/subdepartments (Reading in the PGM1 and PGM2 modes)
* When you take this report in the PGM1 mode, the PGM2 indication is replaced by a "PGM1".
3 Reading of programmed key nos. for departments and PLUs (Reading in the PGM2 mode)
4 Reading of programmed items for link PLUs (Reading in the PGM2 mode)
5 Reading of programmed items for EANs (1) (Reading in the PGM1 and PGM2 modes)
* When you take this report in the PGM1 mode, the PGM2 indication is replaced by a "PGM1".
Note
The EAN codes are printed out in the sequence shown below.
| EAN-13 |
| EAN-8 |
| UPC-A |
| UPC-E |
6 Reading of programmed items for EANs (2) (Reading in the PGM2 mode)
8 Reading of programmed items for cashiers (Reading in the PGM1 and PGM2 modes)
* When you take this report in the PGM1 mode, the PGM2 indication is replaced by a "PGM1".
7 Reading of programmed items for EAN link (Reading in the PGM2 mode)
9 Reading of programmed items for clerks (Reading in the PGM1 and PGM2 mode)
* When you take this report in the PGM1 mode, the PGM2 indication is replaced by a "PGM1".
10 Reading of programmed items for functions - 1 (Reading in the PGM1 and PGM2 modes)
| 28/08/01 18:24 | 11 |
| 123456 #1196 | MAYER |
| 11 NILS | |
| #1300 *PGM2* | |
| F001 (-) 1 | |
| I | -0.50 |
| L18 | |
| F002 (-) 2 | |
| I | -0.25 |
| L18 | |
| F005 %1 | |
| S | -5.00% |
| L100.00% | |
| F006 %2 | |
| S | -10.00% |
| L100.00% | |
| F010 TAX1 ST | |
| F011 TAX2 ST | |
| F012 TAX3 ST | |
| F013 TAX4 ST | |
| F014 TAX5 ST | |
| F015 TAX6 ST | |
| F016 VAT 1 | |
| F017 VAT 2 | |
| F018 VAT 3 | |
| F019 VAT 4 | |
| F020 VAT 5 | |
| F021 VAT 6 | |
| F022 NET1 | |
| F023 NET2 | |
| F024 CP PLU | |
| F025 REFUND | |
| F026 ∞ | |
| F027 ⌘ MODE | |
| F028 MGR ∞ | |
| F029 SBTL ∞ | |
| F030 HASH ∞ | |
| F031 HASH RF | |
| F032 VAT SFT | |
| F033 TAX DELE | |
| F035 NO SALE | |
| F036 G.C. CNT | |
| F037 ***RA | L18 |
| F038 ***RA2 | L18 |
| F039 ***PO | L18 |
| F040 ***PO2 | L18 |
| F041 CA/CHK | |
| 999999.99 | |
* When you take this report in the PGM1 mode, the PGM2 indication is replaced by a "PGM1".
| F042 CASH | L18 |
| 0000000 | |
| F043 CASH2 | L18 |
| 0000000 | |
| F044 CHECK | L18 |
| 0000000 | |
| F045 CHECK2 | L18 |
| 0000000 | |
| F046 CHECK3 | L18 |
| 0000000 | |
| F047 CHECK4 | L18 |
| 0000000 | |
| F048 CREDIT1 | L18 |
| 0000000 | |
| F049 CREDIT2 | L18 |
| 0000000 | |
| F050 CREDIT3 | L18 |
| 0000000 | |
| F051 CREDIT4 | L18 |
| 0000000 | |
| F052 EXCH1 | DM |
| 2 | 1.955830 |
| F053 EXCH2 | |
| 2 | 1.019000 |
| F054 EXCH3 | |
| 2 | 1.960000 |
| F055 EXCH4 | |
| 2 | |
| F056 EXCH1 IS | |
| F057 EXCH2 IS | |
| F058 EXCH3 IS | |
| F059 EX1 CHK | |
| F060 DOM.CUR1 | |
| F061 EX1 CR | |
| F062 DOM.CUR1 | |
| F063 ***CID | |
| 9999999.99 | |
| F064 CA/CH IS | |
| F065 CA/CH ID | |
| F066 CHK/CG | |
| 999999.99 | |
| F067 GUEST | |
| F068 ORDER TL | |
| F069 PAID TL | |
| F070 DOM.CUR1 | |
| F071 DOM.CUR2 | |
| F072 DOM.CUR3 | |
| F073 DOM.CUR4 | |
| F074 *CH ID | |
| F075 COM.SAL1 | |
| 0.00% | |
| F076 COM.SAL2 | |
| 0.00% |
To be continued on the next page
| F082 COM. SAL8 | 0.00% |
| F083 COM. SAL9 | 0.00% |
| F084 NON COM. | |
| F085 *DEPT TL | |
| F086 DEPT (-) | |
| F087 *HASH TL | |
| F088 HASH (-) | |
| F089 *BTTL TL | |
| F090 BTTL (-) | |
| F091 NET 1 | |
| F092 NET 2 | |
| F093 NET 3 | |
| F094 NET 4 | |
| F095 NET 5 | |
| F096 NET 6 | |
| F097 SUBTOTAL | |
| F098 MDSE ST | |
| F099 DIFF ST | |
| F100 ***TOTAL | |
| F101 CHANGE | |
| F102 ITEMS | |
| F103 ITEM ST | |
| F104 COPY | |
| F105 G.C COPY | |
| F106 AVE. | |
| F107 GROUP01 | |
| F115 GROUP09 | |
| F116 CCD | |
| F117 CCD DIF. | |
| F118 DIF. TL | |
| F119 O-P | |
| F120 TTL TAX | |
| F121 NET | |
| F122 COM. AMT1 | |
| F130 COM. AMT9 | |
| F131 COM. TTL | |
| F132 DEPT | |
| F133 GROUP | |
| F134 PLU | |
| F135 TRANS. | |
| F136 TL-ID | |
| F137 CLERK | |
| F138 CASHIER | |
| F139 HOURLY | |
| F140 DAILY | |
| F141 ZERO SAL | |
| F142 CATEGORY | |
| F143 SALES | |
| F144 EAN | |
| F145 PR. CHNG | |
| F146 DELETE |
11 Reading of programmed items for functions - 2 (Reading in the PGM2 mode)
12 Reading of programmed tax rates (Reading in the PGM2 mode)
14 Reading of programmed items for the thermal printer (Reading in the PGM2 mode)
13 Reading of programmed items for auto keys (Reading in the PGM2 mode)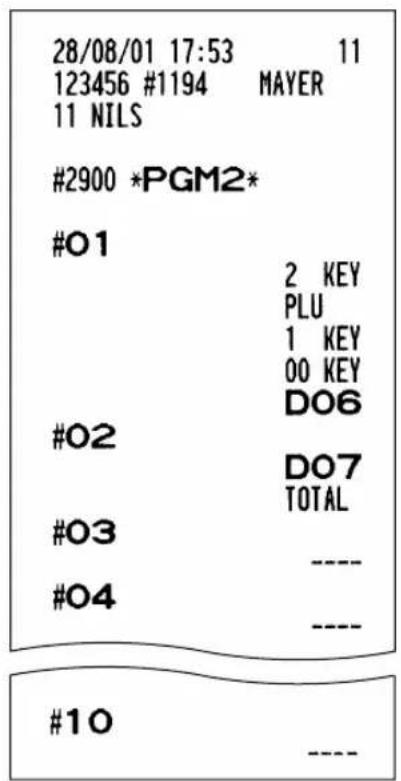
13 Training mode
The training mode is used when the operator or the manager practices register operations.
When a cashier set in training is selected, the machine automatically enters the training mode. When a cashier not set in training is selected, the machine automatically enters the ordinary REG mode. (For programming, consult your dealer.)
The training operations are valid only in REG, MGR and VOID mode.
The corresponding cashier memory is updated in the training mode. Other memories are not updated.

PrintKey operation
TRAINING

READING (X) AND RESETTING (Z) OF SALES TOTALS
- Use the reading function (X) when you need to take a reading of sales information entered since the last resetting. You can take this reading any number of times. It does not affect the register's memory.
- Use the resetting function (Z) when you need to clear the register's memory. Resetting prints all sales information and clears the entire memory except for the GT1 through GT3 and training GT, reset count, and consecutive number.
1 Summary of reading (X) and resetting (Z) reports and the key operations to obtain the reports
X1 and Z1 reports: Daily sales reports X2 and Z2 reports: Periodic (monthly) consolidation reports
| Item | Mode switch position | Job code | Key operation | |
| X1/Z1 X2/Z2 | ||||
| Flash report: (Only display) To clear the display, press the CL key or turn the mode switch to another position. | X1 | — | — | Dept. key ( 1 to 50 )Dept. code → DEPT : Department total amount |
| ⊗ key: Amount of cash in drawer | ||||
| ST key: Sales total | ||||
| Full reading and resetting | X1, Z1 X1, Z1 | 100 | 100 Reading200 Resetting | |
| X2, Z2 | 200 | |||
| Individual clerk reading and resetting | X1, Z1 X1, Z1 | 141 | 141 Reading241 Resetting | |
| X2, Z2 | 241 | |||
| X, Z 41 | 41 Reading2 Resetting | |||
| Individual cashier reading and resetting | X1, Z1 X1, Z1 | 151 | 151 Reading251 Resetting | |
| X2, Z2 | 251 | |||
| X, Z 51 | 51 Reading2 Resetting | |||
| Full clerk reading and resetting | X1, Z1 | X1, Z1 | 140 | 140 Reading240 Resetting |
| X2, Z2 | 240 | |||
| Full cashier reading and resetting | X1, Z1 X1, Z1 | 150 | 150 Reading250 Resetting | |
| X2, Z2 | 250 | |||
| Full department reading | X1 X1 | 110 | 110 210 → ⊗ → TL | |
| X2 210 | ||||
| Individual group reading | X1 X1 | 112 | 112 212 → ⊗ → Group no. → TL | |
| X2 212 | ||||
| Full group reading | X1 X1 | 113 | 113 213 → ⊗ → TL | |
| X2 | 213 | |||
| Reading and resetting of sales information for a range of PLUs/subdepartments | X1, Z1 | X1, Z1 | 120 |  |
| X2, Z2 | 220 | |||
| Reading of sales information of PLUs/subdepartments associated with an individual department | X1 X1 | 121 |  | |
| X2 | 221 | |||
| Reading of sales information on PLUs/subdepartments whose sales amounts are zeros | X1 X1 | 127 |  | |
| X2 | 227 | |||
| Reading of PLU/subdepartments whose sales amounts are zeros (by associated department) | X1 X1 | 127 |  | |
| X2 | 227 | |||
| Reading of sales information for the price amount range of PLUs/sub department | X1 X1 | 129 |  | |
| X2 | 229 | |||
| Reading and resetting of sales information for EANs | X1, Z1 | X1, Z1 | 109 | 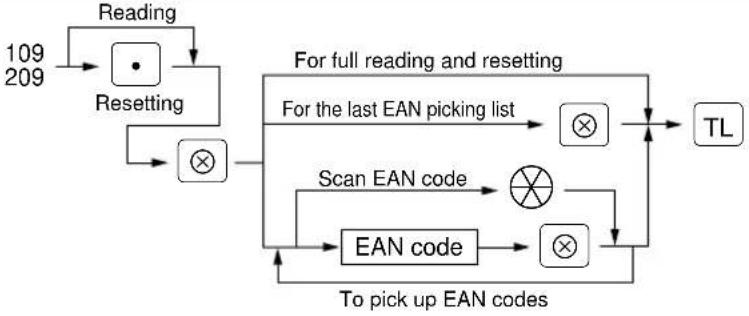 |
| X2, Z2 | 209 | |||
| Reading and resetting of sales information for EANs associated with an individual department | X1, Z1 | X1, Z1 | 101 |  |
| X2, Z2 | 201 | |||
| Reading of EANs whose sales amounts are zeros | X1 X1 | 107 |  | |
| X2 | 207 | |||
| Reading of EANs whose sales amounts are zeros (by associated department) | X1 X1 | 107 | 107 Dept. code TL | |
| X2 | 207 | |||
| Commission sales report | X1 X1 | 132 | 132 TL | |
| X2 232 | ||||
| Transaction reading | X1 X1 | 130 | 130 TL | |
| X2 230 | ||||
| Total in drawer | X1 X1 | 131 | 131 TL | |
| X2 231 | ||||
| Reading and resetting of hourly sales information | X1 | 160 | Reading: 160 Start*time * Enter the time in the 24-hour system.Reading and Resetting: 160 Resetting TL | |
| X1, Z1 | ||||
| Reading and resetting of a stacked report | X1, Z1 | X1, Z1 | 190 | 190 TLWhen Z of stacked report is initiated, X only reports will be skipped. |
| X2, Z2 | 290 | |||
| Reading and resetting of the daily net totals | X2, Z2 | 270 | 270 TLResetting TL | |
Note
Individual and full clerk reading and resetting are available only in the cashier and clerk system. In the factory setting, the register provides the "cashier only" system. So, if you want to change the system, consult your dealer.
Non-accessed EAN deleting
| Item | Mode switch position | Job code | Key operation | |
| X1/Z1 | X2/Z2 | |||
| Reading of non-accessed EANs | X1 105 | 105 | →⊗→TL | |
| Deleting of non-accessed EANs | Z1 105 | 105→•→⊗→For full deletingFor the last EAN picking list Scan EAN codeEAN codeTo pick up EAN codes | ||
Note
When you execute the job #105 in Z1 mode, not only the sales data, but also the EAN code(s) (the related data files) themselves will be deleted.
2 Daily sales totals
■ Full reading and resetting of sales totals
You can take X and Z reports in the X1/Z1 mode. The use of the decimal key ( ) determines when the report will actually reset the sales totals.
• Sample X report • Sample Z report
To be continued on the next page
Note
Not all reports provide the resetting capability. Please refer to the chart on pages 95 through 97.
| D10 | 5.000 Q | |
| DPT. 10 | -10.00 | |
| DEPT (-) | 5.000 Q | “-” dept. counter and total |
| -10.00 | ||
| D11 | 6.000 Q | |
| DPT. 11 | *19.50 | “+” hash dept. counter and total |
| *HASH TL | 6.000 Q | |
| *19.50 | ||
| D12 | 7.000 Q | |
| DPT. 12 | -8.75 | “-” hash dept. counter and total |
| HASH (-) | 7.000 Q | |
| -8.75 | ||
| D13 | 8.000 Q | |
| DPT. 13 | *20.00 | “+” bottle return dept. counter and total |
| *BTTL TL | 8.000 Q | |
| *20.00 | ||
| D14 | 5.000 Q | |
| DPT. 14 | -2.50 | “-” bottle return dept. counter and total |
| BTTL (-) | 5.000 Q | |
| -2.50 | ||
| * TRANS. * | ||
| (-) 3 | 2 Q | Subtotal Θ3 counter and total |
| -2.00 | ||
| (-) 4 | 1 Q | Subtotal percent 1 counter and total |
| -0.75 | ||
| %1 | 1 Q | |
| -0.75 | ||
| %2 | 1 Q | |
| -1.50 | ||
| NET 1 | *2444.22 | Net sales total |
| Taxable 1 total | ||
| TAX1 ST | *739.50 | VAT 1 total |
| VAT 1 | *35.21 | |
| TAX2 ST | *177.72 | |
| VAT 2 | *6.84 | |
| TAX3 ST | *69.50 | |
| VAT 3 | *2.02 | |
| TAX4 ST | *53.00 | |
| VAT 4 | *3.47 | |
| TAX5 ST | *41.50 | |
| VAT 5 | *2.35 | |
| TAX6 ST | *117.50 | |
| VAT 6 | *10.68 | |
| TTL TAX | *60.57 | Tax total |
| NET | *2383.65 | Net total without tax |
| VAT SFT | *123.75 | VAT shift total |
| TAX DELE | *10.00 | Tax delete total |
| (-) 1 | 3 Q | Item Θ1 counter and total |
| -1.50 | ||
| (-) 2 | 1 Q | |
| -0.25 |
To be continued on the next page
To be continued on the next page
| EXCH1 | 3 QDM250.00 | Exchange 1 counter and total |
| DOM.CUR1 | *127.81 | Exchange 1 cheque 1-4 counter and total |
| EX1 CHK | 2 QDM135.00 | Exchange 1 cheque 1-4 total in domestic currency |
| DOM.CUR1 | *69.01 | Exchange 1 credit 1-4 counter and total |
| EX1 CR | 1 QDM69.44 | Exchange 1 credit 1-4 total in domestic currency |
| DOM.CUR1 | *35.50 | |
| EXCH2 | 1 Q50.00 | |
| DOM.CUR2 | *25.56 | |
| EXCH3 | 2 Q41.00 | |
| DOM.CUR3 | *20.91 | |
| EXCH4 | 1 Q100.00 | |
| DOM.CUR4 | *98.13 | |
| ****CID | *1787.75 | Cash in drawer |
| *CH ID | *115.00 | Cheque in drawer |
| CA/CH ID | *1902.75 | Cash + cheque in drawer |
| CHK/CG | *13.95 | Change total for cheque tendering |
■ Cashier reading and resetting
Using this function, you can take X and Z reports for individual cashiers or all cashiers.
Individual cashier reading and resetting

The OP X/Z-mode reading and resetting is allowed only when your machine has been programmed for "OP X/Z mode available" in the PGM2 mode.
• Sample X report • Sample Z report


The subsequent printout occurs in the same format as in the sample X report.
* When you take these reports in the OP X/Z mode, the X report shows an "OP X" and the Z report shows an "OP Z".
| CREDIT3 | 2 Q |
| *63.75 | |
| CREDIT4 | 1 Q |
| *23.55 | |
| EXCH1 | 3 Q |
| DM250.00 | |
| DOM.CUR1 | *127.81 |
| EX1 CHK | 2 Q |
| DM135.00 | |
| DOM.CUR1 | *69.01 |
| EX1 CR | 1 Q |
| DM69.44 | |
| DOM.CUR1 | *35.50 |
| EXCH2 | 1 Q |
| 50.00 | |
| DOM.CUR2 | *25.56 |
| EXCH3 | 2 Q |
| 41.00 | |
| DOM.CUR3 | *20.91 |
| EXCH4 | 1 Q |
| 100.00 | |
| DOM.CUR4 | *98.13 |
| ****CID | *1777.75 |
| *CH ID | *115.00 |
| CA/CH ID | *1892.75 |
| CHK/CG | *13.95 |
Full cashier reading and resetting
The subsequent printout occurs in the same format as in the sample reports of individual cashier reading and resetting, and sales data for cashiers print in this sequence.
■ Clerk reading and resetting
Using this function, you can take X and Z reports for individual clerks or all clerks.
Individual clerk reading and resetting

The OP X/Z-mode reading and resetting is allowed only when your machine has been programmed for "OP X/Z mode available" in the PGM2 mode.
• Sample X report • Sample Z report

Full clerk reading and resetting
![graph TD A["29/08/01 20:25 11\n123456 #1407 MAYER\n11 NILS"] --> D B["30/08/01 9:19 11\n123456 #1527 MAYER\n11 NILS"] --> D C["#140 *X1* \n* CLERK *"] --> D D --> E F["#140 *Z1* \n* CLERK *"] --> E](/content/2026/06/1310341/images/f1d0d6b0dc19d6c1a19d354635d41e07fbc04ab0fb508e644713692e43cdbc90.jpg)
The subsequent printout occurs in the same format as in the reports of individual clerk reading and resetting, and sales data for clerks print in this sequence.
* When you take these reports in the OP X/Z mode, the X report shows an "OP X" and the Z report shows an "OP Z".
■ Reading and resetting of hourly sales information
You can take X and Z reports for sales totals and transaction (customer) counters for 48 half hours, or 24 hours. If both quantity and amount are zero, their print is skipped.
• Sample X report • Sample Z report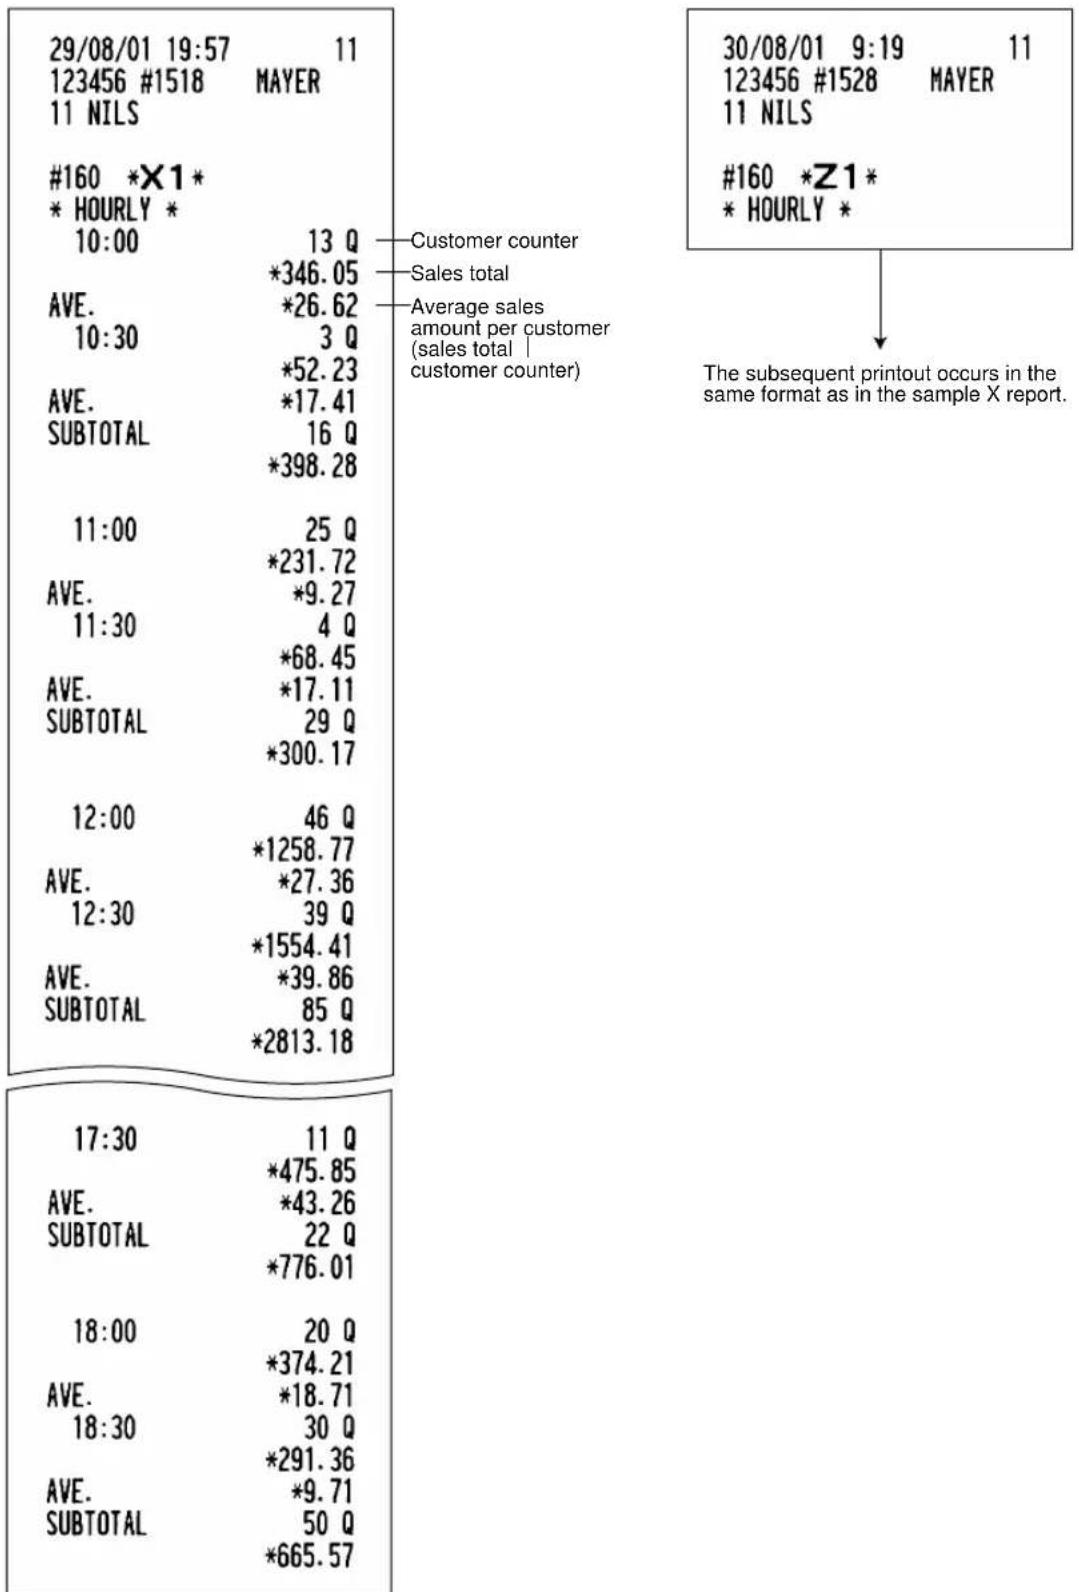
■ Full department reading
| 29/08/01 20:26 11123456 #1408 MAYER11 NILS | |
| #110 *X1**DEPT*D01 600.000 QDPT.O1 *1254.4256.15%D05 30.000 QDPT.O5 *43.201.93%D06 34.000 QDPT.O6 *219.199.81%D07 46.000 QDPT.O7 *313.2514.02%D08 37.000 QDPT.O8 *259.0711.60%D09 27.000 QDPT.O9 *145.026.49%GROUP01 774.000 Q*2234.1567.20% | Sales q'ty and totalRatio of dept. 1 salesamount to "+" dept. total |
| DO2 123.000 QDPT.O2 *724.02100.00%GROUP02 123.000 Q*724.0221.78% | D10 15.000 QDPT.10 -55.72DEPT(-) 15.000 Q-55.72 |
| DO3 39.000 QDPT.O3 *232.92100.00%GROUP03 39.000 Q*232.927.01% | D11 77.000 QDPT.11 *181.26*HASH TL 77.000 Q*181.26 |
| DO4 24.000 QDPT.O4 *133.75100.00%GROUP04 24.000 Q*133.754.02%*DEPT TL 960.000 Q*3324.84100.00% | D12 2.000 QDPT.12 -27.00HASH(-) 2.000 Q-27.00 |
| D13 40.000 QDPT.13 *14.75*BTTL TL 40.000 Q*14.75 | |
| D14 18.000 QDPT.14 -6.90BTTL(-) 18.000 Q-6.90 |
■ Individual group reading
■ Full group reading
■ Reading and resetting of sales information for a range of PLUs/subdepartments
This function provides you with X and Z reports for sales information of a certain range of PLUs/subdepartments. You must enter the start and end PLU/subdepartment code of the range. Of course, the range may represent all of the PLUs/subdepartments in your register.
• Sample X report • Sample Z report

The subsequent printout occurs in the same format as in the sample X report.
■ Reading of sales information on PLUs/subdepartments associated with an individual department
■ Reading of PLUs/subdepartments whose sales amounts are zeros (by associated department)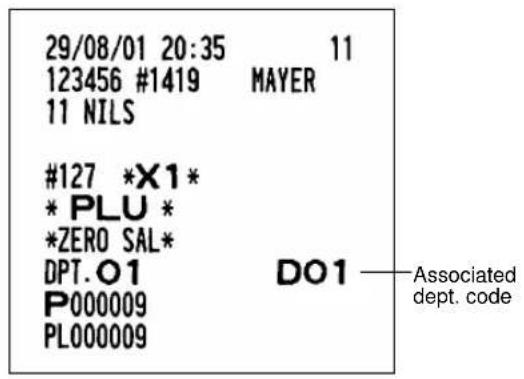
■ Reading of sales information for the price amount range of PLUs/subdepartments ■ Reading of PLUs/subdepartments whose sales amounts are zeros

■ Reading and resetting of sales information for EANs
- Sample X report

- Sample Z report

The subsequent printout occurs in the same format as in the sample X report.
Note
The EAN codes are printed out in the sequence shown below.
| EAN-13 |
| EAN-8 |
| UPC-A |
| UPC-E |
■ Reading and resetting of sales information for EANs associated with an individual department
• Sample X report • Sample Z report


The subsequent printout occurs in the same format as in the sample X report.
■ Reading of EANs whose sales amounts are zeros

■ Reading of EANs whose sales amounts are zeros (by associated department)

■ Reading of commission sales information

■ Transaction reading Total in drawer reading

In this report, the same transaction data as those printed when a full reading is taken are printed, except for department sales totals.

■ Reading and resetting of a stacked report
You can print multiple X1/Z1 reports in sequence at a time.
In this case, you need to program in advance what X1/Z1 reports should be printed in the stacked report sequence.
Note
The following job code numbers alone can be used for stacked report printing.
Job code number: 100, 107, 109, 110, 113, 120, 127, 129, 130, 131, 132, 140, 150, 160
Refer to "Selection of X1/Z1 and X2/Z2 reports to be printed in the stacked report sequence" for details.
■ Deleting of non-accessed EANs
- Sample X report (Reading) • Sample Z report (Deleting)


*: When there is any sales data of the EAN for #209 report, the data is printed here.
When you delete the EAN in Z1 mode under this situation, the data for #209 is also deleted.
3 Periodic consolidation
Your register allows you to take consolidation X and Z reports of a chosen period (normally one week or a month).
■ Generality
The periodic reading or resetting reports are the same in format as those in the X1/Z1 report for daily total except job code no. (#2xx) and mode indication ("X2" or "Z2").
• Sample X report • Sample Z report![graph TD A["30/08/01 9:21 11\n123456 #1530 MAYER\n11 NILS\n#200 *X2*"] --> B["Read symbol"] C["30/08/01 9:22 11\n123456 #1531 MAYER\n11 NILS\n#200 *Z2*"] --> D["Reset symbol\nReset counter of daily total\nZ1 0003\nZ2 0001"] C --> E["Reset counter of periodic consolidation\nGrand total"] F["GT1 *0000…](/content/2026/06/1310341/images/5790143abb8a303176a40b82db2e46dc74ed3add0a9bb59d0e8258f2c60bad3e.jpg)
The subsequent printouts are the same in format as those in the X/Z report for daily total.
■ Reading and resetting of the daily net totals
• Sample X report • Sample Z report

The subsequent printout occurs in the same format as in the sample X report.
■ Reading and resetting of a stacked report
You can print multiple X2/Z2 reports in sequence at a time.
In this case, you need to program in advance what X2/Z2 reports should be printed in the stacked report sequence.

The following job code numbers alone can be used for stacked report printing.
Job code number: 200, 207, 209, 210, 213, 220, 227, 229, 230, 231, 232, 240, 250, 270
Refer to "Selection of X1/Z1 and X2/Z2 reports to be printed in the stacked report sequence" for details.
COMPULSORY CASH/CHEQUE DECLARATION
If you want to make the declaration of the cash and cheque amounts in the drawer mandatory before outputting cashier Z reports, consult your dealer and have your register programmed for compulsory cash/cheque declaration.
If your register is programmed for compulsory cash/cheque declaration (CCD), a cashier must first count and declare the cash and cheque amounts (of domestic and foreign currency) in the drawer before he or she can output a cashier report. The procedure for outputting a CCD report is shown below.
Types of compulsory cash/cheque declaration
- Compulsory declaration prior to individual cashier resetting
- Compulsory declaration prior to full cashier resetting
Note
- Compulsory cash/cheque declaration is available in the above two types. You can choose either of these. Consult your dealer for details.
- When cash/cheque declaration is compulsory, flash reports are not available.
Key operation
After the first TL key is pressed, the register prompts the cashier to input the cash and cheque accounts for both domestic and foreign currency. The cashier can simply input the total amounts of each currency unit, or the number of bills or coins of each denomination of each currency unit.
- Individual cashier report

# :When inputting the cash or cheque amount (domestic currency) in the drawer
EX1 to EX3: When inputting the amount of a foreign currency in the drawer
| 29/08/01 21:21 11123456 #1538 MAYER11 NILS | |
| #151 *Z1**CCD*CA/CH IS *967.70EXCH1 IS 150.00EXCH2 IS 50.00 | |
| *CASHIER *01CSR#1 1 MAYERORDER TL *1220.50PAID TL *1220.50 | |
| CREDIT1 2 Q*78.00EXCH1 1 Q150.00EXCH1 IS 150.00CCD DIF. 0.00DOM.CUR1 *76.69EX1 CHK 1 Q50.00DOM.CUR1 *25.56EX1 CR 1 Q71.39DOM.CUR1 *36.50EXCH2 1 Q50.00EXCH2 IS 50.00CCD DIF. 0.00DOM.CUR2 *49.05EXCH3 0 Q0.00EXCH3 IS 0.00CCD DIF. 0.00DOM.CUR3 *0.00 | |
| ****CID *873.70*CH ID *94.00CA/CH ID *967.70CA/CH IS *967.70CCD DIF. *0.00DIF. TL *0.00CHK/CG *0.56 |
PROGRAMMING FOR EURO
Your register can be modified to correspond with each period set for the introduction of EURO, and in your register each currency is treated as shown on the table below depending on which period you are in. Basically your register can be automatically modified to correspond to the introduction of EURO by executing the operation of Job #800 in X2/Z2 mode. However, there are several options you must set depending on your needs.
How currencies are treated in your register
| Period 1 | Period 2 | Period 3 | ||
| After the introduction of EURO, and before EURO banknotes and coins begin to circulate | After EURO banknotes and coins begin to circulate, and before national currency is withdrawn from circulation. (Co-existence of EURO and national currency) | After the national currency is withdrawn from circulation | ||
| Currency | EURO | Exchange 1 | Domestic currency | Domestic currency |
| National currency (DM, F, etc.) | Domestic currency | Exchange 1 | ||
| Foreign currency | Exchange 2 to Exchange 4 | Exchange 2 to Exchange 4 | Exchange 1 to Exchange 4 | |
Receipt samples:


■ Automatic modification of register system for introduction of EURO
X2/Z2
800
To make your register correspond to the introduction of EURO, your register system can be automatically modified when the procedure shown below is executed in the X2/Z2 mode. According to the steps of the introduction, you can make your register correspond to EURO.
Procedure
![graph LR A["800"] --> B["•"] B --> C["⊗"] C --> D["*A(1,2 or 3)"] D --> E["TL"]](/content/2026/06/1310341/images/4d4f9c9b64a0001e4b6574d2bdc9644a7310a4906a056176407ffe33c45e7052.jpg)
*A=1: Applicable for period 1 *A=2: Applicable for period 2 *A=3: Applicable for period 3
Note
- You can perform each operation only once with the substitution of “A=1”, “A=2” and “A=3”. If you performed the operation with the substitution of “A=2” first, you cannot perform the operation with the substitution of “A=1”. If you performed the operation with the substitution of “A=3” first, you cannot perform the operation with the substitution of “A=1” and “A=2”.
The details of the register system modification are as follows:
When "1" is substituted for "A":
- Issuing a general Z1 report (Job #100)
- Issuing a general Z2 report (Job #200)
- Setting "Yes" for a PGM function "Printing exchange 1 total amount and change amount on receipt and journal" (Job #2616)
- Setting "Division" for a PGM function "Exchange 1 calculation method" (Job #2616)
- Setting the EURO symbol (€) for the currency description text (Job #2334), and setting "2" for the number of digits after decimal point (Job #2330) of exchange 1
- Setting the round-off function enable for currency exchange
After the execution of the procedure with the substitution of "1", treat EURO as foreign currency using Exchange 1 (EX1).
When "2" is substituted to "A":
- Issuing a general Z1 report (Job #100)
- Issuing a general Z2 report (Job #200)
- Resetting GT1, GT2, GT3 and training GT
- Converting the unit prices of Dept, PLU and EAN to EURO currency.
- Setting "Yes" for a PGM function "Printing exchange 1 total amount and change amount on receipt and journal" (Job #2616)
- Setting "Multiplication" for a PGM function "Exchange 1 calculation method" (Job #2616)
- Changing the domestic currency symbol to the EURO symbol (€) and setting the number of digits after decimal point of the domestic currency to 2
- For the setting of the currency description text and the number of digits after decimal point of exchange 1, the ones that had been set to the domestic currency are set. (Job #2330 and #2334)
- Setting the round-off function enable for currency exchange
Note
When any special setting has been applied for the rounding system to make it suit your domestic (national) currency, the setting is cancelled to make it suit your new domestic currency, EURO.
After the execution of the procedure with the substitution of "2", treat EURO as domestic currency, and national currency as foreign currency using Exchange 1 (EX1).
With the execution of the procedure with the substitution of "2", your domestic currency becomes EURO. While unit prices of departments, PLUs and EANs are automatically converted to EURO currency, you must change the rates or amounts for the miscellaneous keys so that they are based on amounts in EURO.
When "3" is substituted to "A":
- Issuing a general Z1 report (Job #100)
- Issuing a general Z2 report (Job #200)
- Resetting GT1, GT2, GT3 and training GT
- Converting the unit prices of Dept, PLU and EAN to EURO currency.
- Setting “No” for a PGM function “Printing exchange 1 total amount and change amount on receipt and journal” (Job #2616)
- Setting "Multiplication" for a PGM function "Exchange 1 calculation method" (Job#2616)
- Changing the domestic currency symbol to the EURO symbol and setting the number of digits after decimal of the domestic currency to 2
- Setting the round-off function enable for currency exchange
Note
When the operation is performed from the status of substitution "1", and when any special setting has been applied for the rounding system to make it suit your domestic (national) currency, the setting is cancelled to make it suit your new domestic currency, EURO.
After the execution of the procedure with the substitution of "3", treat EURO as domestic currency.
When the operation with the substitution of "2" has been performed already, "3. Resetting GT1, GT2, GT3 and training GT" and "4. Converting the unit prices of Dept, PLU and EAN to EURO currency" are not executed.
When the operation with the substitution of "1" or "2" has been performed already, the currency description text of exchange 1 is overwritten with a space.
Optional programming for the introduction of EURO
PGM 2PGM 1
Programming relating to the function of exchange 1 (EX1) cannot be changed automatically with the execution of Job #800 described in the previous section. After the execution on each period, conduct the following programming depending on your needs.
Programming for Exchange 1 (EX1)
Currency exchange rate (Job #1310)
For period 1 and period 2, set the EURO conversion rate.
Cheque/credit operation (Job #2616)
Assigning the drawer number to the drawer for foreign currency (Job #2680)
It may be convenient to have two drawers for EURO (as domestic currency) and national currency (as the foreign currency set in exchange 1) when both of these currencies are co-existing (period 2). In this case, conduct this programming.
OVERRIDE ENTRIES
Programmed limits for functions (such as for maximum amounts) can be overridden by making an entry in the MGR mode.
Procedure
- Turn the mode switch to the MGR position.
- Make an override entry.
Example
On this example, the register has been programmed not to allow deduction entries over 2.00.
PrintKey operation
Turn the mode switch
to the MGR position.
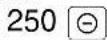
Return the mode switch
to the REG position.


CORRECTION AFTER FINALIZING A TRANSACTION (AFTER GENERATING A RECEIPT)
When you need to void incorrect entries that cashiers cannot correct (incorrect entries that are found after finalizing a transaction or cannot be corrected by direct or indirect void), follow this procedure in the MGR mode.
- Turn the mode switch to the MGR position.
- Press the ∞ key to put your register in the VOID mode.
- Repeat the entries that are recorded on an incorrect receipt. (All data for the incorrect receipt are removed from register memory; the voided amounts are added to the void register totalizer.)


Your machine leaves the VOID mode whenever a transaction is cancelled (i.e. finalized in the VOID mode.) To void additional transactions repeat steps 2. and 3. above.
PRIOR TO ENTRIES
1 Preparations for entries
Before registrations, insert the operator key into the mode switch and turn it to the REG position and check the following items:
■ Receipt and journal paper rolls
If the receipt and journal paper rolls are not set in the machine or there are low rolls, install new ones according to section "4. Installing and removing the paper rolls" under "OPERATOR MAINTENANCE."
■ Receipt ON/OFF function
You can disable receipt printing in the REG mode to save paper using the receipt function. To disable receipt printing, press the RCPT key in the OP X/Z position. This key toggles the receipt printing status ON and OFF. To check the receipt printing status, turn the mode switch to the OP X/Z position or press the CL key in the REG mode. When the function is in the OFF status, the receipt off indicator “_” illuminates.
Note
Your register will print reports regardless of the receipt state. This means that the receipt roll must be installed even when the receipt state is "OFF".
■ Cashier and clerk assignment
Prior to any item entries, cashiers must enter their cashier codes into the register, and may also be required to enter a clerk code. However, these code entries may not be necessary when the same cashier or clerk code is used in the next transaction.
Cashier codes and clerk codes are available in two variants: Variant 1, in which they are displayed (“-00-” to “-99-”), and Variant 2, in which they are not displayed (always “-00-”).
When the cashier or clerk code is assigned by the following procedure, the register prints the two-digit cashier code or clerk code (variant 2: “**”) and the cashier or clerk name both on the receipt and journal for every transaction.
Note
All of these settings depend on how the register has been programmed. For the selection of these settings, consult your local dealer.

Procedure
Cashier assignment
■ Sign-on
![graph TD A["Variant 1: (Code is displayed)"] --> B["Cashier code"] C["Variant 2: (Code is not displayed)"] --> D["CASH #"] B --> E["CASH #"] D --> F["CASH #"] G["To display the signed-on cashier code"] --> B G --> E G --> F](/content/2026/06/1310341/images/2b6b831ca60df013cf5f93031afc07429ac1e919640811cb542fdd16189412e0.jpg)
■ Sign-off
The real cashier key system is also available. In this system, put one of the 1 through 15 keys in the cashier switch to sign on. If you want to choose this system, consult your dealer.
Clerk assignment
■ Sign-on
![graph TD A["To display the signed-on clerk code"] --> B["Clerk code"] B --> C["CLERK #"] D["Variant 1: (Code is displayed)"] --> E["CLERK #"] E --> F["Clerk code"] F --> G["CLERK #"]](/content/2026/06/1310341/images/1c70cec896bae16fa774d61f4ec47c18ec4051019dd6ebcbbaacfe9fd10807c1.jpg)
■ Sign-off
- On the current factory setting, only the entry of the cashier code is required. When cashier & clerk codes entries are desirable for your register, consult your dealer.
- If you want to enter cashier and/or clerk codes before every transaction, consult your dealer.
- For the display type selection of cashier code and clerk code, "Variant 1" has been preset. For the selection of "Variant 2," consult your dealer.
- Clerk can be changed during the transaction. Consult your dealer.
2 Error warning
In the following examples, your register will go into an error state accompanied with a warning beep and the error symbol "E" on the display. Clear the error state by pressing the CL key and take proper action.
Please refer to the error code table on page 158.
- When you enter an over 32-digit number (entry limit overflow): Cancel the entry and re-enter a correct number.
- When you make an error in key operation: Clear the error and continue operation.
- When you make an entry beyond a programmed amount entry limit: Check to see if the entered amount is correct. If it is correct, it can be rung up in the MGR mode. Contact your manager.
- When an including-tax subtotal exceeds eight digits: Delete the subtotal by pressing the CL key and press the TL, CA2, CH1 through CH4, or CR1 through CR4 key to finalize the transaction.
ENTRIES
1 Item entries
■ Single item entries
Procedure
Department entries (direct department entries)
Enter a unit price and press a department key. If you use a programmed unit price, press a department key only.
When using a programmed unit price
![graph TD A["(max. 8 digits)"] --> B["Department keyUnit price *"]](/content/2026/06/1310341/images/68e809e41bfa0f1cb63ecaae8a5d9c7b71fdba6bf85ae9e0725d9121f5f00d6d.jpg)
*Less than the programmed upper limit amounts
Note: When those departments for which the unit price has been programmed as zero (0) are entered, only the sales quantity is added.
Department entries (indirect department entries)
When using a programmed unit price
![graph LR A["Unit price * (max. 8 digits)"] --> B["AMT"] B --> C["Dept. code (1-50)"] C --> D["DEPT #"] D --> B](/content/2026/06/1310341/images/3dc4bb070bc9ababf5e0b449080afa314bc637e9fadd093a6963b776ccf535c3.jpg)
*Less than the programmed upper limit amounts
PLU entries (indirect PLU entries)
Enter a PLU code and press the PLU/SUB key.

Note: When those PLUs for which the unit price has been programmed as zero (0) are entered, only the sales quantity is added.
Subdepartment (open PLU) entries
![graph LR A["Unit price * (max. 8 digits)"] --> B["AMT"] B --> C["PLU code"] C --> D["PLU/SUB"]](/content/2026/06/1310341/images/85ce85782e56308f623616f4892cd52ca25258f9758472ab3134ca6a329a218c.jpg)
*Less than the programmed upper limit amounts
PLU entries (direct PLU entries)
When using a programmed price
![graph TD A["Unit price\n(for subdept.)"] --> B["Direct PLU key"]](/content/2026/06/1310341/images/4353031dc49fe979d8363ea17a152431e88aacbb98f8a3376ec96e6e5465a69b.jpg)
EAN entries
![graph TD A["Scan EAN code"] --> B["EAN code (max.18 digits)"] B --> C["EAN"]](/content/2026/06/1310341/images/04ce1eb1ab66055471f1a3b027aa1ad058ac81c9bcf02494243f9e9e8b182e51.jpg)
* After scanning an EAN code or pressing the EAN key, you may be requested to enter a unit price with the display “----”. In this case, enter the unit price and press the AMT key.


■ Repeat entries
You can use this function for entering a sale of two or more same items.
You can use the REPEAT key to repeat entry instead of department, DEPT, direct PLU, PLU/SUB or EAN key.
Example

PrintKey operation

■ Multiplication entries
Use this feature entry method when you need to enter two or more of the same item.
This feature is useful when you sell a large quantity of items or need to enter quantities that include decimals.
Procedure
![graph TD A["Q'ty Department key"] --> B["Unit price"] B --> C["Dept. entry (direct)"] A --> D["Unit price Dept. code AMT"] D --> E["Dept. entry (indirect)"] E --> F["DEPT #"] A --> G["PLU code"] G --> H["PLU/SUB"] A --> I["Unit price Direct PLU"] I --> J["PLU/subdept. entry (direct)"] A --> K["Unit…](/content/2026/06/1310341/images/0d4e33f54ea60165d00274580c5c73216143a6b149bf23b27f7415e66c7f7263.jpg)
- After scanning an EAN code or pressing the EAN key, you may be prompted to enter a unit price with the display showing "----". In this case, enter the unit price and press the AMT key. • Quantity: Up to four integer digits plus three decimal digits
- Unit price: Less than a programmed upper limit • Quantity x Unit price: Up to eight digits
Example

PrintKey operation

■ Successive multiplication entries
This function is practical, for example, when you enter a sale of items sold by area (square meters).
Procedure
![graph TD A["Length"] --> B["⊗"] B --> C["Width"] C --> D["⊗"] D --> E["Unit price"] E --> F["Department key"] F --> G["Dept. entry (direct)"] D --> H["Unit price"] H --> I["AMT"] I --> J["Dept.code"] J --> K["Dept. DEPT (indirect)"] H --> L["PLU code"] L --> M["PLU/SUB"] M --> N["PLU entry (indirect…](/content/2026/06/1310341/images/4145e6b9cbc0adf171b830b2ba5e6dadd6eadc3c312b1256285c3a6cb2c8bdc6.jpg)
- After scanning an EAN code or pressing the EAN key, you may be prompted to enter a unit price with the display showing "----". In this case, enter the unit price and press the AMT key.
- Length or width: up to seven digits (4-digit integer + 3-digit decimal)
- Unit price: less than a programmed upper limit
- Length x Width x Unit price: up to eight digits
Note
For actual use of this function, consult your dealer.
Example

PrintKey operation

■ Split-pricing entries
You will use this function when your customer wants to purchase items normally sold in bulk.
Procedure
![graph TD A["Selling q'ty"] --> B["⊗"] B --> C["Base q'ty"] C --> D["⊗"] D --> E["Unit price per base q'ty"] E --> F["Department key"] D --> G["Unit price"] G --> H["AMT"] H --> I["Dept.code"] I --> J["DEPT #"] D --> K["PLU code"] K --> L["PLU/SUB"] D --> M["Unit price per base q'ty"] M --> N["Direct…](/content/2026/06/1310341/images/41b348524caf8f40094177c15fae8f87fb7111311982cd3780a04e09a73adb14.jpg)
- After scanning an EAN code or pressing the EAN key, you may be requested to enter a unit price with the display “----”. In this case, enter the unit price and press the AMT key.
- Selling quantity: Up to four digits integer + three digits decimal
- Base quantity: Up to two digits (integer)
Note
For actual use of this function, consult your dealer.
Example

PrintKey operation
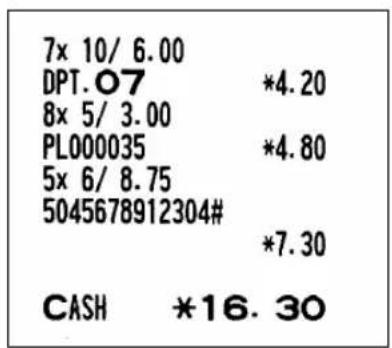
■ Single item cash sale (SICS)/single item finalize (SIF) entries
SICS entries
- This function is useful when a sale is for only one item and is for cash; such as a pack of cigarettes. This function is applicable only to those departments that have been set for SICS or to their associated PLUs, subdepartments or EANs.
- The transaction is finalized and the drawer opens as soon as you press the department key, DEPT * key, PLU/SUB key, the direct PLU key or EAN key.
Example

PrintKey operation
DPT.09
*2.50
CASH
*2.50
Note
If an entry to a department, PLU/subdepartment or EAN set for SICS follows the ones to departments, PLUs/subdepartments or EAN not set for SICS, it does not finalize and results in a normal sale.
SIF entries
- If an entry to a department, PLU/subdepartment or EAN set for SIF follows the ones to departments, PLUs/subdepartments or EANs not set for SIF, the transaction is finalized immediately as a cash sale.
- Like the SICS function, this function is available for single-item cash settlement.
Example

PrintKey operation
DPT.08
*17.45
DPT.09
*15.00
CASH
*32.45
■ Link PLU/EAN link entries
In case that you register a PLU or EAN that has any PLU linked with the PLU or EAN, the linked PLU(s) are automatically registered together with the leading link PLU or EAN when it is registered. The print format on the receipt depends on the programming (#2616) as described below.
Printing detailed information
The description texts and amounts of the leading link PLU/EAN and the linked PLUs are printed individually.
Example
(In case of link PLU)
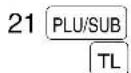
PrintKey operation

Printing leading link PLU/EAN and total sales amount
The description text of the leading link PLU/EAN and the total sales amount of the leading link PLU/EAN and the linked PLUs are printed.
Example
(In case of link PLU)


Note
If a discount entry is made for a link PLU/EAN link, the discount amount is calculated based on the total sales amount. The discount itself is given to the leading link PLU/EAN.
■ EAN learning function
When you enter or scan an undefined code, you are required to enter its unit price and the associated department. The code, associated department and unit price entered are stored in the EAN file and used for future EAN sales entries.
Note
- When there is no capacity remained in the file, the data is not stored in the file.
- For the text for the EAN code, the text of its associated department is applied.
- You can use the EAN learning function in the training mode. This may be convenient to practice the scanning system.
Procedure
“-- ----” is displayed and beep sound is heared three times.
![graph TD A["Scan an undifined EAN code"] --> B["Undifined EAN code"] B --> C["EAN"] C --> D["Unit price"] D --> E["NON DELETE"] E --> F["Department key"] F --> G["AMT"] G --> H["Dept. code"] H --> I["DEPT #"] I --> J["Output"] D --> K["CL"] K --> L["To cancel the operation"] style A fill:#f9f,stroke…](/content/2026/06/1310341/images/eb0b79aace3f1f8d18aa7890c876cafd1f3d7fa5b279a6673a15f43b5294dde7.jpg)
* Press the ☐NON DELETE key when you want to exempt the EAN code entered from the non-accessed EAN delete function (deletion by executing #105 in Z1 mode).
Note
For the repeat entry, use the REPEAT key.
Example

PrintKey operation
5056789123404#
DPT.05 *7.50
CASH *7.50
■ Price inquiry (view) function (for EANs)
You can use this function when you want to know the unit price of the EAN item during transaction in the REG/MGR mode.
Procedure
![graph LR A["INQ"] --> B["Numeric entry (Q'ty ⊗)"] B --> C["EAN code"] C --> D["EAN"] D --> E["CL"] E --> F["*1"] E --> G["*2"] E --> H["*3"] F --> I["AMT"] G --> J["Unit price(MGR mMT)"] H --> K["AMT"] L["Scan EAN code"] --> C M["The total sales amount of the EAN is displayed."] -.-> D](/content/2026/06/1310341/images/457d31ca901400681893518469ca18058d160217510cd95c49d84de147727a6c.jpg)
*1: Press the CL key to cancel the inquiring (view) mode.
*2: Press the AMT key when you want to register the unit price of the EAN displayed.
*3: You can change the unit price temporarily in the MGR mode. The unit price which is programmed in PGM mode is not changed (Price override entry).
Note
For the repeat entry, use the REPEAT key.
Example

PrintKey operation

■ Price change function (for EANs)
Note
To use this function, consult your dealer.
You can use this function when you need to change the unit price or associated department of an EAN item in REG/MGR mode.
There are two methods for change:
- Price change mode
You can change the preset price and/or the associated department of an EAN item without entering PGM mode.
- Changing price during a transaction
When you have found a wrong EAN price and/or associated department upon transaction, you can correct them at the time of transaction. With the entry of new price and/or associated department, the preset price and/or associated department is automatically changed to the new price and/or associated department.
Note
For the Non-PLU type EAN codes having price info. and press codes, the prices in the codes have the priority over the preset prices. So, for these codes, a changed price is valid only when price change is executed.
Procedure
Price change mode![graph TD A[""PC----" is displayed."] --> B["Scan EAN code"] B --> C["EAN"] C --> D[""----" is displayed."] D --> E["PRICE CHANGE"] E --> F["EAN code"] F --> G["EAN"] G --> H["To enter 0"] H --> I["Unit price"] I --> J["CL"] J --> K["To cancel the mode"] K --> L["PRICE CHANGE"] L…](/content/2026/06/1310341/images/1853dc390664ef96d125e78495bd0b05afefb9f641d947147ce33d17dd811892.jpg)
Changing price during a transaction![graph TD A["Scan EAN code"] --> B["EAN code"] B --> C["EAN"] C --> D["PRICE CHANGE"] D --> E["Unit price"] E --> F["To enter 0"] F --> G["CL"] G --> H["To cancel"] E --> I["PRICE CHANGE"] I --> J["To change the unit price only"] E --> K["Department key"] K --> L["To change the associated dept. direc…](/content/2026/06/1310341/images/5f47083b91696c82922d22667089f40ea19093ddc49953f85283124ff2ffe8c4.jpg)
Example
- Price change mode

PrintKey operation
- Changing a price during a transaction

Note
- When an undefined code is entered in the price change mode, the register goes to an error status.
- When you press the PRICE CHANGE key during a transaction, the EAN entry is voided on the first depression of the PRICE CHANGE key, then you are allowed to enter a correct price and/or associated department.
- When an associated department is changed, the item label for the department will also be changed automatically to the item label of the new associated department.
- For the repeat entry, use the REPEAT key.
2 Displaying subtotals
Your machine provides the following two types of subtotals:
■ Normal subtotal
This is a subtotal which is displayed by pressing the ST key. When you press it, the subtotal of all entries which have been made is displayed and the symbol " will light up in the display.


Subtotal will not be printed on a receipt on the current factory setting. If you want to print it, consult your dealer.
■ Difference subtotal (Differ ST)
This is a subtotal which is printed by pressing the DIFFER ST key. You can get two or more difference subtotals in one transaction.
When you press it first, the difference subtotal of all entries which have been made is displayed and printed. If you press it second, you will get the difference subtotal of entries which have been made after you last got it. Taxes are calculated each time you press the OFFER key, and taxes and taxable subtotals are printed on the receipt according to the programming (job #2616).

3 Finalization of transaction
■ Cash or cheque tendering
Press the ST key to get a subtotal, enter the amount tendered by your customer, then press the TL or CA2 key if it is a cash tender or press one of the CH1 through CH4 key if it is a cheque tender. When the amount tendered is greater than the amount of the sale, your register will show the change due amount and the symbol “E” will light up. Otherwise your register will show a deficit and the symbol “Will” light up. Make a correct tender entry.
Example
Cash tendering

PrintKey operation
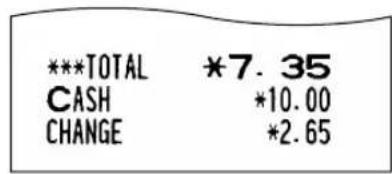
Cheque tendering

PrintKey operation

■ Mixed tendering (cheque + cash)
Example
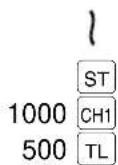
PrintKey operation

■ Cash or cheque sale that does not need any tender entry
Enter items and press the TL or CA2 key if it is a cash sale or press one of the CH1 through CH4 if it is a cheque sale. Your register will display the total sale amount.
Example

PrintKey operation

Credit sale
Enter items and press the corresponding credit keys (CR1 through CR4).

Amount tendering operations (i.e., change calculations) can be achieved by the CR1 through CR4 key when a PGM2 programming allows them.
■ Mixed-tender sale (cash or cheque tendering + credit tendering)

Note: Press one of the CH1 through CH4 keys or the CR1 through CR4 keys in place of the TL key when your customer makes payment in cheques or by credit account.
4 Computation of VAT (Value Added Tax)/tax
■ VAT/tax system
The machine may be programmed for the following six tax systems by your dealer.
Automatic VAT 1-6 system (Automatic operation method using programmed percentages)
This system, at settlement, calculates VAT for taxable 1 through 6 subtotals by using the corresponding programmed percentages.
Automatic tax 1-6 system (Automatic operation method using programmed percentages)
This system, at settlement, calculates taxes for taxable 1 through 6 subtotals by using the corresponding programmed percentages, and also adds the calculated taxes to those subtotals, respectively.
Manual VAT 1-6 system (Manual entry method using programmed percentages)
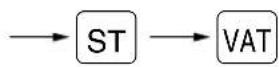
This system provides the VAT calculation for taxable 1 through 6 subtotals. This calculation is performed using the corresponding programmed percentages when the VAT key is pressed just after the ST key.
Manual VAT 1 system (Manual entry method for subtotals that uses VAT 1 preset percentages)
Procedure
![graph LR A["ST"] --> B["VAT rate"] B --> C["VAT"] D["To use a programmed rate"] --> B](/content/2026/06/1310341/images/08923f6a069fb57dea1e4f1833892b93e1137f684abc3ee05657d65bf8bab8eb.jpg)
This system enables the VAT calculation for the then subtotal. This calculation is performed using the VAT 1 preset percentages when the VAT key is pressed just after the ST key. For this system, the keyed-in tax rate can be used.
Manual tax 1-6 system (Manual entry method using preset percentages)
Procedure

This system provides the tax calculation for taxable 1 through 6 subtotals. This calculation is performed using the corresponding programmed percentages when the VAT key is pressed just after the ST key.
After this calculation, you must finalize the transaction.
Automatic VAT 1-3 and automatic tax 4-6 system
This system enables the calculation in the combination with automatic VAT 1 through 3 and automatic tax 4 through 6. The combination can be any of VAT1 through VAT3 corresponding to taxable 1 through taxable 3 and any of tax 4 through 6 corresponding to taxable 4 through taxable 6 for each item. The tax amount is calculated automatically with the percentages previously programmed for these taxes.
Note
- A PLU/EAN not programmed for any of the tax statuses is registered depending on the tax status of the department which the PLU/EAN belongs to.
- VAT/tax assignment can be printed at the fixed right position near the amount on the receipt as follows:
VAT1/tax1 A
VAT2/tax2 B
VAT3/tax3 G
VAT4/tax4 D
VAT5/tax5 E
VAT6/tax6 F
When the multiple VAT/tax is assigned to a department, a PLU or an EAN, a smaller number of the VAT/tax will be printed. For details, contact your authorized SHARP dealer.
Example
(When the manual
VAT 1-6 system is selected)
550 4
ST
VAT
T1
PrintKey operation
DPT.04
*5.50 A
SUBTOTAL
*5.50
TAX1 ST
*5.50
VAT 1
*0.26
NET 1
*5.24
CASH
*5.50
■ VAT shift entries
This feature is intended to shift the tax status of a particular department (PLU or EAN) programmed for taxable 1 or taxable 1 and taxable 3.
- When the VAT shift entry is made for a particular department, PLU or EAN programmed for taxable 1, their tax status shifts to taxable 2.
- When this entry is made for a particular department (PLU or EAN) programmed for taxable 1 and taxable 3, the tax status “taxable 1” remains unchanged, but the other “taxable 3” is ignored.
Procedure
Press the VAT SHIFT to activate the VAT shift prior to entering department(s), PLU(s) or EAN(s) concerned.
Example
(When the manual VAT 1-6 system is selected.)
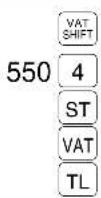
PrintKey operation
| DPT.04 | *5.50 B |
| SUBTOTAL | *5.50 |
| TAX2 ST | *5.50 |
| VAT 2 | *0.21 |
| NET 2 | *5.29 |
| CASH | *5.50 |
5 Auxiliary entries
■ Percent calculations (premium or discount)
- Your register provides the percent calculation for the subtotal or each item entry depending on the programming. • Percentage: 0.01 to 99.99%
Percent calculation for the subtotal
Example
(When a discount of 10% is programmed for the %1 key)

PrintKey operation
| 4× 1.40 | |
| DPT.05 | *5.60 |
| DPT.07 | *2.25 |
| DPT.07 | *2.25 |
| SUBTOTAL | *10.10 |
| -10.00% | |
| %1 | -1.01 |
| CASH | *9.09 |
Percent calculation for item entries
Example
(When a premium of 15% is programmed for the %2 key)

PrintKey operation

■ Deduction entries
Your register allows you to deduct a certain amount less than a programmed upper limit after the entry of an item or the computation of subtotal depending on the programming.
Deduction for the subtotal
Example

PrintKey operation

Deduction for item entries
Example

PrintKey operation
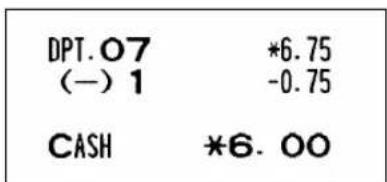
■ Refund entries
For a refund entry, press the RF key just before you press a department key, DEPT * key, direct PLU key, PLU/SUB key or EAN key or just before you scan an EAN code. The operation before pressing the RF key is the same as the one of normal operation. For example, if a refund item is the one entered into a department, enter the amount of the refund, then press the RF key and the corresponding department key in this order; if an item entered into a PLU is returned, enter the corresponding PLU code, then press the RF and PLU/SUB keys; and if a refund item is the one entered into an EAN, press the RF key and scan the EAN code.


■ Printing of non-add code numbers
Enter a non-add code number such as a customer's code number and credit card number within a maximum of 16 digits and press the # key at any point during the entry of a sale. Your register will print it at once.
Example

PrintKey operation

6 Payment treatment
■ Currency exchange
Your register allows payment entries of foreign currency. Pressing one of the EX1 through EX4 keys creates a subtotal in foreign currency.
Procedure
For an additional payment in foreign currency![graph TD A["After an entry is completed or After the amount tendered is found smaller than the sales amount in a sales entry"] --> B["Preset exchange rate"] B --> C["EX1"] B --> D["EX2"] B --> E["EX3"] B --> F["EX4"] G["*Exchange rate"] --> H["CL"] H --> I["Next registration or payment in domestic c…](/content/2026/06/1310341/images/d7e2a4bbbdfdab822266cfa3cc57e5ea1906bd167c71892d11c4a465d281dba9.jpg)
*Exchange rate: 0.000000 to 999.999999
Note
- When the amount tendered is short, the deficit is shown in domestic currency.
- Availability of credit and cheque tendering depends on the programming (#2616) (only for exchange 1).
Example
Preset exchange rate (1.550220) - EX1
PrintKey operation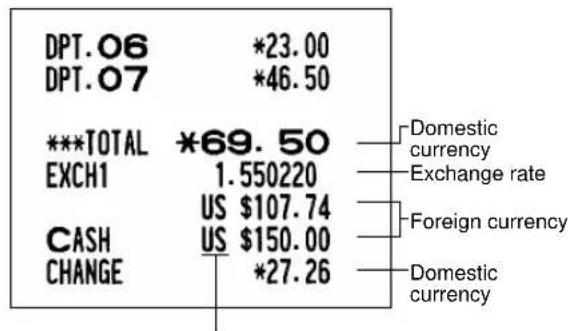
Currency description text
Manual exchange rate - EX4 (The EX4 key can be used only for the manual entry of an exchange rate.)

PrintKey operation
■ Received on account entries
Procedure![graph TD A["Amount (max. 8 digits)"] --> B["RA or RA2"] B --> C["TL or CA2"] B --> D["CH1 through CH4"] B --> E["CR1 through CR4"]](/content/2026/06/1310341/images/70b90978ed36912788f4f2477935661cd92dd38affd069368217bb5ac7580d13.jpg)
Example

PrintKey operation
■ Paid out entries
Procedure![graph LR A["Amount (max. 8 digits)"] --> B["PO or PO2"] B --> C["TL or CA2"] B --> D["CH1 through CH4"] B --> E["CR1 through CR4"]](/content/2026/06/1310341/images/721cf91443c0db43fb815ed7c8715770511379d77cab3dadd81c9e73b3a97b71.jpg)


■ No sale (exchange)
Simply press the NS key without any entry. The drawer will open and the printer will print "NO SALE" on both the journal and the receipt. If you let your machine print a non-add code number before pressing the NS key, a no sale entry is achieved with a non-add code number printed.
0000000000045678
NO SALE
■ Cashing a cheque
Enter the cheque amount, then press one of the CH1 through CH4 key.
Procedure
![graph LR A["Non-add code number"] --> B["#"] B --> C["Cheque amount"] C --> D["CH1"] D --> E["through"] D --> F["CH4"]](/content/2026/06/1310341/images/36b12943109934f0838902b65a1450c49fb181256f425a0bb19e2fae4e16273d.jpg)
Example

PrintKey operation

7 Automatic sequencing key (AUTO key) entries
You can achieve a programmed transaction simply by pressing a corresponding automatic sequencing key.
Example
( AUTO _ 2 = 5 0 0 7 TL)

PrintKey operation

CORRECTION
1 Correction of the last entry (direct void)
If you make an incorrect entry relating to a department, PLU/subdepartment, EAN, percentage ( %1 through %4 ), deduction ( ⊖ through ⊖4 ) or refund, you can void this entry by pressing the ∞ key immediately after the incorrect entry.
Example

2 Correction of the next-to-last or earlier entries (indirect void)
With the ∞ key, you can void any incorrect department, PLU/subdepartment, EAN or item refund entry made during a transaction if you find it before finalizing the transaction (e.g. pressing the TL key). This function is applicable to department, PLU/subdepartment, EAN and item refund entries only.
For the operation, press the ∞ key just before you press a department key, DEPT + key, direct PLU key, PLU/SUB key or EAN key or just before you scan an EAN code. For the refund indirect void, press the ∞ key after you press the RF key.
Example
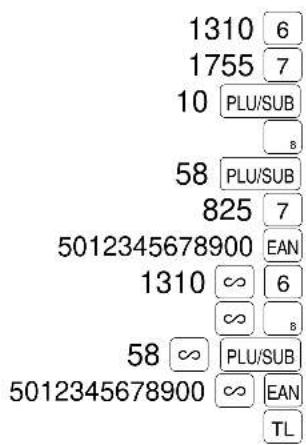
You can void an entire transaction. Once subtotal void is executed, the transaction is aborted and the register issues a receipt.
Example

PrintKey operation

4 Correction of incorrect entries not handled by the direct or indirect void function
Any errors found after the entry of a transaction has been completed or during an amount tendered entry cannot be voided. These errors must be corrected by the manager.
The following steps should be taken:
- If you are making the amount tendered entry, finalize the transaction.
- Make correct entries from the beginning.
- Hand the incorrect receipt to your manager for its cancellation.
SPECIAL PRINTING FUNCTIONS
1 Copy receipt printing
If your customer wants a receipt after you have finalized a transaction with the receipt function being in the "OFF" status (no receipting), press the RCPT key. This will produce a receipt. Your register can also print a copy receipt when the receipt function is in the "ON" status. If you want to make a copy, please consult your dealer.
Note
Pressing the RCPT key in the OP X/Z mode before registration toggles the status "ON" and "OFF".
Example
Printing a copy receipt after making the entries shown below with the receipt function being in the "OFF" status

When the receipt function is in the "ON" status and you press the RCPT key to make a second copy

-When the receipt function is in the "ON" status, the " *COPY *" symbol will be printed on the receipt.
2 Guest check copy
You can use this function when you want to take a copy of guest check.
Press the GC key and make a desired entry.
Procedure
![graph LR A["GC COPY"] --> B["Item entries"] B --> C["Finalization"] C --> D["RCPT"] D --> E["When the receipt ON/OFF function is in the "OFF" status"]](/content/2026/06/1310341/images/82efe8bce7083cc4d9fc7d92ebe9dd4fbd00d38f85c3deb2b45f76ac3d203107.jpg)
Note
The guest check copy has nothing to do with the memory.
Example

PrintKey operation

3 Printing of header and footer graphic logos
As a default setting, it is set to print a graphic logo on the top of each receipt (header graphic logo), and another graphic logo can be printed on the bottom of each receipt (footer graphic logo) with the job code #2616. You can also print the graphic logos with the combination of 3-line header logo message or 3-line footer logo message, or can print only logo message without graphic logo. Consult your dealer when you want to change the setting.
- Sample receipt with a header graphic logo and a footer graphic logo

OVERLAPPED CASHIER ENTRY
This function allows you to switch from one cashier to another and to interrupt the first cashier's entry. So the second cashier can do his or her entry in this mode. For actual use of this function, consult your dealer.
Example
Cashier 1: Entry started
Cashier 2: Cashier change (1 to 2), interrupt initiated
Cashier 2: Transaction finished (2)
Cashier 1: Cashier change (2 to 1), entry restart
Note
- When the cashier and clerk system is applied for your register, you cannot operate the overlapped cashier entry.
- The overlapped cashier entry is not effective while the tendering sale is going on.
- If any cashier is still making an entry (or has not finalized the transaction yet), the machine does not run in any mode other than REG and MGR and can print no X/Z reports. The error code “E22” and the corresponding cashier code(s) are displayed at this time.
- Cashier 1 is assigned.

- Cashier 2 is assigned.

- Cashier 1 is assigned.

CommentsKey operation
The entry by cashier 1 is started.
The entry by cashier 2 is started.
(The entry by cashier 1 is interrupted.)
The transaction by cashier 2 is finalized.
The entry by cashier 1 is restarted.
The transaction by cashier 1 is finalized.
1 In case of power failure
When power is lost, the machine retains its memory contents and all information on sales entries.
- When power failure is encountered in register idle state or during an entry, the machine returns to the normal state of operation after power recovery.
- When power failure is encountered during a printing cycle, the register prints “====” and then carries out the correct printing procedure after power recovery. (See the sample print.)
| 28/08/01 16:15 | 11 |
| 123456 #1164 | MAYER |
| 11 NILS | |
| DPT.07 | *10.00 |
| DPT.08 | *35.00 |
| - - - - - - - - - - - - - - - - - - - - - - - - - - - - - - - - - - - - - - - - - - - - - - - - - - - - - - - - - - - - - - - - - - - - - - - - - - - - - - - - - - - - - - - - - - - - - - - - - - - - - | |
| DPT.08 | *35.00 |
| CASH | *45.00 |
2 In case of printer error
If the printer runs out of paper, the printer will stall, "PPPPPPPPPP" will appear on the display, and the register will start to continuously produce an intermittent beeping tone. Key entries will not be accepted. Referring to "5. Installing and removing the paper roll" in this chapter, install a new roll paper in the proper position, then press the CL key. The printer will print the power failure symbol and resume printing.
If the print head comes up, the printer stalls, "H" will appear on the very left of the display, and the register will start to continuously produce an intermittent beeping tone. Key entries will not be accepted. Bring back the print head to the correct position, then press the CL key. The printer will print the power failure symbol and resume printing.
3 Thermal printing
Your register prints by means of thermal printing. The print head applies heat to thermal paper which is chemically treated to change color when heated to a certain level. This creates the printed text.
■ Cautions in handling the printer

- If you are not going to use the register for an extended period of time, pull the print head release lever toward you so that the print head is set apart from the plate.
- Avoid the following environments:
Dusty and humid places
Direct sunlight
Iron powder (A permanent magnet and electromagnet are used in this machine.)
- Use the print head release lever only when necessary.
- Never pull the paper when it is in contact with the print head. First release the head with the print head release lever, and then remove the paper.
- Never touch the surface of the print head.
- Never touch around the print head and the motor during printing or before they have had sufficient time to cool.
■ Cautions in handling the recording paper (thermal paper)
- Use only the paper specified by SHARP.
- Do not unpack the thermal paper until you are ready to use it.
- Avoid heat. The paper will color at around 70°C .
- Avoid dusty and humid places for storage. Avoid direct sunlight.
- The printed text on the paper can discolor under the following conditions:
Exposure to high humidity and temperature
Exposure to the direct sunlight
Contact with glue, thinner or a freshly copied blueprint.
Heat caused by friction from scratching or other such means.
Contact with a rubber eraser or adhesive tape.
- Be very careful when handling the thermal paper. If you want to keep a permanent record, copy the printed text with a photocopier.
4 Paper roll near-end sensing function (only for the journal paper)
When the journal paper roll comes near the end or is not loaded, the machine senses this condition and sounds an alarm, displaying the error code "E04". At this time, clear the alarm with the CL key and replace the paper roll as soon as possible. The following entry can be made after clearing the alarm. However, since this function works each time one transaction is completed, the alarm sound will be emitted again as the following transaction is completed unless the paper roll is replaced.
If you want to use this function, consult your dealer.
- The sensing position depends upon the size of the paper tube. Therefore, it is advisable to use paper rolls - whose paper tube is 18 mm in O.D. and 12 mm in I.D. - specified by SHARP.
- If the sensing occurs too early or late, contact your dealer.

5 Installing and removing the paper roll
■ Recording paper specifications
Be sure to use paper rolls specified by SHARP.
The use of any other paper rolls than specified could cause paper jamming, resulting in register malfunction.
Paper specification
Paper width: 44.5 ± 0.5 mm
Max. outside diameter: 80 mm
Quality: Thermal paper
Paper tube: 18 mm
- Be sure to set paper roll(s) prior to using your machine, otherwise it may cause a malfunction.
Install the paper roll in the printer. Be careful then to set the roll and cut the paper end correctly.
Note
If the top end of the paper roll is fixed with paste or tape, the paper may lose its color development ability in the pasted or taped area due to the deterioration of the heat-sensitive color development component of the paper surface. This may result in nothing appearing at this location when printing is performed. Therefore, when setting a new paper roll in the machine, be sure to cut off approximately one revolution (approx. 25 cm long).
(How to set the paper roll) (How to cut the paper end)
■ Installing the paper roll
Installing the receipt paper roll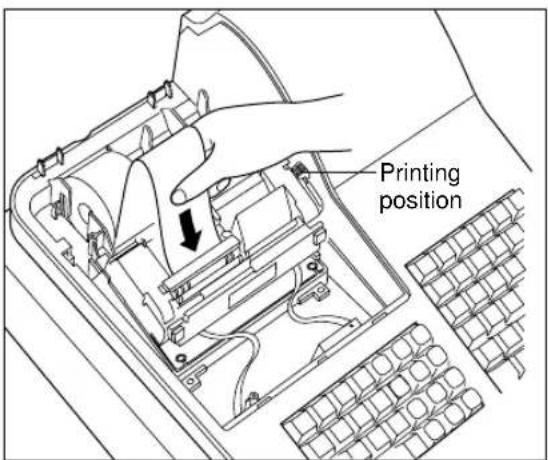
- Turn the mode switch to the "REG" position with the AC cord connected.
- Remove the printer cover.
- Check that the print head release lever is in its printing position.
- Set the paper correctly as illustrated above in the receipt side of the printer.
- Insert the end of the paper into the paper chute as shown on the left. It will automatically be fed through the printer.
- Cut off the excess paper that comes out of the printer with the manual cutter.
- Replace the printer cover.
Installing the journal paper roll

- Turn the mode switch to the "REG" position with the AC cord connected.
- Remove the printer cover.
- Check that the print head release lever is in its printing position.
- Set the paper correctly as illustrated on the previous page in the journal side of the printer.
- Insert the end of the paper into the paper chute as shown on the left. It will automatically be fed through the printer.
- Insert the end of the paper into the slit in the paper take-up spool. (Press the ⬆key to feed more paper through if required.)
- Wind the paper two or three turns around the spool shaft.
- Set the spool on the bearing.
- Replace the printer cover.
Note
- When it is difficult to insert paper into the paper chute, try inserting it again by following the steps described below.
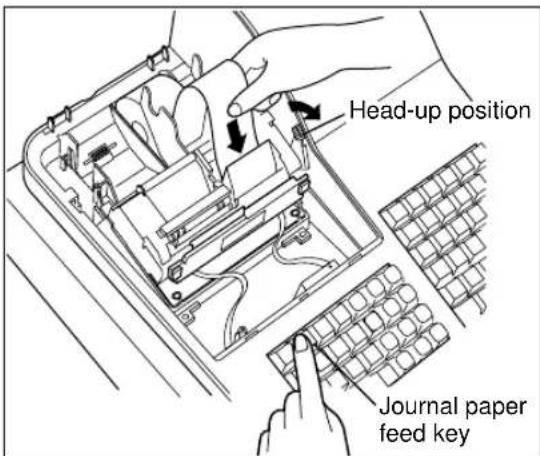
- Cut off the end of paper in a single straight cut.
- Pull the print head release lever toward you to lift up the print head.
- Insert the end of paper into the paper chute, while pressing the corresponding paper feed key (the up arrow key or the up arrow key).
- When the end of paper comes out of the printer, release the feed key and return the print head release lever to its original position.
- Press the feed key to feed more paper.
In case of inserting the journal paper roll
- When you want to manually install a new roll of paper while your machine is turned off, follow the steps shown below:
- Pull the print head release lever toward you to lift up the print head.
- Correctly place the new paper roll into the receipt/journal paper roll location.
- Insert the paper end into the paper chute until it comes out of the printer.
- Cut or roll the paper onto the take-up spool as described for automatic installation.
- Return the print head release lever to its original position.
■ Removing the paper roll
When a red dye appears on the paper roll, it is time to replace the existing paper roll. Replace the paper roll with a new one. If you plan not to use your register for an extended period of time, remove the paper roll, and store it in the appropriate place.
Removing the receipt paper roll

- Remove the printer cover.
- Cut the paper behind the printer and near the paper roll.
- Press the ⬆ key until the paper remaining in the printer comes out completely.
- Remove the paper roll from the back of the printer.
Note
Do not pull the paper through the printer.
Removing the journal paper roll

- Remove the printer cover.
- Press the ↗ key to advance the journal paper until its printed part is out of the way.
- Cut the paper and remove the take-up spool.
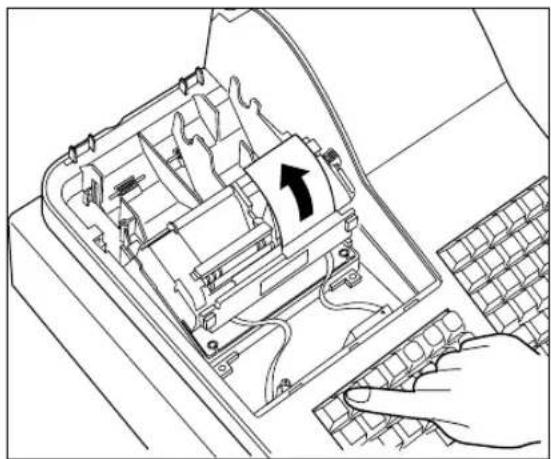
- Cut the paper behind the printer and near the paper roll.
- Press the ↑ key until the paper remaining in the printer comes out completely.
- Remove the paper roll from the back of the printer.
Note
Do not pull the paper through the printer.

- Remove the outer side of the take-up spool as shown on the left.

- Remove the printed journal roll from the take-up spool.
■ Removing a paper jam
Precaution: Be very careful with the manual cutter, so as not to cut yourself. Never touch the print head immediately after printing, because the head may still be hot.
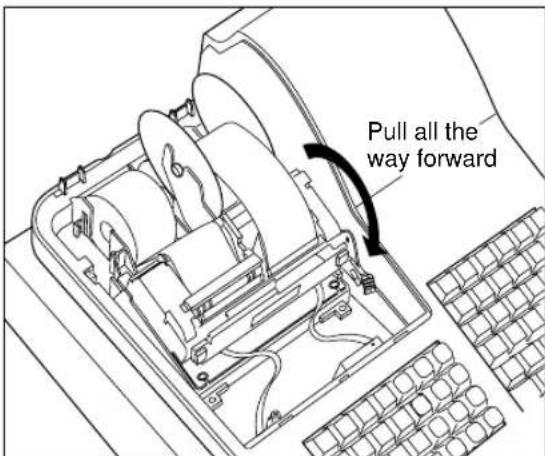
- Remove the printer cover.
- Pull the print head release lever all the way forward (after it stops at one position, continue pulling forward until it stops again and cannot be pulled forward any further).
- Remove the paper jam. Check for and remove any shreds of paper that may remain in the printer.
- Reset the paper roll correctly by following the steps in "Installing the paper roll".
- Return the print head release lever to its original position.
- Replace the printer cover.
6 Cleaning the print head
When the printed text is getting dark or faint, paper dust may be stuck to the print head. Clean the print head as follows:

- Turn the mode switch to the "O" position.
- Remove the printer cover.
- Pull the print head release lever all the way forward (after it stops at one position, continue pulling forward until it stops again and cannot be pulled forward any further).

- Clean the print head with a soft rag moist with ethyl alcohol or isopropyl alcohol.
- Return the print head release lever to its original position immediately after cleaning.
- Replace the printer cover.
Precautions:
Never touch the print head with a tool or anything hard as it may damage the head.
7 Removing the till and the drawer
The till in the register is detachable. After closing your business for the day, remove the till from the drawer and keep the drawer open. The coin case is also detachable from the till. To detach the drawer, pull it forward fully with the till removed, and remove it by lifting it up.

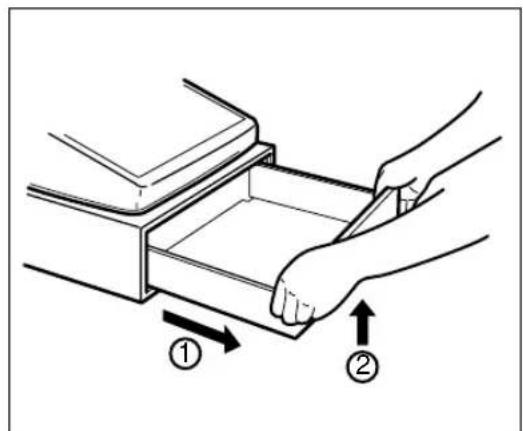
8 Opening the drawer by hand
The drawer automatically opens in the usual way. However, when power failure is encountered or the machine becomes out of order, slide the lever located on the machine bottom toward the rear. (See the figure below.) The drawer will not open, if it is locked with a drawer lock key.

9 Installing the fixing angle bracket
To prevent the register from moving when the drawer opens, the fixing angle bracket is supplied with the register. By attaching the bracket to the table where the register is installed, you can hook the register on this bracket and secure the register to its position.
How to install the fixing angle bracket

- Thoroughly clean the location where the fixing angle bracket (B) is to be placed.
- Peel off the adhesive tape on the fixing angle bracket.
- Hook the angle bracket onto the hook (A) that is located at the bottom rear of the register.
- Firmly stick the fixing angle bracket to the table surface that you cleaned above.
How to remove the register from the fixing angle bracket
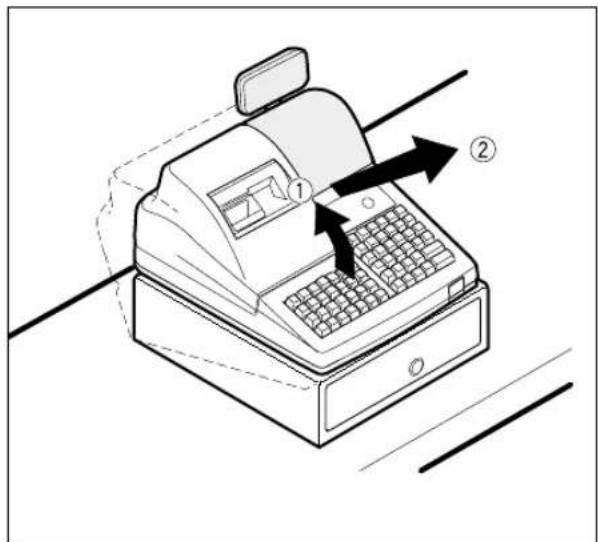
- Lift up the front of the register and pull the register towards you.
10 Before calling for service
The malfunctions shown in the left-hand column below, labelled “Fault,” do not necessarily indicate functional faults of the machine. It is therefore advisable to refer to the “Checking” shown in the right-hand column before calling for service.
| Fault | Checking |
| (1) The display won't be illuminated even when the mode switch is turned to any other position than “☐”. | • Is power supplied to the electrical outlet?• Is the power cord plug out or loosely connected to the electrical outlet? |
| (2) The display is illuminated, but the whole machine refuses registrations. | • Is a cashier code assigned to the register?• Is a clerk code assigned to the register?• Is the mode switch set properly at the “REG” position? |
| (3) No receipt is issued. | • Is the receipt paper roll properly installed?• Is there a paper jam?• Is the receipt function in the “OFF” status?• Is the print head release lever at the printing position? |
| (4) No journal paper is taken up. | • Is the take-up spool installed on the bearing properly?• Is there a paper jam? |
| (5) Printing is unusual. • Is the print head release lever at the | printing position?• Is the paper roll properly installed? |
■ Error code table
When the following error codes are displayed, press the CL key and take a proper action according to the table below.
| Error code | Error status Action | |
| E01 | Registration error Make a correct key entry. | |
| E02 | Misoperation error Make a correct key entry. | |
| E03 | Undefined code is entered. Enter a correct code, or declare it by the programming. | |
| E04 | Journal paper is nearly empty. Replace a journal paper roll with a new one. | |
| E05 | Secret code error Enter a correct secret code. | |
| E07 | Memory is full. Expand the file within a capacity of memory. | |
| E11 | Compulsory depression of the ST key for direct Press the ST key and continue the operation. finalization | |
| E12 | Compulsory tendering Make a tendering operation. | |
| E22 | Overlapped cashier error | |
| E23 | Cashier resetting over error | |
| E31 | Compulsory non-add code entry Enter a non-add code. | |
| E32 | No entry of your cashier code Make a cashier code entry. | |
| E33 | The current cashier code should not be changed. Change a cashier after finalizing the transaction. | |
| E34 | Overflow limitation error Make a registration within a limit of entry. | |
| E35 | The open price entry is inhibited. Make a preset price entry. | |
| E36 | The preset price entry is inhibited. Make an open price entry. | |
| E37 | The direct finalization is inhibited. Make a tendering operation. | |
| E58 | Undefined clerk code is entered. Enter a correct clerk code. | |
| E67 | Registration buffer is full. | |
| E76 | The drawer is still opened. Close the drawer. |
LIST OF OPTIONS
For your register, the following options are available.
For details, contact your dealer.
•RAM memory chip model ER-03RA - Remote drawer model ER-05DW •Till model ER-58CC and till cover model ER-03CV •Key kit models
By using the following key kits, you can change the keyboard layout of your register including the expansion of the number of departments.
ER-11KT7: 30 regular size key kits
ER-12KT7: 30 1 x 2 size key kits
ER-22KT7: 10 2 x 2 size key kits
ER-11DK7G: 30 regular size dummy key kits
ER-51DK7G: 10 5 x 1 size dummy key kits
• Hand scanner model ER-A6HS1
SPECIFICATIONS
Model: ER-A450S
Dimensions: 355 (W) x 424 (D) x 308 (H) mm
Weight: 12.9 kg
Power source: Official (nominal) voltage and frequency
Power consumption: Stand-by 14W
Operating 41W (max.)
Working temperature: 0°C to 40°C
Electronics: LSI (CPU) etc.
Built-in battery: Rechargeable battery, memory holding time about 1 month
(with fully charged built-in battery, at room temperature)
Display:
Operator display: 7-segment display (10 positions)
Customer display: 7-segment display (7 positions)
Printer:
Type: 2-station thermal printer
Printing speed: Approx. 13.3 lines/second
Printing capacity: 24 digits each for receipt and journal paper
Other functions: • Graphic logo printing function
- Logo message function
- Receipt (ON-OFF) function, journal selective function
- Receipt and journal independent paper feed function
Paper roll: Width: 44.5 ± 0.5 mm
Max. diam.: 80 mm
Quality: High quality (0.06 to 0.08 mm thickness)
Cash drawer: 5 slots for bill and 8 for coin denominations
| Accessories: | Manager key | 2 |
| Submanager key | 2 | |
| Operator key | 2 | |
| Drawer lock key | 2 | |
| Paper roll | 2 | |
| Take-up spool | 1 | |
| Fixing angle bracket | 1 | |
| Instruction manual | 1 copy |
* Specifications and appearance subject to change without notice for improvement.
FOR CUSTOMERS IN U.K.
IMPORTANT
The wires in this mains lead are coloured in accordance with the following code:
BLUE:
Neutral
BROWN:
Live
As the colours of the wires in the mains lead of this apparatus may not correspond with the coloured markings identifying the terminals in your plug proceed as follows.
The wire which is coloured BLUE must be connected to the terminal which is marked with the letter N or coloured black.
The wire which is coloured BROWN must be connected to the terminal which is marked with the letter L or coloured red.
The apparatus must be protected by a 3A fuse in the mains plug or distribution board.
CAUTION: DO NOT CONNECT THE LIVE (BROWN) WIRE OR THE NEUTRAL (BLUE) WIRE TO THE EARTH TERMINAL OF YOUR 3-PIN MAINS PLUG.
Environment Protection
The device is supported by a battery. To dispose the battery safely to protect the environment, please note the following points:
• Take the used battery to your local waste depot, dealer or customer service centre for recycling. - Do not throw the used battery into fire, into water or into the household waste!

- CAUTION
- IMPORTANT
- PRECAUTION
- CONTENTS
- INTRODUCTION
- EXTERNAL VIEW
- PRINTER
- KEYBOARD
- KEYS AND SWITCHES
- DISPLAYS
- FOR THE MANAGER
- PRIOR TO PROGRAMMING
- PROGRAMMING
- DIRECT PROGRAMMING
- JOB-CODE-BASED PROGRAMMING
- FOR THE OPERATOR
- PRIOR TO ENTRIES
- ENTRIES
- CORRECTION
- SPECIAL PRINTING FUNCTIONS
- OVERLAPPED CASHIER ENTRY
- LIST OF OPTIONS
- SPECIFICATIONS
- PRINT HEAD RELEASE LEVER
- STANDARD KEYBOARD LAYOUT
- NOTE
- STANDARD KEY NUMBER LAYOUT
- MODE SWITCH AND MODE KEYS
- DRAWER LOCK KEY
- OPERATOR DISPLAY CUSTOMER DISPLAY (POP-UP TYPE)
- NUMBER OF REPEATS FOR REPETITIVE REGISTRATIONS
- RECEIPT FUNCTION STATUS
- MACHINE STATE SYMBOLS
- GENERAL INSTRUCTIONS
- HOW TO PROGRAM ALPHANUMERIC CHARACTERS
- USING CHARACTER KEYS ON THE KEYBOARD
- EXAMPLE
- EDITING THE CHARACTERS
- ENTERING CHARACTER CODES
- PREPARATIONS FOR PROGRAMMING
- SETTING THE DATE AND TIME
- DATE PGM
- TIME PGM
- PROCEDURE
- PROGRAMMING FOR DEPARTMENTS
- UNIT PRICE
- FUNCTIONAL SELECTION PGM
- TAX STATUS
- NORMAL DEPARTMENT/SICS (SINGLE ITEM CASH SALE) / SIF (SINGLE ITEM FINALIZATION)
- HALO (HIGH AMOUNT LOCKOUT)
- PRICE LOOKUP (PLU) PROGRAMMING
- UNIT PRICE PGM 2PGM
- EXAMPLE PROGRAMMING THE UNIT PRICE 1.25 FOR PLU CODE
- SIGN (PLUS/MINUS)
- MODE PARAMETER
- PLU ASSIGNMENT TO DEPARTMENTS
- EUROPEAN ARTICLE NUMBER(EAN)/UNIVERSAL PRODUCT CODE(UPC) PROGRAMMING
- DELETE METHOD
- PROGRAMMING FOR DISCOUNT KEYS
- DEDUCTION AMOUNT (⊖) PGM 2PGM
- HIGH AMOUNT LOCKOUT (HALO) AND +/- SIGN (⊖) PGM
- ITEM: SELECTION: ENTRY
- PROGRAMMING FOR PERCENT KEYS
- PERCENT RATE ( % ) PGM 2PGM
- NOTE YOU MUST USE A DECIMAL POINT WHEN SETTING PERCENTAGE RATES THAT ARE FRACTIONAL
- SIGN (+/-) ( % ) PGM
- EXAMPLE PROGRAMMING MINUS SIGN FOR THE %1 KEY
- PROGRAMMING FOR EXCHANGE KEYS
- CURRENCY EXCHANGE RATE (EX) PGM 2PGM
- PROGRAMMING FOR THE CA2, RA, PO, CH AND CR KEYS
- HIGH AMOUNT LOCKOUT (HALO) (CA2, RA, PO AND CR) PGM
- PROGRAMMING THE TAX RATE
- TAX RATE PGM
- SETTING THE DATE PGM 2 DIRECT
- SETTING THE TIME PGM 2 DIRECT
- SETTING THE REGISTER AND CONSECUTIVE NUMBERS
- SETTING THE REGISTER NUMBER PGM
- PRINTKEY OPERATION
- SETTING THE CONSECUTIVE NUMBER PGM
- TAX RATE
- FUNCTIONAL PROGRAMMING PGM
- SICS (SINGLE ITEM CASH SALE) / SIF (SINGLE ITEM FINALIZATION)
- TYPE OF UNIT PRICE ENTRY
- TAX STATUS PGM 2 DIRECT
- A LIMIT AMOUNT (HALO) OF ENTRY PGM 2 DIRECT
- ALPHANUMERIC CHARACTERS PGM
- UNIT PRICE PGM 2PGM DIRECT
- COMMISSION GROUP ASSIGNMENT PGM
- GROUP NUMBER PGM
- DEPARTMENT KEY POSITIONING PGM
- PLU CODE (SIX DIGITS)
- ASSOCIATED DEPARTMENT
- UNIT PRICE (MAX. SIX DIGITS)
- BASE QUANTITY FOR SPLIT-PRICING ENTRIES - TWO DIGITS
- PLU, SUBDEPARTMENT, PLU/SUBDEPARTMENT, DELETE, OR PROHIBIT MODE
- SIGN (+/-)
- ITEM LABEL (12 CHARACTERS) (OPTION: MAX. 16 CHARACTERS)
- COMMISSION GROUP (1 TO 9)
- LINK PLU
- DIRECT PLU KEY POSITIONING
- DEPARTMENT ASSIGNMENT
- PGM 2PGN
- DIRECT
- UNIT PRICES
- BASE QUANTITY
- PLU/SUBDEPARTMENT MODE PGM 2 2210 2231 DIRECT
- FOR EACH PLU
- FOR A RANGE OF PLUS
- ASSIGNING OF PLUS TO COMMISSION GROUPS
- LINK PLU PGM
- EUROPEAN ARTICLE NUMBER (EAN) OR UNIVERSAL PRODUCT CODE (UPC) PROGRAMMING
- EAN OR UPC CODE
- UPC-A
- UPC-E
- EAN
- GERMAN TYPE
- UNITED KINGDOM
- FRANCE
- SWEDEN
- ADD-ON CODE
- EAN/UPC PROGRAMMING
- EAN CODE DELETE METHOD
- BASE QUANTITY FOR SPLIT-PRICING ENTRIES
- ITEM LABEL (12 CHARACTERS) (OPTION MAX. 16 CHARACTERS)
- COMMISSION GROUP (1-9)
- EAN LINK
- DELETE PERIOD FOR NON-ACCESSED EAN CODES
- NON-PLU CODE FORMAT
- TYPE OF PRESS CODE
- PRICE ENTRY METHOD FOR PRESS CODE
- LABEL OF RECORD IN EAN FILE
- UNIT PRICES □ PGM 2PGM □ DIRECT
- DELETE METHOD PGM
- ASSIGNING OF EANS TO COMMISSION GROUPS PGM
- EAN LINK PGM
- DELETE PERIOD FOR NON-ACCESSED EAN CODES PGM
- PROGRAMMING NON-PLU CODE FORMAT PGM
- PRESS CODE FUNCTIONAL PROGRAMMING PGM
- PROGRAMMING FOR MISCELLANEOUS KEYS
- PROGRAMMING THE RATE (%, EX, COMMISSION) AND THE DEDUCTION (⊖) PGM
- FUNCTION NO
- RATE OR AMOUNT
- PROGRAMMING THE NUMBER OF DIGITS AFTER DECIMAL POINT FOR EXCHANGE KEYS
- CURRENCY DESCRIPTION TEXT PROGRAMMING PGM
- ASSIGNING THE DRAWER NUMBER TO THE DRAWER FOR FOREIGN CURRENCY PGM
- PGM
- A LIMIT AMOUNT (HALO) OF ENTRY (⊖, RA, PO) PGM 2 DIRECT
- SIGN (%, ⊖) PGM 2 DIRECT
- ITEM % OR SUBTOTAL % SELECTION ( % ) PGM
- PERCENT RATE LIMITATION ( % ) PGM
- ITEM ⊖ OR SUBTOTAL ⊖ SELECTION (☐) PGM
- PROGRAMMING FOR THE TL, CA2, CH1 THROUGH CH4, AND CR1 THROUGH CR4 KEYS
- FOOTER PRINTING
- NON-ADD CODE COMPULSORY
- DRAWER OPEN
- AMOUNT TENDERED COMPULSORY
- HIGH AMOUNT LOCKOUT (HALO) FOR CHEQUE CHANGE, CHEQUE CASHING, AND CASH IN DRAWER PGM
- HIGH AMOUNT LOCKOUT (HALO) OF ENTRY FOR MEDIA KEYS PGM 2 DIRECT
- PROGRAMMING OF FUNCTION TEXT
- PROGRAMMING PGM
- CASHIER AND CLERK PROGRAMMING
- CASHIER CODE PGM 2PGM
- CASHIER NAME PGM 1 PGM
- FUNCTIONAL PROGRAMMING FOR CASHIERS PGM
- CLERK CODE PGM 2PGM
- CLERK NAME PGM 2PGM
- PROGRAMMING VARIOUS FUNCTIONS
- PROGRAMMING FOR OPTIONAL FEATURE SELECTION
- OP X/Z MODE AVAILABILITY
- PAID OUT IN THE REG-MODE
- REFUND KEY IN THE REG-MODE
- DIRECT VOID IN THE REG-MODE
- INDIRECT VOID IN THE REG-MODE
- SUBTOTAL VOID IN THE REG-MODE
- FIRST ITEM DIRECT VOID
- PRINTING OF THE NUMBER OF PURCHASED ITEMS
- JOURNAL PRINT FORM
- ZERO SKIP FOR VARIOUS REPORTS
- VAT/TAX AMOUNT, TAXABLE AMOUNT AND NET AMOUNT PRINTING ON THE RECEIPT/JOURNAL
- VAT SHIFT TYPE
- NO SALE IN REG-MODE
- FINALIZATION WHEN THE SUBTOTAL AMOUNT IS ZERO IN THE REG MODE
- EXCHANGE 1 CALCULATION METHOD (FOR EURO SETTINGS)
- PRINTING OF THE EXCHANGE 1 TOTAL AMOUNT AND CHANGE AMOUNT ON THE RECEIPT/JOURNAL
- CASH/CREDIT OPERATION FOR EXCHANGE
- FOOTER GRAPHIC LOGO PRINTING
- CREDIT COUNTING WHEN RECEIVED-ON-ACCOUNT/PAID OUT FINALIZED WITH THE CREDIT KEY
- PROGRAMMING FEED LINE AFTER PRINTING OF A DIFFERENCE SUBTOTAL
- PROGRAMMING ALARM LENGTH OF TIME WITH DRAWER OPENING PGM
- PROGRAMMING OF LOGO MESSAGES PGM
- SELECTION OF X1/Z1 AND X2/Z2 REPORTS TO BE PRINTED IN THE STACKED REPORT SEQUENCE PGM
- SETTING THE TIME RANGE FOR HOURLY REPORTS
- RS-232C CHANNEL ASSIGNMENT
- BARCODE READER PROGRAMMING
- SECRET CODES TO CONTROL ACCESS TO PGM1 MODE, X1/Z1 MODE AND X2/Z2 MODE PGM
- OPERATING
- FUNCTIONAL PROGRAMMING FOR THE PRINTER PGM
- SETTING THE AUTO KEY — AUTOMATIC SEQUENCING KEY — X2/Z
- READING STORED PROGRAMS
- SAMPLE PRINTOUTS
- TRAINING MODE
- READING (X) AND RESETTING (Z) OF SALES TOTALS
- SUMMARY OF READING (X) AND RESETTING (Z) REPORTS AND THE KEY OPERATIONS TO OBTAIN THE REPORTS
- DAILY SALES TOTALS
- FULL READING AND RESETTING OF SALES TOTALS
- CASHIER READING AND RESETTING
- INDIVIDUAL CASHIER READING AND RESETTING
- SAMPLE X REPORT • SAMPLE Z REPORT
- CLERK READING AND RESETTING
- INDIVIDUAL CLERK READING AND RESETTING
- FULL CLERK READING AND RESETTING
- READING AND RESETTING OF HOURLY SALES INFORMATION
- READING AND RESETTING OF SALES INFORMATION FOR A RANGE OF PLUS/SUBDEPARTMENTS
- READING AND RESETTING OF SALES INFORMATION FOR EANS
- READING AND RESETTING OF SALES INFORMATION FOR EANS ASSOCIATED WITH AN INDIVIDUAL DEPARTMENT
- READING OF EANS WHOSE SALES AMOUNTS ARE ZEROS
- READING OF EANS WHOSE SALES AMOUNTS ARE ZEROS (BY ASSOCIATED DEPARTMENT)
- READING OF COMMISSION SALES INFORMATION
- TRANSACTION READING TOTAL IN DRAWER READING
- READING AND RESETTING OF A STACKED REPORT
- DELETING OF NON-ACCESSED EANS
- PERIODIC CONSOLIDATION
- GENERALITY
- READING AND RESETTING OF THE DAILY NET TOTALS
- COMPULSORY CASH/CHEQUE DECLARATION
- TYPES OF COMPULSORY CASH/CHEQUE DECLARATION
- KEY OPERATION
- PROGRAMMING FOR EURO
- RECEIPT SAMPLES
- AUTOMATIC MODIFICATION OF REGISTER SYSTEM FOR INTRODUCTION OF EURO
- WHEN "1" IS SUBSTITUTED FOR "A
- WHEN "2" IS SUBSTITUTED TO "A
- WHEN "3" IS SUBSTITUTED TO "A
- OPTIONAL PROGRAMMING FOR THE INTRODUCTION OF EURO
- PROGRAMMING FOR EXCHANGE 1 (EX1)
- CURRENCY EXCHANGE RATE (JOB #1310)
- CHEQUE/CREDIT OPERATION (JOB #2616)
- ASSIGNING THE DRAWER NUMBER TO THE DRAWER FOR FOREIGN CURRENCY (JOB #2680)
- OVERRIDE ENTRIES
- CORRECTION AFTER FINALIZING A TRANSACTION (AFTER GENERATING A RECEIPT)
- PREPARATIONS FOR ENTRIES
- RECEIPT AND JOURNAL PAPER ROLLS
- RECEIPT ON/OFF FUNCTION
- CASHIER AND CLERK ASSIGNMENT
- CASHIER ASSIGNMENT
- SIGN-ON
- SIGN-OFF
- CLERK ASSIGNMENT
- ERROR WARNING
- ITEM ENTRIES
- SINGLE ITEM ENTRIES
- DEPARTMENT ENTRIES (DIRECT DEPARTMENT ENTRIES)
- DEPARTMENT ENTRIES (INDIRECT DEPARTMENT ENTRIES)
- PLU ENTRIES (INDIRECT PLU ENTRIES)
- SUBDEPARTMENT (OPEN PLU) ENTRIES
- PLU ENTRIES (DIRECT PLU ENTRIES)
- EAN ENTRIES
- REPEAT ENTRIES
- MULTIPLICATION ENTRIES
- SUCCESSIVE MULTIPLICATION ENTRIES
- SPLIT-PRICING ENTRIES
- SINGLE ITEM CASH SALE (SICS)/SINGLE ITEM FINALIZE (SIF) ENTRIES
- SICS ENTRIES
- SIF ENTRIES
- LINK PLU/EAN LINK ENTRIES
- PRINTING DETAILED INFORMATION
- PRINTING LEADING LINK PLU/EAN AND TOTAL SALES AMOUNT
- EAN LEARNING FUNCTION
- PRICE INQUIRY (VIEW) FUNCTION (FOR EANS)
- PRICE CHANGE FUNCTION (FOR EANS)
- PRICE CHANGE MODE
- CHANGING A PRICE DURING A TRANSACTION
- DISPLAYING SUBTOTALS
- NORMAL SUBTOTAL
- DIFFERENCE SUBTOTAL (DIFFER ST)
- FINALIZATION OF TRANSACTION
- CASH OR CHEQUE TENDERING
- MIXED TENDERING (CHEQUE + CASH)
- CASH OR CHEQUE SALE THAT DOES NOT NEED ANY TENDER ENTRY
- CREDIT SALE
- MIXED-TENDER SALE (CASH OR CHEQUE TENDERING + CREDIT TENDERING)
- COMPUTATION OF VAT (VALUE ADDED TAX)/TAX
- VAT/TAX SYSTEM
- AUTOMATIC VAT 1-6 SYSTEM (AUTOMATIC OPERATION METHOD USING PROGRAMMED PERCENTAGES)
- AUTOMATIC TAX 1-6 SYSTEM (AUTOMATIC OPERATION METHOD USING PROGRAMMED PERCENTAGES)
- MANUAL VAT 1-6 SYSTEM (MANUAL ENTRY METHOD USING PROGRAMMED PERCENTAGES)
- MANUAL VAT 1 SYSTEM (MANUAL ENTRY METHOD FOR SUBTOTALS THAT USES VAT 1 PRESET PERCENTAGES)
- MANUAL TAX 1-6 SYSTEM (MANUAL ENTRY METHOD USING PRESET PERCENTAGES)
- AUTOMATIC VAT 1-3 AND AUTOMATIC TAX 4-6 SYSTEM
- VAT SHIFT ENTRIES
- AUXILIARY ENTRIES
- PERCENT CALCULATIONS (PREMIUM OR DISCOUNT)
- PERCENT CALCULATION FOR THE SUBTOTAL
- PERCENT CALCULATION FOR ITEM ENTRIES
- DEDUCTION ENTRIES
- DEDUCTION FOR THE SUBTOTAL
- DEDUCTION FOR ITEM ENTRIES
- REFUND ENTRIES
- PRINTING OF NON-ADD CODE NUMBERS
- PAYMENT TREATMENT
- CURRENCY EXCHANGE
- RECEIVED ON ACCOUNT ENTRIES
- PAID OUT ENTRIES
- NO SALE (EXCHANGE)
- CASHING A CHEQUE
- AUTOMATIC SEQUENCING KEY (AUTO KEY) ENTRIES
- CORRECTION OF THE LAST ENTRY (DIRECT VOID)
- CORRECTION OF THE NEXT-TO-LAST OR EARLIER ENTRIES (INDIRECT VOID)
- CORRECTION OF INCORRECT ENTRIES NOT HANDLED BY THE DIRECT OR INDIRECT VOID FUNCTION
- COPY RECEIPT PRINTING
- GUEST CHECK COPY
- PRINTING OF HEADER AND FOOTER GRAPHIC LOGOS
- COMMENTSKEY OPERATION
- IN CASE OF POWER FAILURE
- IN CASE OF PRINTER ERROR
- THERMAL PRINTING
- CAUTIONS IN HANDLING THE PRINTER
- CAUTIONS IN HANDLING THE RECORDING PAPER (THERMAL PAPER)
- PAPER ROLL NEAR-END SENSING FUNCTION (ONLY FOR THE JOURNAL PAPER)
- INSTALLING AND REMOVING THE PAPER ROLL
- RECORDING PAPER SPECIFICATIONS
- PAPER SPECIFICATION
- INSTALLING THE PAPER ROLL
- INSTALLING THE JOURNAL PAPER ROLL
- REMOVING THE PAPER ROLL
- REMOVING THE RECEIPT PAPER ROLL
- REMOVING THE JOURNAL PAPER ROLL
- REMOVING A PAPER JAM
- CLEANING THE PRINT HEAD
- PRECAUTIONS
- REMOVING THE TILL AND THE DRAWER
- OPENING THE DRAWER BY HAND
- INSTALLING THE FIXING ANGLE BRACKET
- HOW TO INSTALL THE FIXING ANGLE BRACKET
- HOW TO REMOVE THE REGISTER FROM THE FIXING ANGLE BRACKET
- BEFORE CALLING FOR SERVICE
- ERROR CODE TABLE
- FOR CUSTOMERS IN U.K
- ENVIRONMENT PROTECTION
Brand : SHARP
Model : ER-A450S
Category : Cash register