DB-900 - Numeric keypad ROLAND - Free user manual and instructions
Find the device manual for free DB-900 ROLAND in PDF.


User questions about DB-900 ROLAND
0 question about this device. Answer the ones you know or ask your own.
Ask a new question about this device
Download the instructions for your Numeric keypad in PDF format for free! Find your manual DB-900 - ROLAND and take your electronic device back in hand. On this page are published all the documents necessary for the use of your device. DB-900 by ROLAND.
USER MANUAL DB-900 ROLAND
Thank you, and congratulations on your choice of the Roland DB-900 bass amplifier.
Before using this unit, carefully read the sections entitled: "IMPORTANT SAFETY INSTRUCTIONS" (page 2), "USING THE UNIT SAFELY" (page 3), and "IMPORTANT NOTES" (page 6). These sections provide important information concerning the proper operation of the unit. Additionally, in order to feel assured that you have gained a good grasp of every feature provided by your new unit, Owner's Manual should be read in its entirety. The manual should be saved and kept on hand as a convenient reference.
Contents
IMPORTANT SAFETY INSTRUCTIONS......2
USING THE UNIT SAFELY 3
IMPORTANT NOTES. 6
Introduction. 7
Main Features. 7
Before You Use the DB-900 7
To Use the DB-900 Like a Conventional Bass Amp. 7
Button Names and Functions. 8
Front panel. 8
Rear panel 9
Connect your DB-900 11
Turn the power on and off 11
The Memory Function 12
Calling Up Memory 12
Changing the Settings for Memory A and Memory B (Edit) 12
Storing the Panel Settings in Memory A and Memory B (Write) 12
How to handle the Casters 13
Appendices 14
Factory-default Settings 14
Returning to the Factory-default Settings 14
Sample Settings 15
Block diagram. 17
Specifications 18
CAUTION: TO REDUCE THE RISK OF ELECTRIC SHOCK, DO NOT REMOVE COVER (OR BACK).
NO USER-SERVICEABLE PARTS INSIDE.
REFER SERVICING TO QUALIFIED SERVICE PERSONNEL.
The lightning flash with arrowhead symbol, within an equilateral triangle, is intended to alert the user to the presence of uninsulated dangerous voltage within the product's enclosure that may be of sufficient magnitude to constitute a risk of electric shock to persons.
The exclamation point within an equilateral triangle is intended to alert the user to the presence of important operating and maintenance (servicing) instructions in the literature accompanying the product.
INSTRUCTIONS PERTAINING TO A RISK OF FIRE, ELECTRIC SHOCK, OR INJURY TO PERSONS.
IMPORTANT SAFETY INSTRUCTIONS SAVE THESE INSTRUCTIONS
WARNING - When using electric products, basic precautions should always be followed, including the following:
- Read these instructions.
- Keep these instructions.
- Heed all warnings.
- Follow all instructions.
- Do not use this apparatus near water.
- Clean only with dry cloth.
- Do not block any of the ventilation openings. Install in accordance with the manufacturers instructions.
- Do not install near any heat sources such as radiators, heat registers, stoves, or other apparatus (including amplifiers) that produce heat.
-
Do not defeat the safety purpose of the polarized or grounding-type plug. A polarized plug has two blades with one wider than the other. A grounding type plug has two blades and a third grounding prong. The wide blade or the third prong are provided for your safety. When the provided plug does not fit into your outlet, consult an electrician for replacement of the obsolete outlet.
-
Protect the power cord from being walked on or pinched particularly at plugs, convenience receptacles, and the point where they exit from the apparatus.
- Only use attachments/accessories specified by the manufacturer.
- Never use with a cart, stand, tripod, bracket, or table except as specified by the manufacturer, or sold with the apparatus. When a cart is used, use caution when moving the cart/apparatus combination to avoid injury from tip-over.
- Unplug this apparatus during lightning storms or when unused for long periods of time.
- Refer all servicing to qualified service personnel. Servicing is required when the apparatus has been damaged in any way, such as power-supply cord or plug is damaged, liquid has been spilled or objects have fallen into the apparatus, the apparatus has been exposed to rain or moisture, does not operate normally, or has been dropped.

For the U.K.
WARNING: THIS APPARATUS MUST BE EARTHED
IMPORTANT: THE WIRES IN THIS MAINS LEAD ARE COLOURED IN ACCORDANCE WITH THE FOLLOWING CODE. GREEN-AND-YELLOW: EARTH, BLUE: NEUTRAL, BROWN: LIVE
As the colours of the wires in the mains lead of this apparatus may not correspond with the coloured markings identifying the terminals in your plug, proceed as follows:
The wire which is coloured GREEN-AND-YELLOW must be connected to the terminal in the plug which is marked by the letter E or by the safety earth symbol or coloured GREEN or GREEN-AND-YELLOW.
The wire which is coloured BLUE must be connected to the terminal which is marked with the letter N or coloured BLACK.
The wire which is coloured BROWN must be connected to the terminal which is marked with the letter L or coloured RED.
USING THE UNIT SAFELY
INSTRUCTIONS FOR THE PREVENTION OF FIRE, ELECTRIC SHOCK, OR INJURY TO PERSONS
About WARNING and CAUTION Notices
| ▲WARNING | Used for instructions intended to alert the user to the risk of death or severe injury should the unit be used improperly. |
| ▲CAUTION | Used for instructions intended to alert the user to the risk of injury or material damage should the unit be used improperly. * Material damage refers to damage or other adverse effects caused with respect to the home and all its furnishings, as well to domestic animals or pets. |
About the Symbols
| ▲ | The △ symbol alerts the user to important instructions or warnings. The specific meaning of the symbol is determined by the design contained within the triangle. In the case of the symbol at left, it is used for general cautions, warnings, or alerts to danger. |
| ◎ | The ⊙ symbol alerts the user to items that must never be carried out (are forbidden). The specific thing that must not be done is indicated by the design contained within the circle. In the case of the symbol at left, it means that the unit must never be disassembled. |
| ◎ | The ● symbol alerts the user to things that must be carried out. The specific thing that must be done is indicated by the design contained within the circle. In the case of the symbol at left, it means that the power-cord plug must be unplugged from the outlet. |
ALWAYS OBSERVE THE FOLLOWING
WARNING
Before using this unit, make sure to read the instructions below, and the Owner's Manual.

- Do not open or perform any internal modifications on the unit.

- Do not attempt to repair the unit, or replace parts within it (except when this manual provides specific instructions directing you to do so). Refer all servicing to your retailer, the nearest Roland Service Center, or an authorized Roland distributor, as listed on the "Information" page.

- Never use or store the unit in places that are:

- Subject to temperature extremes (e.g., direct sunlight in an enclosed vehicle, near a heating duct, on top of heat-generating equipment); or are

- Damp (e.g., baths, washrooms, on wet floors); or are
- Humid; or are
- Exposed to rain; or are
- Dusty; or are
-
Subject to high levels of vibration.
-
Make sure you always have the unit placed so it is level and sure to remain stable. Never place it on stands that could wobble, or on inclined surfaces.

- The unit should be connected to a power supply only of the type described in the operating instructions, or as marked on the unit.

WARNING
- Do not excessively twist or bend the power cord, nor place heavy objects on it. Doing so can damage the cord, producing severed elements and short circuits. Damaged cords are fire and shock hazards!

- This unit, either alone or in combination with an amplifier and headphones or speakers, may be capable of producing sound levels that could cause permanent hearing loss. Do not operate for a long period of time at a high volume level, or at a level that is uncomfortable. If you experience any hearing loss or ringing in the ears, you should immediately stop using the unit, and consult an audiologist.

- Do not allow any objects (e.g., flammable material, coins, pins); or liquids of any kind (water, soft drinks, etc.) to penetrate the unit.

- In households with small children, an adult should provide supervision until the child is capable of following all the rules essential for the safe operation of the unit.

- Protect the unit from strong impact. (Do not drop it!)


- Do not force the unit's power-supply cord to share an outlet with an unreasonable number of other devices. Be especially careful when using extension cords—the total power used by all devices you have connected to the extension cord's outlet must never exceed the power rating (watts/amperes) for the extension cord. Excessive loads can cause the insulation on the cord to heat up and eventually melt through.

- Before using the unit in a foreign country, consult with your retailer, the nearest Roland Service Center, or an authorized Roland distributor, as listed on the "Information" page.

Placement
- Using the unit near power amplifiers (or other equipment containing large power transformers) may induce hum. To alleviate the problem, change the orientation of this unit; or move it farther away from the source of interference.
- This device may interfere with radio and television reception. Do not use this device in the vicinity of such receivers.
- Do not expose the unit to direct sunlight, place it near devices that radiate heat, leave it inside an enclosed vehicle, or otherwise subject it to temperature extremes. Excessive heat can deform or discolor the unit.
- To avoid possible breakdown, do not use the unit in a wet area, such as an area exposed to rain or other moisture.
- Do not allow rubber, vinyl, or similar materials to remain on this unit for long periods of time. Such objects can discolor or otherwise harmfully affect the finish.
- Do not put anything that contains water (e.g., flower vases) on this unit. Also, avoid the use of insecticides, perfumes, alcohol, nail polish, spray cans, etc., near the unit. Swiftly wipe away any liquid that spills on the unit using a dry, soft cloth.
- Do not paste stickers, decals, or the like to this instrument. Peeling such matter off the instrument may damage the exterior finish.
- During operation, this device must be placed at a distance of no less than 50cm from any walls.
- Do not allow objects to remain on top of the unit while it is in operation.
Additional Precautions
- Please be aware that the contents of memory can be irretrievably lost as a result of a malfunction, or the improper operation of the unit. To protect yourself against the risk of loosing important data, we recommend that you take notes of the adjustments you have made with the setting.
- Unfortunately, it may be impossible to restore the contents of data that was stored in the unit's memory once it has been lost. Roland Corporation assumes no liability concerning such loss of data.
- Use a reasonable amount of care when using the unit's buttons, sliders, or other controls; and when using its jacks and connectors. Rough handling can lead to malfunctions.
- When connecting / disconnecting all cables, grasp the connector itself—never pull on the cable. This way you will avoid causing shorts, or damage to the cable's internal elements.
- A small amount of heat will radiate from the unit during normal operation.
- To avoid disturbing your neighbors, try to keep the unit's volume at reasonable levels. You may prefer to use headphones, so you do not need to be concerned about those around you (especially when it is late at night).
- When you need to transport the unit, package it in the box (including padding) that it came in, if possible. Otherwise, you will need to use equivalent packaging materials.
-
Use a cable from Roland to make the connection. If using some other make of connection cable, please note the following precautions.
-
Some connection cables contain resistors. Do not use cables that incorporate resistors for connecting to this unit. The use of such cables can cause the sound level to be extremely low, or impossible to hear. For information on cable specifications, contact the manufacturer of the cable.
-
This is a heavy device. To prevent injury caused by the unit overturning or being dropped, use two or more people to carry the unit whenever possible.
-
To avoid injury, avoid placing hands at points indicated by the arrows in the following figure.
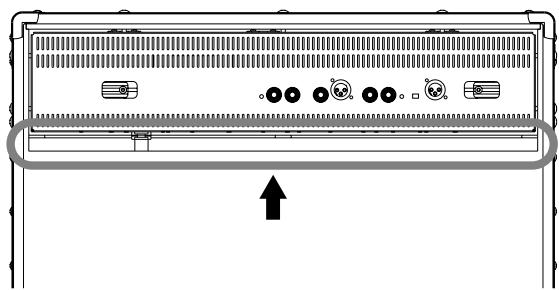
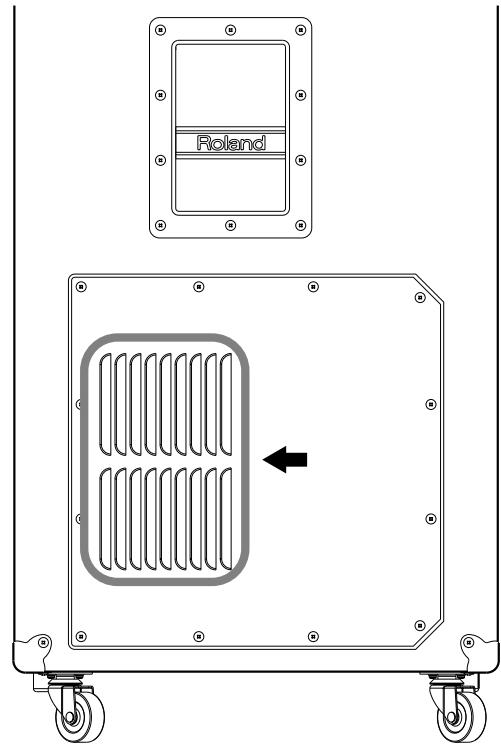
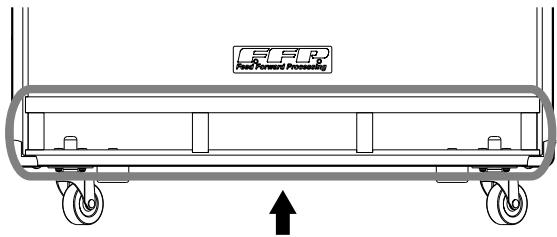
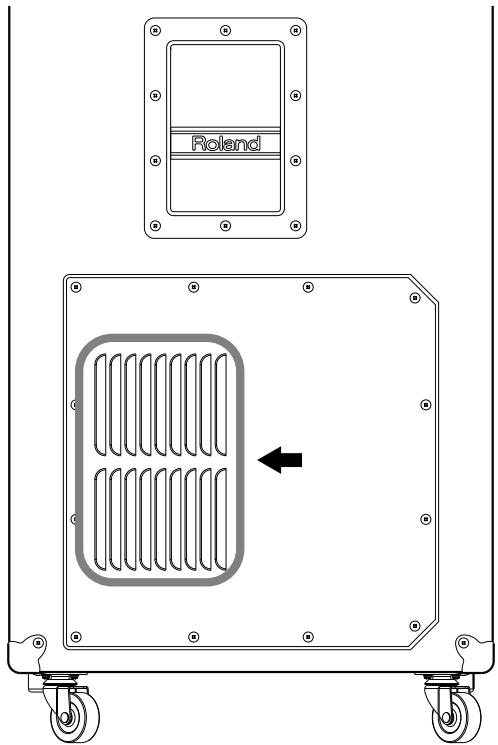
- Do not allow the cooling vents on either side of the unit to become blocked. Obstructing the vents may result in damage or other problems.
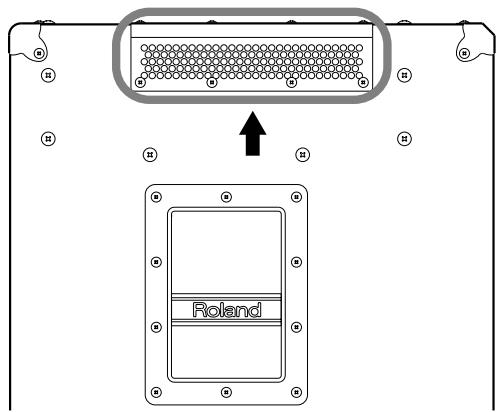
- Wrap the AC cord around the cord hook when transporting or storing the unit.
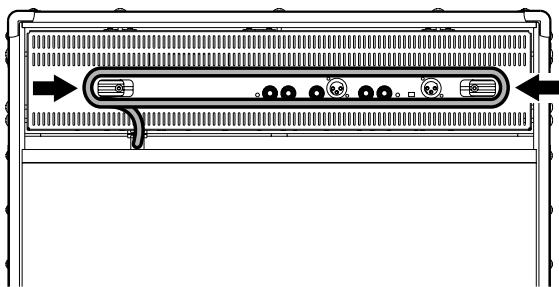
- In order to obtain optimum performance from this equipment, avoid allowing the areas indicated by the arrows in the figure below to become obstructed.

CAUTION
- The unit should be located so that its location or position does not interfere with its proper ventilation.

- Always grasp only the plug on the power-supply cord when plugging into, or unplugging from an outlet.

- Try to prevent cords and cables from becoming entangled. Also, all cords and cables should be placed so they are out of the reach of children.

- If the unit could become a hazard if it moves, all caster wheels should be removed once the unit has been placed at the place of installation, or has been loaded onto a vehicle.


CAUTION
- Never climb on top of, nor place heavy objects on the unit.

- Never handle the power cord or its plug with wet hands when plugging into, or unplugging from, an outlet.

- Before moving the unit, disconnect the power plug from the outlet, and pull out all cords from external devices.

- Before cleaning the unit, turn off the power and unplug the power cord from the outlet.

- Whenever you suspect the possibility of lightning in your area, pull the plug on the power cord out of the outlet.

IMPORTANT NOTES
In addition to the items listed under "IMPORTANT SAFETY INSTRUCTIONS" and "USING THE UNIT SAFELY" on pages 2-5, please read and observe the following:
Power Supply
- Do not use this unit on the same power circuit with any device that will generate line noise (such as an electric motor or variable lighting system).
- Before connecting this unit to other devices, turn off the power to all units. This will help prevent malfunctions and/or damage to speakers or other devices.
Maintenance
- For everyday cleaning wipe the unit with a soft, dry cloth or one that has been slightly dampened with water. To remove stubborn dirt, use a cloth impregnated with a mild, non-abrasive detergent. Afterwards, be sure to wipe the unit thoroughly with a soft, dry cloth.
- Never use benzine, thinners, alcohol or solvents of any kind, to avoid the possibility of discoloration and/or deformation.
- For routine care of the carpeted surfaces, use a brush with stiff bristles.
Repairs and Data
- Please be aware that all data contained in the unit's memory may be lost when the unit is sent for repairs. Important data should always be written down on paper (when possible). During repairs, due care is taken to avoid the loss of data. However, in certain cases (such as when circuitry related to memory itself is out of order), we regret that it may not be possible to restore the data, and Roland assumes no liability concerning such loss of data.
Main Features
FFP Technology
Equipped with a digital signal processor (DSP), the DB-900 is a bass amp that utilizes FFP technology for both superior performance and high power.
- The entire amp system's acoustic dynamic range is expanded, providing dynamic, powerful sound with output power exceeding spec figures.
- The cabinet's acoustic characteristics are improved for a flat response extending into the low end, enhancing the sound quality of the bass amp system as a whole.
- Speaker amplitude linearity is improved, resulting in superb fidelity to input for clean, clear sound.
COSM Technology
The amplifier section models a variety of amps' sonic characteristics, with different tones based on differences in amp configuration and circuitry, providing a range of sounds, from a high-response, wide-range sound to tube-amp overdrive.
Passive Radiator
By combining the use of FFP technology with passive radiators at both left and right sides, the DB-900 is able to provide sound covering the full bass range, including the critical ultra-low frequency range—without super-woofer!
D-Chorus
This amp features a newly developed D-chorus that has been specially tuned for bass. Dynamic band-division processing is performed as appropriate for the input signal, to produce a great chorus effect that does not impair the low-frequency response even when you use "slap" playing techniques or when you play harmonics.
Memory Storage Feature
You can store the settings for controls in memory A or memory B (Memory feature). It's also possible to call up the contents of memory with a foot switch. This means you can also change amp settings quickly during live performances.
Before You Use the DB-900
The factory-default control settings are stored in memory A and memory B (p. 14). When you switch on the power for the first time after purchase, the sounds play according to the settings in memory A, regardless of the present control settings.

After that, starting with the next time you turn on the power, sounds are played with the settings in effect when the power was last switched off. For instance, if you turn off the power while the settings in memory A are in effect, sounds are played using the settings in memory A the next time you turn on the power.
3-Band Equalizer.
The DB-900 is equipped with a three-band equalizer featuring a parametric MIDDLE equalizer, which allows you to create a wide variety of different sounds. Moreover, when combined with the Shape switch, even more tonal variations are possible.
Broad Expandability
The input and output connectors include a headphones jack with optimized tonal correction, a high-performance XLR-type DI connector, two types of Line Out jacks (an XLR type and a balanced phone jack), and convenient Insert jacks for connecting external effects units or other equipment, thus providing support for a wide variety of applications.

What's FFP (Feed Forward Processing) Technology?
FFP is system control technology that optimizes the performance of the amp, speakers, and cabinet characteristics according to the signals being input, based on results of analyses of the operation and behavior of each section of existing amp systems.

What's COSM (Composite Object Sound Modeling) Technology?
Technology that uses different means to create a virtual reconstruction of physical structures, materials, and so on that actually exist is called modeling technology. COSM is proprietary technology from Roland that combines several kinds of sound-modeling technology to create even newer sounds.
To Use the DB-900 Like a Conventional Bass Amp
When you want to operate the DB-900 like a regular bass amp, whereby settings are controlled directly with the knobs, press the MANUAL button, illuminating its indicator.
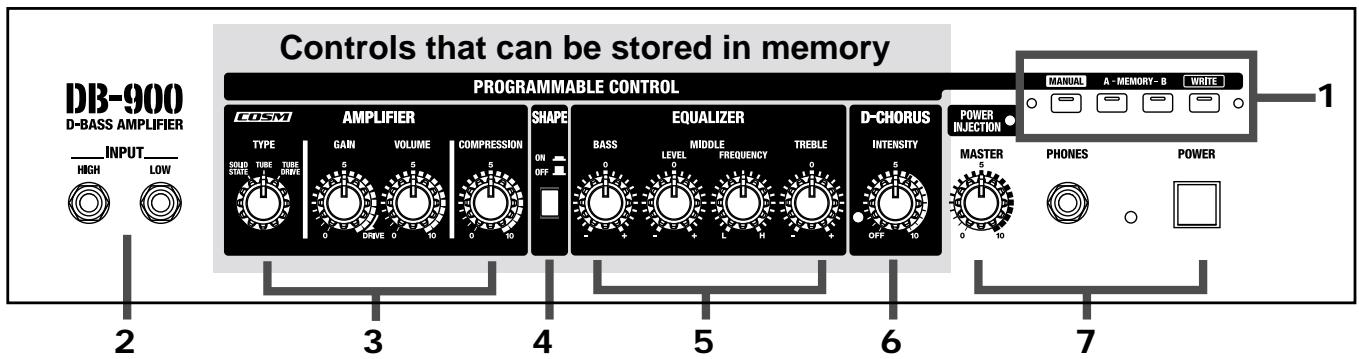
1. Control Buttons
You can store the settings of the controls in memory A or memory B. For more information, take a look at "The Memory Function" (p. 12).
MANUAL Button
To play sounds in a way that faithfully reflects the control settings, press this button to make the indicator light up (the Manual function).

You can use a foot switch to switch the Manual function on and off.
MEMORY A and MEMORY B Buttons
Use these to call up and store knob settings.
The indicators light when the buttons are pressed.

You can use a foot switch to switch between memory A and memory B.
WRITE Button
Press this to store the control settings in memory.
2. Input Jacks
HIGHJack
LOW Jack
Connect the bass guitar to the corresponding jack according to the bass guitar's output level.

Do not connect to the HIGH and LOW jacks simultaneously. This may result in damage to the equipment.
3. Amplifier
Thanks to the modeling function using COSM technology, you can make the settings for a variety of amp sounds.
TYPE Switch
This selects three amp types: solid state, tube, and tube drive.
GAIN Knob
This adjusts the input gain. You can make the settings for a wide range of sounds, from clean to overdrive.
VOLUME Knob
These adjust the volume level. When toggling between memory A and memory B as you use the amp, the VOLUME knob is handy for adjusting the volume level between the two.
COMPRESSION Knob
This adjusts the compression effect.
4. Shape
SHAPE Switch
Setting this switch to ON allows you to modify the tonal characteristics of each amp type selected with the TYPE switch.
5. Equalizer
The DB-900 comes with a three-band equalizer. You can change midrange frequencies, so it's possible to create a wide variety of sounds.
BASS Knob
This adjusts the tone of the bass range.
MIDDLE LEVEL Knob
This adjusts the tone of the middle range.
MIDDLE FREQUENCY Knob
This adjusts the frequency of the middle range.
TREBLE Knob
This adjusts the tone of the treble range.
6. D-Chorus
Thanks to dynamic band-splitting processing according to input signals, you can perform with a chorus effect with no loss in bass-range response.
INTENSITY Knob
This adjusts the amount of chorus that's applied. When you don't want to use a chorus effect, set this to "Off" (the indicator goes dark). If you want to obtain a longer pre-delay effect, set this to a value of 7 or more.

You can use a foot switch to toggle the chorus effect on and off. Note that this is not possible when the INTENSITY knob is off.
7. Master
POWER INJECTION Indicator
This indicator shows the power-boosting effect of DSP. The color of the indicator changes from green to orange according to the effect.
This indicator only applies to the speaker output.
MASTER Knob
This adjusts the volume level of the unit's speaker or the headphones.

The setting of the MASTER knob is not stored in memory A or memory B.
PHONES Jack
This is for connecting headphones. Tonal correction is performed in order to produce the optimal headphones sound.

When headphones are connected, no sound is output to the unit's speaker.

Output to the headphones is monaural.

Before plugging in or unplugging headphones, be sure to adjust the MASTER knob to 0.
POWER Switch
This switches the power on and off. The pilot light illuminates when the power is on.

Before turning the power on or off, be sure to put the MASTER knob at 0.
Rear panel
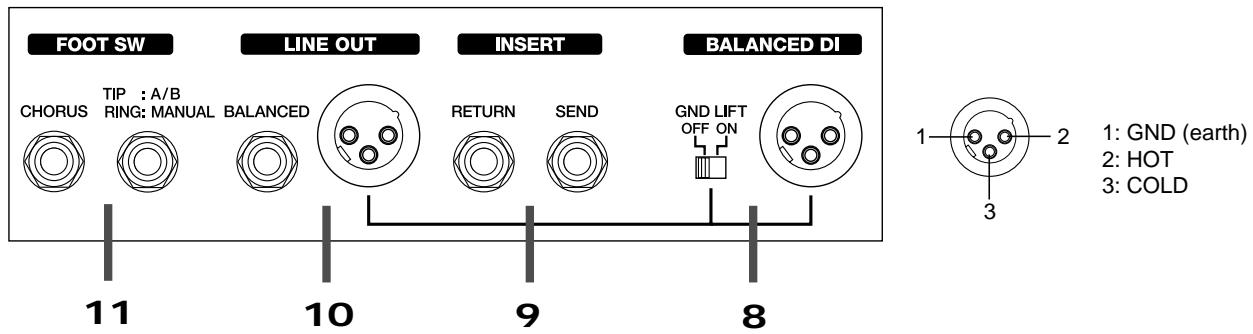
8. Balanced DI
Balanced DI Connector
This is an XLR-type, superior sound quality, balanced DI connector for output of the direct sound of the bass guitar.
GND LIFT Switch
This selects whether the balanced DI connector and the XLR-type Line Out jack are grounded or not. If hum occurs, try changing a switch position
9. Insert
These jacks are for connecting external effects and the like.
SEND Jack
This is the output jack that connects to the input on the external effects unit.
RETURN Jack
This jack is for input of the returned sound from the external effects unit.
10. Line Out
These output preamp sound including D-chorus. There are two types of connectors: an XLR type and a balanced TRS 1/4" phone jack. Use the appropriate one for the equipment you're connecting.
11. Foot Switch
You can connect an optional foot switch (such as the FS-5L) to obtain pedal control over a variety of different functions.
TIP:A/B and RING:MANUAL Jack
You can use a foot switch to switch between memory A and memory B or switch the Manual function on and off.
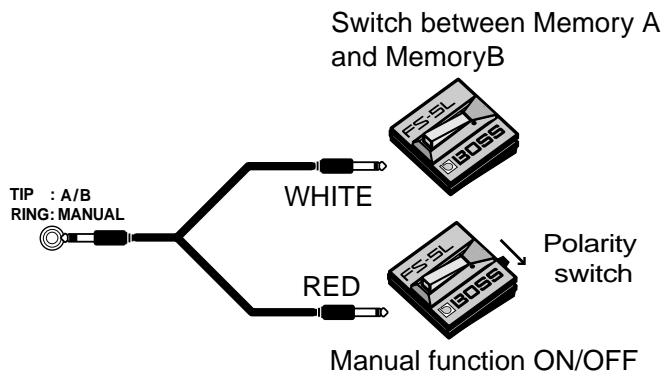
TIP: Switches between memory A and memory B.
RING: This switches the Manual function on and off. When switched off, the settings of the memory just selected are used.

(When using the FS-5L)
When the polarity switch is set as shown in the figure above the FS-5L's indicator lights up when the DB-900 is switched to Manual.

When using a stereo connection cord (PCS-31 etc.), be sure to use two foot switches. Use with one plug empty may result in unstable operation.

When a foot switch is connected to this jack, the MANUAL, MEMORY A, and MEMORY B buttons do not function.

If you use a mono connection cord to connect a foot switch, you'll only be able to use it to switch between Memory A and B.
CHORUS jack
This lets you switch the chorus effect on and off.

(When using the FS-5L) Set the polarity switch as shown in the diagram below. With this setting, the indicator of the FS-5L will light when the Chorus effect is on.
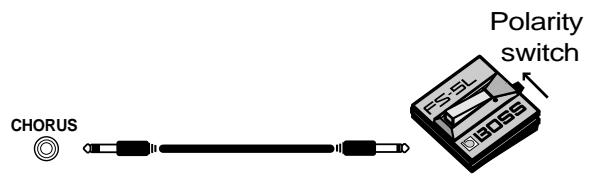

When the D -chorus INTENSITY knob setting is made or stored while at "OFF," the foot switch cannot be used to switch chorus on or off.

If the D -chorus INTENSITY knob has been used to turn on the Chorus effect, using the foot switch to turn off the Chorus effect will cause the D -CHORUS indicator to blink.
Refer to the following diagram and connect the DB-900 to the external equipment you are using.
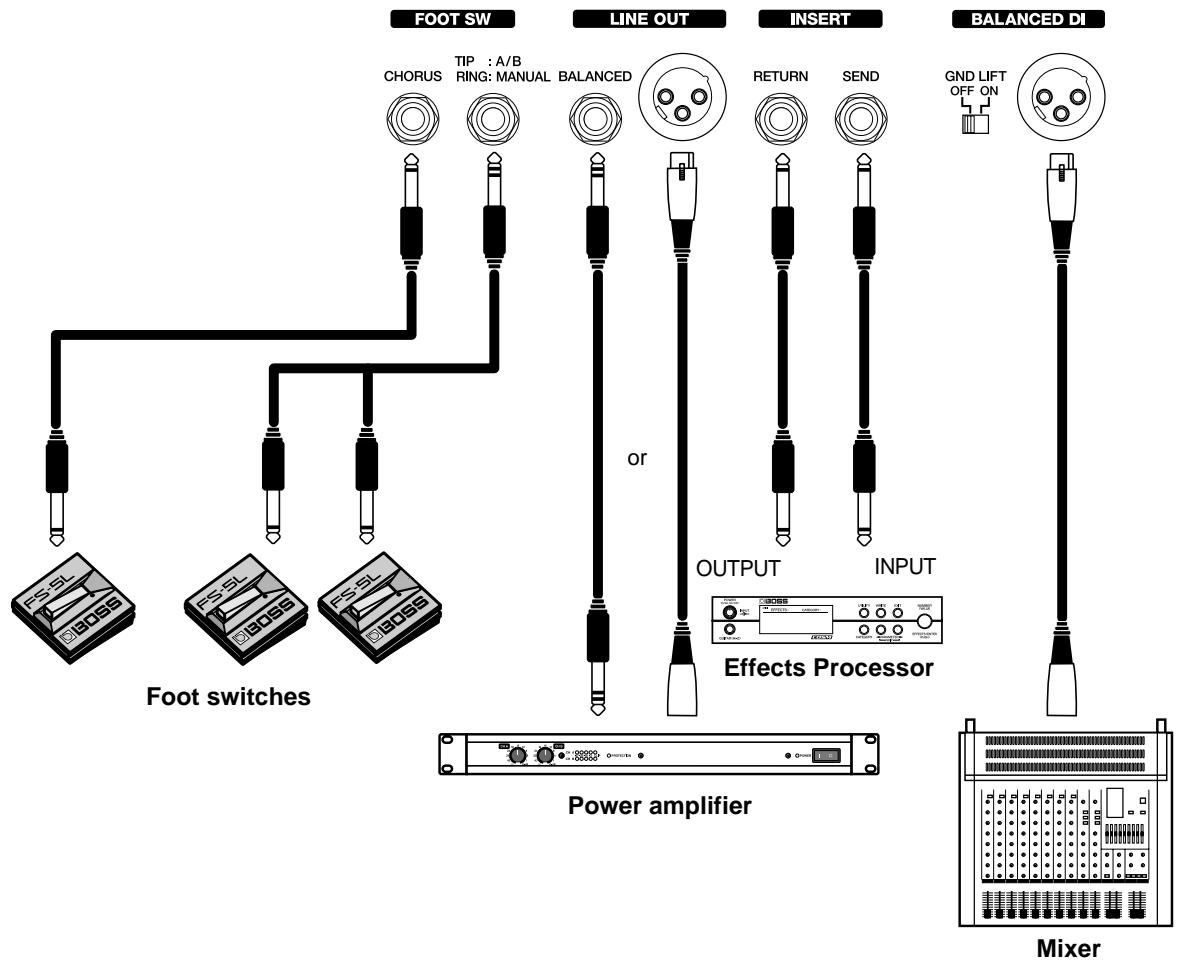
- To prevent malfunction and/or damage to speakers or other devices, always turn down the volume, and turn off the power on all devices before making any connections.
- The pin assignment for the XLR type connectors is as shown below. Before making any connections, make sure that this pin assignment is compatible with that of all your other devices.
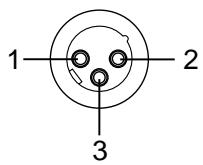
1: GND (earth)
2:HOT
3:COLD
Turn the power on and off
Once the connections have been completed, turn on power to your various devices in the order specified. By turning on devices in the wrong order, you risk causing malfunction and/or damage to speakers and other devices.
- External Effects -> DB-900 -> others output equipment
- Do not touch the cooling vents on the sides of the DB-900; they can become very hot during operation.
- This unit is equipped with a protection circuit. A brief interval (a few seconds) after power up is required before the unit will operate normally.
- Always make sure to have the volume level turned down before switching on/off power. Even with the volume all the way down, you may still hear some sound when the power is switched on/off, but this is normal, and does not indicate a malfunction.
Calling Up Memory
- Press the MEMORY A or MEMORY B button to choose the memory you want.
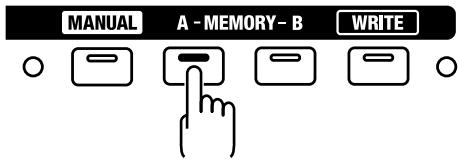

- You can also choose a memory using the foot switch. When doing so, however, be aware that the MEMORY buttons do not function.
- For more on the factory-default settings for memory A and memory B, see "Factory-default Settings" (p. 14).
Changing the Settings for Memory A and Memory B (Edit)
- Press the MEMORY A or MEMORY B button to choose the memory whose settings you want to change.
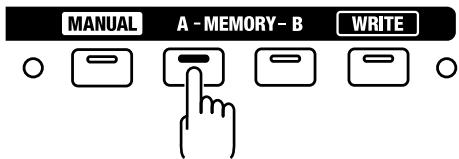

You can also choose a memory using the foot switch. When doing so, however, be aware that the MEMORY buttons do not function.
- Operatethe controls.
When a knob setting is changed, the selected MEMORY button flashes.

When operating the controls, note that editing mode is actually entered after you've hit the same setting as the one in memory. This means it's a good idea to give the control knob a big turn through all the possible settings, then bring it back to the setting you want.

If the MANUAL button or a MEMORY button is pressed at this point, or the power is switched off, any changes you've made in the settings will be discarded.
If you want to save the changes you've made, be sure to carry out the Write procedure.
Storing the Panel Settings in Memory A and Memory B (Write)
You can store the settings for all controls except the MASTER knob in memory A or memory B.
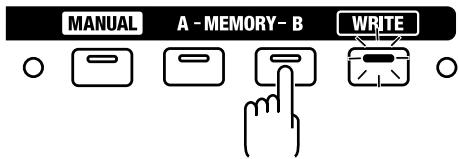
- When you're done making the settings with the controls, press the WRITE button.
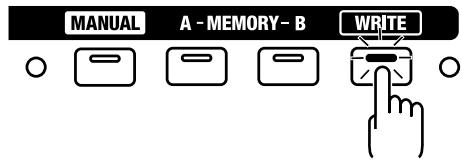
- Press the MEMORY A or MEMORY B button to choose memory A or memory B.
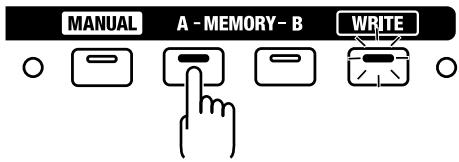

- You can also choose a memory using the foot switch. When doing so, however, be aware that the MEMORY buttons do not function.
-
To cancel the Write procedure, press the MANUAL button. The Write procedure is then cancelled, and the DB-900 switches to Manual mode.
-
Press the WRITE button to write (store) the settings to memory.
The indicator flashes while writing is in progress, and remains steadily lit when it ends.
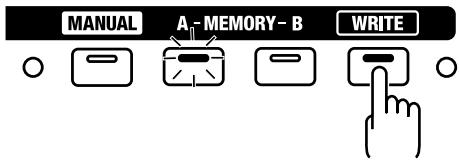

If it is necessary to adjust the volume-level balance between memory A and memory B, adjust the VOLUME knob on the amplifier, and then store the settings.
Attaching and Removing the Casters
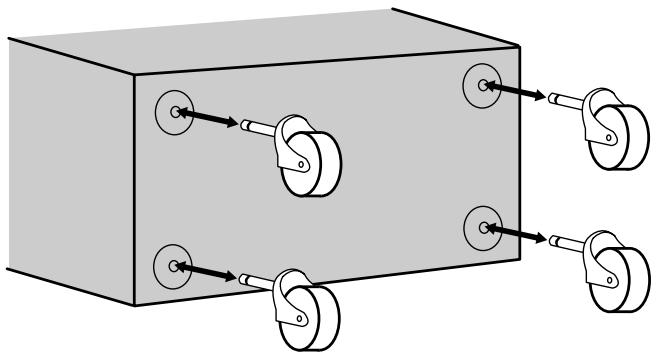
You can attach or remove casters as shown in the following figure.

Be sure to remove all casters when accidental movement may be dangerous such as when setting up the DB-900 on stage or when transporting it in a vehicle.

This is a heavy device. To prevent injury caused by the unit overturning or being dropped, use two or more people to carry the unit whenever possible.

If casters have been attached to the amp, make sure it is used only on a stable, level surface.
Factory-default Settings
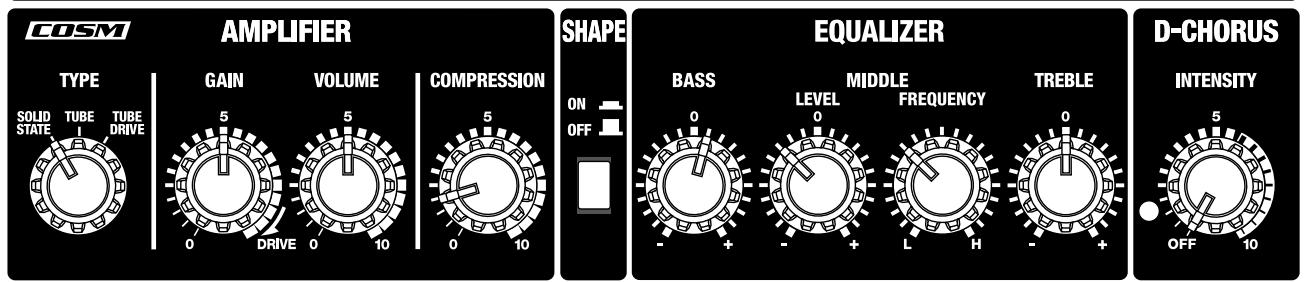
Memory A: Modern Bass
Versatile bass sound for both slapping and finger-picking.
The MIDDLE LEVEL knob controls the definition.
PROGRAMMABLE CONTROL
(ON)
Memory B: Slap Bass
Typical slap sound used in studios.
Adjust the COMPRESSION knob to your taste.
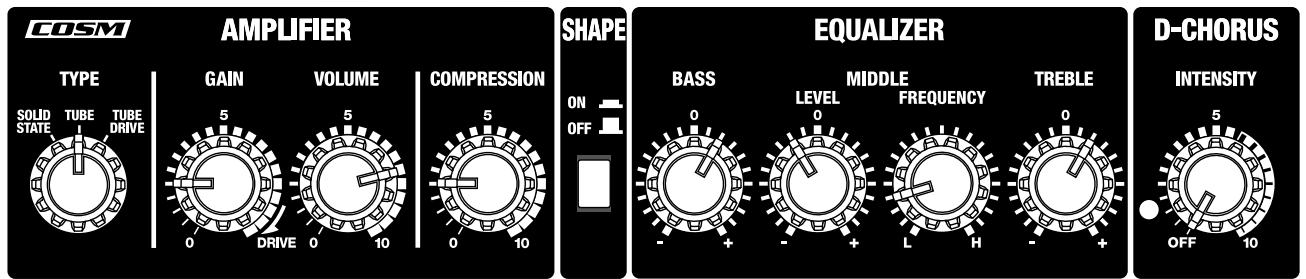
PROGRAMMABLE CONTROL
(ON)
Returning to the Factory-default Settings
To return the settings in memory A and B to their factory defaults, while holding down the MANUAL button, turn on the POWER switch.


POWER
Samle Settings
In addition to the default settings, the following sample settings (which are geared toward specific styles of playing) are also provided.

Once you call up the following sample settings, any settings you've stored at Memory A and B will be lost.
Sample 1
Hold down the MEMORY A button while you switch on the power.
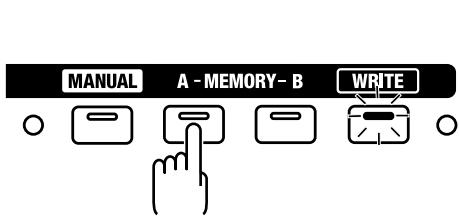

POWER
Then, select either the MEMORY A button or the MEMORY B button.
MEMORY A: Rock Bass
Standard rock sound.
By turning up the GAIN knob enough to produce a slight distortion, you can enjoy the characteristic compression and fatness of a tube amp.
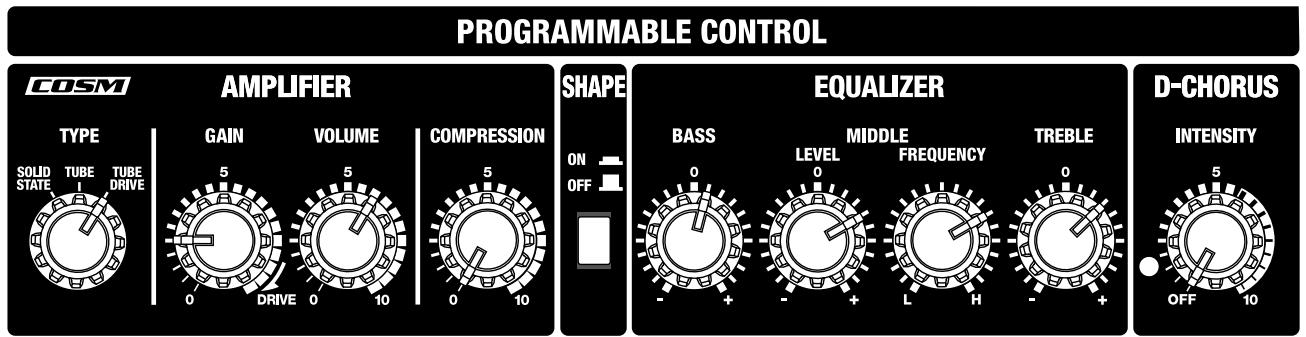
(OFF)
MEMORY B: Solo Fretless
Warm sound suited for fretless bass. Adding D-CHORUS will enhance the harmonics.
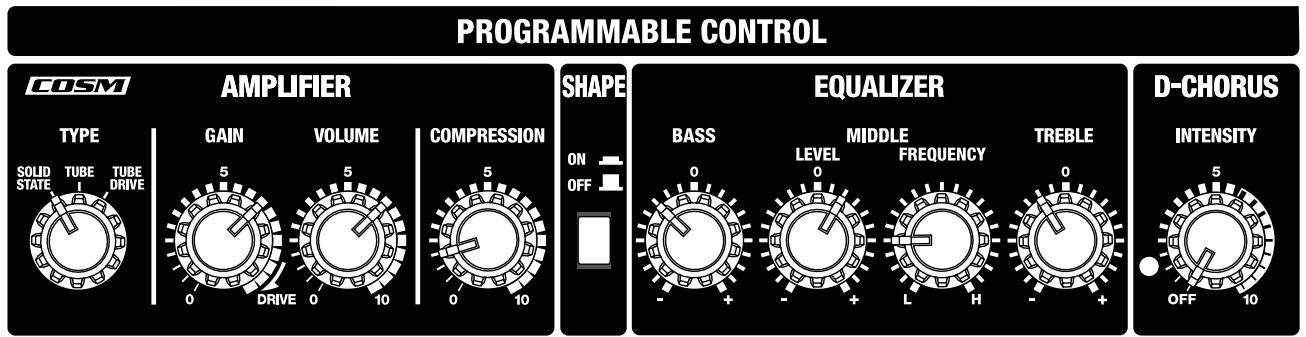
(OFF)
Sample 2
Hold down the MEMORY B button while you switch on the power.

POWER
Then, select either the MEMORY A button or the MEMORY B button.
MEMORY A: Chorus Bass
Transparent chorus sound suited for slapping or flat-picking. The amount of modulation can be controlled with the D-CHORUS INTENSITY knob.
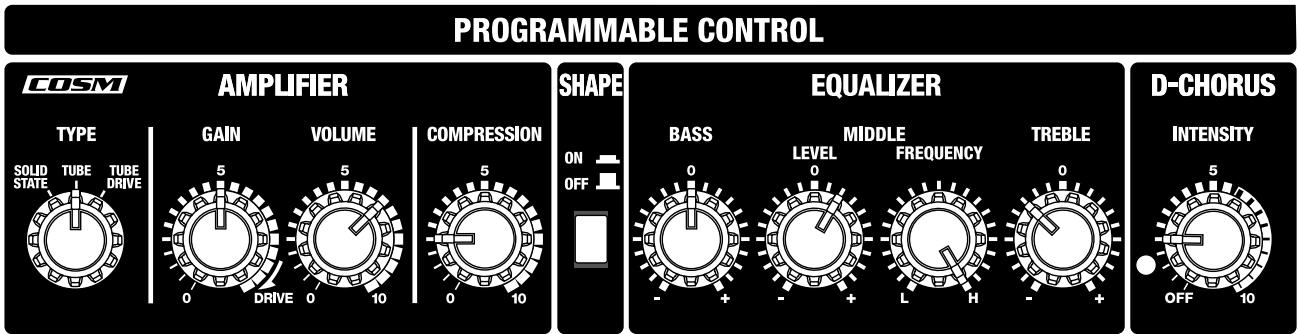
(OFF)
MEMORY B: Overdrive Bass
Wild overdriven sound of the 70's. Great for flat-picking. Use the TREBLE knob to adjust the edginess.
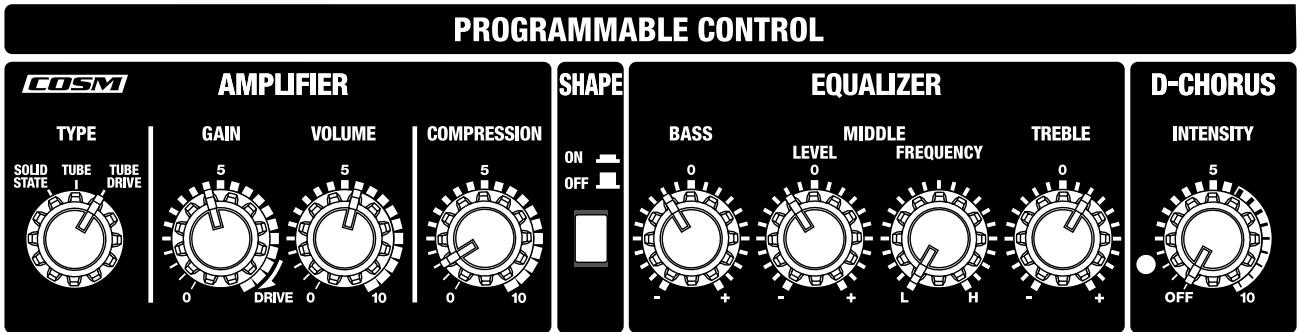
(ON)
Block diagram
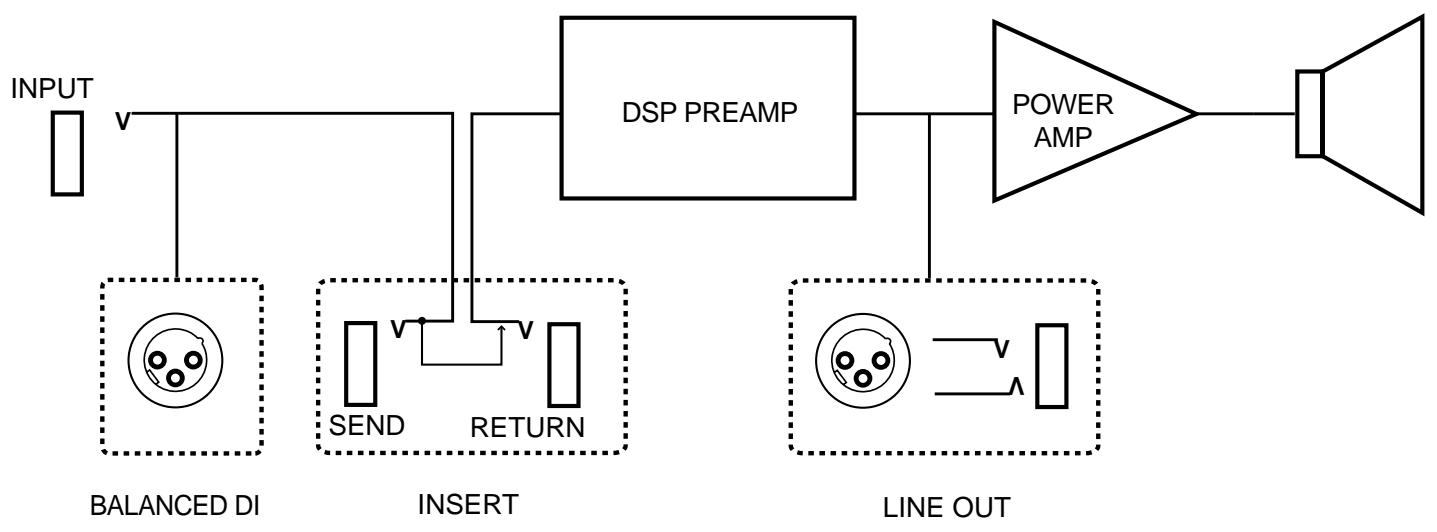
Specifications
Rated Power Output
320W
Nominal Input Level (@1KHz)
INPUT HIGH -30 dBu/1 MΩ
INPUT LOW -20 dBu/300 k Ω
(AMP TYPE: SOLID STATE)
INSERT RETURN +4 dBu
Nominal Output Level
BALANCED DI +4 dBu
INSERT SEND +4 dBu
LINE OUT (XLR type) +4dBu
LINE OUT (PHONE type) +4 dBu
- 0 dBu = 0.775Vrms
Speakers
25 cm (15 inches) x 4
Horn Tweeter x 1
Passive Radiator 30 cm (12 inches) x 2
Memory
A, B (2 memories)
Controls
AMPLIFIER
- TYPE Switch (3 types)
- GAIN Knob
VOLUME Knob - COMPRESSION Knob
SHAPE Switch
EQUALIZER
- BASS Knob
- MIDDLE LEVEL Knob
- MIDDLE FREQUENCY Knob
- TREBLE Knob
D-CHORUS
- INTENSITY Knob (with switch)
MASTER Knob
PROGRAM
- MANUAL Button
- A Button
- B Button
- WRITE Button
POWER Switch
GND LIFT Switch
Indicators
POWER INJECTION (2 colors)
D-CHORUS
POWER
Connectors
INPUT Jacks (HIGH, LOW)
HEADPHONE Jack
BALANCED DI Connector (XLR type)
INSERT Jacks (SEND, RETURN)
LINE OUT Jacks (XLR type, 1/4 inch TRS phone type)
FOOT SWITCH Jacks (TIP: A/B RING: MANUAL, CHORUS)
Power Supply
AC 117 V, 230 V or 240 V
Power Consumption
270 W (117 V, 230 V, 240 V)
Dimensions
654 (W) x 489 (D) x 889 (H) mm
25 - 3/4 (W) x 19 - 1/4 (D) x 35 (H) inches
(including casters)
- In the interest of product improvement, the specifications and/or appearance of this unit are subject to change without prior notice.
This product complies with the requirements of European Directives EMC 89/336/EEC and LVD 73/23/EEC.
-For the USA
FEDERAL COMMUNICATIONS COMMISSION RADIO FREQUENCY INTERFERENCE STATEMENT
This equipment has been tested and found to comply with the limits for a Class B digital device, pursuant to Part 15 of the FCC Rules. These limits are designed to provide reasonable protection against harmful interference in a residential installation. This equipment generates, uses, and can radiate radio frequency energy and, if not installed and used in accordance with the instructions, may cause harmful interference to radio communications. However, there is no guarantee that interference will not occur in a particular installation. If this equipment does cause harmful interference to radio or television reception, which can be determined by turning the equipment off and on, the user is encouraged to try to correct the interference by one or more of the following measures:
Reorient or relocate the receiving antenna.
- Increase the separation between the equipment and receiver.
- Connect the equipment into an outlet on a circuit different from that to which the receiver is connected.
- Consult the dealer or an experienced radio/TV technician for help.
This device complies with Part 15 of the FCC Rules. Operation is subject to the following two conditions:
(1) This device may not cause harmful interference, and
(2) This device must accept any interference received, including interference that may cause undesired operation.
Unauthorized changes or modification to this system can void the users authority to operate this equipment.
This equipment requires shielded interface cables in order to meet FCC class B Limit.
For Canada
NOTICE
This Class B digital apparatus meets all requirements of the Canadian Interference-Caising Equipment Regulations.
AVIS
When you need repair service, call your nearest Roland Service Center or authorized Roland distributor in your country as shown below.
AFRICA
EGYPT
Al Fanny Trading Office P.O.Box 2904.
El Horreit Heliopoulos, Cairo, EGYPT
TEL: (02) 4185531
REUNION
That Other Music Shop
(PTY) Ltd.
11 Melle St., Braamfontein,
Johannesbourg
Republic of SOUTH AFRICA
P.O.Box 32918, Braamfonte
Republic of SOUTH AFRICA
TEL: (011) 403 4105
Paul Bothner (PTY) Ltd.
17 Werdmuller Centre Claremont
7700
Republic of SOUTH AFRICA
P.O.Box 23032
Claremont, Cape Town
SOUTH AFRICA, 7735
TEL: (021) 674 4030
ASIA
CHINA
Beijing Xinghai Musical
Instruments Co., Ltd.
6 Huangmuchang Chao Yang
District, Beijing, CHINA
TEL: (010) 6774 7491
Shanghai Xingtong Acoustics
Equipment CO., Ltd.
Rm.1108, No.2240 Pudong South
Road Shanghai, CHINA
TEL: (021) 6873 4123
HONG KONG
Tom Lee Music Co., Ltd.
Service Division
22-32 Pun Shan Street, Tsuen
Wan, New Territories,
HONG KONG
TEL:24150911
INDIA
Rivera Digitec (India) Pvt. Ltd.
409, Nirman Kendra Mahalaxmi Ela, C. G. J. Offd. D. Edinian
Flats Compound Off. Dr. Edwin Mace Road, Mumbai 400911
Moses Road, Mumbai-400011, INDIA
TEL: (022) 498 3079
INDONESIA
PT Citra IntiRama
J1. Cideng Timur No. 15J-150
Jakarta Pusat
INDONESIA
TEL: (021) 6324170
KOREA
Cosmos Corporation
1461-9, Seocho-Dong.
Seocho Ku, Seoul, KOREA
TEL: (02) 3486-8855
MALAYSIA
G.A. Yupangco & Co. Inc.
339 Gil J. Puyat Avenue
Makati, Metro Manila 1200,
PHILIPPINES
TEL: (02) 899 9801
SINGAPORE
Swee Lee Company
150 Sims Drive
SINGAPORE 387381
TEL:846-3676
CRISTOFORIMUSIC PTE
LTD
Blk 3014, Bedok Industrial Park E,
02-2148,SINGAPORE 489980
TEL:2439555
TAIWAN
ROLAND TAIWAN
ENTERPRISE CO.,LTD.
Room 5, 9fl, No. 112 Chung Shan
N Road Sec 2, Tainei, TAIWAN.
R.O.C
TEL: (02) 2561 3339
THAILAND
Theera Music Co., Ltd.
330 Verng NakornKasem, Soi 2,
Bangkok 10100, THAILAND
TEL: (02) 2248821
VIETNAM
Saigon Music
138Tran Quang Khai St.
District 1
Ho Chi Minh City
VIETNAM
TEL: (08) 844-4068
AUSTRALIA/
NEW ZEALAND
AUSTRALIA
Roland Corporation
Australia Pty., Ltd.
38 Campbell Avenue
Dee Why West. NSW 2099
AUSTRALIA
TEL: (02) 9982 8266
NEW ZEALAND
Roland Corporation Ltd.
32 Shaddock Street, Mount Eden,
Auckland, NEW ZEALAND
TEL: (09) 3098 715
CENTRAL/LATIN
AMERICA
ARGENTINA
Instrumentos Musicales S.A.
Florida 656 2nd Floor
Office Number 206A
Buenos Aires
ARGENTINA, CP1005
TEL: (54-11) 4-393-6057
BRAZIL
Roland Brasil Ltda
Rua San Jose, 780 Sala B
Parque Industrial San Jose
Cotia - Sao Paulo - SP, BRAZIL
TEL: (011) 4615 5666
COSTA RICA
JUAN Bansbach
Instrumentos Musicales
Boulevard Andrews, Albrook,
Panama City,
REP. DE PANAMA
TEL: (507) 315-0101
PARAGUAY
Distribuidora De
Instrumentos Musicales
J.E. Oleary ESQ. Manduvira
Warehouse Area DEPO' Pf.83
H-2046 Torokbalint, HUNGARY
TEL: (23) 511011
IRELAND
Roland Ireland
Audio House, Belmont Court,
Donnybrook, Dublin 4
Republic of IRELAND
TEL: (01) 2603501
ITALY
Roland Italy S. p. A.
Danvik Center 28, 2 tr.
S-131 30 Nacka SWEDEN
TEL: (08) 702 0020
SWITZ
Roland (Switzerland) AG
Musitronic AG
Atlantic Close, Swansea
Enterprise Park, SWANSEA
SA7 9FJ
UNITED KINGDOM
TEL: (01792) 700139
MIDDLE EAST
BAHRAIN
Moon Stores
Bab Al Bahrain Road,
P.O.Box 20077
State of BAHRAIN
TEL: 211 005
CYP2
Radex Sound Equipment Ltd.
17 Diagorou St., P.O. Box 2046,
Nicosia CYPRUS
TEL: (02) 453 426
IRAN
MOCO, INC.
No.41 Nike St.Dr.Shariyati Ave.
Roberoye Cerahe Mirdamad
Tehran, IRAN
TEL: 285 4169
ISRAEL
Halilit P. Greenspoon &
Sons Ltd.
8 Retzif Ha'aliya Hashnya St.
Tel-Ayiv-Yafo ISRAEL
TEL: (03) 6823666
JORDAN
AMMAN Trading Agency
Prince Mohammed St. P.O.Box
825 Amman 11118 JORDAN
TEL: (06) 4641200
KUWAIT
Easa Husain Al-Yousifi
Abdullah Salem Street.
Safat KUWAIT
TEL: 5719499
LEBANON
A. Chahine & Fils
P.O.Box 16-5857 Gergi Zeidan St.
Chahine Building, Achrafieh
Beirut,LEBANON
TEL: (01) 335799
QATAR
Al Emadi Co. (Badie Studio
& Stores)
P.O.Box 62.
DOHA QATAR
TEL:4423-554
SAUDI ARABIA
aDawliah Universal
Electronics APL
Corniche Road, Aldossary Bldg.,
1st Floor
SAUDI ARABIA
P.O.Box 2154, Alkhobar 31952
SAUDI ARABIA
TEL: (03) 898 2081
SYRIA
Technical Light & Sound
Center
Khaled Ibn Al Walid St.
P.O.Box 13520
Damascus - SYRIA
TEL: (011) 2235 384
TURKEY
Barkat muzik aleteri ithalat
ve ihracat Ltd Sti
Sirasylviler cad.Guney is hani 84-
86/6, Taksim. Istanbul. TURKEY
TEL: (0212) 2499324
U.A.E
Zak Electronics & Musical
Instruments Co. L.L.C.
Zabeel Road, Al Sherooq Bldg.
No. 14, Grand Floor DUBAI
U.A.E.
TEL: (04) 3360715
NORTH AMERICA
CANADA
Roland Canada Music Ltd.
(Head Office)
5480 Parkwood Way Richmond
B.C.,V6V2M4 CANADA
TEL: (0604) 270 6626
Roland Canada Music Ltd.
(Toronto Office)
Unit 2, 109 Woodbine Downs
Blvd, Etbicoke, ON
M9W 6Y1 CANADA
TEL: (0416) 213 9707
U.S.A.
Roland Corporation U.S.
5100 S. Eastern Avenue
Los Angeles, CA 90040-2938
U.S.A.
TEL: (323) 890 3700
f May 15, 2001 (Roland)
Roland Corporation