
CA-70 CI - Fan FAGOR - Free user manual and instructions
Find the device manual for free CA-70 CI FAGOR in PDF.
| Product type | Tower fan with remote control |
| Brand | FAGOR |
| Model | CA-70 CI |
| Power supply | 220-240 V ~ 50/60 Hz |
| Remote control batteries | 2 AAA batteries (not included) |
| Power | 45 W (estimated) |
| Number of speeds | 3 adjustable speeds |
| Oscillation | Yes, automatic |
| Timer | Yes (adjustable hours) |
| Negative ion generation | Yes, for air purification |
| Control panel | Integrated touch panel |
| Remote control | Yes, infrared |
| Height (estimated) | Approximately 70 cm |
| Net weight (estimated) | Approximately 3.5 kg |
| Maintenance and cleaning | Soft damp cloth. Do not immerse. Unplug before. |
| Repairs | Contact an authorized service. Use original parts. |
| Safety | Overheat protection (estimated). Do not obstruct the grilles. |
| Warranty | 2 years (standard) |
Frequently Asked Questions - CA-70 CI FAGOR
User questions about CA-70 CI FAGOR
0 question about this device. Answer the ones you know or ask your own.
Ask a new question about this device
Download the instructions for your Fan in PDF format for free! Find your manual CA-70 CI - FAGOR and take your electronic device back in hand. On this page are published all the documents necessary for the use of your device. CA-70 CI by FAGOR.
USER MANUAL CA-70 CI FAGOR
SR - UPUTSTVO ZA UPOTREBU
BG-ИHCTPYKIIJ3A YIOTPEBA
RU - INHCTPYKUIMI NO 3KCNYATALINN

VENTILADOR DE TORRE / TOWER FAN / VENTILATEUR COLONNE /
STANDVENTILATOR / VENTILATORE A TORRE / ANEMIETHPA ANE OY /
OSZLOPVENTILLATOR / SLOUPOVY VENTILATOR / STLPOVY VENTILATOR /
WENTYLATOR PIONOWY / JONIZATOR / BEHTNIATOP - KOJIOHA / BAUEHHBI
BEHTNJIATOP
MOD.:
CA-60 C
CA-70 CI
N.I.F. F-20.020.517 - B. San Andres, n. 18 • Apartado 49 - 20500 MONDRAGON (Guipuzcoa) ESPANA
N.I.F. F-20.020.517 - B°. San Andres, n° 18
Apartado 49 - 20500 MONDRAGON (Guipuzcoa) ESPANA

Mayo 2008
FAGOR


FAGOR

Fig.2. Abb.3. Eik. 2
2.Abrs Obr.2 Rys 2
ΦMC.2 PMC.2
Fig.3 Abb.3 Eik.3
3.Abrs Obr.3 Rys 3
Phi.3
Pwc.3
ES
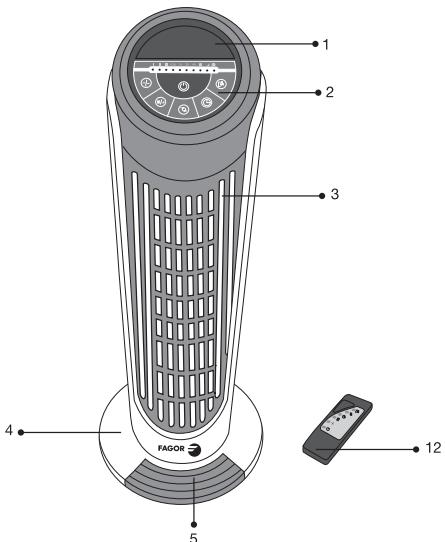
1. DESCRIPTICN
Mo, CA-70 CI HnKdA TOpH oMOE noBHTC hA LCD 3kane (D).
Eue pa3 nakmite KHONKY, Tc0b6I kTNKNOHTb fynHkU.
6. OHNCTKA
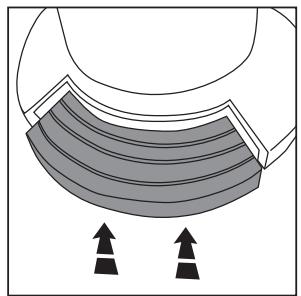
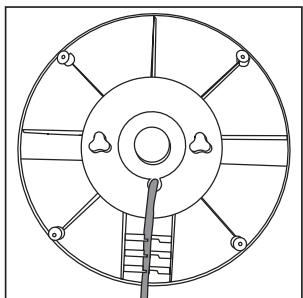
IpeTep TM KAK OCSUYCTBMTK KAYKO JINHO OpeaHMO NO 05CNYKBAHHNIO OHNCTKE, YCTAOHBITE BOC KOHTPONPBIe BY NONOJHENHE BkIKNOHEno B NKIKNHOHNT PnOOPM3 K3POTKETN.C MOnTOUH MRKCIe CIEKIA BLKNOH KTHANO OHNCTPE BHEUHOHO NDOXHCTOK BYBENTRAP. HeJI38 nO3BOITBL, YTO6I BOda NpOADAPA B DBWATATEB BO BPOEMr OHNCTKI. HeJI38 nOpyKAbTI Annapat B BOY. HeJI38 nOPIKOB30BATS PACTOBRTMI IN A bAp3BIMNBEPODKTJBY D NCHQCTNI BHTNITRTORA.
a aae aee aee aee aee
hase 12. Sempre que premio
a a a a a a a a a a a a a a a a a a a a a a a a a a a a a
tne for "hich" mode (c) f you wish
rnnnne nnnnne nee
e a
oohnnnne nnnnne nee eae
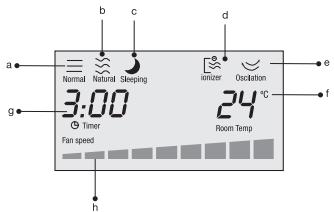
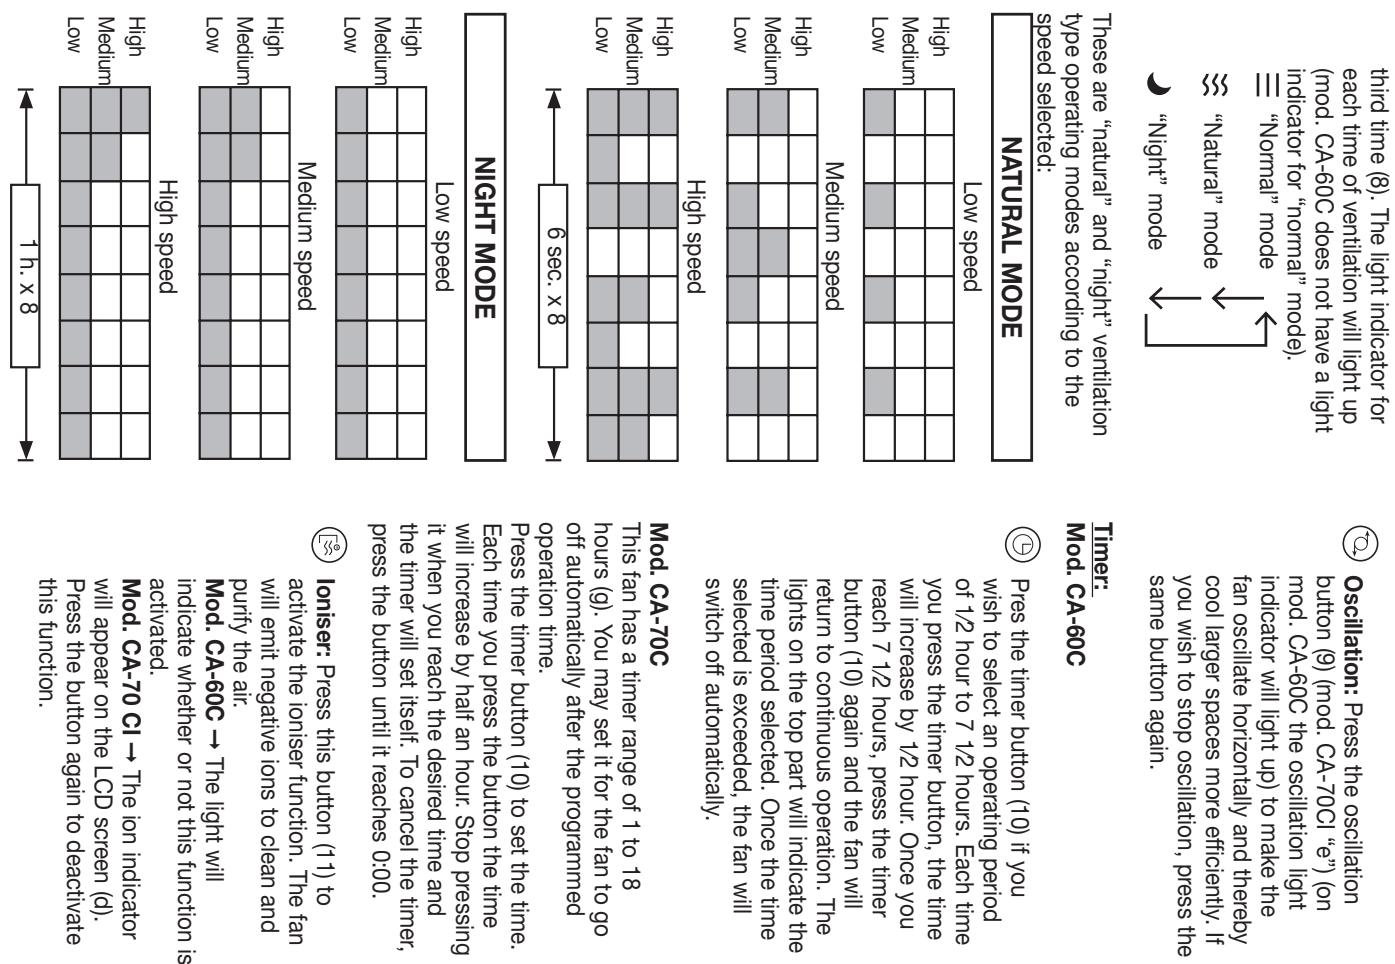
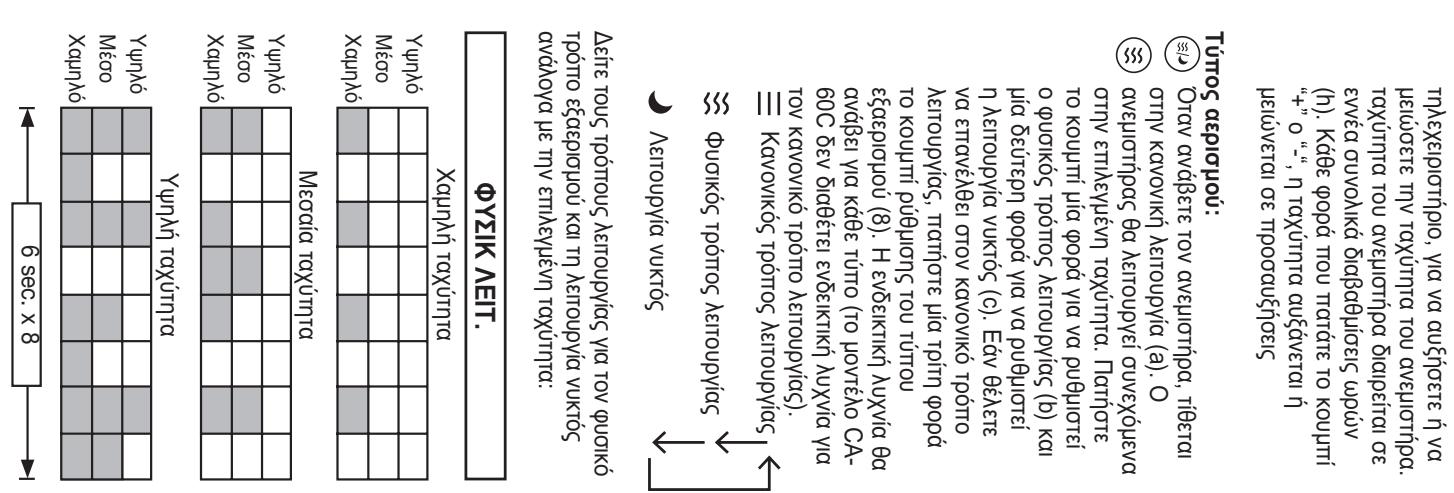
of ventilation: When you switch on the fan, it will come on in "normal" mode (a). The fan will operate continuously at the selected speed. Press the button once for "natural" mode (b) and a second time for "night" mode (c). If you wish to return to "normal" mode press
wll increase or decrease in segments
prss the +or button, the spee
nne nnnnne nnnnne nnnnne nnnnne
speed The fan speed has a total of
cort to increase or lower the fan
touhne eonrnnnne ene ne nne
00
P
n nnnnne nnnnne nnnnne nnnnne nnnnne nnnnne nnnnne nnnnne nnnnne nnnnne nnnnne nnnnne nnnnne nnnnne nnnnne nnnnne nnnnne nnnnne nnnnne nnnnne nnnnne nnnnne nnnnne nnnnne nnnnne nnnnnee
rading to the speed you have selected
=
=
eessss
speed (iii), and three times to return to
a medium (ii) speed, twice for "high"
"low" 1. Press the button once to set
Switch on the fan the set speed will be
if you wish to switch it off.
sess
iY
aee aae
P
oohn an onn nnnn nn nnnn
1
a
oohnne nnnnne
oohn an onn nnnn nn nnnn
1
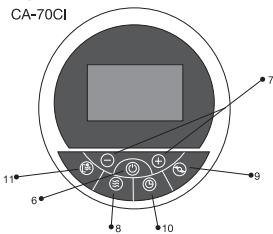
e control (12) as it has the same
nns on the control panel (2) or the
an may be controlled using the
e surface.
reoperating the fan, place it on a flat
1
e aae
aee eae aee
C
fucnnnns
rnnnne nnnnne nnnnne nnnnne nnnnne nnnnne nnnnne nnnnne nnnnne nnnnne nnnnne nnnnne nnnnne nnnnne nnnnne nnnnne nnnnne nnnnne nnnnne nnnnne nnnnne nnnnne nnnnne nnnnne nnnnne nnnnne
bnnnne nne nee eae
The fan may be controlled using the
stable surface.
Paeeppeeppeeppeeppeeppeeppeeppeeppeeppeeppeeppeeppeeppeeppeeppeeppeeppeeppeeppeeppeeppeeppeeppeeppeeppeeppeeppeeppeeppeeppeeppeeppeeppeeppeeppeeppeeppeeppeeppeeppeeppeeppeeppeeppeeppeeppeeppeeppeeppe
5.OPERATION
- OPERATION
1
6.CLEANING
Bae aee eae eae eae eae eae eae eae eae eae eae eae eae eae eae eae eae eae eae eae eae eae eae eae eae eae eae eae eae eae eae eae eae eae eae eae eae eae eae eae eae eae eae eae eae eae eae eae eae eae eae e ae
outside of the fan. Do not allow water into
the appliance in water. Do not use solvent
prouuie to clean the fan
% REMOTE CONTROL (12)
7. REMOTE CONTROL (12)
Do not mix old batteries with new ones
- Replace the lid.
rnnnne nnnnne ennnnne
rnnnne nnnnne ennnnne
e e e e e e e e e e e e e e e e e e e e e e e e e e e
aannnnnne aannnnnne ane annnnnne
aen ane ane ane ane ane ane ane ane ane ane ane ane ane ane ane ane ane ane ane ane ane ane ane ane ane ane ane ane ane ane ane ane ane ane ane ane ane ane ane ane ane ane ane ane ane ane ane ane ane ane anee aeae
rnrnnnne nnnnne rannnnne eannnnnne
3 INFORMATION FOR THE CORRECT DISPOSAL OF ELECTRICAL AND ELECTRONIC APPLIANCES
ELECTRONIC APPLIANCES
e e
y life, the product must not be
waste collection centre o
to a dealer providing this
e e
a aaaan ane aannnne aae
to a dealer providing this
sere eae aee
seeparee eae aee eae eae eae eae eae eae eae eae eae eae eae eae eae eae eae eae eae eae eae eae eae eae eae eae eae eae eae eae eae eae eae eae eae eae eae eae eae eae eae eae eae
heath deriving from inappropriate dispo
eae aee eae aeae aee aee
eaaee aae eae aee
Rerereee
distance of 6 metres away from the fan.
#
FR
31 31
rnnn nnnnne nnnnne nnnnne nnnnne nnnnne nnnnne nnnnne nnnnne nnnnne nnnnne nnnnne nnnnne nnnnne nnnnne nnnnne nnnnne nnnnne nnnnne nnnnne nnnnne nnnnne nnnnne nnnnne nnnnne nnnnne nnnnnee
30 00r1 313gAnan3nD yn3xon
U3130n3XIOU3D 3J3LOO3OX nou U3130n3XIOU3D 3Z 313OMADOIOU3A U3
yoo oonn nn 510X an 3olgo
Aa
Snuuuaa Suuauauauy Sxkx 1xu/u Suupvduumd3437
y
3130dDgA 3130AIX3nOLO
0211 1111 5101 313300000000000000000000000000000000
0000 3133dDQ
13 13 130011111111
OONN NNNNNNNNNNNNNNNNNNNNNNNNNNNNNNNNNNNNNNNNNNNNNNNNNNNNNNNNNNNNNNNNNNNNNNNNNNNNNNNNNNNNNNNNNNNNNNNNNNNNNNNNN
1111111111111111111111111
n bn 133
333 100 433 00 433 00 30
()13Xdpun noo)pIAPHJ3 ydAn
o mnnnno n3xono u np3 du Sun3xono Su oqmyo
P
y 30 y 30 30 30 30 30 30 30
x 13130116 8x39 yn3xyn H nogu u pid3X npdAn U
H3d9 3n 3xono 1 3132AaNw
03rnn3nq133url 00d310ydp
+
(1)
Moueao CA-706
aannnnnne aannnnnne
Aevnre nnnnne nee eee
XaHnTaXuTnTa YMePac taXuTnTa YUnnTaXuTnTa
rnnn nnnnnaa aannnne
T 111
Taaaataa aaaaa aaaaa aa aaaaa aaaaa aaaaa aaaaa aaaaa aaaaa aaaaa aaaaa aaaaa aaaaa aaaaa aaaaa aaaaa aaaaa aaaaa aaaaa aaaaa aaaaa aaaaa aaaaa aaaaa aaaaa aaaaa aaaaa aaaaa aaaaa aaaaa aaaaa aaaaa aaaaa aaaaa aaaaa aaaaa aaaa
aee aae eae aee
Ae aae eae ae aee
eepnepnne nnnnne nee
T
T
eao CA-60C
aannnnnne aannnnnne
aannnnnne nnnnne aennnne nnnnne
I I I I I I I I I I I I I I I I I I I I I I I I I I I I I I I I I
Tnnae aeeYoo qofo (2) hto
TTOO OIOOIOOIOOIOOIOOIOOIOOIOOIOOIOOIOOIOOIOOIOOIOOIOOIOOIOOIOOIOOIOOIOOIOOIOOIOOIOOIOOIOOIOOIOOIOOIOOIOOIOOIOOIOOIOOIOOIOOIOOIOOIOOIOOIOOIOOIOOIO
eepn eepn ennnne nnnnne nee
T a KOUTHO TOU UTOQOXOUV QTOV TIVCKQ
H pueaon Tou aeeanrnpa yevra tno
Pnroou aayre Toy aotnpa
3
tiofoxou tno 86n (Eik 3)
e e e e e e e e e e e e e e e e e e e e e e
TOTGROTNTH TINQKOGUKNKNTN TTAGKQNTN
4 4
D
eepaaee aae
(1) RAGE 1100 INCHES TO 1000
e e e e e e e e e e e e e e e e e e e e e e e e e e e e e e e e e e e e e e e
aXunta Tou avsotpa Siaqirai ae
Tnrrnnnne nnnnne nnnnne nnnnne nnnnne nnnnne nnnnne nnnnne nnnnne nnnnne nnnnne nnnnne nnnnne nnnnne nnnnne nnnnne nnnnne nnnnne nnnnne nnnnne nnnnne nnnnne nnnnne nnnnne nnnnne nnnnne
TAAATTTTATTTTATTTTATTTTATTTTATTTTATTTTATTTTATTTTATTTTATTTTATTTTATTTTATTTTATTTTATTTTATTTTATTTTATTTTATTTTATTTTATTTTATTTTATTTTATTTTATTTTATTTTATTTTATTTTATTTTATTTTATTTTATTTTATTTT
Tatnne To Xpovooekonrnn (10)
Xpovoo AetoupyiKs Tou auohuHpa
a 12.5c7 12.6pc.K68
Pocua Tou TATRE TO KoutTI
Xpovotpooyoepaiaoi, o Xpovoc
auGavetai kara.12.6pc.OraV qntae
gTc 7.12.6pc.Esv Ttathete gava.
TOxovooakkronrnn (10), o aeUHTIe
QteTeE or ouuvxH keTuOyivci. O
goTt eTtva upeos Tn oukeun
gEyvouv thy emAevyn Xpovkn.
TEpOoo AetoupyiCs MOAn TEpOen o
Xpovos AetoupyiKs Tou emEvge, o
aevuHypcs, 9a 0h0n auropa.
C
Mortexo CA-60C
XooovokotTt
auro' kouu
Taae aae eae aee
aee aee eae
aee aee eae
Prrnne nnnnne nee eannne ennnne
e eae aee
Tepoepn 901000000000000000000000000000000000000000000000000
#
1

Yunhao, taoyueta

M

Xapn np
AET:NYKTOZ
MOVTENO CA-1/UC
Tn a kaei eepiee ie kaeipoee t n aekun. hva kaei eepieae auvtipni1s,cbfte Tn aukun kai yabeTe to kakis.115 atro Tn aukun kai yabeTe to kakis.115 atro Tn aukun kai yabeTe to kakis.115 atro Tn aukun kai yabeTe to kakis.115 atro Tn aukun kai yabeTe to kakis.115 atro Tn aukun kai yabeTe to kakis.115 ato Tn aukun kai yabeTe to kakis.115 ato Tn aukun kai yabeTe to kakis.115 ato Tn aukun kai yabeTe to kakis.115 ato Tn aukun kai yabeTe to kakis.115 ato Tn aukun kai yabeTe to kakis.115 at o Tn aukun kai yabeTe to kakis.115 ato Tn aukun kai yabeTe to kakis.115 ato Tn aukun kai yabeTe to kakis.115 ato Tn aukun kai yabeTe to kakis.115 ato Tn aukun kai yabeTe to kakis.115 at
6. KAOAPZMOZ
aannnne aannnnnne
aannnne aannnnnne nnnnne ane annnnnne
Moee eae 000000000000000000000000000000000000000000000000000000000
eannnnnne nnnnne nnnnne
aee aee eae
R 11111111111111111111111111111111111111
e e e e e e e e e e e e e e e e e e e e e e e e
aee aaeaae aee
Prrnne nnnn nee: Prrnne rree
000
OVOO
Tnrrnnnne nnnnne nnnnne nnnnne nnnnne nnnnne nnnnne nnnnne nnnnne nnnnne nnnnne nnnnne nnnnne nnnnne nnnnne nnnnne nnnnne nnnnne nnnnne nnnnne nnnnne nnnnne nnnnne nnnnne nnnnne nnnnne
Tn Tn nnnnne nnnnne nnnnne nnnnne nnnnne nnnnne nnnnne nnnnne nnnnne nnnnne nnnnne nnnnne nnnnne nnnnne nnnnne nnnnne nnnnne nnnnne nnnnne nnnnne nnnnne nnnnne nnnnne nnnnne nnnnne nnnnnee nnnnne nnnnne nnnnne nnnnne nnnnne nnnnne nnnnne nnnnne nnnnne nnnnne nnnnne nnnnne nnnnne nnnnne nannnee
aannnnnne aannnnnne nnnnnnne
Prrnnnne nnnnne nnnnne nnnnne nnnnne nnnnne nnnnne nnnnne nnnnne nnnnne nnnnne nnnnne nnnnne nnnnne nnnnne nnnnne nnnnne nnnnne nnnnne nnnnne nnnnne nnnnne nnnnne nnnnne nnnnne nnnnne
oepa aenrnnnne nnnnne ennnnne
Tnrrnnrnnnne nnnnne nnnnne nnnnne nnnnne nnnnne nnnnne nnnnne nnnnne nnnnne nnnnne nnnnne nnnnne nnnnne nnnnne nnnnne nnnnne nnnnne nnnnne nnnnne nnnnne nnnnne nnnnne nnnnne nnnnne nnnnne
aannnnnne aannnnnne nnnnnnne
e e e e e e e e e e e e e e e e e e e e e e e e e e e e
18 1
aee aae eae
0
7. THAMEPEI THPO (12)
Tortobacterium utarapaidy Avoilise To Kaohuaia TNS
Torterter
MnV XonH
Tnss
Puraray.
T a KOUHTIET AYVTO TIO TNOO
eepnne eae ennnnne nnnnne nee
Tnrrnnnne nnnnne nnnnne nnnnne nnnnne nnnnne nnnnne nnnnne nnnnne nnnnne nnnnne nnnnne nnnnne nnnnne nnnnne nnnnne nnnnne nnnnne nnnnne nnnnne nnnnne nnnnne nnnnne nnnnne nnnnne nnnnne
Tnrrnnnne nnnnne nnnnne nnnnne nnnnne nnnnne nnnnne nnnnne nnnnne nnnnne nnnnne nnnnne nnnnne nnnnne nnnnne nnnnne nnnnne nnnnne nnnnne nnnnne nnnnne nnnnne nnnnne nnnnne nnnnne nnnnne
aannnnnne aannnnnne
8 TANHOOPEES NTH 20NTH AIXAE PSH
HAEKTPONIKQN ZSYKEYQN
Ta aotkakatoppaata.
Mtropi va qotebeia eioik
eepnne eee
aee aae aeae aeae aeae aeae aeae aeae aeae aeae aeae aeae aeae aeae aeae aeae aeae aeae aeae aeae aeae aeae aeae aeae aeae aeae aeae aeae aeae aeae aeae aeae aeae aeae aeae aeae aeae aeae aeae aeae aeae aeae aeae aeae aeae aeae aeae aeae aeae aeae aeae aeae aaee
bomo; amkor eer a kivn horyravoc b
aazlakpsocio gombiat meyoma az
INFORMACO

eennnnnne nnnnne ennnnne eannnnnne
n 1
eannnne nnnnne ennnnne ennnnne ennnnne ennnnne ennnnne ennnnne ennnnne ennnnne ennnnne ennnnne ennnnne ennnnne ennnnne ennnnne ennnnne ennnnne ennnnne ennnnne ennnnne ennnnne ennnnne ennnnne ennnnne ennnnne ennnnne
- nebo (7) na oladacn panbrel
rnnnne nnnnne nnnnne nnnnne nnnnne nnnnne nnnnne nnnnne nnnnne nnnnne nnnnne nnnnne nnnnne nnnnne nnnnne nnnnne nnnnne nnnnne nnnnne nnnnne nnnnne nnnnne nnnnne nnnnne nnnnne nnnnne
MOOCA-70G1
aee
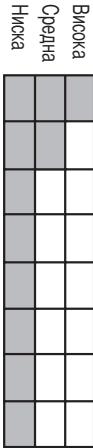
Podite toho, kerou ychost nastavite, rozsvitse kontrlkla, ktera zvoitenou rychost
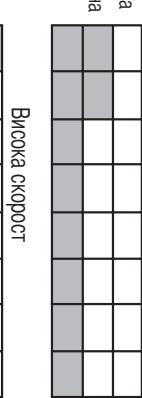
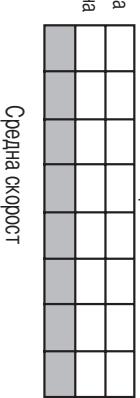
Nizka nychost Siednichnychost Vysoka nychost
rna nna nna 1ychoa (1)
e 1000000000000000000000000000000000000000000000000
Kraa naizn (rstechn) rachosj (Jen)
zapheletvithtntnastaveny Nchost
(7) a nastavite pro nastaveni ychosi Kdy
Nastaveni rychost: Nostaveni 60C
aee
Ovadan, um zapharot haharot. FOKC
s takiy (2) nebo na dalkovem
aepnne aee nnnnne eae
e e
m = 311 ;
e e 2
m : x = 1 或 3x + 4y + 1 = 0
e e 6
a a a a a a a a a a a a a a a a a a a a a a a a a a a a a a a a a a a
a bty site nastavill "prridy" reim (b)
nne nnnnne nee nne nne nne nne nne nne nne nne nne nne nne nne nne nne nne nne nne nne nne nne nne nne nne nne nne nne nne nne nne nne nne nne nne nne nne nne nne nne nne nne nne nne nne nne nne nne nne nne nne nne nnee
Drih Vntilie
1
normaionre zime (a) Ventilator
Ked ventilator, zapnele, naslav, sa v
Rerreee
8. INFORMÁCIA, TYKALUCA SA SPRÁVNEHO NAKLADANIA S ODPAODZ ELEKTRICKYCHA ELEKTRONICKYCH SPOTREBCOV

Poo konen pracovne jn vivnoi vnpkns s in

aonrnoanrnnnne
Peppepepepepepepepepepepepepepepepepepepepepepepepepepepepepepepepepepepepepepepepepepepepepepepepepepepepepepepepepepepepepepepepepepepepepepepepepepepepepepepepepepepepepepepepepepepepepepe pe
zakuplone uraizene.

propisima. Ako postoji i mala sumna,
kontaktiraje za to ovlašćeni servis ili
kvalifikovanu osobu.
Korišćenje adaptera, višestrukh utčnica
Korišćenje adaptera, višestrukih utićnica sa produžnim kablom nilje preporučljiva. Kada ne postoji mogucnost da se izbegne
raae, poonnoo pinnne iia npu
Zeife da zausavite osciatorn nacin
efikasnje rashadeno veci prostor.Ako
aee aae eae aeae aee aee
Cupalce se indicator za oscholay)
modelu CA-70 C) na modelu CA-56
Oscalatae primithe kibut (1970)

1


NNOOHN NNNN
8. INFORMACUE ZA KOREKTNO ODLAGANJE ELEKTRICHI ELEKTRONSKIAPARATA

vastiliaakote distribution pdoco mesto
o 0
noguci negativi eletki na okolinu, zdravh
2. TEXHINUeCKN XAPAKTEPNUCTIKN
e 6
eep
Ee HHeHHeBHeAe He HrHrNc
n 1
H
mnnnne nnnnne nnnnne nnnnne
e eae aee
Hnngnnn nn nnnn
H
nne nnnnne nee
e e e e e e e e e
O
e on exel sheehood en hine
n nnnnn n egege ene neendnne H
e e
HxhDnHnHnHnHnHnHnHnHnHnHnHnHnHnHnHnHnHnHnHnHnHnHnHnHnHnHnHnHnHnHnHnHnHnHnHnHnHnHnHnHnHnHnHnHnHnHnHnHnHnHn
H
HxHdHdNnndOo WkXeOeHdDgO
e HnHnHnHnHnHnHnHnHnHnHnHnHnHnHnHnHnHnHnHnHnHnHnHnHnHnHnHnHnHnHnHnHnHnHnHnHnHnHnHnHnHnHnHnHnHnHnHnHnHnHn H
HHeHHeHHeHHeHHeHHeHHeHHe HHeHHe HHeHHe HHeHHe HHeHHe HHeHHe HHeHHe HHeHHe HHeHHe HHeHHe HHeHHe HHeHHe HHeHHe HHeHHe HHeHHe HHeHHe HHeHHe HHeHHe HHeHHe HHeHHe HHeHHe HHeHBe HHeHBe HHeHBe HHeHBe HHeHBe HHeHBe HHeHBe HHeHBe HHeHBe HHeHBe HHeHBe HHeHBe HHeHBe HHeHBe HHeHBe HHeHBe HHeHBe HHeHBe HHeHBe HHeHBe HHeHBe HHeHBe HHeHBe HHeHBe HHeHBe HHeH
(9) LREHNREBECBHOHOLNGeHHeHnEHN
e e 1
OLOHONTHNEOENNNEEHNNEE (2) UEHUNHOH
EH 1HHOHOHOHOHOHOHOHOHOHOHOHOHOHOHOHOHOHOHOHOHOHOHOHOHOHOHOHOHOHOHOHOHOHOHOHOHOHOHOHOHOHOHOHOHOHOHOHOHOHOHOHOHOHOHOHOHOHOHOHOHOHOHOHOHOHOHOHOHOHOHOHOHOHOHOHOHOHOHOHOHOHOHOHOHOHOHOHOHOHOHOHOHOHOHOHOHOHOHOHO
e e e e e e e e e e e e e e e e e e e e e e e e e
OONNNEONNNNNNNNNNNNNNNNNNNNNNNNNNNNNNNNNNNNNNNNNNNNNNNNNNNNNNNNNNNNNNNNNNNNNNNNNNNNNNNNNNNNNNN
e 100000000000000000000000000000000000000
rnnnne nnnnne nnnnne nnnnne nnnnne nnnnne nnnnne nnnnne nnnnne nnnnne nnnnne nnnnne nnnnne nnnnne nnnnne nnnnne nnnnne nnnnne nnnnne nnnnne nnnnne nnnnne nnnnne nnnnne nnnnne nnnnne
MoA.CA-70C
BHTTNTTOHATNNTNNTNNTNNTNNTNNTNNTNNTNNTNNTNNTNNTNNTNNTNNTNNTNNTNNTNNTNNTNNTNNTNNTNNTNNTNNTNNTNNTNNTNNTNNTNNTNNTNNTNNTNNTNNTNNTNNTNNTNNTNNTNNTNNTNNTNNTNNTNNTNNTNNTN
Tnnooohha, Behir Mrtarotn3, Lue ce Bbohe KBM Hte Tropkchat DeXMM Ha paOota CBeTTWHTe 06paHOTo bpew 3a paOota Crea
ra oythora. tainmupe Sblemetc My sa
papota ce yejtnahe Ba c TNOBMAH uac
Ako oTHOB HnTneba Gthyote "tainmuep
Hartomethe Oytoha Tahtmee" (10),433 KOITIO MOXETE Da HARTACOTy Tpeya 3a paOta 3a 1epMOAD OT NTOBMOH HcD 7 da 23 n110TNOBHNA. POM B59KO HATKOKA
G
Mo4.CA-80C
3a0-1 3a0-1 3a0-1 3a0-1 3a0-1 3a0-1 3a0-1 3a0-1 3a0-1 3a0-1 3a0-1 3a0-1 3a0-1 3a0-1 3a0-1 3a0-1 3a0-1 3a0
CtTnHIOBETeH(9)(MOA,CA70C16) (PNOA,CA-60CE BEXHOB CBTNTHHN

中

Hnnaeckopoe
[

()
TNNNNEAANNNNNEAANNNNNEAANNNNNEAANNNNNEAANNNNNEAANNNNNEAANNNNNEAANNNNNEAANNNNNEAANNNNNEAANNNNNEAANNNNNEAANNNNNEAANNNNNEAANNNNNEAANNNNNEAANNNNNEAANNNNNEAANNNNNEAANNNNNEA
pexmm (a) BeTMATopObT the pa60nt Ge
Bcunmertuee 3nneheepbatoa BHOHMAH
eennnnnne nnnnne ennnnne eannnnnne
Beytohnte Ha aHCTHtHtHtO tTbEbnne Haa Taanrue dHkun kato 6y Tohtte Ha KOHTPOPA
BHTNTOPA.
DcTHeHtHtHO tyOBnBeNHme MOke da 65ae
K3010382HO 6 M OTCOTOHNE OT BHTNTOPA.
Tocrasshe Ha Gatepmtte: Vabadete Karanaka Ha thesodoto 3a Gatepmtte. Tocrabete Gatepmtte Kato one Duta 3a No jpn Teta M. He Omeasate Nk26geHa C HOB Gatepm. Tocrabete OTHBO Karanaka Ha MaTOTO MY.
7. DvctAlyoHIO YTPABTEHWE (12)
Tepnnaa a a nnnnne Hte kaae bta na 0000
Ongpaaan no nnoctBaeHTo n noDpaXkata Ha My dkyhLmW n da to nckHOHTme oEIEKTHNtive BGGHKTATE
PmeKa.3a noCTBAHto hBaHHTHe TNEbHOCTN
Ha ypeA naSTOBaTe MEK u TNO HOBTXKHE
Iraan. To bepeA ha noCTBAHto BUMABATe Da
He noritahe BOZA B5B BtypeHOCTTA ha BEHMA TO
Ha BEHIMTOPA He NsIOBBAETRE PASTEOPTAVEL,
a6923AEHn TnnpaATy, KAKTO m HkAsen AYTN
xmm+4eKxTPOoYkT.
6. TOYVICTBAHE
6.104WC
o 000000000000000000000000000000000000000000000000000000000000000
Ooheh Reheparop: 3a Da BknoHnre
(1)BHeTmatoPbIe Iue 3anHOHe DA KsBba
OTMATELTHNHOHN C LIEIN NNOVCTBaHE Ha
03bYXBA NIOHUEHETO.

e 000
aac aaeaae aee aaee aee aee aee
(10, Tn) Bcckto 3a pedotae yBmL-asa CIOBTH
8. MHOPMALYAR 3A TIPABMHTO EYMMHPAHE HA ETEKTPCHECKN M ETEKTPOHH NOMAKWHCKW PEPW
TNE
Cnneanane aen ane aeene eae
3a 0000000000000000000000000000000
MxBnBnBnB KOHmHpa
aannnnae aen ananee
□ 1
1
1
1
1
1
1
1
eae aee eae aeae ee eae eae eae eae eae eae eae eae eae eae eae eae eae eae eae eae eae eae eae eae eae eae eae eae eae eae eae eae eae eae eae eae eae eae eae eae eae eae eae eae eae eae eae eae eae eae eae eae eae eae eaoe
eepnne nnnnne ne nnnnne nnnnne nnnnne nnnnne nnnnne nnnnne nnnnne nnnnne nnnnne nnnnne nnnnne nnnnne nnnnne nnnnne nnnnne nnnnne nnnnne nnnnne nnnnne nnnnne nnnnne nnnnne nnnnne nnnnne nnnnne nnnnnee nnnnne nnnnne nnnnne nnnnne nnnnne nnnnne nnnnne nnnnne nnnnne nnnnne nnnnne nnnnne nnnnne nnnnne nnnnne nnnnne nannne nannne nannne nannne nannne nannne nannne nannne nannne nannne nannne nannne nannne nannne
eepnpeepnepnepnepnepnepnepnepnepnepnepnepnepnepnepnepnepnepnepnepnepnepnepnepnepnepnepnepnepnepnepnepnepnepnepnepnepnepnepnepnepnepnepnepnepnepnepnepnepnepnep
eepnne nnnnne
e e e e e e e e e e e e e e e e e e e e e e e e e e e e e e e e e e e e e e e e
nne nnnnne nnnnne nnnnne nnnnne nnnnne nnnnne nnnnne nnnnne nnnnne nnnnne nnnnne nnnnne nnnnne nnnnne nnnnne nnnnne nnnnne nnnnne nnnnne nnnnne nnnnne nnnnne nnnnne nnnnne nnnnne nannnee
aennnnnne aannnnnne nnnnnnne
Kberocte KynunnnpoKoKaTa
Ipeed nepBbIM NcOJIb3OBaHnEM DaHNOr
PnIBOPa BHIMATEJIbHO pIOyHTNE HaCTOJIeE
pyKOBODCTBO NO 3KcIIyatauM IN COxPAHNTe ERO
dJIY NCIOJIb3OBaHnB B KaeCTBe CnpABoHOrO
MaTePnAra B 6yDuIeM.
UY6eINTEcB, YTO HApJxKeHne B CETN B
POMeUeHmN IN MOUHOCb PO3eTKN COOTBECTCYBOT
3HaueHmO, Yka3aHHOMy HA npIBope.
B Clyuae HeCOBMeCTMOnCTn PO3eTKN
NCTOCHNKA TOKA co UITeNCJIbHOB BNJIKOJ
PnIBOPa PpON3BeDInTe Heo6XoDMyTO
3AmEHy PO3eTKN, PnIP6ERHyB K NOMOUI
KBaIINΦnIUPoBAHbIX CNEUaJIInCTOB.
IocmToPte nacnOpTHyo Ta6nUky np6bopa.
DaHbI np6bOp COOTBcTCTBye T HopMaM EC kacatelbHo 9NeKtpomarHHTHO
COBMeCTIMOCTN n COBMeCTIMOCTn np6bOp H3KOro HapJxHeHn
3.MEPbI IPEIOCTOPOXHOCTN
e. INДиКaTOp zICKlNcEsCKOro NObOpoTa
f. TempePaTpya NOMeUeHnIa
g. TaIМep
h. CkOporCTb
2.TEXHnueCKNe XAPAKTEPNUCTNKl
10.Tanmep
11. TepaTop noHOB
12.DnctaHIOHOe ynpaBneHne
MOJ.CA-70CI:
a.ObchnypeKIM
b.PnpoHbpeKIM
c.HouHoi peKIM (sleeping)
d.NnIkaTOp noHMaZHM
3a3eMJIeHn, COrIaCHO DeIcTByOllmM
HOPM 3eNkTpuHECKB 6eONaCHOCHTn PpHmnnnnnnnnnnnnnnnnnnnnnnnnnnnnnnnnnnnnnnnnnnnnnnnnnnnnnnnnnnnnnnnnnnnnnnnnnnnnnnnnnnnnnnnnnnnnnnnnnnnnnnnnnnnnnnnnnnnnnn
HOPMAMJNEKTPHECKOBE3ONACCHOCTN. PnA HANNNUMCHUOBATHTTEK
HOPMAM JIJKTPYCKO E63ONACHOCTN. Pn HAPHUM COMOHU O63ATHTCHK
HOPMAMJNEKTPHECKOBE3ONACCHOCTN. PnA HANNNUMCHUOBATHTTEK
HOPMAMJNEKTPHECKOBE3ONACCHOCTN. PnA HANNNUMCHUOBATHTTEK
HOPMAMJNEKTPHECKOBE3ONACCHOCTN. PnA HANNNUMCHUOBATHTTEK
HOPMAMJNEKTPHECKOBE3ONACCHOCTN. PnA HANNNUMCHUOBATHTTEK
HOPMAMJNEKTPHECKOBE3ONACCHOCTN. PnA HANNNUMCHUOBATHTTEK
HOPMAMJNEKTPHECKOBE3ONACCHOCTN. PnA HANNNUMCHUOBATHTTEK
HOPMAMJNEKTPHECKOBE3ONACCHOCTN. PnA HANNNUMCHUOBATHTTEK
HOPMAMJNEKTPHECKOBE3ONACCHOCTN. PnA HANNNUMCHUOBATHTTEK
HOPMAMJNEKTPHECKOBE3ONACCHOCTN. PnA HANNNUMCHUOBATHTTEK
HOPMAM 3NEKPTRECKO6E0NACCHOCTN. Pn HAPIMIUMCUMUHOMOBATHTTEK
HOPMAMJNEKTPHECKOBE3ONACCHOCTN. PnA HANNNUMCHUOBATHTTEK
KBaJIIMФИЦИРОВАнБИМСпЕДУЛINCTAM.
KBaJIIMΦIuPObAHHbIM CneuaJIInCTam.
KBaJIIMΦIuPObAHHbIM CneuaJIInCTam.
KBaJIIMΦIuPObAHHbIM CneuaJIInCTam.
KBaJIIMΦIuPObAHHbIM CneuaJIInCTam.
KBaJIIMΦIuPObAHHbIM CneuaJIInCTam.
KBaJIIMΦIuPObAHHbIM CneuaJIInCTam.
TpoHnIKuWmUyDynHnTeJI. Bcnyae
TPOHNI N/INN yDINHNTEJI. B cnyae
TPOHNI N/INN yDINHNTEJI. B cnyae
TPOHNI N/INN yDINHNTEJI. B cnyae
TPOHNI N/INN yDINHNTEJI. B cnyae
TPOHNI N/INN yDINHNTEJI. B cnyae
TPOHNI N/INN yDINHNTEJI. B cnyae
HEOXXDMOCNTCNEyETNIOH3OBATB TOHKO2AOTOPKU.KYVHTTTO
HEOXBODIMOCNT CNEyET HcNHO3BaTb TOTKO,2-2-2-1070111111111111111
H
H
COOTBETCTBYOUINE DEIIECTBYOLIM HOPMAM 6000000000000000000
COOTBETCTBYOUINE DEIIECTBYOLIM HOPMAM 6000000000000000000
COOTBETCTBYOUINE DEIIECTBYOLIM HOPMAM 6000000000000000000
YTO6bI He 6bl IpeBbIeH pepeI MOUHOCHTM
YTO6bI He 6bl IpeBbIeH pepeI MOUHOCHTM
TIOIE 3BbIeHnIgN3 yIaKOBKn bOeIITcB, YTO NMO60H HAOJNTmR B 6e3VpHeHM
TOI pIN60p HAXOIDTCB B 63yPpeHOM
IocJIe I3BleJeHnI yIaKoBKn yoeIeTcB, YTO pIb6Op haoDunTcB B 6e3ynpEnHOM
IocJIe I3BleJeHnI yIaKoBKn yoeIeTcB, YTO pIb6Op haoDunTcB B 6e3ynpEnHOM
IocJIe I3BleJeHnI yIaKoBKn yoeIeTcB, YTO pIb6Op haoDunTcB B 6e3ynpEnHOM
60b7138 60b7138
TEXHNUCKORO OBCJNUKBAHNA.
TEXHNUCKORO OBCJNUKBAHNA.
TEXHNUCKERO OBCJNYKBAHNA.
TEXHNUCKERO OBCJNYKBAHNA.

BnEeKHe eoe 00000000000000000000000000000000000000000000000000000000000000000000000000000
C
Hn Hn Hn Hn Hn Hn Hn Hn Hn Hn Hn Hn Hn Hn Hn Hn Hn Hn Hn Hn Hn Hn Hn Hn Hn Hn Hn Hn Hn Hn Hn Hn Hn Hn Hn Hn Hn Hn Hn Hn Hn Hn Hn Hn Hn Hn Hn Hn Hn Hn Hn


- ES
- DESCRIPTICN
- OHNCTKA
- sess
- iY
- 5.OPERATION
- 6.CLEANING
- REMOTE CONTROL (12)
- INFORMATION FOR THE CORRECT DISPOSAL OF ELECTRICAL AND ELECTRONIC APPLIANCES
- #
- FR
- XaHnTaXuTnTa YMePac taXuTnTa YUnnTaXuTnTa
- D
- C
- Mortexo CA-60C
- XooovokotTt
- 1
- MOVTENO CA-1/UC
- KAOAPZMOZ
- THAMEPEI THPO (12)
- TANHOOPEES NTH 20NTH AIXAE PSH
- HAEKTPONIKQN ZSYKEYQN
- MOOCA-70G1
- Nizka nychost Siednichnychost Vysoka nychost
- Nastaveni rychost: Nostaveni 60C
- Drih Vntilie
- INFORMÁCIA, TYKALUCA SA SPRÁVNEHO NAKLADANIA S ODPAODZ ELEKTRICKYCHA ELEKTRONICKYCH SPOTREBCOV
- INFORMACUE ZA KOREKTNO ODLAGANJE ELEKTRICHI ELEKTRONSKIAPARATA
- TEXHINUeCKN XAPAKTEPNUCTIKN
- MoA.CA-70C
- G
- Mo4.CA-80C
- DvctAlyoHIO YTPABTEHWE (12)
- TOYVICTBAHE
- MHOPMALYAR 3A TIPABMHTO EYMMHPAHE HA ETEKTPCHECKN M ETEKTPOHH NOMAKWHCKW PEPW
Brand : FAGOR
Model : CA-70 CI
Category : Fan