
VTR-16 - Fan FAGOR - Free user manual and instructions
Find the device manual for free VTR-16 FAGOR in PDF.


| Product type | Column fan |
| Brand | Fagor |
| Model | VTR-16 |
| Dimensions (H x W x D) | 110 x 30 x 30 cm |
| Weight | 4.5 kg |
| Power supply | 220-240 V, 50/60 Hz |
| Power | 55 W |
| Number of speeds | 3 |
| Oscillation | Yes, horizontal |
| Timer | Yes, up to 8 hours |
| Remote control | Yes, included |
| Material | ABS plastic |
| Safety | Front protective grille, non-slip base |
| Maintenance and cleaning | Unplug before cleaning; use a soft dry cloth; do not immerse |
| Spare parts | Available (grille, blade, remote control) |
| Repairability | Repairability index available on the Fagor website |
| Noise level | 55 dB (max) |
| Standby consumption | Less than 1 W |
| Color | White or black (depending on version) |
Frequently Asked Questions - VTR-16 FAGOR
User questions about VTR-16 FAGOR
0 question about this device. Answer the ones you know or ask your own.
Ask a new question about this device
Download the instructions for your Fan in PDF format for free! Find your manual VTR-16 - FAGOR and take your electronic device back in hand. On this page are published all the documents necessary for the use of your device. VTR-16 by FAGOR.
USER MANUAL VTR-16 FAGOR
The image is too blurry to recognize any text content.
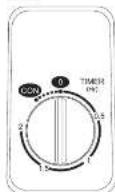
Fig.4b
1A
1B

1. CARACTERÍSTICAS TÉCNICAS
| Modelo | Tensión-Frecuencia | Potencia |
| VTR-10 VTR-10M 230V/50Hz 40 W | ||
| VTR-12 VTR-12M 230V/50Hz 45 W | ||
| VTR-16 VTR-16M 230V/50Hz 60 W | ||
| VTR-15P | 230V/50Hz | |
| VTR-16P | 230V/50Hz |
60
60
5. TEMPORIZADOR (MOD. VTR-16P) (FIG.5)
5. TEMPORIZADOR (MOD. VTR-16P) (FIG.5)
| Model Voltage/Frequency | Power | |
| VTR-10 VTR-10M 230V/50Hz 40 W | ||
| VTR-12 VTR-12M 230V/50Hz 45 W | ||
| VTR-16 VTR-16M 230V/50Hz 60 W | ||
| VTR-15P | 230V/50Hz | |
| VTR-16P | 230V/50Hz |
60
60
These appliances comply with the guidelines set out in the European Electromagnetic Compatibility Directive 89/336/EEC.
Interference suppression: this appliance has been interference-suppressed in accordance with the interference-suppression directives.
Electromagnetic compatibility: this appliance has been suppressed in accordance with the EMC (electromagnetic compatibility) directives.
2. IMPORTANT SAFETY WARNINGS
- Before using the appliance for the first time, read this instruction manual carefully and keep it for later reference.
- Before using the appliance, ensure that the domestic mains voltage is the same as that indicated on the appliance itself.
- On removing packaging, check the appliance is in perfect condition. In case of doubt, contact the nearest Technical Assistance Service.
- This appliance is for domestic use only. Do not use it out of doors.
- In case of breakdown or malfunctioning, switch off the appliance. Do not attempt to repair it. If any repairs are necessary, they must be done by a Technical Assistance Service authorised by the manufacturer. Insist on the use of original spare parts.
- The user must not replace the cable. If it is damaged or needs replacing, this must only be done by a Technical Assistance Service authorised by the manufacturer.
- The manufacturer holds no liability for any damages arising from unsuitable or improper use of the appliance or from
repairs carried out by non-qualified personnel.
- This appliance must not be used in bathrooms or showers or in damp spaces. Do not use it in areas with a temperature of over 40^ C.
- Do not use the appliance if the cable or plug are damaged.
- Do not pull on the cable to remove the plug.
- Before plugging in the appliance, press the "0" button to ensure it is in stop position.
- Unplug the appliance when not in use, before cleaning or maintenance and before moving the appliance.
- Keep the appliance out of reach of children and disabled people.
- Do not push any objects through the protection grille.
- Do not place the fan beside sources of heat or on hot surfaces.
- DO NOT SUBMERGE THE APPLIANCE IN WATER.
- This appliance is not intended for use by persons (including children) with reduced physical, sensory or mental capabilities,
or lack of experience and knowledge, unless they have been given supervision or instruction concerning use of the appliance by a person responsible for their safety.
- Children should be supervised to ensure that they do not play with the appliance.
3. ASSEMBLY INSTRUCTIONS
Before assembling the fan, take the different parts out of the packaging and check that the supply cable is not damaged and that the appliance has not received any knocks during transport. If the appliance is damaged, do not switch it on.
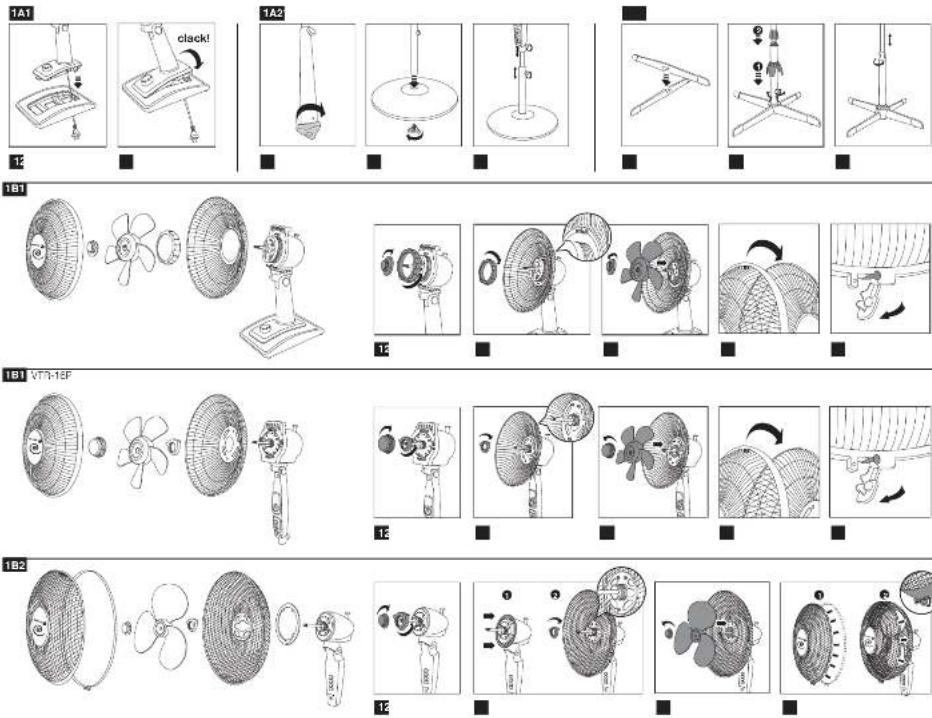
1A. ASSEMBLING THE BASE
1A1.- MODELS: VTR-10 / VTR-10M / VTR-12 / VTR-12M / VTR-16 / VTR-16M
- Thread the cable through the hole in the base.
- Mount the motor support on the base as shown in the figure.
1A2.- MODEL: VTR-16P
- Remove the nut screwed onto the shaft.
- Mount the shaft on the base support and fix it in place with the nut.
- Loosen the screw and pull the inner shaft up to the desired height. Then tighten the screw again. Place the motor support on the base and fasten it in place with the fixing screw.
1A3.- MODEL: VTR-15P
- Remove the nut screwed onto the shaft and fit the legs to the fan as shown in the picture.
- Place the shaft so that the holes for fitting the screws coincide. Then screw in and tighten the screws. Insert the embellisher first, followed by the nut.
- Pull the inner shaft upwards to the desired height and tighten the nut. Fit the motor support to the base and
fasten it in place with the fixing screw.
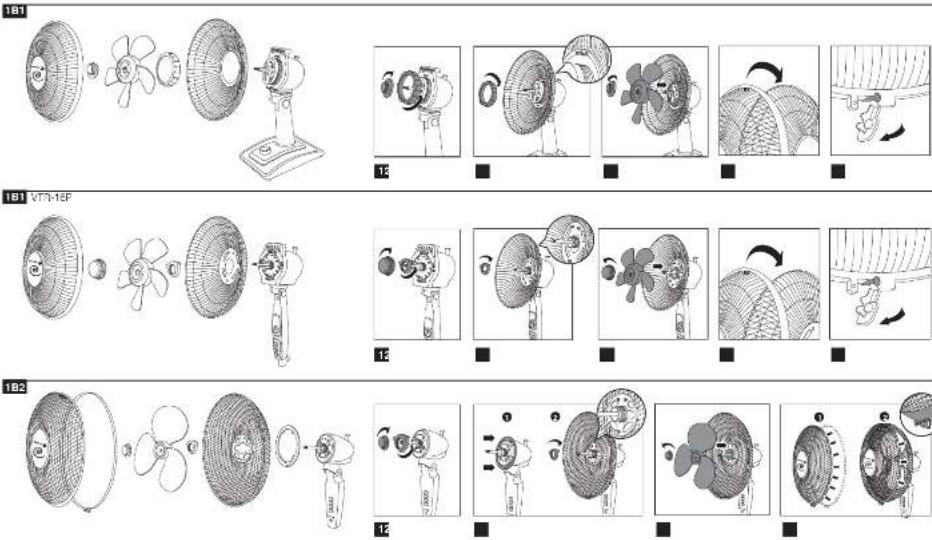
1B. ASSEMBLING THE FAN
1B1.- MODELS: VTR-10 / VTR-10M / VTR-12 / VTR-12M / VTR-16 / VTR-16M / VTR-16P
- Unscrew the nuts on the motor shaft (anticlockwise) and the motor casing (clockwise) respectively.
- Mount the rear protection grille on the motor casing and fix it in place with the fastening nut.
- Insert the blades on the motor shaft, fastening them in place with the blade fixing nut. Turn the blades manually to ensure they spin freely. If they do not turn freely go back to point 2 and mount them again.
- Mount the front protection grille and gently press it until it fits into the plastic ring.
- Close the safety clip and tighten the screw.
1B2.- MODEL: VTR-15P
- Unscrew the nut on the motor casing.
- Mount the decorative ring on the motor support and then fit the rear protection grille onto the motor support, fixing it in place with the nut.
- Insert the blades on the motor shaft, fastening them in place with the blade fixing nut.
Turn the blades manually to ensure they spin freely. If they do not turn freely go back to point 2 and mount them again. - Fit the plastic ring to the front protection grille, then fit the front protection grille onto the rear protection grille and tighten the fixing screw.
4. OPERATING INSTRUCTIONS
- Before using the fan, place it on a stable, flat surface.
- Press the "0" button to ensure the fan is in stop position, and plug it in.
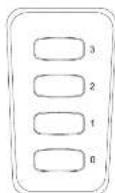
- Select one of the three speeds, 1, 2 or 3. Models VTR-10 / 10M have 2 speeds only: high and low. (Fig. 4a, 4b)
Speeds:
-
Off
-
Low
- Medium
- High
2.- OSCILLATION (Fig.2)
The oscillation button is located at the rear of the fan, on top of the motor. Press the oscillation button in for the fan to move from side to side. Pull the button up to stop the fan moving.
3.- TILT (Fig.3)
The fan can be tilted upwards or downwards manually.
5. TIMER (MOD. VTR-16P) (FIG.5)
If you want the fan to run for a certain length of time, turn the timer clockwise to the desired time. Times of up to 2 hours ("2") may be selected. For continuous functioning, turn the timer to "CON". To switch off the fan, turn the timer to "O".
6. MAINTENANCE AND CLEANING
Unplug the appliance before cleaning it. If you wish to dismantle it for cleaning, follow the assembly instructions in reverse order. The blades can be washed in tepid water with a little mild detergent. They can also be cleaned with a soft damp cloth. Clean the motor area with a soft damp cloth. DO NOT SUBMERGE IT IN WATER. Do not use solvents or abrasive products to clean the fan.
Before assembling and using the appliance, all the parts must be completely dry.
7. WASTE ELIMINATION
The materials used in the packaging, product and accessories can be recycled. Correct separation of waste materials will allow recyclable materials to be re-used. When the appliance is no longer useful, you should cut its cord to put it out of action and dispose of it using a suitable waste elimination procedure. For further information on this matter, consult your local authorities.
8. INFORMATION FOR THE CORRECT DISPOSAL OF ELECTRICAL AND ELECTRONIC APPLIANCES

At the end of its working life, the product must not be disposed of as urban waste. It must be taken to a special local authority differentiated waste collection centre or to
a dealer providing this service. Disposing of a household appliance separately avoids possible negative consequences for the environment and health deriving from inappropriate disposal and enables the constituent materials to be recovered to obtain significant savings in energy and resources.
To remind you that you must collaborate with a selective collection scheme, the symbol shown appears on the product warning you not to dispose of it in traditional refuse containers.
For further information, contact your local authority or the shop where you bought the product.
1. CARACTÉRISTIQUES TECHNIQUES
| Modèle Voltage-Fréquence Puissance | ||
| VTR-10 VTR-10M 230V/50Hz 40 W | ||
| VTR-12 VTR-12M 230V/50Hz 45 W | ||
| VTR-16 VTR-16M 230V/50Hz 60 W | ||
| VTR-15P | 230V/50Hz | |
| VTR-16P | 230V/50Hz | |
60
60
1B2.- MODÈLE: VTR-15P
A1 ترآيب_Q acknowledge
: الأنواع -.1A1
VTR-10 / VTR-10M / VTR-12 / VTR-12M / VTR-16 / VTR-16M



- CARACTERÍSTICAS TÉCNICAS
- TEMPORIZADOR (MOD. VTR-16P) (FIG.5)
- IMPORTANT SAFETY WARNINGS
- ASSEMBLY INSTRUCTIONS
- 1A. ASSEMBLING THE BASE
- 1A1.- MODELS: VTR-10 / VTR-10M / VTR-12 / VTR-12M / VTR-16 / VTR-16M
- 1A2.- MODEL: VTR-16P
- 1A3.- MODEL: VTR-15P
- 1B. ASSEMBLING THE FAN
- 1B1.- MODELS: VTR-10 / VTR-10M / VTR-12 / VTR-12M / VTR-16 / VTR-16M / VTR-16P
- 1B2.- MODEL: VTR-15P
- OPERATING INSTRUCTIONS
- Speeds:
- 2.- OSCILLATION (Fig.2)
- 3.- TILT (Fig.3)
- TIMER (MOD. VTR-16P) (FIG.5)
- MAINTENANCE AND CLEANING
- WASTE ELIMINATION
- INFORMATION FOR THE CORRECT DISPOSAL OF ELECTRICAL AND ELECTRONIC APPLIANCES
- CARACTÉRISTIQUES TECHNIQUES
- 1B2.- MODÈLE: VTR-15P
Brand : FAGOR
Model : VTR-16
Category : Fan