USER MANUAL CA-90CI FAGOR
natural_image
3D rendering of a tall cylindrical industrial fan or tower with vertical blades and a base (no text or symbols visible)
VENTILADOR DE TORRE / TOWER FAN / VENTILATEUR COLONNE / OSZLOPVENTILLÁTOR / SLOUPOVÝ VENTILÁTOR / STÍPOVÝ VENTILÁTOR / WENTYLATOR PIONOWY / BAШЕННЫЙ ВЕНТИЯТОР / مروحة آقنية / DORREKO HAIZAGAILUA
MOD.: CA-90CI
N.I.F. F-20.020.517 - B. San Andrés, n. 19 • Apartado 49 - 20600 MONDRAGON (Guipuzcoa) ESPAÑA

FAGOR


"Versiones an otros idiomas disponibles en la web www.fagar.com"
"Other languages available on the web www.fagar.com"
ES
1. DESCRIPCIÓN
See characteristics plate.
This product complies with the European Directives on Electromagnetic Compatibility and Low Voltage.
3. SAFETY PRECAUTIONS
- Before using this appliance for the first time, read the following instructions carefully and keep them for future reference.
- Make sure that the mains voltage in your home corresponds to that indicated on the appliance.
- In the event of incompatibility between the mains socket and the appliance plug, replace the socket with a suitable one, using a qualified professional.
-
The electrical safety of the appliance is only guaranteed if it is connected to an efficient earth installation, as foreseen in applicable electrical safety regulations. If in doubt, contact a qualified professional.
-
The use of adaptors, multiple sockets and or extension cables is not recommended. Where it is not possible to avoid their use, only adaptors or extensions that comply with applicable safety regulations should be used, and ensuring that the indicated voltage limit is not exceeded.
- After removing the packaging, check that the appliance is in perfect condition, if in doubt, contact the nearest Technical Support Service.
- Packaging elements (plastic bags, polystyrene foam, etc.), should not be left within the reach of children because they can be dangerous.
- The appliance is for domestic use only. Any other use is considered unsuitable or dangerous.
- The manufacturer shall not be responsible for any damages that may arise from improper or inadequate use, or for repairs conducted by non-qualified personnel.
- Do not touch the appliance with wet or damp hands or feet.
- Keep the appliance separate from water or other liquids, to avoid electric shock; do not connect the appliance to the mains if it is on a damp surface.
- Place the appliance on a dry, firm and stable surface.
- Do not allow children or the disabled to handle the appliance unsupervised.
- Do not leave the appliance unattended when it is turned on because it can be dangerous.
- When removing the plug never pull on the cable.
- Unplug the appliance before cleaning or maintenance.
- In the event of fault or malfunction where the appliance is not to be used, turn off the appliance and do not attempt to repair. If a repair is required, contact a Technical Assistance Service authorised by the manufacturer and request the use of original spare parts.
- If the cable for this appliance is damaged, contact an authorised Technical Assistance Service for it to be replaced.
- Do not leave the appliance exposed to the elements (rain, sun, ice, etc.).
- Do not use or let any part of the
appliance come into contact or near hot surfaces (kitchen gas or electric hobs or ovens).
- Do not use detergents or abrasive sponges to clean the appliance.
- Do not touch the hot surfaces. Use the handles.
- Do not let the cable come into contact with the hot parts of the appliance.
- Do not cover the cord, for example with a rug or similar. Place the cord far away from any walk way or anywhere where people might trip over it.
- In order to ensure the air grille does not become blocked, keep the fan at least 20 cm away from the wall.
- Do not place the fan beneath curtains or similar.
- Do not introduce any objects into the grille.
- Do not leave the appliance next to any focus of heat or on hot surfaces.
- Do not direct the flow of air directly towards babies or ill persons.
- This appliance should not be used by physically, sensorially or mentally handicapped people or people without experience or knowledge of it (including children), unless they are supervised or instructed in the use of the appliance by a person responsible for their safety.
- Children should be watched to ensure they do not play with the appliance.
- For greater protection, we recommend installing a residual current device (RCD) with an operational residual current not exceeding 30 mA. Ask your installer for advice.
4. ASSEMBLY
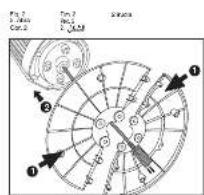
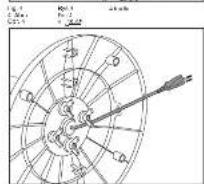
Fit the two parts of the base (3) together as shown in Fig. 2. Thread the cable through the central hole in the base. Align the screw holes on the base with those of the fan. Then insert the screws and tighten them (Fig. 3).
Position the cable in the groove on the base (Fig. 4).
5. OPERATION
Before operating the fan, place it on a flat, stable surface.
The fan may be controlled using the buttons on the control panel or the remote control as it has the same functions.

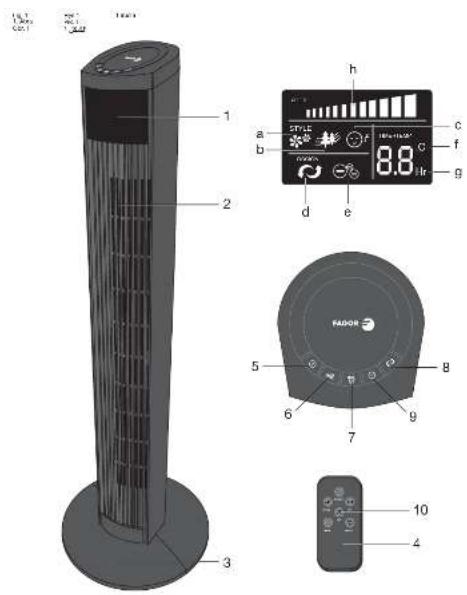
Switching the fan on and off: Press the On/Off button (5) on the control panel or on the remote control, to start up the fan. Press this button again to switch it off.

Speed setting: Press the speed setting button (6) to select the air flow rate. When you switch on the fan the set speed will be “low”. Press the button once to set a “medium speed, twice for “high” speed, and three times to return to “low” speed.
According to the speed you have selected, the light indicator corresponding to this speed will light up.

Ventilation type:
When you switch on the fan, "normal" mode (a).
The fan will run continuously at the speed selected. Press the 📋 button once to set “natural” mode (b) and twice to set “night” mode (c). If you wish to return to “normal” mode, press the ventilation type setting button a third time (7). The light indicator for each time of ventilation will light up.

Oscillation: Press the oscillation button (8) to make the fan oscillate horizontally and thereby cool larger spaces more efficiently. If you wish to stop oscillation, press the same button again.

Timer: This fan has a timer with a range of 1 - 12 hours (g). You may programme the fan to switch off automatically after the functioning time set.
Press the timer button (9) to set the time. Each time you press the button
the time will increase by one hour. Stop pressing the button when you reach the desired time, and the timer will be set. To cancel the timer, press the button until it reaches 0:00.

Ioniser: Press this button (10) on the remote control to activate the ioniser function. The fan will emit negative ions to clean and purify the air.
The ion indicator will appear on the LCD screen (1).
Press the button again to deactivate this function. You also can set ioniser function on control panel. Press ventilation type adjustment button (7) for 3 seconds, ioniser function will be started. To cancel ioniser function, press type adjustment button (7) for 3 seconds again.
6. CLEANING
Before carrying out any cleaning or maintenance operations, switch off all the controls and unplug the appliance. Use a soft, slightly damp cloth to clean the outside of the fan. Do not allow water into the engine during cleaning. Do not immerse the appliance in water. Do not use solvents, abrasive products, or any other chemical product to clean the fan.
7. REMOTE CONTROL
Insert batteries:
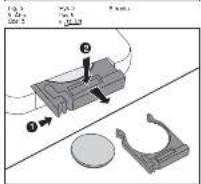
- Remove the lid of the battery compartment (Fig. 5).
- Insert batteries, taking note of the polarity indicated.
- Do not mix old batteries with new ones.
- Replace the lid.
The remote control buttons operate in the same way as the buttons on the control panel on the top of the fan.
The remote control may be used up to a distance of 6 metres away from the fan.

At the end of its working life, the product must not be disposed of as urban waste. It must be taken to a special local authority differentiated waste collection centre or to a dealer providing this
service. Disposing of a household appliance separately avoids possible negative consequences for the environment and health deriving from inappropriate disposal and enables the constituent materials to be recovered to obtain significant savings in energy and resources.
To remind you that you must collaborate with a selective collection scheme, the symbol shown appears on the product warning you not to dispose of it in traditional refuse containers.
For further information, contact your local authority or the shop where you bought the product.
FR
1. DESCRIPTION