
CU-E12PFE - Air-conditioner PANASONIC - Free user manual and instructions
Find the device manual for free CU-E12PFE PANASONIC in PDF.


User questions about CU-E12PFE PANASONIC
0 question about this device. Answer the ones you know or ask your own.
Ask a new question about this device
Download the instructions for your Air-conditioner in PDF format for free! Find your manual CU-E12PFE - PANASONIC and take your electronic device back in hand. On this page are published all the documents necessary for the use of your device. CU-E12PFE by PANASONIC.
USER MANUAL CU-E12PFE PANASONIC
Operating Instructions
Air Conditioner
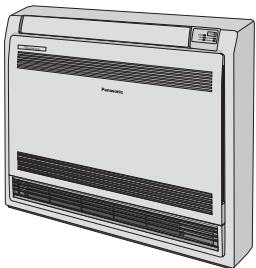
Model No.
Indoor Unit
CS-E9GFEW
CS-E9GFEW-2
CS-E12GFEW
CS-E12GFEW-2
CS-E18GFEW
Outdoor Unit
Single Split
CU-E9PFE
CU-E12PFE
CU-E18PFE
Multi Split
CU-2E15PBE
CU-2E18PBE
CU-3E18PBE
CU-4E23PBE
CU-4E27PBE
CU-5E34PBE


Operating Instructions Air Conditioner
2-9
Thank you for purchasing Panasonic Air Conditioner.
Installation instructions attached.
Before operating the unit, read these operating instructions thoroughly and keep them for future reference.
The illustrations in this manual are for explanation purposes only and may differ from the actual unit.
They are subject to change without notice for future improvement.
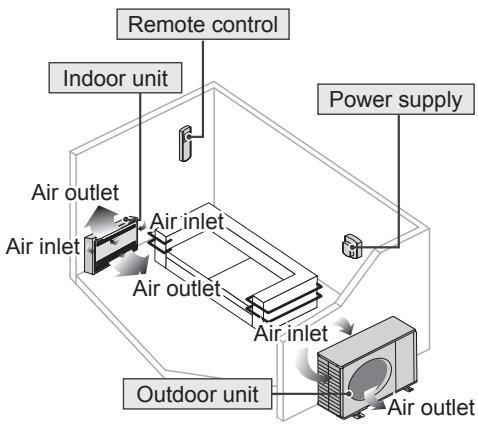
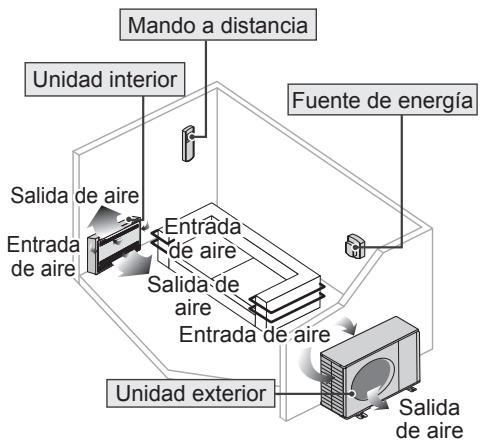
Multi air conditioner system
Multi air conditioner systems save space by letting you connect multiple indoor units to a single outdoor unit.
For complete product features, please refer catalogue.
Indoor units
- It is possible to operate the indoor units individually or simultaneously. The priority of operation is placed on the first unit that turned on.
- During operation, HEAT and COOL modes cannot activate at the same time for different indoor units.
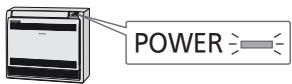
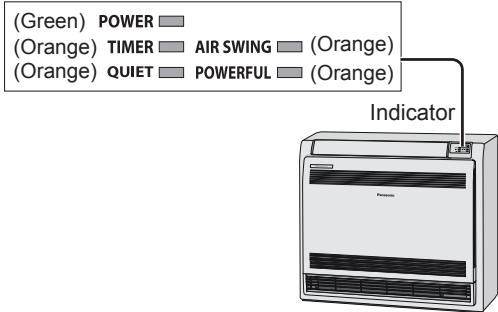
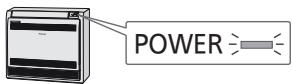
- The power indicator blinks to indicate the indoor unit is standing by for a different operation mode.
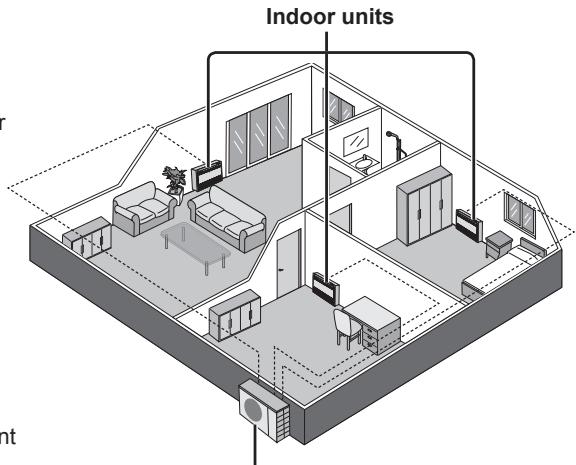
Outdoor unit
(CU-2E15PBE, CU-2E18PBE, CU-3E18PBE,
CU-4E23PBE, CU-4E27PBE, CU-5E34PBE)

Operation conditions
Use this air conditioner under the following temperature range.
DBT: Dry bulb temperature / WBT: Wet bulb temperature
Single split outdoor unit
^ C (temperature)
| CU-E9PFE, CU-E12PFE, CU-E18PFE | Indoor | Outdoor | |||
| DBT | WBT | DBT | WBT | ||
| COOL | Max. | 32 | 23 | 43 | 26 |
| Min. | 16 | 11 | 16 | 11 | |
| HEAT | Max. | 30 | - | 24 | 18 |
| Min. | 16 | - | -15 | -6 | |
Multi split outdoor unit
^ C (temperature)
| CU-2E15PBE, CU-2E18PBE, CU-3E18PBE, CU-4E23PBE, CU-4E27PBE, CU-5E34PBE | Indoor | Outdoor | |||
| DBT | WBT | DBT | WBT | ||
| COOL | Max. | 32 | 23 | 46 | 26 |
| Min. | 16 | 11 | -10 | - | |
| HEAT | Max. | 30 | - | 24 | 18 |
| Min. | 16 | - | -15 | -16 | |
Quick guide
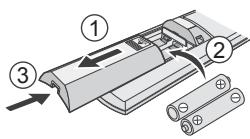
Inserting the batteries
① Pull out the back cover of remote control
② Insert AAA or R03 batteries (can be used ~ 1 year)
③ Close the cover
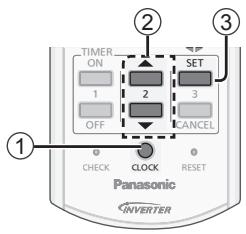
Clock setting
① Press CLOCK
② Set the time
③ Confirm
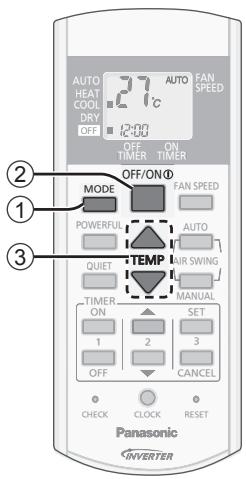
Basic operation
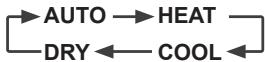
(1) Select the desired mode
② Start/stop the operation
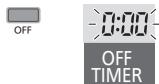
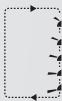
- Please note that the OFF indication is as follows:
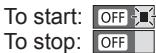
③ Select the desired temperature
Selection range: 16^ 30^
- Operating the unit within the recommended temperature may save energy.
HEAT: 20^ 24^ .
COOL: 26^ C 28^ C .
DRY: 1^ 2^ lower than room temperature.
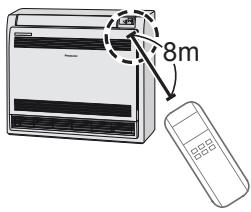
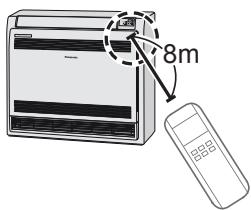
- Use remote control within 8m from the remote control receiver of the indoor unit.
The illustrations in this manual are for explanation purposes only and may differ from the actual unit. They are subject to change without notice for future improvement.
Table of contents
Safety precautions. 4-5
How to use. 6-7
Cleaning instructions 8
Troubleshooting 9
Information. 76
Accessories
Remote control
- AAA or R03 batteries × 2
- Remote control holder
- Screws for remote control holder × 2
To prevent personal injury, injury to others or property damage, please comply with the following:
Incorrect operation due to failure to follow instructions below may cause harm or damage, the seriousness of which is classified as below:
| WARNING | This sign warns of death or serious injury. |
| CAUTION | This sign warns of injury or damage to property. |
The instructions to be followed are classified by the following symbols:
| This symbol denotes an action that is PROHIBITED. |
| These symbols denote actions COMPULSORY. |

WARNING
Indoor unit and outdoor unit

This appliance is not intended for use by persons (including children) with reduced physical, sensory or mental capabilities, or lack of experience and knowledge, unless they have been given supervision or instruction concerning use of the appliance by a person responsible for their safety. Children should be supervised to ensure that they do not play with the appliance.
Please consult authorised dealer or specialist to clean the internal parts, repair, install, remove and reinstall the unit. Improper installation and handling will cause leakage, electric shock or fire.
Confirm with authorised dealer or specialist on usage of any specified refrigerant type. Using refrigerant type other than the specified may cause product damage, burst and injury etc.

Do not install the unit in a potentially explosive or flammable atmosphere. Failure to do so could result in fire.
Do not insert your fingers or other objects into the air conditioner indoor or outdoor unit, rotating parts may cause injury.

Do not touch the outdoor unit during lightning, it may cause electric shock.
Do not expose yourself directly to cold air for a long period to avoid excess cooling.
Do not sit or step on the unit, you may fall down accidentally.

Remote control

Do not allow infants and small children to play with the remote control to prevent them from accidentally swallowing the batteries.
Power supply

Do not use a modified cord, joint cord, extension cord or unspecified cord to prevent overheating and fire.


To prevent overheating, fire or electric shock:
- Do not share the same power outlet with other equipment.
- Do not operate with wet hands.
- Do not over bend the power supply cord.

If the supply cord is damaged, it must be replaced by the manufacturer, service agent or similarly qualified persons in order to avoid a hazard.
It is strongly recommended to be installed with Earth Leakage Circuit Breaker (ELCB) or Residual Current Device (RCD) to prevent electric shock or fire.
Stop using the product if any abnormality/ failure occurs and disconnect the power plug or turn off the power switch and breaker. (Risk of smoke/fire/electric shock) Examples of abnormality/failure
- The ELCB trips frequently.
- Burning smell is observed.
- Abnormal noise or vibration of the unit is observed.
Water leaks from the indoor unit. - Power cord or plug becomes abnormally hot.
Fan speed cannot be controlled. - The unit stops running immediately even if it is switched on for operation.
- The fan does not stop even if the operation is stopped.
Contact your local dealer immediately for maintenance/repair.

This equipment must be earthed to prevent electrical shock or fire.

Prevent electric shock by switching off the power supply:
- Before cleaning or servicing,
- When extended non-use, or
- During abnormally strong lightning activity.

CAUTION
Indoor unit and outdoor unit

Do not wash the indoor unit with water, benzine, thinner or scouring powder to avoid damage or corrosion at the unit.

Do not use for preservation of precise equipment, food, animals, plants, artwork or other objects. This may cause quality deterioration, etc.
Do not use any combustible equipment in front of the airflow outlet to avoid fire propagation.
Do not expose plants or pet directly to airflow to avoid injury, etc.
Do not touch the sharp aluminium fin, sharp parts may cause injury.

Do not switch ON the indoor unit when waxing the floor. After waxing, aerate the room properly before operating the unit.
Do not install the unit in oily and smoky areas to prevent damage to the unit.
Do not dismantle the unit for cleaning purpose to avoid injury.
Do not step onto an unstable bench when cleaning the unit to avoid injury.
Do not place a vase or water container on the unit. Water may enter the unit and degrade the insulation. This may cause an electric shock.
Do not open window or door for long time during COOL/DRY mode operation.

Prevent water leakage by ensuring drainage pipe is:
- Connected properly,
- Kept clear of gutters and containers, or
- Not immersed in water
After a long period of use or use with any combustible equipment, aerate the room regularly.
After a long period of use, make sure the installation rack does not deteriorate to prevent the unit from falling down.
Remote control

Do not use rechargeable (Ni-Cd) batteries. It may damage the remote control.

To prevent malfunction or damage of the remote control:
- Remove the batteries if the unit is not going to be used for a long period of time.
- New batteries of the same type must be inserted following the polarity stated.
MODE

To select operation mode
AUTO - For your convenience
- During operation mode selection the POWER indicator blinks.
Single • Unit selects operation mode every 10 minutes according to setting temperature and room temperature.
Multi - Unit selects operation mode every 3 hours according to setting temperature, outdoor temperature and room temperature.
HEAT - To enjoy warm air
- Unit takes a while to warm up. The power indicator blinks during this operation.
COOL - To enjoy cool air
To reduce power consumption during COOL mode, use curtains to screen off sunlight and outdoor heat.
DRY - To dehumidify the environment
- Unit operates at low fan speed to give a gentle cooling operation.
POWERFUL

To reach temperature quickly
POWERFUL
Single This operation stops automatically after 20 minutes.
Multi Press the button again or turn OFF the unit to stop this operation.
QUIET

To enjoy quiet operation
QUIET
- This operation reduces airflow noise.
To adjust horizontal airflow direction
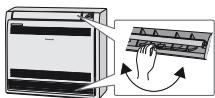
- Both upper and lower horizontal airflow direction louvers are manually adjustable.
Note

POWERFUL
QUIET

- Can be activated in all modes and can be cancelled by pressing the respective button again.
- Cannot be selected at the same time.
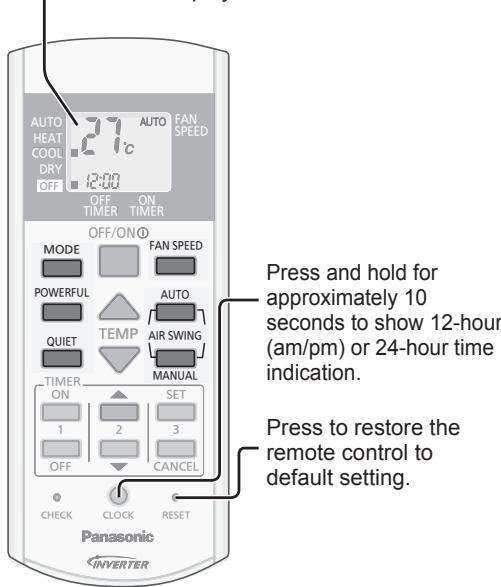
Remote control display
Auto OFF/ON button
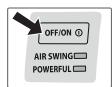
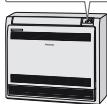
Use when remote control is misplaced or a malfunction occurs.
- Press the button once to use in AUTO mode.
- Press and hold the button until you hear 1 beep, then release to use in forced COOL mode.
- Repeat step 2. Press and hold the button until you hear 2 beeps, then release to use in normal COOL mode.
- Repeat step 3. Press and hold the button until you hear 3 beeps, then release to use in forced HEAT mode.
- Press the button again to turn off.

To select fan speed
(Remote control display)

- For AUTO, the indoor fan speed is automatically adjusted according to the operation mode.
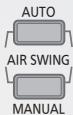
To adjust airflow direction
- Keeps the room ventilated.
AIR SWING - AUTO
AIR SWING
- In heat mode, the air blows upwards for a while, then starts to blow horizontally.
- The vertical airflow louver swings up and down automatically.
AIR SWING - MANUAL
- The airflow direction can be adjusted as desired by using remote control.
- Do not adjust the vertical airflow direction louvers by hand.
AIR SWING

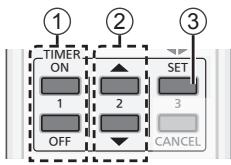
To set the timer
To turn ON or OFF the unit at a preset time.
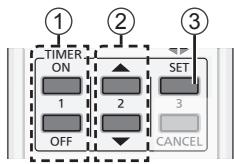
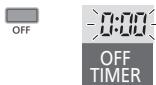
① Select ON or OFF timer
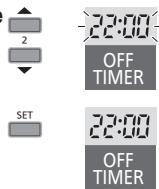
Example: OFF at 22:00
② Set the time
③ Confirm


- To cancel ON or OFF timer, press ON or OFF then press CANCEL
- If timer is cancelled manually or due to power failure, you can restore the previous setting (once power is resumed) by pressing SET.
- When ON Timer is set, the unit may start earlier (up to 30 minutes) before the actual set time in order to achieve the desired temperature on time.
- Timer operation is based on the clock set in the remote control and repeats daily once set. For clock setting, please refer to Quick guide.
Air outlet selection switch
To select preferred airflow pattern.
| Selection | Pattern | Description |
| This setting blows air from upper outlet only. | ||
| This setting automatically decides airflow pattern depending on mode and conditions (Default and recommended). | ||
| For Heat mode, during start or low discharge temperature / For Cool mode, when setting temperature is achieved, the air is blown from the upper air outlet only. | ||
| Air is blown from the upper and lower air outlets for high speed cooling during COOL mode, and for filling the room with warm air during HEAT mode. | ||
To ensure optimal performance of the unit, cleaning has to be carried out at regular intervals. Dirty unit may cause malfunction and you may see error code "H99". Please consult authorised dealer.
- Switch off the power supply before cleaning.
- Do not touch the aluminium fin, sharp parts may cause injury.
- Do not use benzine, thinner or scouring powder.
- Use only soap ( pH7) or neutral household detergent.
- Do not use water hotter than 40^ .
Indoor unit
Wipe the unit gently with a soft, dry cloth.
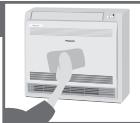
Intake grille
Wash gently and dry.
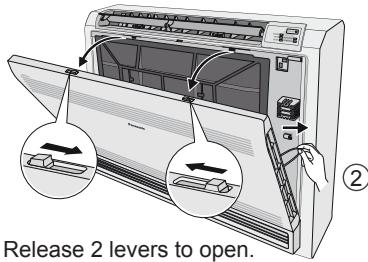
Remove the front panel
(2) Release string to remove.
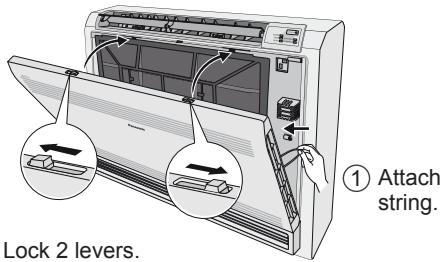
Close it securely
② Lock 2 levers.
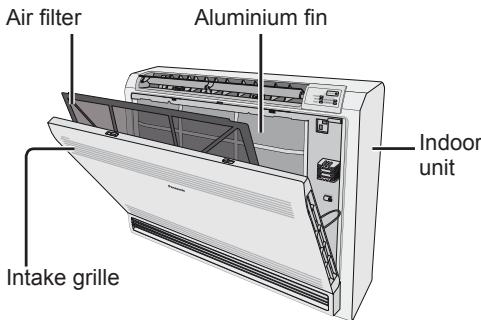
Indoor unit
Air filters
Every 2 weeks
- Wash/rinse the filters gently with water to avoid damage to the filter surface.
- Dry the filters thoroughly under shade, away from fire or direct sunlight.
- Replace any damaged filters.
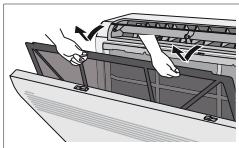
Remove air filter
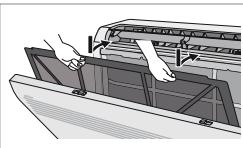
Attach air filter
For seasonal inspection after extended non-use
- Checking of remote control batteries.
- No obstruction at air inlet and air outlet vents.
- Use Auto OFF/ON button to select COOL/HEAT operation. After 15 minutes of operation, it is normal to have the following temperature difference between air inlet and air outlet vents:
COOL: ≥ 8 °C HEAT: ≥ 14 °C
For extended non-use
- Activate HEAT mode for 2~3 hours to remove moisture left in the internal parts thoroughly to prevent mould growth.
- Turn off the power supply.
- Remove the remote control batteries.
The following symptoms do not indicate malfunction.
| Symptom | Cause |
| Mist emerges from indoor unit. | •Condensation effect due to cooling process. |
| Water flowing sound during operation. | •Refrigerant flow inside the unit. |
| The room has a peculiar odour. | •This may be due to damp smell emitted by the wall, carpet, furniture or clothing. |
| Indoor fan stops occasionally during automatic fan speed setting. | •This helps to remove the surrounding odour. |
| Operation is delayed a few minutes after restarting. | •The delay is a protection to the unit's compressor. |
| Outdoor unit emits water/steam. | •Condensation or evaporation occurs on pipes. |
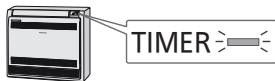
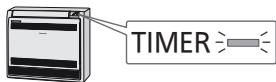
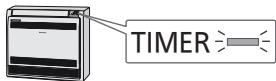
| TIMER indicator is always on. | •The timer setting repeats daily once set. |
| Power indicator blinks during operation and the indoor fan is stopped. | •The unit is in defrost mode, and the melted frost is drained from the outdoor unit. |
| Indoor fan stops occasionally during heating operation. | •To avoid unintended cooling effect. |
| POWER indicator blinks before the unit is switched on. | •This is a preliminary step in preparation for the operation when the ON timer has been set. |
| Cracking sound during operation. | •Changes of temperature caused the expansion/contraction of the unit. |
Check the following before calling for servicing.
| Symptom | Check |
| Operation in HEAT/COOL mode is not working efficiently. | ·Set the temperature correctly. ·Close all doors and windows. ·Clean or replace the filters. ·Clear any obstruction at the air inlet and air outlet vents. |
| Noisy during operation. | ·Check if the unit has been installed at an incline. ·Close the intake grille properly. |
| Remote control does not work. (Display is dim or transmission signal is weak.) | ·Insert the batteries correctly. ·Replace weak batteries. |
| The unit does not work. | ·Check if the circuit breaker is tripped. ·Check if timers have been set. |
| The unit does not receive the signal from the remote control. | ·Make sure the receiver is not obstructed. ·Certain fluorescent lights may interfere with signal transmitter. Please consult authorised dealer. |
NON SERVICEABLE CRITERIAS
TURN OFF POWER SUPPLY then please consult authorised dealer under the following conditions:
Abnormal noise during operation.
Water/foreign particles have entered the remote control.
Water leaks from Indoor unit.
- Circuit breaker switches off frequently.
- Power cord becomes unnaturally warm.
- Switches or buttons are not functioning properly.
The unit stops and the TIMER indicator blinks.
Write down error code at indicator.
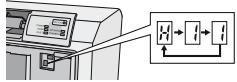
If the error code does not appear at the indicator.
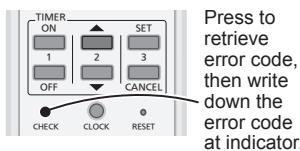
- Turn the unit off and reveal the error code to authorised dealer.
- For certain errors, you may restart the unit for limited operation with 4 beeps when operation starts.
(CU-2E15PBE, CU-2E18PBE, CU-3E18PBE,
CU-4E23PBE, CU-4E27PBE, CU-5E34PBE)

Betriebsbereiche
(CU-2E15PBE, CU-2E18PBE, CU-3E18PBE, CU-4E23PBE, CU-4E27PBE, CU-5E34PBE)

(CU-2E15PBE, CU-2E18PBE, CU-3E18PBE, CU-4E23PBE, CU-4E27PBE, CU-5E34PBE)
UoTma TnAaTlou kIaTIOtIKOU
Ta ouotnmu Ta oaiau KlaipatioKou
Egikovouovxuwo,ETITpETOvTACoacvaouvOeTe TllAaIeS eawtepkcs movadoeaeia kai mvo EwotepiKn mvada.
ΓaTo SuVaoToWxapaktnpiTikwvVwwpiauTuTOIPOIOVTO, TApakaaleiTe va avatpeEeTe OTov KAtALOyo.
EoWTePikEs movadEs
Eivai duvatn n leioupyia twv eoewepikwovovawxwpiota n taotoxpova. H npotepaioTata tou tpotou leioupyiac ovetai otnv npwtn movaba tou exe ievpyoionthei.
Kata n diapkeia nts leioupyias, dev evai duvatn n eevytooin nts OEPMANHs kai Y H tyn Iioa otiyu ia diaopopetikc es oawteipkcs movadesc.
- O δεικτης λειουργίας αναβοσβήνει υωτεναυτόδειξείς ὄτη η εωτερικήνονάβριακεται σεκατασην αναμονης (stand by) για διαφορετικός τρόπους λειουργίας.
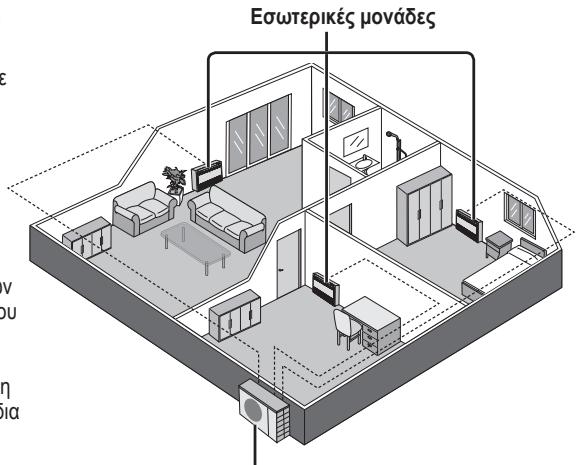
Egwtepikn movad
(CU-2E15PBE, CU-2E18PBE, CU-3E18PBE,
CU-4E23PBE, CU-4E27PBE, CU-5E34PBE)

Eupoc TIIaoynC: 16^ 30^.
H Leitoupyia tsovadac oTa Tlaiaia ts ouviotwEvns Thepokpaia c Egoikovoei Evpeyia.
OEPMAN _H20^ 24^.
H 26^ 28^.
AFYTPANEH:1^ 2^ a t i o Tn i a t i o u.
Xpnaiotoiieite to tnlexeiipiotnpio 0e atoataa8 m ato tov dektn tou tnlexeiipiotpiou ncsewtepkns mvadac.
Oi ekovc o autov tov ony oivai movy ia etieynnan kai mtopei va diaqepouv an to nvy payatikn mova. Ytkeivra e aalayec bixwcs troeodtoinon yia eavovnik beltiown.
Tivakac TepieXoEvwV
IpoquuaEeic aoepaieiaas...36-37
Tpontocxnpans 38-39
Ooynie tsuauiatos 40
AvTietwTion TpoBaaTow ...41
Ia npopopoe 76
Egaptnmuata
Tnλεχειριοτήρι
台 i AAA n R03 × 2
Bacon otnpiigns tnaexpiotpiou
Bibcs yia tn baoon otnpiigns Tou nIeXeiipotnpiou × 2
Tia va TpOaNqEi TpOoWtIKcS TpaUaTIOc, TpaUaTIOc TpIiw N IDIOKtNOiaC, TApakaLcIOTe va OuMOpPwTeIE TE tOmeva:
(CU-2E15PBE, CU-2E18PBE, CU-3E18PBE, CU-4E23PBE, CU-4E27PBE, CU-5E34PBE)

CIRCULATION D'AIR - MANUEL
(CU-2E15PBE, CU-2E18PBE, CU-3E18PBE, CU-4E23PBE, CU-4E27PBE, CU-5E34PBE)

| This symbol denotes a unique action that is already PROHIBIDA. |
|  Estos@simbolos indican aquellasaxonéesque son OBLIGATORIAS. |

ADVERTENCIA
② Ligue/Desligue aunities
Exemplo: OFF as 22:00


② Configure a hora


③ Confirmar


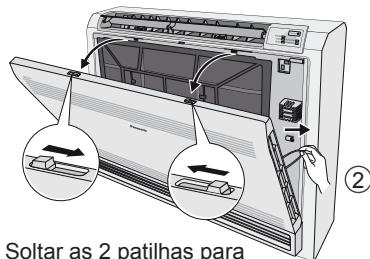
Remover o paine frontal
(CU-2E15PBE, CU-2E18PBE, CU-3E18PBE, CU-4E23PBE, CU-4E27PBE, CU-5E34PBE)

Pa60Ha cpea
I3nON3BaIe To3N KInMaTnK B CneHnTe TEMpeAtypnI rpaHnCi.
DBT: Temnepatypa 6e3 otHTaHe BlaXHocCTHa Ha b3dyxa / WBT: Temnepatypa C otHTaHe BlaXHocCTHa Ha b3dyxa
BbHnEHNMOyHa cNCTeMa c eEnH BbTpEeHN Moyn
^ C (TemnepaTypa)
| CU-E9PFE, CU-E12PFE, CU-E18PFE | В_nomesseниeto | Навын | |||
| DBT | WBT | DBT | WBT | ||
| ОXFIAЖДАСЕ | Макс. | 32 | 23 | 43 | 26 |
| Мин. | 16 | 11 | 16 | 11 | |
| OTОПЛЕНИЕ | Макс. | 30 | - | 24 | 18 |
| Мин. | 16 | - | -15 | -6 | |
BbHsEN Moyn Ha CnCTema C HrKaONKo BbTpseuH N MoDyna
^ C (TemnepaTypa)
| CU-2E15PBE, CU-2E18PBE, CU-3E18PBE, CU-4E23PBE, CU-4E27PBE, CU-5E34PBE | В пошениeto | Навьн | |||
| DBT | WBT | DBT | WBT | ||
| Охлajжданe | Макс. | 32 | 23 | 46 | 26 |
| Мин. | 16 | 11 | -10 | - | |
| OTоллелене | Макс. | 30 | - | 24 | 18 |
| Мин. | 16 | - | -15 | -16 | |
Бьрз спразвочик
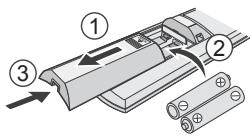
IocTaBHe Ha 6aTepuInTe
① N3dβpnaIte 3aDnHnaKanakHa DnCTaHcNoHHOTyypaBHeHne
② Побравete AAA nR03 6aTePmN (MoraT da ce n3nO3BaT npu6n3ntEnHO eHa roDnHa)
③ 3atbopetekanaka

Hactpoika Ha yacobnka
① Hatmchete CLOCK
② 3aadaite xenaHOTOBpeMe
③ TnTbPdTe
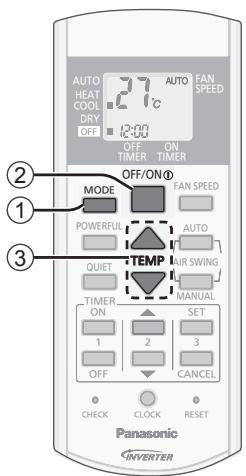
OchOBHn Opeaun
3a npedotbpaTbaHe Ha HeN3npabHOCT mIn NobpeHa Na DCtAHUONHOT UynpABLeHne:
-ИЗраздeTe 6aTePmIte, aК OпЯма Дa ИЗПОЛЗВaTeурда 3a ПЮДьПЖИТЕн eпрюд OT Врeme.
-Hobn6batepnnOTcBttnTpr8BaDa6bdaT NOCTABAHnCBrIaCHO NOCOeHATA NIONPHOCT.
EduhueH
Mynnn
MODE

3a da n36epeTe pexKm Ha pa60Ta
ABTOMATNUEH-3aBaueydo6cTB0
-По Врeme Ha ИЗбиразе Ha peжima Ha pa6oTa HINДИКATOpВТ 3AXPAHBAHE Mira.
EduhueH
- MoynbT n36npa pexkma cn ha pa6oTa Ha BCEK 10 MNHyTN B 3aBcNcMoCT O 3aJaDeHata TEMpepatya i cStHaT a TEMpepatya.
Mynntn
AIR SWING - ABTOMATUHEH
AIR SWING
B pexkIM Ha OToJIeHne Bb3dYxT 3a kaTko 3aNoyBa Da Ce DbXnHaRope, cNeI KoTe DnKHeMeTO CTaba B XOpIN3OHTAHLNA NOCOKA.
Xaany3nte 3a BepTnKaIHHBb3DyUWeH NOTOK CE BnIgat N CnyCKaTABTOMATNHO.
AIR SWING-Pb4HO
Iocokata Na Bb3dUshnnaTOKMOKe Da 6bJe pnOmeHena Upe3DInCTaHUnOHNo ynpabVeHne.
He hactpoBaiTe pbyHcBepTKaJIHnTe BENTINaUOHHN OTBOPN
AIR SWING
3a da hactponTe TaMepa
3a Da BKJIIOUHTE nIu I3KJIIOUHTE KINMaTnKa B npedBaIupTeIHO 3aIadeno BpeMe.
① Изберете ON поOffТаймер
Приимер:ИЗКПЮΥBAHEВ22:00
② 3aàaTe XeJHaHTo BpeMe
③ NotBvbpe
- 3a da OTMeHnTe ON nIN OFF TaImep, HATnCHete ON nIN OFF, cnEi KOeTo HAtncHete CANCE.
Ako TaImepeBt e OTMeHEn pBuHOn IIN B CnUaH Na NOBPeHa Ha 3axpaHbAHeTO, MOKTe Da Bb3CTaHOBIne PnpDmHHaTa HAcTPOiKa, KATO HAITNCHEte ByToHa SET - Ako taHmepbTe hactpoen B pexim ON, ypeBt M0ke Ja 3aIooHe da paOTo nO-paHO (do 30 MM.) npEi DeIeCTBntEnHO 3aJaDeHOTo Bpeme, 3a Da ce noctTnHE HABPeme JKeHaTa OT Bac tempepatya.
TaimepbTe CbeaHa HaHCTPOIKHTe HA hacaOTdNCTAHIOHOHTO UnpaBHeIe Nc HOBaTe EeJedHBHO, CneI KATO BeHbXe HAcTPOEH.3a HACTPOiKa HaCaoBHnKa, MoJI, HApBaTe CnpBaKaE C KpA KTOPOKOBODCTBO.
Klou 3a n36op Ha n3nyckaTeJIHHo OTBOp 3a Bb3dyx
3a da n36epepe npednoHTaHnHaHn 3a n3dyBaHe Ha Bb3dyuHn noTOK.
Information for Users on Collection and Disposal of Old Equipment and Used Batteries
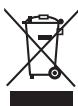
These symbols on the products, packaging, and/or accompanying documents mean that used electrical and electronic products and batteries should not be mixed with general household waste.
For proper treatment, recovery and recycling of old products and used batteries, please take them to applicable collection points, in accordance with your national legislation and the Directives 2002/96/EC and 2006/66/EC.
By disposing of these products and batteries correctly, you will help to save valuable resources and prevent any potential negative effects on human health and the environment which could otherwise arise from inappropriate waste handling. For more information about collection and recycling of old products and batteries, please contact your local municipality, your waste disposal service or the point of sale where you purchased the items.
Penalties may be applicable for incorrect disposal of this waste, in accordance with national legislation.

For business users in the European Union

Pb
If you wish to discard electrical and electronic equipment, please contact your dealer or supplier for further information.
[Information on Disposal in other Countries outside the European Union]
These symbols are only valid in the European Union. If you wish to discard these items, please contact your local authorities or dealer and ask for the correct method of disposal.
Note for the battery symbol (bottom two symbol examples):
This symbol might be used in combination with a chemical symbol. In this case it complies with the requirement set by the Directive for the chemical involved.