
PX-500L - Digital piano CASIO - Free user manual and instructions
Find the device manual for free PX-500L CASIO in PDF.
| Product type | Portable digital piano |
| Brand | Casio |
| Model | PX-500L |
| Dimensions (W x D x H) | 132 cm x 30 cm x 13 cm (approx.) |
| Weight | 12 kg (approx.) |
| Power supply | 12V DC power adapter (included) |
| Number of keys | 88 keys |
| Keyboard | Weighted keys with escapement |
| Polyphony | 64 notes |
| Built-in sounds | 20 tones (piano, organ, etc.) |
| Rhythms | 120 built-in rhythms |
| Recording functions | 2-track recorder, SMF file player |
| Connectivity | Headphone jack, sustain pedal (included), MIDI In/Out, USB (type B) |
| Speakers | 2 x 6 W |
| Maintenance and cleaning | Clean with a soft dry cloth. Avoid solvents. |
| Safety | Use only the provided adapter. Do not expose to moisture. |
| Spare parts and repairability | Contact an authorized Casio service center. Parts available on request. |
Frequently Asked Questions - PX-500L CASIO
User questions about PX-500L CASIO
0 question about this device. Answer the ones you know or ask your own.
Ask a new question about this device
Download the instructions for your Digital piano in PDF format for free! Find your manual PX-500L - CASIO and take your electronic device back in hand. On this page are published all the documents necessary for the use of your device. PX-500L by CASIO.
USER MANUAL PX-500L CASIO
Please keep all information for future reference.
Before trying to use the piano, be sure to read the separate "Safety Precautions".
This equipment has been tested and found to comply with the limits for a Class B digital device, pursuant to Part 15 of the FCC Rules. These limits are designed to provide reasonable protection against harmful interference in a residential installation. This equipment generates, uses and can radiate radio frequency energy and, if not installed and used in accordance with the instructions, may cause harmful interference to radio communications. However, there is no guarantee that interference will not occur in a particular installation. If this equipment does cause harmful interference to radio or television reception, which can be determined by turning the equipment off and on, the user is encouraged to try to correct the interference by one or more of the following measures:
- Reorient or relocate the receiving antenna.
- Increase the separation between the equipment and receiver.
- Connect the equipment into an outlet on a circuit different from that to which the receiver is connected.
- Consult the dealer or an experienced radio/TV technician for help.
FCC WARNING
Changes or modifications not expressly approved by the party responsible for compliance could void the user's authority to operate the equipment.
TO REDUCE THE RISK OF FIRE OR ELECTRIC SHOCK, REFER SERVICING TO QUALIFIED SERVICE PERSONNEL.
Important!
Please note the following important information before using this product.
- Before using the optional AD-12 Adaptor to power the unit, be sure to check the AC Adaptor for any damage first. Carefully check the power cord for breakage, cuts, exposed wire and other serious damage. Never let children use an AC adaptor that is seriously damaged.
- The product is not intended for children under 3 years.
- Use only CASIO AD-12 adaptor.
- The AC adaptor is not a toy.
- Be sure to disconnect the AC adaptor before cleaning the product.
C E
CASIO ELECTRONICS CO., LTD.
Unit 6, 1000
North Circular Road
London NW2 7JD, U.K.
This mark is valid in the EU countries only. Please keep all information for future reference.
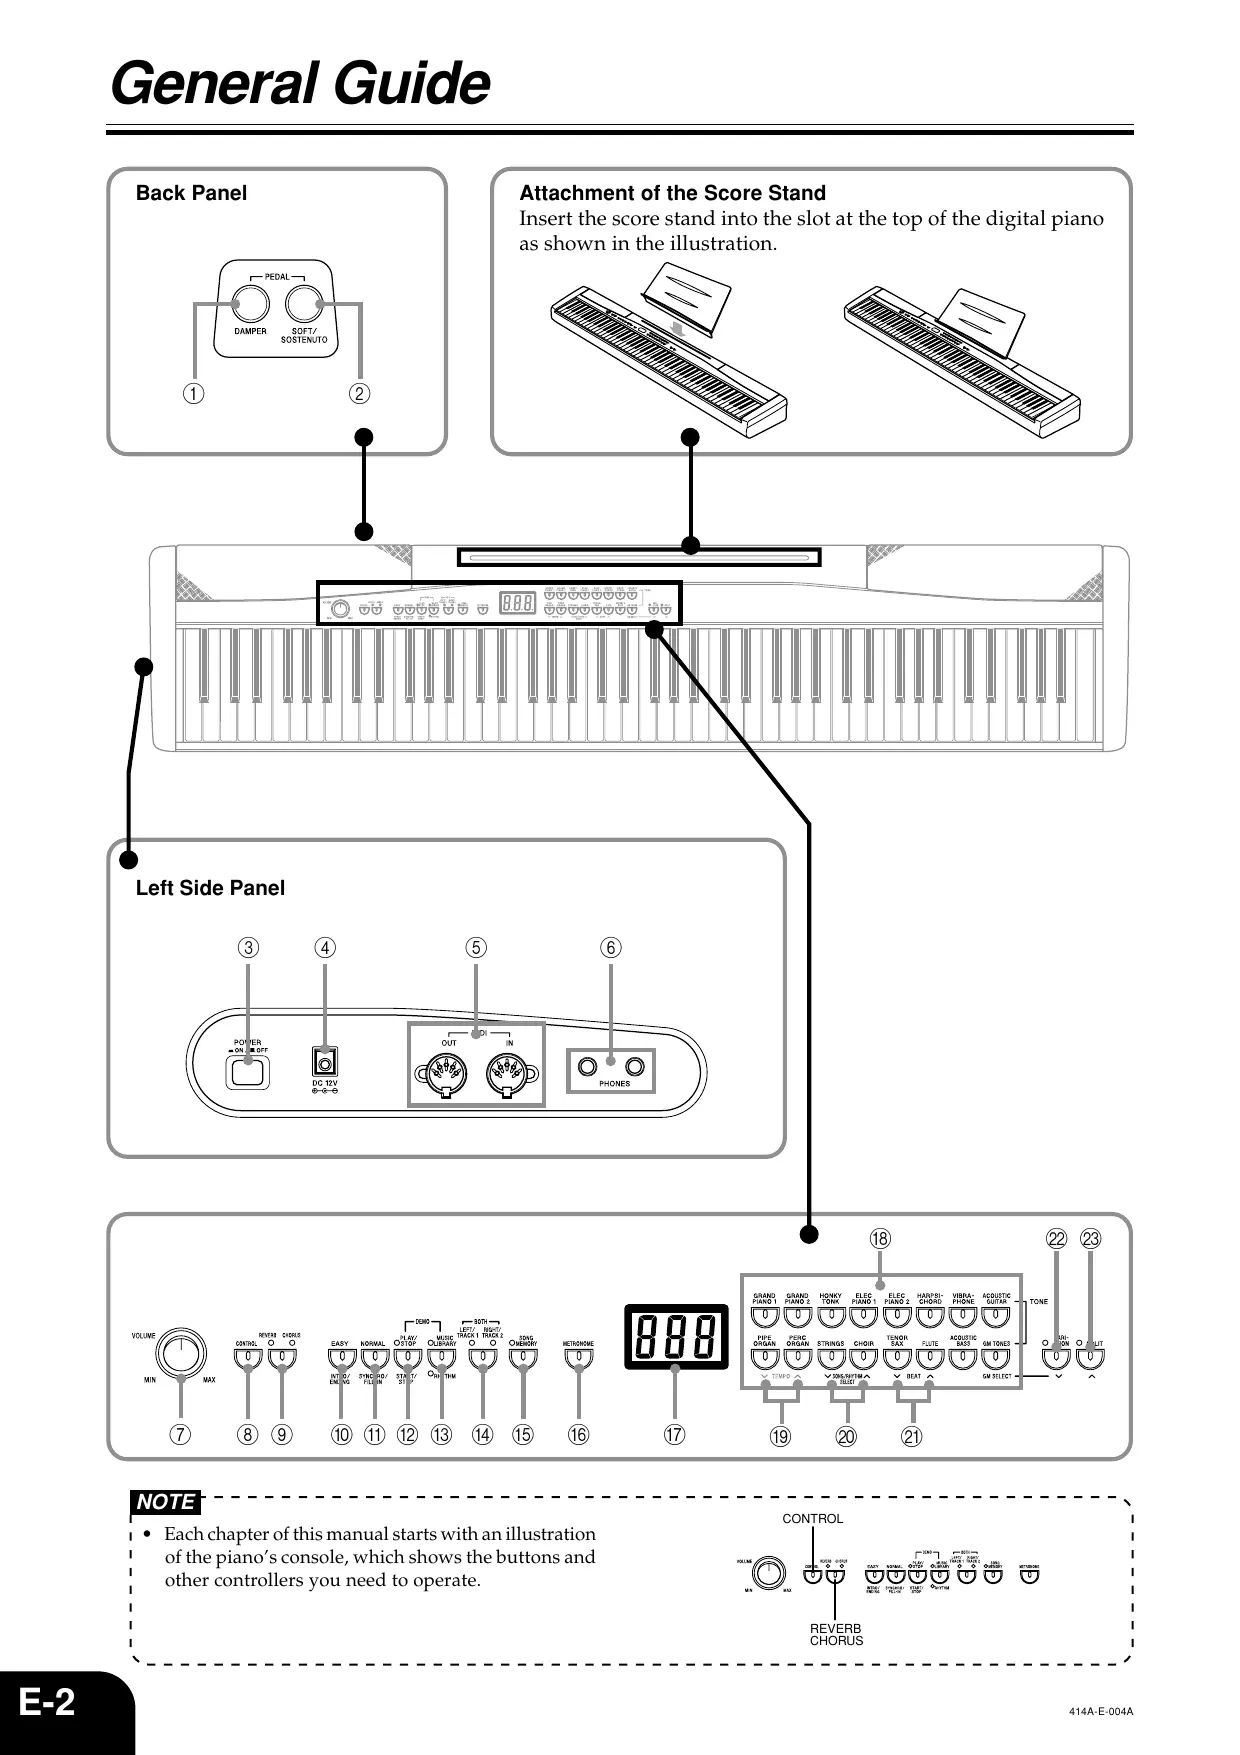
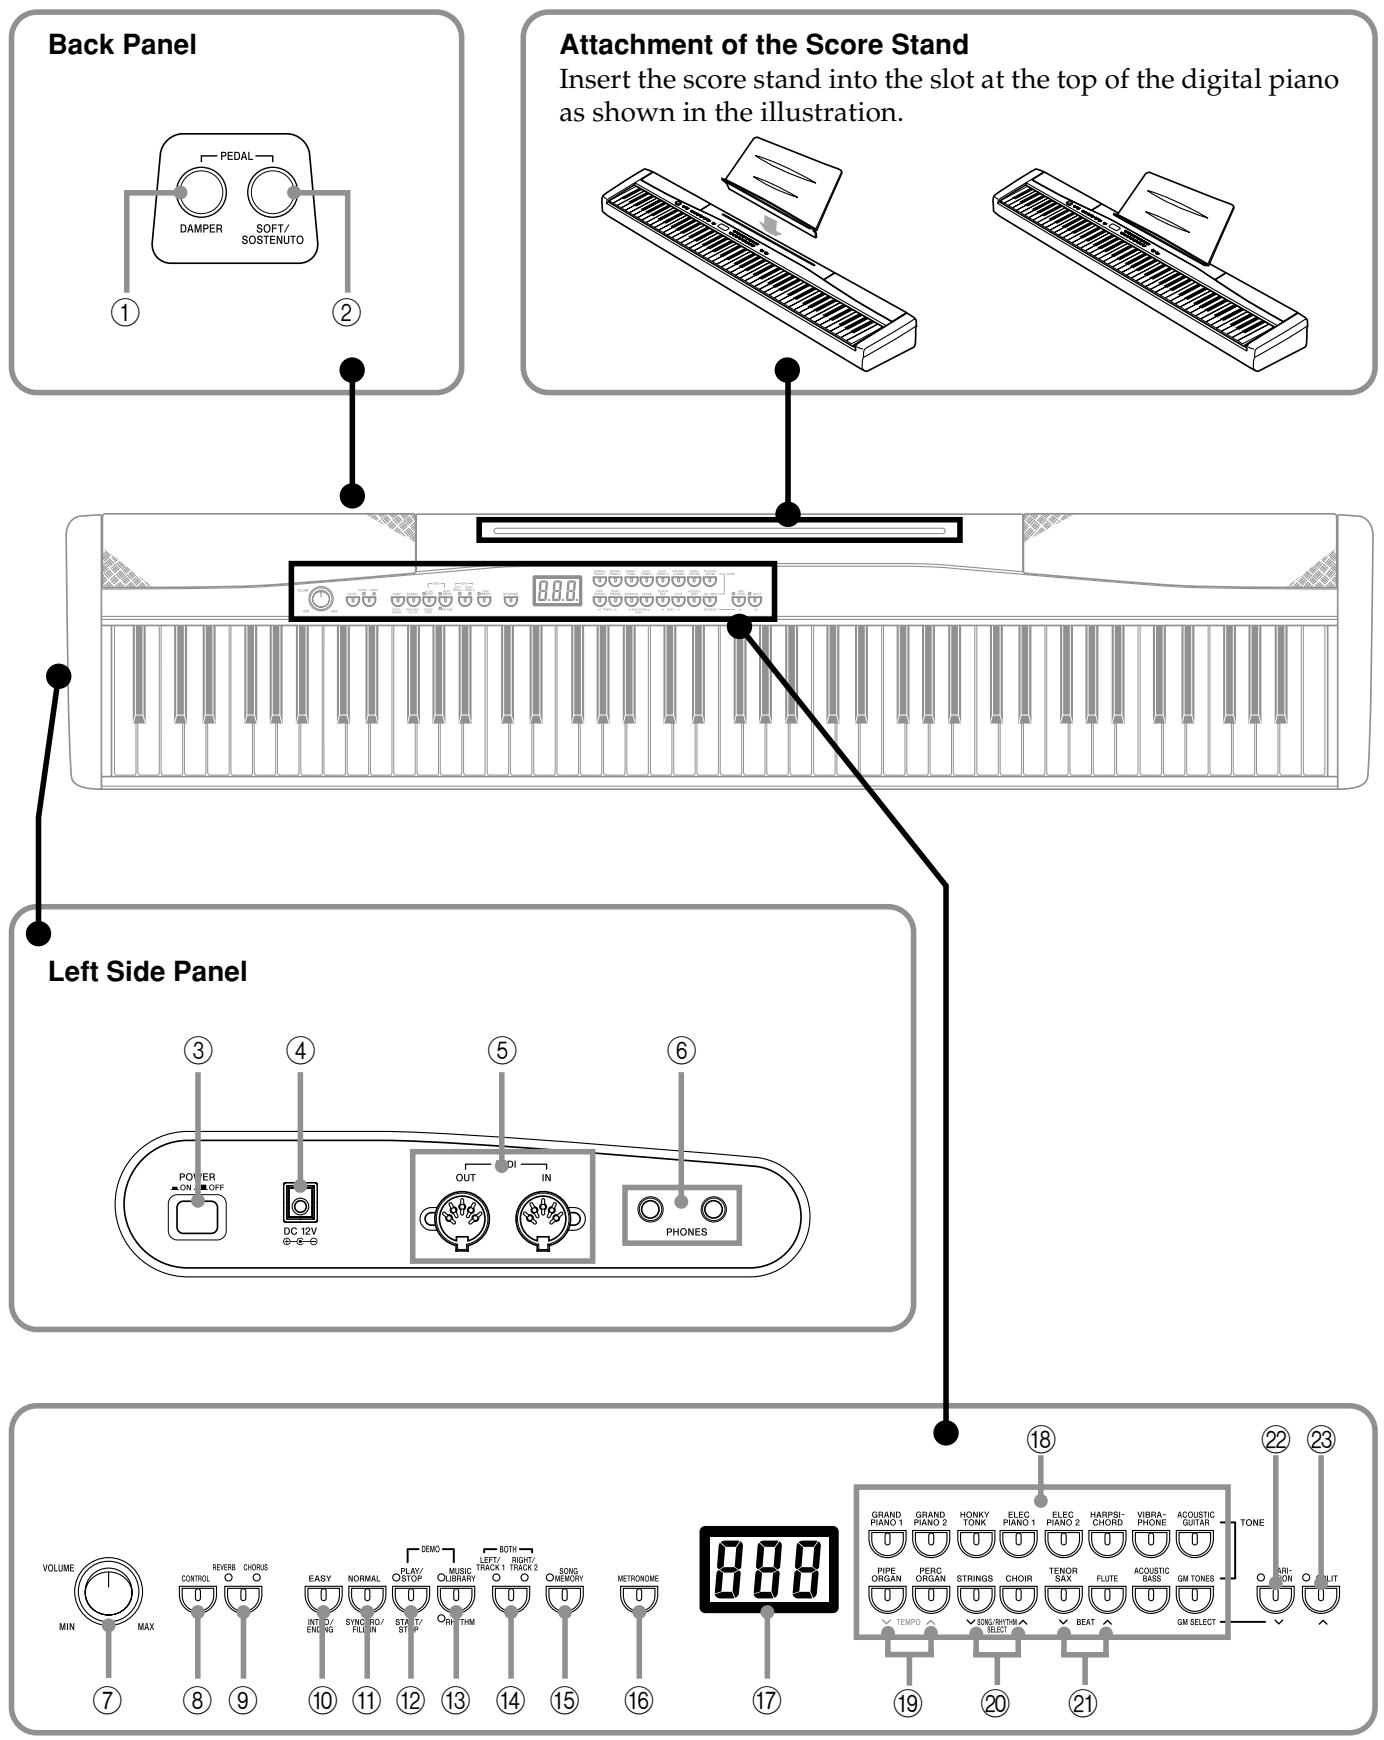
General Guide E-2
Attachment of the Score Stand E-2
Playing Back All the Music Library Tunes ... E-3
Power Supply E-4
Using the AC Adaptor E-4
Connections E-5
Connecting Headphones E-5
Connecting to a PEDAL Jack E-5
Playing with Different Tones... E-6
Selecting and Playing a Tone E-6
Selecting Main Tones and
Variation Tones E-6
Selecting a GM Tone or Drum Set. E-6
Using Tone Effects E-7
Layering Two Tones E-8
Assigning Different Tones to the
Left and Right Sides of the Keyboard. E-9
Using the Piano's Pedals. E-9
Using the Built-in Metronome E-10
Playing Rhythms. E-11
Using Auto Accompaniment E-12
Learning to Play the Music Library Tunes E-16
Playing a Music Library Tune E-16
Practicing with Keyboard Lighting E-16
Recording to and Playing Back from Song Memory .E-19
Recording Your Keyboard Play...... E-20
Playing Back from Song Memory E-21
To Delete Song Memory Data E-21
Other Settings E-22
Changing the Keyboard Touch E-22
Changing the Piano Key. E-22
Changing the Pitch of the Piano to
Match Another Instrument E-22
Turning Off Keyboard Lighting. E-23
Using MIDI E-23
Expanding the Selections in the
Music Library E-24
Troubleshooting E-25
Specifications. E-26
Operational Precautions ......E-27
Setting Control Key Chart.....E-27
Appendix A-1
Tone List A-1
Rhythm List. A-2
Song List A-2
Drum Assignment List. A-3
Fingered Chord Chart. A-5
MIDI Implementation Chart
Company and product names used in this manual may be registered trademarks of others.
NOTE
Each chapter of this manual starts with an illustration of the piano's console, which shows the buttons and other controllers you need to operate.
① PEDAL DAMPER jack
② PEDAL SOFT/SOSTENUTO jack
③ POWER button
④ DC 12V jack
⑤ MIDI OUT/IN terminals
⑥ PHONES jacks
⑦ VOLUME knob
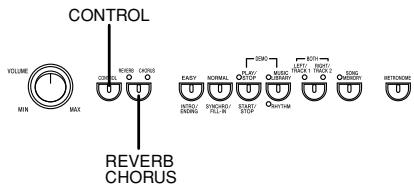
⑧ CONTROL button
(9) REVERB CHORUS button
EASY, INTRO/ENDING button
11 NORMAL, SYNCHRO/FILL-IN button
⑫ PLAY/STOP, START/STOP button
13 MUSIC LIBRARY, RHYTHM button
14 LEFT/TRACK 1 RIGHT/TRACK 2 button
15 SONG MEMORY button
METRONOME button
⑰ Display screen
TONE buttons
TEMPO buttons
20 SONG/RHYTHM SELECT buttons
② BEAT buttons
VARIATION button
23 SPLIT button
NOTE
Key, button, and other names are indicated in the text of this manual using bold type.
Playing Back All the Music Library Tunes
The following procedure plays back the Music Library tunes in sequence.
While holding down the MUSIC LIBRARY button, press the START/STOP button at the same time.
- This causes the MUSIC LIBRARY indicator lamp to flash, and starts sequential playback of the Music Library tunes.
- You can play along with the Music Library tunes on the keyboard, if you want. Tone assigned to the keyboard is the one that is preset for the Music Library tune that is playing.
Press the START/STOP button again to stop Music Library tune play.
You can power this digital piano by plugging it into a standard household power outlet.
Be sure you turn off power and unplug the power cord from the electrical outlet whenever the digital piano is not in use.
Using the AC Adaptor
Make sure that you use only the AC adaptor specified for this digital piano.
Specified AC Adaptor: AD-12
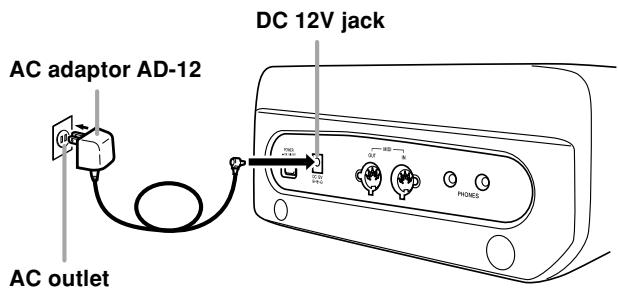
[Left Side Panel]
IMPORTANT!
- Make sure that the product is turned off before connecting or disconnecting the AC adaptor.
- Using the AC adaptor for a long time can cause it to become warm to touch. This is normal and does not indicate malfunction.
Power On Alert
Keyboard keys light to alert you if you leave power on and do not perform any operation for about 6 minutes. Note that keys light only, and no sound is produced. When this happens, press any button or keyboard key to clear the power on alert.
Turning Off Power On Alert
While holding down the CONTROL button, press one of the keyboard keys shown below.
IMPORTANT!
- Whenever connecting external equipment, first set the VOLUME knob of the digital piano and the volume controller of the external equipment to relatively low volume settings. You can later adjust volume to the level you want after connections are complete.
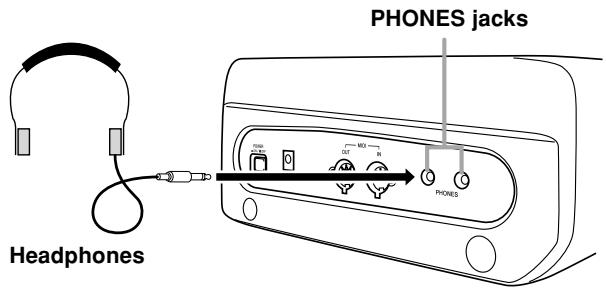
Connecting Headphones
Connect commercially available headphones to the digital piano's PHONES jacks. This cuts off the built-in speakers, which means you can practice even late at night without disturbing others. To protect your hearing, make sure that you do not set the volume level too high when using headphones.
[Left Side Panel]
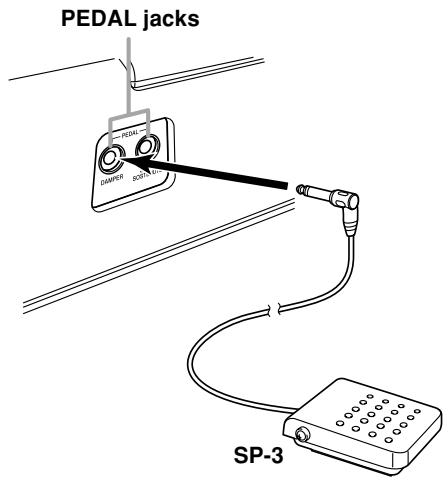
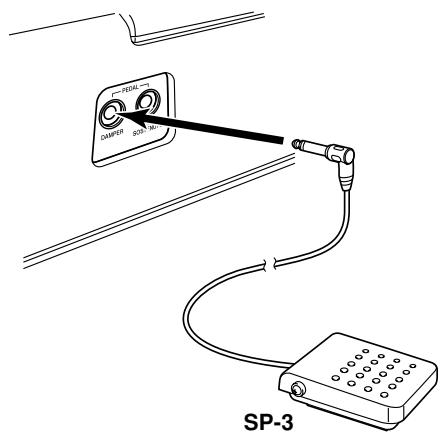
Connecting to a PEDAL Jack
Depending on the type of operation you want the pedal (SP-3) to perform, connect the pedal's cable to the digital piano's PEDAL DAMPER jack or PEDAL SOFT/SOSTENUTO jack. If you want to use both jacks at the same time, you need to purchase another optionally available pedal.
See "Using the Piano's Pedals" on page E-9 for information about using a pedal.
[Back Panel]
Accessories and Options
Use only the accessories and options specified for this digital piano. Use of non-authorized items creates the danger of fire, electric shock, and personal injury.
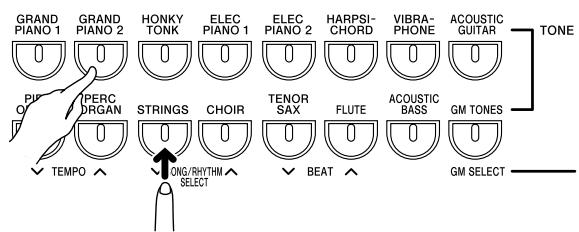
Selecting and Playing a Tone
Your piano has the following types of tones built in.
| Main Tones | 15 |
| Variation Tones | 15 |
| GM Tones | 128 |
| Drum Sets | 10 |
Selecting Main Tones and Variation Tones
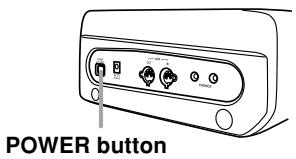
Press the POWER button.
Use the VOLUME knob to adjust the volume level.
- Before playing, it is a good idea to set the volume to a relatively low level.
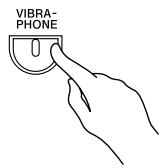
Press one of the 15 TONE buttons to select the tone you want.
- The names of the main tones are marked above the TONE buttons.
Example: To select VIBRAPHONE
4 Press the VARIATION button so the indicator lamp above it is lit.
- This selects the variation tone assigned to each TONE button.
Example: MARIMBA
- For information about variation tone assigned to each button, see the Tone List on page A-1.
5 To toggle between the main tone (VARIATION indicator lamp off) and variation tone (VARIATION indicator lamp on), press the VARIATION button or the TONE button.
Selecting a GM Tone or Drum Set
You can use the following procedure to assign one of the piano's 128 GM tones or 10 drum sets to the GM TONES button. After you assign a GM tone, you can select it by pressing the GM TONES button. In addition, you can also assign a second GM tone or drum set as the variation tone of the GM TONES button. See "Selecting the GM TONES Button Variation Tone" on page E-7.
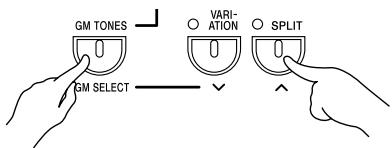
Press the GM TONES button.
- This selects the GM tone that is currently assigned to the GM TONES button.
- The display continues to display the tune or rhythm number.
Use the Tone List on page A-1 to find the GM tone or drum set number you want.
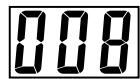
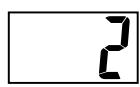
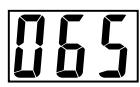
Example: 008 (GM CELESTA)


While holding down the CONTROL button, press the GM TONES button. Remember to keep the CONTROL button depressed.
- This causes the tone number of the GM tone that is currently assigned to the GM TONES button to appear on the display.
Example: 080 (GM SQUARE LEAD) / 080

While holding down the CONTROL button, use the keyboard keys shown below to input the tone number of the GM tone you want to assign to the GM TONES button.
Example: 008 (GM CELESTA)

- Be sure to input all three digits.
This displays the number of the assigned tone.

After inputting the tone number you want, release the CONTROL button to exit the GM tone setting screen.
NOTE
- You can also select a tone by holding down the GM TONES button as you use the GM SELECT [√] and [▲] buttons to scroll through tone numbers on the display.
- The tone that you assign to the GM TONES button is retained until you turn off the keyboard.
- If a drum set is assigned to the GM TONES button, keyboard keys sound drum sounds when you press them. See page A-3 for information about the drum sounds that are assigned to each of the keyboard keys.
Selecting the GM TONES Button Variation Tone
To assign a variation tone to the GM TONES button, perform the steps under "Selecting a GM Tone or Drum Set" on page E-6. After step 1, however, press the VARIATION button so the indicator lamp above it is lit.
After you assign a GM tone as the variation tone, you can select it by pressing the GM TONES button while the indicator lamp above the VARIATION button is lit.
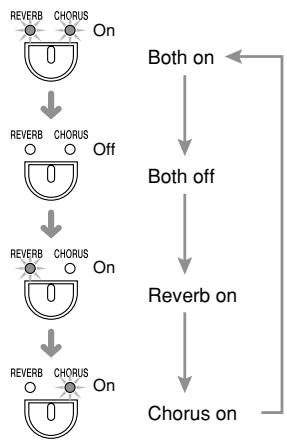
Using Tone Effects
Reverb: Makes your notes resonate
Chorus: Adds more breadth to your notes

Press the REVERB CHORUS button to cycle through the effect settings as shown below.
- You can find out the current reverb/chorus configuration by looking at the REVERB and CHORUS indicator lamps
Other Effect Settings
You can select from among four reverb effects and four chorus effects by pressing the keyboard keys shown below.
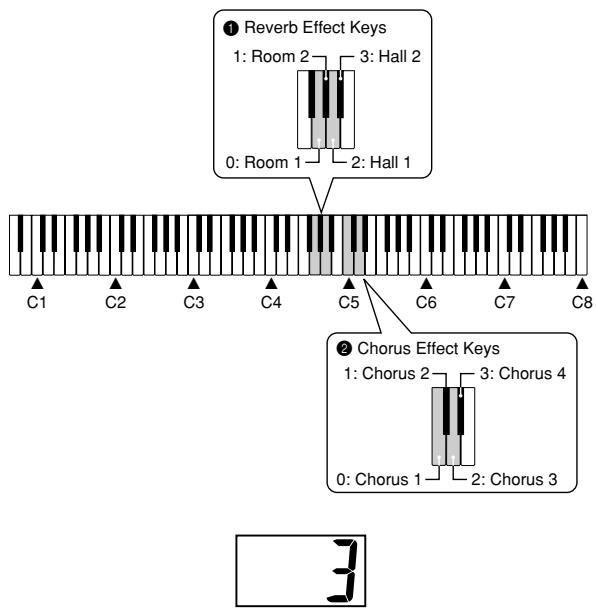
While holding down the CONTROL button, press one of the keyboard keys shown above.
Layering Two Tones
Use the following procedure to layer to two tones, so they sound at the same time.
PREPARATION
- If you plan to use a variation tone, perform the procedure on page E-6 to select the variation tone for the applicable TONE button(s) before starting this procedure.
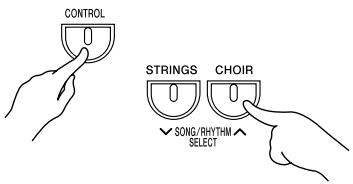
While holding down the TONE button of one of the tones you want to use (the base tone), press the TONE button of the other tone (the layered tone).
Example: Press GRAND PIANO 2 button and STRINGs button at the same time.
- This causes the indicator lamp of the base tone to light, and the layered tone to flash.
- If the base tone (the one you pressed first) is a variation tone, the indicator lamp above the VARIATION button will light.
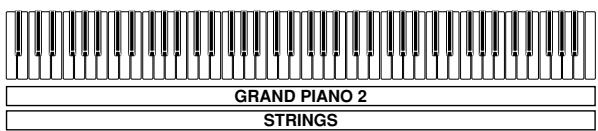
- The tones are now layered.
After you are finished using the layered tones, press one of the TONE buttons again to unlayer them.
NOTE
Note that you cannot layer the main tone and variation tone assigned to the same TONE button.
Adjusting the Volume of Layered Tones
While holding down the CONTROL button, use the keyboard keys shown below to adjust the volume of the layered tones.
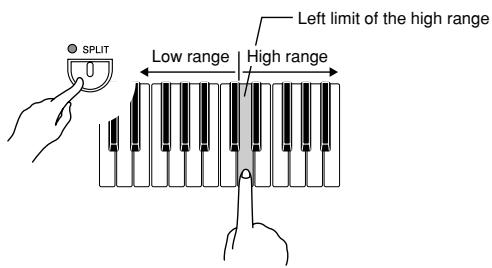
Assigning Different Tones to the Left and Right Sides of the Keyboard
You can assign different tones to keys on the left side and the right side of the keyboard.
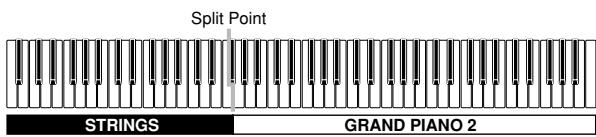
Press the TONE button of the tone you want to select for the high (right) range. Example: GRAND PIANO 2
Press the SPLIT button. This causes the SPLIT indicator lamp to light.
Press the TONE button of the tone you want to select for the low (left) range. The keyboard is now split between the two tones. Example: STRINGS
4 After you are finished using the split keyboard, press the SPLIT button again to unsplit it. This causes the SPLIT indicator lamp to go out.
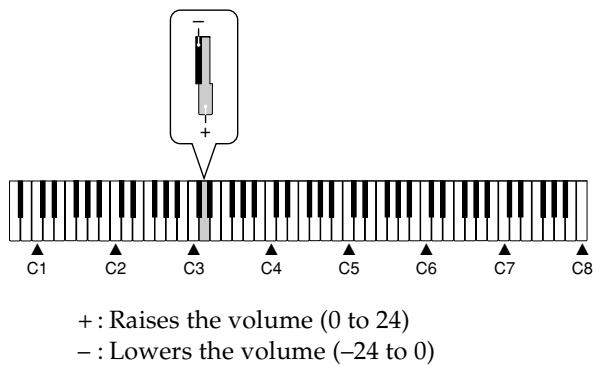
Specifying the Keyboard Tone Split Point
While holding down the SPLIT button, press the keyboard key where you want the left limit of the high range (right) tone to be.
- A note does not sound when you press a keyboard key at this time.
NOTE
- The split point setting also controls the point where the keyboard splits between the accompaniment keyboard (pages E-13, 14) and the melody keyboard. Moving the split point also affects the sizes of the accompaniment keyboard and the melody keyboard.
Using the Piano's Pedals
The digital piano is equipped with two pedal jacks, one for a damper pedal and one for a soft/sostenuto pedal.
Pedal functions
- Damper pedal
Pressing this pedal causes notes to reverberate and to sustain longer.
- Soft pedal
Pressing this pedal dampens notes and slightly reduces their volume. Only notes played after the pedal is depressed are affected, and any notes played before the pedal is pressed sound at their normal volume.
- Sostenuto pedal
Like the damper pedal, this pedal causes notes to reverberate and to sustain longer. The difference between the two pedals is the timing when they are pressed.
With the sostenuto pedal, you press the pedal after depressing the notes you want to sustain. Only the notes whose keyboard keys are depressed when the sostenuto pedal is pressed are affected.
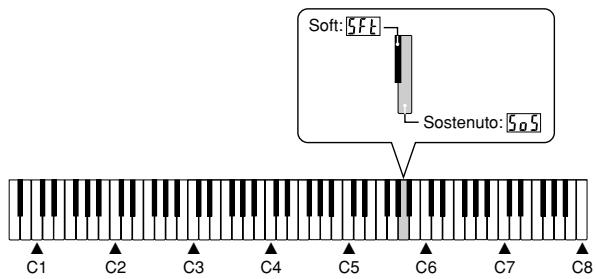
Selecting the Pedal Function
A pedal connected to the piano's PEDAL jack can operate as either a soft pedal or a sostenuto pedal. When you turn on the keyboard, the pedal is initially configured for soft pedal operation. You can perform the following operation to select either soft or sostenuto for the pedal operation.

While holding down the CONTROL button, use the keyboard keys shown below to select either soft or sostenuto.
Using the Built-in Metronome
You can use the metronome to sound a count that helps keep you in proper time.

Press the METRONOME button.
This starts the metronome.

While holding down the CONTROL button, press the BEAT [√] or [▲] button to specify how many beats there are per measure.

- The first value of the beat can be set to a value of 2 through 6. The bell (indicating the first beat of a measure) does not sound while a value of 0 is specified. All beats are indicated by a click sound. This setting lets you practice with a steady beat, without worrying about how many beats there are in each measure.

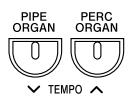
While holding down the CONTROL button, use the TEMPO [√] and [ʌ] buttons to change the tempo (speed) of the metronome.

- You can also use keyboard keys to change the tempo setting (See page E-12).

Press the METRONOME button again to stop the metronome.
You can select from among 120 built-in rhythms. See the Rhythm List on page A-2 of this manual for more information.
NOTE
- Rhythms 110 through 119 consist of chord accompaniments only, without any drums or other percussion instruments. These rhythms do not sound unless CASIO CHORD, FINGERED, or FULL RANGE CHORD is selected as the accompaniment mode. With such rhythms, make sure that CASIO CHORD, FINGERED, or FULL RANGE CHORD is selected before you try playing chords (see the next page).

Press the RHYTHM button so the RHYTHM indicator lamp (below the button) is lit.
Each press of the button toggles between the upper indicator lamp and lower indicator lamp.

While holding down the CONTROL button, use the keyboard keys shown below to input a three-digit rhythm number.
- To select rhythm number 5, for example, press the 0 key, the 0 key and then the 5 key.

Press the START/STOP button.
- This starts the rhythm.

Press the START/STOP button again to stop the rhythm.
NOTE
- You can also cycle through the available rhythms in step 2 by holding down the CONTROL button and pressing the SONG/RHYTHM SELECT [√] or [▲] button.
To adjust the tempo of the rhythm
Press the RHYTHM button so the RHYTHM indicator lamp is lit.
Each press of the button toggles between the upper indicator lamp and lower indicator lamp.
While holding down the CONTROL button, use the TEMPO [√] and [ʌ] buttons to change the tempo (speed) of the rhythm.
- To return the rhythm to its standard tempo setting, press the TEMPO [✔] and [▲] buttons at the same time.
NOTE
- You can also use keyboard keys to change the tempo setting.
(1) While holding down the CONTROL button, press the METRONOME button.
(2) While keeping the CONTROL button depressed, use the keyboard keys shown below to input a three-digit number.
- Tempo Range: 030 to 255
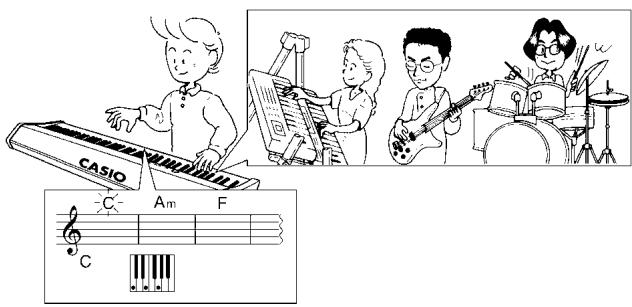
Using Auto Accompaniment
With auto accompaniment, the keyboard automatically plays rhythm, bass, and chord parts in accordance with chords you select using simplified keyboard fingerings, or chords you play. Auto accompaniment makes it feel like you have your own private backup group with you all the time.
To play with auto accompaniment
PREPARATION
- Select the rhythm you want to use and adjust the tempo.

While holding down the CONTROL button, press one of the keyboard keys shown below to select a chord mode.
Here we will select the CASIO CHORD mode.
See page E-13 for information about how to use the chord modes.

Press the SYNCHRO/FILL-IN button.
- This configures the piano so rhythm and chord accompaniment will start automatically when you press any keys within the accompaniment keyboard range.

Press the INTRO/ENDING button.
- This configures the piano so accompaniment starts with an intro pattern.
4 Use a CASIO CHORD fingering to play the first chord within the accompaniment keyboard range.
- See "How to Play Chords" on this page for information about how to finger chords with the various chord modes.
- This will cause the intro pattern for the selected rhythm to play, followed by the auto accompaniment rhythm and chord pattern.
Use CASIO CHORD fingerings to play other chords.
- You can insert a fill-in pattern while an auto accompaniment is playing by pressing the SYNCHRO/FILL-IN button. A fill-in helps to change the mood of the auto accompaniment pattern.
6 To stop auto accompaniment play, press the INTRO/ENDING button. - This will play an ending pattern for the selected rhythm before stopping auto accompaniment play.
NOTE
- You can start or stop auto accompaniment play without an intro or ending pattern by pressing the START/STOP button in steps 3 and 6.
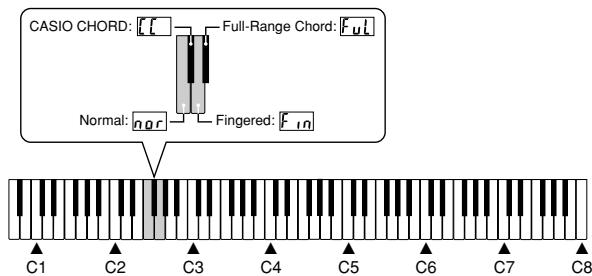
How to Play Chords
The way you finger chords depends on the current chord mode.
■ Normal
In this mode there is no auto accompaniment, so you can play all of piano's keys for standard-fingering chords or melody notes.
CASIO CHORD
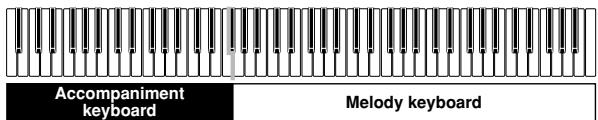
This method of chord play makes it possible for anyone to easily play chords, regardless of previous musical knowledge and experience. The following describes the CASIO CHORD "Accompaniment keyboard" and "Melody keyboard", and tells you how to play CASIO CHORDs.
CASIO CHORD Accompaniment Keyboard and Melody Keyboard
NOTE
- The accompaniment keyboard can be used for playing chords only. No sound will be produced if you try playing single melody notes on the accompaniment keyboard.
Chord Types
CASIO CHORD accompaniment lets you play four types of chords with minimal fingering.
| Chord Types | Example |
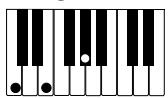
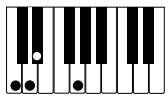
| Major chords Press one accompaniment key. Note that the chord produced when you press an accompaniment keyboard key does not change octave, regardless of which key you use to play it. | C Major (C)
C major # PROA B CODIE F |
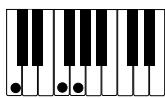
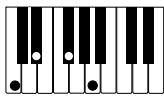
| Minor chords (m) To play a minor chord, keep the major chord key depressed and press any other accompaniment keyboard key located to the right of the major chord key. | C minor (Cm)
C major # PROA B CODIE F |
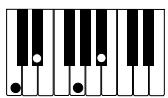
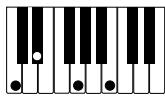
| Seventh chords (7) To play a seventh chord, keep the major chord key depressed and press any other two accompaniment keyboard keys located to the right of the major chord key. | C seventh (C7)
C major # PROA B CODIE F |
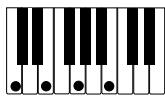
| Minor seventh chords (m7) To play a minor seventh chord, keep the major chord key depressed and press any other three accompaniment keyboard keys located to the right of the major chord key. | C minor seventh (Cm7)
C major # PROA B CODIE F |
NOTE
- It makes no difference whether you press black or white keys to the right of a major chord key when playing minor and seventh chords.
■ FINGERED
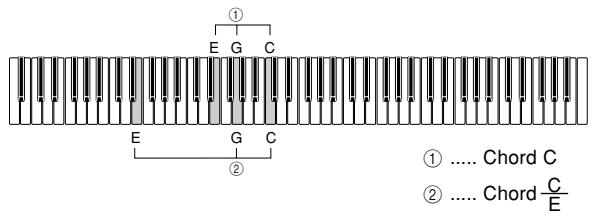
In this mode, you specify chords by playing them as you would on a piano, inside the accompaniment keyboard range. To specify a C-chord, you would play C-E-G.
FINGERED Accompaniment Keyboard and Melody Keyboard
NOTE
- The accompaniment keyboard can be used for playing chords only. No sound will be produced if you try playing single melody notes on the accompaniment keyboard.
C
Cm
Cdim
Caug *1
Csus4

C7*2
Cm7*2
Cmaj7*2
Cm7b5
C7b5*1
C7sus4
Cadd9
Cmadd9
CmM7 *2
Cdim7*1
NOTE
- See the "Fingered Chord Chart" on page A-5 for details on playing chords with other roots.
1: Inverted fingerings cannot be used. The lowest note is the root.
2: The same chord can be played without pressing the 5th G.
NOTE
Except for the chords specified in note*1 above, inverted fingerings (i.e. playing E-G-C or G-C-E instead of C-E-G) will produce the same chords as the standard fingering.
Except for the exception specified in note*2 above, all of the keys that make up a chord must be pressed. Failure to press even a single key will not play the desired FINGERED chord.
FULL RANGE CHORD
This accompaniment method makes it possible to play a total of 38 chord variations: the 15 available with FINGERED plus 23 additional variations. The keyboard interprets any input of three or more keys that matches a FULL RANGE CHORD pattern to be a chord. Any multi-key input that is not a FULL RANGE CHORD pattern is interpreted as melody play. Because of this, there is no need for a separate accompaniment keyboard, and the entire keyboard from end-to-end can be used for both melody and chords.
FULL RANGE CHORD Accompaniment Keyboard and Melody Keyboard

Chords Recognized by This Piano
The following table identifies patterns that are recognized as chords by FULL RANGE CHORD.
| Pattern Type | Number of Chord Variations |
| FINGERED | The 15 chord patterns shown under "FINGERED" on page E-14. |
| Standard Fingerings | 23 standard chord fingerings. The following are examples of the 23 chords available with C as the bass note. C6·Cm6·C69 DbC D E F G A b C B B C D m Fm Gm Am B m Ddim A b7 F7 Fm7 Gm7 A badd9 C C C C C C |
Example: To play the chord C major and .
NOTE
- If there are more than six semitones between the lowest note and the next note to the right, the lowest note is interpreted as a bass note.
Adjusting Accompaniment Volume
Perform the following operation to change the volume level of the rhythm and chord accompaniment (setting range : 000 to 127).

While holding down the CONTROL button, use the keyboard keys shown below to raise (+) or lower (-) the accompaniment volume.
+: Raises the accompaniment volume
- : Lowers the accompaniment volume

Learning to Play the Music Library Tunes
Playing a Music Library Tune
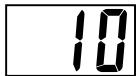
Your piano comes with 80 Music Library tunes built in. See the Song List on page A-2 of this manual for more information.

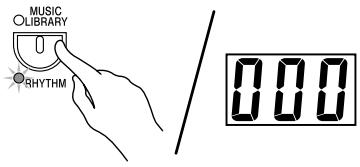
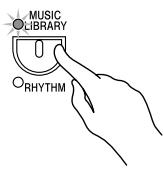
Press the MUSIC LIBRARY button so MUSIC LIBRARY indicator lamp (above the button) is lit.
Each press of the button toggles between the upper indicator lamp and lower indicator lamp.

While holding down the CONTROL button, press the keyboard keys shown below to input a tune number.

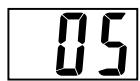
- To select tune number 5, for example, press the 0 key and then the 5 key. Always input two digits for the tune number.

Press the PLAY/STOP button.
- This starts the playback of the tune.

Press the PLAY/STOP button again to stop tune playback.
NOTE
- You can also cycle through the available tunes in step 2 by holding down the CONTROL button and pressing the SONG/RHYTHM SELECT [√] or [▲] button.
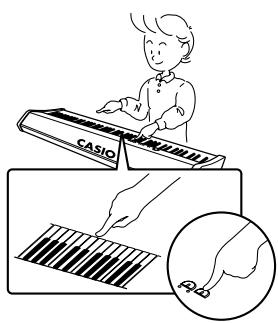
Practicing with Keyboard Lighting
With keyboard lighting, you can practice the left hand part, the right hand part, or both hand parts using the two steps described below.
Easy Lesson:
In this lesson, you learn how to play the correct notes on the keyboard. The parts being played automatically by the piano wait until you press the correct keyboard key, so you can practice at your own pace.
Normal Lesson:
In this lesson, the song plays and the keyboard lights without stopping to wait for you to press the correct keys.
Keyboard Lighting During Lesson Play
When using an auto-accompaniment tune with the Lesson System, the lights indicate not only the note you should play, but how long you should play it (how long you should keep the key depressed). The following describes what illumination of keys indicates.
Note Guide : A lit key indicates the note to be played.
Length Guide :Key remains lit for as long as note should be played.
- Next Note Guide : A flashing key indicates the next note to be played.
- Consecutive Note Guide : When a key lights, goes out momentarily, and then lights again, it indicates that the same note should be played in succession.
Note lengths are not indicated by the Lesson System when playing a two-hand tune with Easy Lesson. The lit key goes out as soon as you press the correct keyboard key and the next note's key flashes.
When playing a two-hand tune with Normal Lesson, the applicable keyboard key remains lit as long as its note plays. In this case, however, the key for the next note to be played does not flash. Keys light when their notes start to play.
Easy Lesson
PREPARATION
- Select the tune you want to practice and adjust the tempo. If you are playing a tune for the first time, a slow tempo is probably best.

Use the LEFT/TRACK 1 RIGHT/TRACK 2 button to select the part you want to practice.
- The indicator lamps above the button show which part is selected.
- To practice the left hand part, the LEFT/TRACK 1 indicator lamp should be unlit.
- To practice the right hand part, the RIGHT/TRACK 2 indicator lamp should be unlit.
- To practice both hand parts, both indicator lamps should be unlit.

Press the EASY button.
- After an introductory count (and the introduction of the tune, if there is one), the piano stands by and waits for you to play the first note.

Follow the lighting of the keys to play the part(s) you selected in step 1.

- The first keyboard key you will need to press flashes during the introductory count (or introduction of the tune). The flashing stops and the key remains lit when the time comes to press the key and play the note. Keyboard Lighting causes each key you need to press next to flash.
- If multiple keyboard keys are lit when practicing the parts for both hands, you need to press all of them to advance.

When you are finished, press the PLAY/ STOP button to end the lesson.
Normal Lesson
PREPARATION
- Select the tune you want to practice and adjust the tempo. If you are playing a tune for the first time, a slow tempo is probably best.

Use the LEFT/TRACK 1 RIGHT/TRACK 2 button to select the part you want to practice.
- The indicator lamps above the button show which part is selected.
- To practice the left hand part, the LEFT/TRACK 1 indicator lamp should be unlit.
- To practice the right hand part, the RIGHT/TRACK 2 indicator lamp should be unlit.
- To turn off both parts, the RIGHT/TRACK 2 and LEFT/TRACK 1 indicator lamps should both be unlit.

Press the NORMAL button.
- The song plays and the keyboard lights without stopping to wait for you to press the correct keys.

Follow the lighting of the keys to play the part(s) you selected in step 1.


When you are finished, press the PLAY/ STOP button to end the lesson.
Recording to and Playing Back from Song Memory
You can store the notes you play in Song Memory for later playback.
Tracks
The song memory of this piano records and plays back notes much like a standard tape recorder. There are two tracks, each of which can be recorded separately. Besides notes, each track can be assigned its own tone number. During playback you can adjust the tempo to change the speed of playback.
Song Memory Capacity
- You can store a total of up to about 5,200 notes (Track 1 + Track 2) in Song Memory.
- Recording stops automatically if the number of notes in Song Memory exceeds the maximum while you are recording. This is indicated by the SONG MEMORY indicator lamp turning on.
Other Song Memory Data
The following data is included when recording to Song Memory: selected tone, tempo and beat settings, pedal operations, reverb and chorus settings, selected rhythm (Track 1 only).
Recorded Data Storage
This digital piano has a lithium battery to supply power to retain memory contents even while power is off.* The life of the lithium battery is five years after the date of manufacture of the digital piano. Be sure to contact your CASIO service provider about having the lithium battery replaced every five years.
- Never turn off piano power while a record operation is in progress.
IMPORTANT!
- If the data recorded in a single track uses up all the available Song Memory capacity, you will not be able to record anything in the other track.
- Recording new data to a track automatically deletes any data previously stored in that track.
- Turning off power while a record operation is in progress deletes anything recorded up to that point.
- CASIO shall not be held responsible for any losses by you or any third party due to loss of data caused by malfunction or repair of this digital piano, or by battery replacement.
SONG MEMORY Button Operation
Each press of the SONG MEMORY button cycles through the functions shown below.
Recording Your Keyboard Play
You can record to either track with or without playback of the other track.
To record to one track without playing back the other

Press the SONG MEMORY button twice so the SONG MEMORY indicator lamp is flashing.
- At this time the LEFT/TRACK 1 indicator lamp should also be flashing. This indicates that the piano is standing by for recording to Track 1.
NOTE
-
If you want to record to Track 2, press the LEFT/TRACK1 RIGHT/TRACK2 button here. This will cause the RIGHT/TRACK2 indicator lamp to flash, which indicates that the piano is standing by for recording to Track 2.
-
Select the tone and effects you want to use in your recording, and configure the tempo and beat settings.
- If you want to use the metronome during recording, press the METRONOME button to start it.
- If you want to use a rhythm and/or auto accompaniment during recording (to Track 1 only), select the rhythm and chord mode.

Start playing something on the keyboard.
- This will automatically start recording.
- Actually, there are a variety of different ways to start the record operation. See "Starting the Record Operation" below for more information.

When you are finished, press the START/ STOP button to stop recording.
- If you are using a rhythm, you can stop recording with an ending pattern by pressing the INTRO/ENDING button.
- Stopping recording causes the SONG MEMORY indicator lamp to go out, and indicator lamp above the button of the track to which you recorded to light.
- To play back the track you just recorded, press the START/STOP button again.

After you are finished recording and playing back, press the SONG MEMORY button so the SONG MEMORY indicator lamp is off.
Starting the Record Operation
You can use any of the following methods to start a record operation in step 2 of the above procedure.
■ When recording to Track 1 with rhythm or auto accompaniment
- Press the START/STOP button to start recording.
- Press the SYNCHRO/FILL-IN button to put the piano into synchro start standby. Recording will start when you finger a chord in the accompaniment range of the keyboard.
- Press the INTRO/ENDING button to put the piano into synchro start standby. Recording will start and an intro pattern will play when you finger a chord in the accompaniment range of the keyboard.
■ When recording to Track 1 without rhythm or auto accompaniment
- Recording will start as soon as you play anything on the keyboard.
When recording to Track 2
- Press the START/STOP button or play something on the keyboard to start recording.
To record to a track while playing back from the other
After you finish recording, you can play back Track 1 and Track 2 at the same time.
Example: To record to Track 2 while playing back the contents of Track 1
Press the SONG MEMORY button once.
- This causes the SONG MEMORY indicator lamp to light.
Press the LEFT/TRACK 1 RIGHT/TRACK 2 button so LEFT/TRACK 1 indicator is lit.
Press the SONG MEMORY button again.
-
This causes the LEFT/TRACK 1 indicator lamp to flash. Press the LEFT/TRACK 1 RIGHT/TRACK 2 button again, so it causes the RIGHT/TRACK 2 indicator lamp to flash, which indicates that the piano is standing by for recording to Track 2.
-
Select the tone and effects you want to use while recording.
4 Press the START/STOP button or play something on the keyboard to start simultaneous playback from Track 1 and recording to Track 2.
When you are finished, press the START/ STOP button again to stop recording.
Playing Back from Song Memory
Press the SONG MEMORY button once.
- This causes the SONG MEMORY indicator lamp to light.
Use the LEFT/TRACK 1 RIGHT/TRACK 2 button to select the track you want to play back.
-
The indicator lamps above the button show the currently selected track.
-
To play back Track 1, the LEFT/TRACK 1 indicator lamp should be lit.
- To play back Track 2, the RIGHT/TRACK 2 indicator lamp should be lit.
- To play back Track 1 and Track 2, both the indicator lamps should be lit.
Press the START/STOP button.
- This starts playback of the track you selected.
- You can change the tempo setting as a track is playing.
- As a track is playing, you can turn the metronome on or off using the METRONOME button.
- You cannot change the tone setting during playback.
- Press the START/STOP button again to stop playback.
To delete song memory data
IMPORTANT!
- The procedure below deletes all of the data from the selected track. Note that the delete operation cannot be undone. Check to make sure you really do not need the data in Song Memory before you perform the following steps.
Press the SONG MEMORY button twice.
- This causes the SONG MEMORY indicator lamp to be flashing.
Use the LEFT/TRACK 1 RIGHT/TRACK 2 button to select the track you want to delete.
- The indicator lamps above the button show the currently selected track.
- To delete Track 1, the LEFT/TRACK 1 indicator lamp should be flashing.
- To delete Track 2, the RIGHT/TRACK 2 indicator lamp should be flashing.
Hold down the SONG MEMORY button until its indicator lamp stops flashing and remains lit.
4 Press the LEFT/TRACK 1 RIGHT/TRACK 2 button.
- This deletes the contents of the track.
Changing the Keyboard Touch
This setting changes the relative touch of the keyboard keys.
Changing the Piano Key
Use this setting to raise or lower the overall key of the keyboard in semitone steps.
Changing the Pitch of the Piano to Match Another Instrument
Use this setting to raise or lower the overall pitch of the piano. The setting range is plus or minus 50 cents (100 cents = 1 semitone) from the standard pitch of A4 = 440.0Hz.

While holding down the CONTROL button, use the keyboard keys shown below to select the keyboard setting you want.
1 Changing the Keyboard Touch
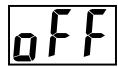
Off: 0FF
Weak (Strong sound is produced even when relatively light pressure is applied.) :
Normal:
Strong (Normal sound is produced even when relatively strong pressure is applied.):
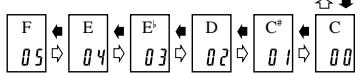
2 Changing the Piano Key
Higher (C# to F)
Normal (C)
Lower (F# to B)
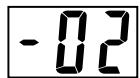
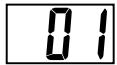
Key: F G A A B Display: 06 05 04 A 03 02
Changing the Pitch of the Piano to Match Another Instrument
+: Raise
:Lower
- Each press of a key changes the current setting by approximately 1 cents (1/100 semitone).
NOTE
- Holding down the CONTROL button and pressing keyboard keys " - " and " + " at the same time returns tuning to the standard A4 = 440.0Hz.

Turning Off Keyboard Lighting

While holding down the CONTROL button, use the keyboard keys shown below to toggle keyboard lighting on and off.

Using MIDI
What is MIDI?
The letters MIDI stand for Musical Instrument Digital Interface, which is the name of a worldwide standard for digital signals and connectors that makes it possible to exchange musical data between musical instruments and computers (machines) produced by different manufacturers.
MIDI Connections
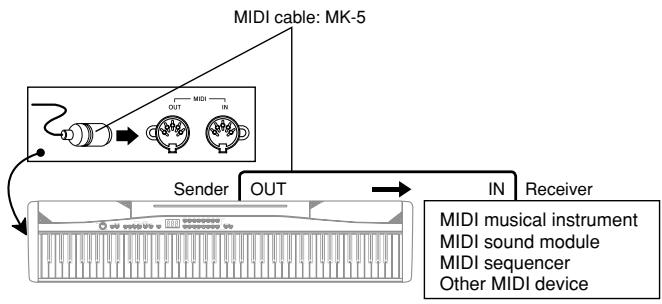
Send
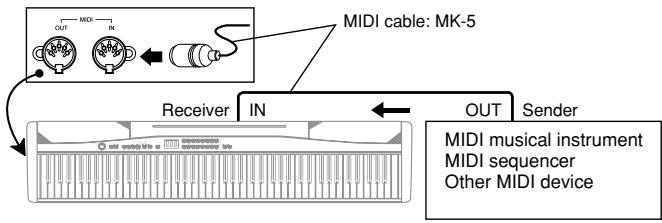
Receive
MIDI Settings
1 Send Channel
Use this setting to specify one of the MIDI channels (1 through 16) as the Send Channel for sending MIDI messages to an external device.
2 Accompl MIDI Out
Use this setting to specify whether or not MIDI messages for the piano's auto accompaniment should be sent.
MIDI IN Chord Judge
Specifies whether chord judge should be performed on accompaniment range MIDI Note On messages received from an external device.
Local Control
This setting controls whether or not power is cut off internally from the piano's keyboard and sound source. Turning off Local Control cuts off power to the keyboard and source, which means that the piano does not produce any sound when played. This comes in handy when you want to turn off the piano's keyboard and use its auto accompaniment feature to accompany an external sequencer or other device.
1 While holding down the CONTROL button, press one the keyboard keys shown below to configure the setting you want.
1 Send Channel
:Decreases value
+: Increases value
2Accomp MIDI Out
Off
On
3 MIDI IN Chord Judge
Off
On
Local Control
Off
On
Navigate Channel (Left Hand Part)
:Decreases value
+: Increases value

Navigate Channel (Right Hand Part)
:Decreases value
+: Increases value
Expanding the Selections in the Music Library
You can transfer song data from your computer to the piano's Music Library. You can store up to 10 tunes (about 29,000 note, about 174 kilobytes) as Music Library songs 80 through 89. For SMF data you purchase or create, you need to use special CASIO conversion to convert it to CASIO format before transferring it to the piano.
You can obtain a copy of the special CASIO conversion software by downloading it at the Web page shown below. After downloading, install the software on your computer.
CASIO MUSIC SITE
http://music.casio.com/
- In addition to the software itself, the CASIO MUSIC SITE will also provide you with information about its installation and use. You can also find out about how to connect your computer and piano, the latest news about your piano and other CASIO musical instruments, and much more.
| Symptom | Possible Cause | Action | Reference |
| No sound produced when keyboard keys are pressed. | 1. VOLUME knob set to MIN. 2. Headphones connected to the digital piano. 3. Local Control turned off. 4. Check the current accompaniment mode setting. Normally, the accompaniment keyboard will not produce any note while CASIO CHORD or FINGERED is selected as the accompaniment mode. | 1. Move the VOLUME knob more towards MAX. 2. Disconnect the headphones from the digital piano. 3. Turn on Local control. 4. Change the accompaniment mode to NORMAL. | Page E-6 Page E-5 Page E-24 Page E-12 |
| Keyboard keys remain lit. | The piano is standing by for keyboard play in Easy Lesson. | 1. Press the lit keys and continue with Easy Lesson play. 2. Press the PLAY/STOP button to stop Easy Lesson. | Page E-18 |
| Keyboard keys light but no sound is produced. | Power on alert is telling you that power is left on. | Press any button or keyboard key to resume normal operation with the keyboard in its initial power on setting. | Page E-4 |
| Keyboard out of tune. | 1. The piano key is set to a value other than C. 2. Incorrect pitch setting of the piano. | 1. Change the piano key setting to C, or turn the digital piano power off and then back on again. 2. Correct the pitch setting, or turn the digital piano power off and then back on again. | Page E-22 Page E-22 |
| No sound produced by demo tune play. | 1. VOLUME knob set to MIN. 2. Headphones connected to the digital piano. | 1. Move the VOLUME knob more towards MAX. 2. Disconnect the headphones from the digital piano. | Page E-6 Page E-5 |
| Memory contents deleted. | Lithium battery is dead. | Contact your CASIO Service Provider for replacement of the lithium battery. | Page E-27 |
| No sound produced by connected external MIDI sound source when the digital piano keys are pressed. | 1. The digital piano Send Channel does not match the Send Channel of the MIDI sound source. 2. Volume or expression setting of the external sound source is set to 0. | 1. Change the Send Channel settings so they are identical. 2. Change the volume or expression setting of the external sound source to an appropriate value. | Page E-24 See the documentation that comes with the external sound source. |
| Models: | PX-500L |
| Keyboard: | 88 piano keys (with touch response) |
| Key Lighting System: | Can be turned on and off |
| Key Lighting Polyphony: | 10 |
| Polyphony: | 32 notes, maximum |
| Tones: | 15 panel tones + 15 variation tones + 128 GM tones + 10 drum sets; with layer and split |
| Digital Effects: | Reverb (4 types), Chorus (4 types) |
| Metronome: | • Time Signatures: 0, 2, 3, 4, 5, 6 • Tempo Range: 30 to 255 |
| Auto Accompaniment: | • Number of Rhythms: 120 • Tempo Range: 30 to 255 • Controllers: START/STOP, INTRO/ENDING, SYNCHRO/FILL-IN • Modes: Normal; CASIO CHORD; FINGERED; FULL RANGE CHORD • Accompaniment Volume: Adjustable |
| Music Library: | • Number of Tunes: 80 preset + 10 loaded song data • Tempo: 30 to 255 • Demo: Sequential looping of all 80 preset tunes |
| Lesson Function: | • 2 types (Easy Lesson, Normal Lesson) • Lesson Part: Left hand, right hand, both hands |
| Song Memory: | • Operations: Real-time recording, playback • Capacity: Approximately 5,200 notes (2 tracks) • Memory Backup: Built-in lithium battery (Battery Life: 5 years) |
| Pedals: | Damper, Soft/Sostenuto (Selectable) |
| Other Functions: | • Touch: 3 types, off • Transpose: 1 octave (F# to C to F) • Tuning: A4 = 440.0Hz ±50 cents (adjustable) |
| MIDI: | 16 multi-timbre receive, GM Level 1 standard |
| Input/Output: | • Headphones: Stereo mini jacks × 2 Output Impedance: 170Ω Output Voltage: 1.1V (RMS) MAX • Pedal: Standard jacks × 2 • Power: 12V DC • MIDI (OUT) (IN) |
| Speakers: | (12cm × 6cm) × 2 (Output: 8.0W + 8.0W) |
| Power Supply: | AC Adaptor: AD-12 |
| Power Consumption: | 12V --- 18W |
| Dimensions: | 132.3×27.8×13.2 cm (521/16×1015/16×53/16inch) |
| Weight: | Approximately 13.0 kg (28.7 lbs) |
- Design and specifications are subject to change without notice.
Locating the Unit
Avoid the following locations.
- Areas exposed to direct sunlight and high humidity
- Areas subjected to very low temperatures
- Near a radio, TV, video deck, or tuner (unit can cause interference with audio or video signals)
Care of the Unit
- Never use benzene, alcohol, thinner or other such chemicals to clean the exterior of the unit.
- To clean the keyboard, use a soft cloth dampened with a weak solution of a mild neutral detergent and water. Wring out all excess moisture from the cloth before wiping.
Lithium Battery
This unit is equipped with a lithium battery to provide power needed to retain memory contents while unit power is turned off. Should the lithium battery go dead, all memory contents will be lost whenever you turn unit power off. The normal life of the lithium battery is five years from the time that the battery was installed. Be sure to periodically contact your retailer or authorized service provider to have the lithium battery replaced. Note that you will be charged separately for lithium battery replacement.
- Note that CASIO COMPUTER CO., LTD. shall not be held liable for any damages or losses or any claims by third parties arising from corruption or loss of data caused by malfunction or repair of the unit, or from battery replacement.
You may notice lines in the finish of the case of this product. These lines are the result of the molding process used to shape the plastic of the case. They are not cracks or breaks in the plastic, and are no cause for concern.
NOTE
- Unauthorized reproduction of this manual in its entirety or in part is expressly forbidden. All rights reserved.
- CASIO COMPUTER CO., LTD. shall not be held liable for any damages or losses or any claims by third parties arising from use of this product or this manual.
- The contents of this manual are subject to change without notice.
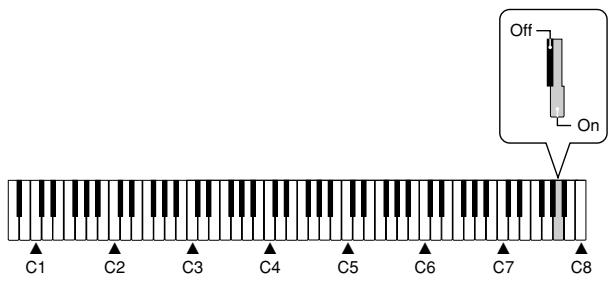
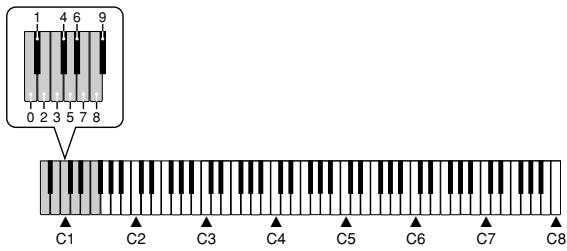
Setting Control Key Chart
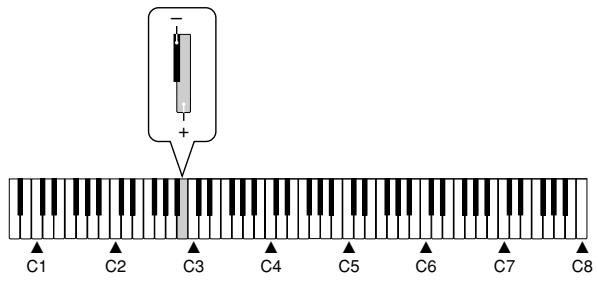
While the CONTROL button is depressed, the keyboard keys can be used to perform a variety of different setting functions. To help you understand which keyboard keys you need to press, it is a good idea to remember where the various C notes (C1 through C8) are on the keyboard.
- A value next to a note name indicates the relative position of the note on the keyboard as shown below.

Number Input Keys (0 to 9)
Keyboard Touch (Off, Weak, Normal, Strong)
3 Chord Mode (Normal, CASIO CHORD, Fingered, Full-Range Chord)
4 Accompaniment Volume (-, +)
Piano Key (F# to C to F)
Chorus Effect (1 to 4)
10 Pedal Function (Soft, Sostenuto)
12 Power on Alert (Off, On)
Tone List/Lista de sonidos
Rhythms 110 through 119 consist of chord accompaniments only, without any drums or other percussion instruments. These rhythms do not sound unless CASIO CHORD, FINGERED, or FULL RANGE CHORD is selected as the accompaniment mode. With such rhythms, make sure that CASIO CHORD, FINGERED, or FULL RANGE CHORD is selected before you try playing chords.
NOTA
| Key/Note Number | STANDARD SET 1 | STANDARD SET 2 | ROOM SET | POWER SET | ELECTRONIC SET | SYNTH SET 1 | SYNTH SET 2 | JAZZ SET | BRUSH SET | ORCHESTRA SET | |
| C3 48 | CR3 49 | High Tom 2 | High Tom 2 | Room High Tom 2 | Power High Tom 2 | Electric High Tom 2 | Synth1 High Tom 2 | Synth2 High Tom 2 | High Tom 2 | Brush High Tom 2 | Timpani c |
| Crash Cymbal 1 | Crash Cymbal 1 | Crash Cymbal 1 | Crash Cymbal 1 | Crash Cymbal 1 | Synth1 Crash Cymbal | Synth2 Crash Cymbal 1 | Crash Cymbal 1 | Brush Crash Cymbal 1 | Timpani c# | ||
| D3 50 | E&3 51 | High Tom 1 | High Tom 1 | Room High Tom 1 | Power High Tom 1 | Electric High Tom 1 | Synth1 High Tom 1 | Synth2 High Tom 1 | High Tom 1 | Brush High Tom 1 | Timpani d |
| Ride Cymbal 1 | Ride Cymbal 1 | Ride Cymbal 1 | Ride Cymbal 1 | Ride Cymbal 1 | Synth2 Ride Cymbal | Synth2 Ride Cymbal | Ride Cymbal Inner | Ride Cymbal Inner | Timpani d# | ||
| E3 52 | Chinese Cymbal | Chinese Cymbal | Chinese Cymbal | Chinese Cymbal | Reverse Cymbal | Chinese Cymbal | Chinese Cymbal | Chinese Cymbal | Chinese Cymbal | Timpani e | |
| F3 53 | F3 54 | Ride Bell | Ride Bell | Ride Bell | Ride Bell | Ride Bell | Ride Bell | Ride Bell | Ride Bell | Brush Ride Bell | Timpani f |
| Tambourine 1 | Tambourine 1 | Tambourine 1 | Tambourine 1 | Tambourine 1 | Synth1 Tambourine | Tambourine 2 | Tambourine 1 | Tambourine 1 | Tambourine 1 | ||
| G3 55 | A&3 56 | Splash Cymbal | Splash Cymbal | Splash Cymbal | Splash Cymbal | Splash Cymbal | Splash Cymbal | Splash Cymbal | Splash Cymbal | Splash Cymbal | Splash Cymbal |
| Cowbell | Cowbell | Cowbell | Cowbell | Cowbell | Synth1 Cowbell | Synth1 Cowbell | Cowbell | Cowbell | Cowbell | ||
| A3 57 | B&3 58 | Crash Cymbal 2 | Crash Cymbal 2 | Crash Cymbal 2 | Crash Cymbal 2 | Crash Cymbal 2 | Synth2 Crash Cymbal 2 | Crash Cymbal 2 | Crash Cymbal 2 | Brush Crash Cymbal2 | Concert Cymbal 2 |
| Vibrasilap | Vibrasilap | Vibrasilap | Vibrasilap | Vibrasilap | Vibrasilap | Vibrasilap | Vibrasilap | Vibrasilap | Vibrasilap | ||
| B3 59 | F4 60 | Ride Cymbal 2 | Ride Cymbal 2 | Ride Cymbal 2 | Ride Cymbal 2 | Ride Cymbal 2 | Ride Cymbal Edge | Ride Cymbal Edge | Ride Cymbal Edge | Ride Cymbal Edge | Concert Cymbal 1 |
| High Bongo | High Bongo | High Bongo | High Bongo | High Bongo | Synth1 High Bongo | High Bongo | High Bongo | High Bongo | High Bongo | ||
| Low Bongo | Low Bongo | Low Bongo | Low Bongo | Low Bongo | Synth1 Low Bongo | Low Bongo | Low Bongo | Low Bongo | Low Bongo | ||
| D4 62 | E&4 63 | Mute High Conga | Mute High Conga | Mute High Conga | Mute High Conga | Mute High Conga | Synth1 Mute Hi Conga | Mute High Conga | Mute High Conga | Mute High Conga | Mute High Conga |
| Open High Conga | Open High Conga | Open High Conga | Open High Conga | Open High Conga | Synth1 Open Hi Conga | Open High Conga | Open High Conga | Open High Conga | Open High Conga | ||
| E4 64 | F4 65 | Open Low Conga | Open Low Conga | Open Low Conga | Open Low Conga | Open Low Conga | Synth1 Open Low Conga | Open Low Conga | Open Low Conga | Open Low Conga | Open Low Conga |
| High Timbale | High Timbale | High Timbale | High Timbale | High Timbale | High Timbale | High Timbale | High Timbale | High Timbale | High Timbale | ||
| Low Timbale | Low Timbale | Low Timbale | Low Timbale | Low Timbale | Low Timbale | Low Timbale | Low Timbale | Low Timbale | Low Timbale | ||
| G4 67 | F4 68 | High Agogo | High Agogo | High Agogo | High Agogo | High Agogo | High Agogo | High Agogo | High Agogo | High Agogo | High Agogo |
| Low Agogo | Low Agogo | Low Agogo | Low Agogo | Low Agogo | Low Agogo | Low Agogo | Low Agogo | Low Agogo | Low Agogo | ||
| A4 69 | F4 70 | Cabasa | Cabasa | Cabasa | Cabasa | Cabasa | Cabasa | Cabasa | Cabasa | Cabasa | Cabasa |
| Maracas | Maracas | Maracas | Maracas | Maracas | Synth1 Maracas | Synth1 Maracas | Maracas | Maracas | Maracas | ||
| B4 71 | F4 72 | Short High Whistle | Short High Whistle | Short High Whistle | Short High Whistle | Short High Whistle | Short High Whistle | Short High Whistle | Short High Whistle | Short High Whistle | Short High Whistle |
| Long Low Whistle | Long Low Whistle | Long Low Whistle | Long Low Whistle | Long Low Whistle | Long Low Whistle | Long Low Whistle | Long Low Whistle | Long Low Whistle | Long Low Whistle | ||
| C5 72 | F5 73 | Short Guiro | Short Guiro | Short Guiro | Short Guiro | Short Guiro | Short Guiro | Short Guiro | Short Guiro | Short Guiro | Short Guiro |
| Long Guiro | Long Guiro | Long Guiro | Long Guiro | Long Guiro | Synth1 Guiro | Synth1 Guiro | Long Guiro | Long Guiro | Long Guiro | ||
| D5 74 | F5 75 | Claves | Claves | Claves | Claves | Claves | Synth1 Claves | Synth1 Claves | Claves | Claves | Claves |
| High Wood Block | High Wood Block | High Wood Block | High Wood Block | High Wood Block | High Wood Block | High Wood Block | High Wood Block | High Wood Block | High Wood Block | ||
| E5 76 | F5 77 | Low Wood Block | Low Wood Block | Low Wood Block | Low Wood Block | Low Wood Block | Low Wood Block | Low Wood Block | Low Wood Block | Low Wood Block | Low Wood Block |
| Mute Cuica | Mute Cuica | Mute Cuica | Mute Cuica | Mute Cuica | High Hoo | High Hoo | Mute Cuica | Mute Cuica | Mute Cuica | ||
| G5 79 | F5 80 | Open Cuica | Open Cuica | Open Cuica | Open Cuica | Open Cuica | Low Hoo | Low Hoo | Open Cuica | Open Cuica | Open Cuica |
| Mute Triangle | Mute Triangle | Mute Triangle | Mute Triangle | Mute Triangle | Elec. Mute Triangle | Elec. Mute Triangle | Mute Triangle | Mute Triangle | Mute Triangle | ||
| A5 81 | F5 82 | Open Triangle | Open Triangle | Open Triangle | Open Triangle | Open Triangle | Elec. Open Triangle | Elec. Open Triangle | Open Triangle | Open Triangle | Open Triangle |
| Shaker | Shaker | Shaker | Shaker | Shaker | Synth1 Shaker | Synth1 Shaker | Shaker | Shaker | Shaker | ||
| B5 83 | F5 83 | Jingle Bell | Jingle Bell | Jingle Bell | Jingle Bell | Jingle Bell | Jingle Bell | Jingle Bell | Jingle Bell | Jingle Bell | Jingle Bell |
| Bell Tree | Bar Chimes | Bell Tree | Bell Tree | Bell Tree | Bell Tree | Bell Tree | Bell Tree | Bell Tree | Bell Tree | ||
| Castanets | Castanets | Castanets | Castanets | Castanets | Castanets | Castanets | Castanets | Castanets | Castanets | ||
| D6 86 | F6 87 | Mute Surdo | Mute Surdo | Mute Surdo | Mute Surdo | Mute Surdo | Mute Surdo | Mute Surdo | Mute Surdo | Mute Surdo | Mute Surdo |
| Open Surdo | Open Surdo | Open Surdo | Open Surdo | Open Surdo | Open Surdo | Open Surdo | Open Surdo | Open Surdo | Open Surdo | ||
| E6 88 | F6 88 | Applause | Applause | Applause | Applause | Applause | Applause | Applause | Applause | Applause | Applause |
Fingered Chord Chart/Cuadro de acordes digitados (Fingered)
| Chord Type Root | aug | sus4 | 7sus4 | m add9 | mM7 | 7'5 | add9 |
| C | |||||||
| C#/ (D') | |||||||
| D | |||||||
| (D')/E | |||||||
| E | |||||||
| F | |||||||
| F#/ (G') | |||||||
| G | |||||||
| (G')/A | |||||||
| A | |||||||
| (A')/B | |||||||
| B |
| Chord Type Root | M | m | 7 | m7 | dim7 | M7 | dim | m75 |
| C | ||||||||
| C#/ (D#) | ||||||||
| D | ||||||||
| (D#)/E# | ||||||||
| E | ||||||||
| F | ||||||||
| F#/ (G#) | ||||||||
| G | ||||||||
| (G#)/A# | ||||||||
| A | ||||||||
| (A#)/B# | ||||||||
| B |
| Function ... | Transmitted | Recognized | Remarks | ||
| Basic Channel | Default Changed | 1 | 1-16 | ||
| 1-16 | 1-16 | ||||
| Mode | Default Messages Altered | Mode 3 X | Mode 3 X | ||
| ********** | X | ||||
| Note Number: | True voice | 21-108 | 0-127 | ||
| ********** | 0-127 | ||||
| Velocity | Note ON Note OFF | O 9nH V = 1-127 X 8nH V = 64 | O 9nH V = 1-127 X 9nH V = 0, 8nH V = ** | ** = no relation | |
| After Touch | Key's Ch's | X | X | ||
| X | X | ||||
| Pitch Bender | X | O | |||
| Control Change | 0, 32 | O | O | Bank select Modulation Data entry Volume Pan Expression Damper Sostenuto Soft Reverb send Chorus send RPN LSB, MSB All sound off Reset all controller | |
| 1 | X | O | |||
| 6, 38 | O*1 | O*1 | |||
| 7 | O | O | |||
| 10 | O | O | |||
| 11 | O | O | |||
| 64 | O | O | |||
| 66 | O*2 | O | |||
| 67 | O*2 | O | |||
| 91 | O | O | |||
| 93 | O | O | |||
| 100, 101 | O | O | |||
| 120 | O | O | |||
| 121 | O | O | |||
| Program Change | :True # | O 0-127 | O 0-127 | ||
| ********** | ********** | ||||
| System Exclusive | O*3 | O*3*4 | |||
| System Common | X | X | |||
| X | X | ||||
| X | X | ||||
| System Real Time | O | X | |||
| O | X | ||||
| Aux Messages | : Local ON/OFF : All notes OFF Active Sense : Reset | X | X | ||
| O | O | ||||
| X | O | ||||
| X | X | ||||
| Remarks | *1 Fine tune and coarse tune send/receive, RPN Null, and pitch bend sense receives *1 Afinacion final y envio/recepction de afinacion gruesa, RPN nulo y recepcion de captacion de inflexion de alta tonal. *2 In accordance with pedal *2 De acuerdo al pedal. *3 · Reverb type [F0][7F][7F][04][05][01][01][01][01][01][01][00][vv][F7] vv=00: Room1, 01: Room2, 02: Hall1, 03: Hall2 · Chorus type [F0][7F][7F][04][05][01][01][01][01][02][00][vv][F7] vv=00: Chorus1, 01: Chorus2, 02: Chorus3, 03: Chorus4 *3 · Tipo de reverberacion [F0][7F][7F][04][05][01][01][01][01][01][00][vv][F7] vv=00: Room1, 01: Room2, 02: Hall1, 03: Hall2 · Tipo de chorus [F0][7F][7F][04][05][01][01][01][01][02][00][vv][F7] vv=00: Chorus1, 01: Chorus2, 02: Chorus3, 03: Chorus4 *4 GM on/off GM on = MIDI In Chord Judge off GM off = MIDI In Chord Judge on *4 Activacion/desactivacion de GM Activacion de GM = Análisis de acordes de entrada MIDI desactivado Desactivacion de GM = Análisis de acordes de entrada MIDI activado | ||||
Mode 1: OMNI ON, POLY
Mode 2: OMNI ON, MONO
O:Yes
Mode 3: OMNI OFF, POLY
Mode 4: OMNI OFF, MONO
X:No

This recycle mark indicates that the packaging conforms to the environmental protection legislation in Germany.
- FCC WARNING
- Important!
- General Guide E-2
- Power Supply E-4
- Connections E-5
- Playing with Different Tones... E-6
- Playing Rhythms. E-11
- Learning to Play the Music Library Tunes E-16
- Recording to and Playing Back from Song Memory .E-19
- Other Settings E-22
- Troubleshooting E-25
- Specifications. E-26
- Operational Precautions ......E-27
- Setting Control Key Chart.....E-27
- Appendix A-1
- MIDI Implementation Chart
- NOTE
- Playing Back All the Music Library Tunes
- Using the AC Adaptor
- Specified AC Adaptor: AD-12
- Power On Alert
- Turning Off Power On Alert
- Connecting Headphones
- Connecting to a PEDAL Jack
- Accessories and Options
- Selecting and Playing a Tone
- Selecting Main Tones and Variation Tones
- Selecting a GM Tone or Drum Set
- Selecting the GM TONES Button Variation Tone
- Using Tone Effects
- Other Effect Settings
- Layering Two Tones
- PREPARATION
- Adjusting the Volume of Layered Tones
- Assigning Different Tones to the Left and Right Sides of the Keyboard
- Specifying the Keyboard Tone Split Point
- Using the Piano's Pedals
- Pedal functions
- Selecting the Pedal Function
- Using the Built-in Metronome
- To adjust the tempo of the rhythm
- Using Auto Accompaniment
- To play with auto accompaniment
- How to Play Chords
- ■ Normal
- CASIO CHORD
- CASIO CHORD Accompaniment Keyboard and Melody Keyboard
- Chord Types
- ■ FINGERED
- FINGERED Accompaniment Keyboard and Melody Keyboard
- FULL RANGE CHORD
- FULL RANGE CHORD Accompaniment Keyboard and Melody Keyboard
- Chords Recognized by This Piano
- Adjusting Accompaniment Volume
- Learning to Play the Music Library Tunes
- Playing a Music Library Tune
- Practicing with Keyboard Lighting
- Easy Lesson:
- Normal Lesson:
- Keyboard Lighting During Lesson Play
- Easy Lesson
- Normal Lesson
- Recording to and Playing Back from Song Memory
- Tracks
- Song Memory Capacity
- Other Song Memory Data
- Recorded Data Storage
- SONG MEMORY Button Operation
- Recording Your Keyboard Play
- To record to one track without playing back the other
- Starting the Record Operation
- ■ When recording to Track 1 with rhythm or auto accompaniment
- ■ When recording to Track 1 without rhythm or auto accompaniment
- When recording to Track 2
- To record to a track while playing back from the other
- Playing Back from Song Memory
- Press the START/STOP button.
- To delete song memory data
- Changing the Keyboard Touch
- Changing the Piano Key
- Changing the Pitch of the Piano to Match Another Instrument
- Turning Off Keyboard Lighting
- Using MIDI
- What is MIDI?
- MIDI Connections
- MIDI Settings
- Send Channel
- Accompl MIDI Out
- MIDI IN Chord Judge
- Local Control
- 2Accomp MIDI Out
- MIDI IN Chord Judge
- Navigate Channel (Left Hand Part)
- Navigate Channel (Right Hand Part)
- Expanding the Selections in the Music Library
- CASIO MUSIC SITE
- Locating the Unit
- Care of the Unit
- Lithium Battery
- Setting Control Key Chart
- Tone List/Lista de sonidos
- NOTA
Brand : CASIO
Model : PX-500L
Category : Digital piano