
CELVIANO AP-80R - Digital piano CASIO - Free user manual and instructions
Find the device manual for free CELVIANO AP-80R CASIO in PDF.
| Product Type | Digital Piano |
| Brand | CASIO |
| Model | CELVIANO AP-80R |
| Number of keys | 88 weighted keys |
| Polyphony | 32 notes |
| Number of tones | 16 built-in tones |
| Number of rhythms | 50 rhythms |
| Pedals | Sustain pedal included |
| Speakers | 2 × 20 W |
| Connectivity | Headphone jack, MIDI In/Out, pedal, line out |
| Power supply | 12 V DC power adapter |
| Dimensions (W × D × H) | 135 × 40 × 85 cm |
| Weight | 42 kg |
| Special functions | Reverb, chorus, dual, layer, metronome, recorder |
| Maintenance and cleaning | Wipe with a soft, dry cloth. Avoid solvents. |
| Safety | Use the provided adapter, do not open the device. |
| Spare parts and repairability | Contact a CASIO authorized service center for any repairs. |
| General information | Detailed manual available for download on the website. |
Frequently Asked Questions - CELVIANO AP-80R CASIO
User questions about CELVIANO AP-80R CASIO
0 question about this device. Answer the ones you know or ask your own.
Ask a new question about this device
Download the instructions for your Digital piano in PDF format for free! Find your manual CELVIANO AP-80R - CASIO and take your electronic device back in hand. On this page are published all the documents necessary for the use of your device. CELVIANO AP-80R by CASIO.
USER MANUAL CELVIANO AP-80R CASIO
Please keep all information for future reference.
Before trying to use the digital piano, be
sure to read the separate "Safety
Precautions".
IMPORTANT SAFETY INSTRUCTIONS
- Read these instructions.
- Keep these instructions.
- Heed all warnings.
- Follow all instructions.
- Do not use this apparatus near water.
- Clean only with dry cloth.
- Do not block any ventilation openings. Install in accordance with the manufacturer's instructions.
- Do not install near any heat sources such as radiators, heat registers, stoves, or other apparatus (including amplifiers) that produce heat.
- Do not defeat the safety purpose of the polarized or grounding-type plug. A polarized plug has two blades with one wider than the other. A grounding type plug has two blades and a third grounding prong. The wide blade or the third prong are provided for your safety. If the provided plug does not fit into your outlet, consult an electrician for replacement of the obsolete outlet.
- Protect the power cord from being walked on or pinched particularly at plugs, convenience receptacles, and the point where they exit from the apparatus.
- Only use attachments/accessories specified by the manufacturer.
- Use only with the cart, stand, tripod, bracket, or table specified by the manufacturer, or sold with the apparatus. When a cart is used, use caution when moving the cart/apparatus combination to avoid injury from tip-over.

- Unplug this apparatus during lightning storms or when unused for long periods of time.
- Refer all servicing to qualified service personnel. Servicing is required when the apparatus has been damaged in any way, such as power-supply cord or plug is damaged, liquid has been spilled or objects have fallen into the apparatus, the apparatus has been exposed to rain or moisture, does not operate normally, or has been dropped.
The apparatus shall not be exposed to dripping or splashing and that no objects filled with liquids, such as vases, shall be placed on the apparatus.
CAUTION
RISK OF ELECTRIC SHOCK DO NOT OPEN

CAUTION: TO REDUCE THE RISK OF ELECTRIC SHOCK, DON NOT REMOVE COVER (OR BACK). NO USER-SERVICEABLE PARTS INSIDE. REFER SERVICING TO QUALIFIED SERVICE PERSONNEL.
The lightning flash with arrowhead symbol, within an equilateral triangle, is intended to alert the user to the presence of uninsulated "dangerous voltage" within the product's enclosure that may be of sufficient magnitude to constitute a risk of electric shock to persons.

The exclamation point within an equilateral triangle is intended to alert the user to the presence of important operating and maintenance (servicing) instructions in the literature accompanying the product.
Contents
General Guide. E-2
Connections E-4
Connecting Headphones E-4
Connecting an audio or musical instrument amplifier... E-4
Selecting and Using Built-in Tones...... E-6
Tone Type E-6
Selecting a Tone E-6
Using Tone Effects E-7
Layering Two Tones E-7
Splitting the Keyboard between Two Tones E-8
Using Layer and Split Together E-8
Using the Pedals E-9
Using the Metronome E-9
Playing a Rhythm . E-10
Playing a Rhythm E-10
Using Auto Accompaniment E-11
Adjusting the Volume of Accompaniment, Tune, and Memory Card Playback .E-13
Using Auto Harmonize. E-13
Using One-Touch Preset E-14
Using Registration Memory .E-15
What is registration memory? E-15
Playing Back Built-in Tunes... E-17
Playing Back a Piano Group Tune E-17
Playing Back a Song Group Tune . E-17
AdjustingPlaybackTempo E-17
Pausing Playback E-18
Skipping Back through a Tune E-18
Skipping Forward through a Tune. E-18
Looping a Musical Phrase E-18
Changing the Melody Tone of a Tune E-18
Playing All of the Built-in Tunes. E-19
Playing Tunes You Download from the Internet...E-19
Playing Music Data from a Memory Card E-19
Practicing a Built-in Tune E-19
Using a Microphone for Sing Along .... E-20
Using Transpose. E-21
Recording Your Keyboard Play ......... E-22
Recordable Data, Parts, and Tracks E-22
Recording Your Practice (Song Recording) E-23
Recording a Performance (Free Recording) E-23
Playing Back a Free Recording. E-24
Overdebbing a Free Recording. E-25
Deleting a Specific Part/Track E-25
Other Settings E-26
Keyboard Touch E-26
Keyboard Tuning E-26
Layer Tone Volume E-26
Display Contrast E-26
Using MIDI E-27
Connecting to a Computer E-27
USB Mode and MIDI Mode E-28
Expanding the Number of Built-in Tunes E-28
Using a Memory Card .E-29
Using a Memory Card E-29
Saving Files to a Memory Card. E-30
Loading a File from a Memory E-31
Renaming a Memory Card File E-32
Deleting a Memory Card File E-32
Formatting a Memory Card. E-33
Supported Input Characters E-33
Memory Card Error Messages E-34
Troubleshooting E-35
Assembly Instructions. E-37
Attachment of the Score Stand E-40
Specifications. E-41
Appendix A-1
Tone List A-1
Rhythm List A-3
Song List A-4
Drum Assignment List A-5
Fingered Chord Chart. A-6
Operational Precautions A-7
Locating the Unit A-7
Care of the Unit A-7
Memory Protection A-7
MIDI Implementation Chart
Company and product names used in this manual may be registered trademarks of others.
429A-E-003A
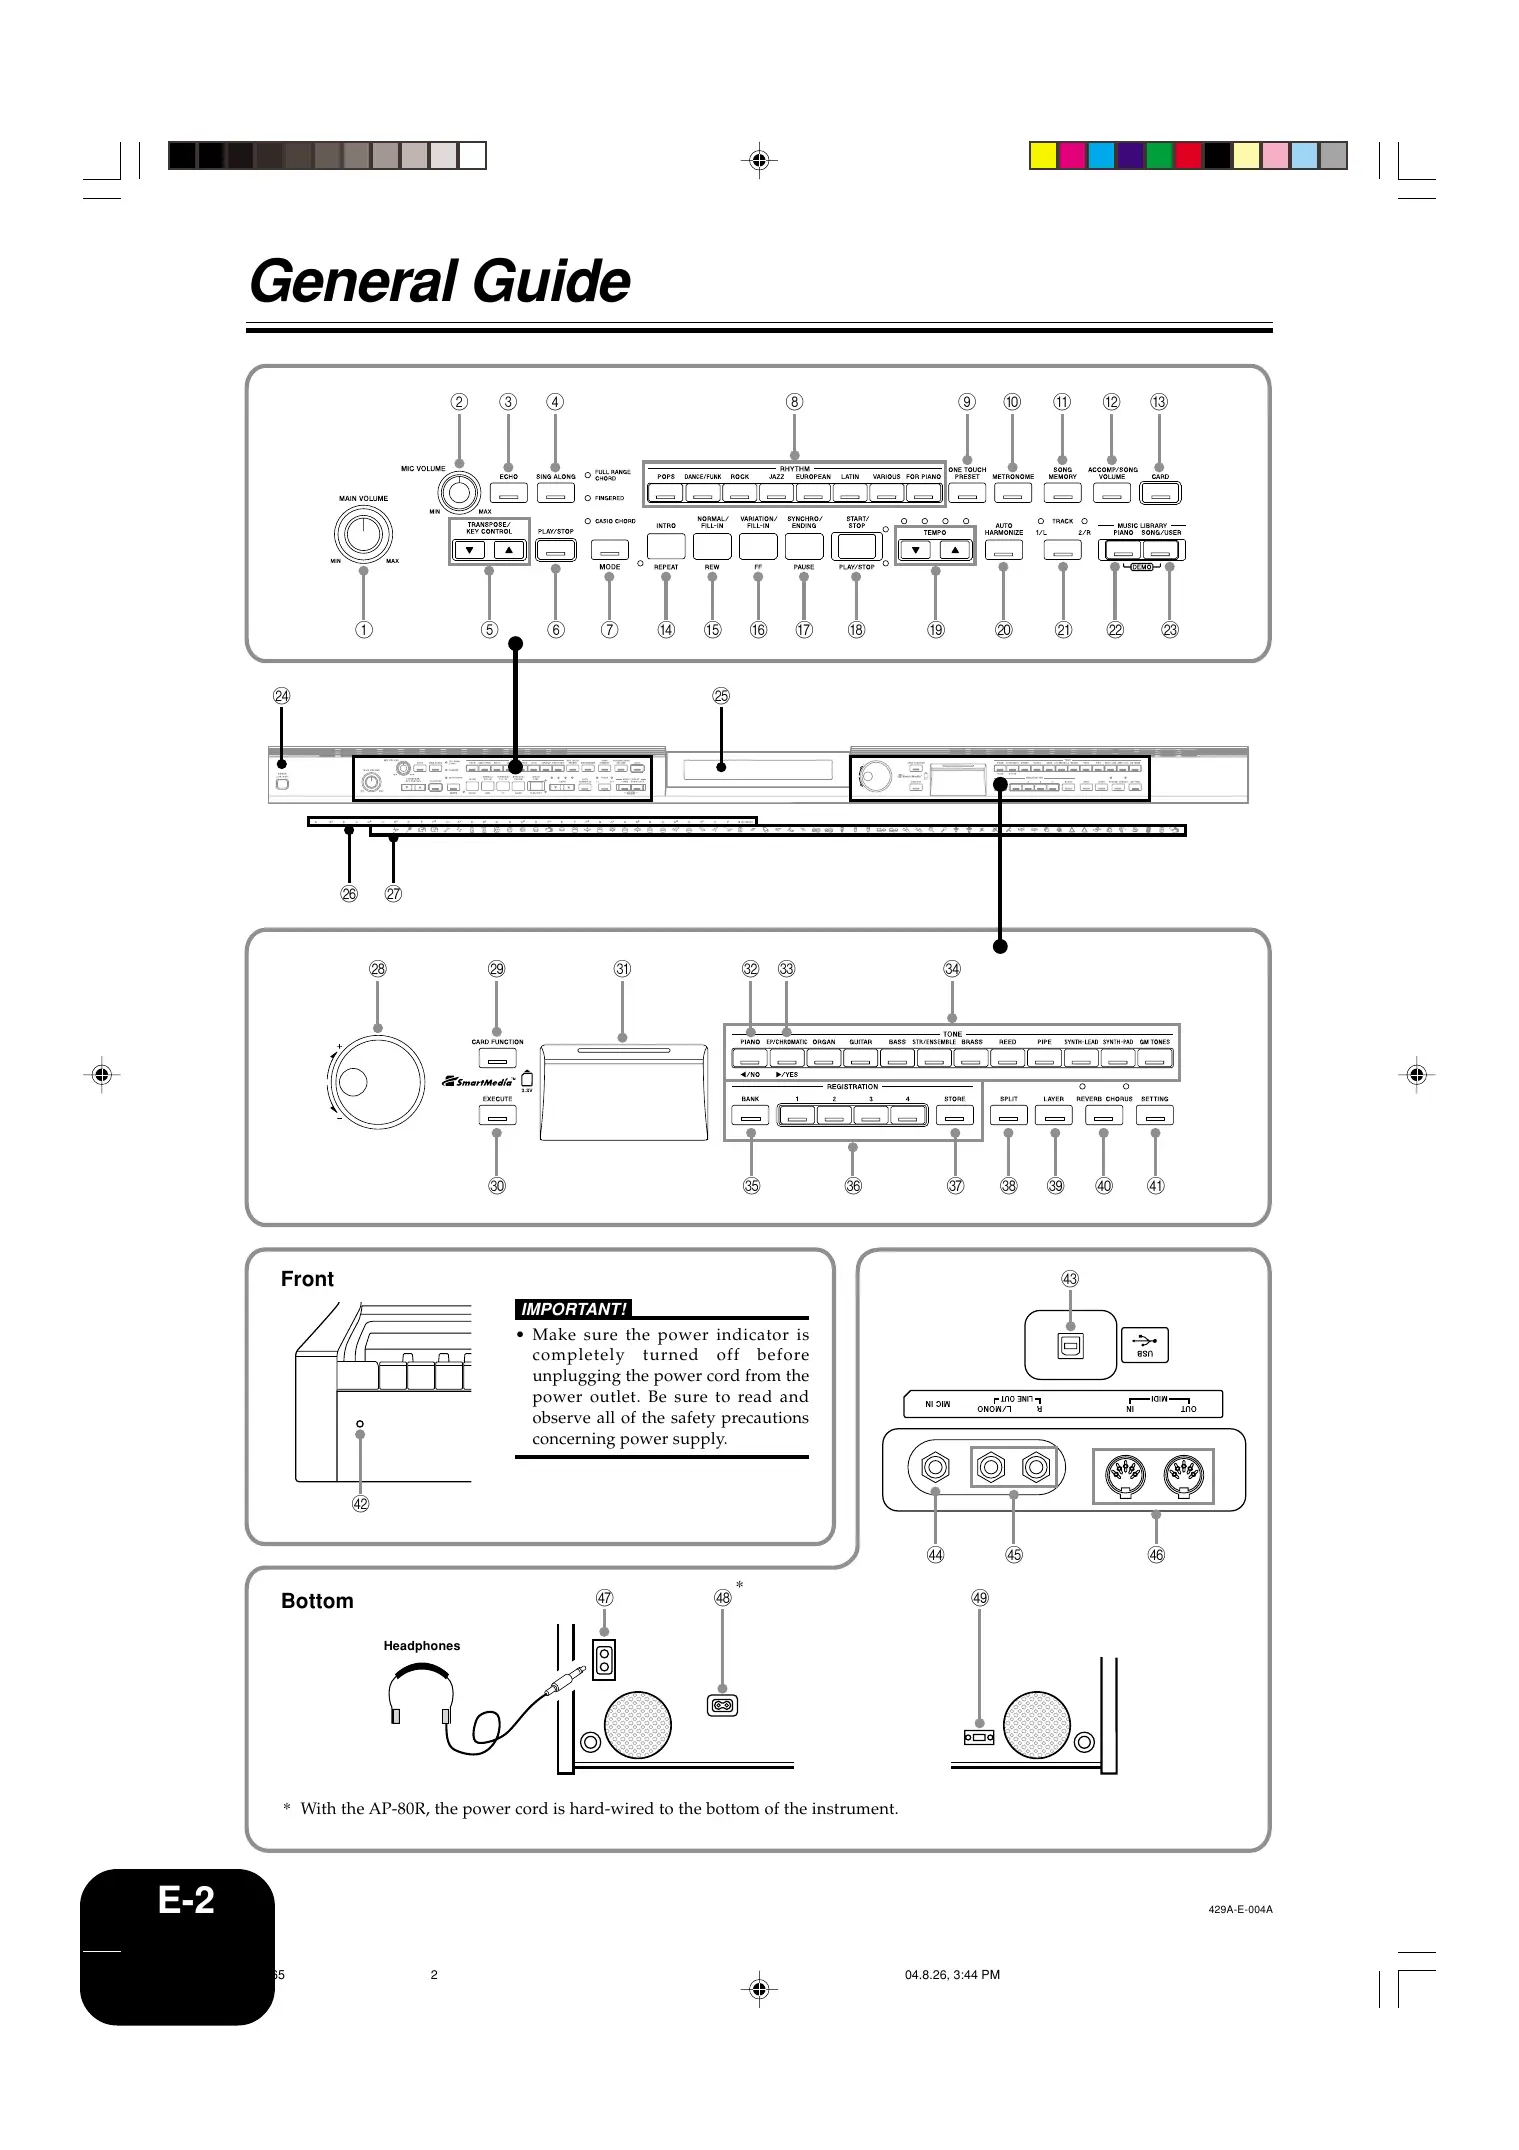
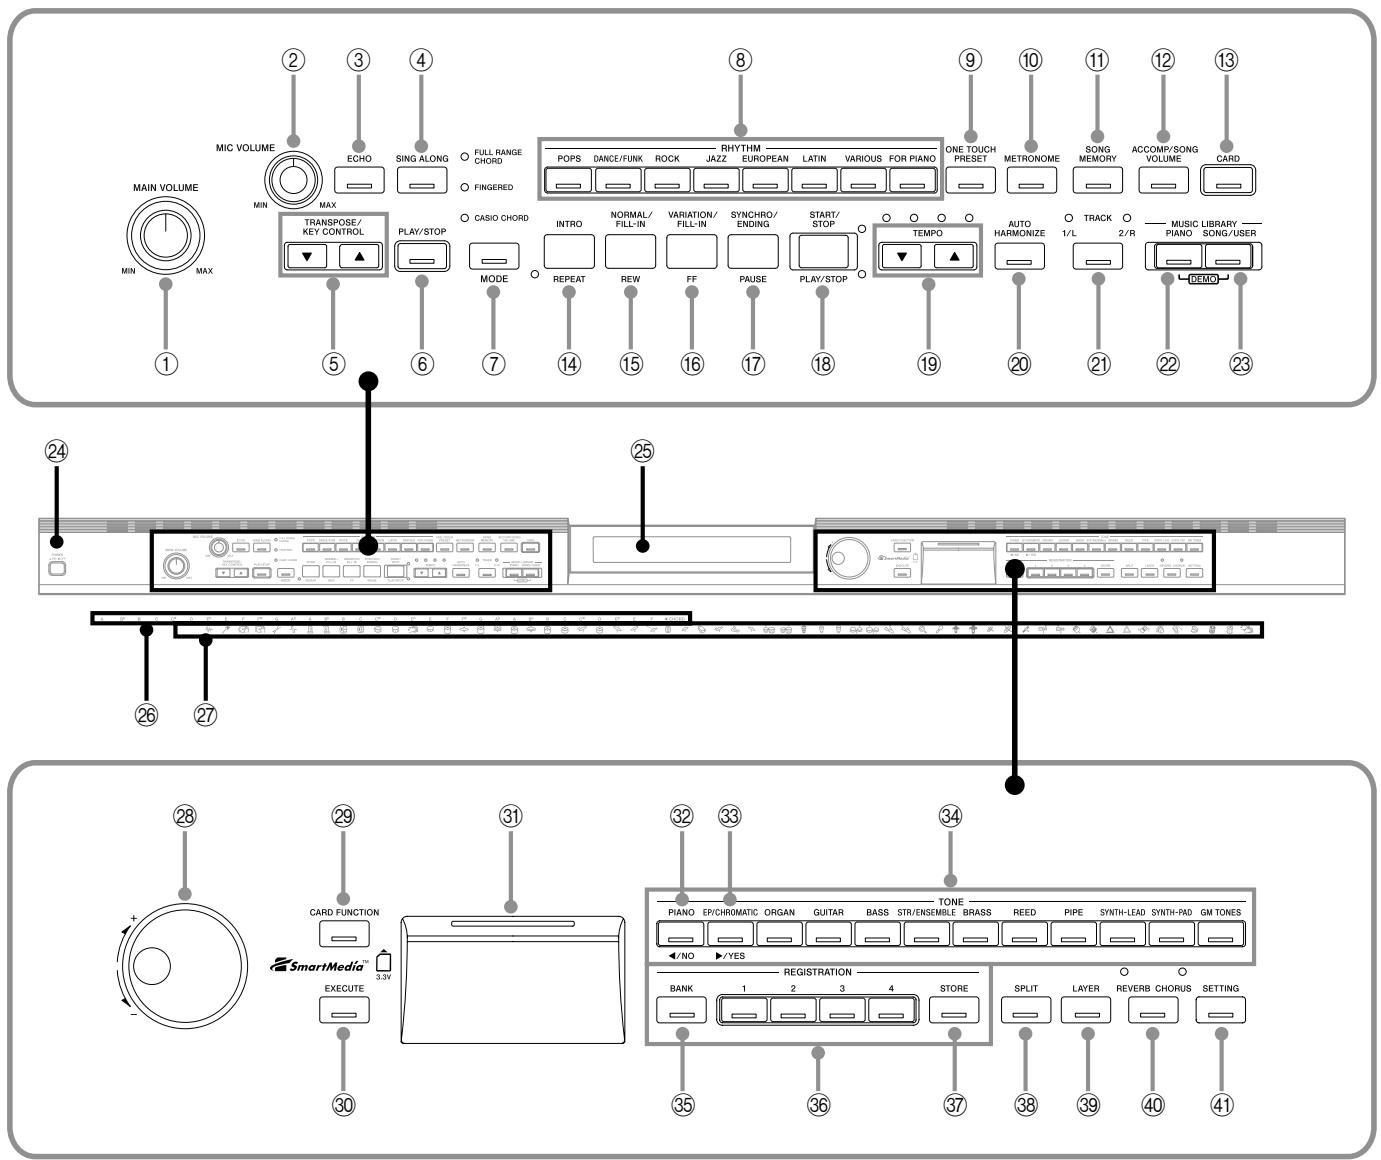
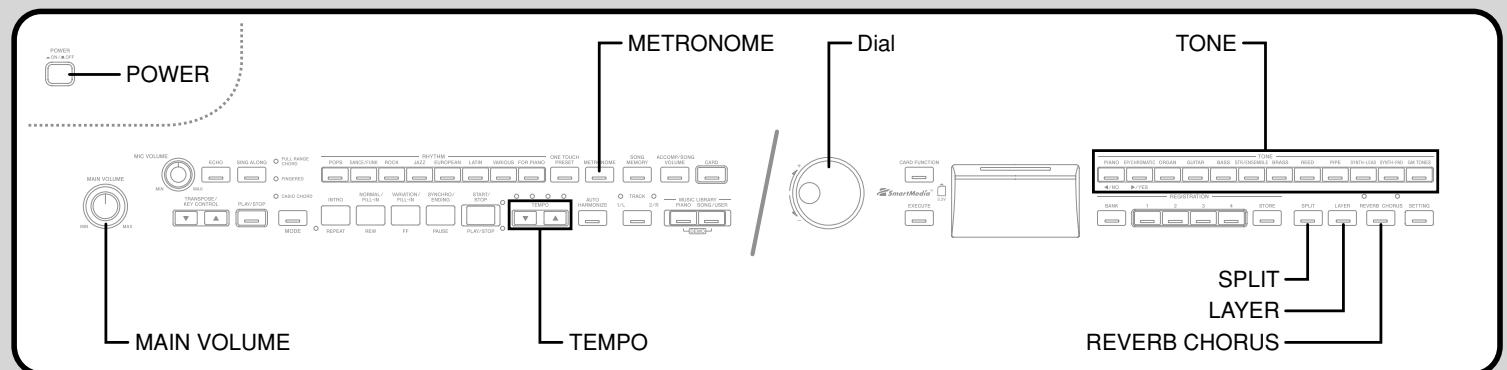
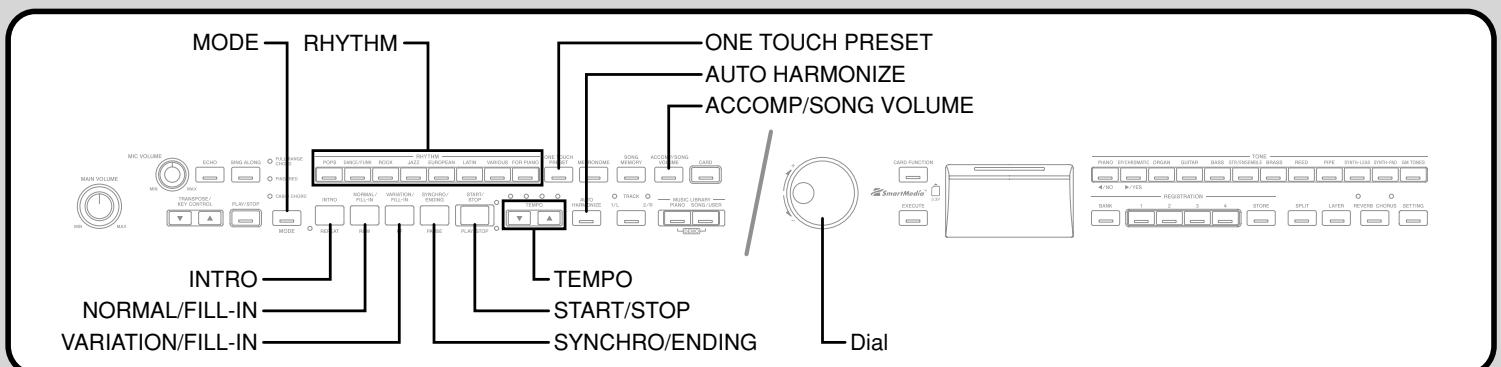
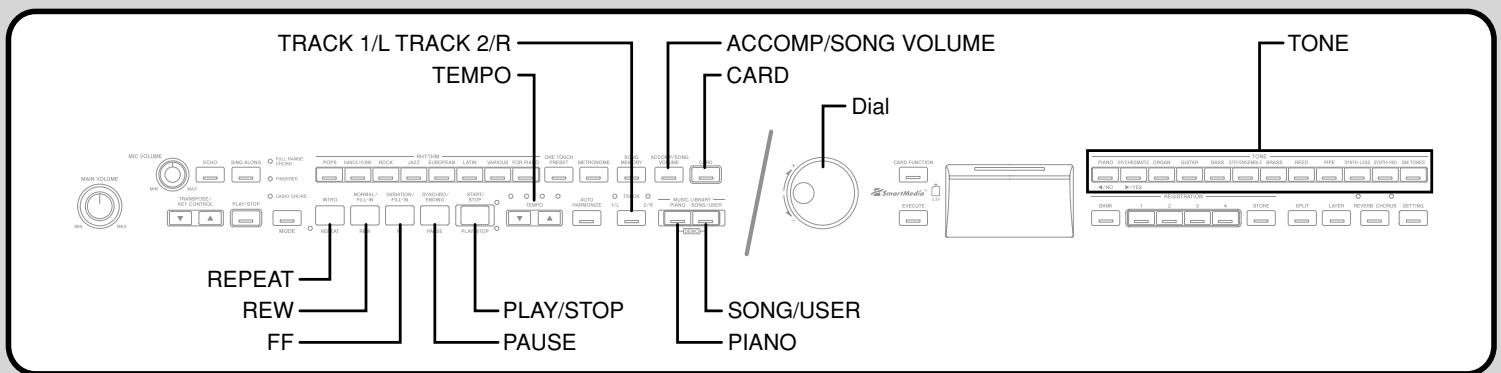
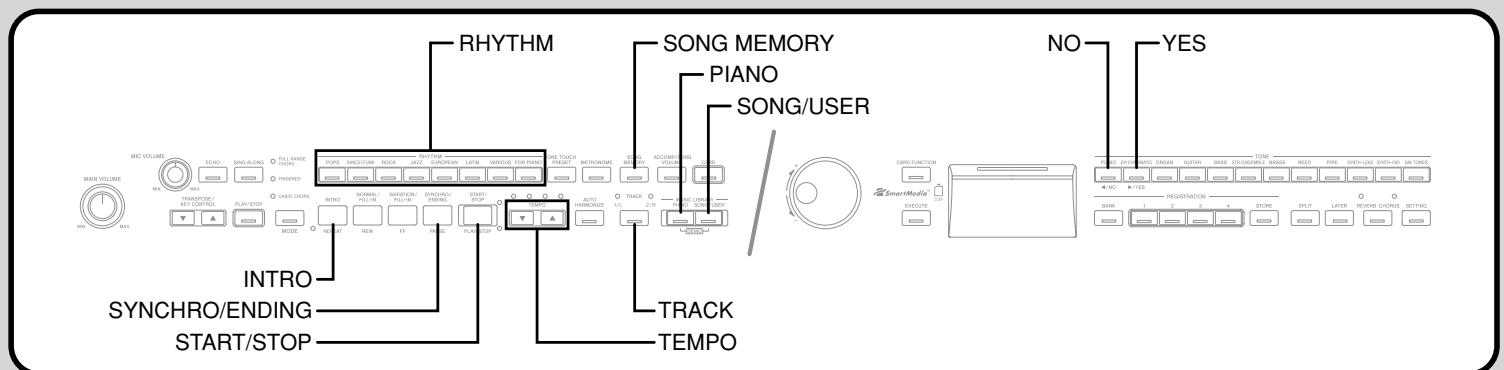
General Guide
Front
IMPORTANT!
- Make sure the power indicator is completely turned off before unplugging the power cord from the power outlet. Be sure to read and observe all of the safety precautions concerning power supply.
Bottom

* With the AP-80R, the power cord is hard-wired to the bottom of the instrument.
CAUTION
Make sure that the cover of the digital piano is fully open whenever you are playing on the keyboard. A partially open cover can suddenly close unexpectedly and pinch your fingers.
① MAIN VOLUME knob
② MIC VOLUME knob
③ ECHO button
④ SING ALONG button
⑤ TRANSPOSE/KEY CONTROL buttons
⑥
⑦ MODE button
⑧ RHYTHM buttons
⑨ ONE TOUCH PRESET button
10 METRONOME button
⑪ SONG MEMORY button
⑫ ACCOMP/SONG VOLUME button
13 CARD button
INTRO, REPEAT button
15 NORMAL/FILL-IN, REW button
16 VARIATION/FILL-IN,FF button
⑰ SYNCHRO/ENDING, PAUSE button
18 START/STOP, PLAY/STOP button
19 TEMPO buttons
20 AUTO HARMONIZE button
② TRACK 1/L 2/R button
MUSIC LIBRARY
② PIANO button
23 SONG/USER button
② POWER button
25 Display screen
CHORD root name
⑦ Percussion instrument list
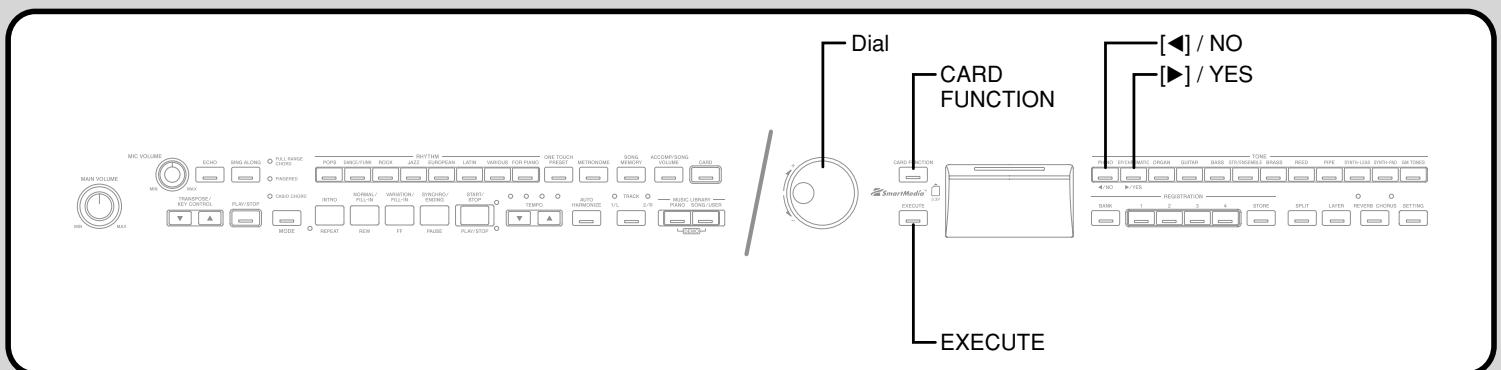
28 Dial
29 CARD FUNCTION button
③ EXECUTE button
③ Card slot
[] cursor/NO button
忍 [ ] 忍 cursor/YES button
TONE buttons
BANK button
③ REGISTRATION buttons
STORE button
38 SPLIT button
39 LAYER button
40 REVERB CHORUS button
④ SETTING button
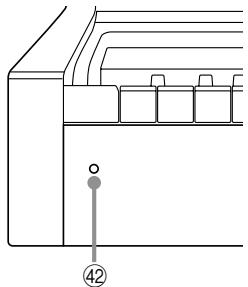
[Front]
④ Power Indicator
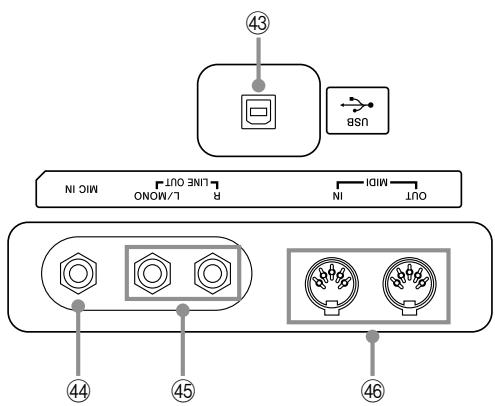
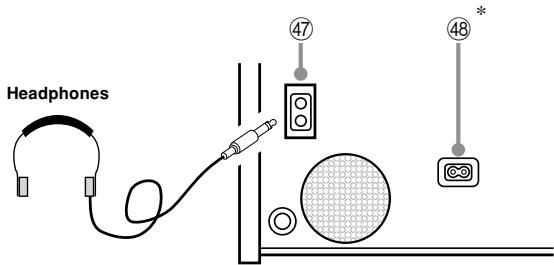
[Bottom]
④ USB port
44 MIC IN jack
LINE OUT R, L/MONO jacks
MIDI OUT/IN terminals
47 PHONES jacks
48 AC Power jack
49 Pedal Connector
NOTE
- Key, button, and other names are indicated in the text of this manual using bold type.
See page E-37 for details on the stand. - This digital piano has two PLAY/STOP buttons. In this manual, the PLAY/STOP button that is located under the SING ALONG
button is indicated as.
Each chapter of this manual starts with an illustration of the digital piano's console, which shows the buttons and other controllers you need to operate.
Memory Protection
Certain settings and memory contents are retained even when the digital piano is turned off. This means that the data and settings will still be available when you turn the digital piano back on again.
This following is a list of the major settings and memory contents that are retained.
Song Memory Data
- Registration Memory Contents
- User Songs
- Display Contrast Setting
Music Library Song Numbers
429A-E-005A
Connections
IMPORTANT!
- Whenever connecting external equipment, first set the MAIN VOLUME knob of the digital piano and the volume controller of the external equipment to relatively low volume settings. You can later adjust volume to the level you want after connections are complete.
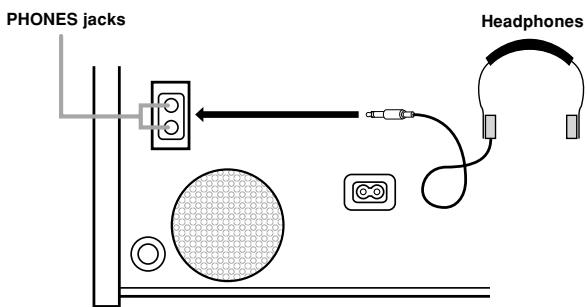
Connecting Headphones
Connect commercially available headphones to the digital piano's PHONES jacks. This cuts off the built-in speakers, which means you can practice even late at night without disturbing others. To protect your hearing, make sure that you do not set the volume level too high when using headphones.
[Bottom]
NOTE
- Be sure to push the headphones plug into the PHONES jack as far as it will go. If you don't, you may hear sound from only one side of the headphones.
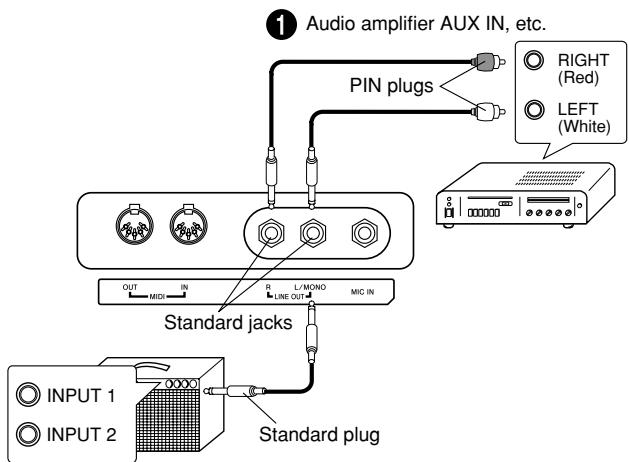
Connecting an audio or musical instrument amplifier
Connecting to an audio or musical instrument amplifier provides even clearer, more powerful sound through external speakers.
IMPORTANT!
- The digital piano automatically adjusts sound output to optimize for headphone output (when headphones are connected) or built-in speaker output (when headphones are not connected). Note that this feature also affects the sound output from the LINE OUT R and L/MONO jacks.
[Bottom]

Guitar amplifier, keyboard amplifier, etc.
NOTICE
This equipment has been tested and found to comply with the limits for a Class B digital device, pursuant to Part 15 of the FCC Rules. These limits are designed to provide reasonable protection against harmful interference in a residential installation. This equipment generates, uses and can radiate radio frequency energy and, if not installed and used in accordance with the instructions, may cause harmful interference to radio communications. However, there is no guarantee that interference will not occur in a particular installation. If this equipment does cause harmful interference to radio or television reception, which can be determined by turning the equipment off and on, the user is encouraged to try to correct the interference by one or more of the following measures:
- Reorient or relocate the receiving antenna.
- Increase the separation between the equipment and receiver.
- Connect the equipment into an outlet on a circuit different from that to which the receiver is connected.
- Consult the dealer or an experienced radio/TV technician for help.
FCC WARNING
Changes or modifications not expressly approved by the party responsible for compliance could void the user's authority to operate the equipment.

CASIO Europe GmbH
Bornbarch 10, 22848 Norderstedt, Germany
This mark applies to the AP-80RV only. Please keep all information for future reference.
E-4
429A-E-006A
04.8.26, 3:44 PM
Connecting to Audio Equipment 1
Use commercially available cables to connect the external audio equipment to the digital piano's LINE OUT jacks as shown in Figure ①. R jack output is right channel sound, while L/MONO jack output is left channel sound. It is up to you to purchase connecting cables like the ones shown in the illustration for connection of audio equipment. Normally in this configuration you must set the audio equipment's input selector to the setting that specifies the terminal (such as AUX IN) to which the digital piano is connected. Use the digital piano's MAIN VOLUME knob to adjust the volume level.
Connecting to a Musical Instrument Amplifier ②
Use commercially available cables to connect the amplifier to the digital piano's LINE OUT jacks as shown in Figure 2. R jack output is right channel sound, while L/MONO jack output is left channel sound. Connecting to the L/MONO jack only outputs a mixture of both channels. It is up to you to purchase connecting cable like the one shown in the illustration for connection of the amplifier. Use the digital piano's MAIN VOLUME knob to adjust the volume level.
Accessories and Options
Use only the accessories and options specified for this digital piano. Use of non-authorized items creates the danger of fire, electric shock, and personal injury.
429A-E-007A
Selecting and Using Built-in Tones
Tone Type
Your digital piano has the following types of tones built in.
| Panel Tones | 120 |
| GM Tones | 128 |
| Drum Sets | 10 |
- See the Tone List on page A-1 for more information.
Selecting a Tone
Panel tones are divided into 12 groups. You can select a group by pressing its TONE button on the digital piano control panel.

Press the POWER button.
Use the MAIN VOLUME knob to adjust the volume level.
- Before playing, it is a good idea to set the volume to a relatively low level.
Press one of the 12 TONE buttons to select the tone group you want.
- For information about each tone group, see the tone list on page A-1.
Example: ORGAN

- Pressing a TONE button causes its indicator lamp to light.

4 Rotate the dial to select a tone in the current selected tone group.
- Rotating the dial scrolls through the names of the available tones on the display. Display the name of the tone you want to use.
Example: Jazz Organ

E-6
429A-E-008A
Using Tone Effects
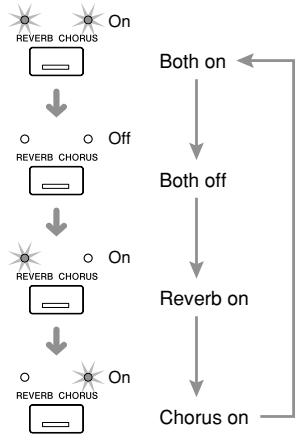
Reverb: Makes your notes resonate
Chorus: Adds more breadth to your notes

Press the REVERB CHORUS button to cycle through the effect settings as shown below.
- You can find out the current effect setting by looking at the REVERB and CHORUS indicator lamps.

After turning on the effect you want, use the dial to select the effect type you want.
- Note that you need to select an effect type with the dial within a few seconds after turning on an effect. If you don't, the display will exit the setting screen.
Effect List
| Reverb | Room 1 Room 2 Hall 1 Hall 2 |
| Chorus | Chorus 1 Chorus 2 Chorus 3 Chorus 4 |
ReverbType:[R0om1]
Chorus Type : [Chorus 1]
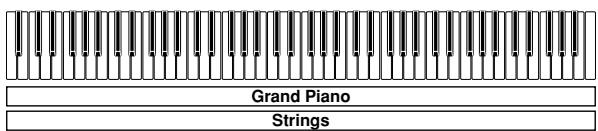
Layering Two Tones
Use the following procedure to layer two tones, so they sound at the same time.

Use the procedure under "Selecting a Tone" on page E-6 to select the main tone.
Example: To select Grand Piano, press the PIANO button, and then rotate the dial until "Grand Piano" is displayed as the tone name.

Press the LAYER button.
- This causes the LAYER indicator lamp to light.

Select the layered tone.
Example: To select "Strings"

- This will cause the indicator lamp of the layered tone (the second one you selected) to light.
- Now you can play using your layered tones.

After you are finished using the layered tones, press the LAYER button again to unlayer them.
Adjusting the Volume of the Layered Tone
You can independently adjust the volume of the layered tone (the second one you select). See page E-26 for more information.
Selecting and Using Built-in Tones
Splitting the Keyboard between Two Tones
You can assign different tones to keys on the left side and the right side of the keyboard.
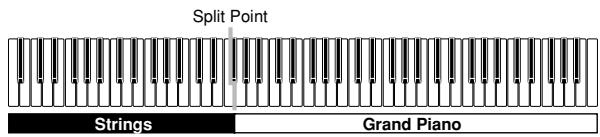
1 Use the procedure under "Selecting a Tone" to select the tone you want to assign to the right side of the keyboard.
Example: To select Grand Piano, press the PIANO button, and then rotate the dial until "Grand Piano" is displayed as the tone name.
Press the SPLIT button.
- This causes the SPLIT indicator lamp to light.
3 Select the tone you want to assign to the left side of the keyboard.
Example: Strings
- Now you can play using the two tones.
After you are finished using the split keyboard, press the SPLIT button again to unsplit it.
- This causes the SPLIT indicator lamp to go out.
To specify the keyboard split point
1 While holding down the SPLIT button, press the keyboard key where you want the left limit of the high range (right) tone to be.
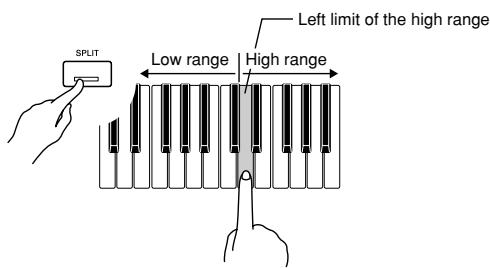
- A note does not sound when you press a keyboard key at this time.
Split Point: F#3
NOTE
The split point is the boundary between the Auto Accompaniment area (pages E-11, E-12) and the melody area of the keyboard. You can change the location of the split point, which also changes the sizes of the keyboard areas.
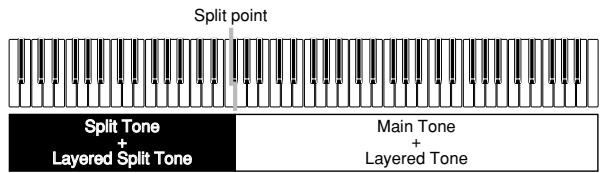
Using Layer and Split Together
You can use the following procedure to layer two tones on the left side of the keyboard (left main tone + left layered tone), and two other tones on the right side (right main tone + right layered tone).
1 Use the procedure under "Selecting a Tone" to select the right main tone.
Use the procedure under "Splitting the Keyboard between Two Tones" to select the left main tone.

SPLIT
3 Press the SPLIT button to temporarily turn off split (SPLIT indicator lamp unlit).
Use the procedure under "Layering Two Tones" to select the left layered tone.
LAYER
Press the LAYER and SPLIT buttons as required so the indicators of both buttons are lit.
SPLIT
LAYER
Use the procedure under "Layering Two Tones" to select the right layered tone.
7 Use the procedure under "To specify the keyboard split point" to specify the split point.
Now you can play using your layered tones and split keyboard.
- After you are finished using layer and split, press the LAYER button to unlayer it and the SPLIT button to unsplit it.
Using the Pedals
The AP-80R comes equipped with the three pedals shown in the illustration below.
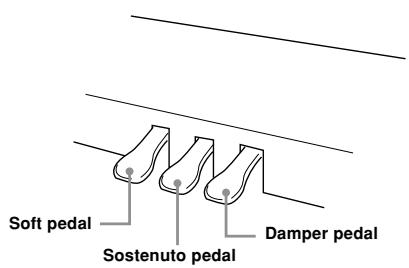
Pedal functions
- Damper pedal
Pressing this pedal causes notes to reverberate and to sustain longer.
- Soft pedal
Pressing this pedal dampens notes and slightly reduces their volume. Only notes played after the pedal is depressed are affected, and any notes played before the pedal is pressed sound at their normal volume.
Sostenuto pedal
Like the damper pedal, this pedal causes notes to reverberate and to sustain longer. The difference between the two pedals is the timing when they are pressed. With the sostenuto pedal, you press the pedal after depressing the notes you want to sustain. Only the notes whose keyboard keys are depressed when the sostenuto pedal is pressed are affected.
Using the Metronome
Press the METRONOME button.
This starts the metronome.
2 Rotate the dial to select the number of beats per measure.
- Note that you need to select the number of beats per measure with the dial within a few seconds after turning on the metronome. If you don't, the display will exit the setting screen.
Metronome Beat: [0]
- You can select a value in the range of 2 through 6. With each setting, a chime sounds as the first beat of each measure, and the remaining beats sound as clicks. Specifying 0 as the setting plays a straight click, without any chime. This setting lets you practice with a steady beat.
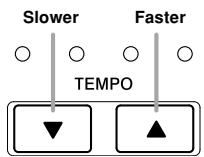
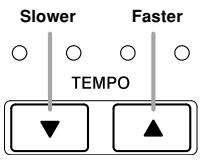
3 Use the TEMPO buttons to adjust the tempo.
NOTE
- You can also use the dial to change the tempo setting while the current setting is indicated by a value in brackets ([ ]) on the display.
Example: [T=120] - The value indicates the number of beats per minutes.
- To return the tempo to its initial default setting, press the TEMPO and buttons at the same time.
4 To stop the metronome, press the METRONOME button again.
Playing a Rhythm
Playing a Rhythm
You can select from among 120 built-in rhythms. See the Rhythm List on page A-3 for more information.
NOTE
- FOR PIANO group rhythms 10 through 19 consist of chord accompaniments only, without any drums or other percussion instruments. These rhythms do not sound unless CASIO CHORD, FINGERED, or FULL RANGE CHORD is selected as the accompaniment mode. With such rhythms, make sure that CASIO CHORD, FINGERED, or FULL RANGE CHORD is selected before you try playing chords.
- Note that there are two different patterns for each rhythm, named "normal" and "variation". Buttons are available for selecting either the normal pattern or variation pattern.
Rhythms are divided into 8 groups. You can select a group by pressing its RHYTHM button on the digital piano control panel.

Press one of the eight RHYTHM buttons to select the rhythm group you want.
- For a complete list of the rhythms available in each group, see the Rhythm List on page A-3.
Example: JAZZ
- This causes the indicator lamp of the button to light.

2 Rotate the dial to select a rhythm in the current selected rhythm group.
- Rotating the dial scrolls through the names of the available rhythms on the display. Display the name of the rhythm you want to use.
Example: Swing

Press the START/STOP button to start play of the selected rhythm's normal pattern.
4 If you want to change to the variation rhythm pattern, press the VARIATION/FILL-IN button.
- To return to the normal rhythm pattern, press the NORMAL/FILL-IN button.
5 To stop the rhythm, press the START/STOP button again.
NOTE
- You can also start rhythm play by pressing the NORMAL/ FILL-IN button (plays the normal pattern) or VARIATION/ FILL-IN button (plays the variation pattern).
To adjust the tempo of rhythm play
1 Use the TEMPO buttons to adjust the tempo of rhythm play.

NOTE
- You can also use the dial to change the tempo setting while the current setting is indicated by a value in brackets ([ ]) on the display.
Example: [T=120]
The value indicates the number of beats per minutes.
- To return the selected rhythm to its standard tempo setting, press the TEMPO and buttons at the same time.
E-10
429A-E-012A
04.8.26, 3:44 PM
Using Auto Accompaniment
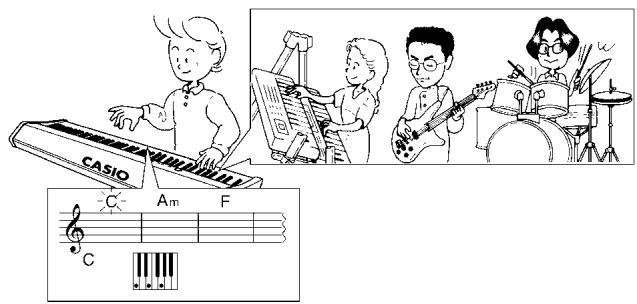
With Auto Accompaniment, the digital piano automatically plays rhythm, bass, and chord parts in accordance with chords you select using simplified keyboard fingerings, or chords you play. Auto Accompaniment makes it feel like you have your own private backup group with you all the time.
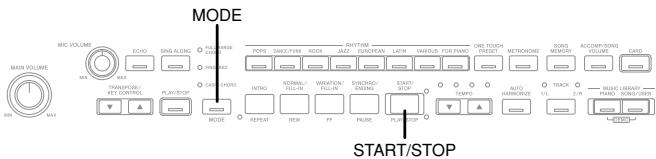
Using the MODE Button
You can use the MODE button to select the accompaniment mode you want to use. You can also use it to turn off Auto Accompaniment. Each press of the MODE button cycles through accompaniment modes in the sequence shown below.
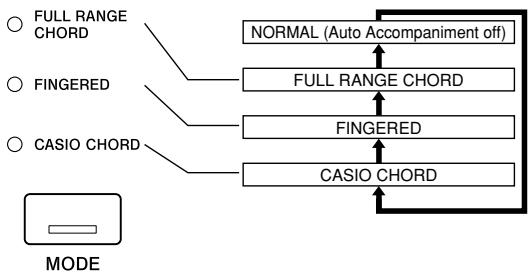
- In the NORMAL mode (no indicator lamp lit), only rhythm accompaniment plays.
- The FULL RANGE CHORD, FINGERED, and CASIO CHORD modes all play Auto Accompaniment patterns. See page E-11 for details about each of these different modes.
To play with Auto Accompaniment
Getting Ready
-
Use the procedures under "Playing a Rhythm" to select the rhythm you want to use and adjust the tempo.
-
Here we will select the CASIO CHORD mode.
- See page E-11 for information about selecting the accompaniment mode.
1 Use the MODE button to select CASIO CHORD, FINGERED, or FULL RANGE CHORD as the accompaniment mode.
Press the SYNCHRO/ENDING button.
- This configures the digital piano so rhythm and chord accompaniment will start automatically when you press any keys within the accompaniment keyboard range.
Press the INTRO button.
Use a CASIO CHORD fingering to play the first chord within the accompaniment keyboard range.
- See "How to Play Chords" on this page for information about how to finger chords with the different chord modes.
- Playing a chord will cause the intro pattern for the selected rhythm to play, followed by the Auto Accompaniment rhythm and chord pattern.
Use CASIO CHORD fingerings to play other chords.
- You can insert a fill-in pattern while an Auto Accompaniment is playing by pressing the NORMAL/FILL-IN button. A fill-in helps to change the mood of the Auto Accompaniment pattern.
- If you want to change to the variation rhythm pattern, press the VARIATION/FILL-IN button. To return to the normal rhythm pattern, press the NORMAL/FILL-IN button.
6 To stop Auto Accompaniment play, press the SYNCHRO/ENDING button.
- This will play an ending pattern for the selected rhythm before stopping Auto Accompaniment play.
NOTE
- You can start or stop auto accompaniment play without an intro or ending pattern by pressing the START/STOP button in steps 3 and 6.
How to Play Chords
The way you finger chords depends on the current chord mode.
■NORMAL
In this mode, Auto Accompaniment is turned off, so you can play chords as you would normally do on a piano keyboard.
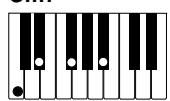
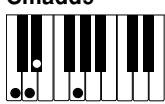
CASIO CHORD
Even if you do not know how to play chords normally, this mode lets you play four different types of chords using simplified fingerings in the accompaniment area of the keyboard. The following shows where the accompaniment area is located, and explains how to finger chords in the CASIO CHORD mode.
CASIO CHORD Mode Keyboard

IMPORTANT!
- In the CASIO CHORD mode, the keys in the accompaniment area of the keyboard operate as "chord switches" only. You cannot use the keys in this area to play notes.
429A-E-013A
Playing a Rhythm
| Chord Type | Example |
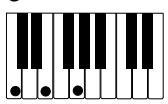
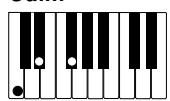
| Major Chords Pressing a single accompaniment area key in the CASIO CHORD mode will play the major chord whose name is marked above the key. All of the accompaniment area keys that are marked with the same chord name play exactly the same chord. | C (C major) ©CDEE F FGAAB B C CODEE F |
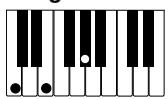
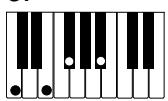
| Minor Chords To play a minor chord, press the accompaniment area key that corresponds to the major chord, while also pressing one other accompaniment area key to the right. | Cm (C minor) ©CDEE F FGAAB B C CODEE F |
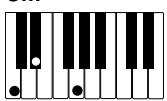
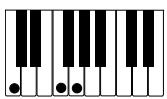
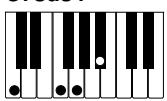
| Seventh Chords To play a seventh chord, press the accompaniment area key that corresponds to the major chord, while also pressing two other accompaniment area keys to the right. | C7 (C 7th) ©CDEE F FGAAB B C CODEE F |
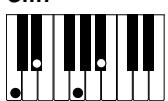
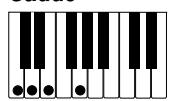
| Minor Seventh Chords To play a minor seventh chord, press the accompaniment area key that corresponds to the major chord, while also pressing three other accompaniment area keys to the right. | Cm7 (C minor 7th) ©CDEE F FGAAB B C CODEE F |
NOTE
When playing a minor, seventh, or minor seventh chord, it makes no different whether the additional keys you press are black or white.
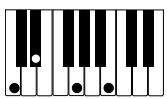
■ FINGERED
In the FINGERED mode, you play standard chord fingerings in the accompaniment area to play chords. To finger a C chord, for example, you would press the C-E-G keys.

FINGERED Mode Keyboard
IMPORTANT!
- In the FINGERED mode, the keys in the accompaniment area of the keyboard operate as "chord switches" only. You cannot use the keys in this area to play notes.
C
Cm
Cdim
Caug *1
Csus4

C7*2
Cm7 *2

Cmaj7*2
Cm7b
C7b5*1
C7sus4
Cadd9
Cmadd9
CmM7 *2
Cdim7*1
NOTE
- See the "Fingered Chord Chart" on page A-6 for information about fingering chords with other roots in the accompaniment area.
1: Inverted fingerings are not supported for these chords. The lowest note fingered is used as the root. See the NOTE below for more information about inverted chords.
2: For these chords, the same chord is specified even if the G fifth is not fingered.
NOTE
- Except for the chords whose names have *1 after them in the above examples, you can also use inverted fingerings for chords. This means, for example, that you could use the fingering E-G-C or G-C-E instead of C-E-G for C major.
Except for the chords whose names have *2 after them in the above examples, you need to press all of the indicated keys in order to finger a chord. Failure to include even a single note may produce a chord that is different from the one you want.
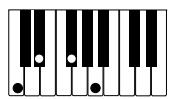
■FULL RANGE CHORD
The FULL RANGE CHORD mode lets you play a total of 38 different types of chords (the same chords available in the FINGERED mode plus 23 more). FULL RANGE CHORD recognizes the pressing of three or more keyboard keys anywhere on the keyboard as a chord fingering. Anything else (pressing one or two keys, or playing any group of notes that does not form a chord fingering that is recognized by the keyboard) is treated as melody notes.
FULL RANGE CHORD Mode Keyboard

Recognized Chords
| Pattern Type | Number of Chord Variations |
| FINGERED | The 15 chord patterns shown under "FINGERED" on page E-12. |
| Standard Fingerings | 23 standard chord fingerings. The following are examples of the 23 chords available with C as the bass note. C6·Cm6·C69 DbC D E F G A b C B C D bm Dm Fm Gm Am B bm Ddim A b7 F7 Fm7 Gm7 A badd9 C C C C C C |
Example: To play the chord C major and .

NOTE
- When there are at least six semitones between the lowest note and the next note to the right, the lowest note is assumed to be the bass note.
- Note that the digital piano's built-in tunes (Piano Group tunes and Song Group Tunes) use rhythms, accompaniments, and effects that are not available with Auto Accompaniment. Because of this, you may not be able to perform a piece exactly like a built-in tune when using Auto Accompaniment.
Adjusting the Volume of Accompaniment, Tune, and Memory Card Playback
Use the procedures below to adjust the volume of the accompaniment, built-in tune playback, and memory card tune playback. These settings are independent of the volume setting for the notes you play on the keyboard. You can specify volume levels in the range of 000 (minimum) to 127 (maximum).
Press the ACCOMP/SONG VOLUME button.
If the RHYTHM button indicator lamp is lit
If the PIANO, SONG/USER, or CARD button indicator lamp is lit
Use the dial to adjust the volume level.
Using Auto Harmonize
When you turn on Auto Harmonize in the FINGERED or CASIO CHORD accompaniment mode, the keyboard automatically adds one of the notes that make up the current chord to each melody note you play. This adds more depth to your melody line.
To play with Auto Harmonize
1 Use the MODE button to select the CASIO CHORD or FINGERED mode. This turns on Auto Accompaniment.
Press the AUTO HARMONIZE button.
- This causes the AUTO HARMONIZE indicator lamp to light, indicating that Auto Harmonize is turned on.
3 Use the dial to select the Auto Harmonize type you want to use.
- Note that you need to select the Auto Harmonize type with the dial within a few seconds after turning on the Auto Harmonize. If you don't, the display will exit the setting screen.
- See "Auto Harmonize Types" on page E-14 for more information about Auto Harmonize types.
Auto Harmonize Type: [Duet1]
4 Start Auto Accompaniment play, and play something in the melody area of the keyboard.
- Harmonize notes are added automatically to the melody notes you play.
5 To turn off Auto Harmonize, press the AUTO HARMONIZE button again.
- This causes the AUTO HARMONIZE indicator lamp to go out.
429A-E-015A
Playing a Rhythm
NOTE
- Auto Harmonize is available in the FINGERED and CASIO CHORD accompaniment modes only.
- Auto Harmonize is disabled and cannot be used while playing back a tune from the Music Library or a memory card.
Auto Harmonize Types
Auto Harmonize lets you select from among the following 12 Auto Harmonize types.
| Type | Effect |
| Duet1 | Adds close (separated by 3 to 5 degrees) 1-note harmony below the melody note. |
| Duet2 | Adds open (separated by more than 4 to 7 degrees) 1-note harmony below the melody note. Duet2 harmony is more open than Duet1. |
| Country | Adds country style harmony. |
| Octave | Adds the note from the next lower octave. |
| 5th | Adds the fifth degree note. |
| 3-Way Open | Adds 2-note open harmony, for a total of three notes. |
| 3-Way Close | Adds 2-note close harmony, for a total of three notes. |
| Strings | Adds harmony that is optimal for strings. |
| 4-Way Open | Adds 3-note open harmony, for a total of four notes. |
| 4-Way Close | Adds 3-note close harmony, for a total of four notes. |
| Block | Adds block chord notes. |
| Big Band | Adds big band style harmony. |
Using One-Touch Preset
With One-Touch Preset, the digital piano automatically configures optimal tone, tempo, and other settings in accordance with the rhythm pattern you select.
The following are the One-Touch Preset settings that are configured for each rhythm pattern.
- Keyboard tone and volume level
- Layer and split on/off settings
- Layer and split tone and volume settings (when layer and split are turned on)
- Tempo setting
- Effect settings
- Auto Harmonize (type, on/off settings)
To apply One-Touch Preset settings

Select the rhythm you want to use.

Use the MODE button to select the accompaniment mode you want to use.

Press the ONE TOUCH PRESET button.
- This will automatically apply the One-Touch Preset settings in accordance with the rhythm pattern you selected, and enter synchro standby.

Play a chord within the accompaniment keyboard range.
- When you do, the rhythm and Auto Accompaniment will start to play.
- The notes will sound in accordance with the settings of the One-Touch Preset.
E-14
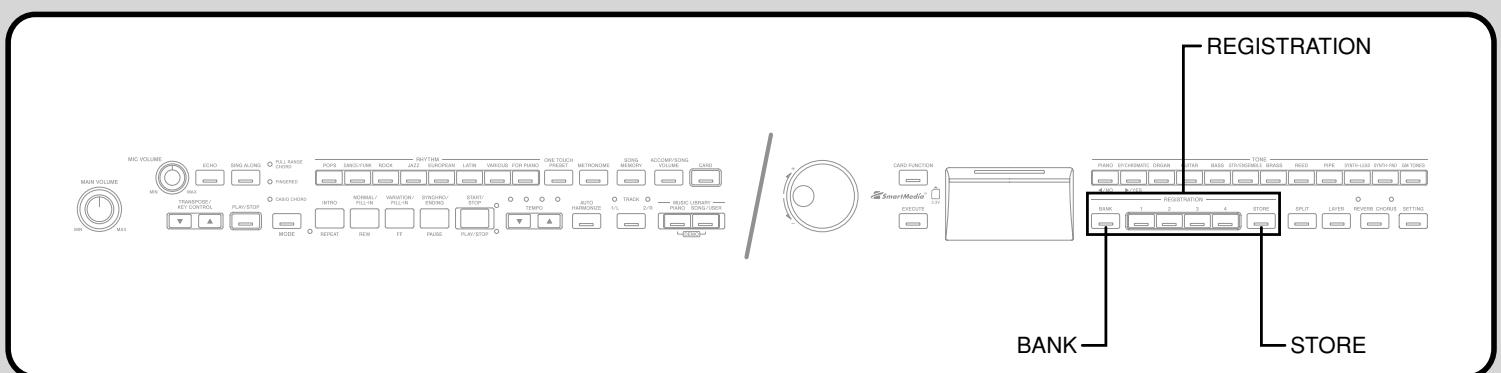
Using Registration Memory
What is registration memory?
Registration memory lets you save up to 16 (4 areas × 4 banks) digital piano setups (tone, rhythm, tempo, etc.) for instant recall whenever you need them.
Registration Memory Setup Data
The following are the settings that can be saved for each registration memory setup.
- Tone
Rhythm - Tempo
- Layer Setting
- Split Setting
- Split point
- Auto Harmonize Setting
- Effect setting
- MODE button setting
NOTE
- All of the registration memory banks are preset with default data.
- You cannot recall data from registration memory while playing back a tune from Music Library or a memory card.
How registration memory organizes its data
Registration memory has four banks, and each bank contains four areas. Use the BANK button to select a bank, and the REGISTRATION buttons to select an area.
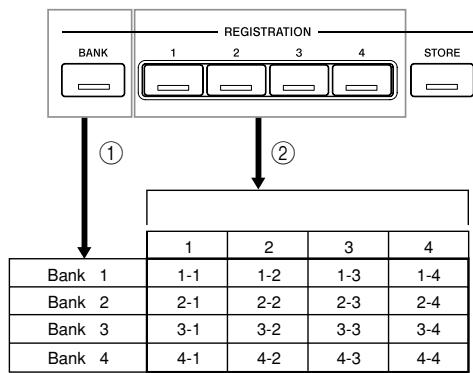
① Each press of the BANK button cycles through the bank numbers, from 1 to 4.
② Pressing a REGISTRATION button (1 to 4) selects the corresponding area in the currently selected bank.
NOTE
- Storing a new setup to a registration memory area replaces the setup that was previous stored there.
- You can save registration memory setup data to a memory card, if you want. See "Using a Memory Card" on page E-29 for more information.
429A-E-017A
Using Registration Memory
To store a setup in registration memory
1 On the digital piano, configure the tone, rhythm, and other settings you want to save as your setup.
- See "Registration Memory Setup Data" (page E-15) for more information.
Use the BANK button to select the registration memory bank where you want to save the setup. - This causes the number of the selected bank to appear on the display for about five seconds. If you do not perform the following step within that time, the bank selection screen will disappear.
Example: Bank 1 selected
Bank
WARNING
-
The following step will replace the setup currently in the area you select with the new setup. Make sure you do not need the current setup before performing the next step.
3 While holding down the STORE button, press the REGISTRATION button (1 to 4) that corresponds to the area where you want to store the setup. -
You can also change the bank selection at this time by pressing the BANK button while holding down the STORE button.
Example: After button 2 is pressed
Store Bank Area 1 -2
To recall a setup from registration memory
1 Use the BANK button to select the registration memory bank that contains the setup you want to recall.
- This causes the number of the selected bank to appear on the display for about five seconds. If you do not perform the following step within that time, the bank selection screen will disappear.
Bank 1
Press the REGISTRATION button (1 to 4) for the area that contains setup you want to recall.
- This displays the number of the area you selected along with the message "Recall". After that, the tone or rhythm screen reappears.
Recall
Bank A r e a 1 2
NOTE If you press a REGISTRATION button without selecting a bank first, the digital piano will recall the setup from the applicable area in the bank you previously last selected.
Registration memory contents are retained even when you turn off digital piano power (page E-3, A-7).
4 Release the REGISTRATION and STORE buttons.
E-16
Playing Back Built-in Tunes
Your digital piano comes with a total of 80 tunes built in. You can play back built-in tunes for your own listening pleasure, or you can use them for practice and even sing-along.
Built-in tunes are divided between the two groups described below.
- Piano Group: 50 tunes
The tunes in this group are piano tunes.
Song Group: 30 tunes
The tunes in this group are Auto Accompaniment tunes. You can connect a microphone to the digital piano and use the sing along mode to sing along with the built-in tunes.
In addition to the built-in tunes, you can also sing along with tunes you download over the Internet, and SMF data tunes (page E-19) on memory cards.
Playing Back a Piano Group Tune
Page A-4 shows a Piano Group List, which lists all of the tunes included in the Piano Group.
Getting Ready
- Use the ACCOMP/SONG VOLUME button (page E-13) to adjust the volume level.

Press the PIANO button to select the Piano Group.
- This causes the PIANO button indicator lamp to light.
NOTE
- Pressing the PIANO button automatically turns off layer and split.

Rotate the dial to select the tune you want.
Example: 46 Amazing Grace
$$ \begin{array}{l} \text {G r a n d P i a n o} \ [ 4 6: \text {A m a z i n g G r a c e} ] ^ {\text {T = 0 6 4}} \end{array} $$

Press the PLAY/STOP button to start playback of the tune.

When you want to stop playback, press the PLAY/STOP button again.
- The same tune plays repeatedly until you stop it.
Playing Back a Song Group Tune
Page A-4 shows a Song Group List, which lists all of the tunes included in the Song Group.
Getting Ready
- Use the ACCOMP/SONG VOLUME button (page E-13) to adjust the volume level.

Press the SONG/USER button to enter the song mode.
- This causes the SONG/USER button indicator lamp to light.

Rotate the dial to select the tune you want.
Example: 28 Sakura Sakura
$$ \left[ \begin{array}{l l} G M & S y n - V o i c e \ 2 8: & S a k u r a S a k u r a \end{array} \right] ^ {T} = 0 7 4 $$

Press the PLAY/STOP button to start Auto Accompaniment.

When you want to stop Auto Accompaniment play, press the PLAY/STOP button again.
- The same tune plays repeatedly until you stop it.
AdjustingPlaybackTempo

Use the TEMPO buttons to adjust the tempo.
429A-E-019A
Playing Back Built-in Tunes
NOTE
- You can also use the dial to change the tempo setting while the current setting is indicated by a value in brackets ([ ]) on
the display.
Example: [T=120]
- The value indicates the number of beats per minutes.
- To return the tempo to its initial default setting, press the TEMPO and buttons at the same time.
- At their initial default tempo setting, some Piano Group tunes may change tempo part way through. After you change the tempo setting for such a tune, playback will proceed at the tempo you selected, from the beginning of the tune to the end.
Pausing Playback
While a tune is playing, press the PAUSE button.
- This pauses playback.
Press the PAUSE button again to restart playback from the location where it was paused.
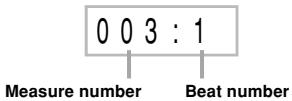
Skipping Back through a Tune
While playback is in progress, hold down the REW button.
- This skips back through the tune measure-by-measure.
- The measure number and beat number appear on the display while you are skipping back.
006:1
Measure number
Beat number
When you reach the point you want, release the REW button to resume playback.
NOTE
Depending on what is being played when you press the REW button, the skip back operation may not start right away when you press it.
Skipping Forward through a Tune
While playback is in progress, hold down the FF button.
- This skips forward through the tune measure-by-measure.
- The measure number and beat number appear on the display while you are skipping forward.
2 When you reach the point you want, release the FF button to resume playback.
Looping a Musical Phrase
You can select one or more measures and "loop" them, which means that they play again and again until you stop playback.
While the tune is playing, press the REPEAT button while the measure you want the phrase to start from is playing.
- This causes the REPEAT indicator lamp to flash.
When playback reaches the measure you want to specify as the end of the loop, press the REPEAT button again.
- This starts repeat play of the loop.
- To cancel repeat play of a loop, press the REPEAT button again so its indicator goes out.
Changing the Melody Tone of a Tune
You can select any one of the digital piano's 248 built-in tones as the melody tone of a built-in tune. You can even change the melody tone setting while playback is in progress.
Press a TONE button.
Use the dial to select the tone you want.
NOTE
- You can return a tune to its preset default tone by selecting the tune again.
E-18
429A-E-020A
Playing All of the Built-in Tunes
You can use the following procedure to play through all of the digital piano's 80 built-in tunes in tune number sequence.

Press the PIANO button and SONG/USER button at the same time.
- This starts playback of the built-in tunes in tune number sequence, starting from Piano Group tune number 00.

To stop playback, press the PLAY/STOP button.
NOTE
During playback of all the built-in tunes, you can use the dial to select a specific song for playback.
Playing Tunes You Download from the Internet
You can save music data for up to 10 tunes you download from the Internet to the digital piano's user song area (Song Group tunes 30 through 39). Once you store a song in digital piano memory, you can play it back using the same procedure as the one for playing built-in tunes.

Press the SONG/USER button.
- This causes the SONG/USER button indicator lamp to light.

Rotate the dial to select the tune you want.

Press the PLAY/STOP button.
-
This starts playback of the tune you selected.
-
Press the PLAY/STOP button again to stop playback.
Playing Music Data from a Memory Card
You can play back SMF* data from a memory card loaded in the digital piano's card slot for your listening enjoyment or sing along fun. For more information about using memory cards, see "Using a Memory Card" on page E-29.
- Standard MIDI File
SMF is a file format for storing MIDI data and other data used by a MIDI device to play back music. When music data is saved to a card in SMF format by a computer running commercially available music software, the data can be read and played by this digital piano.
IMPORTANT!
- Before performing the procedure below, read "Using a Memory Card" on page E-29, and make sure you observe all precautions concerning use of the card slot and memory cards.
Getting Ready
- Insert the memory card that contains the SMF data you want to play into the digital piano's card slot.

Press the CARD button.
- This causes CARD button indicator lamp to light.

Rotate the dial to select the tune you want.

Press the PLAY/STOP button.
- This starts playback of the tune you selected.
- To stop playback, press the PLAY/STOP button again.
NOTE
- If there is not enough memory available to perform the above operation, pressing the PLAY/STOP button will cause a data delete confirmation message to appear (Memory Full: Data Delete? No/Yes). Pressing the YES button will delete all of the data currently stored in the user area (No.30 to 39) of the Song Group. If you do not want to delete the user area data, press the NO button instead.
Practicing a Built-in Tune
You can turn off the left hand part or right hand part of a built-in tune, user song, or SMF data* and play along on the digital piano.
- With SMF data, the left-hand part is assigned to Channel 3, while the right-hand part is assigned to Channel 4.
Getting Ready
- Select the tune you want to practice and adjust the tempo. If you are playing a tune for the first time, a slow tempo is probably best.

Use the TRACK button to turn the parts on or off.
Each press of the TRACK button toggles its indicator lamp on (part turned on) and off (part turned off).
- To practice the left hand part, the TRACK 1/L indicator lamp should be off.
- To practice the right hand part, the TRACK 2/R indicator lamp should be off.
NOTE
- With Song Group tunes (30 through 39), you cannot turn off the left hand part.

Press the PLAY/STOP button.
- This starts playback of the tune, without the part you selected in step 1.

Play the missing part on the digital piano.

To stop playback, press the PLAY/STOP button again.
429A-E-021A
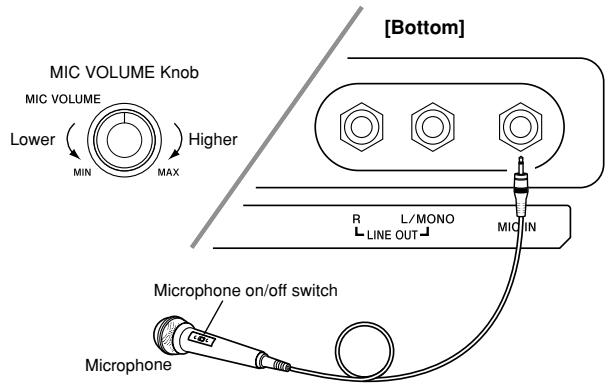
Using a Microphone for Sing Along
You can connect a microphone to the digital piano to sing along with built-in tunes, or with playback of SMF data from a memory card.
Using the Microphone Jack
You can connect a commercially available microphone to the digital piano's microphone jack. Before connecting a microphone, set the MIC VOLUME knob to a relatively low setting. Next, adjust the volume to the desired level after connecting the microphone.
1 Set the MIC VOLUME knob to the "MIN" setting.
Use the microphone's switch to turn it on.
3 Use the MIC VOLUME knob to adjust the microphone volume level.
IMPORTANT!
- You may get static noise in the microphone output if there is an external device connected to the digital piano's MIDI terminal.
- Be sure to unplug the microphone from the digital piano when you are not using it.
Recommended Microphone Type
Dynamic microphone (standard plug)
- Feedback
Any of the following conditions can result in feedback, which causes a howling sound to be produced through the speakers.
- Cupping the head of the microphone with your hands.
- Positioning the microphone to close to the speakers.
If howling occurs, hold the microphone by the barrel (not the head) and move it away from the speakers.
- Noise
Fluorescent lighting near the microphone can cause noise. If this happens, move the microphone away from the fluorescent lighting causing the noise.
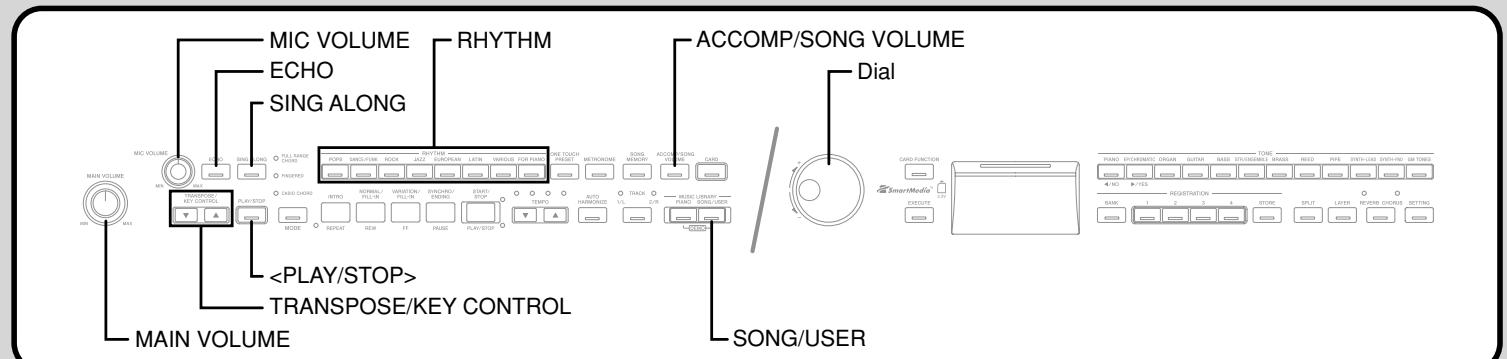
To sing along with playback
Getting Ready
- Adjust the MAIN VOLUME (page E-6), ACCOMP/SONG VOLUME button (page E-13), and MIC VOLUME (page E-20) to appropriate levels.
1 Find the tune you want in the Song Group List, and note its number.
See page A-4 for the Song Group List.
Press the SING ALONG button to enter the sing along mode.
- This causes the SING ALONG button indicator lamp to light.
3 Select the sing along source.
4 Rotate the dial to select the tune you want.
E-20
429A-E-022A
04.8.26, 3:44 PM
Press the button to start playback.
- If the song you selected includes lyric data, the lyrics appear on the digital piano's display.
- Use the microphone to sing along with the playback.
- When you pressing the SING ALONG button and enter the Sing Along mode, the digital piano will automatically reduce the volume of the melody part of the tune. It will also change the tone setting to make sing along easier.
6 You can use the TRANSPOSE/KEY CONTROL and buttons to change the key of the song.
| To do this: | Press this button: |
| Raises the key by one semitone. | ^ |
| Lower the key by one semitone. | ✓ |
Key Control: [ -12 ]
When you want to stop playback, press the button again.
- The same tune plays repeatedly until you stop it.
- To exit the Sing Along mode, press the SING ALONG button so its indicator lamp goes out.
NOTE To return the tune to its default key "00", press both of the TRANSPOSE/KEY CONTROL buttons ( and ) at the same time in step 6 of the above procedure.
Using Microphone Echo
You can turn microphone echo on or off as required.
Press the ECHO button to toggle the microphone echo on and off.
- The ECHO button indicator lamp disappears when the microphone echo is turned off.
NOTE The microphone echo is turned on automatically whenever you turn on digital piano power.
Using Transpose
The transpose feature lets you transpose the overall pitch of the keyboard in semitone steps. This means you can adjust digital piano tuning to make it easier to sing to a particular tune.
Press the RHYTHM button to enter the rhythm mode.
- Note that you cannot use the transpose feature in the song mode and piano mode.
Use the TRANSPOSE/KEY CONTROL and buttons to change the key of the digital piano.
| To do this: | Press this button: |
| Raises the pitch by one semitone. | ^ |
| Lower the pitch by one semitone. | ✓ |
Example: When the digital piano pitch is raised by five semitones
Transpose: [+05]
- You can also change the setting by rotating the dial.
NOTE The transpose setting range is -12 (1 octave down) to +12 (1 octave up).
The power on default setting is "00".
The transpose screen disappears from the display automatically if you do not perform any button operation for about five seconds.
- The transpose setting is also reflected in memory tune and Auto Accompaniment play.
- To return the digital piano to its default pitch "00", press both of the TRANSPOSE/KEY CONTROL buttons (∧ and ∨) at the same time in step 2 of the above procedure.
Recording Your Keyboard Play
You can record your practice sessions while playing along with a Song Memory tune (Song Recording), or you can record your keyboard play along with the Auto Accompaniment you are using (Free Recording).
Recordable Data, Parts, and Tracks
The type of data that is recorded into Song Memory depends on whether you are performing song recording or free recording.
Song Recording: Right-hand part or left-hand part Free Recording: One tune, consisting of two tracks as shown in the illustration below
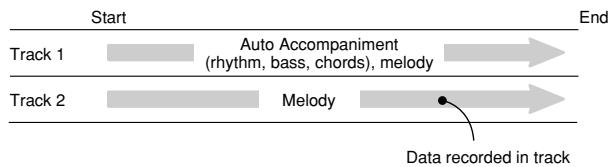
- Since each track is independent of the other, you can edit a recording by re-recording only one of the tracks.
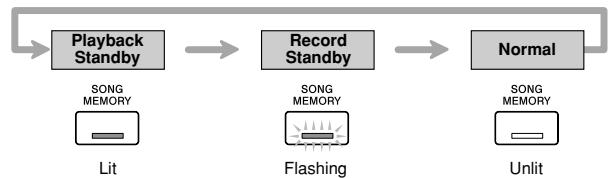
Using the SONG MEMORY Button
Each press of the SONG MEMORY button cycles through the song memory options in the sequence shown below.
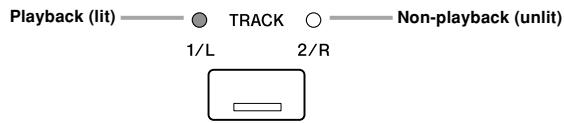
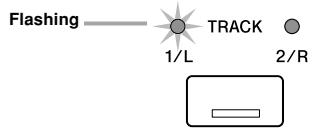
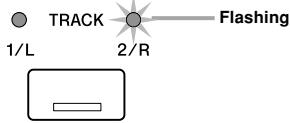
Selecting Parts and Tracks
You can determine the current status of each part/track by checking indicator lamps above the TRACK button.
- DuringPlayback Standby
Each press of the TRACK button toggles Left-hand part/Track 1 and Right-hand part/Track 2 between playback and non-playback.
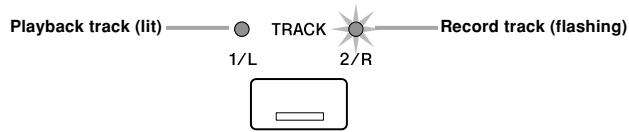
During Record Standby
Each press of the TRACK button toggles Left-hand part/Track 1 and Right-hand part/Track 2 between record standby and playback.
Song Memory Capacity
Song Memory can hold a total of approximately 5,300 notes, which can be divided between a song recording and a free recording. Note that you can use all 5,300 notes for a single recording, if you want. If you do, you will not be able to store a second recording.
- Recording will stop automatically if Song Memory becomes full. If you are using Auto Accompaniment or a rhythm, they will also stop playing at this time.
Recorded Data Storage
- Starting a new recording deletes any data that was previously recorded in memory.
- Should power fail during recording, all of the data in the track you are recording will be deleted.
- A built-in lithium battery supplies the power required to retain digital piano memory contents when power is turned off. Should the lithium battery go dead, memory contents will be lost whenever you turn off digital piano power. For more information, see "Memory Protection" on page A-7.
E-22
429A-E-024A
04.8.26, 3:44 PM
Recording Your Practice (Song Recording)
You can use the procedure below to record your play during practice with one of the digital piano's built-in tunes. You can specify which parts you want to practice, and the keyboard plays the remaining parts as accompaniment.
Getting Ready
- Press the SONG/USER button or PIANO button to select the mode that contains the tune you want to use for recording.
Press the SONG MEMORY button to enter record standby.
- This causes the SONG MEMORY button indicator lamp to flash.
2 Select the tune you want to use for recording.
3 Use the TRACK button to select the part you want to record.
4 Configure the following settings as required.
- Tone (page E-6)
- Tempo (page E-17)
Press the START/STOP button to start recording.
6 Play the required notes on the keyboard.
7 To stop recording, press the START/STOP button again.
- This will stop the recording operation.
- If you want to immediately hear what you recorded, press the START/STOP button again.
Song Recording Data
In addition to your keyboard play and chord accompaniment, the following data is also stored by a song recording operation.
- Tone setting
- Tempo setting
- Tune name
- Recording part
- Pedal operations
- Layer and split settings
- Reverb and chorus settings
Playing Back a Song Recording
Getting Ready
- Press the SONG MEMORY button to enter playback standby.
Press the START/STOP button.
- This starts playback of Song Memory contents.
- Use the TEMPO buttons to adjust the tempo.
To stop playback, press the START/STOP button again.
Recording a Performance (Free Recording)
Use this procedure when you want to record accompaniments and keyboard play in real time.
Getting Ready
- Press the RHYTHM button to enter the rhythm mode.
Press the SONG MEMORY button to enter record standby.
- This causes the SONG MEMORY button indicator lamp to flash.
Use the TRACK button to select Track 1.
3 Configure the following settings as required.
- Tone (page E-6)
Rhythm (page E-10) -
Accompaniment mode (page E-11)
-
Use a slower tempo if you feel you might have trouble playing properly at a faster tempo (page E-17).
4 Press the START/STOP button.
This starts recording.
Play the required notes on the keyboard.
- Any chords you play on the keyboard are recorded, along with their Auto Accompaniment patterns. Melody notes you play are also recorded.
- Any pedal operations you perform while playing are also recorded.
To stop recording, press the START/STOP button again.
- If you make a mistake, you need to go back and re-record from step 1.
- If you want to immediately hear what you recorded, press the START/STOP button again.
NOTE
Recording a performance to a track that already contains data causes the existing data to be replaced by your new performance.
429A-E-025A
Recording Your Keyboard Play
Free Recording Track 1 Data
In addition to notes played on the keyboard and chord accompaniments, the following data is also stored in Track 1 during performance recording.
- Tone number
Rhythm number - Rhythm controller operations
- Pedal operations
- Layer and split settings
- Split point
- Tempo setting
- Reverb and chorus settings
- Auto Harmonize setting
- Registration Memory Contents
- One Touch Preset setting
Track 1 Free Recording Variations
To record without rhythm
Skip step 4 of the above procedure.
- Recording without rhythm starts as soon as you press a keyboard key.
To start recording with synchro start
In place of step 4 of the above procedure, press the SYNCHRO/ ENDING button.
- Now Auto Accompaniment and recording will start when you play a chord within the accompaniment keyboard range.
- To start recording with an intro using synchro start
In place of step 4 of the above procedure, press the SYNCHRO/ ENDING button and then the INTRO button.
- Now Auto Accompaniment and recording will start with an intro pattern when you play a chord within the accompaniment keyboard range.
- To start Auto Accompaniment part way into a recording
In place of step 4 of the above procedure, press the SYNCHRO/ ENDING button, and then play something within the melody range of the keyboard.
- This records the melody without any accompaniment. Auto Accompaniment will start when you play a chord within the accompaniment keyboard range.
- To insert an ending or fill-in into a recording
During recording, use the SYNCHRO/ENDING button, NORMAL/FILL-IN button and VARIATION/FILL-IN button.
Playing Back a Free Recording
Use the procedure below to playback what you have recorded with free recording.
Getting Ready
- Press the RHYTHM button to enter the rhythm mode.
- Press the SONG MEMORY button to enter playback standby.

Press the START/STOP button.
- This starts playback of Song Memory contents. During Song Memory playback, you can use the TRACK button to mute either track and listen to the contents of the other track only.
- Use the TEMPO buttons to adjust the tempo.

To stop playback, press the START/STOP button again.
NOTE
During Song Memory playback, the entire range of the keyboard operates as a melody keyboard, regardless of the MODE button setting. You can play along with Song Memory playback, if you want. You could use layer and split (page E-7, E-8) at this time to assign multiple tones to the keyboard, if you want.
- Note that pause, skip forward, and skip back operations cannot be performed during Song Memory playback.
Over dubbing a Free Recording
You can use the following procedure to record a melody in Track 2 that combines something else that you previously recorded in Track 1.
Getting Ready
- Press the RHYTHM button to enter the rhythm mode.
- Press the SONG MEMORY button to enter record standby.
1 Use TRACK button to select Track 2.
2 Configure the following setting as required.
- Tone number
- Use a slower tempo if you feel you might have trouble playing properly at a faster tempo (page E-17).
Press the START/STOP button.
- This starts playback from Track 1 and recording to Track 2.
Play the melody notes you want as you listen to the playback from Track 1.
5 To stop recording, press the START/STOP button again.
- If you make a mistake, you need to go back and re-record from step 1.
- If you want to immediately hear what you recorded, press the START/STOP button again.
NOTE
Track 2 is a melody-only track, which means that chord accompaniment cannot be recorded there. Because of this, the entire range of the keyboard becomes a melody keyboard when recording the Track 2, regardless of the current MODE button setting.
- If you want to record without playback from a recorded track, enter playback standby, deselect the playback track, and then enter record standby. Note, however, that you cannot turn off rhythm and Auto Accompaniment.
Free Recording Track 2 Data
In addition to notes played on the keyboard, the following data is also recorded to Track 2.
- Tone number
- Pedal operations
Deleting a Specific Part/Track
You can use the following procedure to delete a specific part/track from a song recording or free recording.
Getting Ready
Press the SONG/USER button or PIANO button.
- Press the RHYTHM button.
Press the SONG MEMORY button to enter record standby.
Use the TRACK button to select the part/track you want to delete.
Hold down the SONG MEMORY button until a confirmation message appears on the display.
- To cancel the delete operation, press the NO button.
4 Press the YES button to delete the data.
- This causes the digital piano to return to Song Memory playback standby.
NOTE
1 Pressing the SONG MEMORY button while the part/track
delete screen is on the display returns to record standby.
Song Memory contents are retained even when you turn off digital piano power (page E-3, E-22, A-7).
Other Settings
Use the procedure provided below to change the following settings.
Keyboard Touch
This setting changes the relative touch of the keyboard keys.
off : Off
Light : Weak (Strong sound is produced even when relatively light pressure is applied.)
Normal: Normal
Heavy : Strong (Normal sound is produced even when relatively strong pressure is applied.)
Touch Select: [NormaI]
Keyboard Tuning
Use this setting to raise or lower the overall pitch of the digital piano to match another instrument. The setting range is plus or minus 50 cents (100 cents = 1 semitone) from the standard pitch of A4 = 440.0Hz.
Tun ng : [ - 5 0 ]
Layer Tone Volume
You can specify a volume value in the range of -24 to 00 to +24 for the layered tone when using the layer feature (page E-7).
L a y e r B a l a n c e : [00]
Display Contrast
Use this setting to adjust the contrast of the display screen (00 to 16).
C on t r a s t : [16]
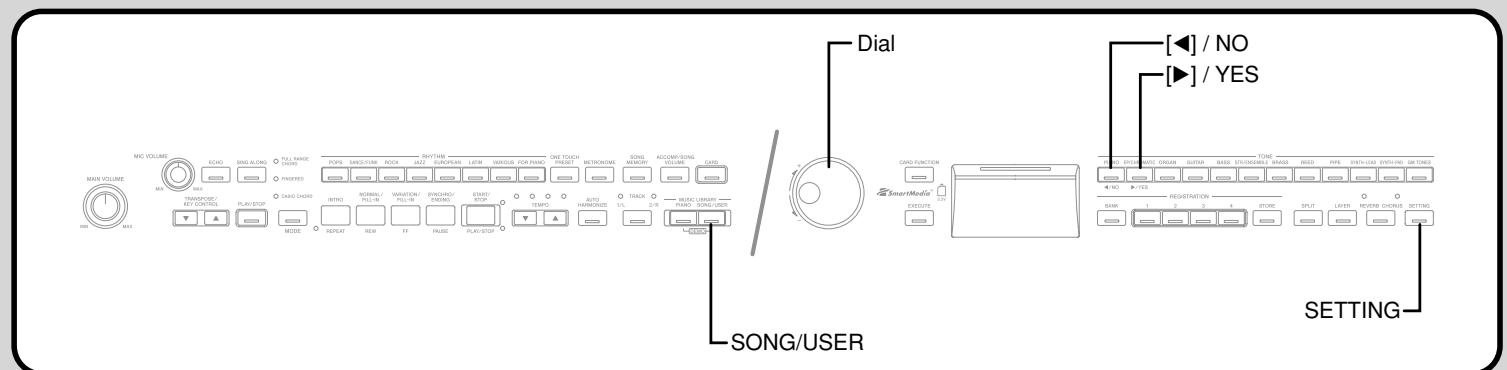
To configure other settings
Press the SETTING button.
Use the [<] and [>] cursor buttons to display the setting screen for the parameter whose setting you want to change.
3 Use the dial to change the currently displayed setting.
4 After all the settings are the way you want, press the SETTING button.
NOTE
- Though a pedal setting screen will appear when you perform the above procedure, note that this model does not support pedal setting operations.
E-26
429A-E-028A
04.8.26, 3:44 PM
Using MIDI
What is MIDI?
MIDI is a standard for digital signals and connectors that allows musical instruments, computers, and other devices, regardless of manufacturer, to exchange data with each other.
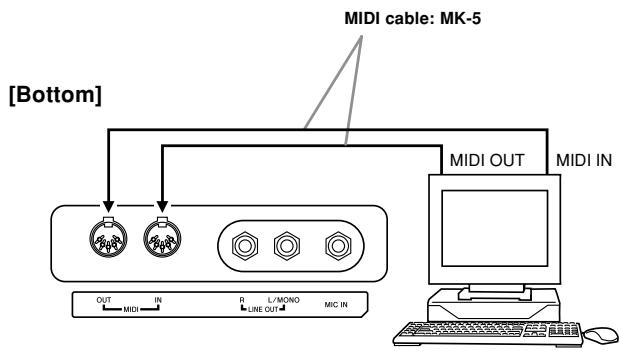
MIDI Connections
Connecting your computer or other external MIDI device to the digital piano's MIDI IN/OUT terminals makes it possible for them to exchange MIDI messages and record and playback keyboard notes on the connected device.
Configuring MIDI Settings
- Send Channel
Use this setting to specify one of the MIDI channels (1 through 16) as the Send Channel, which is used for sending MIDI messages to an external device.
$$ \begin{array}{c} \text {K e y b o a r d C h a n n e l :} \ [ 1 6 ] \end{array} $$
Local Control
When Local Control is turned on, pressing the keyboard's keys plays the notes using the currently selected built-in tone, and also sends the applicable MIDI messages out the MIDI OUT terminal. Turning off Local Control causes MIDI messages to be sent out the MIDI OUT terminal, but nothing is played by the digital piano's sound source when keys are pressed. This comes in handy when you want to turn off the digital piano's keyboard and use its auto accompaniment feature to accompany an external sequencer or other device.
$$ \begin{array}{c c} \text {L o c a l} & \text {C o n t r o l :} \ {[ O f f ]} & \end{array} $$
Accomp MIDI Out
This setting controls whether or not MIDI messages for the digital piano's Auto Accompaniment should be sent.
$$ \begin{array}{c c} \text {A c c o m p O u t :} \ [ \text {O f f} ] \end{array} $$
429A-E-029A
Other Settings
USB Mode and MIDI Mode
Your digital piano has two data communication modes: a USB mode and a MIDI mode.
The USB mode is used when sending and receiving data via the digital piano's the USB port, while the MIDI mode is used for data send and receive via its MIDI terminals.
USB Mode/MIDI Mode Switching
The digital piano will enter the USB mode automatically whenever a connection is established between it and the USB driver running on a connected computer. Any other time (when there is no USB connection between the digital piano and a computer), the digital piano is in the MIDI mode.
USB Mode
Active Port: USB
- If you connect to a computer via the USB port before turning on power, the screen will show "USB" when you turn on power. Note that the screen also will show "USB" and the digital piano will enter the USB mode if you turn on power while there are connections to both the USB port and the MIDI terminals.
- The "USB" indicator will appear for about one second to indicate the USB mode whenever you connect to a computer via the USB port while the digital piano is turned on.
MIDI Mode
Active Port: M1D1
- If you connect another device to the digital piano's MIDI terminals (only) before turning on power, the screen will show "MIDI" when you turn on power.
- Disconnecting from the digital piano's USB port while the digital piano is turned on will cause the "MIDI" indicator to appear for about one second to indicate the MIDI mode.
Expanding the Number of Built-in Tunes
You can transfer song data for up to 10 tunes (approximately 132 kilobytes) to digital piano memory and store it as Song Group tunes number 30 through 39.
You can obtain a copy of the special CASIO conversion software by downloading it at the Web page shown below. After downloading, install the software on your computer.
CASIO MUSIC SITE
http://music.casio.com/
- In addition to the software itself, the CASIO MUSIC SITE will also provide you with information about its installation and use. You can also find out about how to connect your computer and digital piano, the latest news about your digital piano and other CASIO musical instruments, and much more.
Deleting a User Song
Use the following procedure to delete a user song you have loaded to digital piano memory from your computer.

Hold down the SONG/USER button until a user song selection screen appears.

- To exit the selection screen, press the NO button.

Use the dial to select the song you want to delete.

Press the YES button to delete the song.
- The display should now show 0 kilobytes.
Using a Memory Card
In addition to the digital piano's memory, you can also use a SmartMedia memory card to store digital piano data or data loaded from your computer. The following table shows the types of data you can save to a memory card.
| Type | Display Indicator | File Name Extension |
| Music Library tunes | M.L. Song | .CM2 |
| Song Memory Data | MemorySong | Song Recording:.CSM Free Recording:.CSR |
| Registration Memory Setups | Registration | .CR3 |
Using a Memory Card
The digital piano has a card slot that accepts SmartMedia™ memory cards. This provides you with the means to store virtually unlimited amounts of user song and other data from digital piano memory. SmartMedia memory cards are available in capacities ranging from 8MB up to 128MB. The cost of a card varies according to its capacity. Note also that SmartMedia memory cards are available for two different voltages: 3.3V and 5V. This digital piano supports the use of 3.3V cards.
Though a SmartMedia memory card is about the size of a postage stamp, it has anywhere from eight times to 100 times the storage capacity of a floppy diskette, and it provides very high-speed access. SmartMedia memory cards are available from household appliance stores, computer shops, etc.
- SmartMedia™ is a trademark of Toshiba Corporation.
NOTE
- The term "memory card" in this manual refers to the SmartMedia memory card.
Memory Cards
IMPORTANT!
- Be sure to use only a 3.3V SmartMedia memory card that has one of the following capacities. 8MB, 16MB, 32MB, 64MB, 128MB
WARNING
- Use of 5V SmartMedia memory cards is not supported.
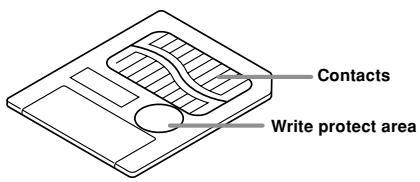
- Note that you will not be able store data to, delete data from, or rename files on a memory card that has a write protect sticker in the write protect area.
Memory Card and Card Slot Handling Precautions
IMPORTANT!
- When using a memory card, make sure you observe all of the precautions in the instructions that come with it.
- Avoid using a memory card in the following types of areas. Such conditions can corrupt data stored on the memory card.
- Areas subjected to high temperature, high humidity, and corrosive gas
- Areas subjected to strong electrostatic charge and digital noise
- Never touch the contacts of a memory card when loading it or removing it from the digital piano.
- Never remove the memory card from the card slot or turn off the digital piano while any data access operation (save, read, delete) is in progress. Doing so can corrupt the data on the memory card and damage the card slot.
- Never insert anything besides a memory card into the card slot. Doing so creates the risk of malfunction.
- Inserting a memory card that carries an electrostatic charge into the card slot can cause malfunction of the digital piano. If this happens, turn digital piano power off and then back on again.
- A memory card can become quite warm after very long use in the card slot. This is normal and does not indicate malfunction.
- A memory card has a limited service life. If you start to experience problems with storing, reading, or deleting data from a memory card you have been using for a long time, it may mean that the card has reached the end of its service life. When this happens, you need to purchase a new card.
Note that CASIO COMPUTER CO., LTD. shall not be held liable for any loss of data stored on a memory card.
429A-E-031A
Using a Memory Card
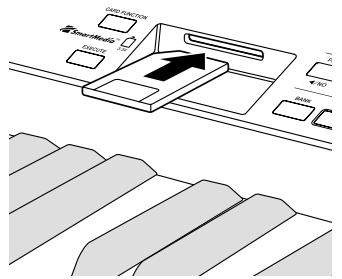
Loading a Memory Card into the Card Slot
With the label side of the memory card facing downwards, carefully insert it into the card slot. Carefully slide the memory card straight into the slot, as far as it will go.
NOTE
- When inserting a SmartMedia card into the card slot, make sure you carefully orient the card correctly so it slides correctly straight into the slot.
Removing a Memory Card from the Card Slot
After making sure that the memory card is not being accessed*, pull it out of the card slot.
- The memory card is being accessed when the CARD button or CARD FUNCTION indicator lamp is lit. Make sure that both of these indicator lamps are not lit.
IMPORTANT!
- Never remove the memory card from the card slot or turn off the digital piano while any data access operation (save, read, delete) is in progress. Doing so can corrupt the data on the memory card and damage the card slot.
Saving Files to a Memory Card
See "Savable File Types" on page E-29 for information about the type of data you can save.
Getting Ready
- Insert a properly formatted memory card into the digital piano's card slot. Make sure that the sticker is removed from the card's write area, which enables writing.
NOTE
- Depending on the type and the amount of data involved, a memory card data save or load operation can take anywhere from a few minutes to more than 10 minutes to complete. The message "Please Wait" will remain on the display to indicate that a data save or load operation is being performed.
IMPORTANT!
- Never try to perform any operation while "Please Wait" is displayed. Performing any operation can cause digital piano's built in memory data or the memory card data to be deleted, or damage data and make it impossible to read.
To save a file to a memory card

Press the CARD FUNCTION button.
- This causes the indicator lamp above the button to light.

Use the dial to display the "Save" screen.

Press the [▶] cursor button to advance to the file type selection screen.

Use the dial to select the file type.

Press the [▶] cursor button to advance to the next screen.

Use the dial to select the file you want to save.
| To save this type of file: | Select this: |
| Music Library playback tune | User song number/name |
| Song Memory data | Free Recording tune (Rythm Mem), Song Recording tune (ML MEM) |
| Registration memory setup | Bank number |

After selecting a file, press the [▶] cursor button to advance to the next screen.

Input the file name you want to use.
- Use the dial to scroll through letters at the current cursor location. For details about the characters you can input, see "Supported Input Characters" on page E-33.
- Use the [] and [] cursor buttons to move the cursor left and right.

After inputting the file name, press the EXECUTE button.
- This will display a confirmation message asking whether you really want to save the data. If the memory card already contains a file with the same name, a confirmation message appears asking if you want to overwrite the existing file with a new one.

To save the data, press the YES button.
- The message "Please Wait" will remain on the display while the save operation is being performed. Never try to perform any other operation on the digital piano while the card is being accessed. The screen in step 2 will reappear after the save operation is complete.
- If you do not want to continue with the save operation, press the NO button. This will return to the screen in step 8.

After you are finished saving the data, press the CARD FUNCTION button so its indicator lamp goes out.
Loading a File from a Memory
Use the procedure below to load data from a memory card into the digital piano memory.
IMPORTANT!
- Before you can use a SmartMedia card with this digital piano, you need to perform the procedure below to format it. After formatting the card, transfer SMF data from your computer to the card.
- Formatting a SmartMedia card with this digital piano automatically creates a folder named "CASIO_MD" on the card. When transferring SMF data from your computer to the card for use by the digital piano, be sure to store it in the "CASIO_MD" folder.
Getting Ready
- Insert the SmartMedia card that contains the data you want to recall into the digital piano's card slot.
NOTE
- Depending on the type and the amount of data involved, a memory card data save or load operation can take anywhere from a few minutes to more than 10 minutes to complete. The message "Please Wait" will remain on the display to indicate that a data save or load operation is being performed.
IMPORTANT!
- Never try to perform any operation while "Please Wait" is displayed. Performing any operation can cause digital piano's built in memory data or the memory card data to be deleted, or damage data and make it impossible to read.
To load file data from a memory card
Press the CARD FUNCTION button.
This causes the indicator lamp above the button to light.
Use the dial to display the "Load" screen.
Press the [▶] cursor button to advance to the file type selection screen.
Use the dial to select the type of file you want to load.
Press the [▶] cursor button to display the file name selection screen.
Use the dial to select the name of the file you want to load.
7 Press the [▶] cursor button to advance to the next screen.
Use the dial to select the destination of the file you are loading.
| To load this type of file: | Select this destination: |
| Music Library playback tune | User song number/name |
| Song Memory data | Free Recording tune (Rythm Mem), Song Recording tune (ML MEM) |
| Registration memory setup | Bank number |
After selecting the destination, press the EXECUTE button.
- This will display a confirmation message asking whether you really want to load the data.
Press the YES button to load the data.
- The message "Please Wait" will remain on the display while the load operation is being performed. Never try to perform any other operation on the digital piano while the card is being accessed. The screen in step 2 will reappear after the load operation is complete.
- If you do not want to continue with the load operation, press the NO button. This will return to the screen in step 8.
After you are finished loading the data, press the CARD FUNCTION button so its indicator lamp goes out.
429A-E-033A
Using a Memory Card
Renaming a Memory Card File
You can use the procedure below to change the name of a file that you previously saved to a memory card.
Getting Ready
To rename a file on a memory card
- Insert the memory card that contains the file you want to rename into the card slot. Make sure that the sticker is removed from the card's write protect area, which enables writing.
Press the CARD FUNCTION button. -
This causes the indicator lamp above the button to light.
Use the dial to display the "Rename" screen.
Press the [▶] cursor button to advance to the file type selection screen.
Use the dial to select the type of the file you want to rename.
Press the [▶] cursor button to advance to the file name selection screen.
Use the dial to select the name of the file you want to rename.
7 Press the [▶] cursor button to advance to the file name input screen. -
Use the dial to scroll through letters at the current cursor location. For details about the characters you can input, see "Supported Input Characters" on page E-33.
- Use the [▲] and [▶] cursor buttons to move the cursor left and right.
After inputting the file name, press the EXECUTE button.
- This will display a confirmation message asking whether you really want to change the name.
Press the YES button to change the file name.
- The message "Please Wait" will remain on the display while the rename operation is being performed. Never try to perform any other operation on the digital piano while the card is being accessed. The screen in step 2 will reappear after the rename operation is complete.
- If you do not want to continue with the rename operation, press the NO button. This will return to the screen in step 7.
10 After you are finished renaming the file, press the CARD FUNCTION button so its indicator lamp goes out.
Deleting a Memory Card File
Use the procedure below to delete a file from a memory card.
IMPORTANT!
- Note that the file delete operation cannot be undone. Make sure that you no longer need data before you delete it.
Getting Ready
- Insert the memory card that contains the file you want to delete into the digital piano's card slot. Make sure that the sticker is removed from the card's write protect area, which enables writing.
To delete a file from a memory card
Press the CARD FUNCTION button.
- This causes the indicator lamp above the button to light.
Use the dial to display the "Delete" screen.
Press the [▶] cursor button to advance to the file type selection screen.
Use the dial to select the type of the file you want to delete.
Press the [▶] cursor button to advance to the file name selection screen.
Use the dial to select the name of the file you want to delete.
7 After selecting the file to be deleted, press the EXECUTE button.
- This will display a confirmation message asking whether you really want to delete the file.
Press the YES button to delete the file.
- The message "Please Wait" will remain on the display while the delete operation is being performed. Never try to perform any other operation on the digital piano while the card is being accessed. The screen in step 2 will reappear after the delete operation is complete.
- If you do not want to continue with the delete operation, press the NO button. This will return to the screen in step 5.
9 After you are finished deleting the file, press the CARD FUNCTION button so its indicator lamp goes out.
Formatting a Memory Card
Use the procedure below to format a memory card.
IMPORTANT!
- Note that formatting a memory card that already contains data causes all of that data to be deleted. Data deleted by the format operation cannot be recovered. Before performing the procedure below, check to make sure that the memory card does not contain any data you might need.
Getting Ready
- Insert the memory card you want to format into the digital piano's card slot. Make sure that the sticker is removed from the card's write protect area, which enables writing.
To format a memory card
Press the CARD FUNCTION button.
- This causes the indicator lamp above the button to light.
Use the dial to display the "Format" screen.
Press the EXECUTE button.
- This will display a confirmation message asking whether you really want to format the memory card.
4 Press the YES button to start formatting.
- The message "Please Wait" will remain on the display while the format operation is being performed. Never try to perform any other operation on the digital piano while the card is being accessed. The screen in step 2 will reappear after the format operation is complete.
- If you do not want to continue with the formatting operation, press the NO button. This will return to the screen in step 2.
After you are finished formatting the memory card, press the CARD FUNCTION button so its indicator lamp goes out.
Supported Input Characters
The following shows the characters you can input when inputting the name of a file being saved to a memory card.
| 0 | 1 | 2 | 3 | 4 | 5 | 6 | 7 | 8 | 9 |
| A | B | C | D | E | F | G | H | I | J |
| K | L | M | N | O | P | Q | R | S | T |
| U | V | W | X | Y | Z | _ | |||
429A-E-035A
Memory Card Error Messages
| Display Message | Cause | Action |
| Err Card R/W | There is something wrong with the memory card. | Use a different card. |
| Err CardFull | The memory card is full. | 1. Use a different card. 2. Delete files you no longer need from the card (page E-32). |
| Err No Card | 1. The memory card is not set correctly in the card slot. 2. There is no memory card in the card slot or the card was removed part way through a card access operation. | 1. Remove the card and reinsert it correctly (page E-30). 2. Insert a card into the card slot. Never remove a card from the card slot while a card access operation is in progress. |
| Err FileName | 1. A file with the same name as the one you are trying to use already exists on the memory card. 2. You are trying to use a file name that is not allowed by MS-DOS. | 1. Use a different file name (page E-32). 2. Name files using the allowable characters (page E-33). |
| ErrReadOnly | You are trying to use a file name that is already used for a read-only file on the memory card. | Use a different card or use a different name. |
| Err Format | 1. The format of the memory card in the card slot is not supported by this digital piano. 2. The memory card in the card slot is not formatted. 3. There is something wrong with the memory card. | 1. Use a card that has the supported format (page E-29). 2. Format the card (page E-33). 3. Use a different card. |
| Err Mem Full | There is not enough digital piano memory available to hold the data you are trying to load. | 1. Delete data you no longer need from the load destination where you are trying to store it. 2. If you are loading data to Song Memory, delete song data you no longer need (page E-25). |
| Err Not SMF0 | You are attempting to load SMF (Standard MIDI File) data that is not Format 0. | Use only Format 0 SMF data. |
| Err No File | You are trying to load data from a card that does not contain any data that is supported by this digital piano. | Change to a memory card that contains data saved by or supported by this digital piano. |
| Err Protect | You are trying to save data to a memory card that is write-protected. | 1. Use a different card. 2. If you want to write to the current memory card, remove it from the card slot and remove the write protect sticker (page E-29). |
| Err WrongDat | There is a problem with the data on the memory card or the data is corrupted. | Use different data or a different card. |
| Err SizeOver | The data file size is greater than 132 kilobytes. | Select a data that is 132 kilobytes in size or smaller. |
| Err No Data | You are attempting to save a user song that does not contain any data. | Select a user song that contains data. |
Troubleshooting
| Problem | Cause | Action | See Page |
| No sound is produced when I press a digital piano key. | 1. The MAIN VOLUME knob is set to “MIN”.2. Headphones are connected to the digital piano.3. MIDI Local Control is turned off.4. Check the current accompaniment mode setting. Normally, the accompaniment keyboard will not produce any note while CASIO CHORD or FINGERED is selected as the accompaniment mode. | 1. Rotate the MAIN VOLUME knob more towards “MAX”.2. Unplug the headphones from the digital piano.3. Turn on the Local Control setting.4. Change the accompaniment mode setting to NORMAL. | E-6E-4E-27E-11 |
| The pitch of the digital piano is off. | 1. The digital piano's key setting is something other than “C”.2. The digital piano tuning is incorrect. | 1. Change the key setting to “C”, or turn digital piano power off and then back on again.2. Adjust digital piano tuning, or turn digital piano power off and then back on again. | E-21E-26 |
| Demo play seems to start, but I can't hear anything. | 1. The MAIN VOLUME knob is set to “MIN”.2. Headphones are connected to the digital piano. | 1. Rotate the MAIN VOLUME knob more towards “MAX”.2. Unplug the headphones from the digital piano. | E-6E-4 |
| Digital piano memory contents seem to disappear. | The lithium battery used for memory backup is dead. | Contact your nearest CASIO service center to have the lithium battery replaced. | A-7 |
| When I play something on the digital piano, my connected external MIDI sound source does not sound. | 1. This digital piano's send channel does not match the send channel of the external MIDI sound source.2. The volume or expression setting of the external sound source is “0”. | 1. Configure the digital piano and the external MIDI sound source to their send channels match.2. Adjust the volume and expression settings of the external sound source. | E-27External sound source user's guide |
| Auto Accompaniment does not sound. | The accompaniment volume setting is “000”. | Use the ACCOMP/SONG VOLUME button to increase accompaniment volume. | E-13 |
| The sound output by the digital piano does not change regardless of how much keyboard pressure I use. | Touch Response is turned off. | Use the SETTING button to turn on Touch Response. | E-26 |
| When playing together with another MIDI instrument, keys and tunings do not match. | The Tuning or Transpose setting of the digital piano is something other than “00”. | Use the TRANSPOSE/KEY CONTROL button or the SETTING button to change the transpose and tuning settings to “00”. | E-21, 26 |
| I am not able to record Auto Accompaniment or rhythm patterns. | Track 2 (melody-only track), is specified as the recording track. | In record standby, use the TRACK button to select Track 1. | E-22 |
| When connected to a computer over a MIDI connection, playing on the keyboard produces unnatural sounds. | The computer's MIDI THRU function is turned on. | Turn off MIDI THRU on the computer, or use the digital piano's CONTROL button to turn off Local Control. | E-27 |
| I can't record chord accompaniment data on my computer. | Accomp MIDI OUT is turned off. | Use the SETTING button to turn on Accomp MIDI OUT. | E-27 |
| The microphone does not work. | 1. The microphone volume setting is too low.2. The microphone's switch is turned off. | 1. Increase microphone volume.2. Turn on the microphone's switch. | E-20E-20 |
| There is noise in the microphone output. | Nearby fluorescent lighting or other digital noise source. | Move the microphone away from the source of the noise. | E-20 |
429A-E-037A
Troubleshooting
| Problem | Cause | Action | See Page |
| I can't store data on a memory card. | 1. The card is write-protected. 2. The card is not inserted correctly into the card slot. 3. There is not enough room available on the card. 4. The card has voltage specifications or a capacity that is not supported by this digital piano. 5. There is something wrong with the card. | 1. Remove the write protect sticker from the card. 2. Correctly insert the card into the slot. 3. Use a different card or delete files you no longer need. 4. Use a card of the specified voltage specifications and capacity. 5. Use a different card. | E-29 E-30 E-32 E-29 |
| I can't load data from a memory card. | 1. The card is not inserted correctly into the card slot. 2. There is not enough room in the area into which you are trying to load the data. 3. The card has voltage specifications or a capacity that is not supported by this digital piano. 4. There is something wrong with the card. | 1. Correctly insert the card into the slot. 2. Make more room in digital piano memory by deleting downloaded songs, and/or Song Memory data. 3. Use a card of the specified voltage specifications and capacity. 4. Use a different card. | E-29 E-25, 28 E-29 |
| I can hear sound through only one side of my headphones. | The headphones plug is not inserted all the way into the PHONES jack. | Push the headphones plug into the jack as far as it will go. | E-4 |

E-36
Assembly Instructions
CAUTION
- Take particular care to avoid injury when installing legs and pedals, and when mounting the keyboard onto the stand.
- When assembling, make sure that the sliding keyboard cover of the digital piano body is completely closed. If the cover is left open during assembly, it may close suddenly causing the fingers to be pinched between the digital piano body and cover.
IMPORTANT!
- Be sure to assemble the stand on a flat surface.
- This stand does not include any of the tools required to assemble it. You should have a large Phillips head (+) screwdriver on hand for assembly.
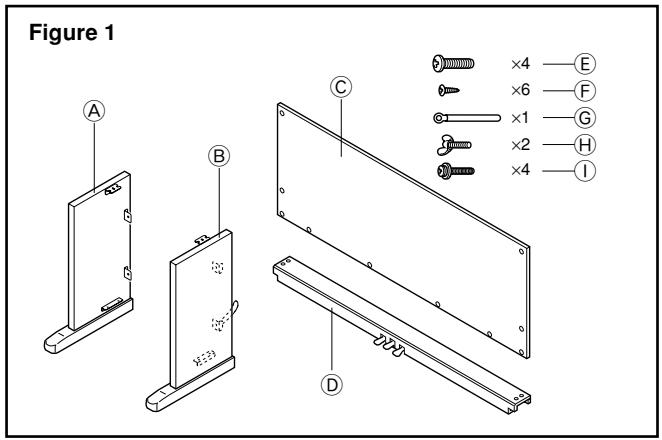
- Check the items that come with the unit to make sure that everything shown in Figure 1 (A through ①) is included. All screws are in a plastic bag inside of the packing cardboard.
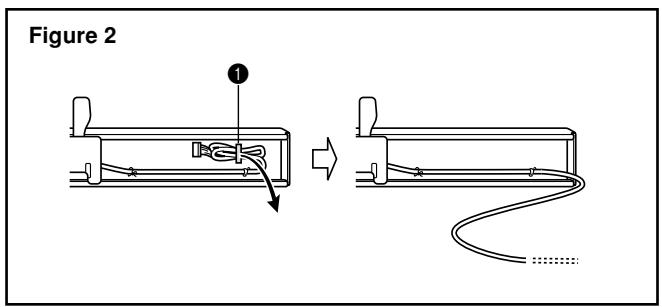
- Before starting actual assembly of the stand, undo the clip at location ① (Figure 2) where the pedal cable comes out the back of crosspiece ⑥.
1 Assembling the stand
Refer to Figures 3, 4 and 5 as you assemble the stand according to the following procedure.
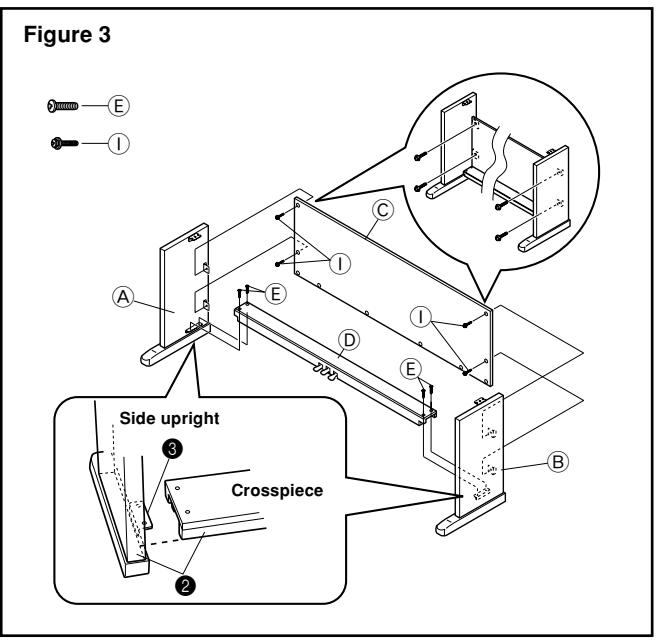
1 Attach side uprights A and B to crosspiece D using the four E screws (Figure 3).
- When joining the two pieces marked 2, the metal pieces 3 on the insides of side uprights A and B should fit into the slots at the ends of crosspiece D. Make sure the metal pieces are pushed into the slots as far as they will go. If they are not, the metal pieces 5 and the screws E will not match up correctly, which can cause stripping of the screws.
429A-E-039A
Assembly Instructions
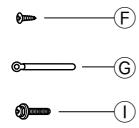
Figure 4
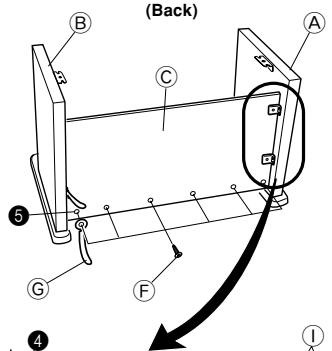
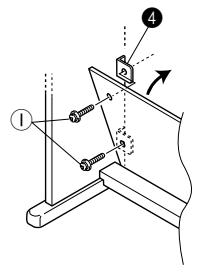
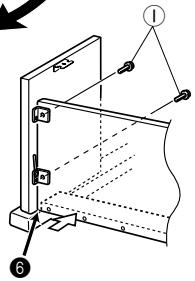
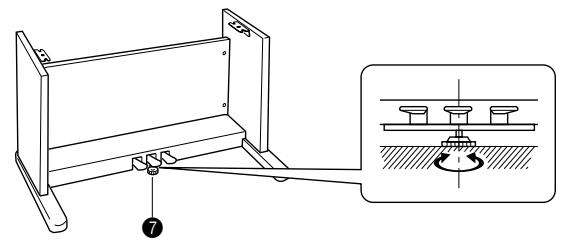
Figure 5

Rotate height adjustment screw ⑦ until it supports crosspiece ①, preventing the crosspiece from bending when you press the pedals (Figure 5).
IMPORTANT!
- Be sure to rotate adjustment screw ⑦ and perform the adjustment procedure described above before depressing the pedals. Failure to do so can result in damage to crosspiece ⑤ .
2 Attach back panel to the 4 brackets and crosspiece D.Note that the back panel should be installed so it is in front of the 4 brackets (Figure 4). Use the four ① screws, six F screws to secure the back panel in place (Figures 3 and 4). Note that you must also install the 6 clip at this time as shown in the illustration.
- First, install the topmost ① screws on the left and right sides of the back panel ⑥. Note that you should slip the ⑤ clip onto the F screw at point ⑤ before you screw in the F screw.
- The back panel should rest on the feet of side uprights and as indicated by in the illustration. Press the back panel against crosspiece while installing the ① screws.
2 Installing the Keyboard onto the Stand
CAUTION
- Take care that you do not pinch your fingers between the keyboard and stand!
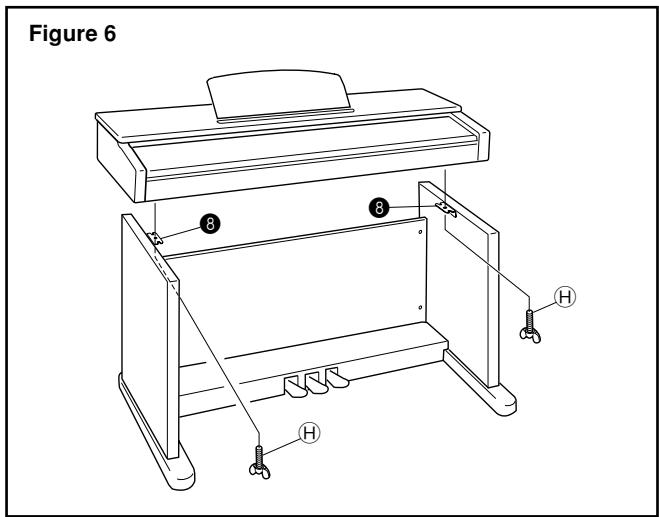
Be sure that you securely anchor the keyboard to the stand using the butterfly bolts (Figure 6).
- Slide the screws on the bottom of the keyboard into the slots in the two angle brackets 3. Next, secure the keyboard to the stand with two butterfly bolts (Figure 7).
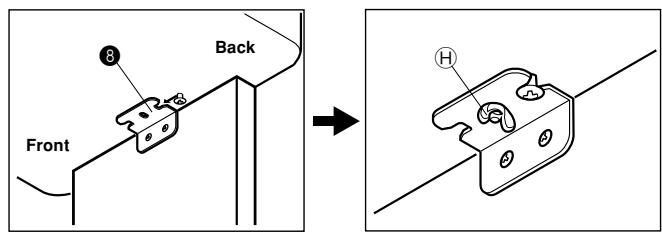
Figure 7
- The butterfly bolts keep the keyboard from falling from the stand. Be sure that you always secure the keyboard with the butterfly bolts.
3 Connecting the Pedal
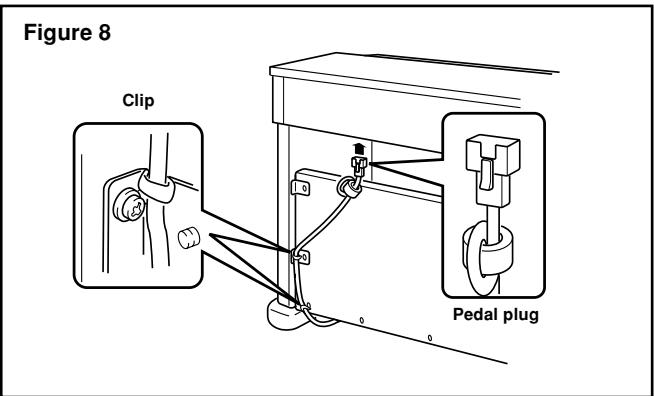
Position the pedal plug as shown in Figure 8 and insert it into the pedal connector on the bottom of the digital piano. Secure the pedal cable to the upright of the stand using the clips (Figure 8).
429A-E-041A
Assembly Instructions
4 Connecting to a Power Supply
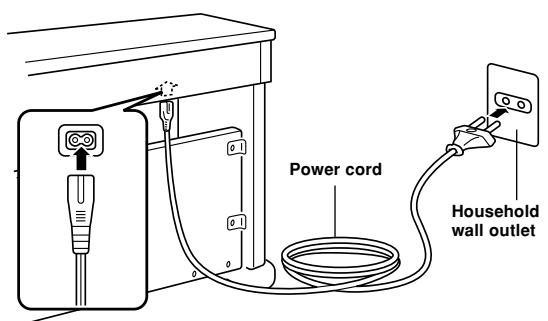
Figure 9
1 Check to make sure that the digital piano's POWER button is in the OFF position. If it is ON, press the button to switch it OFF.
2 Attach the power cord that comes with the digital piano to the bottom of the digital piano.*
Plug the digital piano's power cord into a wall outlet (Figure 9).
- applies to the AP-80RV.
IMPORTANT!
- The shapes of the digital piano's power cord and wall outlet should be different according to countries or regions. The illustrations are examples.
- With the AP-80R, the power cord is hard-wired to the bottom of the instrument.
CAUTION
- The screws that you use to assemble the stand may become loose after a long period due to changes in temperature and humidity, or vibration caused by normal use, etc. Periodically check the screws used to fasten the stand and the butterfly bolts used to fasten the stand and the digital piano, and tighten them whenever necessary.
Power Outlet
- To power the digital piano, use a power outlet that allows easy access when plugging in or unplugging the power cord.
Attachment of the Score Stand
Install the music stand by inserting its pegs into the holes in the top of the piano.
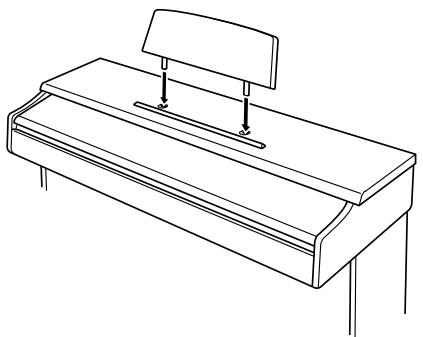
Specifications
All of the items in these specifications apply to the AP-80R and AP-80RV, unless specifically noted otherwise.
| Models: | AP-80R/AP-80RV |
| Keyboard: | 88 piano keys (with touch response) |
| Polyphony: | 32 notes, maximum |
| Tones: | 120 panel tones + 128 GM tones + 10 drum sets; with layer and split |
| Digital Effects: | Reverb (4 types), Chorus (4 types) |
| Metronome: | • Time Signatures: 0, 2, 3, 4, 5, 6 • Tempo Range: 20 to 255 |
| Auto Accompaniment: | • Number of Rhythms: 120 • Tempo Range: 20 to 255 • Modes: Normal; CASIO CHORD; FINGERED; FULL RANGE CHORD • Accompaniment Volume: Adjustable • One Touch Presets: Optimal tone, tempo, layer/auto harmonize on/off settings to match rhythm • Auto Harmonize: 12 types; adds harmony notes to melody in accordance with auto accompaniment chord fingerings. |
| Built-in Tunes: | • Number of Tunes: Piano Group 50 + Song Group 30 + 10 loaded song data (Approximately 132 kilobytes) • Tempo: 20 to 255 • Demo: Sequential looping of all 80 preset tunes • Song Volume: Adjustable |
| Lesson Function: | Lesson Part: Left hand, right hand |
| Song Memory: | • Number of Songs: Two (1 Song Recording, 1 Free Recording) • Recorded Data: Song Recording: Right-hand part, left-hand part, both-hand parts Free Recording: Track 1 (chord accompaniment), Track 2 (melody) • Recording Method: Real-time • Memory Capacity: Approximately 5,300 notes (two songs) |
| Pedals: | Damper, Soft, Sostenuto |
| Registration Memory: | Number of Memory Areas: 16 (4 sets × 4 banks) |
| Card Slot: | 3.3V SmartMedia™ |
| Other Functions: | • Touch: 3 types, off • Transpose: 1 octave (F# to C to F) • Tuning: A4 = 440.0Hz ±50 cents (adjustable) • Display Contrast: Adjustable |
| MIDI: | 16 multi-timbre receive, GM Level 1 standard |
| Input/Output: | • Headphones: Stereo standard jacks × 2 Output Impedance: 170Ω Output Voltage: 1.1V (RMS) MAX • LINE OUT (R)(L/MONO): Standard jacks × 2 Output impedance: 2.3kΩ Output voltage: 1.0V (RMS) MAX • MIC IN: Standard jack Input impedance: 3.3kΩ Input voltage: 10mV • MIDI (OUT) (IN) • USB port |
| Speakers: | φ16 cm × 2 + φ5 cm × 2 (Output: 20W + 20W) |
| Power Supply: | AP-80R: 120V AP-80RV: 220-240V |
| Power Consumption: | AP-80R: 60W AP-80RV: 60W |
| Dimensions: | • Digital Piano (without stand): 138.0 × 47.6 × 24.4 cm (543/8 × 183/4 × 95/8 inch) • Digital Piano: 138.1 × 47.7 × 84.6 cm (547/16 × 1813/16 × 335/16 inch) |
| Weight: | • Digital Piano (without stand): approximately 41.6 kg (91.7 lbs) • Digital Piano: Approximately 54.0 kg (119.0 lbs) |
- Design and specifications are subject to change without notice.
- AP-80R has hardwired power cords.
- AP-80RV has detachable power cords.
429A-E-043A
Appendix/Apéndice
Tone List/Lista de sonidos
- FOR PIANO group rhythms 10 through 19 consist of chord accompaniments only, without any drums or other percussion instruments. These rhythms do not sound unless CASIO CHORD, FINGERED, or FULL RANGE CHORD is selected as the accompaniment mode. With such rhythms, make sure that CASIO CHORD, FINGERED, or FULL RANGE CHORD is selected before you try playing chords.
NOTA
| Key/Note Number | STANDARD SET 1 | STANDARD SET 2 | ROOM SET | POWER SET | ELECTRONIC SET | SYNTH SET 1 | SYNTH SET 2 | JAZZ SET | BRUSH SET | ORCHESTRA SET | |
| E1 28 | E1 27 | High Q | ← | ← | ← | ← | ← | ← | ← | Closed Hi-Hat | |
| Slap | ← | ← | ← | ← | ← | ← | ← | Pedal Hi-Hat | |||
| F1 29 | F1 30 | Scratch Push | ← | ← | ← | ← | ← | ← | ← | Open Hi-Hat | |
| Scratch Pull | ← | ← | ← | ← | ← | ← | ← | Ride Cymbal 1 | |||
| G1 31 | Sticks | ← | ← | ← | ← | ← | ← | ← | ← | ← | |
| A1 32 | Square Click | ← | ← | ← | ← | ← | ← | ← | |||
| A1 33 | Meitrone Click | ← | ← | ← | ← | ← | ← | ← | ← | ← | |
| B1 34 | Meitrone Bell | ← | ← | ← | ← | ← | ← | ← | |||
| B1 35 | Standard Kick 2 | Standard2 Kick 2 | Room Kick 2 | Power Kick 2 | Electric Kick 2 | Synth1 Kick 2 | Synth2 Kick 2 | Jazz Kick 2 | Jazz Kick 2 | Jazz Kick 1 | |
| C2 36 | Standard1 Kick 1 | Standard2 Kick 1 | Room Kick 1 | Power Kick 1 | Electric Kick 1 | Synth1 Kick 1 | Synth2 Kick 1 | Jazz Kick 1 | Jazz Kick 1 | Concert BD 1 | |
| Side Stick | ← | ← | ← | Synth1 Rim Shot | ← | ← | ← | ← | |||
| D2 38 | Standard Snare 1 | Standard2 Snare 1 | Room Snare 1 | Power Snare 1 | Electric Snare 1 | Synth1 Snare 1 | Synth2 Snare 1 | Jazz Snare 1 | Brush Snare 1 | Concert SD | |
| Hand Clap 1 | Hand Clap 2 | ← | ← | Hand Clap 2 | ← | ← | Brush Slap | Castanets | |||
| E2 40 | Standard Snare 2 | Standard2 Snare 2 | Room Snare 2 | Power Snare 2 | Electric Snare 2 | Synth1 Snare 2 | Synth2 Snare 2 | Jazz Snare 2 | Brush Snare 2 | Concert SD | |
| Low Tom 2 | ← | Room Low Tom 2 | Power Low Tom 2 | Synth1 Low Tom 2 | ← | ← | ← | Timpani F | |||
| F2 41 | F2 42 | Closed Hi-Hat | ← | ← | ← | Synth1 Closed HH 1 | ← | ← | ← | Timpani F# | |
| G2 43 | Low Tom 1 | ← | Room Low Tom 1 | Power Low Tom 1 | Electric Low Tom 1 | Synth1 Low Tom 1 | ← | ← | ← | Timpani G | |
| Pedal Hi-Hat | ← | ← | ← | Synth1 Closed HH 2 | ← | ← | ← | Timpani G# | |||
| A2 45 | Mid Tom 2 | ← | Room Mid Tom 2 | Power Mid Tom 2 | Electric Mid Tom 2 | Synth1 Mid Tom 2 | ← | ← | ← | Timpani A | |
| Open Hi-Hat | ← | ← | ← | Synth1 Open HH | ← | ← | ← | Timpani A# | |||
| B2 47 | Mid Tom 1 | ← | Room Mid Tom 1 | Power Mid Tom 1 | Electric Mid Tom 1 | Synth1 Mid Tom 1 | ← | ← | ← | Timpani B | |
| High Tom 2 | ← | Room High Tom 2 | Power High Tom 2 | Synth1 High Tom 2 | ← | ← | ← | Timpani c | |||
| C3 48 | C3 49 | Crash Cymbal 1 | ← | ← | ← | Synth1 Crash Cymbal | ← | ← | ← | Timpani c# | |
| D3 50 | High Tom 1 | ← | Room High Tom 1 | Power High Tom 1 | Electric High Tom 1 | Synth1 High Tom 1 | ← | ← | ← | Timpani d | |
| Ride Cymbal 1 | ← | ← | ← | Synth1 Ride Cymbal | ← | ← | ← | Timpani d# | |||
| E3 52 | Chinese Cymbal | ← | ← | ← | Reverse Cymbal | ← | ← | ← | ← | Timpani e | |
| Ride Bell | ← | ← | ← | ← | ← | ← | ← | Timpani f | |||
| F3 53 | F3 54 | Tambourine | ← | ← | ← | Synth1 Tambourine | ← | ← | ← | ← | |
| Splash Cymbal | ← | ← | ← | ← | ← | ← | ← | ← | |||
| A3 56 | Cowbell | ← | ← | Synth1 Cowbell | Synth1 Cowbell | ← | ← | ← | |||
| A3 57 | Crash Cymbal 2 | ← | ← | ← | ← | ← | ← | ← | ← | Concert Cymbal 2 | |
| Vibraslap | ← | ← | ← | ← | ← | ← | ← | ← | |||
| B3 59 | Ride Cymbal 2 | ← | ← | ← | ← | ← | ← | ← | ← | Concert Cymbal 1 | |
| High Bongo | ← | ← | ← | Synth1 High Bongo | ← | ← | ← | ← | |||
| Low Bongo | ← | ← | ← | Synth1 Low Bongo | ← | ← | ← | ← | |||
| C4 60 | C4 61 | Mute High Conga | ← | ← | ← | Synth1 Mute Hi Conga | ← | ← | ← | ← | |
| E4 63 | Open High Conga | ← | ← | Synth1 Open Hi Conga | ← | ← | ← | ← | |||
| Open Low Conga | ← | ← | ← | Synth1 Open Low Conga | ← | ← | ← | ← | |||
| F4 65 | High Timbale | ← | ← | ← | ← | ← | ← | ← | ← | ← | |
| Low Timbale | ← | ← | ← | ← | ← | ← | ← | ← | |||
| G4 67 | High Apogo | ← | ← | ← | ← | ← | ← | ← | ← | ← | |
| Low Agogo | ← | ← | ← | ← | ← | ← | ← | ← | |||
| A4 69 | A4 68 | Low Agogo | ← | ← | ← | ← | ← | ← | ← | ← | |
| Cabasa | ← | ← | ← | ← | ← | ← | ← | ← | |||
| B4 71 | Maracas | ← | ← | ← | ← | Synth1 Maracas | Synth1 Maracas | ← | ← | ← | |
| Short High Whistle | ← | ← | ← | ← | ← | ← | ← | ← | |||
| C5 72 | Long Low Whistle | ← | ← | ← | ← | ← | ← | ← | ← | ← | |
| Short Guiro | ← | ← | ← | ← | ← | ← | ← | ← | |||
| D5 74 | Long Guiro | ← | ← | ← | ← | ← | ← | ← | ← | ← | |
| E5 75 | Claves | ← | ← | Synth1 Claves | Synth1 Claves | ← | ← | ← | |||
| E5 76 | High Wood Block | ← | ← | ← | ← | ← | ← | ← | ← | ← | |
| Low Wood Block | ← | ← | ← | ← | ← | ← | ← | ← | |||
| F5 77 | F5 78 | Mute Cuica | ← | ← | ← | ← | ← | ← | ← | ← | |
| Open Cuica | ← | ← | ← | ← | ← | ← | ← | ← | |||
| Mute Triangle | ← | ← | ← | ← | ← | ← | ← | ← | |||
| Open Triangle | ← | ← | ← | ← | ← | ← | ← | ← | |||
| B4 71 | Shaker | ← | ← | ← | ← | ← | ← | ← | ← | ← | |
| Jingle Bell | ← | ← | ← | ← | ← | ← | ← | ← | |||
| Bell Tree | ← | ← | ← | ← | ← | ← | ← | ← | |||
| Castanets | ← | ← | ← | ← | ← | ← | ← | ← | |||
| Mute Surdo | ← | ← | ← | ← | ← | ← | ← | ← | |||
| Open Surdo | ← | ← | ← | ← | ← | ← | ← | ← | |||
| Applause | ← | ← | ← | ← | ← | ← | ← | ← | |||
429A-E-091A
Fingered Chord Chart/Cuadro de acordes digitados (Fingered)
| Chord Type Root | aug | sus4 | 7sus4 | m add9 | mM7 | 75 | add9 |
| C | |||||||
| C#/D# | |||||||
| D | |||||||
| (D#)/E# | |||||||
| E | |||||||
| F | |||||||
| F#/G# | |||||||
| G | |||||||
| (G#)/A# | |||||||
| A | |||||||
| (A#)/B# | |||||||
| B |
| Chord type Root | M | m | 7 | m7 | dim7 | M7 | dim | \( {\mathrm{m}}^{7}{}^{15} \) |
| C | ||||||||
| \( C^{\ddagger }/\left( {D}^{b}\right) \) | ||||||||
| D | ||||||||
| \( \left( {D}^{b}\right) /E^{b} \) | ||||||||
| E | ||||||||
| F | ||||||||
| \( F^{\ddagger }/\left( {G}^{b}\right) \) | ||||||||
| G | ||||||||
| \( \left( {G}^{b}\right) /A^{b} \) | ||||||||
| A | ||||||||
| \( \left( {A}^{b}\right) /B^{b} \) | ||||||||
| B |
Appendix/Apéndice
A-6
Operational Precautions
Locating the Unit
Avoid the following locations.
- Areas exposed to direct sunlight and high humidity
- Areas subjected to very low temperatures
- Near a radio, TV, video deck, or tuner (unit can cause interference with audio or video signals)
Care of the Unit
- Never use benzene, alcohol, thinner or other such chemicals to clean the exterior of the unit.
- To clean the keyboard, use a soft cloth dampened with a weak solution of a mild neutral detergent and water. Wring out all excess moisture from the cloth before wiping.
Memory Protection
A built-in lithium battery supplies the power required to retain digital piano settings and memory contents when power is turned off. Should the lithium battery go dead, settings and memory contents (Song Memory data, registration memory data, user songs, display contrast setting, etc.) will be lost whenever you turn off digital piano power. Note that the original built-in lithium battery has a life of about five years from the date the digital piano was manufactured. Be sure to periodically contact your retailer or authorized service provider to have the lithium battery replaced. Note that you will be charged separately for lithium battery replacement.
- Note that CASIO COMPUTER CO., LTD. shall not be held liable for any damages or losses or any claims by third parties arising from corruption or loss of data caused by malfunction or repair of the unit, or from battery replacement.
You may notice lines in the finish of the case of this product. These lines are the result of the molding process used to shape the plastic of the case. They are not cracks or breaks in the plastic, and are no cause for concern.
NOTE
- Unauthorized reproduction of this manual in its entirety or in part is expressly forbidden. All rights reserved.
- CASIO COMPUTER CO., LTD. shall not be held liable for any damages or losses or any claims by third parties arising from use of this product or this manual.
- The contents of this manual are subject to change without notice.
Mode 1: OMNI ON, POLY
Mode 3: OMNI OFF, POLY
Mode 2: OMNI ON, MONO
Mode 4: OMNI OFF, MONO
O:Yes
X:No
429A-E-095A

This recycle mark indicates that the packaging conforms to the environmental protection legislation in Germany.
- IMPORTANT SAFETY INSTRUCTIONS
- CAUTION
- Contents
- General Guide. E-2
- Connections E-4
- Selecting and Using Built-in Tones...... E-6
- Playing a Rhythm . E-10
- Using Registration Memory .E-15
- Playing Back Built-in Tunes... E-17
- Using a Microphone for Sing Along .... E-20
- Recording Your Keyboard Play ......... E-22
- Other Settings E-26
- Using a Memory Card .E-29
- Troubleshooting E-35
- Assembly Instructions. E-37
- Specifications. E-41
- Appendix A-1
- Operational Precautions A-7
- MIDI Implementation Chart
- General Guide
- MUSIC LIBRARY
- [Front]
- [Bottom]
- NOTE
- Memory Protection
- Connections
- IMPORTANT!
- Connecting Headphones
- Connecting an audio or musical instrument amplifier
- NOTICE
- FCC WARNING
- Connecting to Audio Equipment 1
- Connecting to a Musical Instrument Amplifier ②
- Accessories and Options
- Selecting and Using Built-in Tones
- Tone Type
- Selecting a Tone
- Using Tone Effects
- Layering Two Tones
- Adjusting the Volume of the Layered Tone
- Splitting the Keyboard between Two Tones
- To specify the keyboard split point
- Using Layer and Split Together
- Using the Pedals
- Pedal functions
- - Damper pedal
- - Soft pedal
- Sostenuto pedal
- Using the Metronome
- Playing a Rhythm
- To adjust the tempo of rhythm play
- Using Auto Accompaniment
- Using the MODE Button
- To play with Auto Accompaniment
- Getting Ready
- How to Play Chords
- ■NORMAL
- CASIO CHORD
- CASIO CHORD Mode Keyboard
- ■ FINGERED
- ■FULL RANGE CHORD
- FULL RANGE CHORD Mode Keyboard
- Adjusting the Volume of Accompaniment, Tune, and Memory Card Playback
- Press the ACCOMP/SONG VOLUME button.
- Use the dial to adjust the volume level.
- Using Auto Harmonize
- To play with Auto Harmonize
- Use the MODE button to select the CASIO CHORD or FINGERED mode. This turns on Auto Accompaniment.
- Press the AUTO HARMONIZE button.
- Use the dial to select the Auto Harmonize type you want to use.
- Start Auto Accompaniment play, and play something in the melody area of the keyboard.
- To turn off Auto Harmonize, press the AUTO HARMONIZE button again.
- Auto Harmonize Types
- Using One-Touch Preset
- To apply One-Touch Preset settings
- Using Registration Memory
- What is registration memory?
- Registration Memory Setup Data
- How registration memory organizes its data
- To store a setup in registration memory
- WARNING
- To recall a setup from registration memory
- Playing Back Built-in Tunes
- Playing Back a Piano Group Tune
- Playing Back a Song Group Tune
- AdjustingPlaybackTempo
- Pausing Playback
- Skipping Back through a Tune
- Skipping Forward through a Tune
- Looping a Musical Phrase
- Changing the Melody Tone of a Tune
- Playing All of the Built-in Tunes
- Playing Tunes You Download from the Internet
- Playing Music Data from a Memory Card
- Practicing a Built-in Tune
- Using a Microphone for Sing Along
- Using the Microphone Jack
- To sing along with playback
- Press the button to start playback.
- You can use the TRANSPOSE/KEY CONTROL and buttons to change the key of the song.
- When you want to stop playback, press the button again.
- NOTE To return the tune to its default key "00", press both of the TRANSPOSE/KEY CONTROL buttons ( and ) at the same time in step 6 of the above procedure.
- Using Microphone Echo
- Press the ECHO button to toggle the microphone echo on and off.
- NOTE The microphone echo is turned on automatically whenever you turn on digital piano power.
- Using Transpose
- Press the RHYTHM button to enter the rhythm mode.
- Use the TRANSPOSE/KEY CONTROL and buttons to change the key of the digital piano.
- NOTE The transpose setting range is -12 (1 octave down) to +12 (1 octave up).
- Recording Your Keyboard Play
- Recordable Data, Parts, and Tracks
- Using the SONG MEMORY Button
- Selecting Parts and Tracks
- - DuringPlayback Standby
- During Record Standby
- Song Memory Capacity
- Recorded Data Storage
- Recording Your Practice (Song Recording)
- Song Recording Data
- Playing Back a Song Recording
- Recording a Performance (Free Recording)
- Free Recording Track 1 Data
- Track 1 Free Recording Variations
- To record without rhythm
- To start recording with synchro start
- - To start recording with an intro using synchro start
- - To start Auto Accompaniment part way into a recording
- - To insert an ending or fill-in into a recording
- Playing Back a Free Recording
- Press the START/STOP button.
- Over dubbing a Free Recording
- Free Recording Track 2 Data
- Deleting a Specific Part/Track
- Other Settings
- Keyboard Touch
- Keyboard Tuning
- Layer Tone Volume
- Display Contrast
- To configure other settings
- Using MIDI
- What is MIDI?
- MIDI Connections
- Configuring MIDI Settings
- - Send Channel
- Local Control
- Accomp MIDI Out
- USB Mode and MIDI Mode
- USB Mode/MIDI Mode Switching
- USB Mode
- MIDI Mode
- Expanding the Number of Built-in Tunes
- CASIO MUSIC SITE
- Deleting a User Song
- Using a Memory Card
- Memory Cards
- Memory Card and Card Slot Handling Precautions
- Loading a Memory Card into the Card Slot
- Removing a Memory Card from the Card Slot
- Saving Files to a Memory Card
- To save a file to a memory card
- Loading a File from a Memory
- To load file data from a memory card
- Renaming a Memory Card File
- To rename a file on a memory card
- Deleting a Memory Card File
- To delete a file from a memory card
- Formatting a Memory Card
- To format a memory card
- Supported Input Characters
- Troubleshooting
- Assembly Instructions
- Assembling the stand
- Installing the Keyboard onto the Stand
- Connecting the Pedal
- Connecting to a Power Supply
- Power Outlet
- Attachment of the Score Stand
- Specifications
- Appendix/Apéndice
- Tone List/Lista de sonidos
- NOTA
- Operational Precautions
- Locating the Unit
- Care of the Unit
Brand : CASIO
Model : CELVIANO AP-80R
Category : Digital piano