
DPB181Z - Saw MAKITA - Free user manual and instructions
Find the device manual for free DPB181Z MAKITA in PDF.


| Product Type | Cordless Band Saw |
| Model | DPB181Z |
| Brand | Makita |
| Power Source | 18 V Li-ion Battery (sold separately) |
| Battery System | Makita LXT |
| Blade Speed | Variable, 0-390 ft/min (0-120 m/min) |
| Cutting Capacity (Round) | 80 mm (3-1/8 in) |
| Cutting Capacity (Rectangular) | 80 mm x 80 mm |
| Blade Length | 1060 mm (41.7 in) |
| Dimensions (L x W x H) | 450 x 200 x 250 mm (17.7 x 7.9 x 9.8 in) |
| Weight (without battery) | 4.5 kg (9.9 lbs) |
| Variable Speed Trigger | Yes |
| Tool-less Blade Change | Yes |
| Spindle Lock | Yes |
| Lock-off Button | Yes |
| Double Insulated | Yes |
| Maintenance & Cleaning | Wipe with a dry cloth; keep ventilation slots clear |
| Spare Parts | Blades, brush set, battery, charger |
| Reparability | Replacement parts available; consult service center |
| Intended Use | Cutting metal and plastic pipes and profiles |
Frequently Asked Questions - DPB181Z MAKITA
User questions about DPB181Z MAKITA
0 question about this device. Answer the ones you know or ask your own.
Ask a new question about this device
Download the instructions for your Saw in PDF format for free! Find your manual DPB181Z - MAKITA and take your electronic device back in hand. On this page are published all the documents necessary for the use of your device. DPB181Z by MAKITA.
USER MANUAL DPB181Z MAKITA
natural_image
Technical line drawing of a mechanical device with no visible text or symbols

1

2

3
014187
4
5

6
014190
7

8
9
014192
1

1

1
014197
natural_image
Simple line drawing of two stick figures with symbols: one with a circle and 'W' on top, the other with an 'X' above a rectangle (no text or labels)1 3
1 4
natural_image
Line drawing of a robotic device with hands operating it (no text or symbols)004747
1 5
014195
natural_image
Technical line drawing of a mechanical assembly with hands operating a device (no text or symbols visible)1 6
014193
ENGLISH (Original instructions)
Explanation of general view
| 1-1. Battery cartridge | 5-2. Loosen | 9-2. Screws |
| 1-2. Button | 5-3. Lever | 9-3. Blade |
| 1-3. Red indicator | 6-1. Lower holder | 10-1. Hook |
| 2-1. Star marking | 6-2. Upper holder | 10-2. Screws |
| 3-1. Trigger-lock button | 7-1. Bottom bearing | 11-1. Axis |
| 3-2. Switch trigger | 8-1. Wheel | 12-1. Stop ring |
| 4-1. Lamp | 8-2. Rubber tire | 16-1. Cutting wax |
| 5-1. Tighten | 9-1. Stopper plate |
SPECIFICATIONS
| Model | DPB181 | |
| Max. cutting capacity | Round workpiece 64 mm | dia. |
| Rectangular workpiece 64 mm x 64 mm | ||
| Blade speed 3.2 m/s | ||
| Blade size | Length | 835 |
| Width | 13 | |
| Thickness | 0.5 | |
| Overall dimensions (L x W x H) 468 mm x 197 mm x 233 mm | ||
| Net weight 3.2 kg | ||
| Rated voltage D.C. 18 V | ||
- Due to our continuing program of research and development, the specifications herein are subject to change without notice.
- Specifications and battery cartridge may differ from country to country.
- Weight, with battery cartridge, according to EPTA-Procedure 01/2003
ENE088-1
Intended use
The tool is intended for cutting in plastic and ferrous materials.
ENG905-1
Noise
The typical A-weighted noise level determined according to EN60745:
Sound pressure level ( L_pA ): 78 dB (A)
Uncertainty (K) : 1.5 dB (A)
The noise level under working may exceed 80 dB (A).
Wear ear protection
ENG900-1
Vibration
The vibration total value (tri-axial vector sum) determined according to EN60745:
Work mode : cutting metal
Vibration emission ( a_h,CM ): 2.5 m/s ^2 or less
Uncertainty (K) : 1.5 m/s²
ENG901-1
- The declared vibration emission value has been measured in accordance with the standard test method and may be used for comparing one tool with another.
- The declared vibration emission value may also be used in a preliminary assessment of exposure.
WARNING:
- The vibration emission during actual use of the power tool can differ from the declared emission value depending on the ways in which the tool is used.
- Be sure to identify safety measures to protect the operator that are based on an estimation of exposure in the actual conditions of use (taking account of all parts of the operating cycle such as the times when the tool is switched off and when it is running idle in addition to the trigger time).
ENH101-17
For European countries only
EC Declaration of Conformity
Makita declares that the following Machine(s):
Designation of Machine:
Cordless Portable Band Saw
Model No./ Type: DPB181
Conforms to the following European Directives:
2006/42/EC
They are manufactured in accordance with the following standard or standardized documents:
EN60745
The Technical file in accordance with 2006/42/EC is available from:
Makita, Jan-Baptist Vinkstraat 2, 3070, Belgium
9.4.2013
000331
Yasushi Fukaya
Director
Makita, Jan-Baptist Vinkstraat 2, 3070, Belgium
GEA010-1
General Power Tool Safety Warnings
WARNING Read all safety warnings and all instructions. Failure to follow the warnings and instructions may result in electric shock, fire and/or serious injury.
Save all warnings and instructions for future reference.
GEB065-2
CORDLESS PORTABLE BAND SAW SAFETY WARNINGS
- Hold power tool by insulated gripping surfaces, when performing an operation where the cutting accessory may contact hidden wiring. Cutting accessories contacting a "live" wire may make exposed metal parts of the power tool "live" and could give the operator an electric shock.
- Use only blades which are listed in "SPECIFICATIONS".
- Check the blade carefully for cracks or damage before operation. Replace cracked or damaged blade immediately.
- Secure the workpiece firmly. When cutting a bundle of workpieces, be sure that all workpieces are secured together firmly before cutting.
- Cutting workpieces covered with oil can cause the blade to come off unexpectedly. Wipe off all excess oil from workpieces before cutting.
- Never use the cutting oil as a cutting lubricant. Use only Makita cutting wax.
- Do not wear gloves during operation.
- Hold the tool firmly with both hands.
- Keep hands away from rotating parts.
- When cutting metal, be cautious of hot flying chips.
- Do not leave the tool running unattended.
- Do not touch the blade or the workpiece immediately after operation; they may be extremely hot and could burn your skin.
SAVE THESE INSTRUCTIONS.
WARNING:
DO NOT let comfort or familiarity with product (gained from repeated use) replace strict adherence to safety rules for the subject product. MISUSE or failure to follow the safety rules stated in this instruction manual may cause serious personal injury.
ENC007-8
IMPORTANT SAFETY INSTRUCTIONS
FOR BATTERY CARTRIDGE
- Before using battery cartridge, read all instructions and cautionary markings on (1) battery charger, (2) battery, and (3) product using battery.
- Do not disassemble battery cartridge.
- If operating time has become excessively shorter, stop operating immediately. It may result in a risk of overheating, possible burns and even an explosion.
- If electrolyte gets into your eyes, rinse them out with clear water and seek medical attention right away. It may result in loss of your eyesight.
- Do not short the battery cartridge:
(1) Do not touch the terminals with any conductive material.
(2) Avoid storing battery cartridge in a container with other metal objects such as nails, coins, etc.
(3) Do not expose battery cartridge to water or rain.
A battery short can cause a large current flow, overheating, possible burns and even a breakdown.
- Do not store the tool and battery cartridge in locations where the temperature may reach or exceed 50° C (122° F).
- Do not incinerate the battery cartridge even if it is severely damaged or is completely worn out. The battery cartridge can explode in a fire.
- Be careful not to drop or strike battery.
- Do not use a damaged battery.
- Follow your local regulations relating to disposal of battery.
SAVE THESE INSTRUCTIONS.
Tips for maintaining maximum battery life
-
Charge the battery cartridge before completely discharged.
Always stop tool operation and charge the battery cartridge when you notice less tool power. -
Never recharge a fully charged battery cartridge.
Overcharging shortens the battery service life.
-
Charge the battery cartridge with room temperature at 10^ C - 40^ C ( 50^ F - 104^ F). Let a hot battery cartridge cool down before charging it.
-
Charge the battery cartridge once in every six months if you do not use it for a long period of time.
FUNCTIONAL DESCRIPTION
CAUTION:
- Always be sure that the tool is switched off and the battery cartridge is removed before adjusting or checking function on the tool.
Installing or removing battery cartridge
Fig.1
CAUTION:
• Always switch off the tool before installing or removing of the battery cartridge.
- Hold the tool and the battery cartridge firmly when installing or removing battery cartridge. Failure to hold the tool and the battery cartridge firmly may cause them to slip off your hands and result in damage to the tool and battery cartridge and a personal injury.
To remove the battery cartridge, slide it from the tool while sliding the button on the front of the cartridge.
To install the battery cartridge, align the tongue on the battery cartridge with the groove in the housing and slip it into place. Insert it all the way until it locks in place with a little click. If you can see the red indicator on the upper side of the button, it is not locked completely.
CAUTION:
- Always install the battery cartridge fully until the red indicator cannot be seen. If not, it may accidentally fall out of the tool, causing injury to you or someone around you.
- Do not install the battery cartridge forcibly. If the cartridge does not slide in easily, it is not being inserted correctly.
Battery protection system
(Lithium-ion battery with star marking)
Fig.2
Lithium-ion batteries with a star marking are equipped with a protection system. This system automatically cuts off power to the tool to extend battery life.
The tool will automatically stop during operation if the tool and/or battery are placed under one of the following conditions:
- Overloaded:
The tool is operated in a manner that causes it to draw an abnormally high current.
In this situation, release the switch trigger on the tool and stop the application that caused the tool to become overloaded. Then pull the switch trigger again to restart.
If the tool does not start, the battery is overheated. In this situation, let the battery cool before pulling the switch trigger again.
- Low battery voltage:
The remaining battery capacity is too low and the tool will not operate. In this situation, remove and recharge the battery.
Switch action
Fig.3
CAUTION:
- Before installing the battery cartridge into the tool, always check to see that the switch trigger actuates properly and returns to the "OFF" position when released.
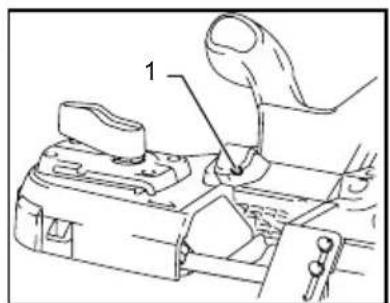
To prevent the switch trigger from accidentally pulled, the trigger-lock button is provided.
To start the tool, press the trigger-lock button from B side and pull the switch trigger.
Release the switch trigger to stop. After use, always press in the trigger-lock button from A side.
Lighting up the lamp
CAUTION:
- Do not look in the light or see the source of light directly.
Fig.4
Pull the switch trigger to light up the lamp. The lamp keeps on lighting while the switch trigger is being pulled. The lamp goes out just after releasing the trigger.
NOTICE:
- Do not apply impact to the lamp, which may cause damage or shorted service time to it.
- Use a dry cloth to wipe the dirt off the lens of lamp. Be careful not to scratch the lens of lamp, or it may lower the illumination.
- Do not use thinner or gasoline to clean the lamp. Such solvents may damage it.
ASSEMBLY
CAUTION:
- Always be sure that the tool is switched off and the battery cartridge is removed before carrying out any work on the tool.
Installing or removing the blade
CAUTION:
- Oil on the blade can cause the blade to slip or come off unexpectedly. Wipe off all excess oil with a cloth before installing the blade.
• Always wear protective gloves when handling the blade.
- Use caution when handling the blade to avoid cut by the sharp edge of the blade teeth.
- Keep your body away from the blade area when checking the blade movement.
- When turning the blade tightening lever clockwise to release the tension on the blade, point the tool downward because the blade may come off unexpectedly.
Fig.5
To install the blade:
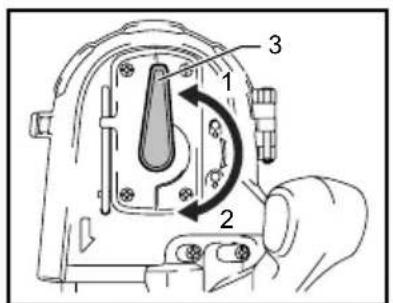
- Turn the blade tightening lever clockwise until it stops to loosen the wheel.
- Match the direction of the arrows on the blade and on the wheels.
Fig.6
Fig.7
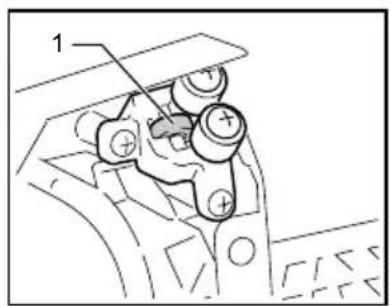
- Insert the non-serrated side of the blade into the upper holder and lower holder. Make sure the blade in both upper and lower holder touches to the bottom bearings.
Fig.8
- With pressing the middle part of the blade, position the blade around one wheel. Moving the wheel to A side makes it easier to do so.
- Position the blade on another wheel similarly.
- Position the edge of the blade on rubber tire.
- Hold the blade in place and turn the blade-tightening lever counterclockwise until it stops. This places proper tension on the blade.
Make sure that the blade is correctly positioned around the wheels.
Start and stop the tool two or three times to make sure that the blade runs properly on the wheels.
To remove the blade, follow the installation procedure in reverse.
Adjusting the stopper plate position
Fig.9
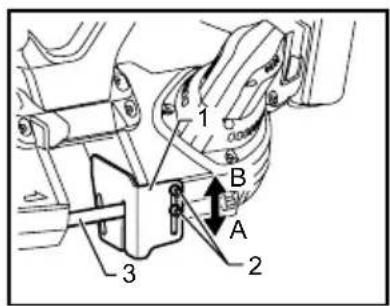
In the ordinary operation, protrude the stopper plate to the A side fully.
When the stopper plate strikes against the obstacles like a wall or the like at the finishing of a cut, loosen two screws and slide it to the B side in the figure.
After sliding the stopper plate, secure it by tightening two screws firmly.
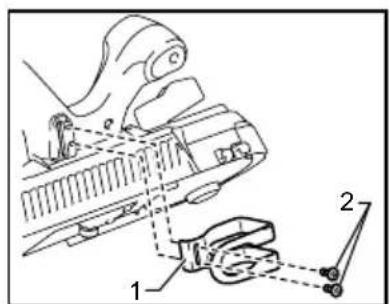
Hook (Optional accessory)
Fig.10
Hook is useful for hanging the tool. Hang tool on a pipe vice or other suitable, stable structure.
To install the hook, set the hook alongside the groove and tighten it with two screws.
Wheel cover (optional accessory)
To install the wheel cover:
- Put together the hinges of the wheel cover and the tool.
Fig.11
- Insert the axes.
Fig.12
- Fasten the axes by the stop rings.
- Lock the wheel cover.
NOTICE:
When opening the wheel cover, press and open both the stoppers simultaneously. Opening only one stopper may cause crack on the wheel cover.
OPERATION
CAUTION:
- Always hold front and rear handle. Never hold the tool body or guards. Hands may slip from these locations and contact blade. Contact with the blade may result in personal injury.
- Make sure to hold the tool firmly when turning on or off the tool or when cutting. Otherwise the tool may fall and cause personal injury.
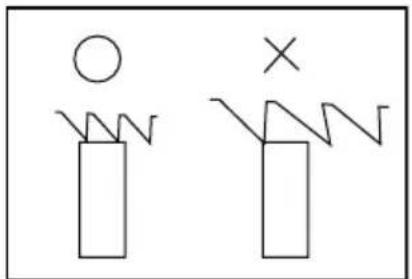
Fig.13
For stable cut, always keep at least two teeth in the cut.
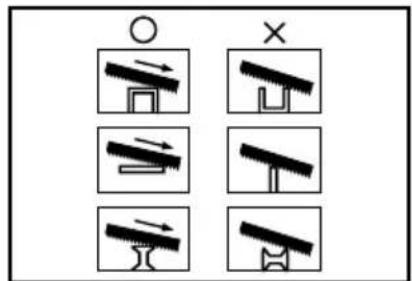
Fig.14
Select the proper cutting position for your workpiece by referring to the figure.
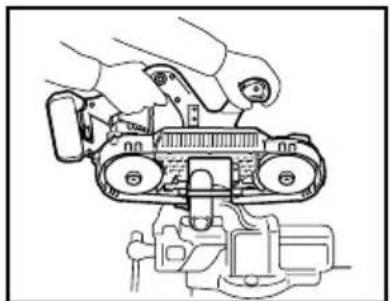
Fig.15
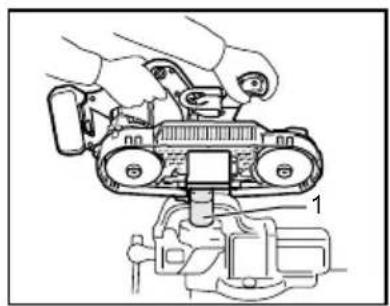
Hold the tool with both hands as shown in the figure. Before turning on the tool, always make sure that the stopper plate contacts the workpiece and the blade is clear of the workpiece.
Turn the tool on and wait until the blade attains full speed. Gently lower the blade into the cut. The weight of the tool or slightly pressing the tool will supply adequate pressure for the cutting. Do not force the tool. As you reach the end of a cut, release pressure and lift it slightly so that it will not fall against the workpiece.
NOTICE:
- Applying excessive pressure to the tool or twisting of the blade may cause bevel cutting or damage to the blade.
- When not using the tool for a long period of time, remove the blade from the tool.
- If the tool is operated continuously until the battery cartridge has discharged, allow the tool to rest for 15 minutes before proceeding with a fresh battery.
Cutting lubricant
CAUTION:
- Never use cutting oil or apply excessive amount of wax to the blade. It may cause the blade to slip or come off unexpectedly.
- When cutting cast iron, do not use any cutting wax.
Fig.16
When cutting metals, use Makita cutting wax as a cutting lubricant. To apply the cutting wax to the blade teeth, remove a cap of the cutting wax, start the tool and cut into the cutting wax as shown in the figure.
MAINTENANCE
CAUTION:
- Always be sure that the tool is switched off and the battery cartridge is removed before attempting to perform inspection or maintenance.
Cleaning
CAUTION:
- Never use gasoline, benzine, thinner, alcohol or the like. Discoloration, deformation or cracks may result.
- Wax and chips on the tires may cause the blade to slip and come off unexpectedly. Use a dry cloth to remove wax and chips from the tires.
After use, remove wax, chips and dust from the tool, wheel tires and blade.
Replacing tires on wheels
Replace the tires when the blade slips or does not track properly because of badly worn tires.
To maintain product SAFETY and RELIABILITY, repairs, any other maintenance or adjustment should be performed by Makita Authorized Service Centers, always using Makita replacement parts.
OPTIONAL ACCESSORIES
CAUTION:
• These accessories or attachments are recommended for use with your Makita tool specified in this manual. The use of any other accessories or attachments might present a risk of injury to persons. Only use accessory or attachment for its stated purpose.
If you need any assistance for more details regarding these accessories, ask your local Makita Service Center.
- Band saw blades
- Hex wrench 4
- Cutting wax
- Hook
- Wheel cover
- Makita genuine battery and charger
NOTE:
- Some items in the list may be included in the tool package as standard accessories. They may differ from country to country.
SVENSKA (Originalbruksanvisning)
Äänenpainetaso (L _pA ): 78 dB (A)

- Intended use
- Noise
- Wear ear protection
- Vibration
- WARNING:
- For European countries only
- EC Declaration of Conformity
- General Power Tool Safety Warnings
- CORDLESS PORTABLE BAND SAW SAFETY WARNINGS
- SAVE THESE INSTRUCTIONS.
- IMPORTANT SAFETY INSTRUCTIONS
- FOR BATTERY CARTRIDGE
- Tips for maintaining maximum battery life
- FUNCTIONAL DESCRIPTION
- CAUTION:
- Installing or removing battery cartridge
- Fig.1
- Battery protection system
- (Lithium-ion battery with star marking)
- Fig.2
- Switch action
- Fig.3
- Lighting up the lamp
- Fig.4
- NOTICE:
- ASSEMBLY
- Installing or removing the blade
- Fig.5
- Fig.6
- Fig.7
- Fig.8
- Adjusting the stopper plate position
- Fig.9
- Hook (Optional accessory)
- Fig.10
- Wheel cover (optional accessory)
- Fig.11
- Fig.12
- OPERATION
- Fig.13
- Fig.14
- Fig.15
- Cutting lubricant
- Fig.16
- MAINTENANCE
- Cleaning
- Replacing tires on wheels
- OPTIONAL ACCESSORIES
- NOTE:
Brand : MAKITA
Model : DPB181Z
Category : Saw