
SHAVER Series 9000 S9211 - Razor PHILIPS - Free user manual and instructions
Find the device manual for free SHAVER Series 9000 S9211 PHILIPS in PDF.


| Product Type | Electric Shaver |
| Model | Philips SHAVER Series 9000 S9211 |
| Dimensions | Approx. 5.7 x 2.4 x 3.5 inches (145 x 60 x 90 mm) |
| Weight | Approx. 0.57 lb (260 g) |
| Power Source | Rechargeable Li-ion battery |
| Charging Time | 1 hour for full charge |
| Shaving Time | 50 minutes after full charge |
| Display Type | LED display with battery and settings indicators |
| Shaving System | V-Track Precision Blades with 3 rotary heads |
| Wet & Dry | Yes, suitable for wet and dry shaving |
| SmartClick | Compatible with Precision Trimmer and Beard Styler attachments |
| Cutting Action | Contour-detecting action with up to 5-D Flexing heads |
| Motor Speed | Up to 110,000 cutting actions per minute |
| Cleaning | Rinseable under tap; compatible with Philips cleaning pod (optional) |
| Maintenance | Replace shaving heads every 2 years (model SH90) |
| Safety Features | Automatic voltage adaptation; travel lock; overcharge protection |
| Blade Material | Self-sharpening steel blades |
| Accessories Included | Charging stand, protective cap, cleaning brush, travel case |
| Warranty | 2 years manufacturer warranty |
Frequently Asked Questions - SHAVER Series 9000 S9211 PHILIPS
User questions about SHAVER Series 9000 S9211 PHILIPS
0 question about this device. Answer the ones you know or ask your own.
Ask a new question about this device
Download the instructions for your Razor in PDF format for free! Find your manual SHAVER Series 9000 S9211 - PHILIPS and take your electronic device back in hand. On this page are published all the documents necessary for the use of your device. SHAVER Series 9000 S9211 by PHILIPS.
USER MANUAL SHAVER Series 9000 S9211 PHILIPS
natural_image
PHILIPS Series 9000 electric shaver with three rotary dials and power button (no text or symbols on device body)
www.philips.com/support/ifu

natural_image
Illustration of an open book with a grid and arrow indicating rotation (no text or symbols)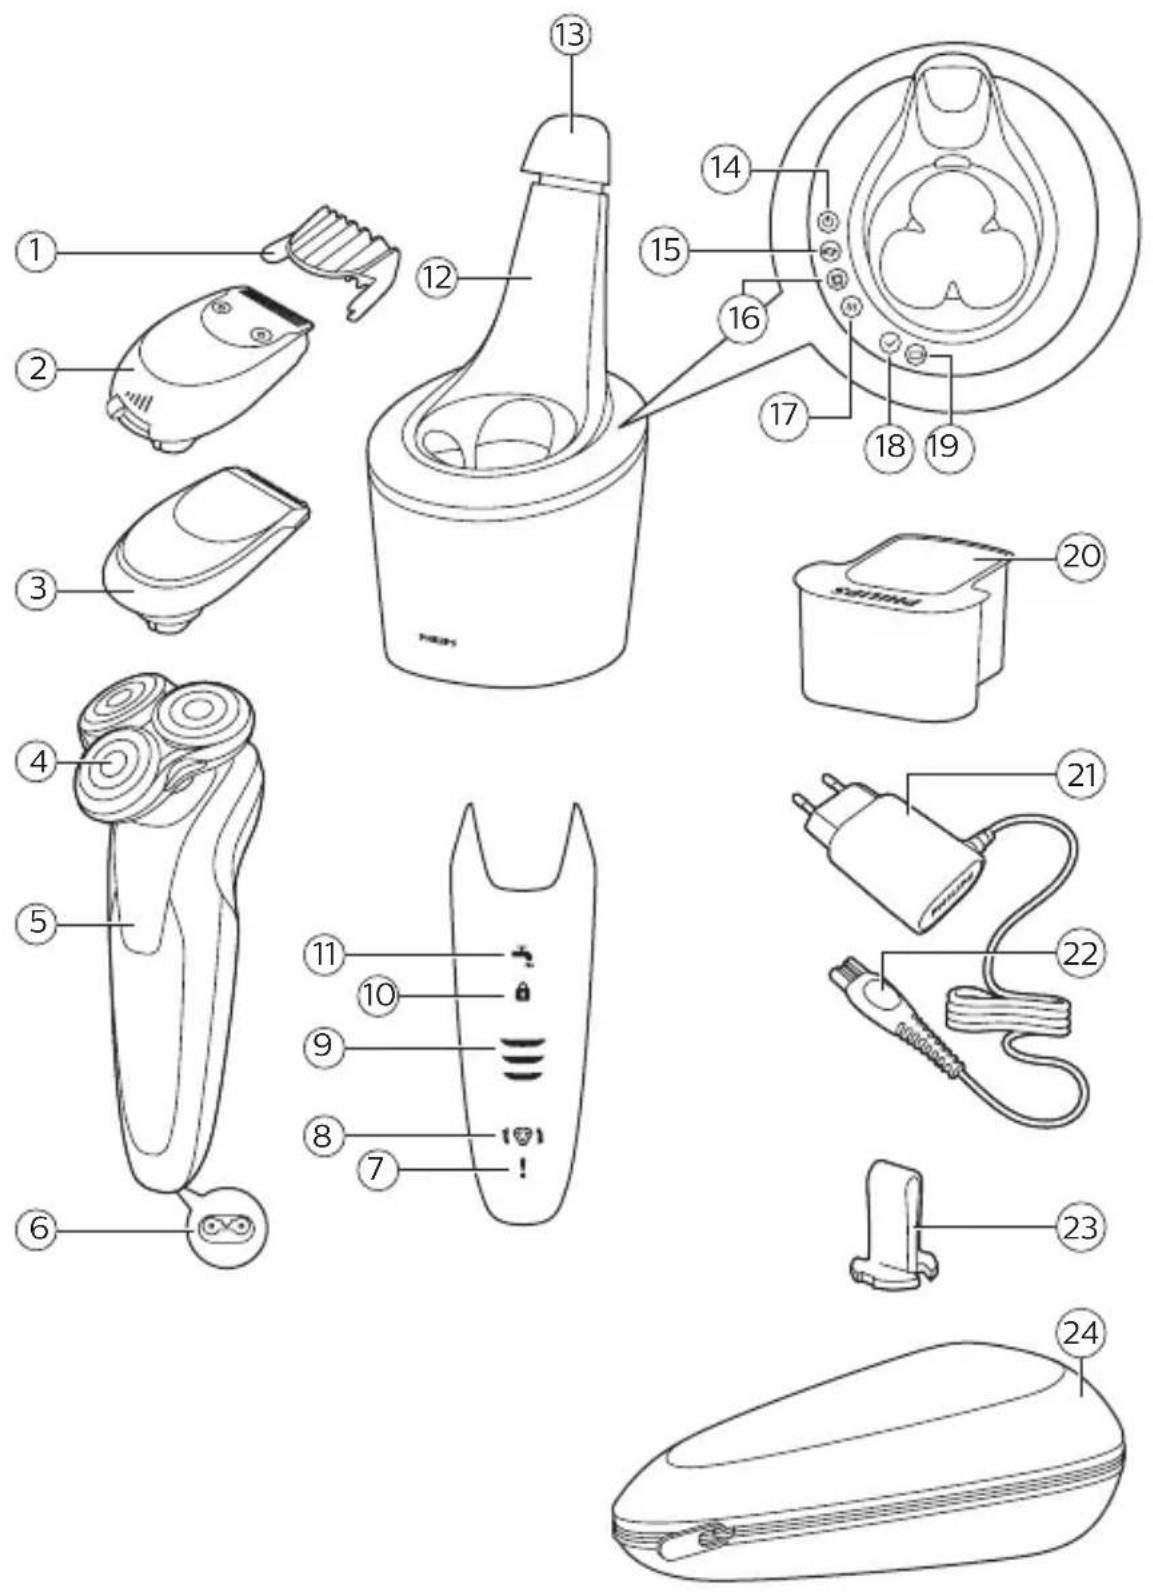
English 6
Čeština 37
Eesti 68
Hrvatski 99
Latviešu 130
Lietuviškai 161
Magyar 192
Polski 224
Română 258
Slovenščina 292
Slovensky 322
Български 354
Українська 389
Introduction
Congratulations on your purchase and welcome to Philips! To fully benefit from the support that Philips offers, register your product at www.philips.com/welcome.
Please read this user manual, as it contains information about the features of this shaver as well as some tips to make shaving easier and more enjoyable.
General description (Fig.1)
1 Comb for beard styler attachment
2 Click-on beard styler attachment
3 Click-on precision trimmer attachment
4 Click-on shaving unit
5 On/off button
6 Socket for small plug
7 Notification symbol
8 Replacement reminder
9 Battery charge indicator
10 Travel lock symbol
11 Cleaning reminder
12 SmartClean system
13 Cap of SmartClean system
14 On/off button
15 Replacement symbol
16 Rinsing symbol
17 Drying symbol
18 Ready symbol
19 Charge symbol
20 Cleaning cartridge for SmartClean system
21 Supply unit
22 Small plug
23 Retaining ring holder
24 Pouch
The accessories supplied may vary for different products. The box shows the accessories that have been supplied with your product.
Important safety information
Read this important information carefully before you use the appliance and its accessories and save it for future reference. The accessories supplied may vary for different products.
Danger

natural_image
Prohibition sign showing a faucet without raindrops, enclosed in a circle (no text)- Keep the supply unit dry.
Warning
- To charge the battery, only use the detachable supply unit (type HQ8505) provided with the appliance.
- The supply unit contains a transformer. Do not cut off the supply unit to replace it with another plug, as this causes a hazardous situation.
- This appliance can be used by children aged from 8 years and above and persons with reduced physical, sensory or mental capabilities or lack of experience and knowledge if they have been given supervision or instruction concerning use of the appliance in a safe way and understand the hazards involved. Children shall not play with the appliance. Cleaning and user maintenance shall not be made by children without supervision.
- Always unplug the shaver before you clean it under the tap.
- Always check the appliance before you use it. Do not use the appliance if it is damaged, as this may cause injury. Always replace a damaged part with one of the original type.
- Do not open the appliance to replace the rechargeable battery.
Caution

natural_image
Prohibition sign showing a faucet with a diagonal line and raindrops, no text present- Never immerse the cleaning system or the charging stand in water and do not rinse it under the tap.
- Never use water hotter than 60°C to rinse the shaver.
- Only use this appliance for its intended purpose as shown in the user manual.
- For hygienic reasons, the appliance should only be used by one person.
- Never use compressed air, scouring pads, abrasive cleaning agents or aggressive liquids such as petrol or acetone to clean the appliance.
- If your shaver comes with a cleaning system, always use the original Philips cleaning fluid (cartridge or bottle, depending on the type of cleaning system).
- Always place the cleaning system on a stable, level and horizontal surface to prevent leakage.
- If your cleaning system uses a cleaning cartridge, always make sure the cartridge compartment is closed before you use the cleaning system to clean or charge the shaver.
- When the cleaning system is ready for use, do not move it to prevent leakage of cleaning fluid.
- Water may drip from the socket at the bottom of the shaver when you rinse it. This is normal and not dangerous because all electronics are enclosed in a sealed power unit inside the shaver.
- Do not use the supply unit in or near wall sockets that contain an electric air freshener to prevent irreparable damage to the supply unit.
Electromagnetic fields (EMF)
This Philips appliance complies with all applicable standards and regulations regarding exposure to electromagnetic fields.
General

- This shaver is waterproof. It is suitable for use in the bath or shower and for cleaning under the tap. For safety reasons, the shaver can therefore only be used without cord.
- The supply unit is suitable for mains voltages ranging from 100 to 240 volts.
- The supply unit transforms 100-240 volts to a safe low voltage of less than 24 volts.
- Maximum noise level: Lc = 69 dB(A)
The display

Note: Before you use the shaver for the first time, remove the protective foil from the display.
Charging

Quick charge: When you connect the shaver to the wall socket, the lights of the battery charge indicator light up one after another repeatedly. When the shaver contains enough energy for one shave, the bottom light of the battery charge indicator starts to flash slowly.
While the shaver continues to charge, first the bottom light of the battery charge indicator flashes and then lights up continuously. Then the second light flashes and lights up continuously, and so on until the shaver is fully charged (see 'Battery fully charged').
12 English
Battery fully charged
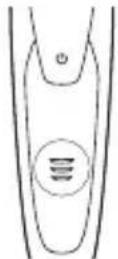
When the battery is fully charged, all lights of the battery charge indicator light up white continuously.
Note: This appliance can only be used without cord. When you press the on/off button during or after charging, you hear a sound to indicate that the shaver is still connected to the wall socket.
Note: When the battery is full, the display switches off automatically after 30 minutes.
Battery low
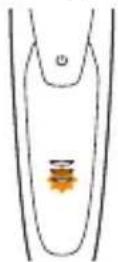
When the battery is almost empty, the bottom light of the battery charge indicator flashes orange and you hear a sound. At this point there is enough energy left for one shave.
Remaining battery charge
The remaining battery charge is shown by the lights of the battery charge indicator that light up continuously.
Cleaning reminder

natural_image
Simple line drawing of a thermometer with a water droplet inside and a blue faucet icon nearby (no text or symbols)Clean the shaver after every use for optimal performance. When you switch off the appliance, the cleaning reminder flashes to remind you to clean the appliance.
Travel lock
When you are going to travel, you can lock the shaver to prevent it from accidentally switching on.
Activating the travel lock

1 Press the on/off button for 3 seconds to use the travel lock mode.

While you activate the travel lock, the travel lock symbol lights up briefly and the shaver produces a short sound. When the travel lock is activated, the appliance produces a sound and the travel lock symbol flashes.
If you try to switch on the shaver while the travel lock is active, the travel lock symbol flashes.

natural_image
Simple line drawing of a human torso with a padlock icon and star symbol (no text or labels)Deactivating the travel lock
1 Press the on/off button for 3 seconds.
While you deactivate the travel lock, the travel lock symbol lights up briefly and the shaver produces a short sound. The appliance switches on and is now ready for use again.
Note: You can also deactivate the travel lock by connecting the appliance to the wall socket.
Replacement reminder

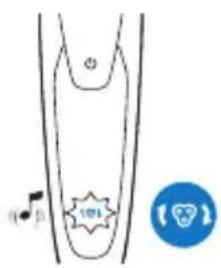
For maximum shaving performance, we advise you to replace the shaving heads every two years. The appliance is equipped with a replacement reminder which reminds you to replace the shaving heads. The shaving unit symbol lights up white continuously, the arrows flash white and the appliance beeps to indicate that you have to replace the shaving heads.
Note: After replacing the shaving heads, you can reset the replacement reminder by pressing the on/off button for 7 seconds. If you do not reset the
replacement reminder, the shaver resets automatically after 9 shaves.
Notification symbol
natural_image
Simple line drawing of a human lower body with a small orange star and a blue warning symbol (no text or labels)Overheating
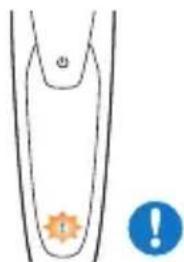
If the appliance overheats during charging, the notification symbol flashes red. When this happens, the shaver stops charging automatically. Charging continues once the temperature of the appliance has decreased to the normal level after approx. 10 minutes.

Blocked shaving heads
If the shaving heads are blocked, the notification symbol continuously lights up red. The replacement reminder and the cleaning reminder alternately flash white and the shaver beeps. In this case, the motor cannot run because the shaving heads are dirty or damaged. If the shaving heads are dirty, you have to clean them. If the shaving heads are damaged, you have to replace them.
Charging
Charge the shaver before you use it for the first time and when the display indicates that the battery is almost empty. The battery charge is indicated by the lights of the battery charge indicator on the display.
Charging takes approx. 1 hour. A fully charged shaver has a shaving time of up to 50 minutes.
Note: You cannot use the appliance while it is charging.
Charging with the supply unit
1 Make sure the appliance is switched off.
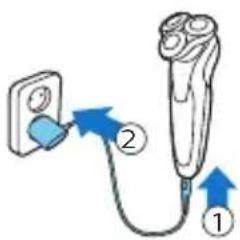
2 Put the small plug in the appliance and put the supply unit in the wall socket.
When you connect the shaver to the wall socket, you hear a sound.
3 After charging, remove the supply unit from the wall socket and pull the small plug out of the appliance.
Charging in the SmartClean system (specific types only)
natural_image
Diagram showing a hand spraying water with arrows indicating flow direction, and a magnified inset showing two blue figures (no text or symbols)1 Put the small plug in the back of the SmartClean system.
2 Put the supply unit in the wall socket.
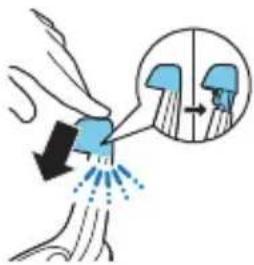
3 Press to open the SmartClean system cap, to be able to place the shaver in the holder ('click').

4 Hold the shaver upside down above the holder. Make sure the front of the shaver points towards the SmartClean system holder.

5 Place the shaver in the holder, tilt the shaver backwards and press down the SmartClean system cap to connect the shaver ('click').
Note: The battery symbol starts to flash to indicate that the appliance is charging. When the battery is fully charged, the battery symbol lights up continuously.
Using the appliance
Note: This appliance can only be used without cord.
Switching the appliance on and off
natural_image
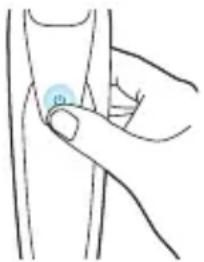
Line drawing of a hand holding a circular object on a knee joint (no text or symbols)- To switch on the appliance, press the on/off button once.
The display lights up for a few seconds.
- To switch off the appliance, press the on/off button once.
The display lights up for a few seconds and shows the remaining battery charge.
Shaving
Skin adaptation period
Your first shaves may not bring you the result you expect and your skin may even become slightly irritated. This is normal. Your skin and beard need time to adapt to any new shaving system. To allow your skin to adapt to this new appliance, we advise you to shave regularly (at least 3 times a week) and exclusively with this appliance for a period of 3 weeks.
Shaving tips
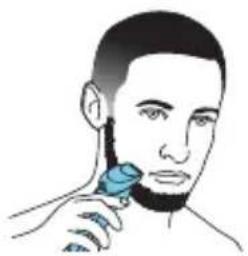
- For the best results on skin comfort, pre-trim your beard if you have not shaved for 3 days or longer.
- Move the shaving heads over your skin in circular movements and apply gentle pressure.
- We advise you to shave a clean beard and face.
Dry shaving
1 Switch on the appliance.
The display lights up for a few seconds.

natural_image
Illustration of a person applying facial hair to their cheek with a blue brush (no text or symbols)2 Move the shaving heads over your skin in circular movements to catch all hairs growing in different directions. Make sure each shaving head is fully in contact with the skin. Exert gentle pressure for a close, comfortable shave.
Note: Do not press too hard, as this can cause skin irritation.
3 Clean the appliance after use.
Wet shaving
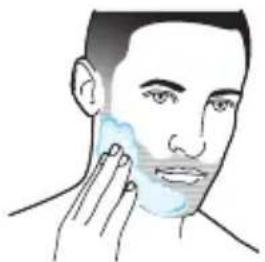
For a more comfortable shave, you can also use this appliance on a wet face with shaving foam or shaving gel.
To shave with shaving foam or shaving gel, follow the steps below:
natural_image
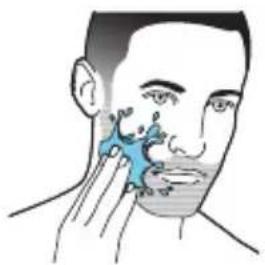
Illustration of a person applying facial care to their face (no text or symbols present)1 Apply some water to your skin.
natural_image
Illustration of a person applying facial care to their face, showing the mask and hand near the chin (no text or symbols)2 Apply shaving foam or shaving gel to your skin.
natural_image
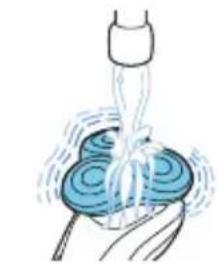
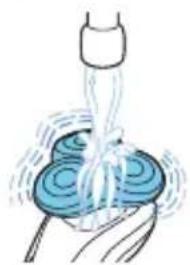
Illustration of a medical procedure with tubing and tubing, no text or symbols present3 Rinse the shaving unit under the tap to ensure that the shaving unit glides smoothly over your skin.
4 Switch on the appliance.

natural_image
Illustration of a person applying facial hair to their neck, showing the brush near the face (no text or symbols present)5 Move the shaving heads over your skin in circular movements to catch all hairs growing in different directions. Make sure each shaving head is fully in contact with the skin. Exert gentle pressure for a close, comfortable shave.
Note: Rinse the shaving unit regularly to ensure that it continues to glide smoothly over your skin.
6 Dry your face.
7 Clean the appliance after use.
Note: Make sure you rinse all foam or shaving gel off the appliance.
Using click-on attachments
Note: The accessories supplied may vary for different products. The box shows the accessories that have been supplied with your product.
Removing or attaching click-on attachments
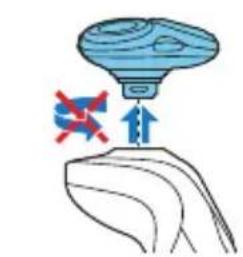
1 Make sure the appliance is switched off.
2 Pull the attachment straight off the appliance.
Note: Do not twist the attachment while you pull it off the appliance.
natural_image
Illustration of a flying saucer with red and blue symbols indicating flight or landing, no text or labels present.
natural_image
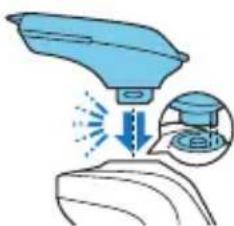
Illustration of a medical or laboratory procedure showing a hand holding a device with an arrow indicating direction, and an inset magnified view of a device (no text or symbols present)3 Insert the lug of the attachment into the slot in the top of the appliance. Then press down the attachment to attach it to the appliance ('click').
Using the precision trimmer attachment
You can use the precision trimmer attachment to touch up your beard, sideburns and moustache.

1 Attach the attachment to the appliance ('click').
2 Switch on the appliance.
The display lights up for a few seconds.
3 Hold the trimmer attachment perpendicular to the skin and move the appliance downwards while you exert gentle pressure.
4 Clean the attachment after use (see 'Cleaning and maintenance').
Using the beard styler attachment with comb
You can use the beard styler with the comb attached to style your beard at one fixed setting, but also at different length settings. You can also use it to pre-trim any long hairs before shaving for a more comfortable shave.
Note: The beard styler is only intended for trimming facial hair. Do not use on areas below the neck.
The length settings on the beard styler attachment correspond to the remaining hair length after cutting and range from 1 to 5 mm (3/64 - 3/16 in).
1 Attach the attachment to the appliance ('click').
natural_image
Illustration of a medical procedure with a blue surgical instrument and an inset showing a graduation cap (no text or symbols present)
natural_image
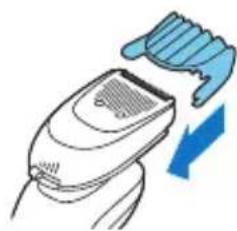
Illustration of a hand washing a small appliance with blue motion arrows indicating airflow (no text or symbols)2 Slide the comb straight into the guiding grooves on both sides of the beard stylist attachment ('click').
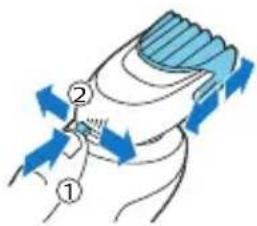
3 Press the length selector and then push it to the left or right to select the desired hair length setting.

natural_image
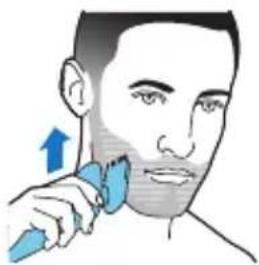
Illustration of a person applying a blue brush to their face, with an upward arrow indicating the direction (no text or symbols present)4 Switch on the appliance.
5 Move the appliance upwards while you exert gentle pressure. Make sure the front of the comb is in full contact with the skin.
6 Clean the attachment after use (see 'Cleaning and maintenance').
Using the beard styler attachment without comb
You can use the beard styler attachment without the comb to contour your beard, moustache, sideburns or neckline at a length of 0.5 mm (1/32 in).
Note: The beard styler is only intended for trimming facial hair. Do not use it on areas below the neck.

1 Pull the comb off the beard styler attachment.
Note: Grab the comb in the center to pull it off the beard stylisty attachment. Do not pull at the sides of the comb.
2 Switch on the appliance.

natural_image
Illustration of a person applying a blue tool to their neck (no text or symbols)3 Hold the beard styler attachment perpendicular to the skin and move the appliance downwards while you exert gentle pressure.
4 Clean the attachment after use (see 'Cleaning and maintenance').
Cleaning and maintenance
Note: The accessories supplied may vary for different products. The box shows the accessories that have been supplied with your product.
Cleaning the shaver in the SmartClean system
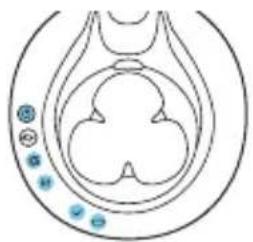
The SmartClean system comes in two types. The features available on your SmartClean system differ per type:
- SmartClean system Basic has one phase: the rinsing phase.

natural_image
Abstract diagram of nested organic shapes with small blue dots, no text or symbols present
natural_image
Diagram of a biological structure with circular elements and blue dots, no text or symbols present- SmartClean system Plus has two phases: the rinsing phase and the drying phase.

natural_image
Simple line drawing of a spray bottle with a red X mark and water droplets (no text or symbols)Preparing the SmartClean system for use
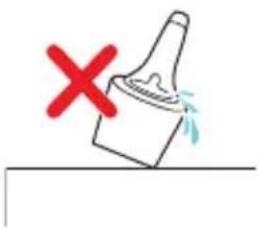
Caution: Do not tilt the SmartClean system to prevent leakage.
Note: Hold the SmartClean system while you prepare it for use.
Note: If you clean the shaver in the SmartClean system once a week, the SmartClean cartridge lasts approximately three months.
22 English

1 Put the small plug in the back of the SmartClean system.
2 Put the supply unit in the wall socket.
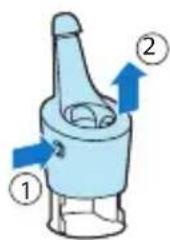
3 Press the button on the side of the SmartClean system (1) and lift the top part of the SmartClean system (2).
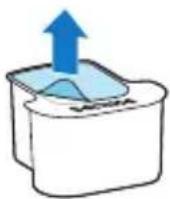
4 Pull the seal off the cleaning cartridge.

5 Place the cleaning cartridge in the SmartClean system.

natural_image
Simple line drawing of a blender with a blue arrow pointing to its side, no text or symbols present.6 While holding the SmartClean system with one hand, gently push the top part of the SmartClean system back down ('click').
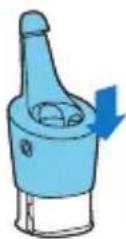
Using the SmartClean system
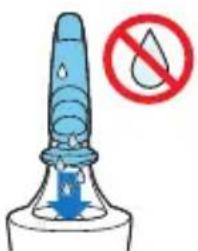
Caution: Always shake excess water off the shaver before you place it in the SmartClean system.
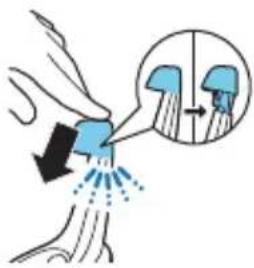
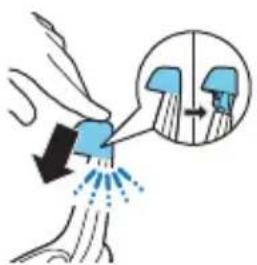
1 Press to open the SmartClean system cap, to be able to place the shaver in the holder ('click').

2 Hold the shaver upside down above the holder. Make sure the front of the shaver points towards the SmartClean system holder.

3 Place the shaver in the holder (1), tilt the shaver backwards (2) and press down the top cap to connect the shaver ('click') (3).
The battery symbol starts to flash, which indicates that the shaver is charging.

natural_image
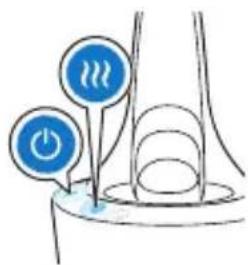
Hand holding two circular buttons with 'Power' and 'Recycle' symbols, no text or labels present4 Press the on/off button on the SmartClean system to start the cleaning program.
During the cleaning phase, the cleaning symbol flashes. When the cleaning phase is done (after approx. 10 minutes), the cleaning symbol lights up continuously.
natural_image
Simple line drawing of a device with two blue circular icons labeled 'Power' and 'Energy', no text or symbols present.SmartClean system Plus only: After the rinsing phase, the drying phase starts automatically. During this phase, the drying symbol flashes. When the drying phase is done (after approx. 4 hours), the drying symbol lights up continuously.

When the cleaning program is done, the ready symbol lights up continuously.
30 minutes after the cleaning program and charging have been completed, the SmartClean system switches off automatically.
The battery symbol lights up continuously to indicate that the shaver is fully charged. Charging takes approx. 1 hour.
5 SmartClean system Basic only: To let the shaver dry, you can leave it in the SmartClean system until your next shave. You can also remove the shaver from the SmartClean system, shake off excess fluid, open the shaving unit and let the shaver air-dry.
Note: If you press the on/off button of the SmartClean system during the cleaning program, the program stops. In this case, the cleaning or drying symbol goes out.
Note: If you disconnect the SmartClean system from its power supply, the cleaning program stops.
Replacing the cartridge of the SmartClean system
Replace the cleaning cartridge when the replacement symbol flashes orange or when you are no longer satisfied with the cleaning result. If you clean the shaver in the SmartClean system once a week, the SmartClean cartridge lasts approximately three months.
1 While holding the SmartClean system with one hand, press the button on the side of the SmartClean system and lift the top part of the SmartClean system.


natural_image
Simple line drawing of a blender with a blue plastic container (no text or symbols)
2 Remove the cleaning cartridge from the SmartClean system and pour out any remaining cleaning fluid. You can safely pour the cleaning fluid down the sink.
3 Discard the empty cleaning cartridge.
4 Unpack the new cleaning cartridge and pull off the seal.
5 Place the cleaning cartridge in the SmartClean system.
6 While holding the SmartClean system with one hand, gently push the top part of the SmartClean system back down ('click').
Cleaning the shaver under the tap
Clean the shaver after every use for optimal performance.
Be careful with hot water. Always check if the water is not too hot, to prevent burning your hands.
Note: Never dry the shaving unit with a towel or tissue, as this may damage the shaving heads.
1 Switch on the appliance.
English

2 Rinse the shaving unit under a warm tap.
3 Switch off the appliance. Pull the shaving head holder off the bottom part of the shaving unit.
4 Rinse the hair chamber under the tap.
5 Rinse the shaving head holder under a warm tap.
6 Carefully shake off excess water and let the shaving head holder air-dry completely.
7 Attach the shaving head holder to the bottom part of the shaving unit ('click').
Cleaning the click-on attachments
Never dry trimmer or beard styler attachments with a towel or tissue, as this may damage the trimming teeth.
The accessories supplied may vary for different products. The box shows the accessories that have been supplied with your product.
Cleaning the trimmer attachment
Never dry the trimmer with a towel or tissue, as this may damage the trimming teeth.
Clean the trimmer attachment after each use.
1 Switch on the appliance with the precision trimmer attachment attached.
2 Rinse the attachment under a warm tap.
3 After cleaning, switch off the appliance.
4 Carefully shake off excess water and let the attachment air-dry completely.
Tip: For optimal performance, lubricate the teeth of the attachment with a drop of sewing machine oil regularly.

natural_image
Illustration of a hand washing a blue object with a tube, no text or symbols presentCleaning the beard styler attachment
Clean the beard styler attachment after each use.
1 Pull the comb off the beard styler attachment.
Note: Grab the comb in the center to pull it off the beard stylisty attachment. Do not pull at the sides of the comb.

2 Rinse cut hairs off the cutting unit with lukewarm water.
3 Rinse cut hairs off the comb.

natural_image
Illustration of a hand spraying water onto a surface with another hand pouring liquid into the air (no text or symbols)
natural_image
Illustration of a hair curler and a hand holding a tool, both without any text or symbols4 Remove the cutting unit from the beard styler attachment. By pushing the cutting unit off the beard styler attachment, you can remove any hairs that have accumulated inside the beard styler attachment. You can also rinse the bottom of the cutting unit.
5 Rinse cut hairs out of the beard styler attachment.
6 Carefully shake off excess water and leave the comb, cutting unit and beard styler attachment to air-dry before you use them again.
7 When the cutting unit is dry, attach it to the beard styler attachment.

8 When the comb is dry, attach it to the beard styler attachment.
9 For optimal performance, lubricate the teeth of the attachment with a drop of sewing machine oil regularly.
natural_image
Illustration of a hairbrush with a blue downward arrow indicating compression or compression (no text or symbols)Storage

natural_image
Illustration of a blue mechanical component with a downward arrow indicating compression or disassembly (no text or symbols)1 Store the appliance in the pouch supplied.
Note: Make sure the appliance is dry before you store it in the pouch.
Replacement
Replacing the shaving heads

For maximum shaving performance, we advise you to replace the shaving heads every two years. Replace damaged shaving heads immediately. Always replace the shaving heads with original Philips shaving heads (see 'Ordering accessories').
Replacement reminder
The replacement reminder indicates that the shaving heads need to be replaced. The shaving unit symbol lights up continuously, the arrows flash white and you hear a beep when you switch the shaver on or off.
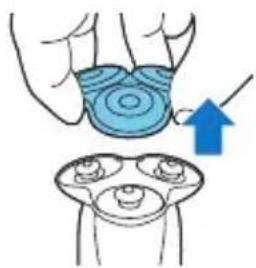
1 Switch off the appliance.
2 Pull the shaving head holder off the bottom part of the shaving unit.
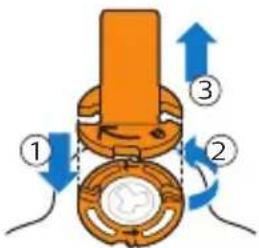
3 Place the retaining ring holder on the retaining ring (1), turn it anticlockwise (2) and lift it off the shaving head (3).
Remove the retaining ring from the retaining ring holder and repeat this process for the other retaining rings.
natural_image
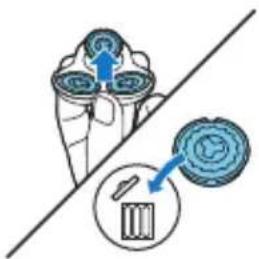
Diagram showing a hand holding three circular objects with blue arrows pointing to them, and a magnified inset showing a battery (no text or symbols)4 Remove the shaving heads from the shaving head holder.
Discard the used shaving heads immediately to avoid mixing them with the new shaving heads.

5 Place the shaving heads in the shaving head holder.
Note: Make sure the notches on both sides of the shaving heads fit exactly onto the projections in the shaving head holder.
6 Place the retaining ring holder on the retaining ring (1), place it on the shaving head (2) and turn it clockwise (3) to reattach the retaining ring. Repeat this process for the other retaining rings.
Each retaining ring has two recesses that fit exactly into the projections of the shaving head holder. Turn the ring clockwise until your hear a click to indicate that the ring is fixed.
Note: Hold the shaving head holder in your hand when you reinsert the shaving heads and reattach the retaining rings. Do not place the shaving head holder on a surface when you do this, as this may cause damage.
7 Attach the shaving head holder to the bottom part of the shaving unit ('click').
8 To reset the replacement reminder, press and hold the on/off button for approx. 7 seconds. Wait until you hear two beeps.
Ordering accessories
To buy accessories or spare parts, visit www.philips.com/parts-and-accessories or go to your Philips dealer. You can also contact the
Philips Consumer Care Center in your country (see the international warranty leaflet for contact details).
The following accessories and spare parts are available:
- SH90 Philips shaving heads
- HQ110 Philips shaving head cleaning spray
- RQ111 Philips beard styler attachment
- RQ585 Philips cleansing brush attachment
- RQ560/RQ563 Philips cleansing brush heads
- JC301/JC302/JC303/JC304/JC305 cleaning cartridge
- HQ8505 supply unit
Note: The availability of the accessories may differ by country.
Recycling

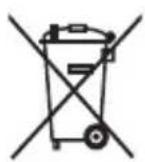
- This symbol means that this product shall not be disposed of with normal household waste (2012/19/EU).
- This symbol means that this product contains a built-in rechargeable battery which shall not be disposed of with normal household waste (2006/66/EC). Please take your product to an official collection point or a Philips service center to have a professional remove the rechargeable battery.
- Follow your country's rules for the separate collection of electrical and electronic products and rechargeable batteries. Correct disposal helps prevent negative consequences for the environment and human health.
Removing the rechargeable shaver battery
Only remove the rechargeable battery when you discard the shaver. Before you remove the battery, make sure that the shaver is disconnected from the wall socket and that the battery is completely empty.
Take any necessary safety precautions when you handle tools to open the shaver and when you dispose of the rechargeable battery.
Be careful, the battery strips are sharp.
1 Insert the screwdriver into the slot between the front and back panel in the bottom of the appliance. Remove the back panel.
2 Remove the front panel.
3 Unscrew the two screws at the top of the inner panel and remove the inner panel.
4 Bend aside the battery lips, which hold the battery, by placing a screwdriver between the battery and the lips.
5 Remove the battery.
Warranty and support
If you need information or support, please visit www.philips.com/support or read the international warranty leaflet.
Warranty restrictions
The shaving heads (cutters and guards) are not covered by the terms of the international warranty because they are subject to wear.
Troubleshooting
This chapter summarizes the most common problems you could encounter with the appliance. If you are unable to solve the problem with the information below, visit www.philips.com/support for a list of frequently asked questions or contact the Consumer Care Center in your country.
Shaver
Problem Possible cause Solution
| The appliance does not work when I press the on/off button. | The appliance is still attached to the wall socket. For safety reasons, the appliance can only be used without cord. | Unplug the appliance and press the on/off button to switch on the appliance. |
| The rechargeable battery is empty. | Recharge the battery (see 'Charging'). | |
| The travel lock is activated. | Press the on/off button for 3 seconds to deactivate the travel lock. | |
| The shaving unit is soiled or damaged to such an extent that the motor cannot run. | Clean the shaving heads thoroughly or replace them. | |
| The appliance does not shave as well as it used to. | The shaving heads are damaged or worn. | Replace the shaving heads (see 'Replacement'). |
| Hairs or dirt | obstruct the shaving heads. | Clean the shaving heads in the regular way or clean them thoroughly. |
Problem Possible cause Solution
| I replaced the shaving heads, but the display still shows the replacement reminder. | You have not reset the appliance. | Reset the appliance by pressing the on/off button for approx. 7 seconds (see 'Replacing the shaving heads'). |
| A shaving unit symbol has suddenly appeared on the display. | This symbol reminds you to replace the shaving heads. | Replace the shaving heads (see 'Replacement'). |
| The notification symbol has suddenly appeared on the display while the appliance is charging. | The appliance is overheated. | Disconnect the appliance from the wall socket for approx. 10 minutes. |
| The notification symbol, the replacement reminder and the cleaning reminder have suddenly appeared on the display. | The shaving heads are damaged. | Replace the shaving heads (see 'Replacement'). |
| The shaving heads are soiled. | Clean the shaving heads (see 'Cleaning and maintenance'). | |
| Water is leaking from the bottom of the appliance. | During cleaning, water may collect between the inner body and the outer shell of the appliance. | This is normal and not dangerous because all electronics are enclosed in a sealed power unit inside the appliance. |
SmartClean
| Problem | Possible cause Solution | |
| The SmartClean does not work when I press the on/off button. | The SmartClean is not connected to the wall socket. | Put the small plug in the SmartClean and put the supply unit in the wall socket. |
| The cleaning cartridge is empty. The replacement symbol flashes to indicate that you have to replace the cleaning cartridge. | Place a new cleaning cartridge in the SmartClean (see 'Replacing the cartridge of the SmartClean system'). | |
| The shaver is not entirely clean after I clean it withthe SmartClean. | You have not placed the shaver in SmartClean properly, so there is no electrical connection between SmartClean and the shaver. | Press down the top cap ('click') to ensure a proper connection between the shaver and the SmartClean. |
| The battery of the shaver is not charged sufficiently. | If the battery of the shaver is not charged sufficiently, the SmartClean may not work properly. The shaver needs to be able to switch on briefly during the rinsing phase. Charge the shaver for a short time before you use the SmartClean to clean your shaver. | |
| The cleaning cartridge needs to be replaced. | Replace the cleaning cartridge (see 'Replacing the cartridge of the SmartClean system'). | |
| You have used another cleaning fluid than the original Philips Norelco cleaning cartridge. | Only use the original Philips Norelco cleaning cartridge. | |
| The hole of the drain of the cleaning cartridge is blocked. | Remove the cartridge from the SmartClean and push the hairs down the drain with a toothpick. | |
| The shaver is not fully charged after I charge it in SmartClean. | You have not placed the shaver in SmartClean properly, so there is no electrical connection between SmartClean and the shaver. | Press down the top cap ('click') to ensure a proper connection between the shaver and SmartClean. |
Úvod
natural_image
Prohibition sign showing a faucet without a shower, enclosed in a circle (no text or symbols)natural_image
Prohibition sign showing a faucet without raindrops, enclosed in a circle (no text)natural_image
Simple line drawing of a funnel with a star-shaped symbol inside and a blue water tap icon nearby (no text or labels)natural_image
Simple line drawing of a human torso with a padlock icon and a small star symbol (no text or labels)Připomenutí výměny

natural_image
Simple line drawing of a human lower body with an orange star-shaped mark and a blue warning symbol (no text or labels)Přehřivání
Ucpané holicí hlavy
natural_image
Illustration of a hand spraying water with a magnified inset showing a blue object inside (no text or symbols)
natural_image
Line drawing of a hand holding a small blue circular object on a vertical line (no text or symbols)natural_image
Illustration of a person applying facial hair to their neck, with no text or symbols present
natural_image
Illustration of a person applying facial massage to their face (no text or symbols)
natural_image
Illustration of a person applying face care to their cheek (no text or symbols)natural_image
Illustration of a person washing hands with water from a bottle (no text or symbols)natural_image
Illustration of a person applying a blue brush to their face, no text or symbols presentnatural_image
Line drawing of a person applying a blue tool to their neck (no text or symbols)natural_image
Abstract diagram with concentric shapes and small blue dots, no text or symbols presentnatural_image
Abstract diagram with nested shapes and small blue dots, no text or symbols presentnatural_image
Diagram of a hand mixer with blue liquid being inserted into a container (no text or symbols)
natural_image
Illustration of a hand spraying water with a magnified inset showing a blue object (no text or symbols)natural_image
Hand holding two blue circular buttons labeled 'Power' and 'Battery', with a small object nearby (no text or symbols)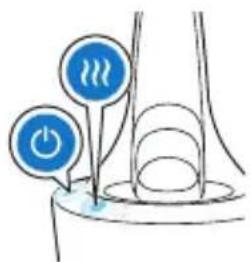
natural_image
Simple line drawing of a device with two blue circular icons labeled 'Power' and 'Energy', connected to a curved surface (no text or symbols)
natural_image
Illustration of a hand holding a blue circular object with a downward arrow, above a magnified view of three circular objects (no text or symbols)natural_image
Illustration of a hand washing a blue object with a bottle above it (no text or symbols)natural_image
Illustration of a hand spraying water onto a surface with a second hand pouring liquid into the air (no text or symbols)2 Zapněte přístroj.
natural_image
Illustration of a blue medical device with a downward arrow indicating compression or disassembly (no text or symbols)natural_image
Prohibition sign of a faucet without any text or symbolsnatural_image
Prohibition sign showing a faucet crossed out by a diagonal line, indicating no fire or water discharge (no text present)natural_image
Simple line drawing of a U-shaped object with a star and a blue water tap icon (no text or symbols)1 Reisilukurežiimi sisenemiseks vajutage 3 sekundi jooksul toitenuppu.

natural_image
Simple line drawing of a human torso with a padlock icon and lock symbol (no text or labels)natural_image
Simple line drawing of a human torso with a pad and lock icons, no text or symbols presentnatural_image
Simple line drawing of a human torso with a small orange star and a blue warning symbol (no text or labels)Ülekuumenemine
natural_image
Diagram showing a hand holding a blue object with arrows indicating motion, and an inset magnified view of a mechanical joint or component (no text or symbols present)natural_image
Line drawing of a hand holding a small blue circular object on a vertical line (no text or symbols)natural_image
Illustration of a person using a hairdryer to apply product code (no text or symbols present)
natural_image
Illustration of a person applying facial massage to the neck area (no text or symbols)
natural_image
Illustration of a person applying a blue tool to their neck (no text or symbols)natural_image
Abstract diagram of nested organic shapes with small colored dots, no text or symbols present
natural_image
Diagram of a biological structure with circular elements and blue dots, no text or symbols present
natural_image
Illustration of a hand cleaning a blue object with a handle, next to a bottle (no text or symbols)natural_image
Illustration of a blue medical device with a blue arrow indicating downward motion (no text or symbols)1 Hoidke seadet kaasasolevas vutlaris.
natural_image
Illustration of a hand holding a blue circular object with an upward arrow, above a stylized face (no text or symbols)natural_image
Illustration of a hand holding three circular objects with arrows indicating direction, alongside a magnified inset showing a cylindrical object (no text or symbols)natural_image
Simple diagram showing a blue circular object with a downward arrow pointing to a circular structure (no text or symbols)natural_image
Diagram showing a gear or mechanical component with arrows indicating motion, intersected by a diagonal line and a green checkmark (no text or symbols present)natural_image
Prohibition sign of a faucet without any text or symbols- Održavajte jedinicu za napajanje suhom.
Upozorenje

natural_image
Prohibition sign of a faucet without any text or symbols- Sustav za čišćenje ili postolje za punjenje nikada nemojte uranjati u vodu niti ispirati pod slavinom.
- Za ispiranje aparata za brijanje nikada ne koristite vodu temperature više od 60 °C.
- Aparat koristite isključivo za svrhu kojoj je namijenjen, kao što je prikazano u korisničkom priručniku.
- Iz higijenskih razloga, aparat bi trebala koristiti samo jedna osoba.
- Za čišćenje aparata nikada nemojte upotrebljavati zračni mlaz, spužvice za ribanje, abrazivna sredstva za čišćenje ili agresivne tekućine poput benzina ili acetona.
- Ako ste uz aparat za brijanje dobili i sustav za čišćenje, obavezno koristite originalnu tekućinu za čišćenje tvrtke Philips (u spremniku ili bočici, ovisno o vrsti sustava za čišćenje).
Napomena: Prije prve uporabe aparata za brijanje, skinite zaštitnu foliju sa zaslona.
Punjenje

Brzo punjenje: Kad spojite aparat za brijanje na zidnu utičnicu, svjetla indikatora napunjenosti baterije svijetle jedno za drugim uzastopno. Kad god aparat za brijanje sadrži dovoljno energije za jedno brijanje, donje svjetlo indikatora napunjenosti baterije počne polako bljeskati.
natural_image
Simple line drawing of a tube with a water droplet inside and a blue circular icon with a faucet symbol (no text or labels)natural_image
Simple line drawing of a human torso with a lock icon and a star symbol, no text or labels present.natural_image
Diagram showing a human torso with a pad and lock icon, no text or symbols presentDeaktiviranje putnog zaključavanja
Za maksimalne performanse brijanja. savjetujemo Vam da mijenjate glave za brijanje sveke dvije godine.
natural_image
Simple line drawing of a human lower body with a small orange star and a blue warning symbol (no text or labels)Ako se uredaj pregrije tijekom punjenja, uskličnik bljeska narančasto. Kada se to dogodi, aparat za brijanje se isključuje automatski. Punjenje se nastavlja kad se temperatura uredaja smanji na normalnu razinu.

Blokada glava za brijanje
natural_image
Diagram showing a hand holding a blue object with arrows indicating motion, and an inset magnified view of a hand holding a blue object (no text or symbols present)1 Mali utikač umetnite u stražnju stranu sustava SmartClean.
5 Stavite aparat za brijanje u držač (1), nagnite ga unatrag (2) i pritisnite gornji poklopac da ga spojite („klik“) (3).
Napomena: Znak baterije počinje bljeskati da označi da se uređaj puni. Kada je baterija puna do kraja, znak baterije svijetli stalno.
Upotreba aparata
natural_image
Line drawing of a hand holding a small blue circular object on a vertical line (no text or symbols)natural_image
Illustration of a person applying facial hair to their cheek, with no text or symbols present3 Očistite uredaj nakon uporabe (vidi 'Čišćenje i održavanje').
Vlažno brijanje
Ovim se uredajem možete koristiti i na mokrom licu s pjenom ili gelom za brijanje radi ugodnijeg brijanja.
Za brijanje s pjenom ili gelom za brijanje slijedite korake u nastavku:

natural_image
Illustration of a UFO with a hand holding a small object, marked with red and blue symbols (no text or labels)
natural_image
Illustration of a medical or laboratory procedure showing a hand holding a device with an arrow indicating motion (no text or symbols present)
natural_image
Illustration of a robotic arm with motion arrows and a magnified inset showing a mechanical component (no text or symbols)3 Umetnite spojnu ušicu nastavka u utor na gornjem dijelu uredaja. Onda pritisnite nastavak prema dolje da ga pričvrstite na uredaj („klik”).
Uporaba nastavka za podrezivanje
natural_image
Illustration of a person applying a blue tool to their face (no text or symbols)3 Držite nastavak trimera okomito prema koži i pomaknite uređaj prema dolje dok lagano pritišćete.
4 Očistite nastavak nakon uporabe (vidi 'Čišćenje i održavanje').
natural_image
Illustration of a blue spray gun spraying liquid onto a surface, with an inset showing a graduation cap (no text or symbols)2 Ugurajte češalj ravno u utore vodilica na obje strane nastavka za oblikovanje brade („klik”).

natural_image
Line drawing of a hairbrush cutting into a toothbrush (no text or symbols)4 Uključite aparat.
natural_image
Illustration of a person applying a blue brush to their face, with an upward arrow indicating motion (no text or symbols)5 Pomičite uredaj prema gore dok lagano pritišćete. Pazite da je prednji kraj češlja u punom kontaktu s kožom.
6 Očistite nastavak nakon uporabe (vidi 'Čišćenje i održavanje').
Uporaba nastavka za oblikovanje brade bez češlja
1 Povucite češalj s nastavka za oblikovanje brade.
Napomena: Uhvatite češalj u sredini kako biste ga povukli s nastavka za oblikovanje brade. Ne povlačite bočne strane češlja.
2 Uključite aparat.

natural_image
Illustration of a person applying a toothbrush to their lower face (no text or symbols)3 Držite nastavak za oblikovanje brade okomito prema koži i pomičite uređaj prema dolje dok lagano pritišćete.
4 Očistite nastavak nakon uporabe (vidi 'Čišćenje i održavanje').
natural_image
Diagram of a biological structure with internal components and small blue dots, no text or symbols present- Osnovni sustav SmartClean ima jednu fazu: fazu ispiranja.

natural_image
Abstract diagram with nested shapes and small blue dots, no text or symbols presentPriprema sustava SmartClean za uporabu
Oprez: Nemojte naginjati SmartClean sustav da ne bi došlo do curenja.
Napomena: Držite SmartClean sustav dok ga pripremate za uporabu.
Napomena: Ako čistite aparat za brijanje u sustavu SmartClean jednom tjedno, spremnik SmartClean traje oko tri mjeseca.
1 Mali utikač umetnite u stražnju stranu sustava SmartClean.

natural_image
Diagram of a blender with a blue plastic container inserted, showing fluid flow direction (no text or symbols)5 Stavite umetak za čišćenje u SmartClean sustav.

6 Gurnite gornji dio sustava SmartClean nazad prema dolje („klik”).

Uporaba sustava SmartClean
Oprez: Uvijek otresite višak vode sa aparata za brijanje prije nego ga stavite u sustav SmartClean.
natural_image
Diagram showing a hand pouring liquid into a pipe with an inset cross-section highlighting a flow direction (no text or symbols)1 Pritisnite gornji poklopac da biste mogli staviti aparat za brijanje u držač („klik”).

2 Držite aparat za brijanje obrnuto iznad držača. Pazite da je prednji dio aparata za brijanje usmjeren prema sustavu SmartClean.


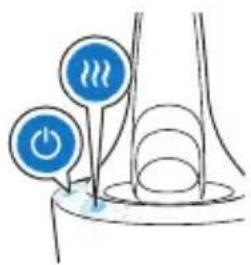
natural_image
Simple line drawing of a device with two blue circular icons labeled 'Power' and 'Hot Water', no text or symbols present.
3 Stavite aparat za brijanje u držač (1), nagnite ga unatrag (2) i pritisnite gornji poklopac da ga spojite („klik”) (3).
Simbol baterije počinje bljeskati, što znači da se aparat za brijanje puni.
1 Uključite aparat.
2 Isperite uredaj za brijanje pod toplom vodom iz pipe.
natural_image
Illustration of a hand pulling a blue object with liquid, no text or symbols present
natural_image
Illustration of a hand performing a medical or therapeutic procedure with a blue arrow indicating direction (no text or symbols present)5 Isperite držač glave za brijanje pod toplom vodom iz pipe.
6 Pažljivo otresite višak vode i ostavite držač glave aparata za brijanje da se potpuno osuši na zraku.
7 Pričvrstite držač glave za brijanje na donji dio jedinice za brijanje („klik”).
natural_image
Illustration of a hand washing a blue object with a tube, no text or symbols presentSavjet: Za optimalan rad, redovito podmazujte zupce nastavka kapljicom ulja za strojeve za šivanje.
Čišćenje nastavka za oblikovanje brade
1 Povucite češalj s nastavka za oblikovanje brade.
Napomena: Uhvatite češalj u sredini kako biste ga povukli s nastavka za oblikovanje brade. Ne povlačite bočne strane češlja.
2 Uključite aparat.
3 Isperite dodatak za oblikovanje brade i češalj zasebno pod toplom vodom iz pipe.
natural_image
Illustration of a blue pen-like object with a downward arrow, no text or symbols presentnatural_image
Prohibition sign of a faucet without any text or symbolsnatural_image
Prohibition sign showing a faucet without raindrops, enclosed in a circle (no text)natural_image
Simple line drawing of a funnel with a water droplet inside and a blue water tap symbol (no text or labels)natural_image
Simple line drawing of a human torso with a padlock icon and lock symbol (no text or labels)natural_image
Simple line drawing of a human lower body with an orange star and a blue warning symbol (no text or labels)natural_image
Illustration of a hand spraying water with an inset showing a magnified view of a person's head (no text or symbols)natural_image
Line drawing of a hand holding a small blue circular object on a vertical line (no text or symbols)natural_image
Illustration of a person applying facial hair to their cheek, showing the blue brush near the mouth (no text or symbols)
natural_image
Illustration of a blue flying saucer with red 'X' symbols and upward arrows, no text or symbols present
natural_image
Illustration of a robotic arm with motion arrows and a magnified inset showing a device (no text or symbols)
natural_image
Illustration of a blue handheld device emitting light beams onto a surface, with an inset showing a magnified view of the device (no text or symbols present)natural_image
Illustration of a person using a handheld tool to apply face-to-face care (no text or symbols present)natural_image
Illustration of a hand using a spray gun to lift a surface, with an inset showing a graduation cap (no text or symbols present)1 Uzlieciet kermana uzgali uz ierices (atskan klikškis).
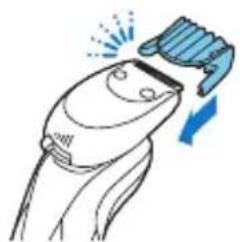
natural_image
Line drawing of a hairbrush cutting into a toothbrush with a blue brush (no text or symbols)natural_image
Illustration of a person applying a hair product to their face, showing a blue brush and arrow (no text or symbols)natural_image
Illustration of a person applying a blue tool to their lower face (no text or symbols)natural_image
Diagram of a biological structure with internal components and two small blue dots, no text or symbols present.natural_image
Abstract diagram with nested shapes and small circular elements, no text or symbols present
natural_image
Illustration of a hand mixer with blue liquid being inserted (no text or symbols)natural_image
Illustration of a hand washing a blue object with a bottle above it (no text or symbols)
natural_image
Illustration of a blue dental implant or screwdriver with a downward arrow indicating compression (no text or symbols)natural_image
Illustration of a hand holding a blue circular object with an upward arrow, above a separate view of a multi-part round object (no text or symbols)natural_image
Illustration of a hand holding three circular objects with arrows indicating direction, alongside a magnified inset showing a cylindrical object (no text or symbols)natural_image
Prohibition sign of a faucet without any text or symbolsnatural_image
No sign depicting a faucet with a showerhead, enclosed in a circle (no text or symbols)natural_image
Simple line drawing of a funnel with a star-shaped symbol inside and a blue circular icon labeled '水' (water) in the corner (no text or symbols on the diagram itself)natural_image
Simple line drawing of a human torso with a power button and a lock icon (no text or symbols)natural_image
Simple line drawing of a human lower body with a small orange star and a blue warning symbol (no text or labels)Perkaitimas
natural_image
Illustration of a hand spraying water with a magnified inset showing a blue object (no text or symbols)natural_image
Line drawing of a hand holding a small blue circular object on a vertical line (no text or symbols)natural_image
Illustration of a person applying facial hair to their neck, showing the brush and eye area (no text or symbols)natural_image
Illustration of a person applying facial massage to the ear (no text or symbols present)1 Sušlapinkite odą.

natural_image
Illustration of a person applying facial care to their face, showing the contour on the cheek (no text or symbols)natural_image
Illustration of a flying saucer with red and blue directional arrows indicating flight or movement (no text or symbols)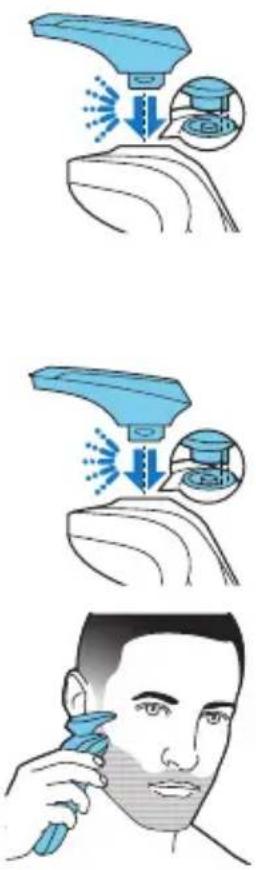
natural_image
Illustration of a blue spray gun spraying liquid onto a surface with an inset showing a graduation cap and a speech bubble (no text or symbols)natural_image
Line drawing of a person's hair being brushed with a blue tool, showing hair texture and facial features (no text or symbols)natural_image
Illustration of a person applying a blue tool to their face, with an upward arrow indicating action (no text or symbols present)4 Ijunkite prietaisa.
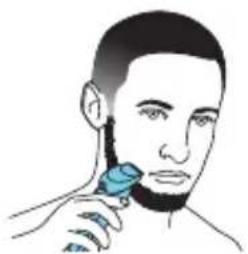
natural_image
Illustration of a person applying a blue tool to their neck (no text or symbols)natural_image
Abstract diagram of nested organic shapes with blue circular markers (no text or symbols)natural_image
Abstract diagram with nested shapes and small blue dots, no text or symbols presentnatural_image
Simple line drawing of a spray bottle with a red X mark and water droplets (no text or symbols)natural_image
Diagram of a blender with a blue plastic container inserted, no text or symbols presentnatural_image
Hand holding two circular buttons with power and signal icons, no text or symbols presentnatural_image
Simple line drawing of a device with two blue circular icons labeled 'Power' and 'Stimulus', connected to a curved surface (no text or symbols)

natural_image
Simple line drawing of a blender with a blue plastic container (no text or symbols)
natural_image
Illustration of a hand washing a blue object with a splashing cord (no text or symbols)natural_image
Illustration of two hands using a tool to lift water from a surface, with one hand spraying the liquid and the other pouring liquid (no text or symbols)Laikymas

natural_image
Illustration of a blue mechanical component with a downward arrow indicating motion (no text or symbols)Pakeitimo priminimas
natural_image
Illustration of a hand pressing down on a blue circular object with an upward arrow, above a circular object (no text or symbols)natural_image
Prohibition sign of a faucet without any text or symbolsnatural_image
Prohibition sign showing a faucet without spraying water, enclosed in a circle (no text)natural_image
Simple line drawing of a funnel with a water droplet inside and a blue circular icon labeled '带' (no text or symbols)natural_image
Simple line drawing of a human torso with a lock icon and star symbol (no text or labels)
natural_image
Simple line drawing of a medical or anatomical structure with a star-shaped marker and an exclamation mark (no text or symbols)Túlmelegedés
natural_image
Illustration of a hand spraying water with an inset showing a close-up of a blue object (no text or symbols)natural_image
Line drawing of a hand holding a small blue circular object on a vertical line (no text or symbols)natural_image
Illustration of a person using a hairdryer to apply facial contouring (no text or symbols present)natural_image
Illustration of a person applying facial care to their face, showing hand placement and facial area (no text or symbols)natural_image
Illustration of a person applying facial care to their face, showing the mask and hand near the chin (no text or symbols)natural_image
Illustration of a person pouring liquid from a bottle onto a blue circular object (no text or symbols)natural_image
Illustration of a person using a hairdryer to apply facial contouring (no text or symbols present)natural_image
Illustration of a blue flying saucer with red cross symbols indicating flight direction (no text or labels)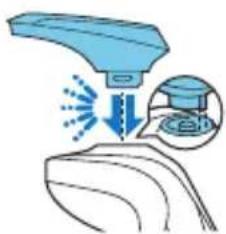
natural_image
Illustration of a medical or laboratory procedure showing a blue surgical instrument interacting with a patient's hand, with an inset magnified view (no text or symbols present)natural_image
Illustration of two hairless tools: a spray gun and a hairbrush, both showing motion and head-to-head movement (no text or symbols)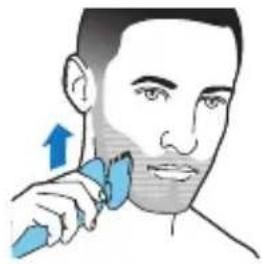
natural_image
Illustration of a person applying a blue tool to their face, with an upward arrow indicating direction (no text or symbols present)natural_image
Illustration of a person using a handheld tool to apply or brush (no text or symbols present)natural_image
Abstract diagram with nested curved shapes and small blue dots, no text or symbols presentnatural_image
Diagram of a biological structure with circular elements and blue circular markers (no text or labels)natural_image
Simple line drawing of a washing machine with a blue arrow pointing to the outlet (no text or symbols)natural_image
Illustration of a hand spraying water with a magnified inset showing a blue object (no text or symbols)natural_image
Hand holding two circular icons with 'Power' and 'Feedback' symbols, no text or labels presentnatural_image
Simple line drawing of a battery with two blue power icons and a curved circuit-like structure (no text or symbols)natural_image
Illustration of a hand washing a blue object with water flowing out (no text or symbols)natural_image
Illustration of two hands spraying water onto a surface, one with blue filter and the other with blue shoes (no text or symbols)natural_image
Illustration of a blue medical device with a blue arrow indicating downward motion (no text or symbols)natural_image
Illustration of a hand performing a medical procedure with a blue arrow indicating direction (no text or symbols)natural_image
Illustration of a hand holding three circular objects with arrows indicating direction, alongside a magnified inset showing a cylindrical object (no text or symbols)natural_image
Diagram showing a blue circular object with a downward arrow pointing to a circular structure (no text or symbols)natural_image
Diagram showing a gear shift with arrows and a checkmark, no readable text or symbols present
natural_image
Prohibition sign of a faucet without any text or symbolsnatural_image
Prohibition sign of a faucet without any text or symbolsnatural_image
Simple line drawing of a tube with a star-shaped symbol inside and a blue water tap icon nearby (no text or labels)natural_image
Simple line drawing of a human torso with a lock icon and a star symbol (no text or labels)natural_image
Simple line drawing of a human torso with a small mark and an exclamation mark (no text or symbols)Przegrzanie
natural_image
Illustration of a hand spraying water with a magnified inset showing a blue object (no text or symbols)natural_image
Line drawing of a hand holding a small blue circular object on a vertical line (no text or symbols)natural_image
Illustration of a person applying facial hair to the lower face, with no text or symbols present.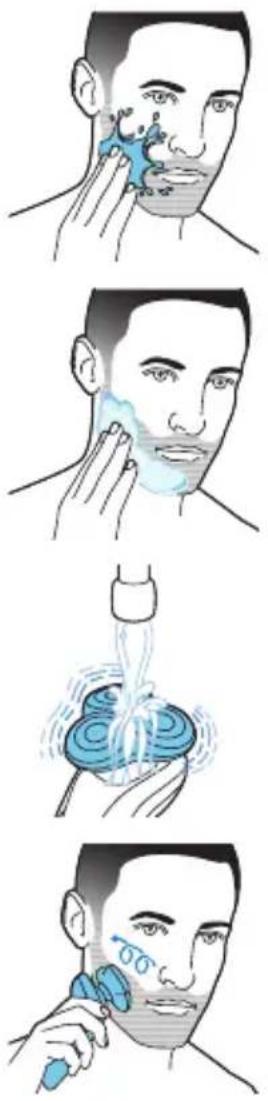
natural_image
Illustration of a blue spray gun on a surface with an inset showing a graduation cap (no text or symbols)
natural_image
Illustration of a hairbrush cutting into a tooth with a blue brush (no text or symbols)
natural_image
Illustration of a person applying a blue brush to their face, with an upward arrow indicating motion (no text or symbols)natural_image
Illustration of a person applying a blue tool to their neck area (no text or symbols)natural_image
Abstract diagram of nested organic shapes with small blue dots at the bottom (no text or symbols)natural_image
Abstract diagram with nested curved shapes and small blue dots, no text or symbols presentnatural_image
Diagram showing a hand spraying water with an inset magnified view of a mechanical component (no text or symbols)natural_image
Simple line drawing of a washing machine with a blue plastic container (no text or symbols)1 Włącz urządzenie.
natural_image
Illustration of a hand cleaning a blue object with a bottle (no text or symbols)natural_image
Illustration of two hands using a tool to lift water, showing liquid transfer and splashing (no text or symbols)2 Włącz urządzenie.
natural_image
Illustration of a blue mechanical component with a downward arrow indicating motion (no text or symbols)natural_image
Illustration of a hand holding a blue circular object with an upward arrow, above a separate view of a multi-plate device (no text or symbols)
natural_image
Diagram showing a hand holding three circular objects with blue arrows indicating direction, alongside a magnified inset of a battery (no text or symbols)natural_image
Diagram showing a blue circular object being lifted by a blue arrow onto a circular base (no text or symbols)natural_image
Diagram showing a gear or cam mechanism with directional arrows and a checkmark (no text or symbols present)natural_image
Prohibition sign showing a faucet crossed out by a diagonal line, indicating no use or prohibition (no text present)natural_image
Prohibition sign of a faucet without any text or symbolsnatural_image
Simple line drawing of a tube with a star-shaped symbol inside and a blue water tap icon nearby (no text or labels)natural_image
Simple line drawing of a medical or anatomical structure with a star-shaped marker and a blue warning circle (no text or symbols)Supraîncălzire
natural_image
Illustration of a hand holding a blue object with arrows indicating motion, alongside an inset showing a close-up of a mechanical component (no text or symbols)
natural_image
Line drawing of a hand holding a small circular object on a vertical line (no text or symbols)natural_image
Illustration of a person applying facial hair to their cheek, showing the brush and eye area (no text or symbols)
natural_image
Illustration of a person applying facial care to their ear (no text or symbols present)natural_image
Illustration of a person applying facial care to the cheek area (no text or symbols)natural_image
Illustration of a hand pouring liquid into a blue container with swirling patterns (no text or symbols)natural_image
Illustration of a person applying facial hair to their cheek, showing the brush and eye area (no text or symbols)natural_image
Illustration of a blue flying saucer with red cross symbols and upward arrows, above a stylized human figure (no text or labels)
natural_image
Illustration of a blue handheld device emitting light beams onto a surface, with an inset showing a magnified view of the device (no text or symbols present)natural_image
Illustration of a blue spray gun on a surface with an inset showing a magnified view of the gun's tip (no text or symbols present)
natural_image
Illustration of a person applying a blue tool to their face (no text or symbols)natural_image
Illustration of a robotic arm with motion arrows and a magnified inset showing a graduation cap (no text or symbols)natural_image
Line drawing of a hairbrush cutting into a toothbrush with blue motion arrows (no text or symbols)natural_image
Illustration of a person applying a blue tool to their face, with an upward arrow indicating action (no text or symbols present)natural_image
Illustration of a person applying a blue tool to their lower face (no text or symbols)natural_image
Abstract diagram with nested curved shapes and small blue dots, no text or symbols presentnatural_image
Abstract diagram with nested shapes and small blue dots, no text or symbols present
natural_image
Simple line drawing of a blender with a blue plastic container (no text or symbols)natural_image
Illustration of a hand pouring liquid into a blue container with swirling patterns (no text or symbols)natural_image
Illustration of a hand cleaning a blue object with water flowing out (no text or symbols)
natural_image
Illustration of two cleaning or disinfection methods using pipettes and buckets (no text or symbols)Depozitare

natural_image
Illustration of a blue mechanical component with a downward arrow indicating motion (no text or symbols)natural_image
Illustration of a hand performing a medical or therapeutic procedure on a patient's abdomen, with an upward arrow indicating the process (no text or symbols present)1 Opriti aparatul.
natural_image
Illustration of a hand holding three circular objects with arrows indicating direction, alongside a magnified inset showing a cylindrical object (no text or symbols)natural_image
Diagram showing a blue circular object with a downward arrow pointing to a circular structure, no text or symbols present.natural_image
Diagram showing a gear or cam mechanism with arrows and a checkmark, no readable text or symbols present.natural_image
No sign depicting a faucet with a diagonal line, crossed out by a diagonal line (no text or symbols)- Napajalnika ne zmočite.
Opozorilo

natural_image
Prohibition sign showing a faucet without raindrops, enclosed in a circle (no text)- Aparata ne odpirajte zaradi zamenjave akumulatorske baterije.
- Čistilnega sistema ali stojala za polnjenje ne potapljajte v vodo in ne spirajte pod tekočo vodo.
natural_image
Simple line drawing of a U-shaped object with a star and a blue circular icon (no text or symbols)natural_image
Simple line drawing of a human torso with a padlock icon and lock symbol (no text or labels)natural_image
Simple line drawing of a human torso with a padlock icon and a star symbol (no text or labels)Aparat je opremljen z opomnikom za zamenjavo, ki vas opozori, da je treba zamenjati brivne glave. Znak brivne enote sveti neprekinjeno belo, puščice utripajo belo in aparat piska, kar pomeni, da morate zamenjati brivne glave.
Opomba: Po zamenjavi brivnih glav morate ponastaviti opomnik za zamenjavo, in sicer tako, da za sedem sekund pridržite gumb za vklop/izklop.
Klicaj

natural_image
Simple line drawing of a human upper body with a small orange gear symbol and a blue warning icon (no text or labels)Pregrevanje
Blokirane brivne glave
natural_image
Diagram showing a hand pouring liquid into a bottle with an inset magnified view of the liquid being poured (no text or symbols)5 Brivnik postavite v nosilec (1), ga nagnite nazaj (2) in pritisnite na zgornji pokrovček, da brivnik priključite (»klik«) (3).
natural_image
Line drawing of a hand holding a circular object on a vertical line (no text or symbols)- Aparat vklopite s pritiskom na gumb za vklop/izklop.
natural_image
Illustration of a person applying facial hair to their cheek with a blue brush (no text or symbols)Suho britje
1 Vklopite aparat.
natural_image
Illustration of a person applying facial massage to the neck area (no text or symbols)1 Navlažite kožo.

natural_image
Illustration of a person applying face-to-face care to their cheek (no text or symbols)2 Na kožo nanesite brivski gel ali peno.
natural_image
Illustration of a person pouring liquid from a bottle onto a blue object (no text or symbols)natural_image
Illustration of a person applying facial hair to their neck, showing the brush near the face (no text or symbols present)natural_image
Illustration of two hand positions with a blue object and red X marks, showing mechanical or electrical damage (no text or symbols)1 Nastavek pritrdite na aparat (»klik«).
2 Vklopite aparat.
natural_image
Illustration of a blue spray gun on a surface with an inset showing a magnified view of the gun (no text or symbols)2 Glavnik potisnite naravnost v vodila na obeh straneh nastavka za oblikovanje brade (zasliši se klik).

natural_image
Illustration of a hairbrush cutting with a blue brush, showing the blade and handle (no text or symbols)
natural_image
Illustration of a person applying a blue tool to their face, with an upward arrow indicating direction (no text or symbols)1 Glavnik povlecite z nastavka za oblikovanje brade.
Opomba: Glavnik primite na sredini in ga izvlecite z nastavka za oblikovanje brade. Ne vlecite na straneh glavnika.
2 Vklopite aparat.
natural_image
Illustration of a person applying a toothbrush to their lower face (no text or symbols)natural_image
Abstract diagram of nested organic shapes with small blue dots at the bottom (no text or symbols)natural_image
Abstract diagram with nested curved shapes and small blue dots, no text or symbols present- Sistem SmartClean Plus ima dve fazi: fazo izpiranja in fazo sušenja.

Priprava sistema SmartClean za uporabo
Pozor: Sistema SmartClean ne nagibajte, da preprečite puščanje.
Opomba: Sistem SmartClean med pripravo za uporabo držite.
Opomba: Če brivnik enkrat tedensko očistite v sistemu SmartClean, vložek SmartClean traja približno tri mesece.

natural_image
Illustration of a hand spraying water with a magnified inset showing a droplet or particle (no text or symbols)1 Pritisnite na zgornji pokrovček, da brivnik postavite v nosilec (»klik«).

flowchart
graph TD
    A["Step 1: Downward movement"] --> B["Step 2: Directional motion indicator"]
    B --> C["Step 3: Motion indicator with light emission"]
    C --> D["Step 4: Process with circular indicators and directional arrows"]
    D --> E["Step 5: Process with circular indicators and directional arrows"]
    E --> F["Step 6: Return to hand"]
    F --> G["End: Checkmark with checkmark"]
2 Brivnik držite obrnjen narobe nad nosilcem. Prepričajte se, da je sprednja stran brivnika usmerjena proti sistemu SmartClean.
natural_image
Illustration of a hand mixer with blue liquid being inserted (no text or symbols)5 Čistilni vložek vstavite v sistem SmartClean.

6 Zgornji del sistema SmartClean potisnite nazaj dol (»klik«).
1 Vklopite aparat.
2 Brivno enoto izperite pod toplo tekočo vodo.
3 Izklopite aparat. Nosilec brivnih glav snemite s spodnjega dela brivne enote.
312
Slovenščina

4 Predalček za odrezane dlačice izperite pod tekočo vodo.
5 Nosilec brivne glave izperite pod toplo tekočo vodo.
natural_image
Illustration of a hand washing a blue object with liquid, no text or symbols present
natural_image
Illustration of two water spray application methods: one using a hand spraying water, the other using a second method with blue liquid (no text or symbols)3 Nastavek za oblikovanje brade in glavnik ločeno izperite pod toplo tekočo vodo.
natural_image
Illustration of a blue pen-like object with a downward arrow indicating compression or disassembly (no text or symbols)1 Aparat hranite v priloženi torbici.
Opomba: Prepričajte se, da je aparat suh, preden ga pospravite v torbico.
Zamenjava
Opomnik za zamenjavo
natural_image
Illustration of a hand performing a medical or therapeutic procedure with an upward arrow, showing no text or symbols.1 Izklopite aparat.
natural_image
Illustration of a hand holding three circular objects with blue arrows indicating direction, alongside a magnified inset showing a tool (no text or symbols)natural_image
Prohibition sign with a faucet and diagonal line symbol (no text)natural_image
Prohibition sign showing a faucet crossed out by a diagonal line, indicating no use or prohibition (no text present)- Neotvárajte zariadenie a nevyberajte nabíjatel'nú batériu.
natural_image
Simple line drawing of a thermometer with a blue square icon showing a faucet symbol (no text or labels)natural_image
Simple line drawing of a human torso with a lock icon and a star symbol, no text or labels present.natural_image
Simple line drawing of a human torso with a padlock icon and a small circle (no text or symbols)natural_image
Simple line drawing of a curved object with an orange star and a blue warning symbol (no text or labels)Prehriatie
natural_image
Diagram showing a hand spraying water with an inset magnified view of a mechanical component (no text or symbols)5 Holiaci strojček vložte do držiaka (1), nakloňte ho dozadu (2) a zatlačením horného krytu smerom nadol strojček zapojte (budete počut „cvaknutie“) (3).
Poznámka: Symbol batérie začne blikat, čo znamená, že zariadenie sa nabíja. Ked'je batéria úplne nabitá, symbol batérie nepretržite svieti.
natural_image
Line drawing of a hand holding a small blue circular object on a vertical line (no text or symbols)natural_image
Illustration of a person applying facial hair to their lower face, showing the brush and eye area (no text or symbols)
Holenie na mokro
natural_image
Illustration of a blue flying saucer with red and blue directional arrows, no text or symbols present
natural_image
Illustration of a blue handheld device emitting light beams onto a surface, with an inset showing a magnified view of the device (no text or symbols present)natural_image
Illustration of a robotic arm with motion arrows and a magnified inset showing a mechanical component (no text or symbols)
natural_image
Illustration of a person applying a blue tool to their face (no text or symbols present)3 Nástavec na zastrihávanie držte kolmo na pokožku a zariadením pohybujte nadol, pričom ho jemne pritláčajte.
4 Po použití (pozrite 'Čistenie a údržba') nástavec vyčistite.
natural_image
Illustration of a blue spray gun on a surface with an inset showing a magnified view of the gun (no text or symbols)1 Upevnite nástavec k zariadeniu (budete počut „cvaknutie“).

natural_image
Line drawing of a hairbrush cutting into a tooth with a blue brush (no text or symbols)natural_image
Illustration of a person applying a blue tool to their face, with an upward arrow indicating direction (no text or symbols present)natural_image
Illustration of a person applying a blue tool to their lower face (no text or symbols)natural_image
Abstract diagram of nested organic shapes with small blue dots, no text or symbols present- Systém SmartClean Basic má len jednu fázu: preplachovanie.
natural_image
Abstract diagram with nested shapes and small blue dots, no text or symbols present- Systém SmartClean Plus má dve fázy: preplachovanie a sušenie.
natural_image
Illustration of a hand washing a small blue container with a blue arrow (no text or symbols)5 Čistiacu kazetu vložte do systému SmartClean.

natural_image
Diagram showing a hand holding a blue object with arrows indicating motion, and a magnified inset showing a face profile (no text or symbols)1 Zapnite zariadenie.
2 Holiacu jednotku opláchnite pod teplou tečúcou vodou.
natural_image
Illustration of a hand pulling a blue object with liquid, no text or symbols present
natural_image
Illustration of a hand performing a medical or therapeutic procedure with a blue arrow indicating direction (no text or symbols present)natural_image
Illustration of a hand washing a blue object with a cord, next to a bottle (no text or symbols)natural_image
Illustration of two water spray application methods: one spraying water onto a surface, the other pouring liquid onto a surface (no text or symbols)2 Zapnite zariadenie.
natural_image
Illustration of a blue mechanical component with a downward arrow indicating motion (no text or symbols)1 Zariadenie odložte do dodaného puzdra.
Pripomenutie výmeny
1 Vypnite zariadenie.
natural_image
Diagram showing a hand holding three circular objects with blue arrows indicating movement, alongside a magnified inset of a cylindrical object (no text or symbols)- Čistiaca kazeta JC301/JC302/JC303/JC304/JC305
- Napájacia jednotka HQ8505
natural_image
Prohibition sign showing a faucet without a shower, enclosed in a circle (no text or symbols)natural_image
Prohibition sign showing a faucet without spraying water, enclosed in a circle (no text)natural_image
Simple line drawing of a funnel with a water droplet inside and a blue circular icon labeled '水' (water) in the corner (no text or symbols on the diagram itself)natural_image
Simple line drawing of a human torso with a lock icon and a star symbol, no text or labels present.natural_image
Simple line drawing of a human torso with a padlock icon and a small circular button (no text or symbols)natural_image
Simple line drawing of a human lower body with an orange star and a blue warning symbol (no text or labels)natural_image
Illustration of a hand spraying water with a magnified inset showing a blue object inside (no text or symbols)natural_image
Line drawing of a hand holding a circular object on a knee joint (no text or symbols)natural_image
Illustration of a person using a hairdryer to apply facial contouring (no text or symbols present)natural_image
Illustration of a person applying facial massage to the neck area (no text or symbols)natural_image
Illustration of a person applying a blue-tinted product to their face, with no visible text or symbolsnatural_image
Illustration of a hand pouring liquid into a blue container with a handle (no text or symbols)natural_image
Illustration of a person applying facial hair to their neck, showing the brush and eye area (no text or symbols)natural_image
Line drawing of a person applying a blue tool to their neck (no text or symbols)natural_image
Diagram of a biological structure with internal components and small blue markers (no text or labels)natural_image
Abstract diagram with nested curved shapes and small blue dots, no text or symbols presentnatural_image
Simple line drawing of a blender with a blue arrow pointing to its side (no text or symbols)natural_image
Illustration of a hand spraying water with arrows indicating flow direction (no text or symbols)natural_image
Hand holding two blue circular buttons labeled 'Power' and 'Battery', with a small object nearby (no text or symbols)natural_image
Simple line drawing of a device with two blue circular icons labeled 'Power' and 'Hot Water', no text or symbols present.
natural_image
Diagram of a washing machine with blue liquid being inserted into it (no text or symbols)natural_image
Illustration of a hand washing a blue object with a bottle above it (no text or symbols)natural_image
Illustration of two water spray droplets on a diagonal line, one spraying water and the other pouring liquid (no text or symbols)2 Включете уреда.
natural_image
Illustration of a blue mechanical component with a downward arrow indicating motion (no text or symbols)natural_image
Illustration of a hand performing a medical or therapeutic procedure on a patient's abdomen, with an upward arrow indicating the process (no text or symbols present)
natural_image
Diagram showing a hand holding three circular objects with blue arrows indicating direction, and a magnified inset showing a battery cell (no text or symbols)natural_image
Diagram showing a blue circular object with a downward arrow pointing to a circular structure, no text or symbols present.natural_image
Diagram showing a gear with motion indicators and a checkmark, no readable text or symbols presentnatural_image
Prohibition sign showing a faucet without raindrops, enclosed in a circle (no text)natural_image
Prohibition sign showing a faucet without raindrops, enclosed in a circle (no text)natural_image
Simple line drawing of a tube with a water droplet inside and a blue circular icon showing a faucet (no text or symbols)natural_image
Simple line drawing of a human torso with a lock icon and a star symbol (no text or labels)natural_image
Simple line drawing of a human torso with a lock icon and a star-shaped button (no text or symbols)natural_image
Illustration of a hand spraying water with an inset showing a magnified view of a person's face (no text or symbols)1 Вставте малу вилку позаду системи SmartClean.
natural_image
Line drawing of a hand pressing a circular object on a knee joint (no text or symbols)natural_image
Illustration of a person applying facial hair to their cheek, showing the brush and eye area (no text or symbols)natural_image
Illustration of a person applying facial care to their face, showing hand placement and mask (no text or symbols)natural_image
Illustration of a person applying face-to-face care to their cheek (no text or symbols)natural_image
Illustration of a hand washing a blue circular object with water flowing from a bottle (no text or symbols)natural_image
Illustration of a person using a hairdryer to apply facial contouring (no text or symbols present)natural_image
Illustration of a blue flying saucer with red and blue symbols indicating flight or landing (no text or labels)
natural_image
Illustration of a blue handheld device emitting light beams onto a surface, with an inset showing a magnified view of the device (no text or symbols present)natural_image
Illustration showing two-step hair styling techniques: top shows a brush tip with motion arrows, bottom shows a hairbrush head with motion arrows (no text or symbols)
natural_image
Illustration of a person applying a blue tool to their face, with an upward arrow indicating direction (no text or symbols present)natural_image
Line drawing of a person applying a blue tool to their neck (no text or symbols)natural_image
Abstract diagram with curved lines and small blue dots, no text or symbols presentnatural_image
Diagram of a biological structure with internal components and blue circular markers (no text or labels)natural_image
Simple line drawing of a washing machine with a blue arrow pointing to the outlet (no text or symbols)natural_image
Diagram showing a hand pouring liquid into a container with an inset view of a mechanical component (no text or symbols)natural_image
Hand holding two circular buttons with 'Power' and 'Feedback' symbols, no text or labels presentnatural_image
Simple line drawing of a battery with two blue power button icons and a curved base (no text or symbols)natural_image
Illustration of a hand cleaning a blue object with a bottle (no text or symbols)
natural_image
Illustration of a hand spraying water onto a surface with another hand holding a spray bottle (no text or symbols)natural_image
Illustration of a blue mechanical component with a downward arrow indicating motion (no text or symbols)natural_image
Illustration of a hand performing a medical or therapeutic procedure with a blue arrow indicating upward motion (no text or symbols present)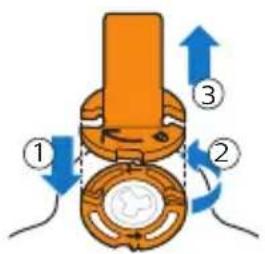

natural_image
Diagram showing a hand holding three circular objects with blue arrows indicating rotation or movement, alongside a magnified inset of a cylindrical object (no text or symbols)
natural_image
Diagram showing a blue circular object with a downward arrow pointing to a circular structure (no text or symbols)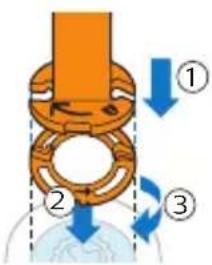
natural_image
Diagram showing a gear or wheel with arrows indicating motion, and a green checkmark on the right (no text or symbols)- Introduction
- General description (Fig.1)
- Important safety information
- Danger
- Warning
- Caution
- Electromagnetic fields (EMF)
- General
- The display
- Charging
- English
- Battery fully charged
- Battery low
- Remaining battery charge
- Cleaning reminder
- Travel lock
- Activating the travel lock
- Deactivating the travel lock
- Replacement reminder
- Notification symbol
- Overheating
- Blocked shaving heads
- Charging with the supply unit
- Charging in the SmartClean system (specific types only)
- Using the appliance
- Switching the appliance on and off
- Shaving
- Skin adaptation period
- Shaving tips
- Dry shaving
- Wet shaving
- Using click-on attachments
- Removing or attaching click-on attachments
- Using the precision trimmer attachment
- Using the beard styler attachment with comb
- Using the beard styler attachment without comb
- Cleaning and maintenance
- Cleaning the shaver in the SmartClean system
- English
- Using the SmartClean system
- Replacing the cartridge of the SmartClean system
- Cleaning the shaver under the tap
- English
- Cleaning the click-on attachments
- Cleaning the trimmer attachment
- Never dry the trimmer with a towel or tissue, as this may damage the trimming teeth.
- Cleaning the beard styler attachment
- Storage
- Replacement
- Replacing the shaving heads
- Ordering accessories
- Recycling
- Removing the rechargeable shaver battery
- Be careful, the battery strips are sharp.
- Warranty and support
- Warranty restrictions
- Troubleshooting
- Shaver
- Úvod
- Připomenutí výměny
- Přehřivání
- Ucpané holicí hlavy
- Ülekuumenemine
- Upozorenje
- Punjenje
- Deaktiviranje putnog zaključavanja
- Blokada glava za brijanje
- Upotreba aparata
- Vlažno brijanje
- Uporaba nastavka za podrezivanje
- Uporaba nastavka za oblikovanje brade bez češlja
- Priprema sustava SmartClean za uporabu
- Oprez: Nemojte naginjati SmartClean sustav da ne bi došlo do curenja.
- Uporaba sustava SmartClean
- Čišćenje nastavka za oblikovanje brade
- Perkaitimas
- Laikymas
- Pakeitimo priminimas
- Túlmelegedés
- Przegrzanie
- Supraîncălzire
- Depozitare
- Opozorilo
- Klicaj
- Pregrevanje
- Blokirane brivne glave
- Suho britje
- Priprava sistema SmartClean za uporabo
- 312
- Slovenščina
- Zamenjava
- Opomnik za zamenjavo
- Prehriatie
- Holenie na mokro
- Pripomenutie výmeny
Brand : PHILIPS
Model : SHAVER Series 9000 S9211
Category : Razor