
HB95054 - Oven SIEMENS - Free user manual and instructions
Find the device manual for free HB95054 SIEMENS in PDF.


| Product type | Built-in oven |
| Brand | Siemens |
| Model | HB95054 |
| Dimensions (W x H x D) | 595 x 595 x 548 mm |
| Interior volume | 71 liters |
| Power supply type | Electric, 230 V / 16 A |
| Total power | 3400 W |
| Energy class | A |
| Cooking modes | Convection (fan-assisted), natural convection, top/bottom heat, grill, convection + grill |
| Special functions | Pyrolysis, assisted cooking, defrosting, keep warm |
| Cleaning | Pyrolytic (self-cleaning) |
| Door | Removable cool glass, 4 panes |
| Lighting | LED, replaceable only by professional |
| Timer | Digital, timer and delayed start |
| Safety options | Child lock, automatic shut-off, door safety |
| Included accessories | 1 grid, 1 baking tray, 1 drip pan |
| Repairability index | 7.8/10 |
| Country of manufacture | Germany |
| Net weight | Approximately 38 kg |
| Power cable length | 1.2 m |
Frequently Asked Questions - HB95054 SIEMENS
User questions about HB95054 SIEMENS
0 question about this device. Answer the ones you know or ask your own.
Ask a new question about this device
Download the instructions for your Oven in PDF format for free! Find your manual HB95054 - SIEMENS and take your electronic device back in hand. On this page are published all the documents necessary for the use of your device. HB95054 by SIEMENS.
USER MANUAL HB95054 SIEMENS
natural_image
Technical line drawing of a mechanical component with internal channels and mounting brackets (no text or symbols)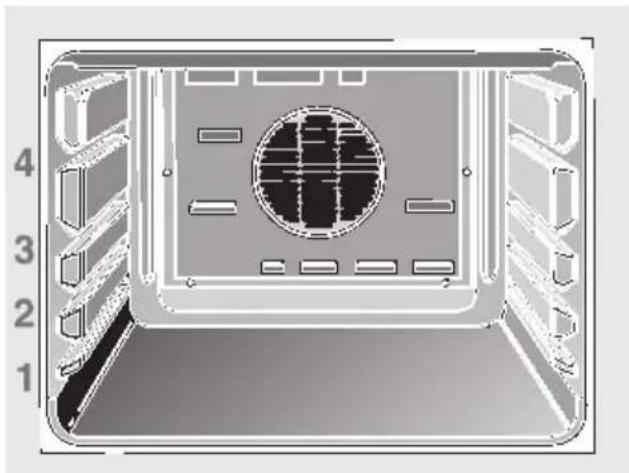
natural_image
Technical diagram of a server rack with numbered slots and a central circular component (no text or symbols)Elektronik-Uhr
Backen in Backformen
natural_image
Illustration of a baked pie on a metal grater (no text or symbols)
natural_image
Illustration of a tray with multiple small round objects and some on top, no text or symbols present.Hinweis:
natural_image
Illustration of a rolled food item on a rectangular tray (no text or symbols)natural_image
Illustration of a tray with six dark, oval-shaped objects inside, placed on top of a transparent base (no text or symbols)natural_image
Hand turning a switch into a bracket (no text or symbols visible)
natural_image
Illustration of a hand inserting a cable into a door panel, with an arrow indicating direction (no text or symbols)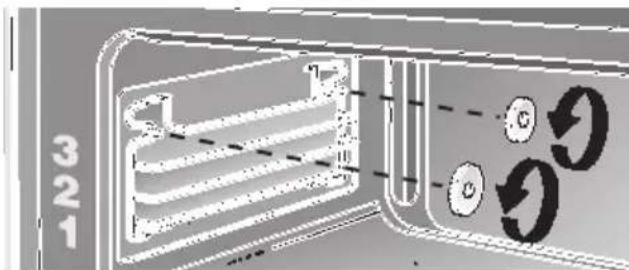
natural_image
Illustration of a hand holding a wall-mounted device with a screen, next to a door (no text or symbols visible)
natural_image
Technical line drawing of a mechanical assembly with no visible text or symbols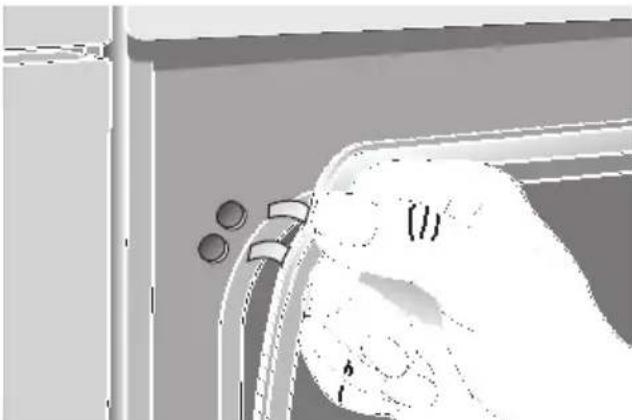
natural_image
Illustration of a hand pressing down on a surface with two circular buttons (no text or symbols)Was ist wenn?
natural_image
Illustration of a hand using a tool to adjust or install a component, no text or symbols presentTable of Contents
Operating Instructions
Page
for the user Page
Important Information
□ Notes on disposal 34
☐ Before connecting your new appliance ... 34
☐ Appliance safety considerations 35
Before Using Your Appliance for the First Time
□ Preliminary cleaning 35
☐ Initial burn-in 35
Introducing: Your New Cooker
□ Control panel overview 36
□ Accessories 37
□ Slide-in levels 37
Electronic Timer
□ Time of day 38
□ Alarm function 39
□ Automatic OFF 40
☐ Automatic ON and OFF 41
Baking and Roasting
☐ Description of Oven Features 42
□ Switching the oven ON and OFF 43
□ Baking 44-47
□ Roasting 48+49
□ Circulating air grilling 50+51
Grilling 52+53
Thawing / Drying / Heating 54+55
Cooking Tips and Helpful Hints 56
Cleaning and Care
□ Important cleaning basics 57
□ Enamel and glass 57
□ Stainless steel front 57
□ Oven interior 57
□Removing/installing the oven door 58
□ Removing the suspend grids 58
Service and Repair Information 59
Trouble-shooting Guide 60
Assembly instructions
for the fitter and
kitchen expert Page
Important instructions 61
Furniture programme 61
Installation 62
Notes on disposal
☐ Old appliances still have some residual value. An environment-friendly method of disposal will ensure that valuable raw materials can be recovered and used again.
Before you dispose of your old appliance, make sure that it has been rendered inoperable.
☐ Your new appliance was protected by suitable packaging while it was on its way to you. All materials used for this purpose are environment-friendly and suitable for recycling. Please make a contribution to protecting the environment by disposing of the packaging appropriately.
Up-to-date information concerning options for disposing of your old appliance and the packaging from the new one can be obtained from your retailer or local government office.
Before connecting your new appliance
☐ Before using your new appliance, please read these Instructions for Use carefully. They contain important information concerning your personal safety as well as on use and care of the appliance.
☐ The Instructions for Use apply to several versions of this appliance. Accordingly, you may find descriptions of individual features that do not apply to your specific appliance.
☐ Please keep the operating and installation instructions in a safe place; this important documentation may also be of use to a possible subsequent owner.
☐ Do not use the appliance if it is damaged in any way.
☐ Installation and connection of the appliance should be performed according to the instructions and connection diagram provided, and should be entrusted to a licensed specialist. In the event of a damage that occurs as a result of improper connection, the warranty will be void.
☐ Our appliances meet the applicable safety regulations for electrical appliances. Repairs may be performed only by customer service engineers trained by the manufacturer. Inexpert repairs may entail serious injury to you, the user.
Appliance safety considerations
☐ The appliance should only be used for the preparation of food.
☐ The surfaces of heating and cooking appliances get hot during operation. The interior oven walls and the heating elements get extremely hot. Always keep children away from the appliance.
☐ Never leave the appliance unattended when cooking with fat or oil. They can catch fire if overheated.
□ Clean the oven regularly.
Fatty or oily remnants could ignite when the oven is switched on.
□ Make sure that the power cord never comes into contact with the hotplates, and does not get caught in the hot oven door. The plastic insulation could melt.
☐ In the case of a defect, switch off (or remove) the mains fuse in the building electrical system.
☐ Do not store combustible items in the oven. They could ignite if the oven is switched on accidentally. Do not place any objects on the hob which might catch fire.
☐ Do not clean the oven or the hob with steam or high-pressure cleaners.
☐ If using hot air ⚙, do not place greaseproof paper loosely in the oven (e.g. when heating the oven). The hot-air fan could draw in the paper which may damage the heater and fan.
☐ Do not insert a baking sheet at the bottom of the oven, or cover it with aluminium foil, because a heat build-up would result. Roasting and baking times would change, and the enamel would be damaged.
☐ Never pour water directly into the hot oven. Damage to the enamel could result.
☐ Fruit juices dripping from the baking sheet leave spots that cannot be removed later. For baking, use the deeper universal baking pan.
□ Never stand or sit on the open oven door.
☐ The oven door must close properly.
Keep the door sealing surfaces clean.
Before Using Your Appliance for the First Time
Preliminary cleaning:
- Clean the appliance exterior with a soft moistened cloth.
- Clean the oven and the accessories with a hot detergent solution.
Initial burn-in
- Heat the empty oven for approx. 30 minutes.
Select top and bottom heat at a setting of 240^ C.
During the initial burn-in phase, please open the kitchen windows to dissipate unpleasant odours.
Introducing: Your new Oven

The control panel:
☐ The switches are retractable. To engage and disengage, depress the switch, making sure that it is in OFF position.
☐ The control panel is illuminated. As soon as you set a function, illumination is switched on.
Main oven functions:
Oven light
"Defrost" setting
Conventional (top and bottom heat)
Hot air
Hot air grilling
Radiant grill-centre
element only,
for small amounts of food
Radiant grill-full element


Mini oven functions:

Oven light

Conventional (top and bottom heat)

Radiant grill-centre element only, for small amounts of food

Radiant grill-full element

Bottom heat
Accessories
☐ Your appliance is supplied with:
| 2 Baking tray |
| 1 Wire shelf |
| 1 Universal pan with grid |
Note:
☐ The baking tray or universal pan may distort while the oven is operating. This is caused by major temperature differences on the utensil. These differences may occur if only one part of the utensil was covered or if deep-frozen food, e. g. pizza, was placed on the utensil.
The distortion will already subside again during baking, roasting or grilling.
Slide-in levels
Mini oven:
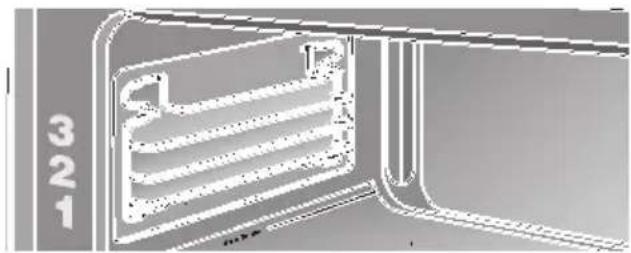
☐ Your oven features 3 slide-in levels. The slide-in levels are counted from bottom to top. The numbers are marked in the oven.
Main oven:
☐ Your oven features 4 slide-in levels. The slide-in levels are counted from bottom to top. The numbers are marked in the oven.
□ When using hot-air baking or roasting, do not use slide-in level »2«, in order not to block air circulation.
natural_image
Technical line drawing of a mechanical component with internal channels and mounting brackets (no text or symbols)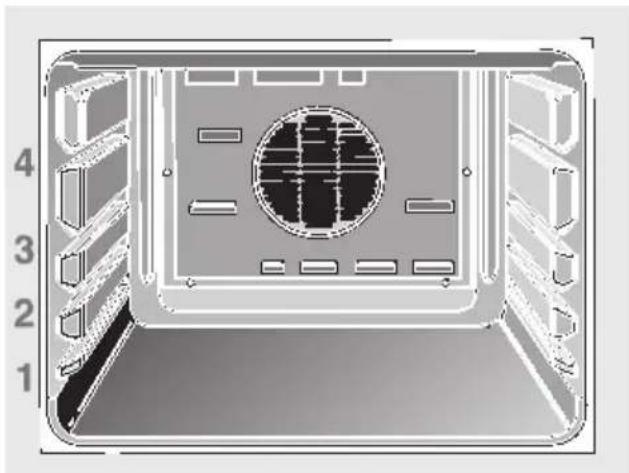
natural_image
Technical diagram of a server rack with numbered slots and a central circular component (no text or symbols)Electronic timer
Notes:
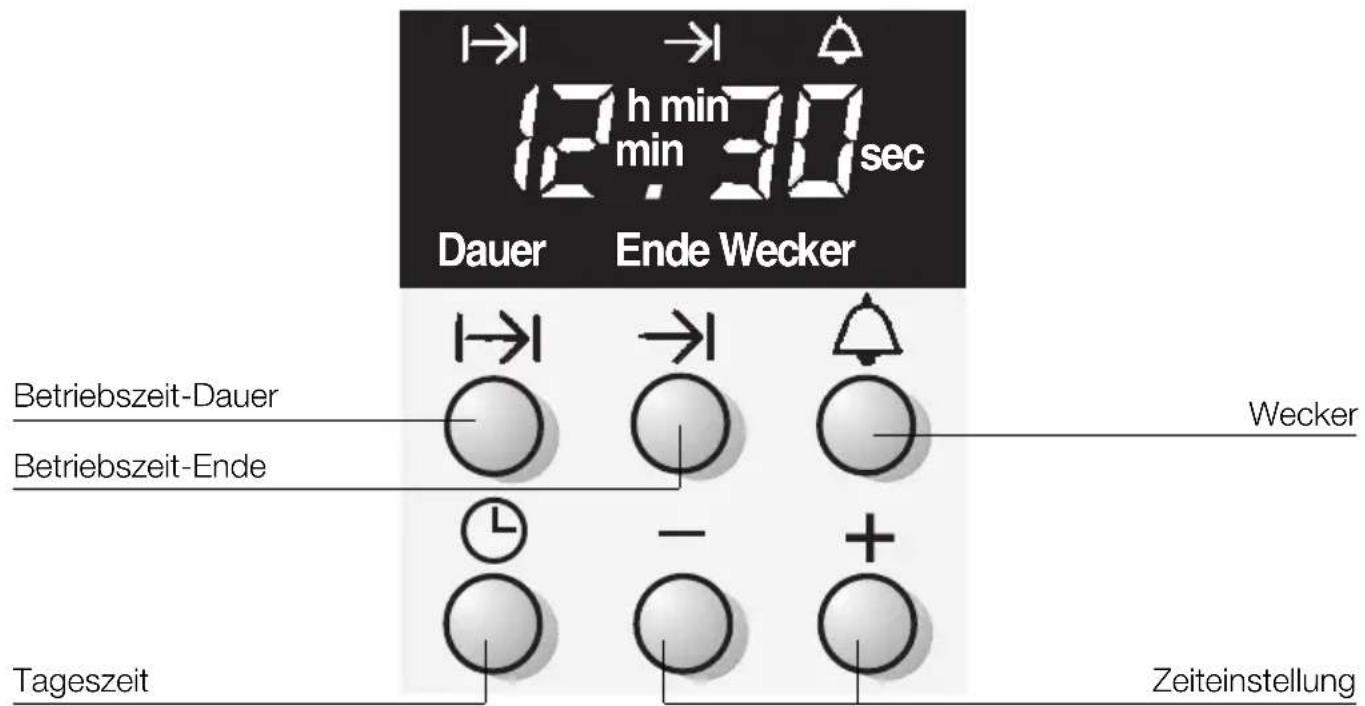
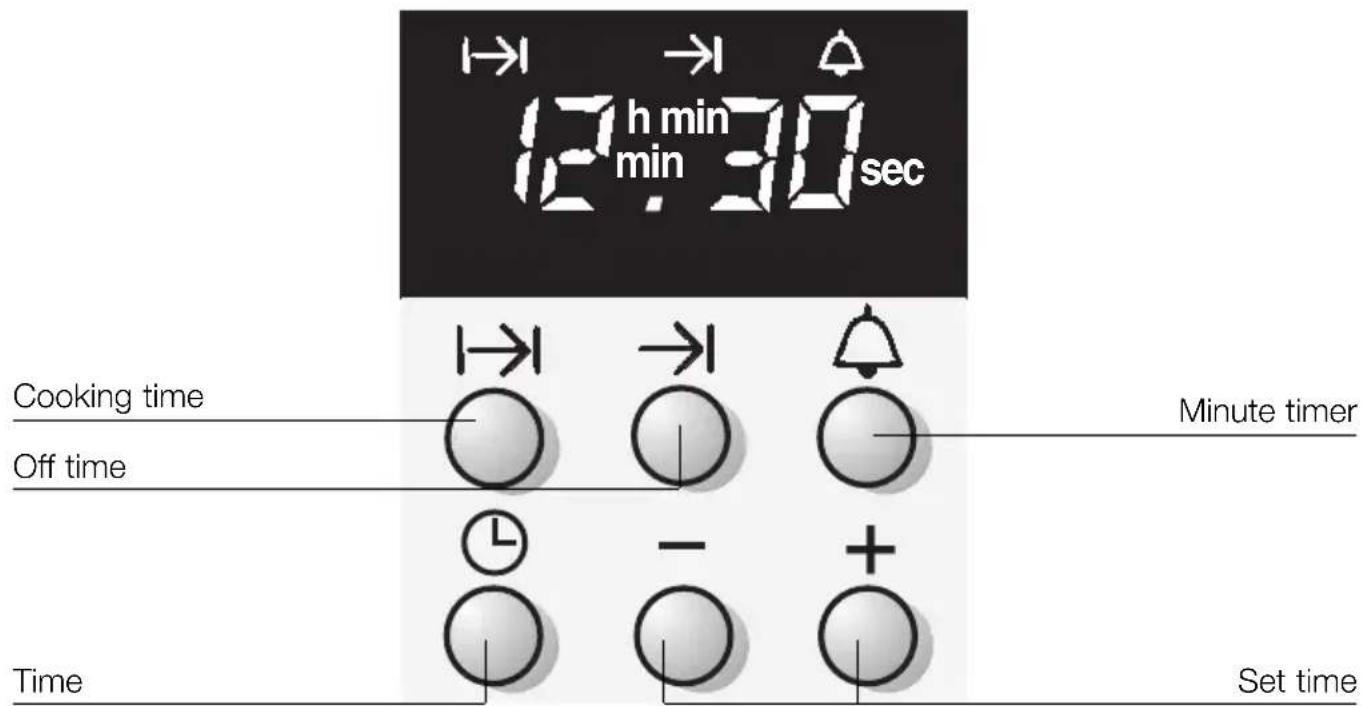
☐ If you keep the button – or + pressed down, you can set the time in steps of 10 minutes.
Time of day
□ Before you use your appliance for the first time, it is necessary to set the current time on the electronic timer.
□ After connecting to the mains, or after a power failure, the display 0.00 will blink.
Setting the time of day:
- Press the clock button ⏻.
- Set the current time with the - or + button. The time will automatically be taken over after a few seconds.
Changing the time (e.g. transition from summer to winter time):
Caution! The time of day cannot be changed whilst a duration or an end is set.
- Press the clock button Ⓤ.
- Set the current time with the - or + button.
☐ The time of day is not displayed if you have already set the timer, a duration or an end. Should you wish to know the time, simply press the clock button ⏻. The time appears in the display for a few seconds.

The alarm
☐ The alarm (timer) can be set at any time.
This applies even if a duration or an end has already been set.
☐ The alarm time always counts down visibly in the display.
The alarm also features a special acoustic signal. This enables you to hear when the alarm time or a selected duration has expired.
Setting procedure:
- Press the alarm button ⏱.
- Set the desired alarm time with the - or + button.
☐ The selected time is automatically registered after a few seconds. The alarm time begins to count down in the clock display.
☐ On completion of the selected time, an acoustic signal sounds and the alarm symbol flashes. It is possible to switch off the signal prematurely by pressing the alarm button 🔒.
Correction:
□ Press the alarm button ⚙. Change the time with the - or + button.
Cancelling:
□ Press the alarm button ⚠ twice in quick succession.
Setting:

Automatic timer for the main oven
☐ You can switch the oven on and off via the electronic clock.
Automatic switch off:
☐ If you wish to bake or roast food immediately, it is only necessary to set the cooking time.
- Select the heating system and the oven temperature.
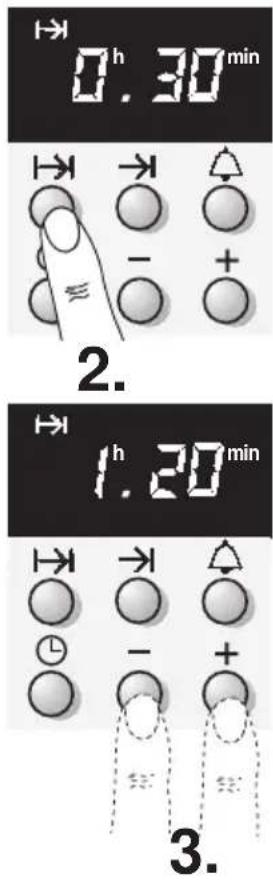
- Press the time button .
- Change the recommended cooking time with the - or + button.
The oven starts after a few seconds.
☐ An acoustic signal sounds when the time expires. The oven switches off. You may switch off the signal prematurely by pressing the time button I→I.
☐ If the meal is not yet ready, make a new time setting using the knob.
☐ Switch off the function selector when your meal is ready.
Correction:
☐ The duration can be changed at any time. Press the cooking time button I→I and correct the duration of cooking time with the - or + button.
Cancel:
☐ Switch off the function selector.
Notes:
☐ The alarm time counts down in the clock display. If you want to know how much longer the meal in the oven will take, simply press the time button I→I. The time remaining is then displayed for a few seconds.
☐ You can set any time between 1 minute and 23 hours, 59 minutes.


Automatic switch on and switch off:
Please remember that easily spoiled foods must not be allowed to remain in the oven for too long.
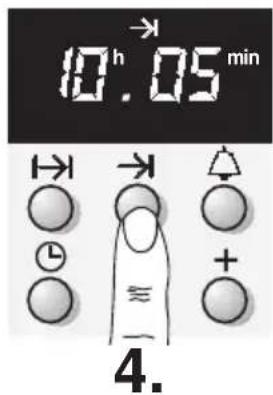
Need to be somewhere else – quickly? Don't worry, the food will still be ready at the right time. That's because the oven switches on and off automatically at the desired times.
- Select the heating system and the oven temperature.
- Press the time button I→I.
- Change the recommended cooking time with the - or + button.
- Press the end button →l. The end time appears in the display. This represents the time when the oven will switch off. Change this to a later time.
- Set the new end time with the + button.
☐ The oven switches on and off automatically. The clock display contains the time remaining until the oven switches on. The duration then begins to count down.
☐ An acoustic signal sounds when the time expires. The oven switches off. You may switch off the signal prematurely by pressing the time button I→I.
☐ If the meal is not yet ready, make a new time setting using the knob.
☐ Switch off the function selector when your meal is ready.
Correction:
☐ Before starting the oven, you may change the end time at any juncture. To do this, press the end button →l. Change the end time with the - or + button.
Cancel:
□ Switch off the function selector.
Note:
☐ The end time will appear for a few seconds if you press the end button →l.

Definition of Oven Features – Main oven
"Defrost" setting

Without temperature.
Recommended for delicate bakeware only (i.e., whipped-cream gateaus).
Top and bottom heat

The heat is generated through radiators situated above and below in the oven and transmitted to the food being baked and cooked by radiation.
- Particularly suited for roasting and baking on one level, for sensitive baked goods and lean meat cuts and bread.
- Use only one insertion level.
We recommend:
Insertion level 1 or 2.
- For further details see baking and roasting tables.
Hot air

The hot air in the oven is circulated by a blower located in the rear wall of the oven, which causes a particularly good heat transmission to the food being baked and roasted.
- Particularly suite for thawing and baking also simultaneously at several levels.
- Ideally usable for certain baked goods like Pizza, yeast twist or cream puffs.
- Do not use insertion level 2, to avoid impairing the air circulation.
Circulating air grilling

The combination between grill and blower.
- Particularly suited for grilling fat meal cuts and poultry.
- Circulating air grilling with closed oven door (energy-saving).
- Use only one insertion level.
We recommend: Insertion level 2 or 3.
- For further details see roasting tables.
Grill


The heat is generated by the radiator and transmitted to the food being grilled by radiation.
- Particularly suited for flat grilled foods like chops, steaks or toast.
- Grilling with closed oven door (energy-saving).
- Use only one insertion level.
We recommend: Insertion level 3 or 4.
- For further details see grilling table.
Centre-area grill

Advantages:
- only the centre area of the grill element heats up
- especially useful with small amounts of food
- energy-saving operation
Full-widthgrill

Advantages:
– the entire grill element heats up
- especially useful with large amounts of food
Top and bottom heat \_\_\_\_
The heat is generated through radiators situated above and below in the oven and transmitted to the food being baked and cooked by radiation.
- Particularly suited for roasting and baking on one level, for sensitive baked goods and lean meat cuts and bread.
- Use only one insertion level.
We recommend: Insertion level 1 or 2.
- For further details see baking and roasting tables.
Grill \_\_\_\_
The food being cooked is exposed to heat from the grill element at the top of the oven cavity.
Advantages:
- Particularly suitable for flat, small cuts of meat, i.e., steaks and sausages, fish, vegetables and toast.
- Grilling with closed oven door (energy-saving).
- Use only one insertion level.
We recommend: Insertion level 2 or 3.
- For further details see grilling table.
Centre-area grill \_\_\_\_
Advantages:
- only the centre area of the grill element heats up
- especially useful with small amounts of food
- energy-saving operation
Full-widthgrill \_\_\_\_
Advantages:
- the entire grill element heats up
- especially useful with large amounts of food
Bottom heat \_\_\_\_
With this setting on the heating element if the base of the oven cavity is activated.
Advantages:
- Particularly useful with dishes that require a distinctive bottom crust or browning e.g. casseroles, baking blind, quiches.
⚠️ Use just before the end of the baking or roasting time.
Switching the Main and Mini oven ON and OFF
Before you switch on your oven, decide which heating system you would like to use.
Switching on the oven:
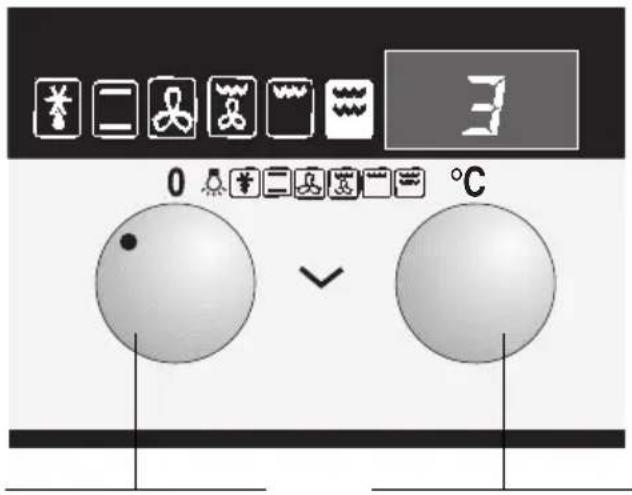
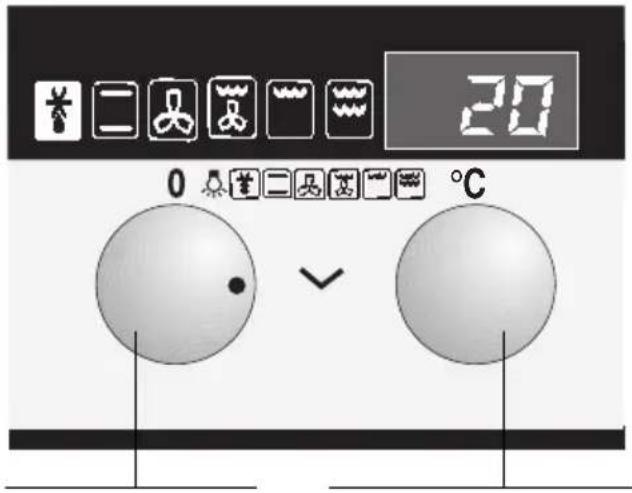
Turn the function selector until the symbol for the desired heating system illuminates.
☐ The suggested temperature is displayed and the oven light switches on.
☐ You can increase or reduce the suggested temperature with the temperature selector in steps of 5^ C (see temperatures in the table of baking or roasting times).
☐ The indicator light for the oven temperature glows red during the heating phase and during reheating. When the set temperature has been reached, the indicator light goes out. The light does not illuminate for grilling.
Switching off the oven:
To switch off the oven, turn the function selector to the ☐ position. All functions are cancelled.
Note:
☐ The appliance features a cooling fan which runs until the oven has cooled down.
Example: Hot air – Main oven

Function selector Temperature selector
Temperature ranges of the various heating systems
| System Preferred Temperature temperature in °C in °C | range | |
| 20 20 - 80 | ||
| 50 - 275 | ||
| 50 - 275 | ||
| 50 - 275 | ||
| 1 | - | |
| 1 | - | |
| 50 - 275 | ||
3
3
Using baking tins
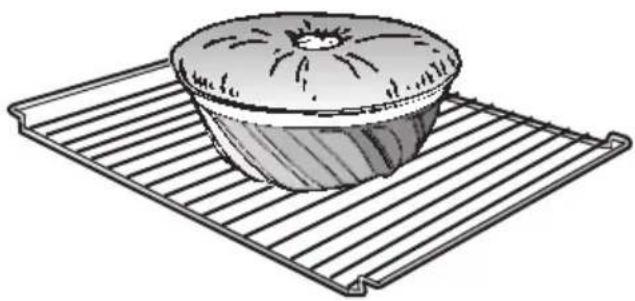
□ Always place baking tins in the centre of the baking grill.
Top/bottom heat:
☐ Dark-coloured baking tins made of metal yield the best results.
☐ For fine-tuning your baking results, create an intermediate slide-in level by turning the baking grill upside-down.
☐ If the cake bottom gets too dark:
Check the slide-in level. Shorten the baking time, and possibly use a lower baking temperature.
☐ If the cake bottom stays too light:
Check the slide-in level. Increase the baking time, select a lower temperature, or use a dark metal baking tin.
Hot-air circulation:
☐ You can use baking tins of any material and having any colour, as long as they are oven-proof.
☐ Do not place baking forms or high cakes too close to the rear oven wall.
Using baking sheets
☐ The slanted (handle) end of the baking sheet must always face the oven door.
□ Always fully insert baking sheets into the oven.
Notes:
☐ You can influence the degree of browning by changing the temperature setting.
☐ If a cake collapses after removing it from the oven, use less liquid on your next attempt, consider using a longer baking time, or use a slightly lower temperature setting.
natural_image
Illustration of a baked pie on a metal rack (no text or symbols)
natural_image
Illustration of a tray with multiple circular objects and small icons, no text or symbols present.Note:
☐ All figures indicated in the table are recommended values only and may vary depending on the quality of the food.
| Type of cakes Shelf Temperature baking time and pastries height in °C in minutes height in °C | Shelf Temperature C | ||||
| Cake mixtures | |||||
| Cake on baking sheet with topping | |||||
| 1 baking sheet | 1 | 150–160 | 40–50 | 1 | 180–190 |
| 2 baking sheets | 1 + 3 | 150–160 | 45–55 | - | - |
| Square cake | 1 | 150–160 | 60–70 | 2 | 170–180 |
| Round cake | 3 | 150–160 | 50–70 | 2 | 170–180 |
| Tall cake | 1 | 150–160 | 50–70 | 2 | 170–180 |
| Fruit flan base (preheat) | 3 | 150–160 | 30–40 | 2 | 170–180 |
| Short pastry | |||||
| Cake on baking sheet with crumble mixture | |||||
| 1 baking sheet | 1 | 160–170 | 50–80 | 1 | 190–200 |
| 2 baking sheets | 1 + 3 | 160–170 | 50–80 | - | - |
| Cake on baking sheet with moist topping (e.g. cream) | 1 | 150–170 | 50–80 | - | - |
| Cake in tin (e.g. cheesecake) | 3 | 150–170 | 50–90 | 2 | 170–180 |
| Fruit flan base (preheat) | 3 | 150–170 | 25–35 | 2 | 190–200 |
| Sponge mixture | |||||
| Swiss roll (preheat) | 1 | 180–190 | 8–15 | 1 | 200–220 |
| Water biscuit | - | - | 30–45 | 2 | 170–180 |
| Fruit flan base | 3 | 150–170 | 20–25 | 2 | 170–180 |
Baking table 📋 or ☐ Main oven
| Type of cakes Shelf Temperature baking time and pastries height in °C in minutes height in °C | Shelf Temperature C | ||||
| Yeast dough | |||||
| Cake on baking sheet with crumble mixture (e.g. apple crumble) | |||||
| 1 baking sheet | 1 | 170–180 | 30–60 | 1 | 180–200 |
| 2 baking sheets | 1 + 3 | 170–180 | 40–60 | - | - |
| Plaited bun, 500 grams flour | 3 | 160–170 | 35–50 | 1 | 180–190 |
| Round cake | 3 | 160–170 | 30–50 | 2 | 180–190 |
| Tall cake | 1 | 160–170 | 30–50 | 2 | 180–190 |
| Biscuits | |||||
| Meringue | 3 | 70–90 | 110–130 | 2 | 70–90 |
| Puff pastry (preheat) | 3 | 180–200 | 20–30 | 2 | 200–220 |
| Choux pastry (preheat) | 3 | 180–190 | 20–30 | 2 | 200–220 |
| Viennese whirl | |||||
| 1 baking sheet | - | - | 20–30 | 2 | 170–180 |
| 2 baking sheets | 1 + 3 | 150–160 | 25–35 | - | - |
| Savoury dishes | |||||
| Soufflé consisting of raw ingredients | 1 | 180–190 | 45–80 | 2 | 200–210 |
| Pizza | 3 | 180–190 | 25–45 | 1 | 210–230 |
| Quiche (preheat) | 3 | 180–190 | 40–60 | 1 | 210–230 |
| Bread, 1 kg (preheat) | |||||
| Start baking | 1 | 200–220 | 10–15 | 2 | 200–240 |
| Finish baking | 1 | 180–210 | 45–60 | 2 | 190–210 |
Roasting with top/bottom heat
Notes:
□ Meat can be roasted in the oven in a particularly economical fashion if the weight of the cut exceeds 750 grams.
□ Roasting in an uncovered pot:
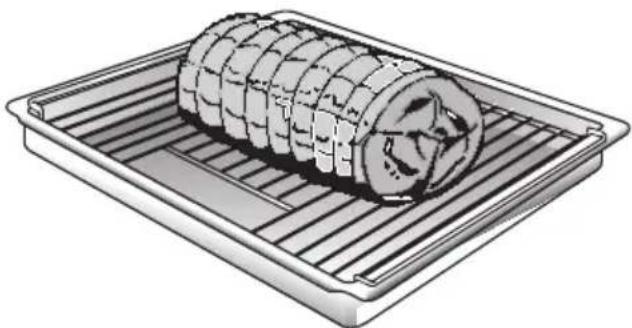
Rinse the universal baking pan and/or the roaster with water, and place the meat into it. The slide-in level depends on the size and height of the roast.
☐ Place the grill into the universal baking pan and slide them together into the same slide-in level.
☐ With fat meat and poultry, pour 125 to 250 ml of water (to suit the size and kind of roast) into the universal pan. At your discretion, baste lean meat with fat, or cover it with bacon strips.
☐ The roast drippings collecting in the universal pan make a tasty gravy. Dissolve the drippings with hot water, bring to a boil, thicken with corn starch, season to taste and, if required, pass it through a strainer.
☐ No preheating is required. Save energy by putting the roast into the oven while it is still cold.
natural_image
Illustration of a rolled food item on a rectangular tray (no text or symbols)☐ Roasting in a covered pot:
Place the meat – whether fresh or frozen – into the roasting pot (or Dutch oven), cover it with a matching lid, and place it on the grill in the oven. You can fine-tune the slide-in level by turning the grill upside-down (intermediate levels). We recommend that beef roast be prepared in a covered roasting pot.
Cooking tips:
☐ For roasting, use only cookware with oven-proof handles.
☐ Prepare large roast directly in the universal pan, without using the grill.
☐ Smaller cuts of roast can be roasted on aluminium foil. To do so, bend the edges of the foil upward, as if to form a dish, and place it on the grill.
□ After the end of the selected roasting time and with the oven switched OFF, leave the roast in the closed oven for approx. 10 minutes.
Note:
☐ Roast in open casserole dish on wire shelf.
□ Shelf height 2
large, solid pieces of meat = longer roasting time, lower temperature.
Flat pieces of meat = shorter roasting time, higher temperature.
☐ The roasting time does not change considerably if two approximately equally large pieces of the same type of meat are roasted simultaneously.
☐ All figures indicated in the table are recommended values only and may vary depending on the quality of the food.
Roasting table
| Type of meat Roasting time Shelf Temperaturein minutes height in °C | top/bottom heat ☐ | ||
| PorkJoint with skin,2 kg (e.g. shoulder or knuckle) Joint 90 - 120 2 190 - 210Smoked pork 70 - 80Fillet of porkMeat loaf, 750 grams | 100 - 130 2 200 - 2202 190 - 21030 - 4560 - 70 | 32 | 200 - 230190 - 210 |
| BeefFilletSirloin (medium-rare) | 45 - 6530 - 45 | 22 | 200 - 220200 - 220 |
| VealJoint / breastKnuckle | 90 - 120 2 180 - 200100 - 130 2 190 - 210 | ||
| LambLegSaddle | 70 - 110 2 200 - 22090 - 120 2 200 - 220 | ||
| PoultryChicken, 1 kgDuck, 2 - 2,5 kgGoose, 3 kg | 60 - 7090 - 120130 - 180 | 222 or 3 | 200 - 220190 - 210180 - 200 |
| GameSaddle of venisonRoast venisonRoast pork | 90 - 120 2 200 - 22090 - 120 2 190 - 210100 - 120 2 190 - 210 | ||
| Fish, whole,1 kg | 30 - 40 | 2 | 180 - 200 |
For poultry and larger meat cuts.
! Always gril with circulating air with closed oven door.
☐ It is not necessary to turn the food being grilled when you use circulating air grilling.
Exception: Poultry must be turned once after half at the cooking time has expired.
- Set Function selector to 📄.
☐ The suggested temperature is displayed and the oven light switches on.
☐ You can increase or reduce the suggested temperature with the temperature selector in steps of 5^ C.
Grilling on the grate:
☐ Insert grate with meat to be grilled into the suitable insertion level.
□ Always place universal drip pan into the proper insertion level.
☐ Dark meat – e. g. from beef, game and mutton – browns more quickly than light meat from veal, pork and poultry.
☐ Light meat and fish fillet are often only light brown on the surface, but done and juicy inside.
☐ Several pieces of meat can be grilled at the same time, e. g. 2 chickens, 2 knuckles or two rolled roasts.
☐ For large or several pieces of meat, the following always applies:
lower temperature, and longer grilling time.
Note: With circulating air grilling, the blower is alternately switched on and off.

Function selector Temperature selector
Table for circulating air grilling 📁 Main oven
Note:
☐ All figures indicated in the table are recommended values only and may vary depending on the quality of the food.
Type of meat Weight Shelf height Temperature Grill time Tips for range in min. wire shelf in °C
| PorkJoint with skin 2 kg 2 170 – 190 | 140 – 150 If the joint is | especially fatty,select a lower tem-perature. Makecrosses in the skinwith a knife. | |||
| PoultryHalf chicken1–3 pieces | Approx.0.4 kg/piece | 2 | 190–210 | 40– 50 | After approx. halfthe cooking time,turn once; coat withbutter or salt water. |
| Whole chicken1–3 pieces | Approx.1 kg/piece | 2 | 190–210 | 60– 70 | |
| Duck | 2–2,5 kg | 2 | 160–170 | 90–110 | |
| Goose | 3 kg | 2 | 150–160 | 130–160 | Stuffed goose canalso be grilled.Turn once. |
Be careful when you grill.
Always keep children away!
Grill with
closed door.
- Set Function selector.
= centre-area grill for smaller amounts of food.
= full-surface grill for smaller amounts of food.
- Set temperature selector:
Grill stages 1 - 2 - 3.
Grilling:
(only with grate and universal drip pan)
□ Brush the grate with oil as required.
☐ Dab off food to be grilled dry and spice (do not salt).
☐ Place grate with food to be grilled into the corresponding insertion level.
□ Always place universal drip pan into the proper insertion level.

natural_image
Illustration of a tray with six dark, oval-shaped objects inside, placed on either side of a transparent container (no text or symbols)☐ If you turn over the concave grate, you can make a fine adjustment of the insertion height (intermediate heights).
□ Meat up to 3 cm thickness (rare steaks) at insertion level 4.
☐ Sausages at insertion level 3 or 4.
☐ Fish (trout) or thick cuts of meat well done at insertion level 3.
Mini oven:
Level 2 or 3.
Meat well done 6-8 Min. per side,
Meat pink inside 4-6 Min. per side,
Fish in slices 6-8 Min. per each side,
Trout 6-10 Min. per side,
Sausages 3-5 Min. per side.
Note: If the grill switches off automatically, the desired temperature has been reached. After a short time, the grill switches on again.
Notes:
□ Always insert the universal pan at shelf height 1.
☐ All figures indicated in the table are recommended values only and may vary depending on the quality of the food.
Dish Shelf height Grill setting Side Grilling time Main oven Mini oven in minutes
| Pork | ||||
| Fillet steak 4 3 | 3 | 1st side 8-112nd side 4-6 | ||
| Neck of pork steak 4 3 | 2-3 | 1st side 10-132nd side 7-10 | ||
| Sausage 3-4 2-3 | 2-3 | 1st side 7-102nd side 5-7 | ||
| Beef | ||||
| Fillet steak 4 3 | 3 | 1st side 10-132nd side 4-7 | ||
| Tournedos 4 3 | 3 | 1st side 8-112nd side 4-6 | ||
| Toast | ||||
| Without topping | 4 3 | 3 | 1st side 4^1/_2-5^1/_2 2nd side ^1/_2-1^1/_2 | |
| With topping | 3-4 | 2-3 | 1-2 | 8-12 |
| Fish | ||||
| Small fish(250-300 g) | 3 | 2 | 1-2 | 1st side 12-152nd side 5-10 |
"Defrost" setting
(without temperature):
- Set Function selector to 📁.
☐ For sensitive frozen food such as cream cakes, butter cakes, cream cakes with chocolate or sugar glazings, fruit, brawn and the like, 1.
☐ Place frozen food in vessel (e. g. porcelain bowl) on the grate.
Function selector Temperature selector
Hot air system with temperature:
- Set Function selector to 📁.
- Set temperature selector.
☐ Fryingens, sausages and meat in foil, bread, rolls cakes and other pastries: Insertion level 1. Temperature selector at 50 to 70.

Function selector Temperature selector
Ready-to-serve meals:
☐ Do not open the aluminium foil package or thaw in closed vessel.
Set oven temperature selector to 160 – 180 (ready to eat after 30 to 40 minutes).
☐ Insertion level 1.

Function selector Temperature selector
Table Thawing / Drying 📋 Main oven
Instruction:
☐ All table values are guide figures which can vary depending on the condition of the food.
Thawing:
| Frozen food Insertion Temperature Thawing time level range in °C in minutes | |||
| Sensitive frozen food like cream 1 Select function individual pieces of cake and butter cream cakes1), cakes with chocolate or sugar temperature galzings1) | (without 30 – 40) | whole or half cream cakes | |
| switching) 80 – 100 | |||
| Fruit (rashberries)2) | 35 – 40 | ||
| Brawn2), cheese, sausages 90 – 100 | |||
| Small meat cuts e. g. steaks, chops and the like | 1 | 50 – 70 | 60 – 70 |
| Chicken in foil1), 800 – 900 g | 70 – 80 | ||
| Rolls1) | 1 | 60 – 80 | 10 – 15 |
| Bread, 1 kg1) | 70 – 90 | ||
| Cake (bowl cake)1) | 70 – 90 | ||
| Ready-to-serve meals | 1 | 170 – 190 | 30 – 40 |
^1) Place or lay on the grate.
^2) Put on a flat dish or plate and place on the grate.
Drying:
| Dried food, amount | Insertion Temperature Drying time level range in °C | ||
| Apple rings, 600 g | 1 + 3 | around 50 | 6–8 hours |
| Pear sections around 800 g | 1 + 3 | around 50 | 9–11 hours |
| Plums or damsons, around 1,5 kg | 1 + 3 | 70–100 | 9–12 hours |
| Bananas, 300 g | 1 + 3 | around 50 | 8–10 hours |
| Mushrooms, 800 g | 1 + 3 | 50–60 | 7–9 hours |
| Kitchen herbs, 400 g (bundles) | 1 | 50–60 | 3–5 hours |
Cooking Tips and Helpful Hints
For baking:
☐ The bottom of a cake baked on a baking sheet stays too light.
☐ The bottom of a cake baked in a tin stays too light.
☐ The bottom of cake or cookies gets too dark.
□ The cake gets too dry.
☐ The inside of the cake remains spongy or doughy, or meat stays raw in the centre.
☐ With very moist baked or roasted goods: For example, when making fruit pie or a water-basted roast, steam develops, condenses on the oven door, and may cause water to drip onto the floor or into the modular furniture enclosing the appliance.
Remove from the oven all baking sheets or universal baking pan currently not in use.
Use a grill and not a baking sheet to support the cake tin during baking.
Select a slightly lower baking temperature and check the shelf height.
Select a slightly higher oven temperature, and shorter baking time.
Use a slightly lower baking or roasting temperature.
Note: Baking or roasting times cannot be shortened by using higher temperatures (done on the outside, raw inside). Select a slightly longer baking or roasting time, allow cake dough more time to rise. Reduce the amount of liquid used in the dough.
Several brief periods of opening the oven door during baking (1 to 2 times, more frequently with longer roasting times) will aid in venting the water vapours from the oven, thereby greatly reducing water condensation.
To save energy:
☐ Preheat only if expressly required by the recipe.
☐ Dark baking tins have a higher degree of heat absorption.
☐ Residual heat: In the case of longer baking times, you can switch off the oven 5 – 10 minutes before the full baking time has elapsed.
Cleaning and Care
Important cleaning basics:
☐ For cleaning, do not use abrasives, no corrosive cleaners, and no sharp objects.
☐ Do not scratch off burnt-in food residues, but soak them off with a moist cloth and dishwashing detergent.
☐ Special cleaners, such as oven cleaning spray, must not be used on aluminium or plastic parts.
Stainless steel front:
☐ When using commercially available stainless steel cleaning agents, the lettering may become damaged.
☐ Do not use scouring sponges.
☐ Use commercially available detergents applied to a soft, moistened cloth or a chamois.
Enamel and glass:
☐ Use hot detergent suds for cleaning.
☐ For cleaning the mating surface of the oven door at the front of the oven, the door should be removed.
Oven interior:
☐ Clean the oven after each use, especially after roasting or grilling.
Food remnants burn in when the oven is reheated.
The baked in remnants are very difficult to remove once burnt in.
☐ You can reduce the degree of soiling by frequent cleaning using the hot-air system.
⚠ Do not clean the warm oven with any of the cleaning products specifically designed for this purpose.
☐ When baking very moist cake, use the universal baking pan.
☐ For roasting, use the appropriate utensils (Dutch oven).
□ Clean the oven before soiling becomes too heavy. Wash out the oven cavity with hot detergent suds.
☐ Leave the door open until the interior has dried.
Oven door pane:
☐ The temperature of the pane inside the oven door is reduced by a heat-reflecting coating.
☐ The reduced temperature ensures that visibility through the oven door window is not impaired.
☐ When the oven door is open, this coating may have a bright appearance. This is quite normal and does not indicate a quality defect.
Cleaning and Care
Manual cleaning steps:
Note: To facilitate cleaning, the unit offers you the following options:
Removing the oven door:
- Fully open the oven door.
- Move the catch levers on the right and left-hand sides to the fully open position.
- Placing the door at an upward angle toward you, grasp the door with both hands and lift it out of the hinges toward you.
Hanging the oven door:
- Set both hinges into their respective receptacles on the left and right, and swing the oven door downward.
- Close the catch levers on the left and right.
- Close the oven door.
Switching on the oven light
Main and Mini Oven:
☐ Set the function selector to position 🔊.
Removing the suspend grids
Mini oven:
- On both left and right sides, remove two milled screws each.
- Carefully remove the suspended grids.

natural_image
Hand turning a switch into a door panel (no text or symbols visible)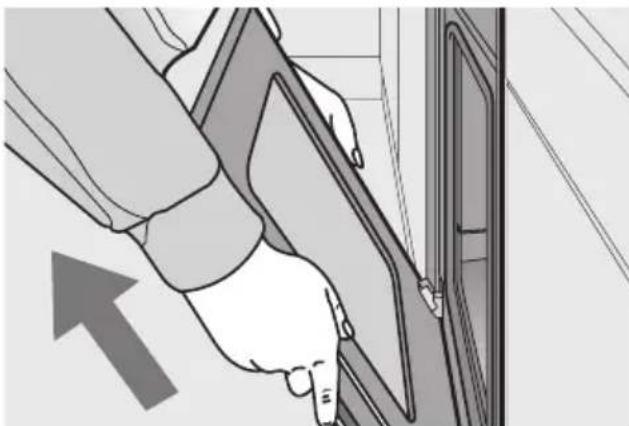
natural_image
Illustration of a hand inserting a card into a door panel, with an arrow indicating direction (no text or symbols)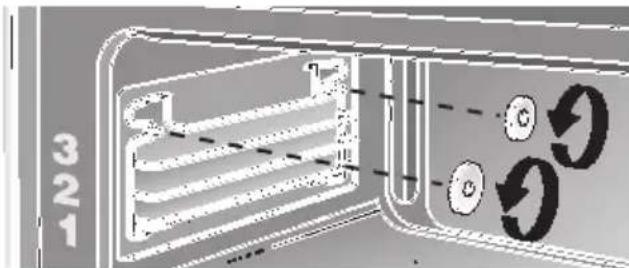
Service and Repair Information
In the event of problems or repairs that you cannot solve or perform yourself, our customer service will be happy to help. Check the customer service directory for a customer service facility in your area.
Caution: Calling the customer service because of an operator error can be very costly! In the event of a customer service request, please have the following information handy:
E-Number FD
You can find this information on the appliance's nameplate. The nameplate is located on the appliance, behind the oven door, on the left bottom edge of the oven.
Replacing the oven light:
Caution: Unplug the appliance or remove the fuse!
Mini Oven:
- To prevent damage, place a dish towel into the cold oven.
- Remove the glass cover by inserting a knife or similar object between the glass and the frame.
- Replace the lamp.
- T ype: Incandescent bulb E 14, 230 - 240 V, 25 W, heat-resistant to 300^ C.
- Y ou may obtain this bulb from your customer service or from your appliance dealer.
Main Oven:
- To prevent damage, place a dish towel into the cold oven.
- Unscrew the lamp cover by turning it counter-clockwise.
- Replace the lamp.
- T ype: Incandescent bulb E 14, 220 – 240 V, 40 W, heat-resistant to 300°C.
- Y ou may obtain this bulb from your customer service or from your appliance dealer.
Replacing the oven door seal:
- Remove the defective oven door seal by simply unhooking it. You may obtain the new oven door seal from your customer service.

Trouble-shooting Guide
Calling the customer service is not always really necessary. In some cases, you can remedy the situation yourself. The following table may contain some helpful tips.
Important general safety guidelines:
Service or repair work on the electronic components may only be performed by a qualified expert. Without exception, prior to starting such repairs, the appliance must be disconnected from the mains. This may be accomplished by tripping the automatic fuse or by removing the fuse from the fuse box that controls your flat or apartment.
| Problem Possible cause | Remedy | |
| There is a general failure of all electrical functions, i.e., the control lamps have suddenly ceased to function. | Defective fuse. Check teh fuse in the fuse box, and replace if required. | |
| Liquids or thin viscous dough are distributed at a visibly uneven thickness. | The appliance has not been placed or installed plumb-and-level. | Level the appliance using the level-ling feet, or check the installation. |
| The electronic timer display suddenly shows a blinking 0.00. | The power supply was briefly inter-rupted. | Reset the time of day. |
| The oven suddenly stop functioning. | The electronic timer is set to an automatic timing cycle. | Set the timer for operation without automatic timing. |
| The oven door window pane fogs up. | This is a normal condition. It is cau-sed by the occurrence of temperatu-re differences. | Heat the oven at 100°C for about 5 minutes. |
| A considerable amount of water condensation occurs in the oven. | This condition is normal with cakes having very moist toppings (fruit), or with very large roasts. | During baking or roasting, open the oven briefly several times; wipe up condensation after use. |
| ... if electronically controlled func-tions fail? | Energy pulses (e.g. lightning flash). | Reset the relevant functions. |
| ... if after prolonged use, the oven window panes are soiled from the inside. | This kind of soiling is normal. 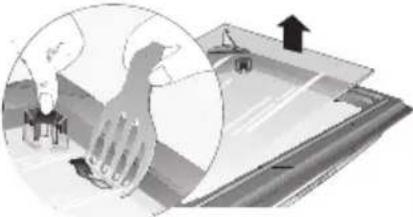 | Detach the oven door and lay front side down on a soft, clean base.Grip the door glass near the hinges, pull up and remove.Doors with 3 panels:Disengage inner door glass at the corner pieces and lift it up using, for example, a pair of frying tongs made of plastic or wood.Installing the cleaned glass:Insert the inner door glass and lock into position.Attach the door glass and lock into position by pressing the glass near the hinges. |
For the installer and kitchen expert!
Important installation notes:
☐ Properly dispose of packaging materials.
☐ Do not use oven door handle for transporting or handling the unit during installation.
□ WARNING: Connection and first start of the appliance may only be performed by an authorised specialist.
☐ Connection must be made using an H05VV-F mains connection cable.
☐ Rated consumption, rated voltage and type no. of the appliance:
See appliance nameplate behind the oven door to the left beneath the side edge of the oven.
☐ The unit's nameplate is located at on the right sidewall of the unit.
☐ Electrical safety of the appliance can be ensured only if the equipment earth in the building installation has been installed according to regulations.
☐ On the installation side a separating device shall be provided.
Any switch with a contact gap exceeding 3 mm may be considered a separating device.
Other examples are LS switches, fuses and contactors.
☐ In the case of repairs interrupt all power connections to the unit.
☐ The connection diagram is located on the rear panel of the appliance.
| 220-230V ~ | 1 2 3 45L1 N |
| 380-400V2N ~ | 1 2 3 4 5L1 L3 N |
| 380-400V3N ~ | 1 2 3 4 5L1 L2 L3 N |
Furniture programmes
Cooker conversion cabinets from virtually all lines of kitchen furniture are suitable for installing the built-in oven. However, the veneers or plastic laminates on the conversion cabinets must be applied with heat-resistant cement (90 C). If plastic laminates or cement are not sufficiently heat-resistant, warping, bubbling or detachment of the finish may result.
Installation of the built-in oven
☐ To burn-in the insulation, heat up the oven prior to installing the unit.
☐ Push the built-in oven into the installation roughing of the conversion cabinet and align the unit until it is in a level position.
Open the oven door and, using one screw on each side, fasten the built-in oven to the side strips of the conversion cabinet (see illustration).
The two screws (supplied with the built-in oven) must be started slightly outward.
☐ Verify that the built-in oven is positioned securely and in a level position, and that the required installation dimensions have been maintained.
☐ The properly installed appliance must be covered on all sides in such a fashion that not even components with rough insulation are exposed to the touch. The cover must be removable with tools only.

natural_image
Hand holding a screwdriver inserted into a panel, no text or symbols visibleSommaire
Mode d'emploi
Page
natural_image
Technical line drawing of a door frame with internal structure (no text or symbols)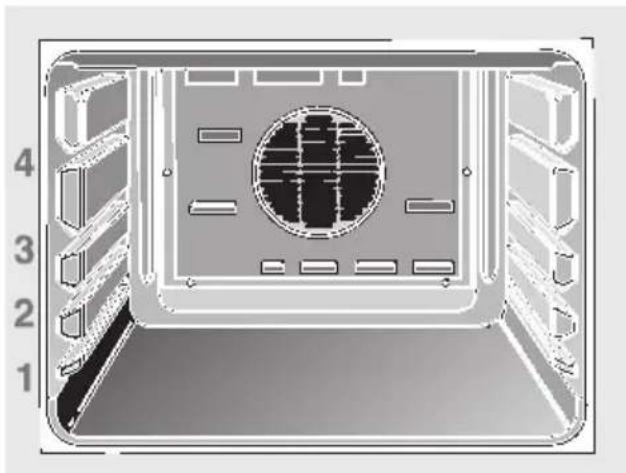
natural_image
Technical diagram of a server rack with numbered components (1-4), showing internal layout and no readable text or symbols.Gril grande surface \_\_\_\_
Advantages:
Gril grande surface \_\_\_\_
Advantages:
natural_image
Illustration of a baked pie on a metal grater (no text or symbols)
natural_image
Illustration of a tray with scattered food items (no text or symbols visible)natural_image
Illustration of a rolled food item on a metal tray (no text or symbols)natural_image
3D illustration of a tray with food items inside, no text or symbols presentnatural_image
Hand turning a key into a bracket (no text or symbols visible)
natural_image
Illustration of a hand holding a door panel, with an arrow pointing upward (no text or symbols)
Attention: mettre le four hors tension.
Petite four:
natural_image
Illustration of a hand holding a square button next to a door, no text or symbols present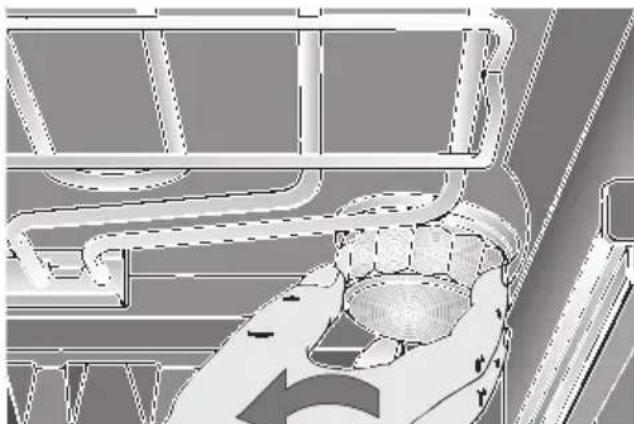
natural_image
Architectural line drawing of a building facade with pipes and a central circular object (no text or symbols)
natural_image
Close-up of a hand pressing down on a surface with two circular buttons (no text or symbols visible)natural_image
Illustration of a hand holding a pen inserted into a panel, with no visible text or symbolsInhoudsopgave
Gebruiksaanwijzing
Pagina
natural_image
Technical line drawing of a mechanical component with internal channels and mounting brackets (no text or symbols)
natural_image
Technical diagram of a server rack with numbered slots and a central circular component (no text or symbols)Elektronische klok

De wekker
natural_image
Illustration of a baked pie on a metal rack (no text or symbols)
natural_image
Illustration of a tray with multiple circular objects and food items, no text or symbols presentN.B.:
Baktabel ☐ of ☐ grote oven
natural_image
Illustration of a rolled food item on a rectangular tray (no text or symbols)natural_image
Illustration of a tray with six dark, oval-shaped objects arranged in a grid (no text or symbols)natural_image
Hand turning a switch into a bracket (no text or symbols visible)
natural_image
Illustration of a hand inserting a card into a door, with an arrow indicating direction (no text or symbols present)
natural_image
Illustration of a hand holding a square button next to a door, no text or symbols present
natural_image
Diagram of a hand holding a small object inside a vehicle or road structure (no text or symbols visible)
natural_image
Illustration of a hand pressing down on a surface with two circular buttons (no text or symbols)natural_image
Illustration of a hand holding a screwdriver near a vertical panel (no text or symbols)Indice
natural_image
Technical line drawing of a mechanical component with internal channels and mounting brackets (no text or symbols)
natural_image
Technical diagram of a server rack with numbered components (1-4), showing internal layout and mounting hardware (no text or symbols)natural_image
Illustration of a baked pie on a metal grater (no text or symbols)
natural_image
Illustration of a tray with multiple small food items, possibly apples or tomatoes, arranged in rows (no text or symbols visible)natural_image
Illustration of a rolled food item on a rectangular tray (no text or symbols)natural_image
Illustration of a tray with six circular objects inside, showing internal structure (no text or symbols)natural_image
Hand turning a component into a curved bracket (no text or symbols visible)
natural_image
Illustration of a hand inserting a cable into a door panel, with an arrow indicating direction (no text or symbols)
natural_image
Illustration of a hand holding a square button next to a door, no text or symbols present
natural_image
Architectural or engineering diagram showing structural elements and a central circular component (no visible text or symbols)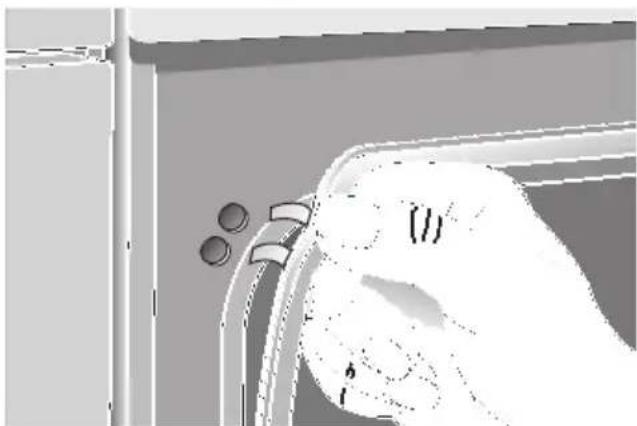
natural_image
Illustration of a hand pressing down on a curved surface with two circular holes, no text or symbols presentnatural_image
Illustration of a hand using a screwdriver to adjust or install a component, no text or symbols presentİçindekiler
Kullanma kılavuzu
Sayfa
natural_image
Technical line drawing of a mechanical component with internal channels and mounting brackets (no text or symbols)
natural_image
Technical diagram of a server rack with numbered components (1-4), showing internal layout and mounting hardware (no text or symbols)Elektronik saat

natural_image
Illustration of a baked pie on a metal grater (no text or symbols)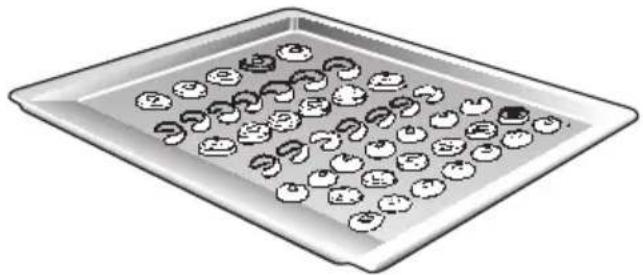
natural_image
Illustration of a tray with scattered circular objects and numbers, no text or symbols presentnatural_image
Illustration of a rolled food item on a rectangular tray (no text or symbols)natural_image
3D illustration of a tray with six dark, irregularly shaped objects inside, placed on top of a transparent base (no text or symbols)natural_image
Hand turning a switch into a bracket (no text or symbols visible)
natural_image
Illustration of a hand inserting a card into a door, with an arrow indicating direction (no text or symbols present)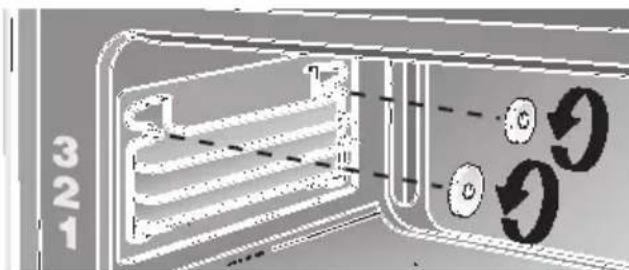
natural_image
Illustration of a hand inserting a small rectangular device into a door (no text or symbols visible)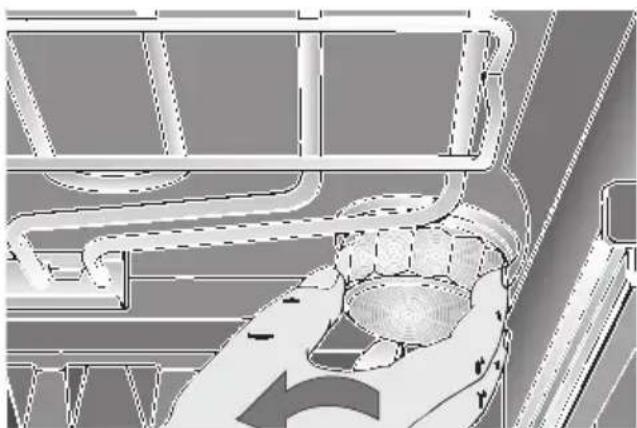
natural_image
Architectural or engineering diagram showing structural elements and a central circular component (no visible text or symbols)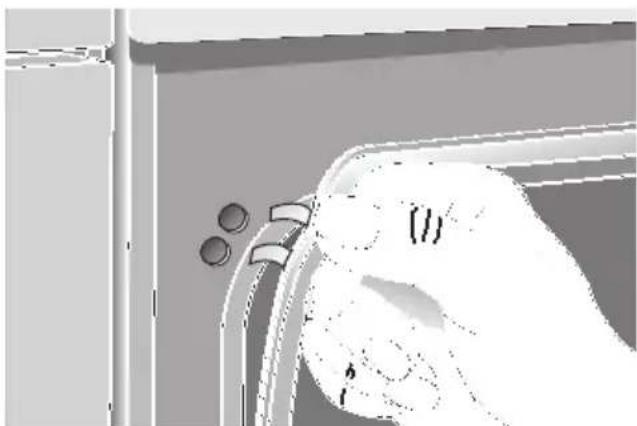
natural_image
Illustration of a hand pressing down on a curved surface with two circular buttons, no text or symbols presentnatural_image
Illustration of a hand using a tool to adjust or install a component, no text or symbols presentFamily Line 018 0 5-2223
- Elektronik-Uhr
- Backen in Backformen
- Hinweis:
- Was ist wenn?
- Table of Contents
- Operating Instructions
- for the user Page
- Important Information
- Before Using Your Appliance for the First Time
- Introducing: Your New Cooker
- Electronic Timer
- Baking and Roasting
- Cleaning and Care
- Service and Repair Information 59
- Assembly instructions
- for the fitter and
- Furniture programme 61
- Notes on disposal
- Before connecting your new appliance
- Appliance safety considerations
- Preliminary cleaning:
- Initial burn-in
- Introducing: Your new Oven
- The control panel:
- Main oven functions:
- Mini oven functions:
- Accessories
- Note:
- Slide-in levels
- Mini oven:
- Main oven:
- Notes:
- Time of day
- Setting the time of day:
- Changing the time (e.g. transition from summer to winter time):
- The alarm
- Setting procedure:
- Correction:
- Cancelling:
- Automatic timer for the main oven
- Automatic switch off:
- Cancel:
- Automatic switch on and switch off:
- Please remember that easily spoiled foods must not be allowed to remain in the oven for too long.
- Definition of Oven Features – Main oven
- "Defrost" setting
- Top and bottom heat
- Hot air
- Circulating air grilling
- Grill
- Centre-area grill
- Full-widthgrill
- Top and bottom heat \_\_\_\_
- Grill \_\_\_\_
- Centre-area grill \_\_\_\_
- Full-widthgrill \_\_\_\_
- Bottom heat \_\_\_\_
- Switching the Main and Mini oven ON and OFF
- Switching on the oven:
- Switching off the oven:
- Using baking tins
- Top/bottom heat:
- Hot-air circulation:
- Using baking sheets
- Roasting with top/bottom heat
- Cooking tips:
- Grilling on the grate:
- Table for circulating air grilling 📁 Main oven
- Grilling:
- Hot air system with temperature:
- Ready-to-serve meals:
- Table Thawing / Drying 📋 Main oven
- Instruction:
- Thawing:
- Cooking Tips and Helpful Hints
- For baking:
- To save energy:
- Important cleaning basics:
- Stainless steel front:
- Enamel and glass:
- Oven interior:
- Oven door pane:
- Manual cleaning steps:
- Removing the oven door:
- Hanging the oven door:
- Switching on the oven light
- Main and Mini Oven:
- Removing the suspend grids
- Service and Repair Information
- E-Number FD
- Replacing the oven light:
- Caution: Unplug the appliance or remove the fuse!
- Replacing the oven door seal:
- Trouble-shooting Guide
- Important general safety guidelines:
- For the installer and kitchen expert!
- Important installation notes:
- Furniture programmes
- Installation of the built-in oven
- Sommaire
- Mode d'emploi
- Gril grande surface \_\_\_\_
- Attention: mettre le four hors tension.
- Petite four:
- Inhoudsopgave
- Gebruiksaanwijzing
- Elektronische klok
- De wekker
- N.B.:
- Indice
- İçindekiler
- Kullanma kılavuzu
- Elektronik saat
- Family Line 018 0 5-2223
Brand : SIEMENS
Model : HB95054
Category : Oven