
UHE 2660-2 Quick - Drill METABO - Free user manual and instructions
Find the device manual for free UHE 2660-2 Quick METABO in PDF.


| Product type | Rotary hammer drill |
| Brand | Metabo |
| Model | UHE 2660-2 Quick |
| Rated power | 1200 W |
| Supply voltage | 230 V / 50 Hz |
| No-load speed | 0 – 1050 rpm |
| Impact rate | 0 – 4200 blows/min |
| Impact energy | 2.8 J |
| Drilling capacity concrete | 26 mm |
| Drilling capacity steel | 13 mm |
| Drilling capacity wood | 32 mm |
| Tool holder | SDS-plus Quick |
| Weight | 2.8 kg |
| Dimensions (L × W × H) | 390 × 80 × 210 mm |
| Sound level (LpA) | 90 dB(A) |
| Vibration level | < 15 m/s² |
| Operating modes | Drilling, hammer drilling, chiseling |
| Main functions | Electronic speed control, continuous lock, depth stop, auxiliary handle |
| Maintenance and cleaning | Regularly clean ventilation slots; check carbon brush condition; lubricate tool holder |
| Safety | Safety clutch, safety torque, anti-theft switch (optional) |
| Spare parts and repairability | Available via Metabo after-sales service |
Frequently Asked Questions - UHE 2660-2 Quick METABO
User questions about UHE 2660-2 Quick METABO
0 question about this device. Answer the ones you know or ask your own.
Ask a new question about this device
Download the instructions for your Drill in PDF format for free! Find your manual UHE 2660-2 Quick - METABO and take your electronic device back in hand. On this page are published all the documents necessary for the use of your device. UHE 2660-2 Quick by METABO.
USER MANUAL UHE 2660-2 Quick METABO
KHE 2660 Quick KHE 2860 Quick
UHE 2660-2 Quick UHEV 2860-2 Quick

natural_image
Four black-and-white photo of four Metabo-branded drillers arranged vertically (no visible text or symbols on the machines themselves)



 | KHE 2660 Quick*1) 00663.. | KHE 2860 Quick*1) 00878.. | UHE 2660-2 Quick*1) 00697.. | UHEV 2860-2 Quick*1) 00713.. | ||
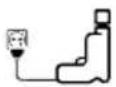 | P_1 | W 850 880 800 1100 | ||||
| P_2 | W 465 490 450 600 | |||||
 | n_1 | /minrpm | 0-1100 0-1150 | 0-10500-2500 | 0-9000-2100 | |
 | n_2 | /minrpm | 830 870 | 7901860 | 9002100 | |
 | SDS-plus | ✓ | ✓ | ✓ | ✓ | |
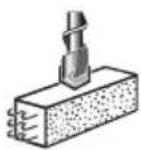 | ø max. | mm(in) | 26(1 ^1 / _32 ) | 28(1 ^3 / _32 ) | 26(1 ^1 / _32 ) | 28(1 ^3 / _32 ) |
| s max. | /minbpm | 4300 4400 | 4200 4500 | |||
| W(EPTA (05/2009) J | 3,0 3,2 2,8 3,4 | |||||
| S | J | / | s | 215 235 200 255 | ||
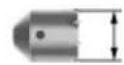 | ø max. | mm(in) | 68(2 ^11 / _16 ) | 68(2 ^11 / _16 ) | 68(2 ^11 / _16 ) | 68(2 ^11 / _16 ) |
 | b | mm(in) | 1,5 - 13(1 ^1 / _16 - _1 / _2 ) | 1,5 - 13(1 ^1 / _16 - _1 / _2 ) | 1,5 - 13(1 ^1 / _16 - _1 / _2 ) | 1,5 - 13(1 ^1 / _16 -1 _1 / _2 ) |
 | ø max. | mm(in) | 32 (1 ^1 / _4 ) 32 | (1 ^1 / _4 ) | 32 (1 ^1 / _4 )28 (1 ^3 / _32 ) | 35 (1 ^3 / _8 )30 (1 ^3 / _16 ) |
 | ø max. | mm(in) | 13(1 ^1 / _2 ) | 13(1 ^1 / _2 ) | 13 (1 ^1 / _2 )6 (1 ^1 / _4 ) | 13 (1 ^1 / _2 )6 (1 ^1 / _4 ) |
 | m | kg(lbs) | 3,1(6.9) | 3,1(6.9) | 3,1(6.9) | 3,3(7.4) |
 | D | mm(in) | 50(1 ^31 / _32 ) | 50(1 ^31 / _32 ) | 50(1 ^31 / _32 ) | 50(1 ^31 / _32 ) |
| a _h ,HD/K _h ,HD | m/s ^2 | 12,9 / 2,4 12,9 / 2,4 | 12,9 / 2,4 12,9 / 2,4 | 13,5 / 1,5 | ||
| a _h ,Cheq/K _h ,Cheq | m/s ^2 | 8,5 / 1,5 8,5 / 1,5 | 8,5 / 1,5 8,5 / 1,5 | 7,2 / 1,5 | ||
| a _h ,D/K _h ,D | m/s ^2 | 3,3 / 1,5 3,3 / 1,5 | 3,3 / 1,5 3,3 / 1,5 | 4,3 / 1,5 | ||
 | L _p A/K _p A | dB (A) | 89 / 3 89 / 3 88 / 3 90 / 3 | |||
| L _WA /K _WA | dB (A) | 99 / 3 99 / 3 99 / 3 99 / 3 | ||||

*2) 2011/65/EU, 2006/42/EC, 2014/30/EU
*3) EN 60745-1:2009+A11:2010, EN 60745-2-6:2010
L = L i n k s l a u f ( z u m S c
Original operating instructions
1. Declaration of Conformity
On our own responsibility, we hereby declare that this drilling and chisel hammer, identified by type and serial number *1), meets all relevant requirements of directives *2) and standards *3). Technical documents for *4) - see page 3.
2. Specified Conditions of Use
The rotary and chipping hammers are suited, with appropriate accessories, for working with hammer drill bits and chisels in concrete, stone and similar materials and with core bits in tiles and similar, as well as drilling without impact in metal, wood, etc and for screwdriving.
The user bears sole responsibility for any damage caused by inappropriate use.
Generally accepted accident prevention regulations and the enclosed safety information must be observed.
3. General Safety Information

For your own protection and for the protection of your power tool, pay attention to all parts of the text that are marked with this symbol!

WARNING – Reading the operating instructions will reduce the risk of injury.

WARNING Read all safety warnings and instructions. Failure to follow all safety
warnings and instructions may result in electric shock, fire and/or serious injury.
Keep all safety instructions and information for future reference.
Pass on your power tool only together with these documents.
4. Special Safety Instructions
Wear ear protectors. Exposure to noise can cause hearing loss.
Use the additional handle supplied with the tool. Loss of control can cause personal injury.
Hold the power tool by the insulated gripping surfaces when performing an operation where the cutting accessory may contact hidden wiring or its own cord. A cutting accessory contacting a "live" wire may make exposed metal parts of the power tool "live" and could give the operator an electric shock.
Always work with the additional handle correctly installed.
Always hold the machine with both hands at the intended handles, take a secure stance and concentrate on the work.
Always wear protective goggles, gloves, and sturdy shoes when working with this tool.
Ensure that the spot where you wish to work is free of power cables, gas lines or water pipes (e.g. using a metal detector).
If the safety coupling responds, switch off the machine immediately.
Do not touch the rotating tool!
Secure the workpiece to prevent slipping or rotation (e.g. by securing with screw clamps).
Remove chips and similar material only with the machine at a standstill.
Caution must be exercised when driving screws into hard materials (driving screws with metric or imperial threads into steel)! The screw head may break or a high reverse torque may build up on the handle.
Pull the plug out of the socket before making any adjustments, changing tools, carrying out maintenance or cleaning.
Avoid inadvertent starts by always unlocking the switch when the plug is removed from the mains socket or whenever the power fails.
A damaged or cracked additional handle must be replaced. Never operate a machine with a defective additional handle.
Safety clutch: f the tool jams or catches, the power supply to the motor is restricted. Due to the strong force which can arise, always hold the machine with both hands using the handles provided, stand securely and concentrate.
Reducing dust exposure:

Some of the dust created using this power tool may contain chemicals known to cause
cancer, allergic reaction, respiratory disease, birth defects or other reproductive harm. Some examples of these chemicals are: Lead from lead-based paints, crystalline silica from bricks and cement and other masonry products, arsenic and chromium from chemically-treated lumber, hard wood like oak or beech, metals, asbestos.
The risk from exposure to such substance will depends on how long you or bystanders are being exposed.
Do not let particles enter the body.
To reduce your exposure to these substances: work in a well ventilated area, and work with approved safety equipment, such as dust masks that are specially designed to filter out microscopic particles.
Observe the relevant guidelines for your material, staff, application and place of application (e.g. occupational health and safety regulations, disposal).
Collect the particles generated at the source, avoid deposits in the surrounding area.
Use suitable accessories for special work. In this way, fewer particles enter the environment in an uncontrolled manner.
Use a suitable extraction unit.
Reduce the exposure to dust with the following:
- do not direct the escaping particles and the exhaust air stream at yourself or nearby persons or on dust deposits.
- Use an extraction unit and/or air purifiers.
- Ensure good ventilation of the workplace and keep clean using a vacuum cleaner. Sweeping or blowing stirs up dust.
- Vacuum or wash the protective clothing. Do not blow, beat or brush.
5. Overview
See page 2.
1 SDS chuck
2 Toollock
3 Chuck lock
4 Keyless chuck *
5 Sleeve keyless chuck *
6 Spindle
7 Additional handle
8 Depth stop
9 L o c k
10 Switch button (for changing the operating mode)
11 Electronic signal indicator *
12 Speed preselection wheel *
13 Rotation selector switch
14 Lock button
15 Trigger switch
* depending on equipment/not in scope of delivery
6. Initial Operation

Before plugging in, check that the rated mains voltage and mains frequency, as stated on the plate match your power supply.

Always install an RCD with a maximum trip current of 30 mA upstream.
6.1 Assembly of the additional handle

For safety reasons, always use the additional handle supplied.
Open the clamping ring by turning the side handle (7) counter-clockwise. Push the additional handle onto the collar of the machine. Insert the depth stop (8). Securely tighten the additional handle at the angle required for the application.
7. Use
7.1 Depth Stop Setting
Loosen the additional handle (7). Set the depth stop (8) to the desired drilling depth and retighten additional handle (7).
7.2 Switching On and Off
Press the trigger switch (15) to switch on the machine.
The speed can be changed using the trigger switch.
UHEV 2860-2 Quick:
The electronic soft start means that the machine accelerates continuously up to the pre-selected speed.
For continuous operation, the trigger button can be locked using the lock button (14). Press the trigger switch again to stop the machine.

In continuous operation, the machine continues running if it is forced out of your
hands. Therefore, always hold the machine with both hands using the handles provided, stand securely and concentrate.
7.3 Select speed (only for UHE...)
Select the optimal speed at the thumbwheel (12) depending on the application.
7.4 Operating mode selection
Press the lock (9) and turn the thumbwheel (10).

Hammer drilling
(Set only when using the hammer chuck (1))

Chiselling
(Set only when using the hammer chuck (1))

Setting chisel position
Turn the chisel in the desired position. Then select "Chiselling" to secure the chisel and prevent it from twisting.

Only for KHE...:
Drilling
(high torque)

Only for UHE ...:
Drilling 1st gear
(high torque)

Only for UHE ...:
Drilling 2nd gear (high speed)

When a chisel is fitted, only operate the
machine in the chiselling operating mode


Avoid levering with the machine when a chisel
is fitted
7.5 Selection of direction of rotation

Only activate the rotation selector switch (13)
when the motor has completely stopped.
Select direction of rotation:
R = clockwise rotation (for drilling, hammer drilling, chiselling, drive in screws)
$$ L = \text { a n t i - c l o c k w i s e } \quad \text { rotation (f o } $$
7.6 Drill chuck change

Ensure a clean spindle (6) when changing the
chuck. Apply a light coating of grease to the
spindle. (Special grease: Order No.: 6.31800)

Only attach the Metabo chuck provided.
Removing the chuck:
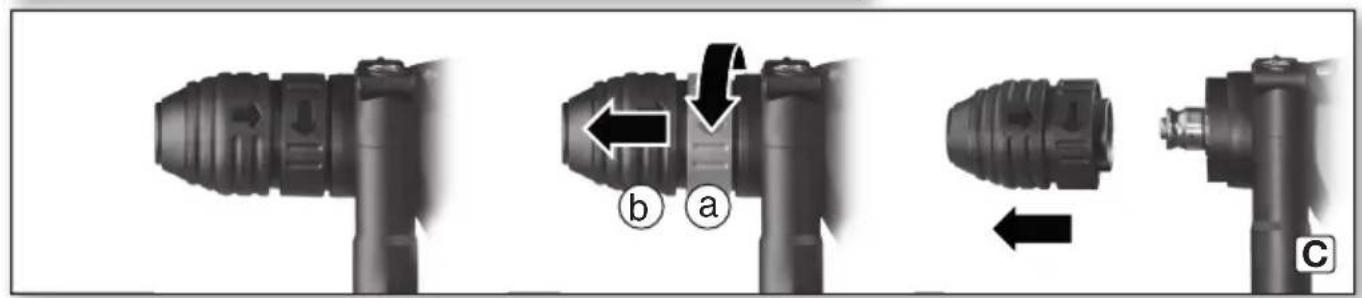
See page 2, fig. C.
ENGLISHen
- Turn the chuck lock (3) in the direction of the arrow until the stop (a) and remove chuck (b).
Replacing the chuck:
See page 2, fig. D.
- Put the chuck onto the spindle (6) (a).
- Turn the chuck lock (3) in the direction of the arrow (b) until the chuck can be pushed completely onto the spindle and release the chuck lock.
- Check to see that the chuck is properly seated.
Note: To prevent the spindle from rotating when the chuck is being changed, put the switch button (10) to chiselling
7.7 Tool change with SDS chuck

Before fitting, clean tool shank and apply special grease (accessories order no.
6.31800)! Use only SDS-Plus tools.
Inserting tools:
- Turn tool and insert until it engages. The tool is automatically locked.
Remove the tool:
See page 2, fig. A.
- Pull tool lock (2) backwards in direction indicated by arrow (a) and remove tool (b).
7.8 Tool change keyless chuck (depends on equipment)
Use the keyless chuck when drilling without impact into metal, wood etc. and for driving in screws.
Clamp tool (see p.2, fig. B):
Turn sleeve (5) in direction "OPEN, RELEASE" (a). Insert tool as deeply as possible (b) and turn sleeve in the opposite direction, until any perceptible mechanical resistance is overcome (c). Caution!
The tool is not yet clamped!
Continue to turn vigorously(you must hear a "click"), until you cannot turn any further - only now is the toolsafely clamped.
Notes: The rattling that might be heard after opening the chuck (depending on the function) can be eliminated by turning the sleeve into the other direction.
With a soft tool shank, retightening may be required after a short drilling period.
8. Maintenance and Cleaning
Always keep thespindle (6) clean and grease it a bit. (Special grease: Order No.: 6.31800)
Clean (4) keyless chuck:
After prolonged use, hold the chuck vertically with the opening facing downwards and fully open and close it several times. The dust collected falls from the opening. Regular use of cleaning spray on the jaws and jaw openings is recommended.
Vent slots:
The vent slots of the machine should be cleaned periodically.
9. Troubleshooting
If the trigger button (15) cannot be pressed, check, if the rotation selector switch (13) is completely in position R or L.
Electronic signal display (11):
- Fast flashing - restart protection
When power is restored after a power failure, the machine - which is still switched on - will not start for safety reasons. To continue operation, switch the tool off and then on again.
10. Accessories
Use only genuine Metabo accessories.
Use only accessories that fulfil the requirements and specifications listed in these operating instructions.
Fit accessories securely. If the machine is operated in a holder: secure the machine well. Loss of control can cause personal injury.
For a complete range of accessories, see www.metabo.com or the catalogue.
11. Repairs
Repairs to electrical tools must ONLY be carried out by qualified electricians!
Contact your local Metabo representative if you have Metabo power tools requiring repairs. See www.metabo.com for addresses.
You can download a list of spare parts from www.metabo.com.
12. Environmental Protection
Observe national regulations on environmentally compatible disposal and on the recycling of disused tools, packaging and accessories.

Only for EU countries: Never dispose of power tools in your household waste! Used power tools must be collected separately and
handed in for environmentally compatible recycling in accordance with European Directive 2002/96/EC on waste electrical and electronic equipment and its implementation in national legal systems.
13. Technical Data
Explanatory notes on the specifications on page 3. Subject to change in accordance with technical progress.
P_1 = R a t e d i n p u t
P_2 = Power output
n_1 = no-load speed
n_2 = on-load speed
_max = Maximum drill diameter
s_max = M a x i m u m i m p a
W = Single impact force
S = Impact performance
b = C h u c k
m = Weight without mains cable
D = Collar diameter
Measured values determined in conformity with EN 60745.
□ Machine in protection class II
\~ AC Power
The technical specifications quoted are subject to tolerances (in compliance with the relevant valid standards).
Emission values These values mak
These values make it possible to assess the emissions from the power tool and to compare different power tools. The actual load may be higher or lower depending on the operating conditions, the condition of the power tool or the accessories. Please allow for breaks and periods when the load is lower for assessment purposes. Arrange protective measures for the user, such as organisational measures based on the adjusted estimates.
Vibration total value (vector sum of three directions) determined in accordance with EN 60745:
a_h, HD = Vibration emission value (hammer drilling into concrete)
a_h, Cheq = Vibration emission value (chiselling)
a_h,D = Vibration emission value(drilling into metal)
K_h,HD/Cheq/D = Uncertainty (vibration)
Typical A-effective perceived sound levels:
L_pA = Sound-pressure level L_WA = A coustic power level K_pa, K_WA = Uncertainty During operation the noise level can exceed 80 dB(A).

Wear ear protectors!
a_h,D = trillingsemissiewaarde (boren in metaal)
K_h,HD/Cheq/D= onzekerheid (trilling)
a_h, HD = vibrationsemission (hammerboring i beton)
a_h, Cheq = vibrationsemission (mejsling)
a_h,D = Vibrationsemission (boring i metal)
K_h,HD/Cheq/D=Usikkerhed (vibration)
- KHE 2660 Quick KHE 2860 Quick
- UHE 2660-2 Quick UHEV 2860-2 Quick
- Original operating instructions
- Declaration of Conformity
- Specified Conditions of Use
- General Safety Information
- Special Safety Instructions
- Reducing dust exposure:
- Overview
- Initial Operation
- Assembly of the additional handle
- Use
- Depth Stop Setting
- Switching On and Off
- Select speed (only for UHE...)
- Operating mode selection
- Selection of direction of rotation
- Drill chuck change
- Removing the chuck:
- ENGLISHen
- Replacing the chuck:
- Tool change with SDS chuck
- Inserting tools:
- Remove the tool:
- Tool change keyless chuck (depends on equipment)
- The tool is not yet clamped!
- Maintenance and Cleaning
- Clean (4) keyless chuck:
- Vent slots:
- Troubleshooting
- Electronic signal display (11):
- Accessories
- Repairs
- Environmental Protection
- Technical Data
Brand : METABO
Model : UHE 2660-2 Quick
Category : Drill