
XF 700 - Karaoke system Trevi - Free user manual and instructions
Find the device manual for free XF 700 Trevi in PDF.


| Product type | Karaoke system |
| Brand | Trevi |
| Model | XF 700 |
| Dimensions (W x D x H) | 40 x 25 x 30 cm |
| Weight | 3 kg |
| Power supply | Mains 230 V~50 Hz |
| Output power | 50 W RMS |
| Main functions | MP3/G player, microphone input, vocal effects, FM radio, USB recording |
| Care and cleaning | Clean with a soft dry cloth |
| Safety | Do not expose to moisture or heat sources |
| Spare parts and repairability | Contact Trevi after-sales service |
| General information | 2-year warranty, compatible with most dynamic microphones |
Frequently Asked Questions - XF 700 Trevi
User questions about XF 700 Trevi
0 question about this device. Answer the ones you know or ask your own.
Ask a new question about this device
Download the instructions for your Karaoke system in PDF format for free! Find your manual XF 700 - Trevi and take your electronic device back in hand. On this page are published all the documents necessary for the use of your device. XF 700 by Trevi.
USER MANUAL XF 700 Trevi
Connection and Operation Manual
ENCEINTE DJ POWERED HAUTE PUISSANCE
FONCTION BLUETOOTH, LECTEUR MP3, USB, RADIO, INPUT AUX IN/MICROPHONE
natural_image
Black and white portable electronic device with two blue-lit fans, no visible text or symbolsFor additional information and updates of this product see www.trevi.it
NOTE D'USO
natural_image
Technical line drawing of a device rear panel with labeled component '27' (no text or symbols beyond label)
This is a precision electronic appliance; avoid using it in the following cases:
- Near strong heat sources, such as central heating plants or stoves.
- In very humid places such as bathrooms, swimming pools, etc.
- In very dusty places.
- In places subject to strong vibrations.
- Position the appliance in such a way that there is always enough room for free air circulation (at least 5 cm).
- Do not block the air inlets.
- If any liquid enters the appliance, unplug it immediately from the socket and take it to the nearest TREVI authorised service centre.
- Before switching on the appliance, always check that the power cable and the connection cable are properly installed.
CARE AND MAINTENANCE
Use a slightly damp soft cloth for cleaning. Do not use solvents and abrasive substances.
IMPORTANT
This device is designed for home use (not professional use). This appliance has been carefully built to ensure long-lasting perfect performance. However, should any inconvenience occur, please contact your local authorised TREVI Service Centre.
TREVI follows a policy of ongoing research and development. Therefore products may have different features from those described.
LOCATION OF CONTROLS
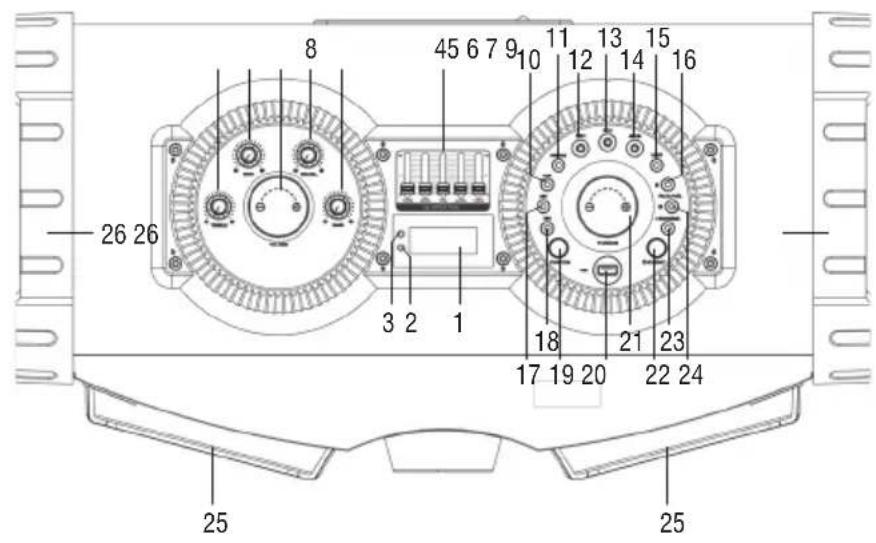

Controls and sockets on the device
- Display
- PAIR Indicator
- Standby Indicator
- EQ Button
- TREBLE Knob
- ECHO Knob
- VOLUME Knob
- MIC Volume Knob
- BASS Knob
-
PAIR Button
-
▶ II /SCAN Button
-
3.5mm MIC Jack 1
-
3.5mm MIC Jack 2
-
3.5mm AUX IN Jack
-
LIGHT Button
-
+FOLD/+10/M. Button
-
Key ◀◀, previous/Fast Backward Button
-
Key ▶, next/Fast Forward Button
-
FUNCTION Button
-
USB Port
-
Tuning Knob
-
STANDBY Button
-
P-MODE/MEM Button
-
-FOLD/-10/M. Button
-
Speakers
-
Handle
-
AC Socket
-
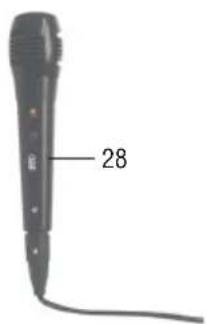
Microphone
POWER SOURCE
This unit works with direct AC mains supply AC 100-240V 60/50Hz
To TURN ON the unit 'plug the power cord into the outlet on the device (27) and the plug into a power outlet.
Do not connect the appliance to sockets with a voltage other than specified.
BASIC FUNCTIONS
After connecting the power, then press the STANDBY button (22) on the front cabinet to turn on unit.
Note: If you don't use the unit for a long time, disconnect the AC power cord from the household wall outlets.
NOTE: In USB/AUX/BT position, when the unit is not providing the main function for 15 minutes, the unit will automatically switch in to standby mode. Press the STANDBY button (22) again to turn on the unit.
Please note that low volume setting in the audio source maybe recognized as “no audio signal”, this will affect the capability of signal detection from the device and can also originate an automatic switch into standby mode. If this happens please reactivated the audio signal transmission or increase the volume setting on the audio source player in order to resume playback.
ESD hints: The product maybe reset or not reset to operation of control due to electrostatic discharge, just switch off and reconnect again.
SETTING THE FUNCTION MODE
To change the function modes, press the FUNCTION button(19) to choose USB/AUX IN/BT/RADIO function.
ADJUSTING THE VOLUME
- Rotate the VOLUME knob (7) on the unit to increase or decrease the music volume.
- Rotate the MIC VOL. knob (8) on the unit to increase or decrease the microphone volume.
This unit has a built-in equalizer system, adjust the EQ bar (4) by five frequencies (100Hz, 330Hz, 1KHz, 3.3KHz, 10KHz) on unit to select a setting that best matches the music style.
TREBLE ADJUSTMENT
Rotate the TREBLE knob (5) on unit to increase or decrease the treble effect that best matches the music style.
MICROPHONE ECHO ADJUSTMENT
Rotate the ECHO knob (6) on unit to increase or decrease the microphone echo effect that best matches the style.
DISCO-LIGHT
To change the disco light effects, press the LIGHT button (15) on unit. You can choose from five different flashing modes.
To disable the disco light, press the LIGHT button (15) on unit until the display shows "OFF".
RADIO OPERATION
Listen to FM radio broadcasts. Press the FUNCTION button (19) until the display reads FM and the radio frequency.
TUNING TO A RADIO STATION
If you know the station frequency that you want to tune to directly:
- Tune to a station by rotate the TUNING knob (21). The station frequency is shown on the display.
AUTO PRESET MEMORY/SCAN
To scan for stations within reception range and save them to preset memory automatically, press and hold the ▶ II /SCAN (11) button. After the unit is finished scanning, the unit will automatically tune to preset number 1 (P01).
To tune to a preset station:
• To tune to the next preset station, press the +FOLD/+10/M. button (16).
• To tune to the previous preset, press the -FOLD/-10/M. button (24).
Choose which stations to save in preset memory instead of scanning automatically.
- Rotate the TUNING knob (21) to tune to the station that you want to save as a preset (e.g., 93.1MHz).
-
Press the P-MODE/MEM button (23), "P01" will flash on the display to indicate that you are saving the station as Preset Memory 01. (To change the preset memory number, press the +FOLD/+10/M. button (16) or -FOLD/-10/M. button (24))
-
Press the P-MODE/MEM button (23) to finish saving the station (e.g., P01 is now set to 93.1MHz).
- To save another station, repeat steps 1 to 3. You may save up to 50 FM stations
USB OPERATION
This PA System provides one USB port for music playback.
- Press the FUNCTION button (19) on unit to select "USB" mode.
- Connect the USB memory stick to the USB port (20). Playback will start automatically from Track 1.
- To pause playback, press the ▶ II /SCAN button (11) on unit. The current track No. and "P" will show on the display.
-
To resume playback, press the ▶ II /SCAN button (11) again.
-
To select a desired track, press the ▶(18) or ◀(17) button respectively during playing until the desired track appears on the display. The unit will start play automatically.
-
To search for a particular passage during playback, press and hold the ▶(18) or ◀(17) button to scan the current playing track at high speed until desired point (passage) appears, then release the button for normal playback mode.
-
To select a song which track number exceeds 10, press the +FOLD/+10/M. button (16) or -FOLD/-10/M. button (24) each time to skip forward/backward 10 tracks, then press the ▶(18) or ◀(17) button to select desired track.
-
To select a desired folder (if the USB contains more than one folder), press and hold the +FOLD/+10/M. button (16) or -FOLD/-10/M. button (24) each time to skip forward/backward a folder, then press the ▶(18) or ◀(17) button to select desired track.
Important: The USB port is intended for data transfer only, other devices cannot be used with this USB connection. The use of USB extension cords is not recommended.
REPEAT PLAY
You can play one track or all tracks on the USB repeatedly.
TO REPEAT A SINGLE TRACK
- Press P-MODE/MEM button (23) on unit during play, the display will show “→” and the current track will be played over an over again till you press the ▶ II /SCAN button (11) on unit.
- To cancel repeat play, press P-MODE/MEM button (23) on unit until "→" disappears from the display.
TO REPEAT ALL THE TRACKS
- Press P-MODE/MEM button (23) on unit until the “◀→” shows steadily on the display, all tracks on the USB will be played over and over again till you press the ▶ II /SCAN button (11) on unit.
- To cancel repeat play, press the P-MODE/MEM button on unit until "←→" disappears from the display.
TO REPEAT THE FOLDER (ONLY FOR USB WHICH CONTAINS MORE THAT ONE FOLDER)
- Press the P-MODE/MEM button (23) on unit until "FOLDER" show steadily on the display, the current folder will be repeated over and over again till you press the ▶ II /SCAN button (11) on unit.
- To cancel repeat play, press the P-MODE/MEM button (23) on unit until "FOLDER" disappears from the display.
RANDOM PLAY
Press the P-MODE/MEM button (23) on unit in play mode till the "RAND" shows steadily on the display, the random play will start from next track automatically, until all tracks are played over and then it will stop. Press the P-MODE/MEM (23) button on unit again until the "RAND" disappears from the display to cancel.
NOTES
- The player may not support some USB devices, this is due to the incompatibility of some processors.
- To avoid harmful interference, always connect USB devices directly to the unit, do not use extension cords.
BLUETOOTH OPERATION
- Press the FUNCTION button (19) on unit to switch to BT function, the LCD will display "bt" and the pair indicator (2) will flash at high speed.
- Turn on the Bluetooth function on the device, scan the unit "XF 700" and connect, then input the password 0000 if required, the pair indicator (2) keep light up to indicate connection done, and the display will show "bt". Press Play to start playback.
- Rotate the VOLUME knob (7) on the unit or adjust the volume on the external device to increase or decrease the music volume to your desired level.
- Press and hold the PAIR button (10) to disconnect Bluetooth.
Note: The Bluetooth works best within 10 meters.
AUX-IN OPERATION
- Press the FUNCTION button (19) on unit to select "AUX" mode.
- Connect your audio device to the AUX IN jack (14) found on the front of the unit with an AUX IN cable.
- Rotate the VOLUME knob (7) on the unit or adjust the volume on the external device to increase or decrease the music volume to your desired level.
- Control playback with your audio device.
MIC JACK OPERATION
- Connect your microphone (28) to the 3.5mm MIC jack 1 (12) or MIC jack 2 (13) found on the front of the unit.
- Rotate the MIC VOL. knob (8) on the unit to increase or decrease the microphone volume.
Note: you can use two microphones simultaneously (second microphone not included).
SPECIFICATIONS
GENERAL
Power Requirement: AC 100-240V 60/50Hz
Power Consumption: Max 42W
Stand-by Consumption: <0.5W
Frequency Range: FM: 87.5 - 108MHz
Weight: 8.2 Kg
Dimensions: 627(L)x340(D)x323(H)mm
Operation temperature: +5°C \~ +35°C
AUDIO SECTION
Power output: 18Wx2
NOTES D'EMPLOI
Consommation Stand-by: <0.5W
Dimensions: 627(L)x340(D)x323(H)mm
WARNING: DO NOT OPEN THE SET. NEITHER CONTROLS OR SPARE PARTS TO BE USED BY THE USER ARE TO BE FOUND INSIDE IT. APPLY TO AUTHORISED TREVI CENTERS FOR SERVICE OPERATIONS.

ACHTUNG
WIRES CONNECTIONS TO A UK THREE-PIN PLUG
The wires in this mains lead are coloured in accordance with the following wiring codes:
Blue: Neutral
Brown: Live
The wires in this mains lead must be connected to the terminals in the plug as follows:
Blue wire: N or Black
Brown wire: L or Red
Neither wire is to be connected to the earth (E or W) terminal of three-pin plug.
Should the fuse fail in the plug remove the plug form the wall socket and replace the fuse with a 3 Amp. ASTA approved BS 1362 fuse.


Precautions for correct disposal of the product.
The symbol shown on the equipment indicates that waste must be disposed of in "separate collection" and so the product must not be disposed of together with urban waste.
The user must take the product to special "separate waste collection centres" provided by local government, or deliver it to the retailer against the purchase of a new product.
Separate collection of waste and subsequent treatment, recycling and disposal operations promotes the production of equipment with recycled materials and limits negative effects on the environment and on health caused by improper handling of waste.
Illegal disposal of the product leads to the enforcement of administrative penalties.

- NOTE D'USO
- CARE AND MAINTENANCE
- IMPORTANT
- LOCATION OF CONTROLS
- Controls and sockets on the device
- POWER SOURCE
- BASIC FUNCTIONS
- SETTING THE FUNCTION MODE
- ADJUSTING THE VOLUME
- TREBLE ADJUSTMENT
- MICROPHONE ECHO ADJUSTMENT
- DISCO-LIGHT
- RADIO OPERATION
- TUNING TO A RADIO STATION
- AUTO PRESET MEMORY/SCAN
- USB OPERATION
- REPEAT PLAY
- TO REPEAT A SINGLE TRACK
- TO REPEAT ALL THE TRACKS
- TO REPEAT THE FOLDER (ONLY FOR USB WHICH CONTAINS MORE THAT ONE FOLDER)
- RANDOM PLAY
- NOTES
- BLUETOOTH OPERATION
- AUX-IN OPERATION
- MIC JACK OPERATION
- SPECIFICATIONS
- GENERAL
- AUDIO SECTION
- NOTES D'EMPLOI
- Precautions for correct disposal of the product.
Brand : Trevi
Model : XF 700
Category : Karaoke system