
DO9139J - Juicer DOMO - Free user manual and instructions
Find the device manual for free DO9139J DOMO in PDF.


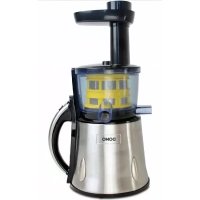
| Product type | Slow masticating juicer |
| Brand | DOMO |
| Model | DO9139J |
| Dimensions (L x W x H) | Approximately 30 x 20 x 35 cm |
| Weight | Approximately 4.5 kg |
| Power supply | 220-240 V ~ 50/60 Hz |
| Power | 150 W |
| Rotation speed | 80 rpm (slow extraction) |
| Bowl capacity | 500 ml (juice) / 1 L (pulp) |
| Materials | BPA-free ABS plastic, stainless steel (filter) |
| Main functions | Juice extraction for fruits and vegetables, pulp separation, reverse function to unclog |
| Care and cleaning | Dishwasher-safe removable parts, cleaning brush included |
| Safety | Lid safety lock, automatic shut-off in case of overheating |
| Spare parts available | Strainer, pusher, bowl, auger |
| Warranty | 2 years |
| Included accessories | Juice container, pulp container, pusher, cleaning brush |
| Certifications | CE, RoHS |
Frequently Asked Questions - DO9139J DOMO
User questions about DO9139J DOMO
0 question about this device. Answer the ones you know or ask your own.
Ask a new question about this device
Download the instructions for your Juicer in PDF format for free! Find your manual DO9139J - DOMO and take your electronic device back in hand. On this page are published all the documents necessary for the use of your device. DO9139J by DOMO.
USER MANUAL DO9139J DOMO
natural_image
Green and black Japanese-style hand mixer device (no visible text or symbols)DO9139J
PRODUCT OF LINEA 2000
GARANTIEVOORWAARDEN
CONDITIONS DE GARANTIE
This appliance has a two year warranty period. During this period the manufacturer is responsible for any failures that are the direct result of construction failure. When these failures occur the appliance will be repaired or replaced if necessary. The warranty will not be valid when the damage to the appliance is caused by wrong use, not following the instructions or repairs executed by a third party. The guarantee is issued with the original till receipt. All parts, which are subject to wear, are excluded from the warranty.
If your device breaks down within the 2-year warranty period, you can return the device together with your receipt to the shop where you purchased it.
CONDICIONES DE GARANTÍA
RECYCLAGE-INFORMATIE
natural_image
Symbol of a trash bin crossed with diagonal lines, representing waste sorting or disposal (no text or labels)

natural_image
Recycling symbol composed of three chasing arrows forming a triangle (no text or labels)RECYCLING INFORMATIONEN
RECYCLING INFORMATION
This symbol on the product or on its packaging indicates that this product may not be treated as household waste. Instead it must be brought to the applicable collection
point for recycling of electrical and electronic equipment. By ensuring this product is disposed of correctly, you will help prevent potential negative consequences for the environment and human health, which could otherwise be caused by inappropriate waste handling of this product. For more detailed information about recycling of this product, please contact your local city office, your household waste disposal service or the shop where you purchased the product. The packaging is recyclable. Please treat the packaging ecologically.
natural_image
Symbol of a trash bin crossed with two crossed lines, no text or numbers presentINFORMACE O RECYKLACI ODPADU
natural_image
Recycling symbol composed of three chasing arrows forming a triangle (no text or labels)INFORMÁCIE O RECYKLÁCIU ODPADU
From now on, accessories and parts of Domo appliances can also be ordered online from the Domo webshop*:
http://webshop.domo-elektro.be
You can reach the webshop through the Domo website as well: www.domo-elektro.be. The accessories and parts can also still be obtained at the store where you bought the appliance.
CZ
If the power supply cord is damaged, it must be replaced by the manufacturer, its service agent or a similarly qualified person in order to avoid a hazard.
flowchart
graph TD
    A["Top View Top"] --> B["Step 1: Insert spring component"]
    B --> C["Step 2: Insert hand valve with red circle highlighting the part"]
    C --> D["Step 3: Insert handle button with green arrow"]
    D --> E["Step 4: Insert handle button with green arrow"]
    E --> F["Step 5: Final state with hand valve and handle"]
UTILISATION POUR LES JUS
flowchart
graph TD
    A["Top: Top 3 Box with lid"] --> B["Step 1: Down arrow to top box"]
    B --> C["Step 2: Down arrow to side box with lid"]
    C --> D["Step 3: Down arrow to side box with lid"]
    D --> E["Step 4: Down arrow to side box with lid"]
    E --> F["Step 5: Down arrow to side box with lid"]
    F --> G["Step 6: Down arrow to side box with lid"]
    G --> H["Step 7: Down arrow to side box with lid"]
    H --> I["Step 8: Down arrow to side box with lid"]
    I --> J["Step 9: Down arrow to side box with lid"]
    J --> K["Step 10: Down arrow to side box with lid"]
This appliance may be used by children from the age of 8 and up, and also by persons with a physical or sensory limitation, as well as mentally limited persons or persons with a lack of experience and knowledge. But only on the condition that these persons have received the necessary instructions on how to use this appliance in a safe way and know the dangers that can occur by using this appliance.
Children cannot be allowed to play with the appliance. Maintenance and cleaning of the appliance may not be done by children, unless they are older than 8 years old and are under supervision. Keep the appliance out of reach of children younger than 8 years old.
This appliance is suitable to be used in a household environment and in similar surroundings such as:
- Kitchen for personnel of shops, offices or other similar professional surroundings
- Farms
- Hotel or motel rooms and other surroundings with a residential character
- Guest rooms or similar
Attention: This appliance cannot be used with an external timer or a separate remote control.
- Read all instructions before use.
- Before use check if the voltage indicated on the appliance corresponds with the voltage of your power net.
- Do not let the cord hang on a hot surface or over the edge of a table or counter top.
- Never use the appliance when the cord or plug is damaged, after malfunction or when the appliance is damaged. In that case, take the appliance to the nearest qualified service center for check-up and repair.
- Close supervision is necessary when the appliance is used by or near children.
- The use of accessories that are not recommended or sold by the manufacturer can cause fire, electrical shock or injuries.
- Remove the plug from the power outlet by pulling the plug itself. Never pull the cord to remove the plug from the outlet.
- Never leave an operating appliance unattended.
- Never place this appliance on or near a gas stove or electrical stove, in a hot oven or in a place where it may come into contact with a hot appliance.
- Do not use the appliance outdoors.
- Only use the appliance for the purpose for which it is made.
- Always place the appliance on a steady, firm, dry and level surface.
- Never immerse the appliance, the cord or plug in water or other liquids to avoid fire, electrical shock or
injuries.
- Never use the plug or the appliance with wet hands.
- Make sure that the plug is properly connected to the power outlet.
- Connect the appliance to an earthed socket.
- This appliance does not contain any parts that you can repair yourself. Always contact a qualified technician for check-up and repair of your appliance.
- Never fill the appliance with unknown foods.
- Make sure that the base of the appliance does not get wet.
- Do not remove the plug from the socket in case the appliance is exposed to gas. Instead you should open all near windows for airflow.
- Do not move the appliance when it is operating.
- If the screw press should get obstructed, put the juicer in ‘rev’ mode for about 2 to 3 seconds to let it turn in the opposite direction. After this, try to let the screw turn in the right direction again.
- Only use the food pusher to guide food into the juicer.
- Do not use the appliance for longer than 30 minutes continuously. The motor could overheat.
- If during use you notice a burnt smell or smoke, immediately stop using the juicer. Take the appliance to a service center for check-up and repair.
• Always use both hands to move the appliance. - Do not use water that is warmer than 65^ C to rinse the appliance.
PARTS
- Pusher
- Cover with fill opening
- Sieve
- Sorbet accessory
- Sieve cleaner
- Squeezing screw
- Bowl
- Spout for juice
- Spout for pulp
- Motor block
- On/Off switch + reverse
- Measuring cup
- Cleaning brush for sieve
- Reset button
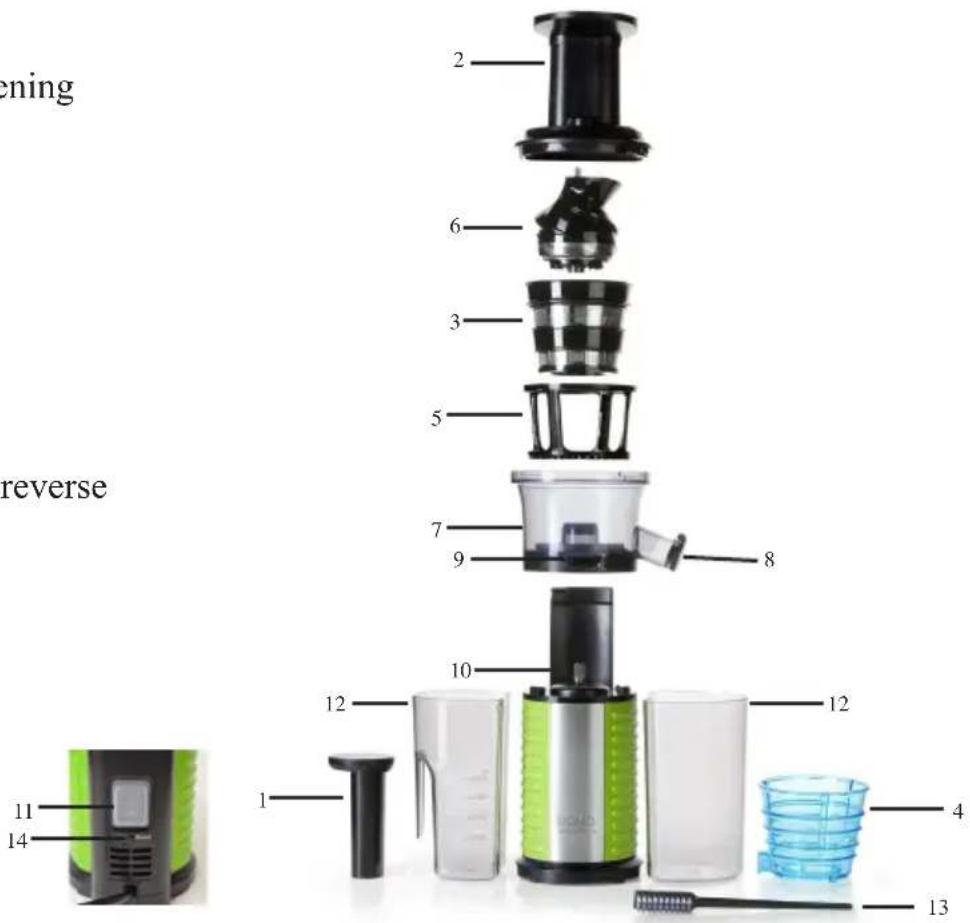
Note: the reset button must be used when the machine is automatically shut off due to overheating or blockage of the machine.
BEFORE FIRST USE
Remove all parts from the packaging.
Wash all removable and washable parts, such as the pusher, cover, sieve, sorbet accessory, sieve cleaner, squeezing screw, bowl and measuring cups in warm soapy water, rinse and dry them thoroughly.
Caution: Never submerge the motor block in water!
Tip: The sieve and the sorbet accessory can be cleaned with the cleaning brush.
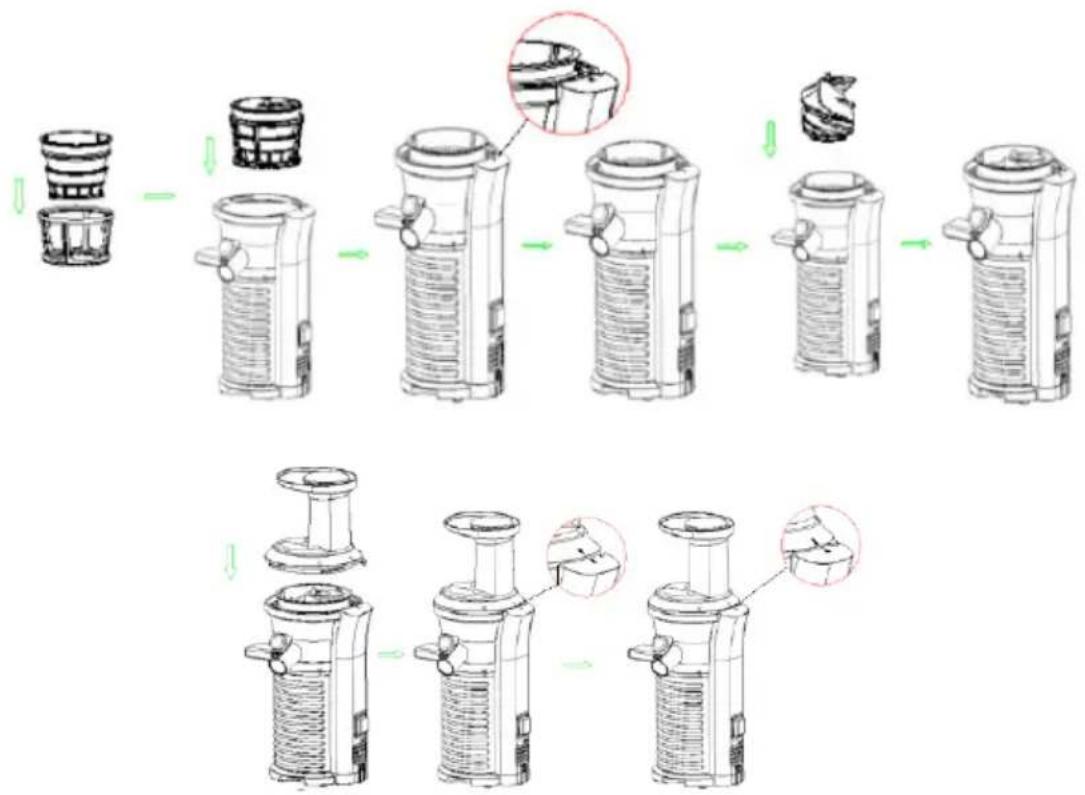
Positioning of the regular sieve:
Make sure the plug is not in the outlet and that the on/off switch is turned off prior to assembling the machine.
- Place the sieve in th sieve cleaner.
- Position the bowl on the motor block. Make sure the bowl is mounted properly on the axle of the motor block and twist the bowl so that the arrows on the bowl and on the motor block are aligned.
-
Position the sieve cleaner with the sieve in the bowl.
-
Push the squeezing screw firmly into the centre of the bowl, making sure that it clicks into position, or else the cover will not close.
- Position the cover on the bowl and twist it until the cover clicks shut, making sure that the arrow on the motor block aligns with the line on the lid.
- Position a measuring cup under the spout for the juice and a measuring cup under the spout for the pulp. The machine is now ready for use.
Repeat these steps in reverse order when disassembling the machine.
flowchart
graph TD
    A["Raw Material"] --> B["Add Food"]
    B --> C["Close-up of Box"]
    C --> D["Product with Bag and Cover"]
    D --> E["Final Product with Stacked Paper and Cover"]
Positioning of the sorbet accessory:
Make sure the plug is not in the outlet and that the on/off switch is turned off prior to assembling the machine.
- Position the bowl on the motor block. Make sure the bowl is mounted properly on the axle of the motor block and twist the bowl so that the
- arrows on the bowl and on the motor block are aligned.
- Position the sorbet accessory on the motor block. Make sure the bowl is mounted properly on the axle of the motor block and twist the bowl tight.
- Push the squeezing screw firmly into the centre of the sorbet accessory.
-
Position the cover on the bowl and twist it until the cover clicks shut, making sure that the arrow on the motor block aligns with the line on the lid.
-
Position a measuring cup under the spout for juice, where the sorbet will come out. The machine is now ready to make sorbet.
Repeat these steps in reverse order when disassembling the machine.

flowchart
graph TD
    A["Step 1: Spring spring"] --> B["Step 2: Switch with highlighted component"]
    B --> C["Step 3: Switch with green arrow indicating rotation"]
    C --> D["Step 4: Final device with hand and blade assembly"]
    D --> E["Step 5: Final device with blade assembly and hand/blade assembly"]
    style A fill:#f9f,stroke:#333
    style B fill:#ccf,stroke:#333
    style C fill:#cfc,stroke:#333
    style D fill:#fcc,stroke:#333
    style E fill:#cff,stroke:#333
INSTRUCTIONS FOR JUICES:
The on/off switch has 3 positions:
On: I
Off: O
Reverse direction: R
Make sure that the machine is turned off (O) and put the plug in the outlet.
Position the 2 measuring cups under the 2 spouts.
Clean the fruit and vegetables and cut them into pieces.
Caution:
Remove hard pits or seeds prior to pressing to prevent possible damage to the squeezing screw.
The peel and pits/seeds must be removed from oranges, lemons, grapefruit and melons before use.
Turn on the on/off switch (I).
Insert the pieces of vegetable and/or fruit into the opening at the top of the cover. Push the food down into the bowl using the pusher.
Tip: Begin with the harder fruit, and then squeeze the soft fruit.
INSTRUCTIONS FOR SORBET:
- Make sure that the machine is turned off (O) and put the plug in the outlet.
- Position the sorbet accessory as described earlier.
Position a measuring cup under the juice spout.
Turn on the on/off switch (I).
Insert the pieces of frozen vegetable and/or fruit into the opening at the top of the cover. Push the food down into the bowl using the pusher.
CAUTION:
Do not insert fingers or other foreign objects into the opening of the cover while the machine is in use. Use only the pusher, and not spoons, fork, sticks, etc.
Never use the machine with an empty bowl.
If the machine becomes stuck during use, turn the on/off switch to R and hold down the switch so that the machine turns in the opposite direction. This could remove any obstructions. Release the switch to stop the reverse movement. If this does not work, turn the machine off, remove the plug from the outlet and re-assemble the machine according to the instructions. Then try to start the machine again.
When the measuring cup is full (max. 800 ml) or when all the frozen food has been squeezed, turn the on/off switch off (O) and empty the measuring cups.
Note: If the machine overheats, it will turn off automatically. Turn the machine off (O). Wait 10 minutes and then push the reset button to switch the machine on again.
Caution:
Never let the machine work for longer than 30 minutes at a time.
Do not touch the on/off switch with wet hands.
If the cover becomes loosened from the bowl during use, the motor of the machine will automatically stop to prevent any hazards.
Juice that is not drunk immediately should always be stored in the refrigerator.
CLEANING AND MAINTENANCE
Remove the plug from the outlet and allow the machine too cool completely before cleaning.
Turn the cover loose from the bowl and disassemble the rest of the parts in reverse order of assembly.
Empty the measuring cups and clean the cover, the pusher, the sieve, the bowl, the squeezing screw and the measuring cups under running water. Use the cleaning brush to clean the sieve properly.
Caution:
Do not use metal sponges, which could damage the machine.
The following parts can be cleaned in the dishwasher: cover, sieve, sorbet accessory, sieve cleaner, squeezing screw, bowl and measuring cups.
The pusher may not be put in the dishwasher.
Be careful when you clean the sieve. The sieve is sharp.
Wipe the exterior of the motor block clean with a moist cloth. Never submerge the motor block in water!
Dry all parts thoroughly, re-assemble the machine and store it in a dry place.
Tip: Rinse all parts immediately after use.
PRECAUCIONES IMPORTANTES
flowchart
graph TD
    A["Initial spring"] --> B["Step 1: Insert spring"]
    B --> C["Step 2: Insert spring with hand"]
    C --> D["Step 3: Insert spring with handle"]
    D --> E["Step 4: Insert spring with handle and grip"]
    E --> F["Final packaging: Final product with hand and grip"]
USO PARA ZUMOS:
flowchart
graph TD
    A["Top View Top View"] --> B["Step 1: Insert spring component"]
    B --> C["Step 2: Insert spring component with red circle highlighting the process"]
    C --> D["Step 3: Insert spring component with green arrow indicating the start point"]
    D --> E["Step 4: Insert spring component with green arrow indicating the end point"]
    E --> F["Final State: Final Step with red circle highlighting the final state"]
ODŠTAVŇOVÁNÍ DŽUSU:
flowchart
graph TD
    A["Top: Top 3 Box with roller head"] --> B["Step 1: Insert a roller component"]
    B --> C["Step 2: Insert a roller component with roller head"]
    C --> D["Step 3: Insert a roller component with roller head"]
    D --> E["Step 4: Insert a roller component with roller head"]
    E --> F["Step 5: Insert a roller component with roller head"]
    F --> G["Step 6: Insert a roller component with roller head"]
    G --> H["Step 7: Insert a roller component with roller head"]
    H --> I["Step 8: Insert a roller component with roller head"]
    I --> J["Step 9: Insert a roller component with roller head"]
    J --> K["Step 10: Insert a roller component with roller head"]
SPRÁVNE VLOŽENIE VOJNE NA SORBET:
flowchart
graph TD
    A["Initial Robot with Chain"] --> B["Step 1: Disassembly"]
    B --> C["Step 2: Rotation of Chain with Arrow"]
    C --> D["Step 3: Disassembly"]
    D --> E["Step 4: Rotation of Chain with Arrow"]
    E --> F["Final Step"]

    subgraph Initial Setup
        G["Top Left Robot"]
        H["Left Arm"]
        I["Bottom Arm"]
    end

    subgraph Comparison
        J["Step 1: Rotation of Chain with Arrow"]
        K["Step 2: Rotation of Chain with Arrow"]
        L["Step 3: Rotation of Chain with Arrow"]
        M["Step 4: Rotation of Chain with Arrow"]
        N["Step 5: Rotation of Chain with Arrow"]
    end

    subgraph Final Setup
        O["Step 1: Rotation of Chain with Arrow"]
        P["Step 2: Rotation of Chain with Arrow"]
        Q["Step 3: Rotation of Chain with Arrow"]
        R["Step 4: Rotation of Chain with Arrow"]
        S["Step 5: Rotation of Chain with Arrow"]
    end
ODŠTAVOVANIA DŽÚSU:
natural_image
Two cylindrical milk dropers on a white surface (no text or symbols visible)
natural_image
Three product photos: a pair of paper-wrapped items, a clear glass coffee maker, and a white rectangular baking bowl (no text or symbols visible)of scan hier:
ou scannez ici:
oder hier scannen:
or scan here:

- GARANTIEVOORWAARDEN
- CONDITIONS DE GARANTIE
- CONDICIONES DE GARANTÍA
- RECYCLAGE-INFORMATIE
- RECYCLING INFORMATIONEN
- RECYCLING INFORMATION
- INFORMACE O RECYKLACI ODPADU
- INFORMÁCIE O RECYKLÁCIU ODPADU
- CZ
- UTILISATION POUR LES JUS
- PARTS
- BEFORE FIRST USE
- INSTRUCTIONS FOR JUICES:
- Caution:
- INSTRUCTIONS FOR SORBET:
- CLEANING AND MAINTENANCE
- PRECAUCIONES IMPORTANTES
- USO PARA ZUMOS:
- ODŠTAVŇOVÁNÍ DŽUSU:
- SPRÁVNE VLOŽENIE VOJNE NA SORBET:
- ODŠTAVOVANIA DŽÚSU:
Brand : DOMO
Model : DO9139J
Category : Juicer