
CD32 - Cd player/recorder BIGBEN INTERACTIVE - Free user manual and instructions
Find the device manual for free CD32 BIGBEN INTERACTIVE in PDF.


| Product type | CD player/recorder |
| Brand | Bigben Interactive |
| Model | CD32 |
| Dimensions (W x H x D) | 430 x 105 x 300 mm |
| Weight | 2.5 kg |
| Power supply | 220-240 V, 50 Hz |
| Power consumption | 15 W (standby), 30 W (active) |
| Supported CD formats | Audio CD, CD-R, CD-RW |
| Main functions | Audio CD playback, recording on CD-R/RW, programmed playback, repeat, shuffle |
| Audio outputs | RCA line output (left/right), 3.5 mm headphone output |
| Audio input | RCA line input (for recording) |
| Care and cleaning | Clean with a soft, dry cloth. Do not use solvents or abrasive products. |
| Safety | Do not expose to humidity, extreme temperatures, or shocks. Disconnect before cleaning. |
| Spare parts and repairability | Spare parts available through after-sales service. Repairability index: 6/10. |
| Warranty | 2 years |
| General information | Manufacturer: Bigben Interactive. Category: CD player/recorder. Compliant with CE standards. |
Frequently Asked Questions - CD32 BIGBEN INTERACTIVE
User questions about CD32 BIGBEN INTERACTIVE
0 question about this device. Answer the ones you know or ask your own.
Ask a new question about this device
Download the instructions for your Cd player/recorder in PDF format for free! Find your manual CD32 - BIGBEN INTERACTIVE and take your electronic device back in hand. On this page are published all the documents necessary for the use of your device. CD32 by BIGBEN INTERACTIVE.
USER MANUAL CD32 BIGBEN INTERACTIVE
MANUEL D'INSTRUCTIONS
EMPLACEMENT DES COMMANDES
INDICATEUR STEREO FM
MODE REPETITION (repeat 1)
Read this instruction and safety manual carefully before use. Keep this manual in a safe place for further reference.
WARNINGS
To reduce the risk of fire or electric shock, do not expose this EXPLANATION OF GRAPHIC SYMOBOLS. product to rain or moisture
| HARZARD WARNING | The lightning symbol inside an equilateral triangle warns the user of the presence inside the product of uninsulated hazardous electric voltages powerful enough to represent an electrocution risk. | |
| RISK OF ELECTRIC SHOCK DO NOT OPEN | ||
| CAUTION: TO MINIMISE THE RISK OF ELECTRIC SHOCK, NEVER REMOVE THE COVER. THIS PRODUCT CONTAINS NO USER-SERVICEABLE PARTS. ONLY QUALIFIED REPAIR TECHNICIANS SHOULD WORK ON THIS EQUIPMENTS. | The exclamation mark symbol inside an equilateral triangle warns the user that important operating and servicing (troubleshooting) instructions are contained in the documentation accompanying the product. | |
CD32
HAZARD WARNING: TO REDUCE THE RISK OF FIRE OR ELECTRIC SHOCK, DO NOT EXPOSE THIS PRODUCT TO RAIN OR MOISTURE. CLASS 1 LASER PRODUCT

CAUTIONS INVISIBLE LASER RAD WHEN OPEN AND INTER DEFEATED. AVOID EXP TO BEAM.
This product contains a low-power emitter.
PRECAUTIONS FOR USE
To ensure safe use of this product, please follow the Condensation advice below:
advice below.
Positioning
● Water droplets or condensation may from inside it is moved into a very warm, humid atmosphere.
- Do not use the product in extremely hot, cold, dusty or damp condition.
- Condensation can cause the product to malfunction.
- Place the product on a smooth, flat surface.
- Leave the set in a warm room for 1 to 2 hours to allow the condensation to evaporate.
Place it on a well-ventilated position; do not cover in the event of a problem, unplug the power cord and with fabric or stand on a rug or carpet. contact a qualified repair technician.
Power supply Before using this product, check that its rated voltage matches your mains power supply voltage. Ventilation precautions Never obstruct the product's ventilation holes.
Safety instructions Warning concerning liquids
- Never pull on the power cord when plugging in or unplugging the product; always use the plug pulling the cold cold damage, it and creates a pile of electric - Do not allow liquids to splash or spill onto the product, and never stand a liquid-filled container (vase, jar, etc.) on the top of it.
shock. Warning concerning excessive sound levels
- Unplug the product from the mains socket if you do not intend to use it for an extended period. - Owing to this product's extremely low noise output and extended dynamic range, the user may be tempted to turn up the volume louder than necessary.
- The On/Off button does not isolate the product from the power supply. To disconnect the product from the mains power supply, you must unplug the power cord. - The sound output may be excessively high, to the point of damaging the product's headphones or loudspeaker. Always keep the volume within reasonable limits.
- This product should only be used in a horizontal position.
[Non-Text]
For your convenience, record the model number and serial number for future reference.
Serial number :

PORTABLE CD BOOMBOX WITH
ANALOGUE AM/FM RADIO
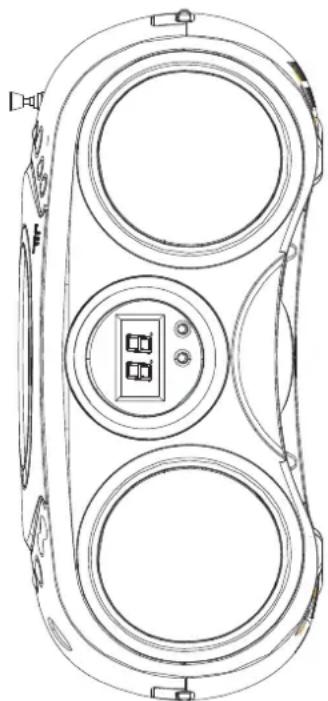
INSTRUCTION MANUAL
FUNCTIONS AND CONTROLS
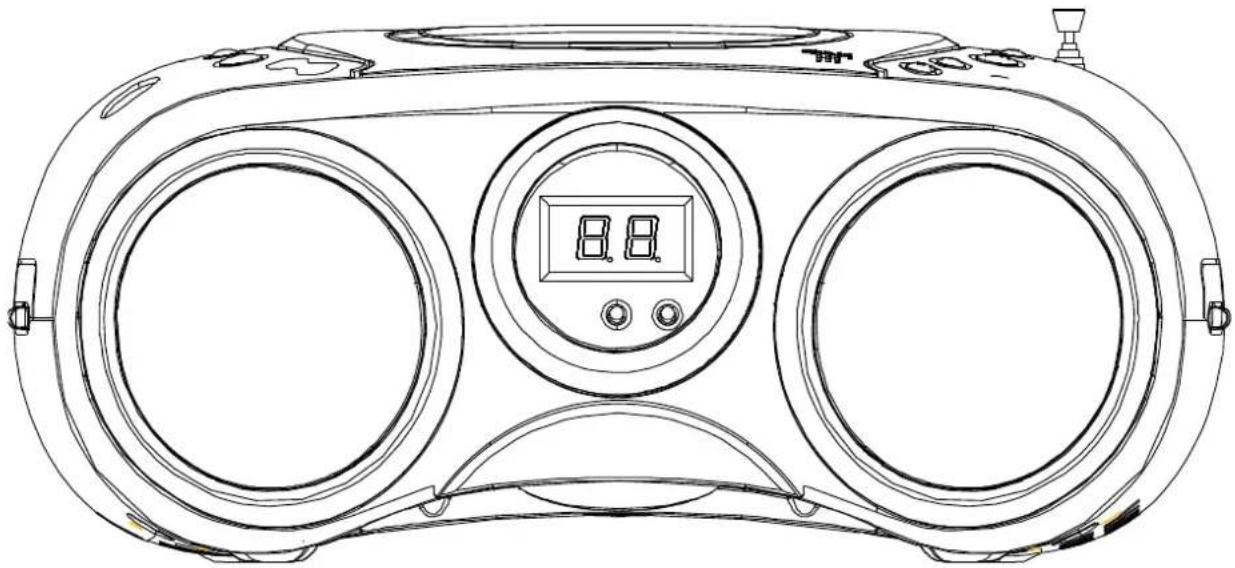
Front panel
Top panel
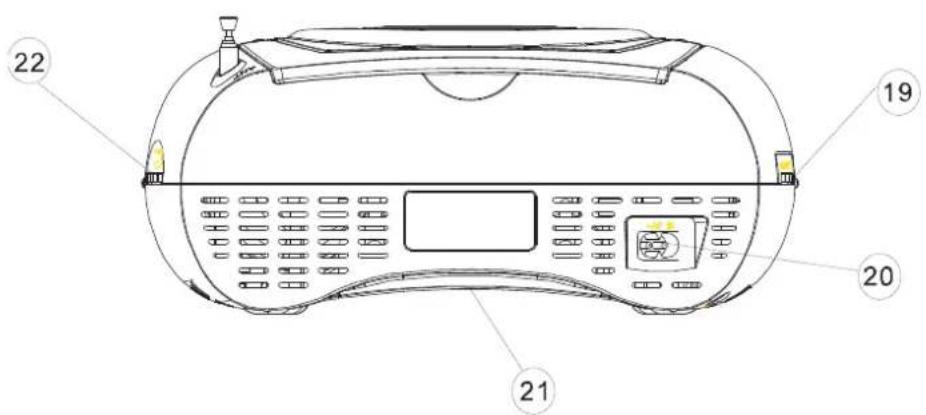
Rear panel
FRONT AND TOP PANEL
- SPEAKER
PROGRAM INDICATOR
(2) 1. 2. 3. 4. 5. 6. 7. 8. 9. 10. 11. 12. 13. 14. 15. 16. 17. 18. 19. 20. 21. 22. 23. 24. 25. 26. 27. 28. 29. 30. 31. 32. 33. 34. 35. 36. 37. 38. 39. 40. 41. 42. 43. 44. 45. 46. 47. 48. 49. 50. 51. 52. 53. 54. 55. 56. 57. 58. 59. 60. 61. 62. 63. 64. 65. 66. 67. 68. 69. 70. 71. 72. 73. 74. 75. 76. 77. 78. 79. 80. 81. 82. 83. 84. 85. 86. 87. 88. 89. 90. 91. 92. 93. 94. 95. 96. 97. 98. 99.
PLAY/PAUSE INDICATOR - Flash continuously - PAUSE indicator. - Light - PLAY indicator.
REPEAT 1/ALL INDICATOR ●Flash continuously - REPEAT 1 indicator. ○Light - REPEAT ALL indicator.
- DISPLAY
· display of CD functions.
FM STEREO INDICATOR - display of FM stereo indications.
TEL 5002616 AUTENIX
- TELESCOPIC ANTENNA - improvement of FM reception.
BAND SELECTOR (AM·FM·FM ST.) - frequency band selection: AM, FM or FM ST.
-
NEXT CD: next tracks
-
PLAY/PAUSE CD: start or pauses CD playback.
-
BACK
CD: return to the previous track.
- STOP
CD: stops CD playback or delete a program.
- CD DOOR
- CD compartment door open/close mark (OPEN/CLOSE).
- PROGRAM
programming and control of programmed track number.
- REPEAT
CD: repeat a track/CD/program.
-
STEREO HEADPHONE JACK - connect for the 3.5mm stereo head
-
FUNCTION SELECTOR
- source selection CD or RADIO and power off.
REAR PANEL
[Non-Text]
[Non-Text]
[Non-Text]
[Non-Text]
[Non-Text]
[Non-Text]
[Non-Text]
[Non-Text]
[Non-Text]
[Non-Text]
[Non-Text]
[Non-Text]
[Non-Text]
[Non-Text]
[Non-Text]
[Non-Text]
[Non-Text]
[Non-Text]
[Non-Text]
[Non-Text]
[Non-Text]
[Non-Text]
[Non-Text]
[Non-Text]
[Non-Text]
[Non-Text]
[Non-Text]
[Non-Text]
[Non-Text]
[Non-Text]
[Non-Text]
[Non-Text]
[Non-Text]
AC POWER SUPPLY - power supply cord connection
VOLUME CONTROL
- sound level control.
00
20.
(二)交易对方
21.
[Non-Text]
22.
[Non-Text]
REAR PANEL
VOLUME CONTROL
- sound level control.
PROGRAM INDICATOR
- Flash continuously - During PROGR - Light - PROGRAM PLAY indicator
(2) 1. 2. 3. 4. 5. 6. 7. 8. 9. 10. 11. 12. 13. 14. 15. 16. 17. 18. 19. 20. 21. 22. 23. 24. 25. 26. 27. 28. 29. 30. 31. 32. 33. 34. 35. 36. 37. 38. 39. 40. 41. 42. 43. 44. 45. 46. 47. 48. 49. 50. 51. 52. 53. 54. 55. 56. 57. 58. 59. 60. 61. 62. 63. 64. 65. 66. 67. 68. 69. 70. 71. 72. 73. 74. 75. 76. 77. 78. 79. 80. 81. 82. 83. 84. 85. 86. 87. 88. 89. 90. 91. 92. 93. 94. 95. 96. 97. 98. 99.
PLAY/PAUSE INDICATOR
- Flash continuously - PAUSE indicator. - OLight - PLAY indicator.
REPEAT 1/ALL INDICATO
Flash continuously - REPEAT 1 OLight - REPEAT ALL indicator.
DISPLAY
DISPLAY - display of CD functions
- display of OD functions.
FM STEREO INDICATOR - display of FM stereo indications
[Non-Text]
TELESCOPIC ANTENNA
- improvement of FM rece
THE STATESTOCK
BAND SELECTOR (AM·FM- - frequency band selection: A
(1) 2017年1月1日
- NEXT
CD: next tracks.
10 PLAY/PAUS
-
PEAT/FAUSE CD: start or pauses CD
-
BACK
-
BACK CO: return to the previous
-
Potential to the previous
-
STOP
CD stops CD playback
- CD DOOR
- CD compartment door
(OPEN/CLOSE).
- PROGRAM
CD: programming and
track number.
-
REPEAT
-
REPEAT CD: repeat a track/CD/c
(2) 10.5% in 2013, 12:
- STEREO HEADPHO connect for the 3.5mm
- connect for the 0.6mm
- FUNCTION SELECT

GENERAL OPERATION
If you would like, the electrical power supply can be used to save the batteries. Make sure that the unit is unplugged from the wall outlet before inserting the batteries.
USING THE DC POWER SUPPLY
Open the battery compartment and insert 8 R14 batteries with respect to the "+" and "-" polarity indications in the compartment.
Important: When replacing the batteries, make sure you dispose of the old batteries in accordance with applicable regulations. They should be disposed of in a location specifically designated for that purpose so they can be recycled safely and without posing any risk for the environment. Do not burn or bury them. Incorrect use of the batteries may result in electrolyte leakage having a corrosive effect in the compartment.
- Do not mix different types of batteries: do not use alkaline batteries with saline batteries, for example. only use batteries of the type recommended by the manufacturer. - Do not mix old and new batteries when inserting new ones.
- If the unit is not to be used for an extended period of time, remove the batteries from the unit.
- Batteries shall not be exposed to excessive heat such as sunshine, fire or the like.
- Warning: excessive sound pressure from earphones and headphones can cause hearing loss.
USING THE AC POWER SUPPLY
- Make sure that the voltage indicated on the manufacturer's nameplate in the battery compartment corresponds to the voltage supplied by your electrical installation. If this is not the case, consult your dealer or service center.
- Connect the electrical power cable the unit then plug it into the wall outlet. The wall outlet must be located near the product and be easily accessible.
- To turn power to the apparatus off, unplug the power supply cable from the wall outlet.
- To protect the unit during violent thunderstorms, unplug the power supply cable from the wall outlet.
RADIO
• To the
To listen to the FM radio, extend the telescopic antenna and orient it for optimum reception. Reduce the length of the antenna if the signal is too strong (if you are very near the transmitter, for example).
As the unit is equipped with a built-in antenna, the telescopic antenna does not have to be used to listen to AM stations. Move the entire unit to orient the built-in antenna.
[Non-Text]
RADIO RECEPTION
1. Set the FUNCTION SELECTOR to RADIO.
-
Position the FREQUENCY BAND SELECTOR on the desired band: AM, FM or FM ST.
-
Turn the TUNING CONTROL to search for the desired station. NOTE: The EM storage indicator comes on if the FREQUENCY RAN
NOTE: The FM stereo indicator comes on if the FREQUENCY BAND SELECTOR is set on FM stereo and you have tuned the radio to an FM stereo station.
-
Adjust VOLUME CONTROL for the desired volume level.
-
When you have finished listening to the radio, position the FUNCTION SELECTOR to OFF to turn the unit off.
STEREO HEADPHONE JACK
Plug stereo headphones (not included), equipped with a 3.5mm mini-plug, into the PHONES jack (on top of the unit, left-hand side) for private listening, without disturbing those around you.
Reduce the VOLUME to a low level before putting on the headphones. You can then adjust the VOLUME progressively to a comfortable level.
Reduce the VOLUME to a low level before putting on the headphones. You can then adjust the VOLUME progressively to a comfortable level.
GENERAL OPERATION
1. Select the source by setting the FUNCTION SELECTOR to CD, OFF or RADIO.
2. Set the desired volume level using the VOLUME KNOB.
3. To turn off the unit, set the FUNCTION SELECTOR to OFF.
Open the battery compartment in the compartment.
Important:
When replacing the batteries, make sure you dispose of the old batteries in accordance with applicable regulations. They should be disposed of in a location specifically designated for that purpose so they can be recycled safely and without posing any risk for the environment. Do not burn or bury them.
Incorrect use compartment.
POWER SUPPLY
CD PLAYER OPERATION
CD PLAYBACK
The CD player supports audio discs, CD-R and CD-RW. Do not attempt to read CD-ROM, CDi, VCDs, DVDs
Note: Even if this portable radio-CD player is able to read CD-R and CD-RW discs, in addition to conventional compact discs, it is not possible to offer a 100% guarantee that all CD-R/RW discs can be read; playback depends on the quality and condition of the blank discs that you use, among other things. A playback failure does not necessarily indicate that the unit is malfunctioning.
- Position the FUNCTION SELECTOR on CD (the display unit briefly displays -- -).
-
To open the CD player door, raise it by the corner marked OPEN/CLOSE.
-
Insert a CD, CD-R or CD-RW disc, printed surface facing upwards and gently press the CD player door to close it.
-
Start playback by pressing PLAY/PAUSE.
-
Press PLAY/PAUSE to interrupt or resume playback.
- To stop CD playback, press STOP.
NOTE: CD playback stops automatically when:
the CD comparing the radio function i
SELECTING A DIFFERENT TRACK
During playback, press NEXT or BACK on the unit or remote control unit to select a track.
- Briefly press NEXT to pass to the next track or press NEXT several times until the desired track
- number appears in the display. Briefly press BACK to return to the start of the current track.
• Press BACK several times to find a previous track.
SEARCHING FOR A PASSAGE ON A TRACK
- Press and hold BACK or NEXT to read the track must forward mode at reduced volume.
- When you have found the desired passage, release the BACK or NEXT button(normal playback resumes automatically).
REPEAT
Repeat: playback of the current track continuously. Repeat all: playback of the entire CD continuously.
PROGRAMMING OF TRACK NUMBERS
Up to 20 tracks can be programmed in any order. If desired, a given track can be programmed more than once. 1. In STOP mode, press BACK or NEXT to select a track
- When the desired track number appears, press the PROG button once to record the track (the display
unit displays "prog", briefly followed by the track number selected).
-
Repeat steps 1 and 2 to select and program the desired tracks.
-
To start playback of your programmed tracks, press PLAY/PAUSE.
PROGRAM CHECK
in STOP mode, press the PROG. button. (the display unit displays the track numbers in the order programmed).
DELETING A PROGRAM
Perform the following operations to delete the memory: • Open the CD door:
Open the 6D door,
Select the RADIO source;
Press STOP once.
(1) 2023年1月1日
[Non-Text]
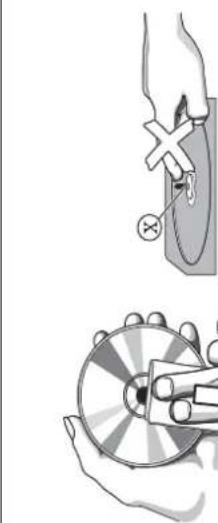
CLEANING CDs
- Use a soft and clean cloth to wipe away fingerprints or dust from the surface of the disc.
- Wipe in a straight motion from the center to the edge. Very small dust particles and slight smudges have absolutely no effect on the sound quality.
- Never use chemical products such as sprays for conventional (vinyl) records, anti-static aerosols, benzene or thinners to clean your CDs.
- To reduce the risk of scratches, always store CDs in their case when not used.
- Do not expose CDs to direct sunlight, high humidity or excessively high temperatures for long periods of time.
- Never write or affix labels to the CD's surfaces.
CLEANING THE LENS
If the lens is dirty, the sound may skip and the CD may not be read correctly. Open the CD door and clean the lens as follows:
- Unplug the power cord.
• Dust or dry particles:
Blow on the lens several times using a camera lens brush, then wipe it gently with the brush to remove the dust. Then blow again on the lens.
the dust. Then blew again on the ends.
If you are unable to clean the lens with the camera lens brush, use a dry cotton swab to clean the surface, from the center to the outside.

TROUBLESHOOTING
TROUB LESHOOTING
If a problem occurs, check the points below before taking the apparatus in for repair.
If you are unable to solve a problem using the indications provided below, contact your dealer or after-sales service center.
WARNING: Under no circumstances should you attempt to repair the apparatus yourself; doing so will void the guarantee.
Problem Solution
GENERAL Power supply
. DO 12V--- 6 x OM-2/N14 batteries (not included)
AUDIO SECTION Output power (RMS)
: 8 Ohms
:ø 3.5mm
: ∅ 3.5mm
(The technical characteristics are liable to change without notice)
NO SOUND/ELECTRIC POWER NO INFORMATION DISPLAYED ABOUT THE DISC
■ Adjust the volume. ■ Insert a CD, CD-R or CD-RW in the player.
• The electrical power cord is not plugged in • The CD is scratched or very dirty.
■ Check the power cord connections.
• The laser lens is covered with condens
- The batteries are dead/not inserted correctly. - Check the installation and charge of the - Wait until condensation disappears from lens
- Check the installation and charge of the batteries.
THE DISPLAY UNIT DOES NOT FUNCTION The CD-R is blank or the disc is not finalized. CORRECTLY/THE BUTTONS DO NOT FUNCTION Use a finalized CD-R.
- Electrostatic discharge.
■ Turn the unit off and disconnect it. Plug it back THE CD IS NOT READ The CD is scratched or very dirty
in a few seconds later. ■ Replace/clean CD. See Maintenance.
- The laser lens is covered with condensation. - Wait until condensation disappears from the lens.
THE CD SKIP TRACKS
• The CD is scratched or dirty.
■ Replace/clean CD. See maintenance.
[Non-Text]
- A program sequence is activated. - Exit the programming mode(s).





IMPORTED BY BIGBEN INTERACTIVE SA
ZI DES PORTES DU NORD
62820 LIBERCOURT - FRANCE
bigben interactive
RADIO PORTÁTIL CD
CD32

- REPEAT 1
- REPEAT ALL
- LECTURA NORMAL
MANUALE D'ISTRUZIONI


FR94320992977


RICEZIONE FM / FM STEREO
- REPEAT 1
- REPEAT ALL
- LETTURA NORMALE
![graph LR A["*1"] --> B["REPEAT 1"] C["."] --> D["REPEAT ALL"] E["."] --> F["NORMAL PLAYBACK"] G["."] --> F](/content/2026/06/1286894/images/89d446f21bece55182afc79edb3164639ce5992ed94286d0f55d6c2d62a2e400.jpg)
SPECIFICATIONS
Alimentazione:
AC 230V/50Hz
MANUAL DE INSTRUÇÕES
RECEPÇÃO FM / FM STEREO
BEDIENUNGSANLEITUNG
GEBRUIKSAANWIJZING
ONTVANGST FM / FM STEREO
- REPEAT 1
- REPEAT ALL
- NORMAAL AFSPELEN
![graph LR A["REPEAT 1"] --> B["REPEAT ALL"] B --> C["NORMAL PLAYBACK"] C --> A](/content/2026/06/1286894/images/911e3e7fffcdc29ece7cc7939a03e4413c50fd55d0bbbb6da8e6e67d218aff58.jpg)




- MANUEL D'INSTRUCTIONS
- EMPLACEMENT DES COMMANDES
- INDICATEUR STEREO FM
- MODE REPETITION (REPEAT 1)
- WARNINGS
- CD32
- CAUTIONS INVISIBLE LASER RAD WHEN OPEN AND INTER DEFEATED. AVOID EXP TO BEAM
- PRECAUTIONS FOR USE
- FUNCTIONS AND CONTROLS
- GENERAL OPERATION
- USING THE AC POWER SUPPLY
- RADIO RECEPTION
- SET THE FUNCTION SELECTOR TO RADIO
- STEREO HEADPHONE JACK
- POWER SUPPLY
- CD PLAYER OPERATION
- CD PLAYBACK
- SELECTING A DIFFERENT TRACK
- PROGRAMMING OF TRACK NUMBERS
- DELETING A PROGRAM
- CLEANING CDS
- CLEANING THE LENS
- TROUBLESHOOTING
- TROUB LESHOOTING
- GENERAL POWER SUPPLY
- AUDIO SECTION OUTPUT POWER (RMS)
- NO SOUND/ELECTRIC POWER NO INFORMATION DISPLAYED ABOUT THE DISC
- THE CD SKIP TRACKS
- IMPORTED BY BIGBEN INTERACTIVE SA
- BIGBEN INTERACTIVE
- RADIO PORTÁTIL CD
- RICEZIONE FM / FM STEREO
- SPECIFICATIONS
- RECEPÇÃO FM / FM STEREO
- BEDIENUNGSANLEITUNG
- GEBRUIKSAANWIJZING
- ONTVANGST FM / FM STEREO
Brand : BIGBEN INTERACTIVE
Model : CD32
Category : Cd player/recorder