MWHA 2021 B - Microwaves HOTPOINT - Free user manual and instructions
Find the device manual for free MWHA 2021 B HOTPOINT in PDF.
| Brand | Hotpoint |
| Model | MWHA 2021 B |
| Product Type | Microwave |
| Rated Voltage | 230 V ~ 50 Hz |
| Input Power (Microwave) | 1270 W |
| Output Power (Microwave) | 800 W |
| Capacity | 20 L |
| Turntable Diameter | 255 mm |
| External Dimensions (W x H x D) | 439,5 x 336 x 278 mm |
| Net Weight | 11,6 kg |
| Functions | Microwave, defrost (weight/time), quick cooking, multi-stage cooking (up to 2 stages), 8 auto menus |
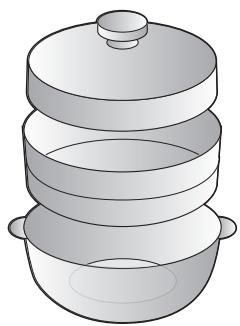
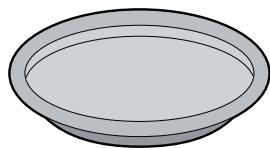
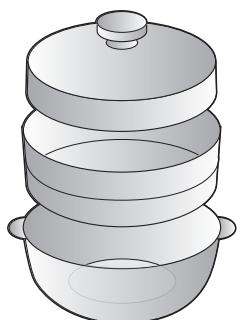
| Included Accessories | Glass tray, roller support, electric plate, steam cooker (depending on model) |
| Safety | Child lock, safety lock system, automatic stop when door is opened |
| Cleaning | Clean with a damp cloth, do not use abrasive cleaners or metal scrapers |
| Energy Efficiency Class | Not specified |
| Noise Level | Not specified |
Frequently Asked Questions - MWHA 2021 B HOTPOINT
User questions about MWHA 2021 B HOTPOINT
0 question about this device. Answer the ones you know or ask your own.
Ask a new question about this device
Download the instructions for your Microwaves in PDF format for free! Find your manual MWHA 2021 B - HOTPOINT and take your electronic device back in hand. On this page are published all the documents necessary for the use of your device. MWHA 2021 B by HOTPOINT.
USER MANUAL MWHA 2021 B HOTPOINT
ALCUNI ACCESSORI SONO DISPONIBILI SOLO CON ALCUNI MODELLI

GUIDA AL PIATTO ROTANTE
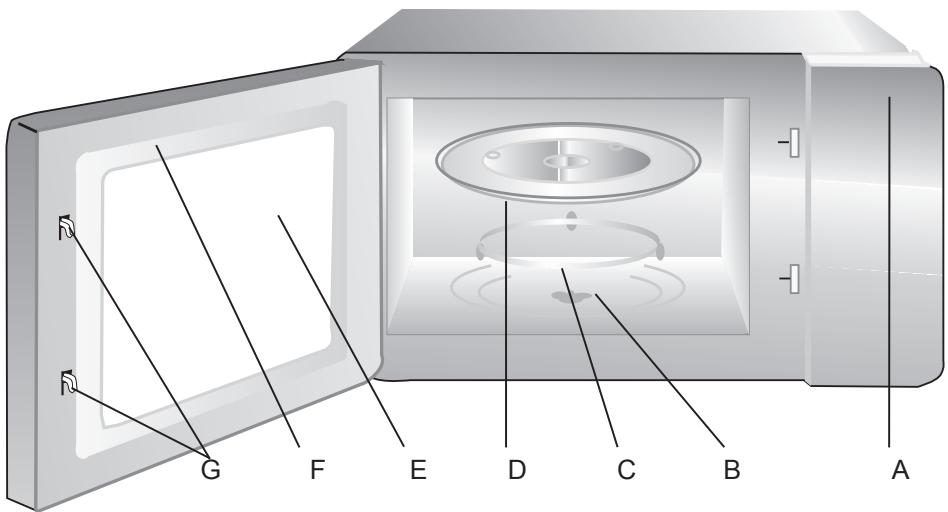
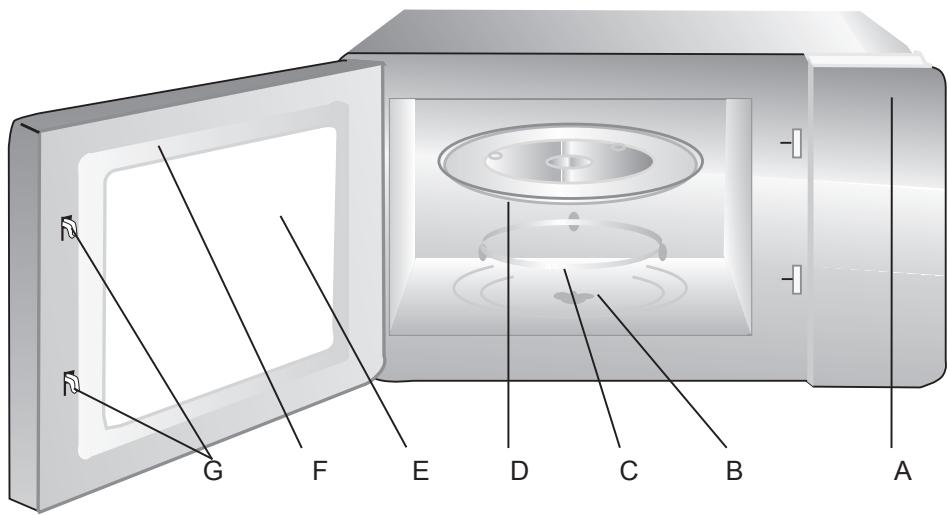
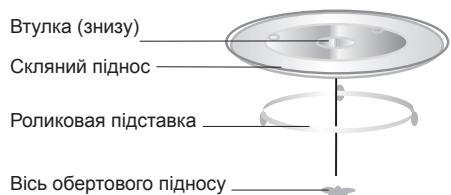
Names of Oven Parts and Accessories
Remove the oven and all materials from the carton and oven cavity.

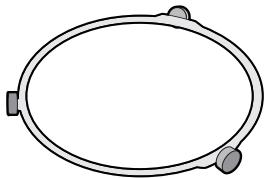
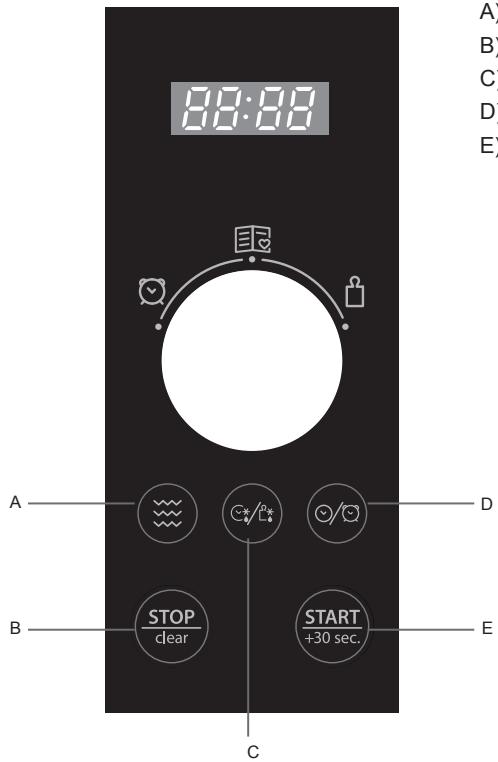
A) Control panel
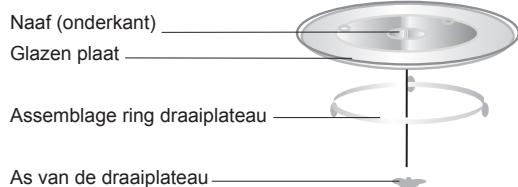
B) Turntable shaft
C) Turntable ring assembly
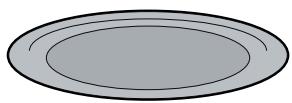
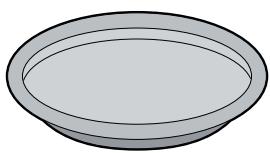
D) Glass tray
E) Observation window
F) Door assembly
G) Safety interlock system
INTRODUCTION
Please read these instructions carefully before using this product, and save this manual for future use. Failure to follow these instructions could affect the life of the appliance and reduce oven performance.
KEEP THESE INSTRUCTIONS CAREFULLY
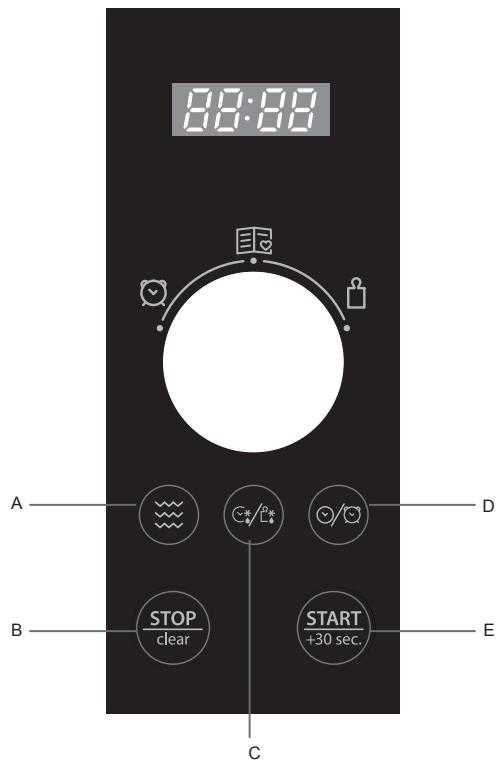
USER INTERFACE
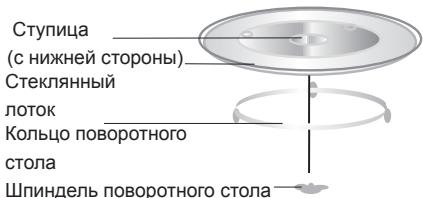
Fit it in the oven. Always put the turntable support under the glass turntable. The support is intended for the glass turntable only.
GLASS TURNTABLE
Put the glass turntable on the turntable support. It will collect dripping substances during the cooking process.
CRISPY PLATE
Place the food directly on the crispy plate. Do not use other dishes or utensils on the crispy plate. Always place the crispy plate on the glass turntable. Use the crispy plate with microwave and combi (microwave + grill) functions only. For better results, preheat the Crispy plate with microwave for 3 minutes at maximum power.
STEAMER
Always use the steamer on the glass turntable. Fill the lower part with water to obtain steam. The strainer is suggested for foods such as fish, potatoes and vegetables. Don't use the strainer for cooking foods such as pasta, rice and legumes. Use the steamer only with microwave function.
IMPORTANT SAFETY INSTRUCTIONS WARNING
To reduce the risk of fire, burns, electric shock, and injury to persons or overexposure to microwave energy when using this appliance, please follow basic safety precautions, including the following:
- Warning: Liquids or other food must not be heated in sealed containers since they are liable to explode.
- WARNING: It is hazardous for anyone other than a qualified personnel to carry out any service or repair operation which requires the removal of the anti-radiation protective cover of the microwave oven.
- This appliance is not intended for use by children not older than 8 and persons with reduced physical, sensory or mental capabilities, or lack of experience and knowledge, unless they have been given supervision or instruction concerning use of the appliance so that they are able to use the oven in a safe way and understand the hazards of improper use. Children shall
not play with the appliance. Do not allow children under 8 years of age perform cleaning and maintenance operations without supervision.
- Keep the appliance and power supply cord out of reach of children under 8 years of age.
- Only use utensils suitable for microwave cooking.
- Clean the oven at regular intervals and remove any food remains.
- Read and follow the specific: PRECAUTIONS TO PREVENT POSSIBLE OVEREXPOSURE TO MICROWAVE ENERGY
- Carefully attend appliance when paper, plastic, or other combustible materials are used to heat food in order to prevent the risk of fire.
- In case of smoke emission, switch off or unplug the appliance and keep the door closed in order to stifle any flames.
- Do not overcook food.
- Do not use the oven cavity for storage purposes. Do not store items, such as bread, cookies, etc. inside the oven.
- Remove wire twist-ties and
en
metal handles from paper or plastic containers/bags before placing them in the oven.
- Follow the installation instructions strictly to finish installation or store the oven.
- Do not heat eggs in the shell and whole hard-boiled eggs in the microwave oven as they may explode even after microwave heating has ended.
- This appliance is intended for household use and similar applications such as staff kitchen areas in shops, offices and other working environments, guest rooms in hotels, motels and other residential type environments, farm houses, bed and breakfast environments.
- In case of damage, power supply cord must be replaced by the manufacturer, any service technician or similarly qualified personnel in order to prevent any hazard.
- Do not store or use the appliance outdoors.
- Do not use the appliance near water, on a wet basement or near a swimming pool.
- The temperature of accessible surfaces may be high during appliance operation. The
surfaces are likely to get hot during use. Keep cord away from hot surfaces, and do not cover any oven vent openings.
- Do not let cord hang over edge of table or counter.
- Failure to maintain the oven in a clean condition could lead to deterioration of the surface that could adversely affect the life of the appliance and possibly result in a hazardous situation.
- The contents of feeding bottles and baby food jars shall be stirred or shaken and the temperature checked before consumption, in order to avoid burns.
- Microwave heating of beverages can result in delayed eruptive boiling, therefore extra care must be taken when handling the container.
- The appliance is not intended for use by persons (including children) with reduced physical, sensory or mental capabilities, or lack of experience and knowledge, unless they have been given supervision or instruction concerning use of the appliance by a person responsible for their safety.
- Children should be supervi
sed to ensure that they do not play with the appliance.
- The appliance is not intended to be operated by means of an external timer or separate remote-control system.
- Accessible parts may become hot during use. Young children should be kept away from appliance.
- Steam cleaner is not to be used.
- During use the appliance becomes hot. Care should be taken to avoid touching heating elements inside the oven.
- Only use the temperature probe recommended for this oven (for ovens provided with temperature-sensing probe tools.)
- Warning: The appliance and its accessible parts become hot during use. Care should be taken to avoid touching heating elements. Children under 8 years of age shall be kept away unless continuously supervised.
- The microwave oven must be operated with the decorative door open (for ovens with a decorative door).
- The rear surface of appliance shall be placed against a wall.
- The microwave oven shall not
be placed in a cabinet unless it has been tested in a cabinet.
PRECAUTIONS TO PREVENT POSSIBLE OVEREXPOSURE TO MICROWAVE ENERGY
- Do not attempt to operate this oven with the door open as this can result in harmful exposure to microwave energy. Never tamper with or deactivate the interlocking devices on the door.
- Do not place any object between the oven front face and the door or allow any dust or cleaner deposits on sealing surfaces.
- WARNING: If the door or door seals are damaged, the oven must not be operated until it has been repaired by a qualified service technician.
ADDENDUM
Failure to maintain the oven in a clean condition could lead to deterioration of the surface that could adversely affect the life of the appliance and possibly result in a hazardous situation.
SPECIFICATIONS
| Model: | MWHA 2021 |
| Rated Voltage: | 230V~50Hz |
| Rated Input Power(Microwave): | 1270W |
| Rated Output Power(Microwave): | 800W |
| Oven Capacity: | 20L |
| Turntable Diameter: | 255mm |
| External Dimensions: | 439.5x336x278mm |
| Net Weight: | Approx. 11.6 kg |
GROUNDING INSTALLATION
DANGER
Electric Shock Hazard
Touching some of the internal components can cause serious personal injury or death. Do not disassemble this appliance.
WARNING
Electric Shock Hazard
Improper use of the grounding can result in electric shock. Do not plug into an outlet until appliance is properly installed and grounded.
This appliance must be grounded. In the event of an electrical short circuit, grounding reduces the risk of electric shock through an appropriate current-carrying wire discharging any static charge. This appliance is
equipped with a cord provided with a grounding wire and plug. The plug must be plugged into an outlet that is properly installed and grounded. Consult a qualified electrician or service technician if the grounding instructions are not completely understood or to ensure the appliance has beenproperly grounded. If required, use a 3-wire extension cord, only.
- A short power-supply cord is provided to reduce the risks of entanglement or tripping over a longer cord.
- If a long cord set or extension cord is used: 1) The marked electrical rating of the cord set oextension cord should be at least as great as the electrical rating of the appliance. 2) The extension cord must be a grounding-type 3-wire cord. 3) The long cord should never drape over the counter top or tabletop where it can be pulled on by children or tripped over unintentionally.
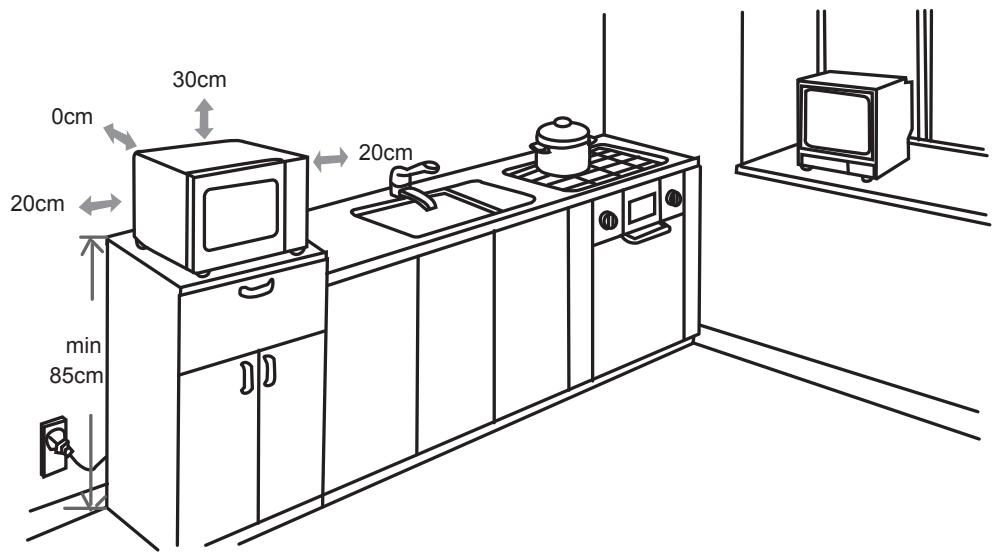
INSTALLATION
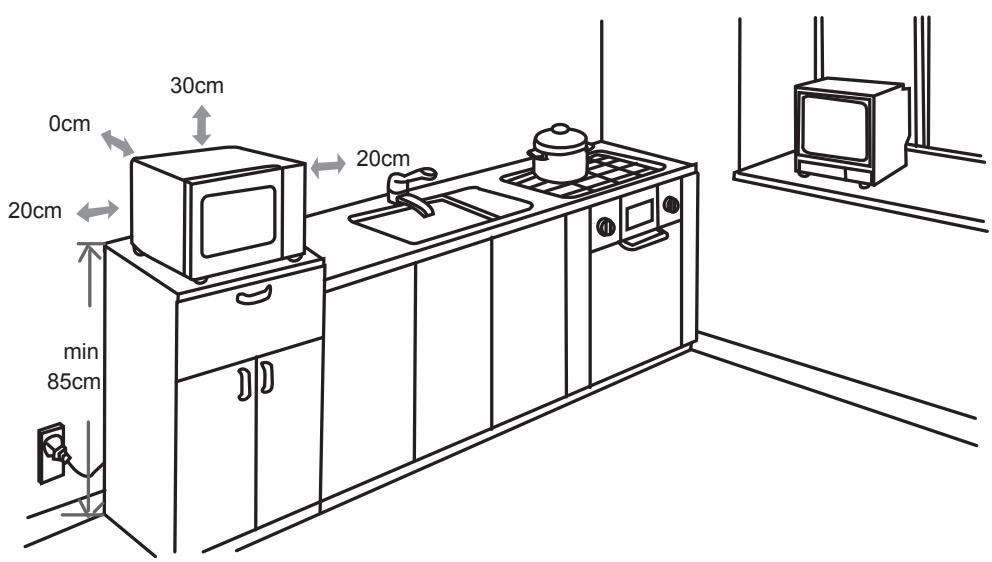
- Select a level surface that provide enough openspace for the intake and/or outlet opening vents.
(1) The minimum installation height is 85cm .
(2) The rear surface of appliance shall be placed against a wall. Leave a minimum clearance of 30cm above the oven; a minimum clearance of 20cm is required between the oven and any adjacent walls.
(3) Do not remove legs from the bottom of the oven.
(4) Blocking the intake and/or outlet openings can damage the oven.
(5) Place the oven as far away from radios and TV as possible. Operation of microwave oven may cause interference to your radio or TV reception.
- Plug your oven into a standard household outlet. Be sure the voltage and the frequency is the same as the voltage and the frequency on the rating label.
Do not install oven over any cooktop/hob or other heat-producing appliance. If installed in proximity of or over sources of heat, the oven could be damaged and the warranty would be void.
The accessible surface may be hot during operation.
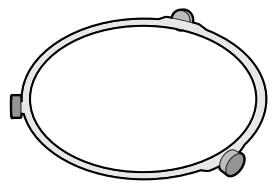
TURNTABLE INSTALLATION
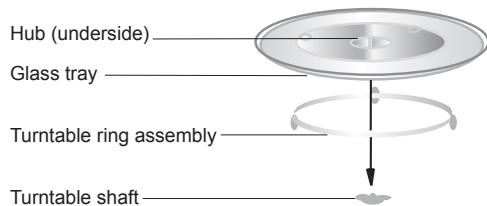
a. Never place the glass tray upside down. The glass tray should never be restricted.
b. Both glass tray and turntable ring assembly must always be used during cooking.
c. Food and food containers must always be placed on the glass tray for cooking.
d. If glass tray or turntable ring assembly cracks or breaks, please contact your nearest authorized service centre.
COUNTERTOP INSTALLATION
Remove all packaging material and accessories. Inspect the oven for damages such as dents or broken door. Do not install if oven is damaged.
Cabinet: Remove any protective film from the microwave oven cabinet surface.
en
Do not remove the light brown Mica cover that is attached to the oven cavity to protect the magnetron.
This microwave oven uses modern electronic controls to adjust cooking parameters and meet your cooking needs.
CLOCK SETTING
When the microwave oven is Powered ON, the oven will display "0:00". Buzzer will ring once.
1) Press "CLOCK/KITCHEN TIMER", the hour figure will flash;
2) Turn the KNOB to adjust the hour figures, the input time should be within 0--23.
3) Press "CLOCK/KITCHEN TIMER", the minute figures will flash.
4) Turn the KNOB to adjust the minute figures, the input time should be within 0--59.
5) Press "CLOCK/KITCHEN TIMER" to finish clock setting. : will flash.

Note:1) The clock function cannot be used if the clock is not set.
2) During clock setting, the oven will automatically go back to the previous status after 1 minute of inactivity.
KITCHEN TIMER
(1) Press "CLOCK/KITCHEN TIMER" twice, LED will display 00:00.
(2) Turn the KNOB and enter time on the timer. (The maximum cooking time is 95 minutes).
(3) Press "START/+30SEC./CONFIRM" to confirm setting.
(4) When the time arrives, the buzzer will ring 5 times. If the clock has been set (24-hour system), LED will display the current time.

Note: 1) Kitchen time is different from 24-hour system. Kitchen Timer is a timer.
2) During kitchen timer, no program can be set.
MICROWAVE COOKING
1) Press the "Microwave" key once, and "P100" display.
2) Press "Microwave" repeatedly or turn the
KNOB to select the microwave power; "P100", "P80", "P50", "P30", "P10" will display in order.
3) Press "START/+30SEC./CONFIRM" to confirm.
4) Turn the KNOB to adjust cooking time. (Time setting should be 0:05- 95:00.)
5) Press "START/+30SEC./CONFIRM" to start cooking.

Note: the time intervals to adjust cooking time in the timer knob are as follows:
The maximum cooking stage number is two. Always select defrost as first cooking stage. The buzzer will ring once after each stage and the next stage will begin.

Note: Auto menu cannot be set as one of the multi-stage.
Example: follow the steps below to defrost food for 5 minutes, and then cook with 80% microwave power for 7 minutes:
1) Press "WEIGHT/TIME DEFROST " twice, the screen will display "dEF2";
2) Turn the KNOB to adjust defrost time by 5 minutes;
3) Press "Microwave" once;
4) Turn the KNOB to choose 80% microwave power till "P80" display;
5) Press "START/+30SEC./CONFIRM" to confirm;
6) Turn the KNOB to adjust cooking time by 7 minutes;
7) Press "START/+30SEC./CONFIRM" to start cooking.
SPEEDY COOKING
1) When in stand-by mode, press "START/ +30SEC./CONFIRM" key to cook with 100% power level for 30 seconds. Each additional press will increase cooking time by 30 seconds. The maximum cooking time is 95 minutes.
2) During microwave heating or defrost-by-time process, press "START/+30SEC./CONFIRM" to increase the cooking time.
3) When in stand-by mode, turn the KNOB left to choose the cooking time directly. After choosing the time, press "START/+30SEC./CONFIRM" to start cooking. The microwave power is 100% .

Note: When in auto menu and defrost-by-weight modes, cooking time cannot be increased by pressing "START/+30SEC./CONFIRM".
DEFROST BY TIME
1) Press "WEIGHT/TIME DEFROST" twice, the screen will display "dEF2".
2) Turn the KNOB to select the cooking time. The MAX. time is 95 minutes.
3) Press "START/+30SEC./CONFIRM" key to start defrosting.
DEFROST BY WEIGHT
1) Press "WEIGHT/TIME DEFROST "once, the screen will display "dEF1".
2) Turn the KNOB to select food weight. The range of weight is 100-2000g.
3) Press "START/+30SEC./CONFIRM" key to start defrosting.
AUTO MENU
1) When in stand-by mode, turn the KNOB right to choose from "A-1" to "A-8";
2) Press "START/+30SEC./CONFIRM" to confirm your selection;
3) Turn the KNOB to choose food weight;
4) Press "START/+30SEC./CONFIRM" to start cooking;
5) The buzzer will ring five times to notify the termination of cooking.

Note: Auto Menu
| Menu | Weight(g) | Display | Power |
| A-1 REHEAT | 200 | 200 | 100% |
| 400 | 400 | ||
| 600 | 600 | ||
| A-2 VEGETABLES | 200 | 200 | 100% |
| 300 | 300 | ||
| 400 | 400 |
| A-3 FISH | 250 | 250 | 80% |
| 350 | 350 | ||
| 450 | 450 | ||
| A-4 MEAT | 250 | 250 | 100% |
| 350 | 350 | ||
| 450 | 450 | ||
| A-5 PASTA | 50(with 450 ml water) | 50 | 80% |
| 100(with 800 ml water) | 100 | ||
| A-6 POTATOES | 200 | 200 | 100% |
| 400 | 400 | ||
| 600 | 600 | ||
| A-7 PUZZA | 200 | 200 | 100% |
| 400 | 400 | ||
| A-8 SOUP | 200 | 200 | 80% |
| 400 | 400 |
INQUIRE FUNCTION
1) When in microwave mode, press "Microwave", the current power will be displayed for 2-3 seconds.
2) During cooking, press "CLOCK/KITCHEN TIMER" to check the current time. It will be displayed for 2-3 seconds.
CHILDREN SAFETY LOCK
Lock: When in stand-by mode, press "STOP/CLEAR" for 3 seconds; a long "beep" will notify activation of the children's safety lock mode and screen will display "C-1".
Unlock: When in safety lock mode, press "STOP/CLEAR" for 3 seconds: a long "beep" will notify the lock is released.
SPECIFICATIONS
(1) The buzzer will ring once when turning the knob back to starting position;
en
(2) "START/+30SEC./CONFIRM" must be pressed to continue cooking if the door is opened during cooking;
(3) Once the cooking program has been set, "START/+30SEC./CONFIRM" must be pressed within 1 minute. If no action is taken, the current time will be displayed and current settings will be cancelled.
(4) The buzzer will ring once when the key is properly pressed. The buzzer will not ring if the key is improperly pressed.
(5) The buzzer will ring five times to notify the termination of cooking.
UTENSILS
CAUTION
Personal Injury Hazard
It is hazardous for anyone other than a qualified personnel to carry out any service or repair operation which requires the removal of the anticirradiation protective cover of the microwave oven. See the instructions on "Materials you can use in microwave oven or to be avoided in microwave oven." Some non-metallic utensils may not be intended for microwaving use. If in doubt, test the utensil in use following the procedure below.
Utensil Test:
- Fill a microwave-safe container with 1 cup of cold water (250ml) along with the utensil.
- Cook on maximum power for 1 minute.
- Carefully feel the utensil. Do not use empty warm utensils for microwave cooking.

Do not exceed 1 minute cooking time.
MICROWAVE OVEN
| Utensils | Remarks |
| Aluminium foil | Shielding only. Small smooth pieces can be used to cover thin parts of meat or poultry to prevent overcooking. Arcing can occur if foil is too close to oven walls. The foil should be at least 1 inch (2.5cm) away from oven walls. |
| Browning Dishes | Follow manufacturer's instructions. The bottom of browning dishes must be at least 3/16 inch (5mm) above the turntable. Improper use may cause the turntable to break. |
| Dinnerware | Microwave-safe only. Follow manufacturer's instructions. Do not use cracked or chipped dishes. |
| Glass jars | Always remove lid. Use only to heat food until just warm. Most glass jars are not heat resistant and may break. |
| Glassware | Heat-resistant oven glassware only. Make sure there is no metallic trim. Do not use cracked or chipped dishes. |
| Oven cooking bags | Follow manufacturer's instructions. Do not close with metal tie. Make slits to allow steam to pour out. |
| Paper plates and cups | Use for short-term cooking/warming only. Do not leave oven unattended while cooking. |
| Paper towels | Use to cover food for reheating and absorbing fat. Use with supervision for a short-term cooking only. |
| Parchment paper | Use as a cover to prevent splattering or as a wrap for steaming. |
| Plastic | Microwave-safe only. Follow the manufacturer's instructions. Should be labelled “Microwave Safe”. Some plastic containers may soften as the food inside gets hot. “Boiling bags” and tightly closed plastic bags should be slit, pierced or vented as directed by package instructions. |
| Plastic wrap | Microwave-safe only. Use to cover food during cooking to retain moisture. Do not allow plastic wrap to touch food. |
| Microwave-safe thermometers only (meat and candy thermometers). | |
| Wax paper | Use as a cover to prevent splattering and retain moisture. |
MATERIALS TO BE AVOIDED IN MICROWAVE OVEN
| Utensils | Remarks |
| Aluminium tray | May cause arcing. Transfer food into a microwave-safe dish. |
| Food carton with metal handle | May cause arcing. Transfer food into a microwave-safe dish. |
| Metal or metal-trimmed utensils | Metal shields the food from microwave energy. Metal trim may cause arcing. |
| Metal twist ties | May cause arcing and could cause a fire in the oven. |
| Paper bags | May cause a fire in the oven. |
| Plastic foam | Plastic foam may melt or contaminate the liquid inside when exposed to high temperature. |
| Wood | Wood will dry out when used in the microwave oven and may split or crack. |
CLEANING
Ensure the appliance is unplugged from power supply.
- Clean oven cavity after use with a slightly damp cloth.
- Clean the accessories always with soapy water.
-
The door frame, seal and surrounding surfaces must be cleaned carefully with a damp cloth when they are dirty.
-
Do not use harsh abrasive cleaners or sharp metal scrapers to clean the oven door glass since they can scratch the surface and the glass may break.
Cleaning Tip. To easy clean the cavity walls that the cooked food can touch: place a half lemon in a bowl, add 300ml(1/2 pint) water and heat at 100% microwave power for 10 minutes. Wipe the oven clean using a soft, dry cloth.
TROUBLE SHOOTING
| EVENT | POSSIBLE CAUSE | REMEDY |
| Oven cannot be started. | (1) Power cord not plugged in tightly. | Unplug. Then plug again after 10 seconds. |
| (2) Fuse blowing or circuit breaker in function. | Replace fuse or reset circuit breaker (repaired by professional personnel of our company) | |
| (3) Trouble with outlet. | Test outlet with other electrical appliances. | |
| Oven does not heat. | (4) Door not closed well. | Close door well. |
| Glass turntable makes noise when microwave oven operates. | (5) Roller wheel and / or oven bottom is dirty. | Refer to “Maintenance of Microwave Oven” to clean dirty parts. |
| Microwave oven interference with TV | Radio and TV signals may be interfered during microwave oven operation. It is similar to the interference of small electrical appliances, like mixers, vacuum cleaners, and electric fans. | It is normal. |
| Oven light is dim | In low power microwave cooking, oven light may become dim. | It is normal. |
| Steam accumulating on door, hot air out of vent openings. | While cooking, steam may come out of food. Most steam will get out from vent openings. Anyway, some may accumulate on cool place like oven door. | It is normal. |
| Oven started accidentally with no food in. | Do not operate the appliance without any food inside. It is very dangerous. |
According to Waste of Electrical and Electronic Equipment (WEEE) directive, WEEE should be separately collected and treated. If at any time in future you need
to dispose of this product please do NOT dispose of this product with household waste.
Please send this product to WEEE collecting points where available.
MIKRODALDA FIRININIZIN KURULUMU
HACTPOIBAHE HA BALIATA ΦYPHA
HaHMeHOBaHnHa Na yactn n akcecoapn Ha fypHaTa
I3BaTe ΦypHaTaN BcNChMATEpHaNtO KaJHOHa KAMEpaTa HaΦypHaTAt.

A) KoHTpOen nahanen
B) 3aDbNKBaUca O Na BbPraata Ce YHnna
C)Ппспособленье 3a Вьртуца счная.
D) CtbnneHa yHnna
E) Празорец за наобл endeines
F) MexaHn3bM Ha BpTa
G) CnCTema Ha oBe3OpacBaU n3KJIIOuBaTeI
BbBEHNE
Ipooyete BnHmATEJHO Te3n INHCTpyKcnn npedn da n3non3BaTe BaWata MKNPOBbJIHOBA cyphna I rN 3ana3eTe. Ako cna3BaTe Te3n INHCTpyKcnn, BaWata cyphna Ue BN Cnykdo6pe DbJrroDHN.
3АПАЗETE TE3ИнСТРУКЦИ
NOTPENEJICKINHTEPENC
A) MinkpoBbJIHH
B) Cnpn/N3mncTn
C) Pa3mpa3yBaHe no BpeMe/TeTnO
D) KxhEnckn TaHmep/acaOBHNK
E) Cтар/+30 сек./Повьрди
AKCECOAPN
HЯКОN AKCECOAPN CA HAJINCHI CAMO 3A HЯKON MOДЕЛN
BbPTaUCA CE ONOPA
IocTaBeTe ro BvB fypHata. BuHaRn noCTaBraIte BbptTauata ce onopa nOd CTbKHeHaTa onopa. IoDnopata e npedHa3Nahe caMo 3a BbptTao ce CTbkNo.
BbPTaIIO CE CTbKJIo
To e npedna3HaueHo 3a cb6npaHe Ha Kaiknte no BpeMe Ha rotBeHe.
TABAC BUCOKN PboBE
IocTabe XpaHata DnpeKTHO Bbpxy TabaTa C BvCOKn Pb6Obe. He n3non3BaIte Dpyr n CbDoBe n np6opn Bbpxy TabaTa C BvCOKn Pb6Obe. BnHaTn NoCTabraTe TabaTa C BvCOKn Pb6Obe Bbpxy BbptJIoTO ce CtbKIO. N3non3BaIte TaBAtc C BvCOKn Pb6Obe cMoC fYHKUInTe MmKpOBblHOBA fYHKUIn + rpn). 3a Da noCTnHHeTe NO-dOpn pe3yIaTn, 3arpeiTe PpeDbapntEno TabaTa C BvCOKn Pb6Obe C fYHKUInTa MmKpOBblHOBA neka 3a 3MHyTu Ha MaKcImaJIHa MoUHOCT.
CbД 3A TOTBEHE HA NAPA
BnHaHn 13noN3BaIte Cbda Bbpxy BbpTjIoTO ce c tbkNo. HanbIhete DoIhata YacCT C BOa, 3a da nOlyuHte npapa. FInIbTpBt Ce npenOpbUba 3a xpaHn, kato p6a, kapToΦn i 3eNeHcyu. He n3noN3BaIte FInIbTpba 3a xpaHn, kato naCTa, opn3 i 6o6oBn pactehna. N3noN3BaIte ypeDa 3a roTBeHe Ha npapa camo C φyHKzIra Ta 3a MmKpOBblHOBA φypHa.
BAJHINHHCTPYKUNN 3A B630PACHOCT
3aДаHaMaJInte pIcKa OT noXap, TOKOB yIap IJIN HapaHЯBaHe Ha Xopa IJIN I3JaRaHe Ha npeKoMEpHa MmKPOBbJIHOBa eHeprIy, KOraTO I3NoI3BaTe BaIIuYpeD, BnHarN CneIdBaIte OCHOBHInTe MEPKn 3a 6e3OnaChOCT KaTo:
- I P E D U Y P E X K J E H N E: T e u h o c t n i d p y r n x p a h n He T p r o b a Da c e 3 a r p r a B 3 a T b o p e H N C b D O B E, T b K a T O M O R a T d n 3 b y x H aT.
- INPEДУПЕЖDEHNE: 13BbPbBaHeTo Ha O6cIyXBaHe IIN ONepaIGNI NO peMOHT, KOITo BkInOuBa OTCTpaHЯBaHeTo Ha KAnAka, OcNtpyraBa3aUIta CpeUy N3laRaHe Ha MKNpOBbJHOBA eHeprIg, PpeDCTabIbRA OnaCHOCT 3a BCEKn Dpyr, pa3nueH ON KOMTeENTHO nIe.
- To3n ypeM MoKa Da 6bDe n3No13BaH O T Deca Ha Bb3pact OT 8 n NobeYe rOdiHn I NlIcA C HamaJIeHN FIn3NueCKn, CEN3OpHN IINYMCTBeHN CNOOCBHOCTN INIINCA HA ONIT I N03HaHNA, AOK Ca NOd HaN3Op IIN Ca 6bn INHCtpKtpanH No OTHOSeHne Ha n3No13BaHTo Ha ypeDa no 6e3OnaceH NaHH pa3bnpat CbIeCTByBaUHTe OnaCHOCTN. DeCaTa He Tpr6Ba Da cNirpaTc ypeDa. POniCTBaHe n NOIDpbXka Ha Notpe6nteHa Tpr6Ba Da c E3BbPbWAOT Deca, OCBen aKO Te Ca Ha Bb3pact Na8 r. n IOD HAbKnOJeHne.
- Πa3eTe ypeHa HcRbna Ka6e nDaJIeU OToDocTbNa Ha Daeua noJ 8 roHnN.
- Излбайу само сьдовe, похожи 3a ynotpe6a в мкровьнови Фчн.
- Φύρηλατηρεδανιας Σκαλαβεγασεντηρεδανιας Σκαλαβεγασεντηρεδανιας Σκαλαβεγασεντηρεδανιας Σκαλαβεγασεντηρεδανιας Σκαλαβεγασεντηρεδανίας Σκαλαβεγασεντηρεδανίας Σκαλαβεγασεντηρεδανίας Σκαλαβεγασεντηρεδανίας Σκαλαβεγασεντηρεδανίας Σκαλ αβεγασεντηρεδανίας Σκαλ αβεγασεντηρεδανίας Σκαλ αβεγασεντηρεδανίας Σκαλ αβεγασεντηρεδανίας Σκαλ αβεγασεν
- Пожетeteи седайтспсифунITE "ПЕДПАЗНМЕКИ 3A ИЗБЯГBAHE HA ИЗЛАГАЕ HA ПPEKOMEPHA MIKPOBьJIHOBA EHEPГИ".
- Пи загравае наханвпл actmocobи nJIN xapTneHn ONAKOBKN,ДрьжTe NOI OKO Фунота поади ВьзMOxHOC7 3a 3anaBaHe.
- Пи OTделяне на дим, ИЗклочete ИИпзвадете сеньсяну урда и дрьхтевразата 3atBopepa, 3a д ce NOTушat
eBeHTyaJIHn IJIaMbU.
- He nperpraBte XpaHaTata.
- He n3n03BaIe foypHaTacuen cbxpanHeHcBxpaHbAte npOdyKTNaKTo XJa6, 6nCKBHTn T.H. BbB BbTpEsiHoCTTa Ha foypHaTata.
- Maxhete MeTaHnHTe TeJUeTa-Bp3Kn I MeTaHnHTe DpbXkN OT XapTneH Nnn PnaCTMaCobN KOHeIHePn/Top6n, npEa nn NoCTaBnTe BbB Fpyhata.
13.Инстеларайуп разноагайтaelифураCAMOBcBOTBetCTBNECИНСТPyкцinte3aИнстеларе. - 奈ица В черунka И сени Тьрд CBарени
Яица He Тразба Да Се 3агрват В
МКровьлноа Фурна, Тьн КATO могат Д
ИЗБухнат, Дори И спед КATO 3агрванeto e
прикнию.
15.To3n ypeE e npedHa3NaeH 3a 6ntOBu n nooobHn npinloXeHn, KaTo Hapnpimep: -KyxHeHcN 3OHN 3a nepcoHaJa B Mara3HH, OΦncn u npytn pa60THn cpei; -OT KIneHTn B XOTeJI, MoteJI IN dpyr BnJKNIUnH NOMEueHn; -CTOnaHcN IocTroKn; -HactaHbAhe TIN "HOUyBka N 3akycka". - Ako 3axpanBaunr KaBEn e NOBpeDeH, ToI TpAba Da 6bJe 3aMeHen OT npOn3BOuNTeJn, HerOB o6cnykBaUc cepBn3 nIn dpyro KBaINΦuNpuHO JInCe, 3a da ce n36erHe onaCHOCT.
- He cbxpanraBaiTe nnn n3noi3BaIte ypea Ha OTKPnTO.
- He n3nOJ3BaIte fypHata B 6nI3oCT do BOda, B MOKpo IomeuEne NJI IN B 6nI3oCT do PnyBEN 6aceH.
- TemnepaTypata Ha DoCTbHNITe NOBbpxHOCTM MoKe Da e BVCOKa, DOKaTOypeDbT paBOTN. NOBbpxHOCTMte Ca BVcSToHne Da ce HaropeuBaT NO BpeMeHa yNoTpe6a. IpeNa3BaIte Ka6eLa OT HarpTaTaNOBbpxHOCTN He NOKpNBaIte BCNUKN OTBOPN 3a BEHTINlaCnHa fpyhata.
- He nO3BONBAIte Ka6eJa da BnCn ha d p6a Ha Macata nn nnToA.
-
Ako He ce noIbpxa YnCTOTata Ha cyphata, MoKe da IOBeDe I DO BNOUbaHe Ha CbCTOARHHeTo HA NOBbpxHOCTTa, KOeTo Da ce OTPa3n He6JaarOpnTtHO Ha JxIBota Ha ypeDa n Da IOBeDe I DO ONACH CITyauJia.
-
CbIbpxKaHHeTo Ha 6e6eXKn 6yTnKn nnn 6bypkKaHcyTa C 6e6eXKn XpaHn CneBa Da ce pa36bPKBAt nn Pa3Knaat, KaKTo n Da ce npOBepn TempepaTypata npedn KOHCymaun, 3a Da ce n36BerHaT n3rapaHn.
- МИКРОВьЛНОВOTO 3aRЯВане Ha HAnITKmoKe Da DoBeTe Do 3a6aBeHo 3aBnpaHe, 3aTOBa BHNMaBaIte npi 6opabHe c KOHTeHepa.
- TOni ypei He e npedha3auehen 3a non3BaHe OT LInCa (BkHNoHTeJIHO Deua) C HamaJIeHN n3uYeCKn, CeTUBHn NJIN YMCTBeHN CnOC6HoCTn JNJIbE3 OENT N IIO3HaHnN, OCBEN AKO Te Ca OCTabEHn PND Ha6KnODeHne INI INHCTpyKTupAHn 3a ynoTpE6aTa Ha ypea ot LInCe, OTROBapAio 3a TExHata Be3oNaChOCT.
25.ДeцаТрбБаДаСеНдзИрВАТ,Дa Heси ИграЯT Cурда. - YpeIbT He e npEHa3HaueH 3a paOTo c NOMoUta Ha BbHSeH TaMep IIN OTdEnHa CnCTema 3a DnCTaHcNOnHOy UnpaBJIeHne.
- ДостынITE чагу могат да се harpeят по Врeme на уnotpe6a. Мankite Deca ТрбБа Дд Дьржан Надалч.
28.Да He ce n3noI3BaT napHn nouchBaun cpeIcTba - IIO Bpeme Ha ynoTpe6a ypeDbT ce HarpraBa. Tpa6Ba Da ce BnIMaba Da ce n36yRa DOKOCBaHTo Ha HarpBaun Ce eJeMeHTBbB Fpyhata
- I3noI3BaIte cAmo coHaTa 3a TempepaTpa npenopbUbaHa 3a Ta3n fypHa. (3a fypHn CHa6JeHc MexAHN3bM 3a I3noI3BaHe Ha TempepaTpHa ceH3OpHa coHda.)
- I PPEIyIIPEJKDEHNE: YpeIbT I IOCTbIHNTE My yactn MORaT da ce HarpeT no Bpeme Ha ynotpe6a. Tpr6Ba da ce BHIMABA da ce n36raBda OKOCbaHeTo Ha HarpRAuNc eJeMeHTn. DeaTa Ha noMaIKo OT 8 roINH Da 6bDaT bPkaHn HadaJeU, OCBeH aKO He ca nOd HenpeKbChat HaD3Op.
- Мнровьлнова турна Трабва да ce ekсплоатира c OTворена ДекopaТИВHA BpATA. (3a Фурни с ДекopaТИВHA BpATA.)
- 3aHaTa CtpaHa Ha ypeHa Tp8Ba Da 6bJe IOCTaBeH KbM CTeHa.
- Мнровьлнова тфуна He Трабва да ce noctава вшkaф, осевенaco He e buna Tectbaha
ПЕДПАЗНМЕРКИЗА ИЗБЯГВАЕ HA ИЗЛАГАЕ HA ПPEKOMEPHA МИКPOВьЛHOВАЕ HЕERTИА
- He npabete onnti Da n3noJI3BaTe Ta3n fypHa npi OTBopeHa Bpata, Tb' KaTO TOBa M0Ke Da DOBeIe Do ONaCHO n3JaaraHe Ha MInKPOBbJHOBA eHeprna. BaXHo e da He ce HapyuBaT NIN NOdnpabRT ppeDpa3HnTe MEXAHN3Mn.
-
- He noctabraye npedmetm Mexdy npedhata yact Ha cyphata n Bpata na Da n03BOJRAte HacnoBaHe Ha MPbcoTna nnNoHCTBaU npenapat Bbpxy yIbTHraBaaTaNOBbpxHOCT.
-
- INPEДУПЕХДECHNE: Ako BpaTata nIN yINbTHENHnTa Ha BpaTata ca NOBpeDEHN,ФунATA He Tpr6Ba Da ce nIIN3Ba,ДOKaTO He ce peMOHTnpa OT KOMPeTeHTHO nIe.
ПРИJOXKEHNE
Ako ypeIbT He ce NODIbPka B DIObpo CbCTOHNHe Na YNCTOTA, NOBbPxHOCTTa MY MOKe Da CE BLOUIN, KOETO bN NOBIIJIO Ha IPOdJIKNITEJIHOCTTa Ha JXIBOTA Ha ypeDa I Da IOBeDe Do ONaCHA CITYaUIN.
CNEUΦUKAUIN
Ha MKNPOBbJIHOBa eHeprna, npeIcTabJIraBa ONaCHOCT 3a BceKn dpyr, pa3nueH OT KOMPeTeHTHO JInCe.
BnKTe nHCTpykCnnte B MaTePnAni, KOnTo MoKeTe Da n3NoTbATE nIi He n3NoTbAite B MmKpObJlnoBa cyphra".Bb3MoXHo e da IMa HnKoN HeMeTaJIHn CbDoBe/npi6Opn, KOnTO He ca 6e3oJacn 3a yNtpe6a B MmKpObJlnoBa cyphra.AKO ImaTe CbMHeHn, MoKeTe Da TcETBaTe BbnpocHna CbD/npi6Op cNeDbaiKn npOceDypata no-doNy.
TecTbaHe Ha cIIOBe n npnbOpn:
- HanbIhHeTe CbD, noJxOJa 3a n3nOJI3BaHe B MmKpOBbJIHObaФурHa, c 1 YaHa cTyJeHa BOda (250ml), 3aeJHo C BbIpocHnBcD nIIN npI6Op.
- Puchete Ha MaKc. MoUHOCT 3a 1 MInHyTa.
- BHIMaTeHNO n3BaJeTe CbJa.AKO npa3HnT CbI e TOnbJ, He ro n3NoJ3BaJTe 3a MInKpOBoJHOBO rOTBeHe.

He naBnBaBaiTe 1 MNHyTa BpeMe 3a rotBeHe.
MATEPHAJIN, KONTO MOXETEДА N3ПОЛ3BATE B MИКPOВьЛHOBA ФУРHA
CbdoBe
3a6eJekk
WAARSCHUWING BELANGRIJKE VEILIGHEIDSINSTRUCTIES
INSTALLATIE DRAAIPLATEAU
INSTALACE NA PRACOVNI DESKU
HaMeHOBaHnIaTeJaJIeN pIpuHaJNeKHoCTe
IocTaHbTe ney b BCE npnilaraemble MaTePnaJbI n3 ynaKOBKn n3 BHyTpneHne qactn neHn.
A)Панель ураленя.
B) Ⅲπινηθενν nobopoTHoro cTOna
C) KoiIbIo NOBOPoTHOrO CTOna
D) CTeKnIaHbI IOTOK
E) O630pHoe OKoUko
F)Дверца
G)БлOKИРовka сиСтЕмbl6e3ОпаСнOCTN
BVEDEHNE
Ipeed TEM, KAK NpOB3OBAbC8 MKNPOBOHOBO neBHO, BHNMaTeNbHO npOHTaTte 3Ty HNCTpyKcIOu TuaTeNbHO co6JIoudaaiTe ee peKoMeHdaun.
EcnBb6ydeTe cIeIOBaT bToHcTpKcN, Ba7a MmKpOBoHOBa ney otJnUHO nocJyKNT Bam B TeueHne doJrnx net.
БЕPEЖHO XPAHNTE эТу ИНСТРУКЦИО
TEXHNUECKNEXAPAKTEPNCNIK
- BbIbepeTe poBHyIO NOBepXHocTb, rDe IMeeeTc IOCTaTOUHO MeCTa InBaBEHTUNLAuIN, KaK Ha BCacbIBaHne, TaK N Ha BbInyCK.
(1)Пechь установinaется на BBICOTE He HNKe 85 cm.
(2)3aHnra NOBepxHOCTb yCTPOIcTBA DoJNkHa 6bITb HnpaBHe Ha CTeHy. OCTaBte 3aOp He MeHee 30 cm NaI neYbIO. PacToRHe IO CTeH DoJNkHO 6bITb He MeHee 20 cm.
(3) He cHmMaTe HOKKn C HIXKHe nCTOpOhbl neu.
(4)ПepeKpbTne BeHTnIaIIOHbIx OTBepCTn MOKeT npNBecTn K BbIXOy Neu n3 cTPOJ.
(5) PacnoJoxKe Te neb KaK MoXHo daJIbWe OT paIIO n TeIeBUN3Opa. MInkpOBoJHOBaI neY npn pa6Ote MOKeT Bbl3bIBaTb NOMExn npn pnpeme paIIO- n TeneCirHaHa.
2.ПоДКЛЮЧNTeпechк STaHДAPTHOи po3etke domaшнй сеКТрИчЕСКО сTe.N.Y6eДntecb, YTO HAnpЯЖЕнUE ИЧАТОТA сTeN COOTBETCTBYOT HAnpЯЖEHIO И ChAteTo, yKa3aHHbIM BTEXHnuecknX xapakTepuCtNKax.
He yctaHabnBaIte neb Had nIHTOIN IIN dpyHM HargBaTeNbHbIM o6OpydoBaHneM. PnY cTahOBke B6n3 NCTOCHNKOB TENla, neb MoKeT nOlyuHTb NOBpeXdEHHraPANTN npN 3TOM TepaETcR.
Ipn pa6oTe neu ee NOBepxHocT MoYr CnIbHO HaraBeBaTcR.
ru
HCTAJIACNA HA BbPTaI
a. He KnaIaNte CTeKJIaHHbI JIoTOK B InepeBepHyTOM COCTOHHM. CTeKJIaHHbI JIoTOK He DoJXKeH 6bITb Yem-To 3aJxat.
b.Пи пи�罗TOBHeHn Пиц BCerdaДОЛЖнbl npIMeHrTbCЯCTeKJIaHHbI JLOTOK IN KOnbI O nobOpOTHOcTOna.
C.ДлЯ рпirotoВе_Hипи Hужно CTaBnTb ee
ИЛКоТeнHepbl CпишЕн Ha CTeKPlHHbI JLOTOK.
d. Ecnn CTeKJIaHHbI JIoTOK IIN KOnbUcIO NOBOPOTHOro CTOna IMeIoT TpeUHHbI INN NOBpeXKeHbI, CBxNtEcB C 6bnXkaIIIM OTdeIeHNMe TExHnYeCKOrO 0cbLyXkBaHnI.
YCTAHOBKA HA KYXOHHOI CTOIKE
YdaJIte BCE ynaKOBOHyIe MaTePnAJIbI n npHaJdNexHocTn. IpoBepbTe ney Ha haJIynchie NOBpeXdeHn, HapnpMeR, BMrTHIN INIcLOMaHHoI DBePcI. Neyb c NOBpeXdeHnMaM NyCTaHaBnBaTb HeNb3r.
Kopnyc: YdaIInTe BCE 3aUHTHbIe PIIeHNHa NOBepxHOCTN KOpnyCa MmKpOBoNHOBOI Neu.
He ydaIyTe CBeTIO-KOpNueHByU HaKJIeKy Mica, npNKpeJIeHHyU dJa 3aunTbI marHeTpOHa OT NOBpeXdHn.
HCTPYKUNIPO 3KCPNYATAUIN
B 3toM MKNPOBOHOBO Nneu npimeHeHO 3JIeKTPoHnOE ynpaBLeHne, NO3BOJIAUeToTOHO YCTaHOBnTB npaMeTpbl Dnla HAnIyUeRo pexmua npiroTOBLeHnaN.
YCTAHOBKA BPEMEH
PnB KJIIOUeHmMKNPOBOJHOBOI neu B CeTb Ha 3KpaHe nOABJETcR «0:00» I oDIN pa3 3ByuHT
CINHJI.
1) HαχΜιTe KΗΝΥ [ CLOCK/KITCHEN TIMER (KγχΟΗΝΤΑΙΜΕρ/чας)], Μοκαδηνη Καοῦ Ḁυήτην ΜιΓΑΤβ;
2)ПоворачиBaTe PУКУ Do yctaHOBKN HUxHOrO 3нauhenя YacOB BДиana3OHe O T 0do 23.
3) Haxmnte [CLOCK/KITCHEN TIMER (Kyxonhny TaMep/ucbI)], Tepeb NaHET MInTaTb 3NaUeHne MNHyT.
4)ПоворачиваitePykydoуctahOBKNHyxHOrO 3haeHnMaMHyT BДиana3OHe OTo 0do59.
5) Haxmnte [CLOCK/KITCHEN TIMER (Kyxonhny TaImep/Yacbl)], YTObI 3aKOHHTb HAcTpoKy BpeMeHn. Tenepb NaHET MIRatb 3HaK «:».

PpmeaHne:1)EcnnuacbI He HacptonTb, OHn He 6ydyT pa6oTaB npn BKJIOueHn CETn.
2) B npocece hacTroponk BpeMeHn, ecnn He nTe Onpaunj DInIteJbHOCTbIO B 1 MmHyT, ney abOTMaTHueckn BepHeTcB npdebldyuee COCTOHN.
KXYOHHbI TAIMEP
(1)ДвждынжмITE KHONKY [CLOCK/KITCHEN TIMER (Kyxohhbl Taimep/cha)],HaИнДиКаTope noЯВntc3haueHne «00:00».
(2)ПовернitePyuKу n yctahOBnTe Bpemr. (MakcmaJIbHoe Bpemr nprirotobneHnra pIuIcoCTabJIeT 95 mHyt.)
3) Haxmnte KhoNk [START/+30SEC./ CONFIRM (Pnyck/+30 cek./noTbepKdEne)] dny noTBepeKdEneHaCTpoEe.
(4)Korda npidet 3aadaHnoe Bpem,5 pa3 npo3ByuHT cnHaJ. EcIn Yacbl 6bln Hactpoehbl (24-uaocba CnCTema),Ha INdikatope 6ydet OTo6paKaTbCer TeKyuIee Bpem.

0---1 MmH :5ceKHyD
1---5 MHN : 10cekyHd
5---10MnH :30cekyHd
10---30 MHH : 1 MNHyTa
30---95 MInH : 5 MInHyT
TABJIUCA COOTBETCTBNA MOUHOCTN CBY
| Мошист CBY | 100% | 80% | 50% | 30% | 10% |
| Отообравлене | P100 | P80 | P50 | P30 | P10 |
ПИNGOTOBLEHNE ПИСИ B HECKOЛьКО 3TANOB
Moxho 3aatab do DByx 3tanob. Ecnn OoHn n3 3Tanob -pa3mOp03ka, 3TO HxKHO yKa3aTB dIra nepBoro 3Tana. IIO OKOHuaHH KaaJDO rTana oDHN pa3 3ByuHT CnHaJI N cpa3y HaunHaetc CJeDuOuN 3Tan.

PpmeaHne:peKIM aBTOMeHHeJIb3r IcNOJIb30BaTb B KaueCTBe OJHOro N3
HECKOJIbKINX3TaIIOB.
MEPbI IPREIOCTOPOXHOCTN
Onachoctb nonyuhenia TpaBmbl
Для ЛюбIx Лик КрOME NOДГ罗TOBньIx CпсцmaJIINCTOB ONaCHO BыПОЛНЯТь Oперали NO ремontу И ТхичесКOMУ OБС顺序ИВанIO, BKluHuaIQUIe ChrTNe KOPnyCa, NOCKONbKy рNi 3Tom OTKpbIbAeTcRdoCTyN KИЗ顺序ИCBY.
Cm. yka3aHnna «MaTePnAbl, KOtOpbIe MoKHO nCNoJIb3OBAbT B MNIKPOBONHOBoi Neu, N Te, KOtOpbIe lyUyHe He npImeHbT». MoKet BCTpeaTbCS NOcyaN He CoDEpXaUaMeTaNla, KOTOpO, Tem He MeHee, HeJIb3a NOnJIb3OBAbTcB MNIKPOBONHOBoi Neu. EcIn COMHeBaTeCb, MOxHo npOBepNTb COMHInTeJIbHyO NOcyDy ONINCAHHbIM HIXke CnOCo6om.
PpOBeRka nocuIbI:
- HanolnTe KOTheHep, npiroDhI dI pynpmeHENB MmKpOBoHOBo Neu, 1 yauKoXoIoNoHO BoDbI (250M), nocTaBnB praDM ComHnteHyIOncydy.
- BkIIOHnTe MaKcIMaJIbHyIO MOUHOCTb Ha 1 MHHyTy.
- AkkypaTHo nToTporaIte nocdy.Ecnn nyCTaI nocya HarpeNaCb, eIO HeJIb3a NOJb3ObaTbcra IINpriROTOBHeHnI PIMU IN B MInKPOBOHOBO neu.

He npoBODnTe npo6y doJbwe 1 MNHyTbI.
MATEPNAJIbI, KOTOPbIE MOXHO NcIOJIb3OBATb B MINKPOBOJHOBOI PEUY
Pocya
AnomnneBaJ qonba
Ppimechan
ToIbKO dIa
3KpaHnroBaBHAn.
He6oJIbUe KycOuKn
MOxHO NcOJb3OBaTb
dJIa HApKbIBAHIN TOHKX
JOMTKOB MCA UIN
DomaUHne IITUcbl, YTO6bl
He nepeCyUHTb INXPn
rotOBeE.Ccnn FOJIbRy
pacNOJIOXJTb CJINUKOM
6Nn3Ko K CTehkAm,
BO3MOxHO NOBnBEHnA
NCKPeHn. FOnIbRa DOnJXHa
pacNoJaratbCS He 6NIKe
2,5 CM OT cTeHOK NeHn.
PnB O3HNKHOBEHm HEnCnpaBHOCTN
Ipeed TEM, kak o6paTntbcB C Lyx6y CepBnca npOBepbTe, HeNb3a JIn yCTpaHnTB HeNCnpaBHOCTb camOcTOReIbHo (CM. pa3dEn «HeNCnpaBHOCTn IMeToDbI IN yCTpaHeHnA»).
ObpaTntbcB Cnyk6y CepBnca MoxHo nO Telefohy 6ecnlaTHoR ropey JINHm IIN no TetefoHam, yKa3aHHbIM B rapaHTnHOM DOKymente.
! Mbl pekomehnyem o6paatabctoTolko KaBTOPn3OBaHHbIM CepBnCHbIM ueHTpam ! PnppeMOHTe Tpe6yIte NcNoJIb3OBaHnOpunHaJIbHbIX 3aNaChbIX YacTei
Ipeepo6paueHnem B Cnyk6y CepBnca Heo6xOIMO y6eIHTbcra, YTO Bbl roTobbl coo6uNTb onepaTopy:
OncanHeHcnpaBHOCTn;
Homep rapaHTnHOro DOKymeHTa (cepBnCHOH KHNKKN, cepBnCHORO cepTnΦnKaTa n T.n.);
MoDemb n cepuHbH Homep (S/N) 3eJnya, yka3aHHbIe B INHΦOpMaζIOHHO TaBnUcKe, paCNoTOKeHHoHa n3eJInn Inp rapaHTnHOM DOKymeHTe;
-Дату п的对象и n3дения.
DpyryIOIone3HyIO INHOpMaunIO HOBocN Bbl MoKeTe HaTn Ha caTe www.hotpoint-ariston. ruBpa3dene «CepBnc»
YTNJIIN3AUINIA
Corgncho EbponeeckoI DnpkeTnBe 2002/96/EC 06 ytniN3aunn 3neKtpOnHHbIX n 3neKtpnuecknx npnbopOB (WEEE) 6bITOBbIe 3neKtponpNbopbl He DOJXHbI
BbIbpaCbIbA TbCBcC O bUyHbIM MycOpOM. CtapbIe 6bITobbIe pInbOpby DOnJXhbl BbIbpaCbIbA TbCBc OTDeNbHO IIN ONTUM3aUN CTOnMOCTN IOBTOPHO INcONlb3OBaHn N nepepa60TKI
MaTePnaIOB,coCTaBIAUOUIx npIbOp,a TaKKe IJNA OXpaHbI 3KOIONN IN 3DOpOBbJIIOJe.CnMBoI nepeeepkHyTa MyCopnHa KOp3INHa IMeETcHa HBCex npi6opax, HanOMInHa POJb3OBaTeIHO 06 OBa3aHHOCHT pa3dJIbHorO c6Opa Mycopa.Bonee NOpO6bHe CBeDEHnKaCaTeJIbHO pApBnJIbHO yTIN3aCnI CTaporo 6blTOBOrO 3NeKTponp6Opa IOJb3OBaTeIIMOTy NOLyuNTb B COOTBETCTBYIOUcEM ROC. UypeXDeHn INI B MAra3INHe 6blTOBOI TexHNI.

AIO 77
NEWTI PETTEY
New 6eJweKtepi MeH KepeK-kaPaKapbIbIH aTaynapbl
PeeKHe 6apIbIK MaTepeaIaIapDbI KapToHHan KHe neTtiH iIiHe HbIfapBbIb3.
A) Baçkapy nahaneli
B) AaHaMaJbI b6iNk
C) AHaJImaJIbI CaKINHa XINHaFbI
D) ΘΗΝΕΚ ΦΟΥΟΗ
E) Kapay tepeseci
F) EciK xHaftbl
G) Kayinci3ik kynblj kyneci
KIPICNE
MnKpOtonkbHdbI neuHizdi naaDanahydAnb6ypbH 6yn HcKaynapbMyKmT Okbl WbIfbH3 XHe OHkatah caKaTaHb3. Byn HcyKaynap cKaTaNfAa JxafdaJa neuHiz3 y3ak Kblndap 6oBly 3dIK Kb13MeT etedi.
БУЛ HУСКAYЛAPДы KATAH CAKTAHbI3
PANDAJAHUShbIHbIH INHTEPΦEICI
A) MinkpoToIkbiH
B) ToKtaty/Koio
C)CaJImaFbI/yaKaBtBi 6oBbIHlaM3bIHepity
D) Ac Yü Taïmepi/Ca fat
E) Baçṭay+/30cek./pacctay
KEPEK-ЖAPAKTAPbl
KEBIP KEPEK-JAKAPKTAP HAKTbI YJITINEPDE FAHA BAP


AINHANFBIITABAKUATIPETI
OhI neWKe opHaTbHb3. AHaJIbIbTa6aKaTaiperIH apdaiIM aHaHaftbI WbIHb Ta6aKaHaBHAc7bHa KaBbIb3. ByTIpeK TeAHaftbI WbIHbTa6aKaWa YsiH apHaNFaH.
AINHAJfblwUbIHbl TABAKWA
AinhaflbIu bHbI Ta6aKaHaHbI aHaflbIu Tabakua tiperHe KoibHbI3. On nicipy ypdiCi 6apbcBHaTaMubInaTbIH 3aTTapdbxHaNHaDbI.
KATTBI TABAKSHA
A3bIKbTI TIKENE KaTbI TabaKaUFA KoBtHbI3.
BaCa Ta6aKTapbI Hemece acnantapdbI KaTbI Ta6aKaUfA KoMaHbI3. KaTbI Ta6aKaUHa bI ePaIbIM aHaJIbIi WbIHbI Ta6aKaUfA KoBtHbI3. KaTbI Ta6aKaUHa bI TK MKNpOTKnBID XHe Kypama (MKNpOTKnBID + rPnlb) yHKuJnapMeH naIdaIahbIbI3. XKaCbI HETNXe any YsIH KaTbI Ta6aKaUHa bI MKNpOTKnBID NeIe 3 MNHyTTa MaKcImaIbI KyATNeH KbI3DbIPbIHbI3.
БYFA ПICIPПИSS
Bya nicipriwi Te npdaibm aHnflbIu 乌hbl Tabakwada naDanaHbHb3. By uhrapy yuih TeMeHri beJirine cy tonTbipbHb3. Cy3eKi 6aJIbK, Kapton XHe KekHic cnAaTb1 a3bIKtap yuiH YcbHbJaBc. Cy3ekhi nacta, kpiu xHe 6pwaK cnAaTb1 a3bIKapdbn icipy yuiH konDaHaBb3. Byfa nicipriwi Tek mKpOToJIbHfynKcnaCbIme naDanaHbHb3.
MAHbI3ДыI KAYINCI3ДIK EPEXKEJIPE IBOИьIHSHA ECKEPTY
KypbIbIbI3dbI naIdaIaNHy Ke3iHne ept, TOK COfy, aIam JapaKaTbI HeMeCE MKNpOJkbIHdbI neuTIH waMaHaN TbIC KyaTbIHa YUbIPay KayniH a3aiTy yuiH KeNecinepei KamTtBtH Heri3ri CaKtBk WapanapbIH CaKaTbI3:
- ECKEPTY: CynbIKbTKap JxHe 6aca TaFamdap Kxabik KOHTeHepnepde XblbITbIMaybl Tnic,ce6eoiJXapblNyby MymkiH.
- ECKEPTY:KineTITyIFaanBacKa Ke3 KeJreH aamdapdbH MKNPOTOIKbIHDbI KyaTka ySbipaydaH KOpFaiTbIH KaKnakTbIH WeuinyiH KaMTNTbIH KbI3MeT KepCey Hemece XeHnDey XMybICTapBH opbIHday Kayinti 6oNbIn Ta6blnadbl.
- 8 kactah yIkeh bala nap xeHe deHe, ce3y He akbl kabileTepi wKeTeyni Hemece TExkpnbeci MeH biiktiniri a3 aanmnap 6yn Kypaldbi bipeyDInbKaBbIaybHna Kayinci3 naDaIaHy BoBHua HcKaynapdbi anfah xhe bIKTMaj KayiTepdi TycIHReh KaFdaJaFaHa OHbI naDaIaHa aIaDbI. Balaanapfa KypalmeH OHIayf pyKcat etneH3. 8 Xacka TOImarH bala napfa Ta3aIay XHe TexHKaNbIK KbI3MeT Kepcety KymbICTapbH 6akblaycbI3 OpbIHdayf pyKcat 6epMeH3.
- Kypan MeH OHbIH CbIMbIH 8 jactaH kiuii 6aIaanapdaH anWak yctaHbl3.
- Tek MInKpoTOnKbHnDbI neUtpe apHaIraH bIDbcTapdbI naIdaIaNbIHbI3.
- Neusti Jyieni Tpye Ta3apbIn, Ke3 KeIreH TaFAM KaIdbkTapbHaH Ta3anay Kaxket.
- Keneci māniMeTrepdi OKbIb3 XaHe opbIHdaHbI: «UAMADAH TbIC MIKPOTOJIbIHDbI KYATTbIH MYMKIH TYTbIHJyblbOJdbIPMAY BObIHUA CAKTbIK UAPAJAPbl
- TaFamDbI pNactNK Hemece KapTOH KOHTeHepnepDe XbJIbTy Ke3iHde XaHbIn Kety MymKINdiHc6 BaJNaHbICTbI neuTi YHemi BaKbIJaayda yCTaHbI3.
- TyTih 乌kca, KpybIfblHb eWipiH3 Hemepe03eKaDah aKbIpaTbHb3 JHe OTbI bacy
yuih eciktjKaobik Kynde yctahb3.
- TaFamDbI WAmadaH TbIC KbI3DbIPMaHbI3.
- Neusti caTay MaKCaTTapbHda naIaIaN6aHbI3. Han, ToKaI, T.6. CnAeTbI TaFamapdbI neustiH iuiHde caKTaMaHbI3.
- KaptoH Hemece PnactNK KOHTeHep/ KaTaNapDbI NeuKe CaTyDah 6ypbIH CbIM TyHHseKTePiX He MeTaII TTKaJIapBHaJbIN TACTaHbI3.
- Byn neuTi Tek yCbHbJFaH opHaTy HcKaynapbHa Caikec opHaTbHbI3 HeMece opHaNactbipbHbI3.
- Copeeri kT KaTbI n icKeH KMbtpKaIapDbI MKNpOToJIbIHdbI neHTepDe Kb3DbIpMaFaH XeH, c6e6i OaP MKNpOToJIbIHdbI Kb3Dbpy aKtaJFaHHaN KeIH De XapblYbI MymkiH.
- ByI Kpyblfbl TypMbICTa naIdaIaNHyfKaHecofAH YKcac TEmeHderiJeN KOJaNbICTapFa apHaIraH:
-Дуkeндер, KeHcener JxHe baca JxMbIC optanapbIHdafta acy KbI3MeTKepepiHi aMakTapbl;
- KOHaK yIJIepDe, MOTeNbIepeRerI JxHe 6aKa Da TpyfBn YI OptaJIapbIHDa TytBHybIJaP TaPaNbIHn;
-epmeprnik yJnep;
-KoHaTbH Jep XHe TaHfbl ac TypiHderi optanap.
- Erep Kyat cblmb 3akblmdaIanfah 60anca, kayinti 60nbipmay yuih onbI eHidipyuli, kbl3met Kepcety areHTi Hemece caikec 6bniktiniri 6ap aamdnap anmaCTbipyTnic.
- KypbIJIfblHbI cbIpTTa caKTamaHbI3 Hemece naJdaanHa6aHbI3.
- Byn neuTi cydbiH KacbIHda, DbIMKbln Xeptene Hemece 6accenHHiH KaCbIHda naaDanaHbHa3.
- KypbIJIbI JxMlbc icTeN TyPfAHa aUbIK beTepDIn TEMpePaTypaCb IxKorApbl 6onybl MyMKH. BeTep naJaIaNHy BapbcBlnda Kbl3bIN KeTyI MyMKH. CblIMbl Kbl3dIpJbIaTbIH 6TtEH aIwak YCTaHbI3 XHe neuTih eWbipaya KipeTIH-BlFaTbIH caHbIaynapbl H beremehi3.
- CbIMhbH yCTeH hEmec eencteyii6 bTeiHcJIbipan typybH 6OJIbIPMaHbI3.
- NeuTi Ta3a KyiHne YcTaMaCaHbI3, 6eTHiHa HauapLaybHa anbIn Kein, KypblfHbIH Kbl3MeT ety Mep3imHe Kepi acepi Turi3in,
Kayinti Kaftaay Tydbpyb MyMKH.
22. Kyin KeTney yuH TaMaKTaHDbIpy 6TeJIkeNepi MeH 6aIaNapFa apHaIFaH bIbIcTapDbIH iWiHdericIn apaNaCTbIpy Hemece uay Kepek XHe TemnepaTypacBn TekcepYKepeK.
23. CycbHapbl MMKpoTOLkbHdb neIe Xblby KIdiptiInre, 3pyntuTkiHayfa anapbl coFaBb, COHbIKTaH KOHTeHepdi yctaraH Ke3de cak 6oJy kepek.
24. KpybIfbl DeHe, ce3y HeMece aKbIa Ka6iIeTepi WeKteyni He Tαxipnbeci MeH bIikTiliri a3 aadamap 6yI Kypanblb 6ipeynIHb KaBILaybIHda Kayinci naIdaIahy 6oBbHsa HcKaynapdb aIraH JxHe bIKTMaN KATEpDi TyciReH KaFdaiDa fHa OHb naIdaIaHa anaDbI.
25. BaapdbH KpybIfBImeH OHaMaByHa Ke3 XekTi3y YsiH OApdbI KaDaFanay KaKTeT.
26. KypblfblcIPTkbl TaMep Hemece 6eKe KaWbIKTbIKTaH backapy Kyneci apKbIbI backapblnyuhih aphaImmaFah.
27. Adbk 6bnwekept naandaHy 6abbcihda bICTbK 60nybl MyMkiH. KiueHTaB 6anapdbOaH anwak yctay kaxet.
28. By Ta3apTkblbI KOJaHaBImaybl Tnic.
29.Паидаланубарысьнда Крьлгь bICTbK 6onaы. ПewsTIN iwiHderi Kbi3Dbipy эпementsтерин устамay yшin abai 6ony kaxket.
30. Tek 6yn newke aphaIFaH TemnepaTpa DaTunirn naDanaHaBbIb3 (TemnpaTpaHbI aHbIKay daTUnKTepeMeH xa6dbkTaIFaH neWter yuH)
31. ECKEPTY: Kypblfblx XHe Ohbln Awhk 6bnweKtepi naindaanhy bapbcihda bictbik 60ana. Kbi3dbpaTbH 3JemeHTepdi yctamay ywiin abai 6ony kaxet.8 kactah Kiwi 6baIanapdby 3diKci 6akblny actBHa 6bonmaHan KaFdaJa KypblfbldAn apbl yctay kaxet.
32. MinkpoToIkblHbI neu DeKopatnBtik eciri aIbIK KyIHDe KymbIC icTeiinyi Tnic (deKopatnBtik eciri 6ap neWtep yuiH).
33. 33. KypbIJIfblHbIH apTkbl 6etI KaobIpraFa Kapama-KapcblOpHaTbIJybl Tnic.
34. 34. MmKpOToIKnBbIbI neW cepeHIn iuiHHe TeKcepydE HtneiHWe, OHbl cpeHIn iuiHe oHaTnFaH XeH.
UAMADAH TbIC MINKPOTOKbIHDbI KYATTbIH MYMKIH TYTbIHbIJybIH BOJIbIPMAY BOIbIHUSA CAKTbIK UAPALAPbI
- Byn nei ti aibik ecirimeh kymbic icTeNeH3, 6yn MnkpoTOLkbln KyaTTbH Kayinti acepiHe anbln Kenyi yMmKIn. Kayinc3diK Kyblntapbln 6y3yFa Hemece KacaKaHa 6yndipyre Tbblm caIbHaDbI.
- IeWtiH aIbHfbi 6eTI me HeciKTH apacbHa eIkaHdai 3aTapbl opHaTnAbH3 HeMece Kip He Ta3apTKblu KaIbIKTapbHbH Tblfbl3daTkblu 6etTepih De XnHaNbyH 6oIdbipMaHbI3.
- ECKEPTY: Ecik Hemece ecik TbIfbI3daTkbIITapbl 3akbIMdIanca, neW eKIneTTi MaMaH TapanbHaH XeHDeJMeReHwe JxMByC icTeTIJImeyiTic.
KOCbIMUa
Kypblfbl Ta3a KyIHDe caKTalMaCa, OHbIH CbIPTkbl Typi HaapnaiDbI XeHe KypblfblHbIH KbI3MeT Mep3imHe acep etin, Kayinti XaFdaNFa eKeenyi MymkiH.
CINATTAMAJIAP
MnKpOToNkBHyDbl NeW 3NeKtpHeHRe HKe3De, neW "0:00" MmHIn KepCetin, Dbl6bICTbIK CnHAnI bip pet Dbl6bICTaHbI.
1) “CLOCK/KITCHEN TIMER(AC YI TAIMEPI/ CAFAT)” TYIMeciH bacbHb3, cafT cunφpbj KaHaDbj;
2) Carat caHdapbH peTtey yuIH BACKAPY TETIIN 6paHbI3, eHriiziren yaKbIT 0-23 apacbHda 6onybl Tnic.
3) “CLOCK/KITCHEN TIMER(AC YI TAIMEPI/CAFAT)” TYIMeciH bacbIbI3, MInyT cIφpbIkaHaIbI;
4)MnHyT caHdapbH pettey yuH IN BACAPY TETIIN 6yaHbI3, eHriizreH yaKbIT 0—59
apacbHda 60nytTnic.
5) YakbittbOpHaTydbaayTay yuHIN "CLOCK/ KITCHEN TIMER(AC YI TAIIMEPI/CAFAT)" TyMeciH bacbHb3. :"XaHaNbI."

Eckptne:1) Cafat opHaTbIMaca, Kyat icke KocbIrfan Ke3e OJ KymBc icTeMeiDi. 2) CafATt bOpHaty npoueci 6apbcihda, 1 MInHy t iuiHne KymBc icTeMece, neaIdbIHfbl Kyire aBTOMaTTbl Typde opanaDbI.
AC YI TAI MEPI
(1)“CLOCK/KITCHEN TIMER(AC YI TAI MEPI/ CAFAT)” TyuMeciH eki peT bacbIb3, xapbIK dnoBbl 00:00 məhiN Kepcetei.
2) BACKAPY TETIIN 6ypbHb3 JxHe TaMep yaKbITbH eHri3iH3. (MaKcImaNdb TaMaKa daBbHday yaKbITb - 95 MNHyT).
3) Параметри пасу "START/+30SEC./CONFIRM (БACTAY/+30CEK./PACTAY)" TуIMecIHбасHyI3.
(4) TaHmep yaKbITbHa KeTKeHNe, Dbl6bICTbIK CnHrAn 5 pet Dbl6bICTaHbI. CaFt opHaTbInca (24 caFaTTbIK Jxye), XapbIK dnoDbI aFBIMdaBfYaKbITbIK KepcTeJI.

Eckptne: 1) Ac yu yaKbITbl 24 caFaTTbIK Jyuehen e3reJe. Acy TaMepi - TaMep 60nbTn TablaaBl.
2) Ac yu TaMepi 6apbIcIbIa 6aFdpIaIaMaHbI opHaTy MymkiH emec.
MINKPOTOJKNbIHDbI NELTE TAMAK DAHbIHDAY
1) "Microwave (MɪkpoTOLKbɪH)" Tɪyɪmecɪn bɪp peɪt 6aʊbɪhɪz, "P100" kʌaʒbɪ kɛpceɪtiJIeɪd.
2) MmKpoTOnkbln KyaTbIH TaHday ysiH, "Microwave (MmKpoTOnkblH)" TyMecin 6ipHewe pet 6acblb3 Hemece BACKAPY TETIiH 6ypaHb3, "P100", "P80", "P50", "P30", "P10" kzaynapbI petimeh Kepctinei.
3) Pactay yushi“START/+30SEC./CONFIRM (BACTAY/+30CEK./PACTAY)”Tiyimecih6abHybI3.
4)Даиындay yaКытbing pettey yшin BACKAPY TETIIN 6урьнл3. (YaKbIT napametpi 0:05-95:00 6onybl Tnic.)
5) TamaK daBbHdaydbI bactay yuIH "START/+30SEC./CONFIRM (BACTAY/+30CEK./ PACTAY)"TMyMeciH 6acblbl3.

Eckptne: yakblttb6ackapy TeirHH Kemerimeh peTtenetih yaklt apalbIKtapbl
Keleci de:
0--1 MInH : 5ceKyHd
1---5 MmH : 10 cekyHd
5---10 MIn :30 cekyHd
10---30 MmH : 1 MmHyT
30---95 MHH : 5 MNHyT
MVKPOTOJIKbIH KYATbIHbIH KECTECI
2) MinkpoTOLkblHbI neIte daIbHday Hemece My3bIH epity Ke3iHne yaBtIb apTbIpy yuHIN "START/+30SEC./CONFIRM (BACTAY/+30CEK./ PACTAY)" Tymecin 6acblbl3.
3) KyTu KnyiHne DaaiBihDay yaKbIbIH TikeNei TaHday yuH IN BACKAPY TETIIN 6ypbHbI3. YaKbITbI TaHdaFaHHa KeiH DaaiBihDaYbI bactay yuH IN "START/+30SEC./CONFIRM (BACTAY/+30CEK./PACTAY)" TyMeciH bacbHbI3. MmKpOToNkBiHdbI neWtIH KyaTbI 100%.

Eckptne: ABTomaTTbI M3iP JxHe CaJIMaK 6oBbHua My3bH epity KyIpePiDe
daHbHay yaKbITbl "START/+30SEC./
CONFIRM (BACTAY+30CEK./PACTAY)"
Tymecin bacy apkblb apTTbIpa aIaIbI.
YAKbIT BOHbIHSHA EPITY
1)“WEIGHT/TIME DEFROST(EPITY)”“TYMeciH6ip pet 6acbIbI3, ekpaHda “dEF2” kza3yblKepceriIe.i
2)Даиындay yaьын TaHday yuH IN BACKAPY TETIIN 6ypbihb3.Мakcimamdbi yaKbIT -95 MInHyT.
3) Epitydi bactay yushi“ START/+30SEC./CONFIRM (BACTAY/+30CEK./PACTAY)”Tymecin bacsbHb3.
CAJMAfbl BOYbIHUA M¥3bIH EPITY
1)“WEIGHT/TIME DEFROST(EPITY)”“TYMeciH6ip pet 6acbIbI3, ekpaHda “dEF1” xa3yblKepceriIe.i
2) Tāram caImaftbIH TaHday yuīn BACKAPY TETIIN 6ypbHbɪ. CaImakTap ayKbIMbl: 100-2000 r.
3) Epitydi bactay yushi“ START/+30SEC./CONFIRM (BACTAY/+30CEK./PACTAY)”Tymecin bacsb13.
ABTOMATTbl M3IP
1) KyTu KnyiHne, “A-1” - “A-8” iWiHeH məsipdi TaHday ywiH BACKAPY TETIiH OHf a bpaHb3;
2) TaHdaIraH m3zipi pactay yuH
"START/+30SEC./CONFIRM (BACTAY/+30CEK./ PACTAY)" TVIMeciH 6acblb3;
3) Tafam caImaftbH TaHday ywiH BACKAPY TETIIN 6ypblHb13;
4) TamaK daBbHdaydbI bactay yuIH "START/+30SEC./CONFIRM (BACTAY/+30CEK./ PACTAY)" TVimeciH bacbl3;
5) Tamak daibinday aarktafHaHHa KeiH, abibctbik cunHan 6ec pet cunHan 6epeji.

Eckeptne: ABtOMaTTbI M3ip
| Мэзір | Салмak (r) | Диаспейдіе кэрсетіліу | Куат |
| A-1 KАйТА КыЗдIPУ | 200 | 200 | 100% |
| 400 | 400 | ||
| 600 | 600 | ||
| A-2 KЕКΘHIC | 200 | 200 | 100% |
| 300 | 300 | ||
| 400 | 400 | ||
| A-3 БАЛыК | 250 | 250 | 80% |
| 350 | 350 | ||
| 450 | 450 | ||
| A-4 ET | 250 | 250 | 100% |
| 350 | 350 | ||
| 450 | 450 | ||
| A-5 ПАCTA | 50 (с汞men 450 мnl) | 50 | 80% |
| 100 (с汞men 800 мnl) | 100 | ||
| A-6 KAPTOП | 200 | 200 | 100% |
| 400 | 400 | ||
| 600 | 600 | ||
| A-7 ПИцla | 200 | 200 | 100% |
| 400 | 400 | ||
| A-8 COPПА | 200 | 200 | 80% |
| 400 | 400 |
CYPATyФУHKUЯrcbI
1)MnKpoTOLkblHHbH TaMaK daBbHday KyIHDe "Microwave (MnKpoTOLkbH) TYmecin bacbH3, afbIMdaBkyat 2-3 cekyHd boBkepcTeJIeI.
2) TaMaK daBbHday KyiHne, aBfIMdaFbl yaBbTTb TeKcepy yuHIN "CLOCK/KITCHEN TIMER" AC YI TAIMEPI/CAFAT) TyMeCIn 6acbHb3. On 2-3 cKeyni Kepcetinedi.
БАЛАЛAPFAAPHAJIFAHКУЛыNTAYФУнкИЯсbl
Kyblntay: Kyty KmyHne, "STOP/CLEAR (TOKTATY/KOIO)" TyMecin 3 ckyHd 60bl 6bacblb3, 6bnanapdaH Kyblntay pexmIhe kipydi 6jIipetih y3ak "Dlb6bICTbK CnHn" 6blfbln, dinCnnei [---] "ka3byHn Kepcetei. Kblntayd H sblyf: KyblntaIHaH Kynde, "STOP/ CLEAR (TOKTATY/KOIO)" TyMecin 3 ckyHd 60bl 6acbl typbHb3, Kyblntah 6ocatblFaHbH 6bldpetih y3ak Dlb6bICTbK CnHn 6bIfabbl.
CNIATTAMA
(1) Baçapу Tetirih 6acbHda 6ypran Ke3de
ДыбICTbIcHnAn 6ip pet shfAdbi;
(2) EciK TamaK daiByHday 6apbIcBiHda aIbIK 6oIca, ac e3ipJeDi JxanfactbIpy yuIH, "START/+30SEC./CONFIRM (BACTAY/+30CEK./ PACTAY)" TyImcicn bacy kajet;
(3) TaMaK DaBbIHday 6aFapnAmacbl opHaTbIbnFaHHaH KeiH, "START/+30SEC./ CONFIRM (BACTAY/+30CEK./PACTAY)" Tymecici 1 MInyT 6oBbl 6acblmAdbl. AfbImdafl yaKbit Kepcetinei. NapamTp 6oJbIbplmaiDbI.
(4)Дурьсбасылган Кафдайда ДыбICTык синан Бер pinei, Дурьсбасылмaca, Кауан Кайтамайы.
(5) TaMaK dAaBbIHday aAraTaNfAhaBbH eCKepy yuH, dIbIbICbIK cInrHan 6ec pet cInrHan 6epeji.
bldltAP
CAK BOJIbIHbl3
XKeke kapaKaT aJy Kayni
Kjnti Tynfaanb6aca Ke3 KeJreH aadamapdbIH MKNpOTIKbHdbI KyaTka YusbipaydaN KOpFaNTbH
KaKNaTbH WeiJyH KAMTbH KbI3MeT KepCety Hemece XeHney XMbICTapbH opbHday Kayinti 60bln Ta6blJa.
«MnKpoToNkBbIbI neIte naIdaIaNbIa aIaTbIH
Hemece bac tapbIyI TNic MaTePnaIaIap»
TypaIbI HyckayIaIbpI KapaIbI3. MnkPoToNkbHbI
neIte naIdaIaHnyuH kayinTi 6oNaTbIH
Kei6ip MeTaNdAn JkacaImaHaB bIdbICTap 6ap
6oNybl MyMKIn. KymHdaHcaHbI3, TeMeHderi
npOeDpyaHbOpbHdAn bIDbICTb TeKcepyre
6oJaBl.
bldcbTbI Tekcepy:
- MinkpoToIkBbIHDbI neu ywiH kayinc3 KOHTeHepdi COHaA-ak, TeKcepiTeIH bIDbICtbl 1 Kece (250 m) cybIK cyMeH TOITbIPbIHbI3.
- 1 MInyT 6oIbI MaKcImaJIdbI KyaTnEHHbJIbTIbIHbI3.
- bIbIcTbI 6aIkan yctan KepiH3. Erep 6oc bIbIC XbIbI 6oIca, Ohbl MKNPOToNkblHdbI neuTe KOnlaHyf a 6oImaiDbI.

1 MHHYTTbIK XbJIbITY yaKbITbIHaH acbIPMaHbl3.
MINKPOTOJIKNbIINDbI NEUITE KOJIdAHyFA BOJATbIH MATEPNAJIAP
| bɪdʒɪctap | Tycɪnɪdɪpmeɪep |
| ʌnliʊmniŋnʌŋkɑnɪtɪbɪpɒl | Tek 6eɪtiŋ Jɔaʊbɪ. ŠɪamədənʌTbɪC Kbɪzɪdɪpɪyɒdɪbɪ6oɪʌdɪpmaŋ yʊɪiŋ eTneHeme C KcE tɪtɪhɪŋ6eɪliɛkterɪŋ Jɔaʊbɪ yʊɪnKɪskeɪntaɪ yɜɪnɪdɪpeɪnnaɪdɪaɪnɪya 6ɔnʌdɪbɪ.ʌŋkɑnɪtɪp neʊtɪnKaɪbɪrplafənbɪHa TbɪMJaɪkbiɪn OphəlaɪackaɪnDaYʌsʌkbiɪn ŠaɪsblɪpyɒlMymkɪn.ʌŋkɑnɪtɪp neɪssəkɪbɪrplafənbɪnænKemdeɡennde 1 dɪɔm (2,5 cm)apənɪkɪtə bɒŋbɪtɪnɪc. |
| Кызартын Кызаруа арhalлан Тарелke | Өндірuyшінн HUCKaynapын орьиданыз. Кызартын Кызаруа arhanlanfahn ТарелkeniHн Таменгіохаflы айналатын Heri3den кем dereндe 3/16 дюm (5 MM) Жогары 6бonyы тис. Дурblc айдanaнбay aihaanltaHn Heri3dɪn 6bɪnyɪn Túdbypby Mумкɪн. |
| Ас iшетин Бдыс-аяк | Tek мікротолынды пew ушін kayinci3 турлepi.Өндірuyшін нүсaynapын opынданыз. Жарылган Неме сынык Тарелkenepdi пайданlaнбыз. |
| Өнек стakaан | Өрkaшан кaknaftын алынд.Tek кыны Күйи deиін Кыздіру ушін пайданындыз.Өнек стандандын кебici Кыздіруг ТezIMCi3 кени жэнжарын Tырлын кетуì Мумкɪн. |
| Өнек bldlc- аяк | Tek Kыздіруfa ТezIMdi пewke aphanlanfahn ойнек bldlc-aяктары. Метал бөлswертэрін жok Ендіrinе кэз кетізінiz. Жарылган Неме сынык Тарелkenepdi пайданlaнбыз. |
| Пeшte дaiындay kanтары | Өндірuyшінн HUCaynapын орьиданыз. Метал бөкітішіт якпалыз. Бydын кішkeventa саынданlaн Mумкɪн'dik beriiz. |
| Картон Тарелkenep Жэne kecenep | Tek Кыска Мерзімdi дaiындау/Kылblу Ушін пайданыныз. Дайындану kezінde пewti δаьлayсыз Ка landырmaныз. |
| Кагаз сунri | Каята жылтыхөнê бөлінетін майдь сінірі ушінBJБETIHЖаБУ KEЗінDE пайданыньИЗ.Тек Кыіcka мерзімідaiынДay baftapamacbɪнда Бакыләр пайданыньИЗ. |
| Пүreament Кагазы | Шаширayдь БОндьрмay ушін KaNTama petiHne пайданыньИЗ hemece Буга Nicipry ушін ораньИЗ. |
| Пл actик | Тек мікрOTOLьндь newушін kayinci3 Турлени.ЕндірУшін нүсayларын орынданы.«МікрOTOLьндь пшіke apналГан»den БелrinеHyi TnIC. lшінderi Таfram bICыfah саын Пл actик KOнту希рлор Жумсары.«Пicipyre apналган пaketтep» Жэн БекemЖаБыларын Пл actик пaketтep КаNTamacьнда Керсетінг徳і тіnlінуі, Тecіліу hemece кжellen'detyi Тиic. |
| Ас орайын Таса | Тек мікрOTOLьндь newушін Kayinci3 Турлени.Даындан Ke3iHne bILfəngdы саКтay Мakcatында taFamdы ЖаБу ушін райданыньИЗ. |
| Термometр neurop | Тек мікрOTOLьндь的新uшінKayinci3 Турлени (et Жэнkoндітрліk зattapfa apналган Термometр neurop). |
| Баалayыз кагаз | Шаширayдь БОндьрмay Жэну bILfəngdы саКтay ушін KaNTama petiHne пайданыньИЗ. |
MUKPOTOJIKBbIHbI NEWTE KOJIdAHbIIMaHTbIH MATEPNJdAP
blbictap
TycinDipMeJep
| Алеминий тарта | Ушковишашьограды Тудир у мимкін. Таfram'dы МИКРOTOKсынды的新ш ушін Кayinci з bдіcka салындз. |
| Металл ТуTKась бар ушін kayinci3 Картон bдыс | Ушковишашьограды Тудир у мимкін. Таfram'dы МИКРOTOKсынды的新ш ушін Кayinci з bдіcka салындз. |
| Металл Немесе metajmen Каразлган ыдістар | Металл мИКРOTOKсынды Куаты таframfa тuriizбey бoreйdi. Металmen кал'tay Ушковишашьограды Тудир у мимкін. |
| Металл Туінші龟тepi | Ушковишашьограды Тудирьп, newe erptti Тудир у мимкін. |
| Картон пakettingр | Пechte erptti тудауь МUMkiH. |
| Пенонп act | Пенонп act жогары temпература осяп; Ушьогая epуіnewe iшінderi сүйытіktы постауы мимкін. |
| Araш | Аraш мИКРOTOKсынды пewte пайдану keziнде Курfan, бөлінлр кетуі hemeces Жарылін кету мIMkiH. |
TA3AJAY
KypbIJIfBIHbIH KyaT Ke3iHeH aXbIpaTbIJFaHbIHa Ke3 XeTKi3iH3.
- PnIJaIaHaHAn KeiH neTuH iUH cAJI DbIMKblMaTaMeH Ta3aIaHbI3.
- Kocajkbl Kepek-kaPaKapTapbl ca6blbI Cymeh eDetterIe Ta3aJaHbI3.
- EciK JkaTaybMeH TbIfbIaTaTkblU, XaHe Kepuinec JkaTkaH bJIweKeTp KipneHre H KaFdaJa DaIMkbJI MaTaMeH MyKnrT Ta3anay KaKeT.
- Nee eciriHn eHneriH ta3anay yHin KaTbI bCKbl Ta3aNafBtapDbI Hemece yWKip MeTaN KbpFbWtApDbI naJdaNaH6aHbI3,
Oanap 6eTTi Cbipbn Tactan,AnHeKtiH 1bIbIHaybiHa Keenyi MymkiH.
Ta3aay 60bihwa KeHec-JKbIbIbIrah TaFAM TUREH iki Ka6bIpranapdbI OHai Ta3aay yuH: JIMMOHHbIH japTbcIH Kecere caHIn, 300 MJI (1/2 pHTa) cy KcObHbI3 XaHe 100% MNKpoToNkBH KyaTbIHda 10 MNHyTTaJ Kbl3dblpbHbI3. KymCaK, KypFaK MaTaHbI naJdaNaHbIN, neWti Ta3aan CypTih3.
AKAYIbIKTAPDbI WELWY
| Калыntы | |
| Миротолынды пew ТД сигналынды калындуны кedingri каллгуde | Ради Кэне TД сигналындын калындуны Миротолынды пew ЖуMbIC ICTEN KATKANDA кedingri tan boynby МуMKH. Бул мінсер, Вадкум тацалыш Жэне злесур желдөтkiш Сигныкы Злесур Кчынларын Кedingri сүхсak кени. Бул калыntы 60ын Табылды. |
| Пештох karын КУнгир | Миротолынды пешто Темен Катпен дайндан Кeзинд пewтih Жунгир 60ын MуMKH. Бул калыntы 60ын Табылды. |
| ЕсIKE оу Жиналын, aka Коретин-шылфын салынayларынан ыICTык aya shылдäы | Дайндан Таframан 6у МуMKH. Бул к ау Ксетин-шылфын салынayларынан shылдäы. Бірак біра Малшэрп的新 eciri сяяксы салык онлайн МуMKH. Бул калыntы Балын tabылдäы. |
| Пеш кенин iш бoc куннide icke Косылдь. | Крьнынды iшнide тafam Жок Куннide icke кocуfa Тыьим салынfasн. Бул - eTe kayinti. |
| АкayльбíK | М yielders | шелдимi |
| CEБЕБI |
| Пew icke Косьла алмайды. | (1) Кат сыМыб ecек жалганбаган. | Ахърatableнз. 10 секундан кейн каят жалган керигз. |
| (2) Сашидьрьш Жанын кетti Hemece Жхьрatable Жуmbic icten Тур. | Сашидьрьш увсьдьрьш Hemece Жхьрatable Бсьдьрьш (KOMпанямьдьн Каси маманды Таралын Жендөгэн). | |
| (3) Розта akayныfы. | Розтахы баска злесст Кчьлрatable пайданын Tekcertрin керигз. | |
| Пew Жьлытайды. | (4) Ecik дyperс Жаблмafан. | Есikt di dyperctan Жаблдз. |
| Мнкотольнды newжмьс iconten Турсан аналмайы aiнек платформасыш шу шуларды. | (5) Роль Люнeti тхэн пeestiti actынfyы лачалfax. | Лас сөлшөтөрdi Таэалay уүй «Мнкотольнды пeesk教 Тхннкалык Кьзмет керсETY Бенин karалыз. |

3NeKtpnik XaHe 3NeKtpoHdbIK
ka6dbikTapdbiH KaIdbIKTapbl
(WEEE) DnpeKTHBaCbHa CənKeC,
WEEE 6eJek XnHaNybl XeHe eHdEnyi Tnic. Erep 6oIaKaTb 6yI eHIMdi KOKbICKa Tactay KaKet 6oJCa, OHbl TyPmbICTbIK KOKbICTapMeH 6ipre TACTAMHbI3. OHbl KOJIKeTImDi WEEE XnHay HYKTeIepiHe Xi6ePiHi3.
KbI3MET KOPCETY
B3 eTbIHybInapbIMbI3fa KbI3MeT KepceTeM3
KHe cepBnCTIK KbI3MeTTi Kofapbl DeHReNe YcblHyf TaPbICaMbI3.Ci3re KybpIbnFIme OHai XHe KOaNbl
XyMbIC XacayfMyMkiHik6epy yuH eHIMdepim3di
Y3dikci XeTIinDipin OTbIPy TaPbICaMbI3.
KypbuBbifa Kytim Kepcety
KypbInfbira Kytim Kepcetyre apHafran Hotpoint AristonycbHATbIH KypbInfBHH Professional Kc6i6n 6yIMdApHBHxJenici KypbInfbHbIH KonDaHbc Mep3mH y3apTaBl xHe OHbl CbHIN kany Kayinih a3aTadbl.
Professional Kcic6yBIMdapbHbH JeNici KpybIbHbI3dbHep EpeKwENIkTepH eCkepe OtbipIn JxacanFaH. HmHdep cana, 3KoNOrnJx HeKoNdAHay Kayinc3diR 60bIHwa EyponaBik KOFapBt CTAndapTTapDb KaTaA caKaTaNbIPbIN NtAnrJa JxacanFaH. TonbIK AknapaTTbI www.hotpoint-ariston.ru Be6caiTbIHIN "KbI3MeT Kepcety" 6eNiImHe KapaHbI3 XHe KanaHbI3daRbI dyKeHepDe CypaHbI3.
Yekinetti Kbi3MeT KepeCy opTaNbIKTapBi
Θ3 TybHhybInapMbIb3ra JxakbIbIpaK bony yuHn Ie6ep MaMaHapbIbHIn XOFaPbI DeHreJDeI KcCIO DaBbIHDbIFMeH aDinirimE epeKweneHETi Kbl3MeT KepeTy Jeinepi H KaIbINTactBipdik.
Akaay naia 6oIraH XaFdaIa
Kb3Met Kepcety optanlfbHa xa6apnacap anlbHda, akaynlkTb e3iH3 Ty3etin Kepyre TblpblcbHbI3 ("AkaynlkTap XeHe onapdbTy3ety KonnapbTapaybH kapaHbI3).
Kb3MeT KepCteTy optaIbIbHa KeniJik KyKaTbHda KepcetIinrtenefoh HemipimEn xa6apnacyfa 6oIaIbl.
! Bi3 yekinetti Kbl3met Kepcety opTanbIKtapbHa fana xa6apnacydyIycbIHAmbi3
!KxHdey xMybictapbIn icKe acbipraH Ke3de cnPmaBik 6enwekTepe rHa KOndaHybIn TaIan etIH3.
KbI3MeT Kepcety opTaIbIbHa xa6apnacap anDbIHa KeIeCi MmIeTepdi bepyre daIbIh eKeHHi3Di TeKcepin aIbIbI3:
AkayIbIK TpyIH CnataTay;
Kenijik KxKaTbHbH Hemipi (Kb3Met Kepcety KitanlacbI, Kb3MET Kepcety ceTpncKaTb T.C.C.);
KypbIfblHbH aknapat TaKaTauacbHa HeMece KeniJik KxKaTbHda KepeCtiReH KypblFbHbH MoDeni XHe cepnJIbHK Hempi (S/N);
KypblfBhlhCatbIfaah-KyHi
Baca naДалы aknapat neн жанытарды www. hotpoint-ariston.ru Be6-caNTbIbH«KbI3MeT KepcTeY» tapaybHaH Kepe anacbI3.
KOKbICKA TACTAY

3NeKtp XeHe 3NeKtpOnHkAnbIK KypandapbIH KaIbIKTapbHa (WEEE) KaTbICTb2002/96/EC Eypona 3aHHamacbHa caikec yu KpbIJIbIbApbl KaIbIbTIb TOIbIK KaIaNbIK KaIbIK aHaNbIMbIH naJaNaHbIn KOblmaybl TnIC.
OpTa MeH XaIbIK DeHcayIbIbHa THeTIH 3INHHbI aIbIH ana OtbpIn, JapaMcbI3 KpyIbIbIbIap KaTaNanDaIahy MeH MaunHa iHiNderi MATEpnaIaIapDbI eHdey KHybIH OHtaJIaHbIpy MaKCatbIHda6eKxHnAlybl
Kepek. Bapnblk eHIMdepderi cbl3bnfah KOKbIC Xawiri eHim necHIN beneKTeIReH KOKbIC XnHayfa KaTbICTbl MInDeTIH eCke canaBl. JkapamCb3 yu KpyblfblnapbH dypbc KOHOFA KaTbICTbl KOCbIMwa aknapat any ywiH eHIM neEpi TnicTi xaIbIKKa Kb3Met Kepcety optaBflHa Hemece OanpdbH JkepriniKiTo ekindepine xabapnaca anaBl.
Euüöp opama mætparhãs
tarāmī mteyüke Čepk.
When the microwave oven is Powered ON, the oven will display "0:00". Buzzer will ring once.
1) Press "CLOCK/KITCHEN TIMER", the hour figure will flash;
2) Turn the KNOB to adjust the hour figures, the input time should be within 0--23.
3) Press "CLOCK/KITCHEN TIMER", the minute figures will flash.
4) Turn the KNOB to adjust the minute figures, the input time should be within 0--59.
5) Press "CLOCK/KITCHEN TIMER" to finish clock setting. ":" will flash.

Touching some of the internal components can cause serious personal injury or death. Do not disassemble this appliance.
YBAGA
He6e3neuHO -EneKtpoWok
HeBnKoHaHn Bka3iBok 0do 3a3eMnEHHa Horo npncTPO MOKe npu3BecTN Do ypaXeHHa eJektpnUHM CTpymom. DaHn npncTpi MoKHa NiikJIouATn Do eJekTpOmepeKi TiIbKn NicNn noBHORo BCTaHOBnEHn Y BiIDNOBIDHOCTi Do IHCTpyKcii Ta 3a3emNeHHa.
T Pnpctpi NOBUNH 6ytN 3aemJIeHn. y pa3i KOPOTKOrO 3AMkAHHH 3aEMJehn BIDBOINb CTpym B 3eMJIIO, TmC Camm 3MeHwYe PN3NK ypaKeHHN eEeKTPuHMM CTpyMOM. DaHNI pnpctpi OblaHaHn 3aemJIOUHM dpoTom Ta BNlKOHO i3 a3aemJehnM. He Do3BONrEbCn iDkJIouATn BNkYp03ETky, Uo He BCTaHOBHeHa y BiDNOBIDHOCTI do ycix npabIN Ta He 3aemJIeHa.
3BepHItbcIg KbaIiFikOBaHOrO eNeKtpnka a6o Cneuianicta 3TexhiHoro OcbnyroByBaHHraKUO BkazIBKn 10o 3a3emJenHHe 3po3ymJI Bam y nobHi mpi, a6o Bu cymHbAcTeCb n BipHo 3a- 3emHeo BaH npncpti. Jaioe Heo6xidHCTb BVKOpNCTOBYBatn NOOBKyBaU, D03BOJAreTbCBAKOpNCTOBYBatn TiIbKn 3-dpOTobN IOOBKyBaU.
- Y KOMnJIeKti i3 NiuNo nocTaayetbcry HHyp HeBeJInKOIO DOBXINH, IaToro, 6o6 3HN3NTn Pn3IK 3aJIpyTuBaHb Ta naiHb Upeez hHyp 6IbIooIO DOBXINH.
- BnKOpNCToBvOuH Do- Brn HHyp NIOOBKyBaH:
1) HomiHaJIbHI eNeKTPnHi nOKa3HnKi, kIHaHeCeHO Ha 5hHyp Nn PNOOBKyBaU, NOBnHHi6yTu He MeHsi 3a nOKa3HnKi npNCtPOH.
- 2) Побхувачин Мати 3-дротови ekeTpHnIshyp i3a3eMneHHaM.
- 3) DoBmI shHyp notpi6Ho cKlaCTn taKIM YHOM, IIOb BiH He 3BVCAB uepe3 KpaI CTOJy Cn npinabky, OckJIbKn MaJIeHbKi DIIn MOKytB 3aueHNITcB i nepeKINHyTNCb.
BCTAHOBJIENH
- Bn6epiTb piBHy nobepxHIO, 0o Mae doCTaTHbO npocTopy DnA BnyCKHnx Ta (u) BNyCKHx BEHTNJrIcHnX OTbOpIB.
(1)ПИ NOTIбHOBHTNHa BnCOTI OHAHIMeHSe 85cmBID niDnOrn.
(2)Ппст piMae 6byTN NOBepHyTm 3a-Дньою панeHnIIO do CTiHn. Heo6xidno, 30cm BilbHOrO npocTopy,a nomix cTOpOHAm neyi Ta cyciD himnpedmetamn—20 cm.
(3) He 3HimaiTe HIXKn, IIO 3HaxOJaTbCra 3Hn3y neyi.
(4)БлokуВанньунckнTxa(и)Виунckнх BeHTINJIHINXOTBOPIMOKe NOJKOДTNiH.
(5)Пи Heo6xHNo BCTaHOBuTn NODaJI BiD paIionpimMaHa Ch TeneBisOpa.ПiJ cac po-60Tu MIkoXbInbOBoI NeHi MoKyTb CTBOpOBaTncb paIionpeWkoDi, lo nepeWkoJaIObpoI paIONpimMaHa Ch TeneBisOpa.
2.Плкчьпь niу do.stahandpthoi nobytoboi po3etkn.IpekeohaiTece,zo BOJbTaK Ta cactota eNeKtpomepekbiBIDnOBiAde BONbTaKeBi Ta cactotiHa nacnpthi Tabniu ci neci.
3a6bopoHeNo BcTaHOBnIOBaTn nH a NoBepxHIO KxOHNoo nnTkn Nn 6yNb-ЯKOro iNtoro TnIOBnPOMiHIOUHO npIcTPOU. JaKuo nH bCTaHOBLeHo NO6n3y DkepeNa Tnna, npIcTpiM oMe po3JaHaTncs I Bam 6ynde BiIMOBNeHo y rapaHTiHOMO obCnyroByBaHHi.
3OBHnHIOBepxHMOKytHarpiBaTncn iJd yac po6oTu npucTroIo.
YCTAHOBKA OBEPTOBOTOIДHOCA
ua
a. Hikon He BnKOpNCToByTe CkJHn NiDnoc DOROpn Hn3Om. CkJIHN NiDnoc 3aBxKn NOBnHeBInbHO pyXaTncb.
6) CkIaHnPiJiHoc i pONIKOBa nIcTaNbKa MaIOb TB NIKOPINCTOBYBaTnCS npN KOxHOMy BnKOpNCTAHHi neHi.
B) Ycja Ta KOHTeHepn IJxI MaHTb CTaBNTcna Ha CKJAHNI pN KOKHOMy BnKOpNCtAHHI neyi.
r)KaKIO CKJHNI iNHOc YI pOJIKOBA NiIcTAbKa TpICHe aO bO 3NaMaAcTbCra, 3BepHiTbCra ceHTpy Tex-HiHOrO 06cIyroByaHHra.
BCTAHOBJIENHRA KYXOHOMY CTOJI
BmItb yecb nakyBaIbHn MaTeiI Ta !yce npuaadJa. YbaXHo orJraHbTe niu abn He 6yno HiaKnx N0xKOJKeHb, Ja, HanpNknaI, BM'YTuHa u3JamaHi DberpuTa. He BcTahOBJIou- Te niu, kAIO pncTyHi 6yb-kaI NOxKOJKeHHa.

Ua: Bnuanitb 6yNb-ky 3axnchny nnBky i3 nobepxhi uafn.
He MoXHa BnDJaTn CbITIO-KOpNueHBy CnIO- DAnHy PnAChNkU, 10 npKpInNeHa Do CTiHKn neCi Ta CnyrE 3axnCTom MarHeTpOhy.
BKA3IBKN ⅢOIO BVKOPNCTAHNЯ
DanHn npicptiO cHaueHH cyuacHO nAhenH ynpablinHH, 3 Donomorojo kkoB Mu MoKeTe 6iNbTuTOHn HanaSTOBvBaTn npoec npiroToYbaHH iKi 3rIO BauHm ynoobAHnM.
HAJIALITYBAHHI ROINHHNKA
PicnpiiknueHnei do eNeKtpomepeXi, dinPnnei nokaxe «0:00» ta oDIn pa3 npo3ByuHTb3BykOBn CnHaI.
1)HaTnCHiTB KHONky [CLOCK/KITCHEN TIMER] [(KXYOHHH TAIIMEP/TOIDINHHNK)], noHyTb 6blmAtn uΦpr, kI O3NaHauOy ToDInH.
2)Повертаочи PMYK, ВибepiTB noTpio6He 3na-уеннаюн BiD 0do 23.
3)HaTnCHiTB KHONky [CLOCK/KITCHEN TIMER] [(KXYOHHH TAIIMEP/TOJINHHNK)], nouHTb 6blmAtn uΦpr, kI O3NaHauOt bXbJIInH.
4)Повертуочи PMYK, Виберпьnotpiбhe 3на-уеннахвлни вд 0 до 59.
5) Hatnciht b KhoNky [CLOCK/KITCHEN TIMER] [(KXYOHH N TAI MEP/TOIINHHNK)], 06b n 3aBepuHTn HanaaTByaHn rOdInHHnka. Bye 6blMaTN CMBON «:».

Ppimtka:1) JaKIO roDHHNK He HanaHTyBAtN, BIn He 6ynde npaIbBatN KOJI Niu6yde NiKIINoHeOdo eNeKtpomepeXi.
2)Пд ус наштувань годаннka,nic Я 1 xВ. Бздялбно ti пистри nobер Нетс сд по чаTKOBOrO CTaHy.
KXYOHHN TAIMEP
1) Hatnchitb Dbiu Khonky [CLOCK/KITCHEN TIMER] [(KXYOHHNI TAIIMEP/TOIDHHNK)], dinpnei nokae 00:00.
2)Повертаочи РУЧК,оберпnotriбни ча таймени Мakсимальни ча пригоруbaнни стоюп 95xb.
3) 36epekei, HATNCHByBn KHOkny [START/ +30SEC./CONFIRM] [(CTAPT/+30 CEK/ПД- TBEPDNTI)].
4) Koli nac taMepy cpiHne 5 pa3iB npo3ByuHb 3BykOBn cnHan. JkiO roDHHNK 6yB hAJaTuBOBaHn (y 24-roDHHOMy fOpMaTi), dncPnei noKaxe nToOHn Yac.

PO3MOPOXEHHI 3 TAIMEPOM
!3BepTaeBnKIOHNOdoynOBHOaKeHNxΦaxIBiB.
Tpe6a noBIDOMHT:
TIN HecnpabHocTi;
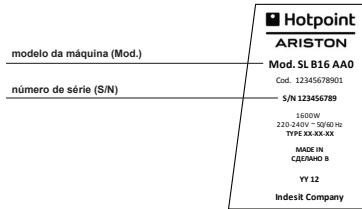
MOdelenMaunHn(MoI.)
cepHnH oHep (S/N).
YTNJI3AUJIA

Cbponeibka DnpekTbva 2002/96/ EC zodo BIXdoiB enektpnHoro n enektpoHoro
obnaHannha (WEEE) 3aboponye tyniauio noobytox npuiadI uepez 3araJbnu cStemy
3bpaHnn McbKnx BIXdoiB. 3noSheni npinaDi MaOtB 3bnpaTnc Okpem, oOb ONtMI3yBaTn BnTpA Na nobTOpHe BVOKOpNCTAHN nepepO6ky MaTePianIB BCEpani NpictpoiB i 3anoBirtn Shoki

atmocpei 3dopob'io JIOeI. Bci npoduktna MapkyoTbca nepekpceneHIM KOUHKOM DnA CMTT, Oo6 Haraatn ix BlaCHNKam npo oObR'zKoOo OKpeMoI ytuniaui. 3a noanbwoIO IHOpmaicno npabuNam ytuniau nObyTOBnx pncItroB ix BlaCHNK MaHOt 3BepHyTcra do MicceBOI KOMyHaNbHOI cLyXbN.