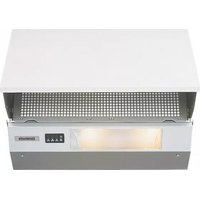
CD22130 - Range hood CONSTRUCTA - Free user manual and instructions
Find the device manual for free CD22130 CONSTRUCTA in PDF.


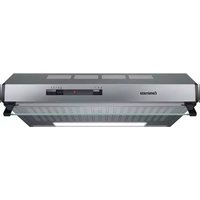
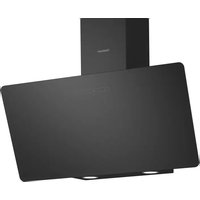
| Product type | Decorative hood |
| Brand | Constructa |
| Model | CD22130 |
| Dimensions (H x W x D) | 15 x 60 x 50 cm |
| Weight | 12 kg |
| Power supply | 220-240 V, 50 Hz |
| Suction power | 650 m³/h |
| Noise level | 65 dB(A) (max) |
| Exhaust type | External evacuation or recirculation |
| Number of speeds | 3 |
| Lighting | LED, 2 x 3 W |
| Filter type | Washable metal grease filter |
| Charcoal filter | Optional (recirculation model) |
| Controls | Push buttons |
| Maintenance and cleaning | Clean the grease filter every month; replace the charcoal filter every 6 months |
| Safety | Automatic shutdown in case of overheating |
| Spare parts available | Filters, bulbs, charcoal kit |
| Repairability | Repairability index 8.2/10 |
| General information | For domestic use; wall mounting recommended |
Frequently Asked Questions - CD22130 CONSTRUCTA
User questions about CD22130 CONSTRUCTA
0 question about this device. Answer the ones you know or ask your own.
Ask a new question about this device
Download the instructions for your Range hood in PDF format for free! Find your manual CD22130 - CONSTRUCTA and take your electronic device back in hand. On this page are published all the documents necessary for the use of your device. CD22130 by CONSTRUCTA.
USER MANUAL CD22130 CONSTRUCTA
natural_image
3D rendering of a rectangular industrial or storage unit with a sloped top and perforated interior (no text or symbols visible)en Operating and installation instructions
Licht Lüfterstufen

Licht Lüfterstufen
natural_image
Diagram of a computer monitor with a grid-patterned screen and an inset showing a magnified view of the screen (no text or symbols present)natural_image
3D diagram of a rectangular plate with internal compartments and a curved line extending from its top (no text or symbols)- Vlies-Fettfilter
natural_image
Technical line drawing of a rectangular electronic component with internal grid structure (no text or symbols)natural_image
Close-up of a textured surface with a magnified inset showing internal structure (no text or symbols visible)
natural_image
Illustration of a hand using a tool to adjust or install a component, with a magnified inset showing a mechanical assembly (no text or symbols visible)natural_image
Illustration of a hand holding a solar panel next to a cage with a birdcage, and an inset showing a smartphone (no text or symbols present)Filter und Wartung
natural_image
Diagram of a hand pressing down on a curved panel with arrows indicating force direction (no text or symbols)natural_image
Diagram showing a mechanical assembly with a component and a separate view of a curved structure (no text or symbols)natural_image
Cross-sectional diagram of a mechanical component with internal cavities and layered structure (no text or symbols)natural_image
3D mechanical assembly diagram showing components like gears and housing (no text or labels)natural_image
3D mechanical component illustration showing layered structures with no visible text or symbolsnatural_image
3D mechanical assembly diagram showing components like gears and housing (no text or labels)natural_image
Diagram showing a structural element with arrows indicating direction and a magnified inset of a circular component (no text or symbols)natural_image
Technical line drawing of a mechanical component or bracket (no text or symbols visible)natural_image
Mechanical assembly diagram showing a lever mechanism with an arrow indicating motion (no text or symbols present)natural_image
Architectural cross-section diagram showing structural layers and framing (no text or labels)Achtung: Hat die
natural_image
Exterior view of a modern office building (no signage)Licht Ventilatorstanden

Licht Ventilatorstanden

Licht Ventilatorstanden intensieve stand

natural_image
Diagram of a computer monitor with a grid pattern and an inset showing a close-up of its screen (no text or symbols present)natural_image
Pure architectural or engineering diagram showing a rectangular structure with internal divisions and no visible text, numbers, or symbols.natural_image
Illustration of a rectangular object with internal patterns and no visible text or symbolsnatural_image
Technical line drawing of a 3D rectangular panel with internal grid structure and a curved handle (no text or symbols)natural_image
Illustration of a hand assembling a component with magnified inset showing internal components (no text or symbols)natural_image
Illustration of a hand opening a book with a grid and magnified inset showing a device (no text or symbols)natural_image
Architectural diagram of a building facade with circular inset showing interior layout (no text or symbols)natural_image
Diagram of a hand inserting a component into a fan or fan array (no text or symbols visible)natural_image
Technical illustration of a mechanical component with internal cavities and mounting brackets (no text or symbols)Monteren terugslagklep:
natural_image
Technical diagram showing a mechanical assembly with arrows indicating direction (no text or symbols present)natural_image
Illustration of mechanical components with no visible text or symbolsnatural_image
3D rendered mechanical components with no visible text or symbolsnatural_image
3D mechanical assembly diagram showing a housing and component (no text or symbols visible)natural_image
Diagram showing a roof structure with an arrow indicating direction and a magnified inset of a building detail (no text or symbols)natural_image
Architectural sketch of a room corner with a window and door (no text or symbols)natural_image
Diagram showing a hand pressing down on a curved object with an arrow indicating direction, and a magnified inset of a mechanical component (no text or symbols)natural_image
Architectural cross-section diagram showing structural elements and dimensions (no text or labels)Let op: wanneer
natural_image
Diagram of a mechanical system with springs and pulleys, no visible text or symbolsnatural_image
Exterior view of a modern office building (no signage)natural_image
Illustration of a computer monitor with a grid pattern and an inset showing a magnified view of the screen (no text or symbols present)natural_image
Technical line drawing of a mechanical component with internal grid structure (no text or symbols)natural_image
Simple line drawing of a rectangular object with internal patterns and no visible text or symbolsnatural_image
Technical line drawing of a rectangular plate with internal compartments and a curved handle (no text or symbols)natural_image
Illustration of hands assembling mechanical parts with a magnified inset showing internal components (no text or symbols)natural_image
Diagram of a hand pressing down on a curved panel with arrows indicating force or movement (no text or symbols present)natural_image
Technical illustration of a mechanical component with cross-sectional view (no text or symbols)natural_image
Technical diagram showing a mechanical assembly with arrows indicating direction (no text or labels)natural_image
3D rendered mechanical components with no visible text or symbolsnatural_image
3D mechanical assembly diagram showing components like a cylindrical part and flanged parts (no text or symbols)natural_image
Technical illustration of mechanical components with no visible text or symbolsnatural_image
Architectural line drawing of a window with a door and window frame (no text or symbols)natural_image
Technical diagram showing mechanical components with an arrow indicating direction (no text or symbols present)natural_image
Architectural cross-section diagram showing structural layers and framing (no text or labels)natural_image
Diagram of a device with an inset circular view showing internal components (no text or symbols)natural_image
Exterior view of a server rack with indicator lights and a coiled spring (no visible text or symbols)We reserve the right to construction changes within the context of technical development.
natural_image
Illustration of a computer monitor with a magnified inset showing its interior layout (no text or symbols)natural_image
Pure technical line drawing of a 3D rectangular structure with internal grid lines and no text or symbolsnatural_image
Isometric view of a rectangular plate with scattered dark specks (no text or symbols)natural_image
3D diagram of a rectangular plate with internal grid lines and a curved line extending from its top edge (no text or symbols)natural_image
Illustration of hands assembling a mechanical component with a magnified inset showing internal components (no text or symbols)natural_image
Illustration of a hand using a laptop with a grid overlay and magnified inset showing a device (no text or symbols)natural_image
Architectural diagram of a building facade with circular inset showing floor plan view (no text or labels)natural_image
Diagram of a hand inserting a component into a fan or fan array (no text or symbols visible)natural_image
3D mechanical component diagram showing internal layered structure (no text or symbols)natural_image
Diagram showing a mechanical assembly with arrows indicating direction, no visible text or symbolsnatural_image
Illustration of mechanical components with no visible text or symbolsnatural_image
3D rendered mechanical components with no visible text or symbolsnatural_image
3D mechanical assembly diagram showing layered components and mounting brackets (no text or symbols)natural_image
Architectural diagram showing a window with a door and ceiling fixture (no text or symbols)natural_image
Diagram showing a hand pressing down on a device component with an arrow indicating rotation (no text or symbols present)natural_image
Technical diagram of a window frame with structural elements and dimension lines (no text or symbols)natural_image
Diagram of a device with labeled components and an inset circular view showing a mechanical or electrical component (no readable text or symbols)natural_image
Exterior view of a modern office building (no signage)Operating modes
Exhaust-air mode:
☐ The extractor-hood fan extracts the kitchen vapours and conveys them through the grease filter into the atmosphere.
☐ The grease filter acoros the solid particles in the kitchen vapours.
☐ The kitchen is kept almost free of grease and colours.
If the extractor hood is operated in exhaust-air mode at the same time as a flue-type heater (e.g. gas, oil or solid-fuel heater, instantaneous water heater, boiler), ensure that there is an adequate air supply, which the heater requires for combustion.
Safe operation is possible provided that the partial vacuum in the room in which the heater is installed does not exceed 4 Pa (0.04 mbar).
This can be achieved if the combustion air is able to flow through non-lockable openings, e.g. in doors, windows and in conjunction with an air supply/air-intake well box or by other technical procedures such as reciprocal interlocking.
If the air intake is inadequate, there is a risk of poisoning from combustion gases which are drawn back into the room.
An air-intake/exhaust-air mail box by itself is no guarantee that the limiting value will not be exceeded.
Note: When assessing the overall requirement, the combined ventilation system for the entire household must be taken into consideration. This rule does not apply to the use of cooking appliances, such as hobs and ovens.
Unrestricted operation is possible if the extractor need is used in recirculating mode - with activated carbon filter.
Operating modes
Circulating-air mode:
☐ This requires installation of an activated carbon filter (see section on filter and maintenance).
☐ The activated carbon filter is obtainable as a special accessory from your horized dealer.
☐ The corresponding accessory numbers can be found at the end of these operating instructions.
☐ The extractor-hood fan extracts the kitchen vapours, which are purified in the grease filter and activated carbon filter and then conveyed back into the kitchen.
☐ The grease filter absorbs the grease particles in the kitchen vapours.
☐ The activated carbon filter binds the odorous substances.
⚠️ If no activated carbon filter is installed, it is not possible to bind the odorous substances in the cooking vacours.
aut-
Before using for the first time
Important notes:
☐ The Instructions for Use apply to several versions of this appliance. Accordingly, you may find descriptions of individual features that do not apply to your specific appliance.
☐ This extractor hood complies with all relevant safety regulations.
□ Repairs should be carried out by qualified technicians only.
Improper repairs may put the user at considerable risk.
Do not use the appliance if damaged.
The appliance is not intended for use by young children or informed persons without supervision.
Young children should be supervised to ensure they do not play with the appliance.
If the connecting cable for this appliance is damaged, the cable must be replaced by the manufacturer or his customer service or a similarly qualified person in order to prevent serious injury to the user.
The appliance may be connected to the mains by a qualified technician only.
⚠️ Dispose of packaging materials properly (see Installation instructions).
This extractor hood is designed for domestic use only.
Light bulbs must always be fitted when the extractor hood is in use.
⚠️ Defective bulbs should be replaced immediately to prevent the remaining bulbs from overloading.
⚠️ Never operate the extractor hood without a grease filter.
Before using for the first time
Before using your appliance for the first time, please read these instructions for use carefully. They contain important information concerning your personal safety as well as on use and care of the appliance.
☐ Please retain the operating and installation instructions for a subsequent owner.
Overheated fat or oil can easily catch fire. If you are cocking with fat or oil, e.g. chips, etc., never leave the cooker unattended.
Do not flance food directly under the extractor hood.
Risk of grease filter catching fire due to flares.
The hotplates must always be covered with a utensil.
Restrictions apply to the use of the extractor hood over a solid-fuel burner (coal, wood, etc.). (See Installation instructions).
Gas hobs / Gas cookers
Do not use all the gas hotplates simultaneously for a prolonged period (max. 15 minutes) at maximum thermal load, otherwise there is a risk of burns if the housing surfaces are touched or a risk of damage to the extractor hood.
If the extractor hood is situated over a gas holo, operate the hood at maximum setting if three or more gas hotplates are operated simultaneously.
Using the extractor hood
Kitchen vapour is most effectively eliminated by:
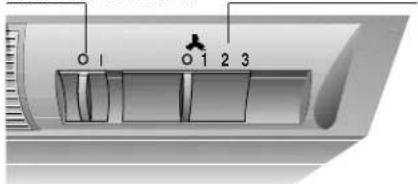
Light Fan speed
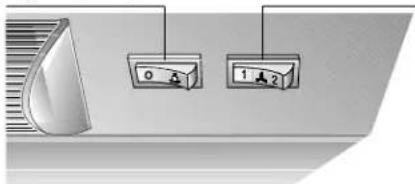
Light Fan speed

natural_image
Diagram of a car air conditioner unit with four icons (person, butterfly, cat, mouse) pointing to the control panel (no text or labels)Light Fan speed
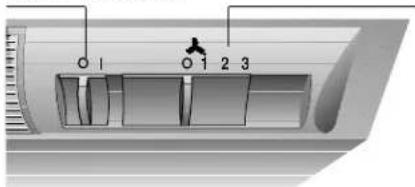
Light Fan speed Full power

☐ Switching on the extractor hood when you start cooking.
Switching off the extractor hood a few minutes after you have finished cooking.
Switching on the fan:
Open the door.
□ Select fan speed.
Switching off the fan:
Close the door.
☐ When the door is opened out again the fan operates at its last speed setting.
Switching on the fan:
Open the door.
□ Select fan speed.
□ Push-and-lock switch for full power.
Switching off the fan:
The extractor hood can be switched off in various ways.
Switching off 1:
□ Switch to 0 - switch fan to OFF.
Switching off 2:
☐ Close the door (switch remains CN).
☐ To switch ON again just open the door. The extractor hood operates at its last fan speed setting.
Lighting:
The light can be used at any time even when the fan is switched OFF or the door is closed.
Filters and maintenance
Different grease filters can be used to absorb the grease particles in kitchen vapour.
Fleece grease filter:
The filter mat consists of highly flareresistant material.
Attention:
A build up of greasy residue increases flammability, and the function of the extractor hood may be impaired.
Important:
Replace the fleece grease filter in good time, otherwise there is a risk of fire from the heat which accumulates curing deep-fat frying or roasting.
Replacing the fleece grease filter:
During normal operation (daily 1 to 2 hours) the fleece grease filter must be replaced every 8 to 10 weeks.
☐ Replace printed fleece grease filters at the latest when the coloured print dissolves.
Only use original filters.
These comply with the safety regulations and ensure optimum function.
Disposal if the old fleece grease filter:
☐ Fleece grease filters do not contain any harmful substances. They can be disposed of as bio-degradable waste.
Metal grease filters:
The filter rats consist of non-flammable metal.
Attention:
A build up of greasy residue increases flammability, and the function of the extractor hood may be impaired.
Important:
Replace the metal grease filter in good time, otherwise there is a risk of fire from the heat which accumulates during deep-fat frying or roasting.
Cleaning the metal grease filters:
During normal operation (daily 1 to 2 hours) metal grease filters must be replaced every 8 to 10 weeks.
☐ The retail grease filter can be cleaned in the dishwasher. Slight discoloration may occur.
Important:
☐ Do not clean heavily saturated metal grease filters together with kitchen utensils.
☐ If cleaning by hand, soak the filter rats in a hot scapy solution for several hours. Then brush them off, rinse thoroughly and leave to dry.
☐ Only use original filters.
These ensure optimum function.
Removal the grease filter:
- Open door as far as it will go.
- Push the filter screen up slightly, lift it towards you over the brackets and take it out downwards..

natural_image
Illustration of a computer monitor with a magnified inset showing a grid pattern and an upward arrow (no text or symbols)- Remove the wire grid.

natural_image
3D diagram of a rectangular structure with internal grid patterns and a curved line extending from its top (no text or symbols)- Fleece grease filter
Remove saturated filter rat, clean the filter grid and insert new filter mat.
Metal grease filter
Remove saturated filter rats, clean
nats and
grid.
Refit the cle-
ared filter
nats,
making sure
trat there is
no gap in the middle.

natural_image
Simple line drawing of a rectangular plate with internal patterns and dot markings (no text or symbols)Fitting grease filters:
- Clamp in the filter mats with the wire grid.
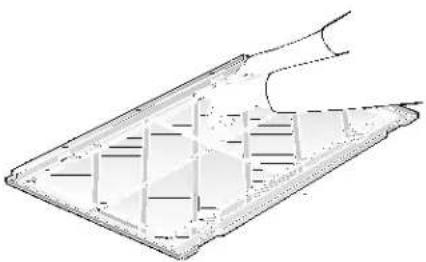
natural_image
Technical line drawing of a rectangular electronic component with internal grid structure (no text or symbols)- Position the filter screen against the housing and push upwards. Push in the lower edge over the lugs and lower the grid into place.
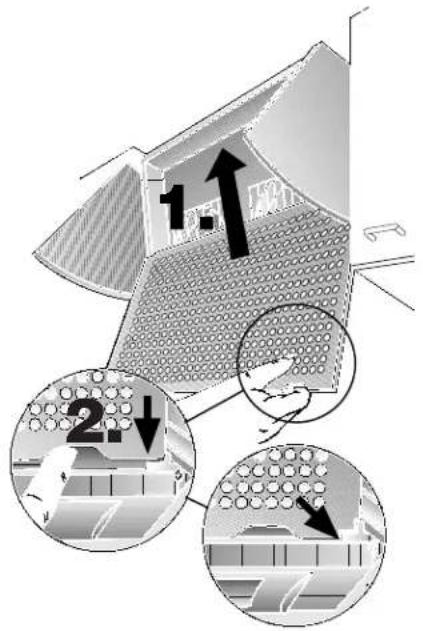
Check that the filter screen is securely located behind the retaining brackets on both sides.
Activated carbon filter:
For binding colours in recirculating air mode.
Fitting and removal:
-
Open door to the stop.
-
Push the filter screen up slightly, lift it towards you over the brackets and take it out downwards.

- Insert the screw through the wing nut and bushing and screw into the housing (only necessary upon initial fitting. The screw and wing nut are included with activated carbon filter.
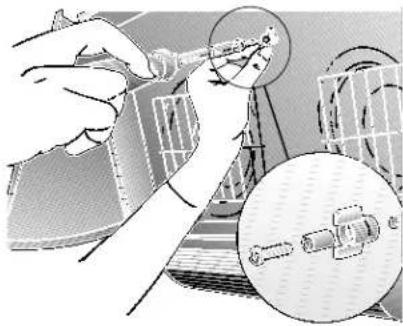
natural_image
Illustration of a hand holding a tool with a magnified inset showing a mechanical component (no text or symbols present)- Using a screwdriver or similar, press the two lugs in the housing through to the back (only necessary upon initial fitting).

natural_image
Illustration of a hand opening an open book with a grid and magnified inset showing a smartphone (no text or symbols)- Insert activated carbon filter in the lower left corner of the housing. Shift it until both hooks slot into the holes and then secure in place with the wing nut.

- Position the filter screen against the housing and push upwards. Push in the lower edge over the brackets and lower the screen into place.

Check that the filter screen is securely located behind the retaining brackets on both sides.
Removal is in the reverse sequence.
Replacing the activated carbon filter:
During normal operation (daily 1 to 2 hours) the activated carbon filter must be replaced approximately 1x year.
The activated carbon filter can be purchased FROM YOUR DEALER (see Optional accessories).
Only use original filters.
These ensure optimum function.
Disposal of the old activated carbon filter:
☐ Activated carbon filters do not contain any harmful substances. They can be disposed of as residual waste.
Changing the bulbs Cleaning and care important information
Isolate the extractor hood by pulling out the mains plug or switching off the fuse.
☐ When cleaning the grease filters, remove grease deposits from accessible parts of the housing. This prevents the risk of fire and ensures that the extractor hood continues operating at maximum efficiency.
□ Clean the extractor hood with a hot scap solution or a mild window cleaner.
Do not scrape off dried-on dirt but wipe off with a cane cloth.
☐ Do not use scouring agents or abrasive soconges.
Note: Do not use alcohol (spirit) or plastic surfaces, as dull marks may appear.
Caution: Ensure that the kitchen is adequately ventilated. Avoic naked flames!
⚠️ Clear the operating buttons with a mild soapy solution and a soft, clamp cloth only. Do not use stainless-steel cleaner to clean the operating buttons.
Aluminium and plastic surfaces:
Use a soft, non-linting window cloth or micro-fibre cloth.
Do not use dry cloths.
☐ Use a mild window cleaning agent.
☐ Do not use aggressive, acidic or caustic cleaners.
Do not use abrasive agents.
- Switch off the extractor hood and ceenergize by pulling out the mains plug or switching off the fuse.
- Press the edges of the lamp cover together where indicated and lift it out towards you.
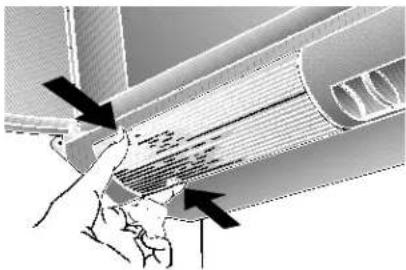
natural_image
Diagram of a hand pressing down on a curved panel with arrows indicating force or movement (no text or symbols present)- Replace the bulb (standard filarent bulb, max 40 V, E'4 bulb holder).
- Refit lamp cover.
- Reinsert mains plug or switch on the fuse.
Faults
If you should have any questions or there are any faults, call customer service (see list of customer service units).
Please give the following details when you call:
Product no. (E-Nr.)
Serial no. (FD)
Enter these numbers in the spaces above. You will find the numbers on the rating plate inside the extractor hood after removing the filter screen.
Old appliances are not worthless rubbish. Valuable raw materials can be reclaimed by recycling old appliances. Before disposing of your old appliance, render it unusable.
You received your new appliance in a protective shipping carton. All packaging materials are environmentally friendly and recyclable. Please contribute to a better environment by disposing of packaging materials in an environmentally-friendly manner.
Please ask your dealer or inquire at your local authority about current means of disposal.
The extractor hood can be used in exhaust air or circulating air mode.
Always mount the extractor hood over the centre of the hob.
The minimum distance between the hob and the lower edge of the extractor hood is 650 mm.
The extractor hood must not be installed over a solid fuel cooker - a potential fire hazard (e.g. flying sparks) - unless the cooker features a closed, non-removable cover and all national regulations are observed.
The smaller the gap between the extractor hood and hotolates, the greater the likelihood that droplets will form on the underside of the extractor hood.
Additional information concerning gas cookers:
When installing gas notolates, comply with the relevant national statutory regulations (e.g. in Germany: Technische Regeln Gasinstallation TRd).
⚠️ Always comply with the currently valid regulations and installation instructions supplied by the gas appliance manufacturer.
Only one side of the extractor hood may be installed next to a high-sided unit or high wall. Gap at least 50 mm.
Optimum efficiency of the extractor hood:
☐ Short, smooth exhaust pipe.
As few bends as possible.
☐ Pipe diameter as large as possible (ideally 150 mm dia.) and wide pipe bends.
If long, rough exhaust-air pipes, many pipe bends or smaller pipe diameters are used, the air extraction rate will no longer be at an optimum level and there will be an increase in noise.
Round pipes
Short exhaust air pipe: inside diameter min. 120 mm, Longer exhaust air pipe: inside diameter min. 150 mm.
Flat ducts must have an inside
cross-section equivalent to that of the round pipes.
There should be no sharp bends.
a 120 mm dia. approx. 113 cm a 150 mm dia. approx. 177 cm
☐ If pipe diameters differ, insert sealing strip.
☐ Ensure that there is an adequate air supply for exhaust air mode.
Exhaust-air mode
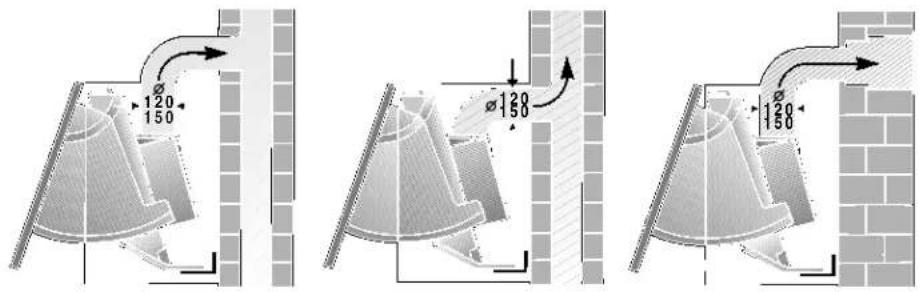
The exhaust air is discharged upwards through a ventilation shaft or directly through the outside wall into the open.
Exhaust air must not be discharged via a smoke or exhaust gas flue which is already in use or via a shaft which is used for ventilating rooms in which fireplaces are located.
Discharge exhaust air in accordance with official and statutory regulations (e.g. national building regulations).
Discharge of air into smoke or exhaust air flues which are not in use requires the consent of a heating engineer.
If the extractor hood is operated in exhaust-air mode at the same time as a flue-type heater (e.g. gas, oil or solid-fuel heater, instantaneous water heater, boiler), ensure that there is an adequate air supply which the heater requires for combustion.
Safe operation is possible provided that the partial vacuum in the room in which the heater is installed does not exceed 4 Pa (0.04 nbar).
This can be achieved if the combustion air is able to flow through non-lockable openings, e.g. in doors, windows and in conjunction with an air supply/air-intake wall box or by other technical procedures such as reciprocal interlocking.
If the air intake is inadequate, there is a risk of poisoning from combustion gases, which are drawn back into the room.
An air-intake/exhaust-air wall box by itself is no guarantee that the limiting value will no be exceeded.
Note: Men assessing the overall requirement, the combined ventilation system for the entire household must be taken into consideration. This rule does not apply to the use of cooking appliances, such as hobs and gas cookers.
The extractor hood can be used without restriction in circulating air mode - with an activated carbon filter.
⚠ For exhaust air mode always cut out the protective grid in the air connector.

natural_image
Diagram showing a mechanical assembly with arrows indicating direction, no visible text or symbolsWith exhaust mode, a backwash valve should be installed unless it is already in -corporated in the exhaust pipe or wall box.
If a backwash valve is not included with your appliance, your dealer can supply you with one (see accessories).
Installation backwash valve:
Insert the backwash valve in the mounting openings on the air connector.

natural_image
3D technical illustration of a mechanical component with no visible text or symbolsIf the exhaust air is being routed through the outside wall, a telescopic wall box should be used.
Connecting to ∅100 mm exhaustair duct
Attach the reducing adapter (enclosed or available from specialist dealer) to the air outlet. Attach the exhaust-air duct to the adapter.

natural_image
3D rendered mechanical components with no visible text or symbolsConnecting to ∅120 mm exhaustair duct
Attach the exhaust-air duct directly to the air outlet.
Before installation

natural_image
Technical illustration of mechanical components with no visible text or symbolsConnecting to ∅150 mm exhaustair duct
Attach the enlarging adapter (enclosed or available from specialist dealer) to the air outlet. Attach the exhaust-air duct to the adapter.

natural_image
Illustration of mechanical components or parts, possibly a valve or clamping device, with no visible text or symbols.If a backflow flap has been installed, check that it functions properly.
Circulating-air mode
With activated carbon filter if exhaust-air mode is not possible.
The air purified by an additional activated carbon filter is returned to the room.
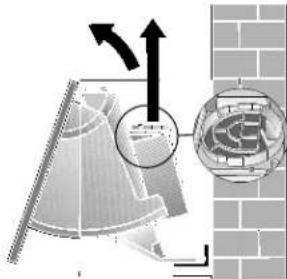
natural_image
Diagram showing a structural element with an arrow indicating direction and a magnified inset of a grid-like structure (no text or symbols)After installing the extractor hood, insert the activated carbon filter.
For installing see Filters and maintenance.
If the extractor hood is installed beneath a cabinet, ensure that there is an adequate air outlet (min. 177 cm ^2 ).
The extractor cones as standard equipped with a protective grid in the air connector. If this is has been removed (in the case of exhaust air operation), the air connector must be supplemented by a recuser piece with protective grid (see section on special accessories).
Electrical connection Installation
WARNING:
THIS APPLIANCE MUST BE EARTHED
IMPORTANT: Fitting a Different Plug:
The wires in the power cord are coloured as follows:
Green and Yellow - Earth
Blue - Neutral
Brown - Live
If you fit your own plug, the colours of these wires may not correspond with the identifying marks on the plug terminals.
Proceed as follows:
- Connect the green and yellow (Earth) wire to the terminal in the plug marked 'E' or with the symbol (), or coloured green or green and yellow.
- Connect the blue (Neutral) wire to the terminal in the plug marked 'h' or coloured black.
- Connect the brown (Live) wire to the terminal marked 'L', or coloured red.
The extractor hood may be connected to a correctly installed earthed socket only. Attach the earthed socket near the extractor hood in an accessible position.
☐ The earthed socket should be connected via its own power circuit.
⚠️ If appliances cc not feature the OFF delay function, the indicator may start flashing when the extractor hood has been switched off for several hours via a separate switch, even though the grease filters are not yet saturated.
(See Filters and maintenance).
Electrical specifications:
These can be found on the rating plate inside the appliance following removal of the filter frames.
⚠ Before carrying out repairs, always isolate the appliance.
Length of the connection cable: 1.30 m.
If permanent connection is required:
The extractor hood may only be connected by an electrician registered with the local electricity board.
A disconnecting device must be provided on the installation side. Switches with a contact opening of more than 3 mm and all-pole disconnection are regarded as disconnecting devices. These include LS switches and contactors.
If the connecting cable for this appliance is damaged, the cable must be replaced by the manufacturer or his customer service or a similarly qualified person in order to prevent serious injury to the user.
This extractor hood orplies with EU regulations on interference suppression.
Please note: A wall hanging set can be obtained from your dealer (see section or special accessories) for fastening the hood (e.g. at the end of the row of kitchen units).
The extractor hood is designed for installation between two wall cabinets.
- Remove grease filter
(see Filters and maintenance)
- Using the enclosed template mark the positions of the screws on the side panels of the neighbouring cabinets.

The extractor hood can also be installed slightly lower, depending on the height of the wall cupboards. Position the template correspondingly lower.
Observe the minimum distance from hob to extractor hood of 650 mm (the fixing screws must be fitted at least 1040 mm above the hob).
- Predrill (with bradawl or 2 mm pit) and screw in the screws to 5 mm.
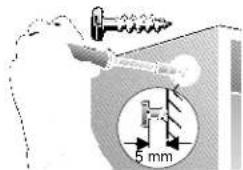
- Suspend the extractor hood on the two screws between the wall cabinets.

natural_image
Pure architectural line drawing of a corner detail with no text, numbers, or symbols- The two door carriers of the extractor flap must be pushed into the appliance to he stops.
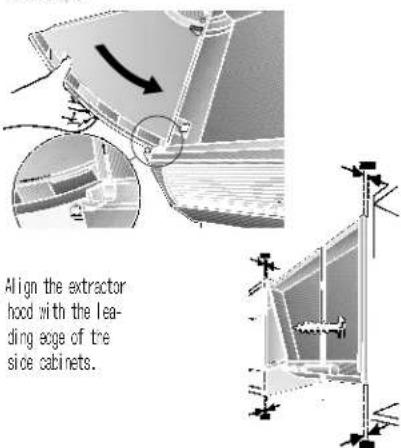
Installation
Important: If the door of the unit is at a distance from the body of the unit (e.g. due to rubber stops), the extractor hood must be drawn forward by the same distance.
- Mark the position of the lower fixing screws, predrill and fasten the screws.
- All four fixing screws must be firmly tightened.
- Connect pipes.
- Connect electricity.
Mounting the door:
Door thickness: min. 16 mm
Door height: 380 to 700 mm
Door weight: 7 kg (max.)
In order to ratch the wall cabinets on either side, the door can project at the too and bottom.
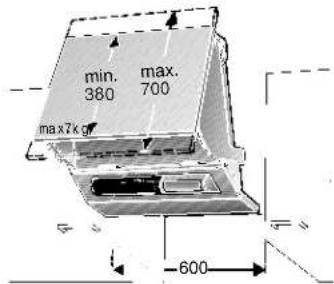
- Remove the two door carriers to the right and left, by pulling both the red plastic catches inwards and removing the door carrier out towards you.

- Mark the fixing points on the door. For dimensions of vertical screw fixings, see:
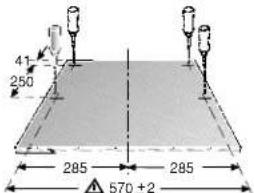
If the top edge of the door is not flush with the top edge of the cabinet, and the dimensions accordingly.
If the tops of the cabinets are not installed flush with each other, the door must be mounted correspondingly higher.
The screw locations on the door can be marked directly on the door in situ. If you are doing this, leave the door carriers in the appliance. Position the door, align it and mark the back.
Keep precisely to the dimension 570 = 2.
- Screw the door carriers to the door, making sure your left-right orientation is correct.

- Insert the complete door into the extractor hood
Check that the door meets the stops on both sides when pulled out. This means that it is safely locked in place.
The rec plastic catches can only be released if the door is not swung out to the stop.
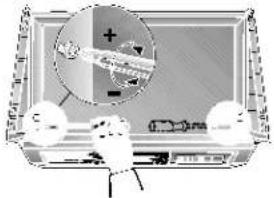
- The two screws to the right and left inside the housing can be used to adjust door gliding according to the weight of the door.
natural_image
Illustration of a computer monitor with a magnified circular view showing a screen and mouse (no text or symbols)Turning the screws clockwise will make the door more difficult to move.
Mounting wall covering rail:
The gap between the hood and the rear wall can be dressed with the enclosed covering rail.
Screw-fasten the covering rail to the underside of the extractor hood.
Pefit the grease filter.

natural_image
Exterior view of a modern office building (no signage)If the unit door has to be removed:
Pull the red plastic catches in the housing on both sides inwards to release the door, which can then be pulled out towards you.

Weight in kg
| Appliance version | Exhaust air | Recirculating air |
| single rotor 6,5 7,8 | ||
| dual rotor 8,0 9,3 |
We reserve the right to construction changes within the context of technical development.
natural_image
Diagram of a computer monitor with a grid pattern and an inset showing a magnified view of the screen (no text or symbols present)natural_image
Technical line drawing of a rectangular electronic component with internal grid structure (no text or symbols)natural_image
3D diagram of a rectangular panel with internal grid structure, no text or symbols presentnatural_image
Close-up of a mechanical component with a magnified inset showing internal structure (no visible text or symbols)
natural_image
Illustration of a hand using a tool to adjust components, with an inset showing a close-up of a mechanical component (no text or symbols visible)natural_image
Illustration of a hand using a tool to clean or store items, with magnified insets showing a grid and storage unit (no text or symbols)natural_image
Diagram of a vehicle interior with labeled parts and a circular inset showing a water tank (no text or symbols present)natural_image
Diagram of a hand adjusting a ventilation duct with arrows indicating airflow direction (no text or symbols)natural_image
Diagram showing a mechanical assembly with arrows indicating process flow (no text or labels)natural_image
3D mechanical assembly diagram showing internal components and mounting brackets (no text or symbols)natural_image
3D mechanical assembly diagram showing components like a housing, clamps, and a cylindrical component (no text or labels)natural_image
3D rendered mechanical components with no visible text or symbolsnatural_image
Technical illustration of a mechanical assembly with no visible text or symbolsnatural_image
Close-up of a window frame with a small object on the left side (no visible text or symbols)natural_image
Technical diagram showing a mechanical component with an arrow indicating direction, and a magnified inset of a detail view (no text or symbols)natural_image
Architectural cross-section diagram showing structural layers and framing (no text or labels)natural_image
Diagram of a device with labeled components and an inset magnified view showing internal components (no readable text or symbols)natural_image
Technical diagram of a mechanical or electrical component with no visible text, numbers, or symbols.natural_image
Interior view of a vehicle air conditioner unit with four control panel icons (no text or labels visible)natural_image
Diagram showing a computer monitor with a grid-patterned screen and a magnified view of its screen area (no text or symbols present)- Lossa trådgallret.

natural_image
Technical line drawing of a rectangular plate with internal grid structure (no text or symbols)- Fettfilter
natural_image
Technical line drawing of a rectangular electronic component with internal grid structure (no text or symbols)natural_image
Diagram of a device with mesh structure and magnified view showing internal components (no text or symbols)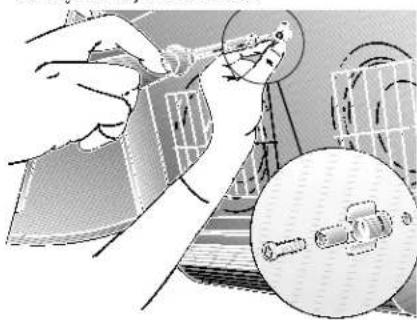
natural_image
Illustration of a hand using a tool to adjust or install a component, with an inset close-up showing a mechanical component (no text or symbols visible)natural_image
Illustration of a hand holding a device next to a grid and a magnified inset showing a device (no text or symbols present)natural_image
Illustration of a hand adjusting a ventilation duct with arrows indicating airflow direction (no text or symbols)natural_image
Mechanical assembly diagram showing a piston and rotor assembly with arrows indicating motion (no text or labels)natural_image
Cross-sectional diagram of a mechanical component with internal structure (no text or symbols)natural_image
Illustration of a camera lens mounted on a flat surface with a cylindrical lens above (no text or symbols)natural_image
Illustration of mechanical components or clamps with no visible text or symbolsnatural_image
Technical illustration of a mechanical assembly with no visible text or symbolsnatural_image
3D architectural rendering of a window frame structure with no visible text or symbolsnatural_image
Diagram showing a mechanical component with an arrow indicating direction, and a magnified inset of a detail (no text or symbols)natural_image
Diagram of a server rack with a digital display and mechanical components (no text or symbols) | CZ5200X0 |
 | CZ5322X1 |
 | CZ5110X0 |
 | 086244 |
 | 088208 |
 | CZ5521X1 |
Constructa
Postfach 83 01 01
D 81701 München
info@constructa.de
Internet: http://www.constructa.de
CD 21030
CD 22030
ConLine©
0 18 05 - 213 413
€ 0,14/min. DTAG
9000 213333
Printed in Germany 1007 Es.

- Filter und Wartung
- Monteren terugslagklep:
- Let op: wanneer
- Operating modes
- Exhaust-air mode:
- If the air intake is inadequate, there is a risk of poisoning from combustion gases which are drawn back into the room.
- Circulating-air mode:
- Before using for the first time
- Important notes:
- Gas hobs / Gas cookers
- Using the extractor hood
- Switching on the fan:
- Switching off the fan:
- Switching off 1:
- Switching off 2:
- Lighting:
- Filters and maintenance
- Fleece grease filter:
- Attention:
- Important:
- Replacing the fleece grease filter:
- Only use original filters.
- Disposal if the old fleece grease filter:
- Metal grease filters:
- Cleaning the metal grease filters:
- Removal the grease filter:
- Metal grease filter
- Fitting grease filters:
- Activated carbon filter:
- Fitting and removal:
- Replacing the activated carbon filter:
- Disposal of the old activated carbon filter:
- Changing the bulbs Cleaning and care important information
- Isolate the extractor hood by pulling out the mains plug or switching off the fuse.
- Aluminium and plastic surfaces:
- Faults
- Additional information concerning gas cookers:
- Optimum efficiency of the extractor hood:
- Discharge exhaust air in accordance with official and statutory regulations (e.g. national building regulations).
- If the extractor hood is operated in exhaust-air mode at the same time as a flue-type heater (e.g. gas, oil or solid-fuel heater, instantaneous water heater, boiler), ensure that there is an adequate air supply which the heater requires for combustion.
- If the air intake is inadequate, there is a risk of poisoning from combustion gases, which are drawn back into the room.
- ⚠ For exhaust air mode always cut out the protective grid in the air connector.
- Installation backwash valve:
- If the exhaust air is being routed through the outside wall, a telescopic wall box should be used.
- Connecting to ∅100 mm exhaustair duct
- Connecting to ∅120 mm exhaustair duct
- Before installation
- Connecting to ∅150 mm exhaustair duct
- Circulating-air mode
- The air purified by an additional activated carbon filter is returned to the room.
- Electrical connection Installation
- WARNING:
- THIS APPLIANCE MUST BE EARTHED
- IMPORTANT: Fitting a Different Plug:
- Electrical specifications:
- Length of the connection cable: 1.30 m.
- If permanent connection is required:
- The extractor hood is designed for installation between two wall cabinets.
- Installation
- Mounting the door:
- Check that the door meets the stops on both sides when pulled out. This means that it is safely locked in place.
- Mounting wall covering rail:
- If the unit door has to be removed:
- Constructa
Brand : CONSTRUCTA
Model : CD22130
Category : Range hood