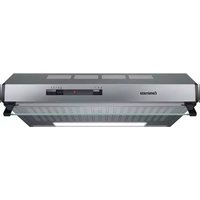
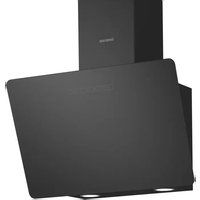
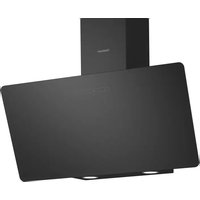
CD11351 - Range hood CONSTRUCTA - Free user manual and instructions
Find the device manual for free CD11351 CONSTRUCTA in PDF.


| Product type | Cooker hood |
| Brand | Constructa |
| Model | CD11351 |
| Width | 90 cm |
| Depth | 50 cm |
| Height | 60-110 cm (telescopic) |
| Net weight | 12 kg |
| Power supply | 220-240 V, 50 Hz |
| Motor power | 150 W |
| Lighting | 2 LED bulbs (2x3 W) |
| Number of speeds | 3 speeds + intensive |
| Max airflow | 650 m³/h |
| Max noise level | 65 dB(A) |
| Energy class | A+ |
| Control type | Touch electronic |
| Grease filter | Metal, dishwasher-safe |
| Charcoal filter | Optional, to be replaced every 6 months |
| Extraction type | Recirculation or external extraction |
| Nozzle diameter | 150 mm |
| Auto shut-off function | Yes, after 10 minutes |
| Cleaning | Easy-clean glass panel |
| Repairability index | 7.8/10 |
Frequently Asked Questions - CD11351 CONSTRUCTA
User questions about CD11351 CONSTRUCTA
0 question about this device. Answer the ones you know or ask your own.
Ask a new question about this device
Download the instructions for your Range hood in PDF format for free! Find your manual CD11351 - CONSTRUCTA and take your electronic device back in hand. On this page are published all the documents necessary for the use of your device. CD11351 by CONSTRUCTA.
USER MANUAL CD11351 CONSTRUCTA
[en] Instruction manual 9
Extractor hood CD11321, CD11351, CD11391
Hotte CD11321, CD11351, CD11391
Afzuigkap CD11321, CD11351, CD11391
de
Inhaltsverzeichnis
Störungen – was tun? 7
Kundendienst....7
Zubehör 8
natural_image
Simple line drawing of a gas stove with a checkmark and fire symbol (no text or labels)natural_image
Diagram of a device with internal components and a magnified inset showing a detail (no text or symbols)natural_image
Technical diagram of a metal enclosure with a curved arrow indicating rotation or movement (no text or symbols)natural_image
Technical illustration of a metal enclosure with internal compartments and mounting holes (no text or symbols)natural_image
Diagram of a room layout with walls, doorways, and directional arrows (no text or symbols)natural_image
Diagram of a mechanical component with concentric layers and a circular base, showing internal rotation arrows (no text or symbols)Störungen – was tun?
natural_image
3D rendering of a circular mechanical component with concentric rings and a central slot (no text or symbols)Vlies-Fettfilter
CZ5201X0
natural_image
Simple line drawing of three overlapping sheets of paper (no text or symbols)en
Table of contents
Important safety information....9
Environmental protection....11
Operating modes....11
Operating the appliance ....12
Cleaning and maintenance....12
Trouble shooting ....14
After-sales service ....14
Accessories ....15
Additional information on products, accessories, replacement parts and services can be found at wwwConstructa.de and in the online shop wwwConstructa-eshop.com
⚠️ Important safety information
Read these instructions carefully. Only then will you be able to operate your appliance safely and correctly. Retain the instruction manual and installation instructions for future use or for subsequent owners.
The appliance can only be used safely if it is correctly installed according to the safety instructions. The installer is responsible for ensuring that the appliance works perfectly at its installation location.
This appliance is intended for domestic use and the household environment only. The appliance is not intended for use outside. Do not leave the appliance unattended during operation. The manufacturer is not liable for damage which is caused by improper use or incorrect operation.
This appliance is intended for use up to a maximum height of 2000 metres above sea level.
This appliance may be used by children over the age of 8 years old and by persons with reduced physical, sensory or mental capabilities or by persons with a lack of experience or knowledge if they are supervised or are instructed by a person responsible for their safety how to use the appliance safely and have understood the associated hazards.
Children must not play with, on, or around the appliance. Children must not clean the appliance or carry out general maintenance unless they are at least 8 years old and are being supervised.
Keep children below the age of 8 years old at a safe distance from the appliance and power cable.
Check the appliance for damage after unpacking it. Do not connect the appliance if it has been damaged in transport.
This appliance is not intended for operation with an external clock timer or a remote control.
Danger of suffocation!
Packaging material is dangerous to children. Never allow children to play with packaging material.
Danger of death!
Risk of poisoning from flue gases that are drawn back in.
Always ensure adequate fresh air in the room if the appliance is being operated in exhaust air mode at the same time as room air-dependent heat-producing appliance is being operated.
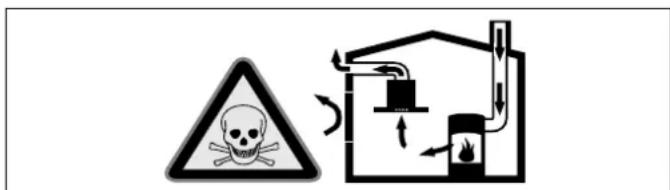
Room air-dependent heat-producing appliances (e.g. gas, oil, wood or coal-operated heaters, continuous flow heaters or water heaters) obtain combustion air from the room in which they are installed and discharge the exhaust gases into the open air through an exhaust gas system (e.g. a chimney).
In combination with an activated vapour extractor hood, room air is extracted from the kitchen and neighbouring rooms - a partial vacuum is produced if not enough fresh air is supplied. Toxic gases from the chimney or the extraction shaft are sucked back into the living space.
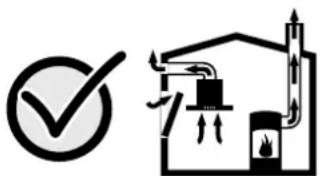
■ Adequate incoming air must therefore always be ensured.
■ An incoming/exhaust air wall box alone will not ensure compliance with the limit.
Safe operation is possible only when the partial vacuum in the place where the heat-producing appliance is installed does not exceed 4 Pa (0.04 mbar). This can be achieved when the air needed for combustion is able to enter through openings that cannot be sealed, for example in doors, windows, incoming/exhaust air wall boxes or by other technical means.
natural_image
Simple line drawing of a checkmark and a schematic diagram of a gas stove (no text or symbols)In any case, consult your responsible Master Chimney Sweep. He is able to assess the house's entire ventilation setup and will suggest the suitable ventilation measures to you.
Unrestricted operation is possible if the vapour extractor hood is operated exclusively in the circulating-air mode.
Risk of fire!
■ Grease deposits in the grease filter may catch fire.
Replace the grease filter at least every two months.
Never operate the appliance without the grease filter.
- Grease deposits in the grease filter may catch fire. Never work with naked flames close to the appliance (e.g. flambéing). Do not install the appliance near a heat-producing appliance for solid fuel (e.g. wood or coal) unless a closed, non-removable cover is available. There must be no flying sparks.
- Hot oil and fat can ignite very quickly. Never leave hot fat or oil unattended. Never use water to put out burning oil or fat. Switch off the hotplate. Extinguish flames carefully using a lid, fire blanket or something similar.
- When gas burners are in operation without any cookware placed on them, they can build up a lot of heat. A ventilation appliance installed above the cooker may become damaged or catch fire. Only operate the gas burners with cookware on them.
- Operating several gas burners at the same time gives rise to a great deal of heat. A ventilation appliance installed above the cooker may become damaged or catch fire. Never operate two gas burners simultaneously on the highest flame for longer than 15 minutes. One large burner of more than 5 kW (wok) is equivalent to the power of two gas burners.
Risk of burns!
The accessible parts become very hot when in operation. Never touch hot parts. Keep children at a safe distance.
Risk of injury!
■ Components inside the appliance may have sharp edges. Wear protective gloves.
■ Items placed on the appliance may fall down. Do not place any objects on the appliance.
Risk of electric shock!
- A defective appliance may cause electric shock. Never switch on a defective appliance. Unplug the appliance from the mains or switch off the circuit breaker in the fuse box. Contact the after-sales service.
- Incorrect repairs are dangerous. Repairs may only be carried out and damaged power cables replaced by one of our trained after-sales technicians. If the appliance is defective, unplug the appliance from the mains or switch off the circuit breaker in the fuse box. Contact the after-sales service.
- Do not use any high-pressure cleaners or steam cleaners, which can result in an electric shock.
Causes of damage
Caution!
Risk of damage due to corrosion. Always switch on the appliance while cooking to avoid condensation. Condensate can produce corrosion damage.
Always replace faulty bulbs to prevent the remaining bulbs from overloading.
Risk of damage due to ingress of humidity into the electronic circuitry. Never clean operator controls with a wet cloth.
Surface damage due to incorrect cleaning. Clean stainless steel surfaces in the direction of the grain only. Do not use any stainless steel cleaners for operator controls.
Surface damage due to strong or abrasive cleaning agents. Never use strong and abrasive cleaning agents.
Risk of damage from returning condensate. Install the exhaust duct in such a way that it falls away from the appliance slightly (1° slope).
Environmental protection
Your new appliance is particularly energy-efficient. Here you can find tips on how to save even more energy when using the appliance, and how to dispose of your appliance properly.
Saving energy
During cooking, ensure that there is a sufficient supply of air so that the extractor hood can work efficiently and with a low level of operating noise.
■ Adjust the fan speed to the intensity of the cooking fumes. Only use intensive mode where this is required. A lower fan speed means that less energy is consumed.
If there are intensive cooking fumes, select a higher fan speed in good time. If cooking fumes have already spread in the kitchen, the extractor hood must be operated for longer.
■ Switch off the extractor hood if you no longer require it.
■ Switch off the lighting if you no longer require it.
■ Clean and, if required, replace the filter at regular intervals in order to increase the effectiveness of the ventilation system and to prevent the risk of fire.
Environmentally-friendly disposal
Dispose of packaging in an environmentally-friendly manner.

This appliance is labelled in accordance with European Directive 2012/19/EU concerning used electrical and electronic appliances (waste electrical and electronic equipment - WEEE). The guideline determines the framework for the return and recycling of used appliances as applicable throughout the EU.
Operating modes
This appliance can be used in exhaust-air mode or circulating-air mode.
Exhaust air mode

The air which is drawn in is cleaned by the grease filters and conveyed to the exterior by a pipe system.
Note: The exhaust air must not be conveyed into a functioning smoke or exhaust gas flue or into a shaft which is used to ventilate installation rooms which contain heat-producing appliances.
■ Before conveying the exhaust air into a non-functioning smoke or exhaust gas flue, obtain the consent of the heating engineer responsible.
If the exhaust air is conveyed through the outer wall, a telescopic wall box should be used.
Circulating-air mode

The air which is drawn in is cleaned by the grease filters and an activated carbon filter and conveyed back into the kitchen.
Note: To bind odours in circulating-air mode, you must install an activated carbon filter. The different options for operating the appliance in circulating-air mode can be found in the brochure. Alternatively, ask your dealer. The required accessories are available from specialist outlets, from customer service or from the Online Shop. The accessory numbers can be found at the end of the instructions for use.
Operating the appliance
These instructions apply to several appliance variants. It is possible that individual features are described which do not apply to your appliance.
Note: Switch on the extractor hood when you start cooking and switch it off again several minutes after you have finished cooking. This is the most effective way of removing the kitchen fumes.
Note: Fold the glass cover forwards. This increases the extraction area.
Control panel

1 Lighting
0 Switches off the lighting
1 Switches on the lighting
2 Fan
0 Switches off the fan
1 Switches on fan speed 1
2 Switches on fan speed 2
3 Switches on fan speed 3
Setting the fan
Note: Always adjust the fan strength to meet current conditions. If there is a large build-up of steam or fumes, select a high fan setting.
Switching on
Set the slide control to position 1, 2 or 3.
Note: If the fan is switched on, an LED lights up.
Switching off the appliance
Set the slide control to position 0.
Lighting
The lighting can be switched on and off independently of the ventilation.
Set the slide control to position 1.
Cleaning and maintenance

Risk of burns!
The appliance becomes hot during operation. Allow the appliance to cool down before cleaning.

Risk of electric shock!
Penetrating moisture may result in an electric shock. Clean the appliance using a damp cloth only. Before cleaning, pull out the mains plug or switch off the circuit breaker in the fuse box.

Risk of electric shock!
Do not use any high-pressure cleaners or steam cleaners, which can result in an electric shock.

Risk of injury!
Components inside the appliance may have sharp edges. Wear protective gloves.
Cleaning agents
Observe the information in the table to ensure that the different surfaces are not damaged by using the wrong type of cleaning agent. Do not use
■ harsh or abrasive cleaning agents,
■ cleaning agents with a high concentration of alcohol,
■ hard scouring pads or sponges,
■ high-pressure cleaners or steam cleaners.
Wash new sponge cloths thoroughly before use.
Follow all instructions and warnings included with the cleaning agents.
Area Cleaning agents
| Stainless steel Hot soapy water: | |
| Clean with a dish cloth and dry with a soft cloth. | |
| Clean stainless steel surfaces in the direction of the grain only. | |
| Special stainless steel cleaning products are available from our after-sales service or from specialist retailers. Apply a very thin layer of the cleaning product with a soft cloth. | |
| Painted surfaces Hot soapy water: | |
| Clean using a damp dish cloth and dry with a soft cloth/towel. | |
| Do not use any stainless steel cleaners. | |
| Aluminium and plastic | Glass cleaner: |
| Clean with a soft cloth. | |
| Glass Glass cleaner: | |
| Clean with a soft cloth. Do not use a glass scraper. | |
| Operating controls Hot soapy water: | |
| Clean using a damp dish cloth and dry with a soft cloth. | |
| Risk of damage to the electronics from penetrating moisture. Never clean operator controls with a wet cloth. | |
| Do not use any stainless steel cleaners. | |
Removing the fleece grease filter
Risk of fire!
Grease deposits in the grease filter may catch fire. Replace the grease filter at least every two months.
Never operate the appliance without the grease filter.
Note: Only use genuine replacement filters. This ensures compliance with safety regulations and optimal performance of the appliance.
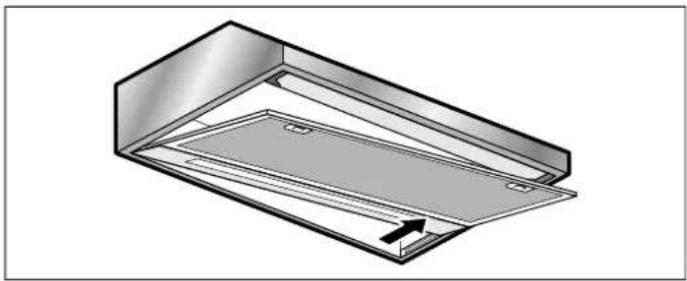
- Press the locks on the left and right of the filter grid.

natural_image
Diagram of a mechanical assembly with a magnified inset showing a component detail (no text or symbols)- Swing the filter grid down.

natural_image
3D diagram of a metal enclosure with a curved arrow indicating rotation or movement (no text or symbols)- Position the filter grid at an angle and remove it.
natural_image
Technical diagram of a mechanical assembly with no visible text or symbols- Remove the wires and then remove the fleece grease filter.

natural_image
Diagram of a room layout with furniture and directional arrows, no text or symbols present- After removing the fleece grease filter, clean the inside of the appliance.
- Clean the filter grid.
Fitting the fleece grease filter
- Trim the new fleece grease filter to the required size and place it in the filter grid.
- Clamp the fleece grease filter in place with the wires.
- Insert the filter grid.
Note: Make sure that the locks on the left and right of the filter grid engage.
Changing the activated charcoal filter (only in circulating-air mode)
In order to guarantee efficient odour filtration, the filter must be serviced regularly.
The activated charcoal filters must be replaced at least every 4 months.
Notes
The activated charcoal filters are not included in the delivery. The activated charcoal filters can be obtained from specialist retailers, from our after-sales service or from the Online Shop.
■ The activated charcoal filters cannot be cleaned or reactivated.
Note: Only use genuine replacement filters. This ensures optimal performance of the appliance.
- Remove the fleece grease filter; see the Removing the fleece grease filter section.
- Undo the threaded joint on the activated charcoal filter cover.

natural_image
Diagram of a mechanical component with concentric rings and a circular base, showing internal rotation arrow (no text or symbols)- Remove the activated charcoal filter.
- Insert the activated charcoal filter.
- Screw the cover in place.
- Fit the fleece grease filter; see the Fitting the fleece grease filter section.
Trouble shooting
Malfunctions often have simple explanations. Please read the following notes before calling the after-sales service.
⚠️ Risk of electric shock!
Incorrect repairs are dangerous. Repairs may only be carried out and damaged power cables replaced by one of our trained after-sales technicians. If the appliance is defective, unplug the appliance from the mains or switch off the circuit breaker in the fuse box. Contact the after-sales service.
Malfunction table
| Problem Possible cause Solution | ||
| The appliance does not work | The plug is not plugged in. | Connect the appliance to the electricity supply |
| Power cut Check whether other kitchen appliances are working | ||
| Faulty fuse Check in the fuse box to make sure that the fuse for the appliance is OK | ||
| The lighting does not work. | The bulbs are faulty. | For information on changing the bulbs, see the "Replacing Bulbs" section. |
Replacing bulbs
Risk of electric shock!
When changing the bulbs, the bulb socket contacts are live. Before changing the bulb, unplug the appliance from the mains or switch off the circuit breaker in the fuse box.
Risk of burns!
Halogen bulbs become very hot when switched on. There is still a risk of burning for some time after they have been switched off. Allow the halogen bulbs to cool down before replacing them.
Important Only use a bulb of the same type and same power (see also the bulb holder or rating plate).
Replacing halogen bulbs with screw base
Notes
■ To replace the bulbs, do not remove the plastic cover. The bulbs can be accessed from inside by removing the filter grid.
- When inserting halogen bulbs, do not touch the glass bulb. Use a clean cloth to insert the halogen bulbs.
- Allow the bulb to cool down.
- Remove the filter grid.
- Unscrew the bulb and replace it with a bulb of the same type.
- Fit the filter grid.
- Insert the mains plug and switch on the fuse again.
Replace the bulb with one of the same type:
Voltage: 230 V
Power: Max. 28 W
Thread: E14
After-sales service
Our after-sales service is there for you if your appliance needs to be repaired. We will always find the right solution in order to avoid unnecessary visits from a service technician.
When calling us, please quote the product number (E no.) and the production number (FD no.) so that we can provide you with the correct advice. The rating plate with these numbers can be found inside the appliance (remove the filter grid to gain access).
You can make a note of the numbers of your appliance and the telephone number of the after-sales service in the space below to save time should it be required.
E no. FD no.
After-sales serviceO
Please be aware that a visit by an after-sales engineer will be charged if a problem turns out to be the result of operator error, even during the warranty period.
Please find the contact data of all countries in the enclosed customer service list.
Rely on the professionalism of the manufacturer. You can therefore be sure that the repair is carried out by trained service technicians who carry original spare parts for your appliances.
Accessories
(not included in the scope of delivery)
Activated charcoal filter
CZ5101X0

natural_image
3D rendering of a circular mechanical component with concentric rings and a central slot (no text or symbols)Fleece grease filter
CZ5201X0

natural_image
Simple line drawing of three overlapping sheets of paper (no text or symbols)
Table des matières
natural_image
Simple line drawing of a gas stove with a checkmark and airflow indicators (no text or symbols)natural_image
Diagram of a device interior with a magnified view showing internal components (no text or symbols)natural_image
3D diagram of a metal enclosure with a curved arrow indicating rotation or movement (no text or symbols)natural_image
Technical illustration of a metal enclosure with a sloped roof and rectangular panel (no text or symbols)natural_image
Diagram of a room layout with furniture and directional arrows, no text or symbols presentnatural_image
Diagram of a mechanical component with concentric layers and a circular base, showing internal structure and an arrow indicating direction (no text or symbols)natural_image
3D rendering of a circular mechanical component with concentric rings and a central slot (no text or symbols)natural_image
Simple line drawing of three overlapping sheets of paper (no text or symbols)nl
Inhoudsopgave
natural_image
Simple line drawing of a checkmark and a schematic diagram of a gas stove (no text or symbols)natural_image
Diagram of a device interior with a magnified view showing internal components (no text or symbols)natural_image
Technical diagram of a metal enclosure with a curved arrow indicating rotation or movement (no text or symbols)- Filterrooster schuin positioneren en afnemen.

natural_image
Technical diagram of a metal enclosure with internal compartments and mounting holes (no text or symbols)natural_image
Diagram of a door with two arrows indicating left and right movement, no text or symbols presentnatural_image
Diagram of a mechanical component with concentric rings and a circular base, showing internal structure and an arrow indicating direction (no text or symbols)natural_image
3D rendering of a circular mechanical component with concentric rings and a central slot (no text or symbols)Vlies-vetfilter
CZ5201X0

natural_image
Simple line drawing of three overlapping sheets of paper (no text or symbols)
9001012938
- de
- Inhaltsverzeichnis
- Störungen – was tun?
- en
- Table of contents
- ⚠️ Important safety information
- Danger of suffocation!
- Danger of death!
- Risk of fire!
- Replace the grease filter at least every two months.
- Risk of burns!
- Risk of injury!
- Risk of electric shock!
- Causes of damage
- Caution!
- Environmental protection
- Saving energy
- Environmentally-friendly disposal
- Operating modes
- Exhaust air mode
- Circulating-air mode
- Operating the appliance
- Lighting
- Fan
- Setting the fan
- Switching on
- Switching off the appliance
- Lighting
- Cleaning and maintenance
- Cleaning agents
- Removing the fleece grease filter
- Fitting the fleece grease filter
- Changing the activated charcoal filter (only in circulating-air mode)
- Notes
- Trouble shooting
- ⚠️ Risk of electric shock!
- Replacing bulbs
- Replacing halogen bulbs with screw base
- After-sales service
- After-sales serviceO
- Accessories
- Table des matières
- Inhoudsopgave
Brand : CONSTRUCTA
Model : CD11351
Category : Range hood