
Car Camcorder X-mini - Dash cam AIPTEK - Free user manual and instructions
Find the device manual for free Car Camcorder X-mini AIPTEK in PDF.


| Product Type | Dash Camera |
| Brand | Aiptek |
| Model | Car Camcorder X-mini |
| Dimensions | Approximately 6.5 x 4.5 x 3.0 cm |
| Weight | Approximately 60 g |
| Power Supply | 12V cigarette lighter adapter |
| Battery | Built-in lithium-ion (200 mAh) |
| Storage | MicroSD card up to 32 GB (not included) |
| Video Resolution | Full HD 1080p (1920x1080) |
| Viewing Angle | 120 degrees wide angle |
| Main Functions | Loop recording, motion detection, G-sensor, audio recording |
| Display | 2.0-inch LCD screen |
| Maintenance and Cleaning | Clean the lens with a dry microfiber cloth. Avoid abrasive products. |
| Safety | Do not expose to moisture or extreme temperatures. Use the supplied adapter. |
| Spare Parts and Repairability | Mounting bracket, USB cable, 12V adapter available. Repair by authorized center. |
| General Information | 1-year warranty. CE, RoHS certified. |
Frequently Asked Questions - Car Camcorder X-mini AIPTEK
User questions about Car Camcorder X-mini AIPTEK
0 question about this device. Answer the ones you know or ask your own.
Ask a new question about this device
Download the instructions for your Dash cam in PDF format for free! Find your manual Car Camcorder X-mini - AIPTEK and take your electronic device back in hand. On this page are published all the documents necessary for the use of your device. Car Camcorder X-mini by AIPTEK.
USER MANUAL Car Camcorder X-mini AIPTEK
natural_image
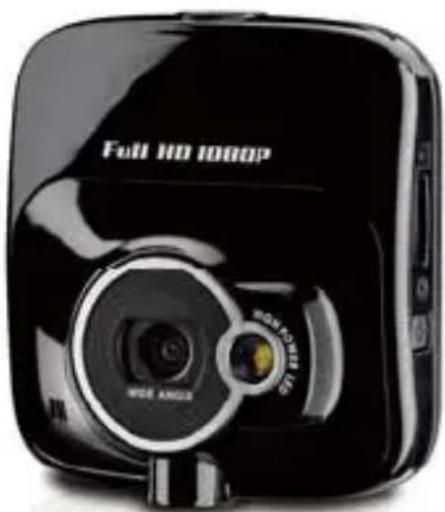
Black Full HD 1000P camera with visible lens and control buttons (no text beyond branding)CAR CAMCORDER
-English-
Welcome
Thank you very much for purchasing our product.
Before you start enjoying this product it's recommend to read this user's manual and follow the instructions step by step to get the best result with your new product.
Best Regards,
Service Team

FCC Compliance Statement
This device complies with Part 15 of the FCC Rules. Operation is subjected to the following two conditions: (1) this device may not cause harmful interference, and(2) this device must accept any interference received, including interference that may cause undesired operation.
This equipment has been tested and found to comply with limits for a Class B digital device, pursuant to Part 15 of the FCC rules. These limits are designed to provide reasonable protection against harmful interference in residential installations. This equipment generates, uses, and can radiate radio frequency energy, and if not installed and used in accordance with the instructions, may cause harmful interference to radio communications. However, there is no guarantee that interference will not occur in a particular installation. If this equipment does cause interference to radio or television equipment reception, which can be determined by turning the equipment off and on, the user is encouraged to try to correct the interference by one or more of the following measures:
- Reorient or relocate the receiving antenna.
- Move the equipment away from the receiver.
- Plug the equipment into an outlet on a circuit different from that to which the receiver is connected.
- Consult the dealer or an experienced radio/television technician for additional suggestions.
You are cautioned that any change or modifications to the equipment not expressly approved by the party responsible for compliance could void your authority to operate such equipment.
Important Notice
- Do not drop, puncture or disassemble the device; otherwise the warranty will be voided.
- Avoid all contact with water, and dry hands before using.
- Use the device with care. Avoid pressing hard on the device body.
- For your own safety, avoid using the device when there is a storm or lightning.
- Use only the accessories supplied by the manufacturer.
- Keep the device out of the reach of infants.
- When you get off the car, do not leave the device on the dashboard that is subject to direct sunlight.
- For your own safety, do not operate the controls of the product while driving. This product is intended to be used as a car recorder aid only.
- For more details, please download the complete user manual from the official website. (http://www.aiptek.tw/download.php)
CE Regulatory Notice
This equipment complies with the requirements set out in the Council Directives on the Approximation of the Laws of the Member States relating Electromagnetic Compatibility (2004/108/EC); the Low Voltage Directive (2006/95/EC); the Restriction of The Use of Certain Hazardous Substances in Electrical And Electronic Equipment Directive (2002/95/EC), Turkish EEE Directive; the Commission Regulation (EC) No 1275/2008 implementing Directive 2005/32/EC of the European Parliament and of the Council with regard to eco-design requirements for standby and off mode electric power consumption of electrical and electronic household and office equipment, and the Directive 2009/125/EC of the European parliament and of the council establishing a framework for the setting of eco-design requirements for energy-related products.
Notes on Installation
- Install the device near the rear-view mirror to obtain the best open-field view.
- Make sure that the lens is within the wiping range of the windscreen wiper to ensure a clear view even when it rains.
- Do not touch the lens with your fingers. Finger grease may be left on the lens and will result in unclear videos or snapshots. Clean the lens on a regular basis.
- Do not install the device on a tinted window. Doing so may damage the tint film.
- Make sure that the installation position is not hindered by the tinted window.
Caution
- Use the authorized charger only.
- Never disassemble by yourself.
- Never short-circuit the battery.
- Dispose of the battery properly.
- Exposing the battery to open flames can cause explosion.
If the time arises to throw away your product, please recycle all the components possible.
Batteries and rechargeable batteries are not to be disposed in your domestic waste!
Please recycle them at your local recycling point.
Together we can help to protect the environment.





Contents
1 Introduction 7
1.1 Features 7
1.2 Package Contents....7
1.3 Product Overview 8
2 Getting Started....9
2.1 Inserting the Memory Card....9
2.2 Installing in Vehicles.... 10
2.2.1 Mount to Windshield.... 10
2.2.2 Adjust Device Position 10
2.3 Connecting to Power ....11
2.4 Powering the Device On / Off 12
2.4.1 Auto Power On/Off.... 12
2.4.2 Manual Power On/Off.... 12
2.5 Initial Settings.... 13
2.5.1 Set Automatic Recording.... 13
2.5.2 Set the Date and Time 13
3 Using the Car Recorder 14
3.1 Recording Videos 14
3.1.1 Record videos while driving 14
3.1.2 Record all other types of videos.... 14
3.1.3 Emergency Recording.... 15
3.1.4 The Recording Screen 16
3.1.5 Using the LED Light.... 17
3.1.6 Taking Snapshot.... 17
3.2 Playback Videos and Photos.... 18
3.2.1 Playing Videos 19
3.2.2 Viewing Photos 19
3.2.3 The Playback Screen.... 20
3.2.4 Deleting Files 21
4 Adjusting the Settings 22
4.1 Using the Menu 22
4.2 Menu Tree 23
5 Installing the Software 25
6 Specifications 26
1. Introduction
Thank you for purchasing this advanced Car Recorder. This device is specifically designed for real time video and audio recording when driving.
1.1 Features
• Full HD camera (1920x1080 @ 30fps)
• 2.4" LCD color screen
- Wide angle lens
• High power LED for low light environments
- Motion detection
• Automatic Emergency recording for collision detection
• Supports SDHC up to 32GB
1.2 Package Contents
The package contains the following items. In case there is any missing or damaged item, contact your dealer immediately.
Car Recorder Bracket CD-ROM

Quick start guide Car adapter

1.3 Product Overview
Top and Bottom Views

natural_image
Technical line drawing of a mechanical component with labeled parts (1 and 2), no readable text or symbols present.
natural_image
Technical line drawing of a mechanical component with a circular feature and labeled part '3' (no text or symbols beyond the number)Side (Left and Right) Views


Front View

Rear View
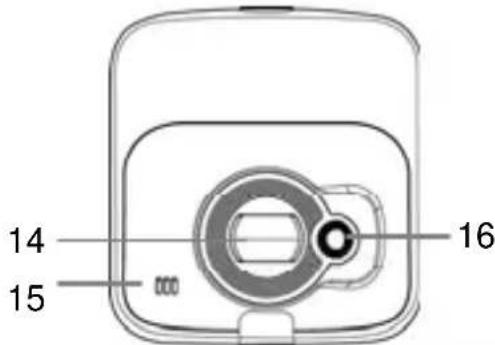
| No. | Item |
| 1 | Microphone |
| 2 | Bracket Socket |
| 3 | Bracket Socket |
| 4 | Memory Card Slot |
| 5 | Power Button |
| 6 | USB Connector |
| 7 | HD Connector |
| 8 | Reset Button |
| No. | Item |
| 9 Back Button ( ) ↩ | |
| 10 LCD Panel | |
| 11 Up Button ( ) ▲ | |
| 12 Down Button ( ) ▼ | |
| 13 Enter Button ( ) OK | |
| 14 Wide Angle Lens | |
| 15 Speaker | |
| 16 LED Light | |
Note: To operate the device, press the corresponding buttons ((9, 11, 12, 13) according to guide icons shown the screen.
2. Getting Started
2.1 Inserting the Memory Card
Insert the memory card with the gold contacts facing the back of the device. Push the memory card until it clicks into place.

natural_image
Diagram of a printer rear panel showing a USB flash drive and a separate physical card slot (no text or symbols present)To remove the memory card
Push to eject the memory card out of the slot.
Note: Do not remove or insert the memory card when the device is turned on. This may damage the memory card.
2.2 Installing in Vehicles
2.2.1 Mount to Windshield
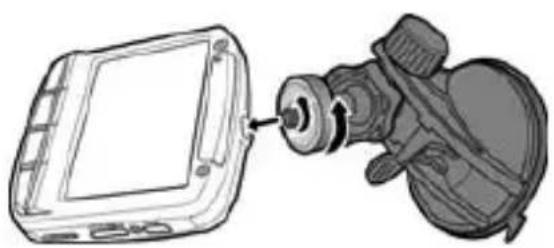
- Attach the device to the bracket base. Turn and tighten the car holder and the bracket base to make sure the device is securely locked in place.
- With the suction-cup laying flat, position the suction-cup on the windshield.
- Hold the base firmly on the windshield and press down the clamp to mount the car holder to the windshield. Make sure the base is securely locked in place.
natural_image
Diagram showing a device connected to a mechanical component (no text or symbols present)
natural_image
Diagram of a mobile phone with a device and directional arrow indicating rotation (no text or symbols)2.2.2 Adjust Device Position
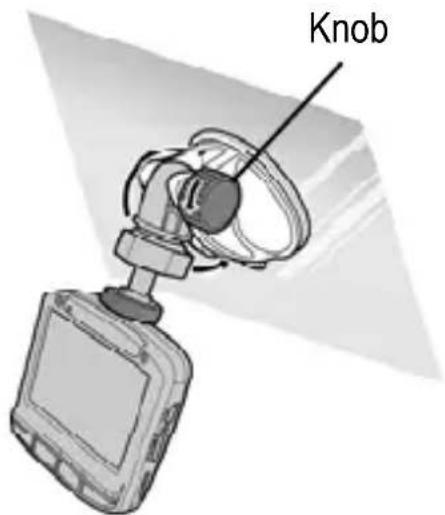
Rotate the knob to swivel the device vertically.

Rotate the knob to swivel the device horizontally up to 360°.
2.3 Connecting to Power
Use only the supplied car adapter to power up the device and charge the built-in battery.

natural_image
Interior view of a car dashboard and steering wheel, showing steering wheel, dashboard, and rearview mirror (no text or symbols)-
Connect one end of the car adapter to the USB connector of the device.
-
Plug the other end of the car charger to the cigarette lighter socket of your vehicle. Once the vehicle engine is started, the device automatically turns on.
Note:
The orange LED lights up while the battery is charging.
Please take note if the environment temperature reaches 45irc C or above, the car adapter still can supply power to device, but it will not charge the Lithium-ion battery. This is the characteristic of Lithium-ion and is not a malfunction.
2.4 Powering the Device On / Off
2.4.1 Auto Power On/Off
Once the vehicle engine is started, the device automatically turns on. If the Automatic Record function is enabled, the recording will automatically start right after the device turns on.
See Set Automatic Recording (2.5.1).
Once the vehicle engine shuts down, the device automatically saves the recording and turns off the power within 10 seconds.
See Delay Shutdown (4.2).
2.4.2 Manual Power On/Off
To manually turn on the power, press the POWER button.
To turn off, press and hold the POWER button
for at least 2 seconds.

natural_image
Line drawing of a device with a button labeled 'Power' and an inset showing a hand pressing the button (no text or symbols present)2.5 Initial Settings
Before using the device, we recommend you to enable the Automatic Record function and set up the correct date and time.
2.5.2 Set Automatic Recording
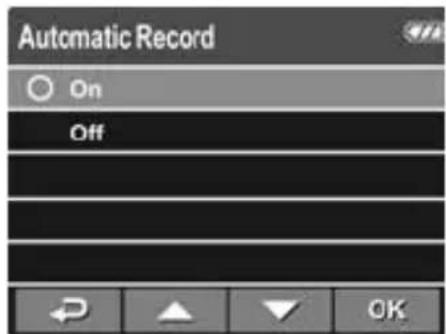
To enable the recording to start automatically after you turn on the power, do the following:
-
Press the button to enter the OSD menu.
-
Press the / ▲ button to select Automatic Record and press the OK button.
-
Press the / ▲ button to select and press the OK button. On
-
Press the BACK button to exit the menu.
2.5.3 Set the Date and Time
To set the correct date and time, do the following:
-
Press the button to enter the OSD menu.
-
Press the ▲/▼button to select Date / Time and press the OK button.

- Press the / ▲ button to adjust the value and press the button to move to another field.
OK
- Repeat step 3 until the date and time setting is complete.
3. Using the Car Recorder
3.1 Recording Videos
3.1.1 Record videos while driving
When the vehicle engine starts up and the Automatic Record function is enabled, the device automatically turns on and starts recording.
Recording will automatically stop when the engine is switched off. Or, press the ▼ button to stop recording manually.
Note:
On some cars, the recording will continue when the engine is switched off.
If this happens, do one of the following:
- Manually turn off the cigarette lighter.
- Remove the car adapter from the cigarette lighter.
3.1.2 Record all other types of videos
- Press the button to start recording.
- Press the button to stop recording.
Note:
One video file is saved for every 3 or 5 minutes of recording. See Using the Menu (4.1). The device saves the recording in the memory card. If the memory card capacity is full, the oldest file in the memory card is overwritten.
3.1.3 Emergency Recording
During video recording, press the OK button to continuously record the video in one file until the memory card storage is full or the recording is manually stopped.
To stop the recording, press the ▼ button.

Note: If the Collision Detection function is enabled and a collision is detected, the device will automatically trigger the emergency recording. See Using the Menu (4.1).
3.1.4 The Recording Screen
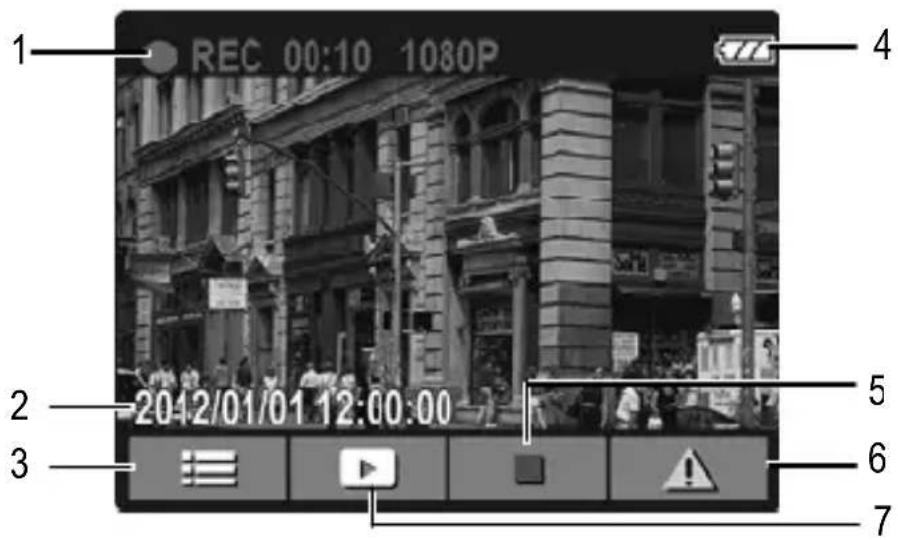
| No. | Item | Description |
| 1 | Duration | Indicates the recording duration. |
| 2 | Date and time | Indicates the current recording date and time. |
| 3 | Guide icon (Menu) | Press the button to enter the OSD menu. |
| 4 | Battery | Indicates the remaining battery power. |
| 5 | Guide icon (Stop) | Press the button to stop the recording. |
| 6 | Guide icon (Emergency) | Press the OK button to continuously record the video in one file until the recording is manually stopped. |
| 7 | Guide icon | Press the button to switch to |
(Playback) Playback mode.
3.1.5 Using the LED Light
You can use the LED light to provide extra light when the lighting is insufficient.
To enable the LED light, do the following:
-
Press the button to enter the OSD menu.
-
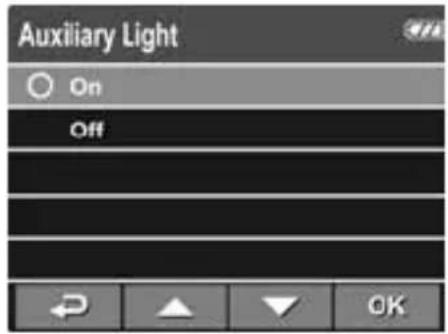
Press the / ▲ button to select Auxiliary Light and press the OK button.
-
Press the / ▲ button to select On and press the OK button.
-
Press the button to exit the menu.
Note:
Turn off LED lights when the battery is low.
When using LED lights for a long time, it may become hot. Take care not to touch the hot LED lights.
3.1.6 Taking Snapshot
You can also use this device to take snapshots of the current scene.
From the standby screen, press the ▼ button to take a snapshot.

Note: If recording is in progress, press the▼ button to stop the recording.
3.2 Playback Videos and Photos
- If recording is in progress, press the button to stop recording. The standby screen is displayed.
- Press the button to enter the OSD menu.
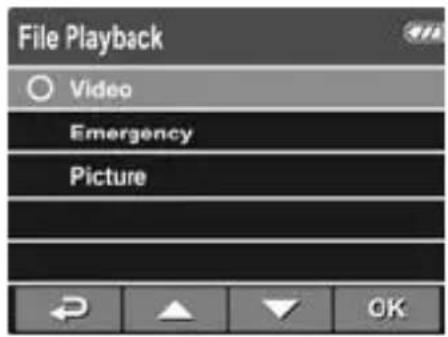
- Press the / ▲ button to select the file category that you want to browse and press the ○ button.
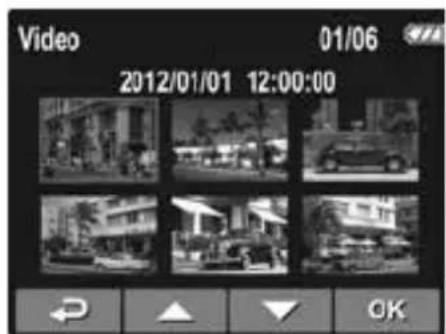
- Press the / ▲ button to view the next or the previous file and press the ▲ button to view the file in full screen.
Note: From the standby screen, you can directly enter Playback mode by pressing ▲ button. The last recorded video is displayed on the screen.
3.2.1 Playing Videos
To play videos, do the following:
- If recording is in progress, press the button to stop recording.
- Press the button to enter the OSD menu.
- Press the / ▲ button to select OK button. File Playback and press the
- Press the / ▲ button to select press the ○ button. Video or Emergency and
- Press the / button to browse for the desired video file and press the button to play the video.
- Press the button to pause the playback. Press it again to resume.
3.2.2 Viewing Photos
To view photos, do the following:
- If recording is in progress, press the button to stop recording.
- Press the ↩ button to enter the OSD menu.
- Press the / ▲ button to select OK button. File Playback and press the
-
Press the / ▲ button to select Picture and press the OK button.
-
Press the / ▲ button to browse for the desired photo file and press the ○ button to view the file in full screen.
3.2.3 The Playback Screen
Video Playback Screen

Photo Playback Screen
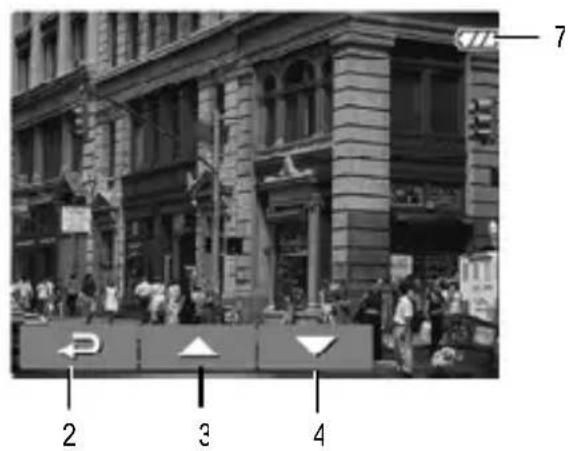
| No. | Item | Description |
| 1 | Date and time | Indicates the recorded date and time. |
| 2 | Guide icon (Back) | Press the button to return to file selection display. |
| 3 | Guide icon (Previous) | Press the button to view the previous video/photo. |
| 4 | Guide icon (Next) | Press the button to view the next video/photo. |
| 5 | Guide icon (Pause) | Press the button to pause the video playback. |
| 6 | Duration | Indicates the elapse time. |
| 7 | Battery | Indicates the remaining battery power. |
3.2.4 Deleting Files
To delete file(s), do the following:
- If recording is in progress, press the button to stop recording.
-
Press the button to enter the OSD menu.
-
Press the / ▲ button to select File Deletion and press the OK button.
-
Press the / ▲ button to select the file category and press the OK button.
-
Press the / ▲ button to select the file that you want to delete and press the OK button to enter the Delete menu.


- Press the / ▲ button to select an option.
| Item Description |
| Delete One Delete the current file. |
| Delete All Delete all files. |
- Press the button to confirm delete.
Note: Deleted files cannot be recovered. Ensure the files have backup before deletion.
4. Adjusting the Settings
4.1 Using the Menu
You can customize the video recording and other general settings via the on-screen display (OSD) menus.
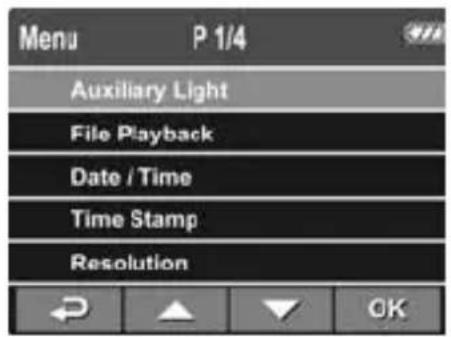


- If recording is in progress, press the Record button to stop recording.
- Press the ↩ button to open the OSD menu.
- Press the / ▲ button to select a menu option and press the OK button to enter the selected menu.
- Press the / ▲ button to select the desired setting and press the ○ button to confirm the setting.
5. Press the button to exit the menu.
4.2 Menu Tree
Refer to the below table for details on menu items and available menu options.
| Menu option | Description Available option | |
| Auxiliary Light | Enable/Disable the LED light. | On / Off |
| File Playback | Select the file category that you want to view. | Video / Emergency / Picture |
| Date / Time | Set the date and time. | |
| Time Stamp | Enable/Disable the date stamp. | On / Off |
| Resolution Set the video resolution. 1080P(1920x1080) / 720P(1280x720) | ||
| LCD Setting | Set the duration for the display to automatically turn off right after video recording starts. | On / Turn Off After 30 Sec. / Turn Off After 3 min. / Off |
| Voice Record | Enable/Disable the voice recording. | On / Off |
| Beep Enable/Disable the beep. On / Off | ||
| Automatic Record | Enable/Disable the device to automatically record video after the device is turned on. | On / Off |
| Record Interval | Set the recording duration for each recorded video file. | 3 mins / 5 mins |
| Motion Detection | Enable/Disable the motion detection. If this function is enabled and the device detects any object movement,it will automatically start the recording. | On / Off |
| Collision Detection | Enable/Disable the collision detection. If this function is enabled and any collision is detected, the device will automatically trigger the emergency recording. | High Sensitivity / Normal Sensitivity / Low Sensitivity / off |
| Delay Shutdown | Set the delay duration before turning off the power. | 10 Sec. / Off |
| Language Set | the on-screen display menu language. | |
| File Deletion | Delete the file(s). Video / Emergency Picture | |
| TV standard | Set the TV type based on your local region. | NTSC / PAL |
| Format Format | at the memory card. Yes / No | |
| Default Reset | all settings to factory default settings. | Yes / No |
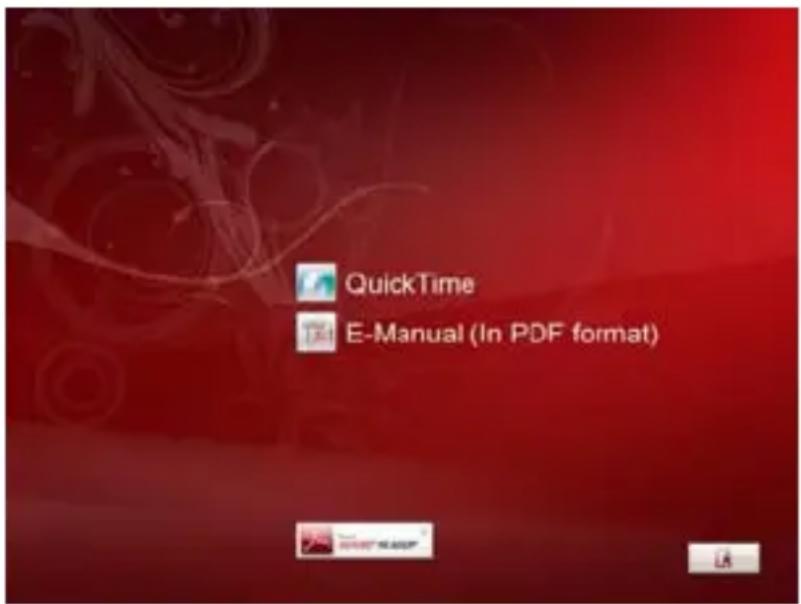
5. Installing the Software
- Place the attached CD ROM into the CD player.
- If the CD does not execute automatically, please use Windows File Manager to execute the Install_CD.exe file in the CD.
The following screen will be shown up.
-
Press the [Menu] item to start the installation process according to the instructions on-screen.
-
Specifications
| Item Description | |
| Image sensor | 5 Megapixel(s) CMOS sensor |
| Effective pixels | 2592 (H) x 1944 (V) |
| Storage media | Support Micro SDHC, up to 32GB class 4 or above |
| LCD display | 2.4" LCD color TFT (112K pixels) |
| Lens | Wide Angle Fixed Focus lensF2.8, f=3.0mm |
| Focus range | 1.5m~Infinity |
| Movie Clip | Resolution: Full HD (1920 x 1080), 30fpsHD (1280 x 720), 30fps |
| Format: .mov | |
| Still image(Snapshot) | Resolution: 5M (2592 x 1944) |
| Format: DCF (JPEG, Exif: 2.2) | |
| Shutter | Electronic shutterAuto:1/2 ~1/2000 sec. |
| G-Sensor | 3-Axis G-Force sensor |
| ISO | Auto |
| White Balance | Auto |
| Assist Lamp | Yes |
| Microphone | Yes |
| Speaker | Yes |
| Interface | Mini USB, Mini C Type HDMI |
| Battery | Built-in 470mAh Li-polymer rechargeable |
| Power supply | Cigar car charger (Input:12V~24V/1.0A)5V/1A adaptor (Input AC 100V~240V, 50/60Hz) |
| Operating Temperature | 0° ~ 60°C |
| Storage Temperature | -20° ~ 80°C |
| Dimensions | 65 x 62 x 27 mm |
| Weight | Approx. 85g |
Copyright © 2012
All rights reserved.
All other marks, products or company names mentioned in this guide are trademarks of their respective companies.
User's Manual
natural_image
Black Full HD 1000P camera with visible lens and control buttons (no text beyond branding)CAR CAMCORDER
-German-
Inhalt
natural_image
Line drawing of a mobile phone with front panel and keypad (no text or symbols)natural_image
Simple concentric circle diagram with no text or symbolsFahrzeug-Netzteil


natural_image
Line drawing of a cordless cable with two connectors (no text or symbols)natural_image
Technical line drawing of a mechanical component with no visible text or symbolsnatural_image
Diagram of a printer rear panel with an attached SAG card and a black arrow pointing to the next component (no text or symbols present)natural_image
Diagram showing a device connected to a mechanical device with a knob (no text or symbols present)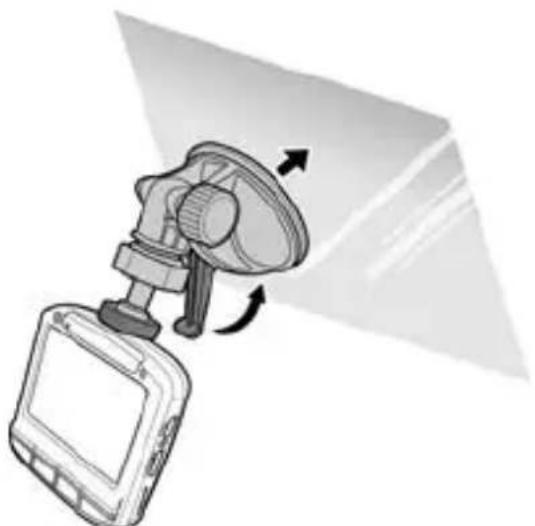
natural_image
Diagram of a car navigation device with directional arrows indicating motion (no text or symbols)natural_image
Interior view of a car dashboard and steering wheel, showing steering wheel, dashboard, and rearview mirror (no text or symbols)natural_image
Line drawing of a device with a hand pressing a button (no text or symbols)natural_image
Black Full HD 1000P camera with visible lens and control buttons (no text beyond branding)CAR CAMCORDER
-French-
natural_image
Line drawing of a generic electronic device with a screen and keypad (no text or symbols)Support CD-ROM


natural_image
Simple concentric circle diagram with no text or symbolsnatural_image
Line drawing of a cordless cable with two connectors (no text or symbols)natural_image
Technical line drawing of a mechanical component with two views (labeled 1 and 2) showing internal features and ends, no text or symbols present.natural_image
Diagram of a printer's rear panel showing a USB drive and a separate physical card slot (no text or symbols present)natural_image
Illustration of a device being inserted into a device (no text or symbols visible)
natural_image
Diagram of a remote control device with directional arrows indicating rotation (no text or symbols)natural_image
Interior view of a car dashboard and steering wheel, showing steering wheel, dashboard, and rearview mirror (no text or symbols)natural_image
Line drawing of a computer control panel with an open button and a hand cursor pointing to it (no text or symbols present)
natural_image
Black foldable OP camera with lens and control buttons (no visible text or symbols on body)CAR CAMCORDER
-Italian-
Indice
natural_image
Line drawing of a mobile phone with front panel and keypad (no text or symbols)natural_image
Simple concentric circle diagram with no text or symbols

natural_image
Line drawing of a cordless cable with a plug and connector (no text or symbols)natural_image
Line drawing of a car front bumper with no text or symbolsnatural_image
Diagram of a printer rear panel with an attached SAG card and a black arrow pointing to the print area (no text or symbols present)natural_image
Diagram showing a device connected to a mechanical component (no text or symbols present)
natural_image
Diagram of a mounted device with directional arrows indicating motion or rotation (no text or symbols)natural_image
Interior view of a car dashboard and steering wheel, showing dashboard, steering wheel, and rearview mirror (no text or symbols)natural_image
Line drawing of a device with a button labeled 'Power' and an inset circle highlighting the button (no text or symbols present)natural_image
Black Full HD 1000P camera with visible lens and control buttons (no text beyond branding)CAR CAMCORDER
-Spanish-
Acerca de esta guía
Aviso Regulatorio CE
Contenidos
Aviso Regulatorio CE....4
natural_image
Line drawing of a mobile phone with front panel and keypad (no text or symbols)Brazo CD-ROM


natural_image
Simple concentric circle diagram with no text or symbolsnatural_image
Line drawing of a cable and plug with a connector (no text or symbols)natural_image
Technical line drawing of a mechanical component with a circular opening and labeled part '3' (no text or symbols beyond label)natural_image
Diagram of a printer's rear panel showing the internal ports and a separate physical card inserted into the base (no text or symbols present)natural_image
Diagram showing a device connected to a mechanical component, no text or symbols present
natural_image
Diagram of a remote control device with directional arrows indicating rotation (no text or symbols)natural_image
Interior view of a car dashboard and steering wheel with red dashed alignment lines (no text or symbols)natural_image
Line drawing of a device with a button labeled 'Power Button' and an inset circle highlighting the function (no text or symbols present)natural_image
Black Full HD 1000P camera with visible lens and control buttons (no text beyond branding)CAR CAMCORDER
-Portuguese
Sobre este guia
natural_image
Line drawing of a mobile phone with front panel and keypad (no text or symbols)Guia


natural_image
Simple concentric circle diagram with no text or symbolsAdaptador para carros


natural_image
Line drawing of a cable and plug with a connector (no text or symbols)1.3 Visão geral
natural_image
Line drawing of a car front view showing the roof, door, and side panels (no text or symbols)natural_image
Diagram of a printer's rear panel showing the main port and attached to a physical storage card (no text or symbols present)natural_image
Diagram showing a device connected to a mechanical component, no text or symbols present
natural_image
Diagram of a device with a sensor or camera module and directional arrows indicating rotation (no text or symbols)natural_image
Interior view of a car dashboard and steering wheel with red dashed alignment lines (no text or symbols)natural_image
Line drawing of a device with a button labeled 'Power' and an inset circle highlighting the button (no text or symbols present)natural_image
Black Full HD 1000P camera with visible lens and control buttons (no text beyond branding)CAR CAMCORDER
-Russian-
natural_image
Simple line drawing of a rectangular electronic device with a screen and buttons (no text or symbols)Краткое руководство
Кронштейн CD-ROM

natural_image
Line drawing of a cordless cable with two connectors (no text or symbols)natural_image
Technical line drawing of a mechanical component with no visible text or symbolsnatural_image
Diagram of a printer rear panel showing a USB drive and a separate card slot (no text or symbols present)natural_image
Diagram showing a device connected to a mechanical component (no text or symbols present)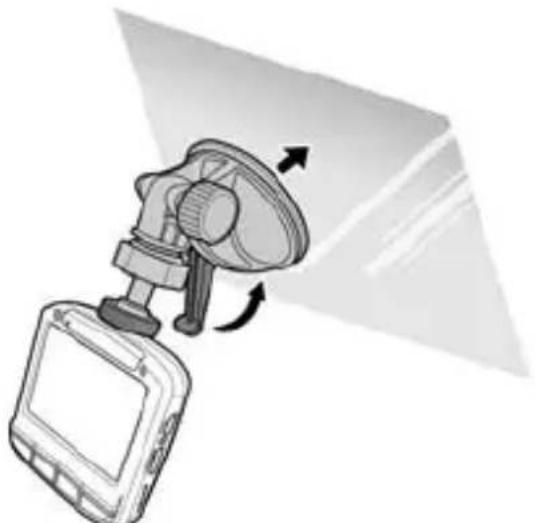
natural_image
Diagram of a remote control device with directional arrows indicating rotation (no text or symbols)natural_image
Interior view of a car dashboard and steering wheel with red dashed alignment lines (no text or symbols)natural_image
Line drawing of a computer control panel with an open button and a hand cursor pointing to it (no text or symbols present)

- CAR CAMCORDER
- Welcome
- FCC Compliance Statement
- Important Notice
- CE Regulatory Notice
- Notes on Installation
- Caution
- Contents
- Introduction 7
- Getting Started....9
- Using the Car Recorder 14
- Introduction
- Features
- Package Contents
- Product Overview
- Getting Started
- Inserting the Memory Card
- Installing in Vehicles
- Mount to Windshield
- Adjust Device Position
- Connecting to Power
- Note:
- Powering the Device On / Off
- Auto Power On/Off
- Manual Power On/Off
- Initial Settings
- Set Automatic Recording
- Set the Date and Time
- Using the Car Recorder
- Recording Videos
- Record videos while driving
- Record all other types of videos
- Emergency Recording
- The Recording Screen
- Using the LED Light
- Taking Snapshot
- Playback Videos and Photos
- Playing Videos
- Viewing Photos
- The Playback Screen
- Deleting Files
- Adjusting the Settings
- Using the Menu
- Press the button to exit the menu.
- Menu Tree
- Installing the Software
- Inhalt
- Indice
- Acerca de esta guía
- Aviso Regulatorio CE
- Contenidos
- Sobre este guia
- Visão geral
Brand : AIPTEK
Model : Car Camcorder X-mini
Category : Dash cam