
Master E3 - Cooker CASO - Free user manual and instructions
Find the device manual for free Master E3 CASO in PDF.


| Product type | Electric cooker |
| Model | Master E3 |
| Brand | CASO |
| Dimensions (W x D x H) | 60 x 60 x 85 cm (estimate) |
| Weight | 50 kg (estimate) |
| Power supply | 230 V / 50 Hz, 16 A |
| Total power | Approximately 10 kW |
| Number of burners | 4 |
| Burner type | Ceramic glass |
| Oven | Integrated, capacity 70 L (estimate) |
| Oven heating types | Natural and forced convection |
| Oven functions | Traditional cooking, convection, grill, defrost |
| Cleaning | By pyrolysis (self-cleaning) |
| Safety | Automatic shut-off, child lock, oven door safety |
| Maintenance | Clean with a damp cloth and mild detergent |
| Spare parts | Available through CASO after-sales service |
Frequently Asked Questions - Master E3 CASO
User questions about Master E3 CASO
0 question about this device. Answer the ones you know or ask your own.
Ask a new question about this device
Download the instructions for your Cooker in PDF format for free! Find your manual Master E3 - CASO and take your electronic device back in hand. On this page are published all the documents necessary for the use of your device. Master E3 by CASO.
USER MANUAL Master E3 CASO
caso Germany
Braukmann GmbH
Raiffeisenstraße 9
D-59757 Arnsberg
Tel.: +49 (0) 29 32 / 54 76 6 - 99
Fax: +49 (0) 29 32 / 54 76 6 - 77
eMail: kundenservice@caso-germany.de
Internet: www.caso-germany.de
11 Operating Manual....40
11.1 General....40
11.2 Information on this manual 40
11.3 Warning notices ....41
11.4 Limitation of liability 42
11.5 Copyright protection....42
12 Safety....43
12.1 Intended use....43
12.2 General Safety information ....44
12.3 Sources of danger......45
12.3.1 Danger due to Electromagnetic Field....45
12.3.2 Danger of Burning....45
12.3.3 Danger of Explosion....46
12.3.4 Danger of Fire 46
12.3.5 Dangers due to electrical power....47
13 Commissioning....48
13.1 Safety information....48
13.2 Delivery scope and transport inspection....48
13.3 Unpacking....48
13.4 Disposal of the packaging....48
13.5 Setup 49
13.5.1 Setup location requirements: 49
13.5.2 Preventing Radio interference....51
13.6 Electrical connection....51
14 Design and Function 52
14.1 Complete overview ....52
14.1.1 Details on the device....52
14.2 Operating elements and displays....53
14.2.1 Operating panels and Displays....53
14.2.2 Signal Tones....53
14.2.3 Overheating Protection Facility 54
14.2.4 Automatic shutdown protection....54
14.2.5 Rating plate....54
15 Operation and Handing 55
15.1 Functioning and Advantages of Induction Cookers .. 55
15.2 Instructions on Cookware ....56
15.3 Safety Instructions....57
15.4 Operating the Appliance....58
15.4.1 Using the Touch Controls 58
15.4.2 Switching Off....58
15.4.3 Switching On....58
15.4.4 Timer....59
15.4.5 Using the Timer as a Minute Minder .....59
15.4.6 Setting the timer to turn one cooking zone....60
15.4.7 Booster 61
15.4.8 Lock function (children lock key)....61
16 Cleaning and Maintenance....62
16.1 Safety information....62
16.2 Cleaning....63
17 Troubleshooting....63
17.1 Safety notices....63
17.2 Causes and rectification of faults....64
18 Disposal of the Old Device....65
19 Guarantee....65
20 Technical Data 66
21 Mode d'emploi 68
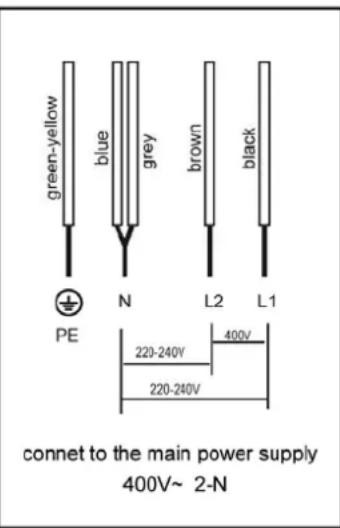
connet to the main power supply 220-240V 2+2N\~

connet to the main power supply 400V\~ 2-N

connet to the main power supply 220-240V\~
Original Operating Manual
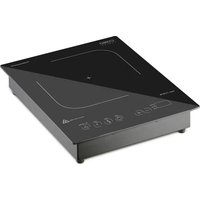
Induction cooker with three hobs for assembly Master E3

11 Operating Manual
11.1 General
Please read the information contained herein so that you can become familiar with your device quickly and take advantage of the full scope of its functions.
Your microwave will serve you for many years if you handle it and care for it properly.
We wish you a lot of pleasure in using it!
11.2 Information on this manual
These Operating Instructions are a component of the induction cooker (referred to hereafter as the Device) and provide you with important information for the initial commissioning, safety, intended use and care of the device.
The Operating Instructions must be available at all times at the device. This Operating Manual must be read and applied by every person who is instructed to work with the device:
- Commissioning
- Operation
- Troubleshooting and/or
- Cleaning
Keep the Operating Manual in a safe place and pass it on to the subsequent owner along with the device.
11.3 Warning notices
The following warning notices are used in the Operating Manual concerned here.
⚠GEFAHR
DANGER
A warning notice of this level of danger indicates a potentially dangerous situation.
If the dangerous situation is not avoided, this can lead to death or serious injuries.
▶ Observe the instructions in this warning notice in order to avoid the danger of death or serious personal injuries.
⚠️WARNUNG
WARNING
A warning notice of this level of danger indicates a possible dangerous situation.
If the dangerous situation is not avoided, this can lead to serious injuries.
▶ Observe the instructions in this warning notice in order to avoid the personal injuries.
▲VORSICHT
ATTENTION
A warning notice of this level of danger indicates a possible dangerous situation.
If the dangerous situation is not avoided, this can lead to slight or moderate injuries.
▶ Observe the instructions in this warning notice in order to avoid the personal injuries.
HINWEIS
PLEASE
NOTE
A notice of this kind indicates additional information, which will simplify the handling of the machine.
11.4 Limitation of liability
All the technical information, data and notices with regard to the installation, operation and care are completely up-to-date at the time of printing and are compiled to the best of our knowledge and belief, taking our past experience and findings into consideration.
No claims can be derived from the information provided, the illustrations or descriptions in this manual.
The manufacturer does not assume any liability for damages arising as a result of the following:
• Non-observance of the manual
• Uses for non-intended purposes
- Improper repairs
- Technical alterations
- Use of unauthorized spare parts
All translations are carried out to the best of our knowledge. We do not assume any liability for translation errors, not even if the translation was carried out by us or on our instructions. The original German text remains solely binding.
11.5 Copyright protection
This document is copyright protected.
Braukmann GmbH reserves all the rights, including those for photomechanical reproduction, duplication and distribution using special processes (e.g. data processing, data carriers, data networks), even partially.
Subject to content and technical changes.
12 Safety
This chapter provides you with important safety notices when handling the device.
The device corresponds with the required safety regulations.
Improper use can result in personal or property damages.
12.1 Intended use
This device is only intended for use in households in enclosed spaces for warming up, cooking and roasting foods.
The cooking pots used for the induction hob surface must be suitable for induction cooking.
Uses for a different purpose or for a purpose which exceeds this description are considered incompatible with the intended or designated use.
⚠️WARNUNG Warning
Danger due to unintended use!
Dangers can emanate from the device if it is used for an unintended use and/or a different kind of use.
▶ Use the device exclusively for its intended use.
▶ Observe the procedural methods described in this Operating Manual.
Claims of all kinds due to damages resulting from unintended uses are excluded.
The User bears the sole risk.
12.2 General Safety information
HINWEIS
Please note
Please observe the following general safety notices with regard to the safe handling of the device.
▶ Examine the device for any visible external damages prior to using it. Never put a damaged device into operation.
▶ If the connection lead is damaged, you will need to have a new connection lead installed by an authorized electrician.
▶ Persons, who are not able to operate the device because of any physical, mental or motor disabilities may only use the device under the supervision or under the instructions of a responsible person.
▶ Do not permit children to use the device, unless they are supervised.
▶ Children being supervised not to play with the appliance.
▶ Do not leave the device unsupervised when it is in operation.
▶ Only qualified electricians, who have been trained by the manufacturer, may carry out any repairs that may be needed. Improperly performed repairs can cause considerable dangers for the user.
▶ Only customer service departments authorized by the manufacturer may carry out repairs on the device during the guarantee period, as otherwise the guarantee entitlements will be null and void in the event of any subsequent damages.
▶ Defective components must always be replaced with original replacement parts. Only such parts will guarantee that the safety requirements are fulfilled
▶ Do not immerse the appliance in water or other liquids, and do not put it in the dishwasher.
12.3 Sources of danger
12.3.1 Danger due to Electromagnetic Field
⚠️WARNUNG
WARNING
The magnetic fields generated during operation of the appliance may lead to adverse effects.
Adhere to the following safety instructions:
▶ People with elevated electrical sensitivity should not remain in the immediate vicinity of the appliance for longer than is necessary.
▶ If in any doubt, people with pacemakers or implanted medication pumps should consult their doctor about the harmlessness of using the appliance.
▶ Do not place any magnetisable objects, e.g. credit cards, data carriers or cassettes on or in the immediate vicinity of the appliance.
▶ Place cooking utensils in the middle of the hob, so that the base of the pot covers as much of the electromagnetic field as possible.
▶ Do not remove any coverings on the appliance.
12.3.2 Danger of Burning
⚠️WARNUNG
WARNING
The items cooked on this appliance as well as the cooking utensils used and the surface of the appliance can become very hot.
Adhere to the following safety instructions in order to avoid burning or scalding yourself or others:
▶ Protect your hands during all work at the hot appliance by using heat insulating gloves, dish cloths or similar.
▶ Do not place any metal cooking utensils, pot or pan lids, knives or other metal objects on the hob. When the appliance is switched on, these items can become very hot.
▶ Do not touch the hot surface of the ceramic hob. The induction cooker itself does not produce any heat during the cooking process, but the temperature of the cooking utensils heats the hob.
12.3.3 Danger of Explosion
⚠️WARNUNG
WARNING
Incorrect use of the appliance incurs a danger of explosion due to the overpressure produced.
Adhere to the following safety instructions in order to prevent a danger of explosion:
▶ Never heat food or liquids in sealed containers such as, for example, cans. The container can burst due to the overpressure generated. A can is best heated by opening it an placing it in a pot filled with a little water.
12.3.4 Danger of Fire
⚠️WARNUNG
WARNING
There is a risk of fire if the appliance is used incorrectly.
Adhere to the following safety instructions in order to avoid a risk of fire:
▶ During operation remove all easily inflammable items (e.g. detergents, aerosol cans, oven, cloths and dishcloths, etc.) from the immediate vicinity of the appliance.
▶ Avoid overheating oils and fats for extended periods. Overheated oil and fat can ignite rapidly.
▶ Do not place any empty cookware on the cooking area.
HINWEIS
Please note
If a fire should occur on the cooking hob, proceed as follows:
◆ Switch the appliance off (if necessary, switch off the fuse).
◆ Smother the flames with a large pot lid, plate or a moist dish cloth.
NEVER EXTINGUISH WITH WATER!
After the fire has been extinguished allow cooking utensils and the appliance to cool down and ensure that there is a sufficient flow of fresh air.
12.3.5 Dangers due to electrical power
⚠GEFAHR
Danger
Mortal danger due to electrical power!
Mortal danger exists when coming into contact with live wires or subassemblies!
Observe the following safety notices to avoid dangers due to electrical power:
▶ Only qualified electricians, may carry out the installation!
▶ If the connection lead is damaged, you will need to have a special connection lead installed by an authorized electrician.
▶ If the surface is cracked, switch off the appliance and switch off the fuse to avoid the possibility of electric shock.
Do not operate this device if its power cable or plug is damaged, if it does not work properly or if it is damaged or has been dropped. If the power cable is damaged, it will need to be replaced by the manufacturer or his service agency or a similar qualified person, to avoid any dangers.
▶ Do not open the housing on the device under any circumstances. There is a danger of an electrical shock if live connections are touched and the electrical or mechanical structure is altered. In addition, functional faults on the device can also occur.
▶ Do not touch the appliance or the mains plug with wet hands.
▶ Do not immerse the appliance in water or other liquids, and do not put it in the dishwasher.
▶ Do not insert objects into the openings of the appliance. There is a risk of electrocution if contact is made with voltage-carrying connections.
13 Commissioning
This chapter provides you with important safety notices during the initial commissioning of the device. Observe the following notices to avoid dangers and damages:
13.1 Safety information
⚠️WARNUNG
Warning
Personal and property damages can occur during commissioning of the device!
Observe the following safety notices to avoid such dangers:
▶ Packaging materials may not be used for playing. There is a danger of suffocation.
13.2 Delivery scope and transport inspection
- As a rule, the Master E3 is delivered with the following components:
- Induction cooker with 3 hobs for assembly
- 2 brackets and 2 screws for assembly
- Operating Instructions
HINWEIS
Please note
▶ Examine the shipment for its completeness and for any visible damages.
▶ Immediately notify the carrier, the insurance and the supplier about any incomplete shipment or damages as a result of inadequate packaging or due to transportation.
13.3 Unpacking
To unpack the device, remove the device out of the carton and remove the packaging material.
13.4 Disposal of the packaging

The packaging protects the device against damages during transit. The packaging materials are selected in accordance with environmentally compatible and recycling-related points of view and can therefore be recycled.
Returning the packaging back to the material loop saves raw materials and reduces the quantities of accumulated waste. Take any packaging materials that are no longer required to “Green Dot” recycling collection points for disposal.
HINWEIS Please note
▶ If possible, keep the original packaging for the device for the duration of the guarantee period of the device, in order that the device can be re-packaged properly in the event of a guarantee claim.
13.5 Setup
13.5.1 Setup location requirements:
In order to ensure the safe and trouble-free operation of the device, the setup location must fulfil the following prerequisites:
- The appliance is designated for assembly.
- The wall and induced heating zone above the table surface shall withstand heat. The safety distance between the hotplate and cupboard above should be at least 760 mm.
- The appliance must be positioned on a solid, even, horizontal and heat-resistant base with sufficient load-supporting capacity for the appliance itself plus the heaviest anticipated cooking contents. The thickness of the table surface is at least 30 mm.
- The induction cooker must not be operated on a base with an iron or steel content, as this can heat up considerably.
- Select an installation location where children cannot reach the appliance's hot surface.
- Do not set up the device in a hot, wet or extremely damp environment or near flammable material.
- Do not set up the induction cooker in the vicinity of appliance and objects which react sensitively to magnetic fields (e.g.: cooling equipment, dishwashers, rotary dryers, radios, televisions, cassette recorders, etc.).
- The installation and assembly of this device in non-stationary setup locations (e.g. on ships) must be carried out by specialist companies / electricians, provided they guarantee the prerequisites for the safe use of this device.
- To operate correctly, the appliance requires a sufficient flow of air. Leave a 50 mm gap on all sides when setting up the appliance.
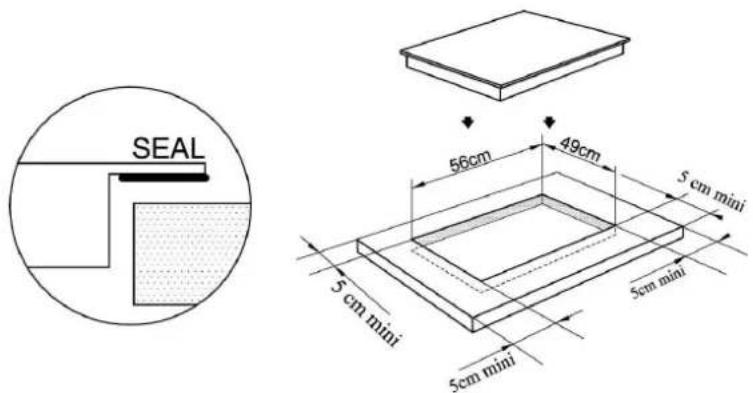
- Fix the hob on the table by screwing 2 brackets on the bottom of the hob after installation.
- Adjust the bracket position to suit for different table top thickness
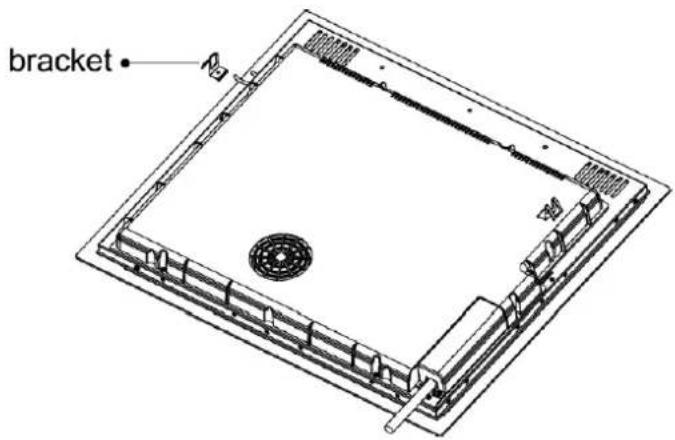
- The cool air is drawn in by the underside of the appliance. Do not cover or block any of the air openings (air intake and air exit).

| A(mm) | B(mm) | C(mm) | D | E |
| 760 50 | 20 Air intake | Air exit 5 mm |
13.5.2 Preventing Radio interference
The appliance can cause interference to radios, televisions or similar devices. Interference can be removed or reduced using the following measures:
- Place the radio, television etc. as far away from the appliance as possible.
- Connect the appliance to a different socket, so that different electric circuits are being used for the appliance and the receiver experiencing interference.
- Use a correctly installed aerial for the receiver in order to ensure good reception.
13.6 Electrical connection
In In order to ensure the safe and trouble-free operation of the device, the following instructions must be observed for the electrical connection:
- Before connecting the device, compare the connection data (voltage and frequency) on the rating plate with those of your electrical network. This data must agree in order that no damages occur in the device If in doubt, ask your qualified electrician.
- The electrical outlet must be protected by a 16A safety cut-out switch.
- The connection between the device and the electrical network may employ a 3 meter long (max.) extension cable with a cross-section of 1.5 mm 2 . The use of multiple plugs or gangs is prohibited because of the danger of fire that is involved with this.
- Make sure that the power cable is undamaged and has not been installed under the oven or over hot or sharp surfaces.
The electrical safety of the device is only guaranteed if the device is connected to a properly installed protective conductor system. Operations using an electrical outlet without a protective conductor are prohibited. If in doubt, have the house installation checked over by a qualified electrician.
The manufacturer cannot be made responsible for damages that are caused by a missing or damaged protective conductor.
14 Design and Function
This chapter provides you with important safety notices on the design and function of the device.
14.1 Complete overview
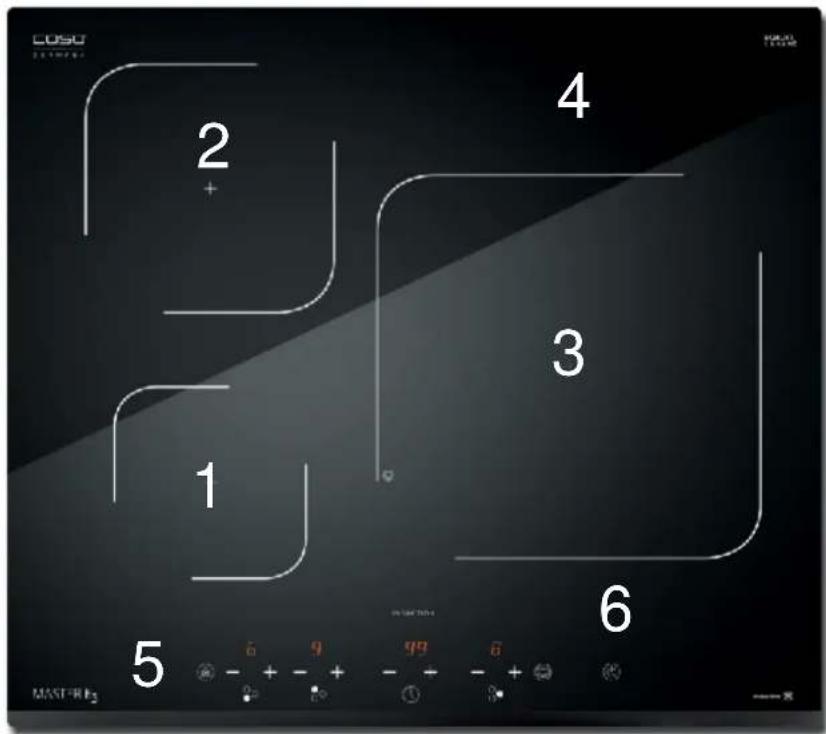
- max. 1500 W zone
- max. 2000 W zone
- max. 3000/3600 W zone
- ceramic hob
- panel
- An/Standby-button
14.1.1 Details on the device

This instruction and when "H" is displayed, is to warn that the ceramic hob may still be hot. Although the induction cooker itself does not generate any heat during the cooking process, the temperature of the cooking utensil does heat the hob!
Adhere to the following safety instructions in order to avoid being burnt by the hot appliance:
▲VORSICHT ATTENTION
Risk of burning due to hot surface!
▶ Do not touch the surface of the ceramic hob while it is still hot ("H" is displayed)
▶ Do not place any objects on the hot ceramic hob.
14.2 Operating elements and displays
14.2.1 Operating panels and Displays

The appliance emits an acoustic signal after being switched on and in the event of a fault.
14.2.3 Overheating Protection Facility
The appliance is equipped with an overheating protection facility. If the temperature of the appliance exceeds the critical limit the appropriate error message is displayed and an acoustic signal sounds. For safety reasons the appliance shuts off further power supply. After the cooling-down phase the appliance can be switched on again.
HINWEIS
▶ Do not place any empty cookware on the cooking area. Heating an empty pot or pan activates the overheating protection and the device turns off automatically.
14.2.4 Automatic shutdown protection
The device is equipped with an auto shut down safety protection function. If ever you forgot to turn off your hotplate, it shuts down automatically. The default working times for various power levels are:
| Power level | automatic shutdown after | |
| 1~3 | 8 | hours |
| 4~6 | 4 | hours |
| 7~9 | 2 | hours |
14.2.5 Rating plate
The rating plate with the connection and performance data can be founded on the back of the device.
15 Operation and Handing
This chapter provides you with important notices with regard to operating the device. Observe the following notices to avoid dangers and damages:
⚠️WARNUNG
Warning
▶ Do not leave the device unsupervised when it is in operation, so that you can intervene quickly in the event of dangers.
15.1 Functioning and Advantages of Induction Cookers
With an induction cooker the heat is not transferred by a heating element via the cooking utensil to the food to be cooked, but rather the necessary heat is generated directly in the cooking pot with the aid of induction currents.
An induction coil underneath the ceramic glass hob generates an alternating electromagnetic field, which penetrates the ceramic glass hob and induces the heat-generating current in the base of the cookware.
Advantages of the Induction Hob
- Energy-saving cooking due to direct energy transfer to the pot.
- Enhanced safety since energy is only transferred when a pot is placed on the hob.
- Energy transfer between the induction cooking zone and the base of the pot with high degree of efficiency.
- Rapid heating.
- Low risk of burning, since the cooking surface is only heated by the base of the pot.
- Boiling over pot contents does not burn onto the hob.
- Rapid, fine-tuned control of the input power.
15.2 Instructions on Cookware
The cooking pot used for the induction cooking surface must be made of metal, have magnetic characteristics and have a sufficient, flat bottom surface.
Here is how to decide if the pot is suitable:
Ensure that the pot bears an inscription stating its suitability for cooking with induction current, or perform the following magnet test:

Place a magnet (e.g. a magnet from a magnetic board) close to the base of your cooking pot. If it is strongly attracted then you can use the cooking pot on the induction hob.
The table below serves as a guide to help you choose the correct cooking utensils:
| Suitable Cookware | Unsuitable Cookware |
| Cookware with magnetic bottom (ferreous). | Pots made of copper, aluminium, heat-resistant glass and other non-metallic pots |
| Enamel-coated steel pots with thick bases | Pots made of stainless steel without a magnet iron core |
| Cast-iron pots with enamel-coated bases | Pots that do not sit flat on the hob |
| Pots made of stainless steel, multi-layered steel, stainless steel ferrite steel or aluminium with special base | Pots with a base diameter of less than 12 cm or more than 26 cm |
HINWEIS
Please
note
▶ Using the induction-compatible pots of some manufacturers can lead to the occurrence of noises that are due to the design of these pots.
VORSICHT
Attention
Please also adhere to the following instructions for using suitable cookware:
▶ Only use pots with an induction-compatible base.
The maximum permissible weight of all pots plus its contents must not exceed 18 kg.
▶ Be careful when using hollow-walled simmer pots. Pots of this type can boil dry unnoticed. This leads to damage to the pot and hob.
▶ Make sure that the bottom of the cookware does not scrape across the surface of the ceramic field, although a scratched surface does not impair the use of the device.
15.3 Safety Instructions
⚠️WARNUNG
Warning
▶ Do not leave the appliance unattended during operation, so that you can intervene quickly in the event of danger.
▶ Do not move the appliance during operation or with hot cookware on the hob.
▶ Ensure that the cookware is properly centred on the hob. It must not be positioned on the control panel or on the frame.
▶ In order to prevent overheating do not place any aluminium foil or metal panels on the appliance surface.
▶ Do not touch the hot surface of the ceramic hob. Although the induction cooker itself does not produce any heat during the cooking process, the temperature of the cookware does heat up the hob.
▶ Keep the hob and the underside of the pot clean and dry at all times. If liquid gets between the base of the pot and the hob, this liquid can vaporise and the resulting pressure can cause the pot to jump into the air, with a resulting risk of injury.
HINWEIS
▶ Switch the appliance off after use. This avoids unnecessary use of energy, and ensures your safety.
▶ If the appliance is unused for extended periods of time, we recommend that the appliance be unplugged from the mains.
15.4 Operating the Appliance
15.4.1 Using the Touch Controls

- The controls respond to touch, so you don't need to apply any pressure.
- Use the ball of your finger, not its tip.
- You will hear a beep each time a touch is registered.
- Make sure the controls are always clean, dry, and that there is no object (e.g. a utensil or a cloth) covering them. Even a thin film of water may make the controls difficult to operate.
15.4.2 Switching Off

The complete appliance is switched off using the Master On/Off switch (1).
Each hob is switched off by using the key “+” and “-” (2-4) simultaneously or choose power level “0”.
HINWEIS Please note
Note that the appliance's fan continues to operate for a while after the appliance has been switched off in order to dissipate the heat that has built up in the appliance.
15.4.3 Switching On

Press the Master On/Off switch (1), the keys light up “-” or “-” and an acoustic signal sounds. Now the device is in standby mode.
Place a suitable cooking pot with its contents to be cooked on the centre on the hob ( 120 mm - 260 mm).
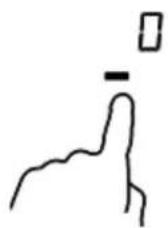
Now select the appropriate hob cooking zone button + / - (2-4).
15.4.4 Timer

You can use the timer in two different ways:
- You can use it as a minute minder. In this case, the timer will not turn any cooking zone off when the set time is up.
- You can set the timer for one cooking zone
- You can set the timer for up to 99 minutes.
15.4.5 Using the Timer as a Minute Minder

Press the Master On/Off switch (1), to switch the appliance on, than choose "Timer" (5).
With the + / - keys (5) you can now select the operating time in 1-minute intervals (up to max. 99 minutes).
Once the time is up, an acoustic signal sounds and the device automatically goes into standby mode
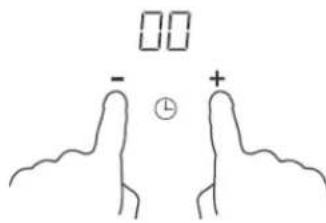
Hint: Touch the "+" control once to increase by 1 minute. Hold the "+" control to increase by 10 minutes.
Touch the "-" control once to decrease by 1 minute. Hold the "-" control to decrease by 10 minutes.
Touching the “-” and “+” together, the timer is cancelled, and the “00” will show in the minute display.
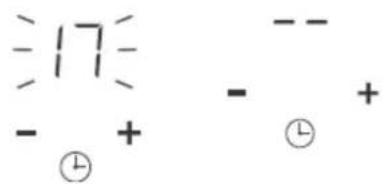
When the time is set, it will begin to count down immediately. The display will show the remaining time and the timer indicator will flash for 5 seconds.
Buzzer will bips for 30 seconds and the timer indicator shows “---” when the setting time finished.
15.4.6 Setting the timer to turn one cooking zone
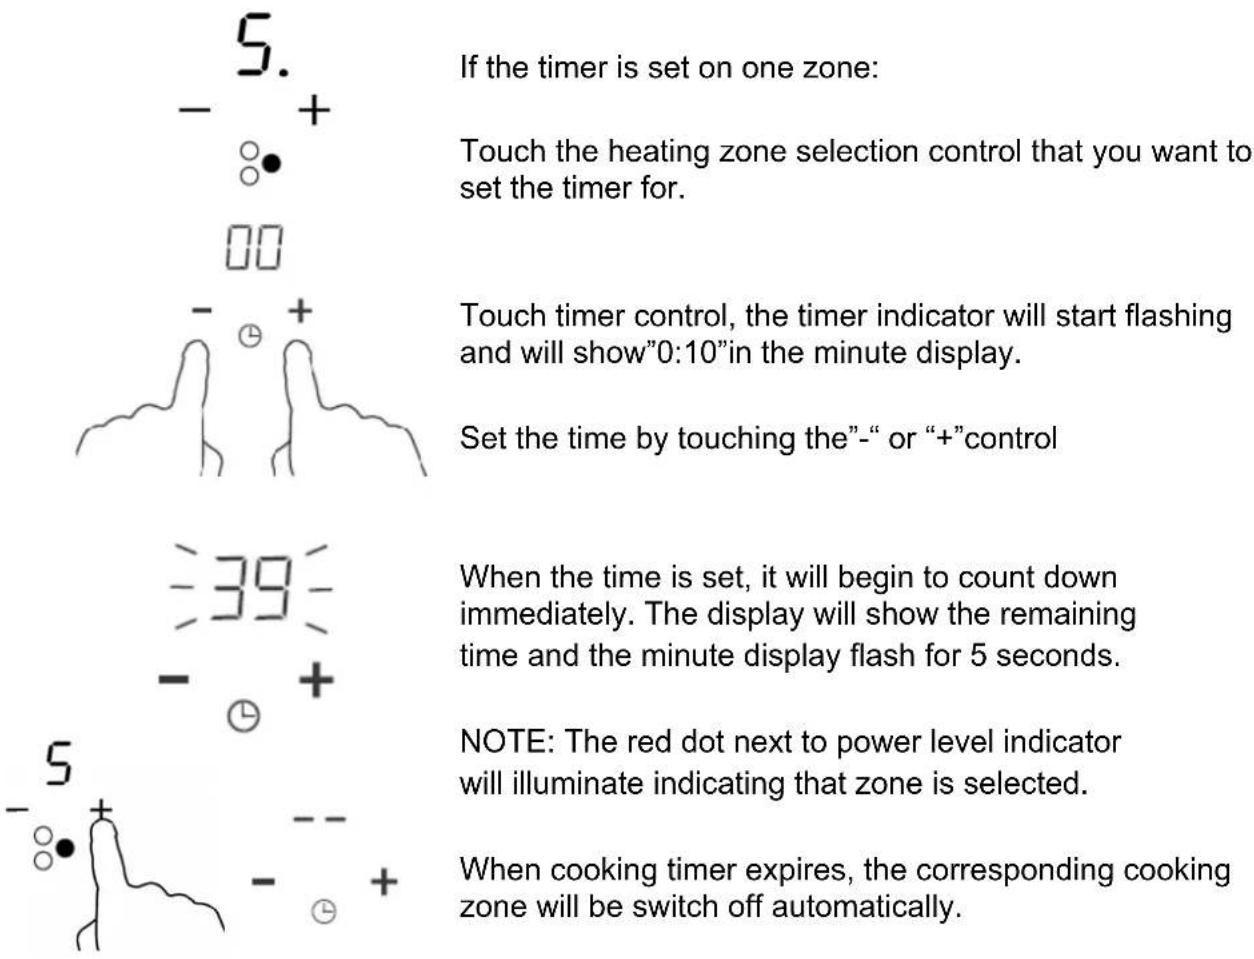
HINWEIS Please note
▶ During timer operation, you can change the duration at any time with the + / - keys (2) or the slide Control (3). With the memory function of the device, the power stage remain unchanged here.
▶ During the cooking process the power level and timer can be readjusted as you wish.
15.4.7 Booster

To reach the desired temperature very fast, press directly Booster (6), after selecting the power level. The display shows "P" and within the next 5 minutes additional booster power is reached. Afterwards the hob switches back to the pre-selected power level.

For de-activation of booster press again Booster (6) or"-(2-4) the hob switches back to the pre-selected power level.
Touching “-” and “+” control together. the cooking zone switch off and the boost function cancel automatically
15.4.8 Lock function (children lock key)
Activation of Lock function:
Press the Lock key (7) until the timer shows "Lo". All keys will be blocked except Master On/Off (1), to avoid mal-operation. After locking, induction hotplates continue to heat in the preset power stage. Also the timer continues counting.
De-activation of Lock function:
Press the Lock key (7) for ca. 2 sec. until all keys are free to use again.
16 Cleaning and Maintenance
This chapter provides you with important notices with regard to cleaning and maintaining the device. Please observe the notices to prevent damages due to cleaning the device incorrectly and to ensure trouble-free operation.
16.1 Safety information
▲VORSICHT Attention
Please observe the following safety notices, before you commence with cleaning the device:
The device must be cleaned and food residues must be removed at regular intervals. If the device is not maintained in a clean condition, this will have a detrimental effect on the service life of the device and can also result in a dangerous condition in the device as well as in the growth of fungus and bacteria.
▶ Switch the device off prior to cleaning it and unplug the plug from the wall power outlet.
The hob can be hot after use. There is a danger of burning! Wait until the appliance has cooled down.
▶ Clean the hob after use as soon as it has cooled down. Extended waiting unnecessarily complicates cleaning and can make it impossible in extreme cases. Excessive accumulations of dirt can even damage the device under certain circumstances.
▶ If dampness penetrates into the device, this can damage the electronic components. Please ensure that no liquid can enter the interior of the device through the ventilation slots.
▶ Do not immerse the appliance, its cables and the plug in water or other liquids, and do not put it in the dishwasher.
▶ Do not use any aggressive or abrasive cleaning agents or solvents.
▶ Do not scrape off stubborn dirt with hard items.
16.2 Cleaning
◆ Ceramic hob, Housing and Operating Panel
Clean the hob, the housing of the device and the operating panel with a soft, slightly damp cloth or a mild detergent. If there are accumulations of dirt, apply white vinegar to the polluted zone.
▲VORSICHT Attention
In order not to damage the plastic components, do not use any solvent-based cleaning detergents such as, for example, petrol.
▶ Do not use any flammable, acidity or alkaline materials or substances near the device, as this may reduce the service life of the device and lead to deflagration when the device is turned on.
17 Troubleshooting
This chapter provides you with important notices with regard to operating the device. Observe the following notices to avoid dangers and damages:
17.1 Safety notices
▲VORSICHT Attention
▶ Only qualified electricians, who have been trained by the manufacturer, may carry out any repairs on electrical equipment.
▶ Improperly performed repairs can cause considerable dangers for the user and damages to the device.
17.2 Causes and rectification of faults
In the event of a fault, an error code will appear in the display; it describes the cause of the fault.
The following table assists in localizing and rectifying minor faults.
| Fault Possible Cause To Rectify | ||
| E1/E2 | Abnormal supply voltage. | ► Make sure the appliance is connected to the voltage indicated |
| E3/E4 | Abnormal temperature | ► Please inspect the pot |
| E5/E6 | Bad hotplate heat radiation | ► Please restart after hotplate has cooled down |
| F3-F8 Thermostat failure | ► Please restart after hotplate has cooled down. | |
| F9-FE | Temperature sensor failure | ► Please restart after hotplate has cooled down. |
HINWEIS
Please note
▶ If error messages continue to be displayed after an extended waiting period or after restarting the appliance, then it must be sent to Customer Service to be examined.
▶ If you are unable to solve the problem with the steps shown above, please contact Customer Service.
18 Disposal of the Old Device
Old electric and electronic devices frequently still contain valuable materials. However, they also contain damaging substances, which were necessary for their functionality and safety.
If these were put in the non-recyclable waste or were handled incorrectly, they could be detrimental to human health and the environment. Therefore, do not put your old device into the non-recyclable waste under any circumstances.
HINWEIS Please note
▶ Utilise the collection point, established in your town, to return and recycle old electric and electronic devices. If necessary, contact your town hall, local refuse collection service or your dealer for information.
▶ Ensure that your old device is stored safely away from children until it is taken away.
19 Guarantee
We provide a 24 month guarantee for this product, commencing from the date of sale, for faults which are attributable to production or material faults.
Your legal guarantee entitlements in accordance with § 439 ff. BGB-E remain unaffected by this.
The guarantee does not include damages, which were incurred as a result of improper handling or use, as well as malfunctions which only have a minor effect on the function or the value of the device. Consumables, transit damages, inasmuch as we are not responsible for these, as well as damages, which were incurred as a result of any repairs that were not performed by us, are also excluded from the guarantee entitlements.
This device is designed for use in domestic situations and has the appropriate performance levels.
Any use in commercial situations is only covered under the guarantee to the extent that it would be comparable with the stresses of being used in a domestic situation. It is not intended for any additional, commercial use.
In the event of justified complaints, we will repair the faulty device at our discretion or replace it with a trouble-free device.
Any pending faults must be reported within 14 days of delivery. All further claims are excluded.
To enforce a guarantee claim, please contact us prior to returning the device (always provide us with proof of purchase).
20 Technical Data
| Device | Induction cooker with 3 hobs for assembly |
| Name | Master E3 |
| Model | MC-IT7116A |
| Item No.: | 3045 |
| Mains data | 220-240V 50/60Hz |
| Power consumption | 7100 Watt |
| External measurements(W x H x D): | 590 x 56,5 x 520 mm |
| Assembly dimensions | 560 x 490 mm |
| Net weight | 9,0 kg |
21 Mode d'emploi
21.1 Généralités


31 Istruzione d'uso
31.1 In generale

HINWEIS
▲WARNUNG WAARSCHUWING
▲WARNUNG WAARSCHUWING


- ORIGINAL OPERATING MANUAL
- INDUCTION COOKER WITH THREE HOBS FOR ASSEMBLY MASTER E3
- 11 OPERATING MANUAL
- 11.1 GENERAL
- 11.2 INFORMATION ON THIS MANUAL
- 11.3 WARNING NOTICES
- ⚠GEFAHR
- DANGER
- A WARNING NOTICE OF THIS LEVEL OF DANGER INDICATES A POTENTIALLY DANGEROUS SITUATION
- ⚠️WARNUNG
- WARNING
- A WARNING NOTICE OF THIS LEVEL OF DANGER INDICATES A POSSIBLE DANGEROUS SITUATION
- ▲VORSICHT
- ATTENTION
- HINWEIS
- PLEASE
- NOTE
- 11.4 LIMITATION OF LIABILITY
- 11.5 COPYRIGHT PROTECTION
- 12 SAFETY
- 12.1 INTENDED USE
- ⚠️WARNUNG WARNING
- DANGER DUE TO UNINTENDED USE
- 12.2 GENERAL SAFETY INFORMATION
- PLEASE NOTE
- PLEASE OBSERVE THE FOLLOWING GENERAL SAFETY NOTICES WITH REGARD TO THE SAFE HANDLING OF THE DEVICE
- 12.3 SOURCES OF DANGER
- 12.3.1 DANGER DUE TO ELECTROMAGNETIC FIELD
- THE MAGNETIC FIELDS GENERATED DURING OPERATION OF THE APPLIANCE MAY LEAD TO ADVERSE EFFECTS
- 12.3.2 DANGER OF BURNING
- THE ITEMS COOKED ON THIS APPLIANCE AS WELL AS THE COOKING UTENSILS USED AND THE SURFACE OF THE APPLIANCE CAN BECOME VERY HOT
- 12.3.3 DANGER OF EXPLOSION
- INCORRECT USE OF THE APPLIANCE INCURS A DANGER OF EXPLOSION DUE TO THE OVERPRESSURE PRODUCED
- 12.3.4 DANGER OF FIRE
- 12.3.5 DANGERS DUE TO ELECTRICAL POWER
- MORTAL DANGER DUE TO ELECTRICAL POWER
- 13 COMMISSIONING
- 13.1 SAFETY INFORMATION
- PERSONAL AND PROPERTY DAMAGES CAN OCCUR DURING COMMISSIONING OF THE DEVICE
- 13.2 DELIVERY SCOPE AND TRANSPORT INSPECTION
- 13.3 UNPACKING
- 13.4 DISPOSAL OF THE PACKAGING
- HINWEIS PLEASE NOTE
- 13.5 SETUP
- 13.5.1 SETUP LOCATION REQUIREMENTS
- 13.5.2 PREVENTING RADIO INTERFERENCE
- 13.6 ELECTRICAL CONNECTION
- 14 DESIGN AND FUNCTION
- 14.1 COMPLETE OVERVIEW
- 14.1.1 DETAILS ON THE DEVICE
- ▲VORSICHT ATTENTION
- RISK OF BURNING DUE TO HOT SURFACE
- 14.2 OPERATING ELEMENTS AND DISPLAYS
- 14.2.1 OPERATING PANELS AND DISPLAYS
- 14.2.3 OVERHEATING PROTECTION FACILITY
- 14.2.4 AUTOMATIC SHUTDOWN PROTECTION
- 14.2.5 RATING PLATE
- 15 OPERATION AND HANDING
- 15.1 FUNCTIONING AND ADVANTAGES OF INDUCTION COOKERS
- ADVANTAGES OF THE INDUCTION HOB
- 15.2 INSTRUCTIONS ON COOKWARE
- HERE IS HOW TO DECIDE IF THE POT IS SUITABLE
- VORSICHT
- 15.3 SAFETY INSTRUCTIONS
- 15.4 OPERATING THE APPLIANCE
- 15.4.1 USING THE TOUCH CONTROLS
- 15.4.2 SWITCHING OFF
- 15.4.3 SWITCHING ON
- 15.4.4 TIMER
- 15.4.5 USING THE TIMER AS A MINUTE MINDER
- 15.4.6 SETTING THE TIMER TO TURN ONE COOKING ZONE
- 15.4.7 BOOSTER
- 15.4.8 LOCK FUNCTION (CHILDREN LOCK KEY)
- ACTIVATION OF LOCK FUNCTION
- DE-ACTIVATION OF LOCK FUNCTION
- 16 CLEANING AND MAINTENANCE
- 16.1 SAFETY INFORMATION
- 16.2 CLEANING
- ◆ CERAMIC HOB, HOUSING AND OPERATING PANEL
- 17 TROUBLESHOOTING
- 17.1 SAFETY NOTICES
- 17.2 CAUSES AND RECTIFICATION OF FAULTS
- 18 DISPOSAL OF THE OLD DEVICE
- 19 GUARANTEE
- 21 MODE D'EMPLOI
- 21.1 GÉNÉRALITÉS
- 31 ISTRUZIONE D'USO
- 31.1 IN GENERALE
- ▲WARNUNG WAARSCHUWING
Brand : CASO
Model : Master E3
Category : Cooker