FH G IX/HA - Built-in oven HOTPOINT - Free user manual and instructions
Find the device manual for free FH G IX/HA HOTPOINT in PDF.
| Product type | Built-in oven |
| Brand | Hotpoint |
| Model | FH G IX/HA |
| Dimensions (W x H x D) | 43.5 cm x 31 cm x 43.5 cm |
| Capacity | 58 L |
| Approximate weight | 35 kg |
| Electrical supply | 230 V ~ 50 Hz |
| Gas supply | Natural gas (G20/G25) or liquid gas (G30/G31), adaptable |
| Oven burner power | 2.60 kW (nominal) / 1.00 kW (reduced) |
| Ignition type | Built-in electronic, manual ignition possible in case of power failure |
| Gas safety | Safety thermocouple: gas shut-off if flame goes out |
| Cooking functions | Gas cooking (oven), electric grill, rotisserie (depending on model) |
| Interior lighting | 25 W bulb, E14 base, replaceable |
| Timer | Mechanical audible timer (independent of cooking) |
| Removable door | Yes, for easy cleaning |
| Cleaning | Exterior: damp sponge and mild soap; interior: hot water and detergent; door: non-abrasive products; accessories dishwasher safe |
| Installation class | Class 3 (built-in) |
| Repairability index | Not communicated |
Frequently Asked Questions - FH G IX/HA HOTPOINT
User questions about FH G IX/HA HOTPOINT
0 question about this device. Answer the ones you know or ask your own.
Ask a new question about this device
Download the instructions for your Built-in oven in PDF format for free! Find your manual FH G IX/HA - HOTPOINT and take your electronic device back in hand. On this page are published all the documents necessary for the use of your device. FH G IX/HA by HOTPOINT.
USER MANUAL FH G IX/HA HOTPOINT
Electrical connection
Gas connection
Data plate
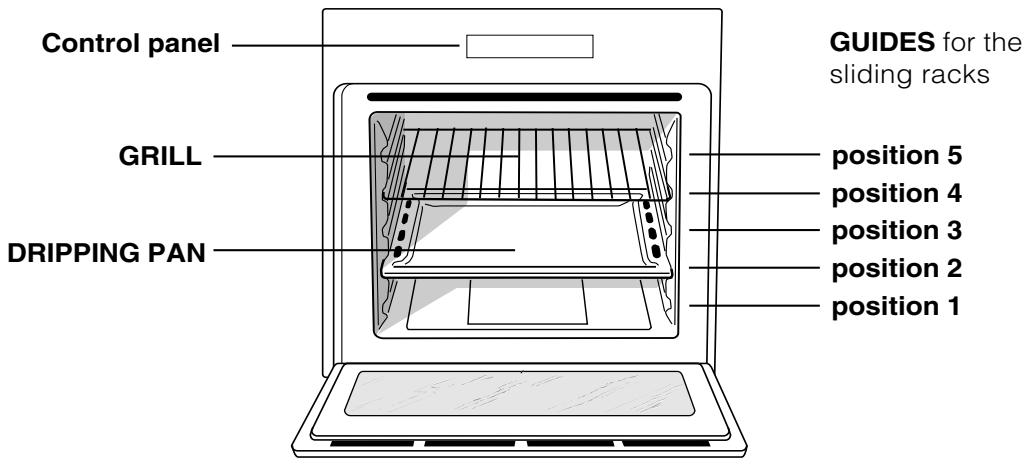
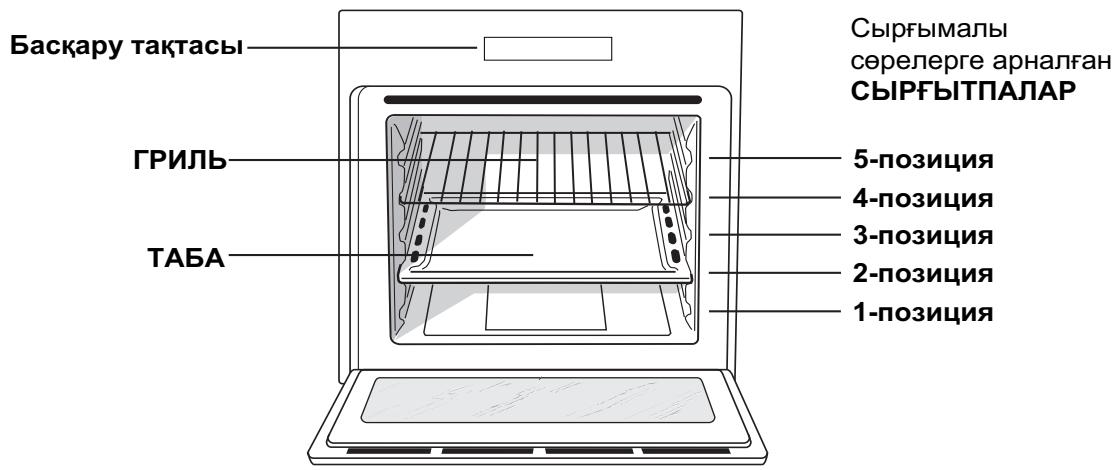
Description of the appliance, 18
Overall view
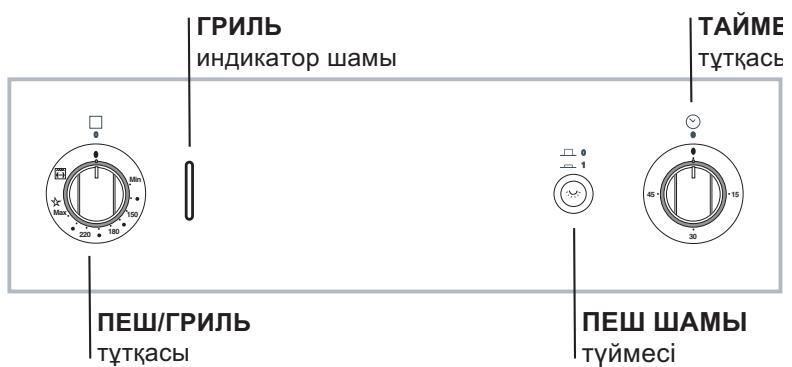
Control panel
Start-up and use, 19-20
Starting the oven
How to use the timer
Burner and nozzle specifications
Cooking modes, 21
Cooking modes
Practical cooking advice
Cooking advice table
Precautions and tips, 22
General safety
Disposal
Respecting and conserving the environment
Maintenance and care, 23
Switching the appliance off
Cleaning the appliance
Cleaning the oven door
Replacing the light bulb
Assistance
GB
ZG/HA
FZGIX/HA
FBG/HA
FBGIX/HA
FR G/HA
FRGIX/HA
FR G0 /HA
FR G0 IX /HA
FH G/HA
FHGIX/HA
FHR G/HA

GB
! Before operating your new appliance please read this instruction manual carefully. It contains important information for safe use, installation and care of the appliance.
! Please keep these operating instructions for future reference. Pass them on to possible new owners of the appliance.
Positioning
! Keep packaging material out of the reach of children. It can become a choking or suffocation hazard (see Precautions and tips).
! The appliance must be installed by a qualified person according to the instructions provided. Incorrect installation may cause harm to people and animals or may damage property.
! This appliance should only be installed and used in permanently ventilated rooms in compliance with current National regulations. The following requirements must be observed:
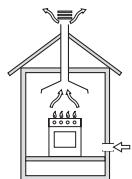
- The room must be equipped with an air extraction system that expels any combustion fumes. This may consist of a hood or an electric fan that automatically starts each time the appliance is switched on.
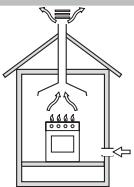
In a chimney stack or branched flue. exclusively for cooking appliances
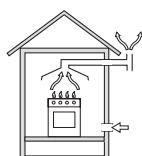
Directly to the Outside
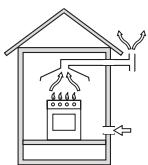
- The room must also allow proper air circulation, as air is needed for combustion to occur normally. The flow of air needed for combustion must not be less than 2 ~m^3 / h per kW of installed power.
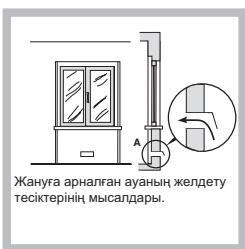
Examples of ventilation holes for combustant air.
The air circulation system may take air directly from the outside by means of a pipe with an inner cross section of at least 100~cm^2 ; the opening must not be vulnerable to any type of blockages.
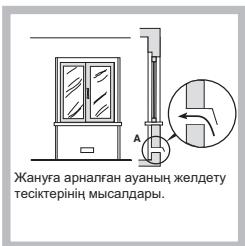
Examples of ventilation holes for combustant air.
The system can also provide the air needed for combustion indirectly, i.e. from adjacent rooms fitted with air circulation tubes as described above. However, these rooms must not be communal rooms, bedrooms or rooms that may present a fire hazard.
- Liquid petroleum gas sinks to the floor as it is heavier than air. Therefore, rooms containing LPG cylinders must also be equipped with vents to allow gas to escape in the event of a leak. As a result LPG cylinders, whether partially or completely full, must not be installed or stored in rooms or storage areas that are below ground level (cellars, etc.). It is a good idea to keep only the cylinder being used in the room, positioned so that it is not subject to heat produced by external sources (ovens, fireplaces, stoves, etc.) which could raise the temperature of the cylinder above 50^ .
Fitting the appliance
Use a suitable kitchen unit to ensure that the appliance functions properly.
- The panels adjacent to the oven must be made from heat-resistant material.
- Cabinets with a veneer exterior must be assembled with a glue that can withstand temperatures of up to 100^ .
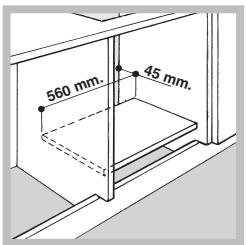
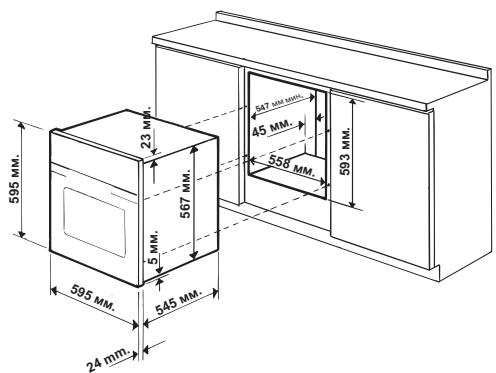
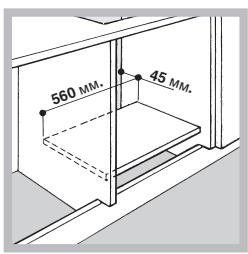
- To install the oven under the counter (see diagram) or in a kitchen unit, the cabinet must have the following dimensions:
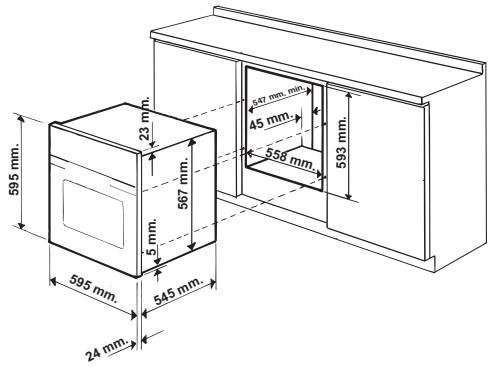
! The appliance must not come into contact with electrical parts once it has been installed. The figures indicated on the data plate have been calculated for this type of installation.
Ventilation
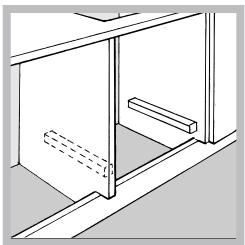
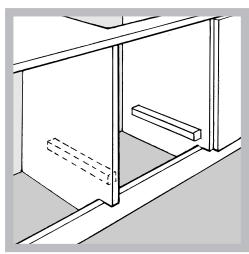
To ensure adequate ventilation, the back panel of the cabinet must be removed. It is advisable to install the oven so that it rests on two strips of wood, or on a completely flat surface with an opening of at least 45 × 560 mm (see diagrams).
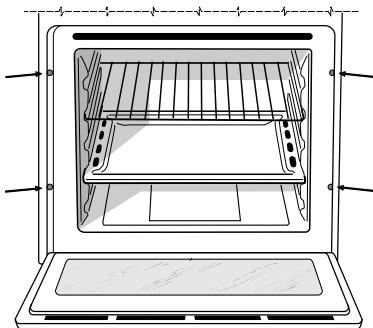
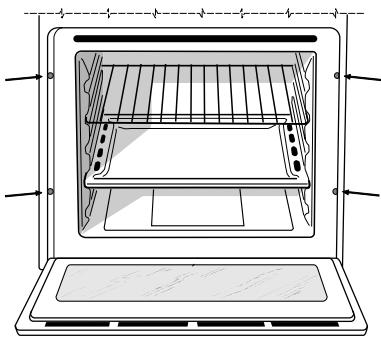
Centring and fastening
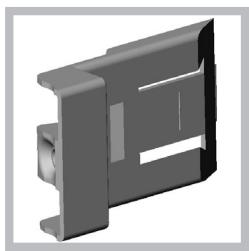
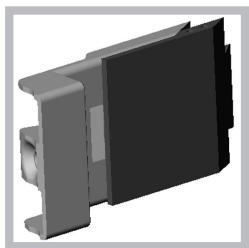
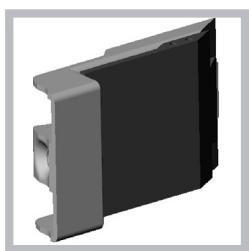
Position the 4 tabs on the side of the oven according to the 4 holes on the outer frame. Adjust the tabs according to the thickness of the cabinet side panel, as shown below:
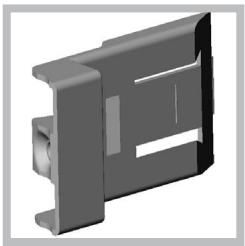
20 mm thick: take off the removable part of the tab (see diagram).
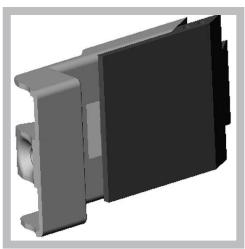
18 mm thick: use the first groove, which has already been set in the factory (see diagram).
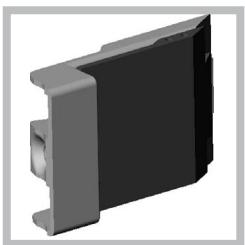
16 mm thick: use the second groove (see diagram).
Secure the appliance to the cabinet by opening the oven door and fastening 4 screws into the 4 holes of the outer frame.
! All parts ensuring the safe operation of the appliance must not be removable without the aid of a tool.
Electrical connections
! Ovens equipped with a three-pole power supply cable are designed to operate with alternating current at the voltage and frequency indicated on the data plate located on the appliance (see below).
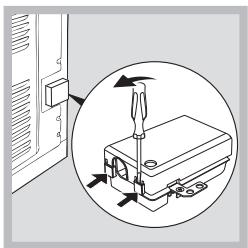
Fitting the power supply cable
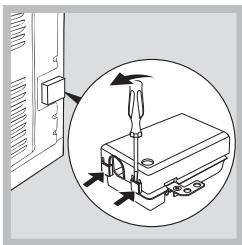
- Open the terminal board by inserting a screwdriver into the side tabs of the cover. Use the screwdriver as a lever by pushing it down to open the cover (see diagram).
- Loosen the cable clamp screw and remove it, using a screwdriver as a lever (see figure).
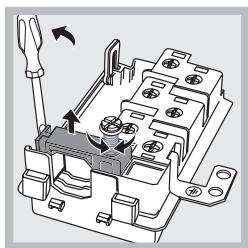
- Remove the wire contact screws L-N- 1± , then fasten the wires under the screw heads, respecting the colour code: Blue (N), Brown (L) and Yellow-Green Verde (1±)
Connecting the supply cable to the mains
Install a standardised plug corresponding to the load indicated on the data plate (see adjacent box). The appliance must be directly connected to the mains using an omnipolar circuit-breaker with a minimum contact opening of 3mm installed between the appliance and the mains. The circuit-breaker must be suitable for the charge indicated and must comply with current electrical regulations (the earthing wire must not be interrupted by the circuit-breaker). The supply cable must not come into contact with surfaces with temperatures higher than 50^ .
! The installer must ensure that the correct electrical connection has been made and that it is compliant with safety regulations.
Before connecting to the power supply, make sure that:
- the appliance is earthed and the plug is compliant with the law.
- the socket can withstand the maximum power of the appliance, which is indicated on the data plate (see below).
- the voltage is in the range between the values indicated on the data plate (see below).
- the socket is compatible with the plug of the appliance. If the socket is incompatible with the plug, ask an authorised technician to replace it. Do not use extension cords or multiple sockets.
! Once the appliance has been installed, the power supply cable and the electrical socket must be easily accessible.
! The cable must not be bent or compressed.
! The cable must be checked regularly and replaced by authorised technicians only (see Assistance).
! The manufacturer declines any liability should these safety measures not be observed.
Gas connection
The appliance should be connected to the main gas supply or to a gas cylinder in compliance with current National regulations. Before carrying out the connection, make sure the cooker is compatible with the gas supply you wish to use. If this is not the case, follow the instructions indicated in the paragraph "Adapting to different types of gas." When using liquid gas from a cylinder, install a pressure regulator that complies with current National regulations.
! Check that the pressure of the gas supply is consistent with the values indicated in Table 1 ("Burner and nozzle specifications") since this will ensure the safe operation and longevity of your appliance while maintaining efficient energy consumption.
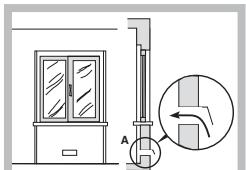
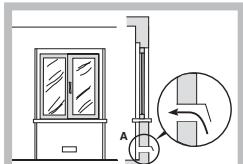
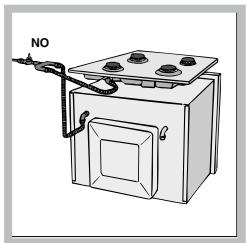
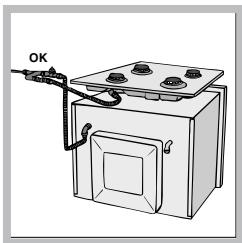
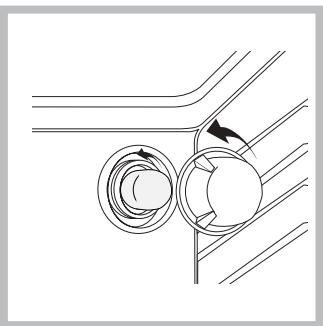
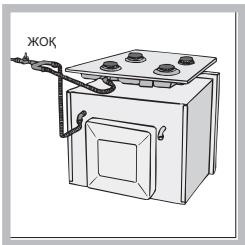
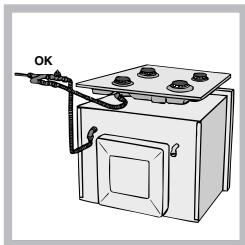
! Should you need to install a gas hob on top of a built-in gas oven, it is strictly forbidden to connect the two or to use a single cut-off tap. The two appliances should be connected separately, and each one should have its own stop tap in order to make them completely independent from one another (see figures).
Connection with a rigid pipe (copper or steel)
! Connection to the gas system must be carried out in such a way as not to place any strain of any kind on the appliance.
There is an adjustable L-shaped pipe fitting on the appliance supply ramp and this is fitted with a seal in order to prevent leaks. The seal must always be replaced after rotating the pipe fitting (the seal is provided with the appliance). The gas supply pipe fitting is a threaded 1/2 gas cylindrical male attachment.
Connecting a flexible jointless stainless steel pipe to a threaded attachment
The gas supply pipe fitting is a threaded 1/2 gas cylindrical male attachment.
These pipes must be installed so that they are never longer than 2000mm when fully extended. Once connection has been carried out, make sure that the flexible metal pipe does not touch any moving parts and is not compressed.
! Only use pipes and seals that comply with current National regulations.
Checking the tightness of the connection
! When installation has been completed, check the pipe fittings for leaks using a soapy solution. Never use a flame.
Adapting to different types of gas
In order to adapt the oven to a type of gas other than the type for which it was manufactured (indicated on the label), follow these simple steps:
- Replacing the oven burner nozzle
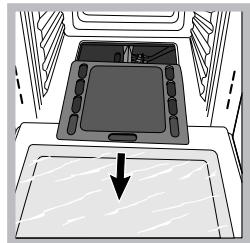
- Open the oven door fully.

- Slide out the bottom of the oven.
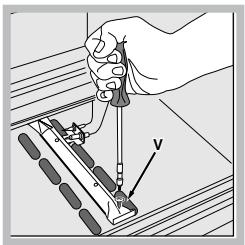
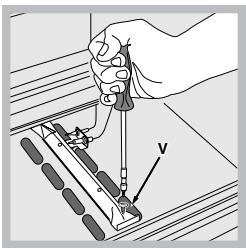
- Unscrew the burner fastening screws.
- Remove screw "V" and then the oven burner.
-
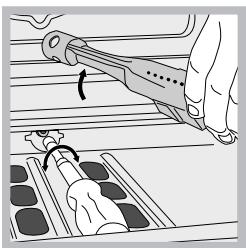
Unscrew the oven burner nozzle using the special socket spanner for the nozzles, or better still a 7 mm socket spanner, and replace it with a nozzle suited to the new type of gas (see Table 1).
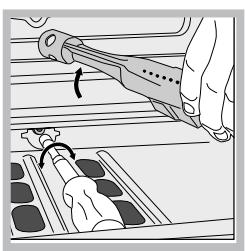
-
Replace all the parts, following the steps described above in the reverse order.
! Take particular care when handling the spark plug wires and the thermocouple pipes.
- Primary air regulation for the oven burner The burner was designed not to need any adjustments to the primary air.
-
Setting the oven burner to minimum
-
Turn the knob first to the Max setting for about 10 minutes and then to Min.
- Remove the knob.
- Remove the disk fastened to the control panel.
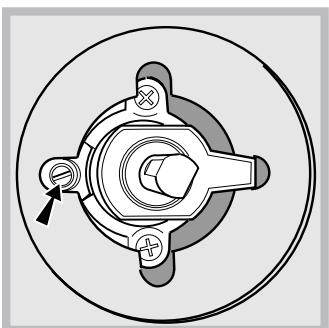
- Adjust the screw located outside the thermostat cock pin until the flame is small but steady (the flame can be seen through the slots on the oven bottom).
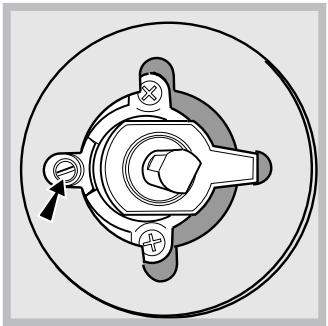
- Make sure the burner does not switch off when you turn the knob from Max to Min quickly, or when you open and close the oven door quickly.
! If the appliance is connected to liquid gas, the regulation screw must be fastened as tightly as possible.
! Once this procedure is finished, replace the old rating sticker with one indicating the new type of gas used. This sticker is available from any of our Service Centres.
! If the gas pressure is different from the recommended pressure, a suitable pressure regulator must be fitted to the inlet pipe in accordance with current National Regulations.
| DATA PLATE | |
| Dimensions | width 43.5 cm height 31 cm depth 43.5 cm |
| Volume | 58 l |
| Electrical connections | see data plate |
| Gas features | see data plate |
| CE | This appliance conforms to the following European Economic Community directives: 2006/95/EEC dated 12/12/06 (Low Voltage) and subsequent amendments - 89/336/EEC dated 03/05/89 (Electromagnetic compatibility) and subsequent amendments - 93/68/EEC dated 22/07/93 and subsequent amendments. 90/336/EEC dated 29.06.90 (Gas) and subsequent amendments. 2002/96/EC |
GB
Overall view
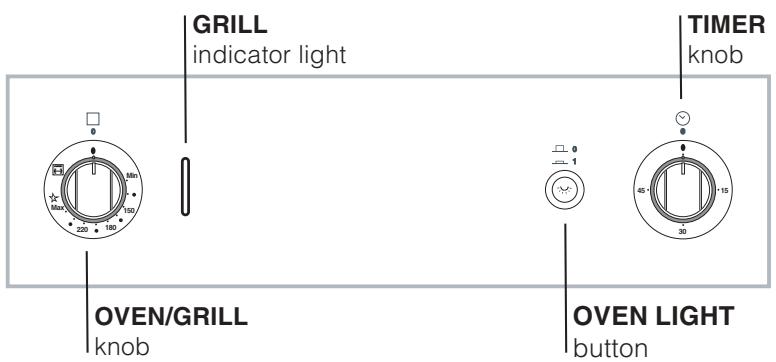
Control panel
! The first time you use your appliance, heat the empty oven with its door closed at its maximum temperature for at least half an hour. Ensure that the room is well ventilated before switching the oven off and opening the oven door. The appliance may produce a slightly unpleasant odour caused by the burning away of protective substances used during the manufacturing process.
Starting the oven
This knob is used not only to select the different oven modes, but also to choose the right cooking temperature for various foods from among the temperatures shown on the knob itself (the range is from 140^ to 240^ inclusive). The electronic ignition device of the oven is built into the control knob. To light the oven burner, press the OVEN knob in as far as possible and turn it anti-clockwise, setting it to position (keeping the oven door shut). The oven is equipped with a safety device. After lighting the burner allow the gas to circulate until the safety thermocouple is heated by keeping the OVEN knob pressed in for about 6 seconds.
! The electronic ignition device of the oven burner must not be activated for more than 15 seconds. If the burner fails to light after 15 seconds, stop pressing the OVEN knob, open the oven door and wait for at least one minute before you try to light the burner again.
The cooking temperature is selected by matching the desired temperature with the reference mark on the control panel; the complete range of temperatures is shown below:
| Min | • | 150 | • | 180 | • | 220 | • | Max |
| 140 | 145 | 160 | 200 | 230 | 240 |
The oven will automatically reach the temperature set, and the thermostat, which is controlled by the knob, will keep the temperature constant.
Switching the oven on manually
In the event of a power failure, the oven burner can be lit manually:
- Open the oven door.
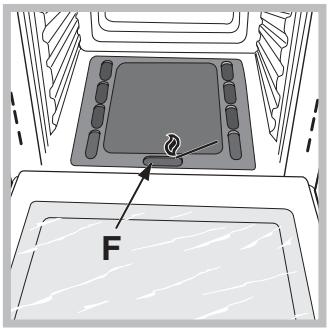
- Hold a match or lighter near the burner hole as shown in the figure, press knob F (see figure) in fully and turn it anticlockwise, setting it to the Max position.
The oven is equipped with a safety device. After lighting the burner allow the gas to circulate until the safety thermocouple is heated by keeping the OVEN knob pressed in for about 6 seconds.
- Once the burner is lit, shut the oven door.
If the burner flame is accidentally extinguished, turn the OVEN control knob to the off position, open the oven door and wait for at least one minute before trying to light the burner again.
The GRILL knob
Your oven is equipped with an electric grill. The extremely high and direct temperature of the grill makes it possible to brown the surface of meats and roasts while locking in the juices to keep them tender. The grill is also highly recommended for dishes that require a high surface temperature: beef steaks, veal, rib steak, fillets, hamburgers etc...
Some examples of how the grill may be used are included in the "Practical Cooking Advice" section.
! When using the grill, the oven door must be kept shut.
! Never put objects directly on the bottom of the oven - this could result in damage to the enamel coating.
! Always place cookware on the rack(s) provided.
Cooling ventilation
In order to cool down the external temperature of the oven, some models are fitted with a cooling fan that blows air out between the control panel and the oven door.
! Once the cooking has been completed, the cooling fan remains on until the oven has cooled down sufficiently.
Turnspit (only available in certain models)
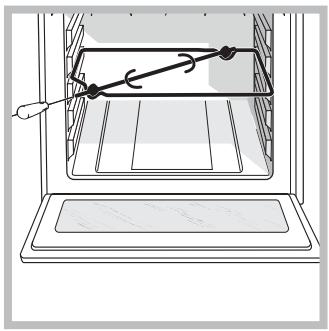
To operate the rotisserie (see diagram) proceed as follows: 1. Place the dripping pan in position 1. 2. Place the rotisserie support in position 3 and insert the spit in the hole provided on the back panel of the oven.
- Start the rotisserie using the knob to select

Oven light
This is switched on by pressing the LIGHT button.
How to use the timer
- To set the buzzer, turn the TIMER knob clockwise almost one complete revolution.
- Turn the knob anticlockwise to set the desired time: align the minutes shown on the knob with the indicator on the control panel.
- The timer operates in minutes: when the selected time has elapsed, a buzzer will sound.
! The timer does not switch the oven on or off.
Burner and Nozzle specifications
| Table 1 | Liquid gas | Natural gas | ||||||
| Burner | Thermal Power kW (gross heat value)* | By-pass 1/100 | Nozzle 1/100 | Flow* g/h | Nozzle 1/100 | Flow* l/h | ||
| Nominal | Reduced | (mm) | *** | ** | (mm) | |||
| Oven | 2,60 | 1,00 | 49 | 78 | 189 | 186 | 119 | 248 |
| Supply pressures | Nominal (mbar) | 28-30 | 37 | 20 | ||||
| Minimum (mbar) | 20 | 25 | 17 | |||||
| Maximum (mbar) | 35 | 45 | 25 | |||||
- At 15^ C and 1013 mbar-dry gas
Propane P.C.S. = 50.37 MJ/Kg
* Butane P.C.S. = 49.47 MJ/Kg
Natural P.C.S. = 37.78 MJ/m³
Cooking modes
GRILL mode
The top heating element comes on. The extremely high and direct temperature of the grill makes it possible to brown the surface of meats and roasts while locking in the juices to keep them tender. The grill is also highly recommended for dishes that require a high surface temperature: beef steaks, veal, rib steak, fillets, hamburgers etc... Always cook in this mode with the oven door closed.
Practical cooking advice
! In the GRILL cooking mode, place the dripping pan in position 1 to collect cooking residues (fat and/or grease).
GRILL
- Place the grill in position 3 or 4, making sure that the food is in the centre of the grill.
- We recommend that you set the maximum power level. The top heating element is regulated by a thermostat and may not always be on.
PIZZA
- Use a light aluminium pizza pan. Place it on the rack provided. For a crispy crust, do not use the dripping pan (prevents crust from forming by extending cooking time).
- If the pizza has a lot of toppings, we recommend adding the mozzarella cheese to the top of the pizza halfway through the cooking process.
Cooking advice table
| Selector knob setting | Food to be cooked | Weight (in kg) | Cooking rack position from oven bottom | Preheating time (minutes) | Thermostat knob setting | Cooking time (minutes) |
| Oven | Lasagne | 2,5 | 3 | 10 | 200 | 55-60 |
| Cannelloni | 2,5 | 3 | 10 | 200 | 40-45 | |
| Pasta bakes | 2,2 | 3 | 10 | 200 | 50-55 | |
| Veal | 1,7 | 2 | 10 | 210 | 80-90 | |
| Chicken | 1,5 | 3 | 10 | 200 | 70-80 | |
| Turkey roll | 2,5 | 3 | 10 | 200 | 80-90 | |
| Duck | 1,8 | 3 | 10 | 200 | 90-100 | |
| Rabbit | 2,0 | 3 | 10 | 200 | 80-90 | |
| Pork loin | 1,5 | 3 | 10 | 200 | 70-80 | |
| Leg of lamb | 1,8 | 3 | 10 | 200 | 80-90 | |
| Mackerels | 1,3 | 3 | 10 | 200 | 30-40 | |
| Dentex | 1,5 | 3 | 10 | 180 | 30-40 | |
| Trout baked in foil | 1,0 | 3 | 10 | 200 | 30-35 | |
| Neapolitan-style pizza | 0,6 | 3 | 15 | 210 | 15-20 | |
| Dry biscuits | 0,5 | 4 | 15 | 180 | 25-30 | |
| Tart | 1,1 | 3 | 15 | 180 | 30-35 | |
| Chocolate cake | 1,0 | 3 | 15 | 165 | 50-60 | |
| Leavened cakes | 1,0 | 4 | 15 | 165 | 50-60 | |
| Grill | Soles and cuttlefish | 1 | 4 | 5 | - | 6 |
| Squid and prawn kebabs | 1 | 4 | 3 | - | 4 | |
| Cod filet | 1 | 4 | 3 | - | 10 | |
| Grilled vegetables | 1 | 4 | - | - | 8-10 | |
| Veal steak | 1 | 4 | 5 | - | 20-25 | |
| Chops | 1,5 | 4 | 5 | - | 20-25 | |
| Hamburgers | 1 | 4 | 3 | - | 10-15 | |
| Sausages | 1,7 | 4 | 5 | - | 20-25 | |
| Toasted sandwiches | n.° 4 | 4 | 3 | - | 2-3 | |
| With rotisserie (where present) | ||||||
| Veal on the spit | 1.0 | - | - | - | 80-90 | |
| Chicken on the spit | 1.5 | - | - | - | 80-90 | |
| Lamb on the spit | 1.0 | - | - | - | 80-90 |
! Cooking times are approximate and may vary according to personal taste. When cooking using the grill, the dripping pan must always be placed on the 1st oven rack from the bottom.
! This appliance has been designed and manufactured in compliance with international safety standards. The following warnings are provided for safety reasons and must be read carefully.
General safety
- This is a class 3 built-in appliance.
- Gas appliances require regular air exchange to maintain efficient operation. When installing the cooker, follow the instructions provided in the paragraph on "Positioning" the appliance.
- The appliance was designed for domestic use inside the home and is not intended for commercial or industrial use.
- The appliance must not be installed outdoors, even in covered areas. It is extremely dangerous to leave the appliance exposed to rain and storms.
- When moving or positioning the appliance, always use the handles provided on the sides of the oven.
- Do not touch the appliance with bare feet or with wet or damp hands and feet.
- The appliance must be used by adults only, to cook food according to the instructions in this manual.
- Do not touch the heating elements and parts of the oven door when the appliance is in use; these parts become extremely hot. Keep children well away from the appliance.
- Ensure that the power supply cables of other electrical appliances do not come into contact with the hot parts of the oven.
- The openings used for ventilation and dispersion of heat must never be covered.
- Always grip the oven door handle in the centre: the ends may be hot.
Always use oven gloves to place cookware in the oven or to remove it. - Do not use aluminium foil to line the bottom of the oven.
- Do not place flammable materials in the oven: if the appliance is switched on by mistake, it could catch fire.
- Always make sure the knobs are in the “●”/“O” position when the appliance is not in use.
- When unplugging the appliance always pull the plug from the mains socket, do not pull on the cable.
-
Never carry out any cleaning or maintenance work without having unplugged the plug from the mains.
-
In case of malfunction, under no circumstances should you attempt to repair the appliance yourself. Repairs carried out by inexperienced persons may cause injury or further malfunctioning of the appliance. Contact a Service Centre (see Assistance).
- Do not place heavy objects on the open oven door.
- The appliance should not be operated by people (including children) with reduced physical, sensory or mental capacities, by inexperienced individuals or by anyone who is not familiar with the product. These individuals should, at the very least, be supervised by someone who assumes responsibility for their safety or receive preliminary instructions relating to the operation of the appliance.
- Do not let children play with the appliance.
Disposal
- When disposing of packaging material: observe local legislation so that the packaging may be reused.
- The European Directive 2002/96/EC on Waste Electrical and Electronic Equipment (WEEE), requires that old household electrical appliances must not be disposed of in the normal unsorted municipal waste stream. Old appliances must be collected separately in order to optimise the recovery and recycling of the materials they contain and reduce the impact on human health and the environment. The crossed out "wheeled bin" symbol on the product reminds you of your obligation, that when you dispose of the appliance it must be separately collected. Consumers should contact their local authority or retailer for information concerning the correct disposal of their old appliance.
Respecting and conserving the environment
- By using the appliance in the hours between late afternoon and early morning, you can help reduce the workload placed on electrical companies.
Always keep the oven door closed when using the GRILL mode in order to attain the best results and to save energy (approximately 10% ). - Regularly check the door seals and wipe clean to ensure they are free of debris so that they stick properly to the door and do not allow heat to disperse.
Switching the appliance off
Disconnect your appliance from the electricity supply before carrying out any work on it.
Cleaning the appliance
! Never use steam cleaners or pressure cleaners on the appliance.
- The stainless-steel or enamel-coated external parts as well as the rubber seals may be cleaned using a sponge that has been soaked in lukewarm water and neutral soap. If these stains are difficult to remove, use only specialised products. After cleaning, rinse and dry thoroughly. Do not use abrasive powders or corrosive substances.
- Ideally, the inside of the oven should be cleaned after each use, when it is still lukewarm. Use hot water and detergent, rinse and dry with a soft cloth. Do not use abrasive products.
- The accessories can be washed like everyday crockery and may even be cleaned in the dishwasher.
Cleaning the oven door
Clean the glass part of the oven door using a sponge and a non-abrasive cleaning product, then dry thoroughly with a soft cloth. Do not use rough abrasive material or sharp metal scrapers as these could scratch the surface and cause the glass to crack.
To clean the oven more thoroughly, you can remove its door:

1. Open the oven door fully (see diagram).
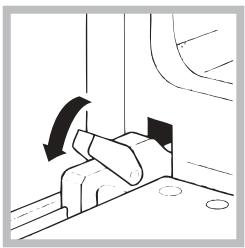
2. Lift up and turn the small levers situated on the two hinges. (see diagram).
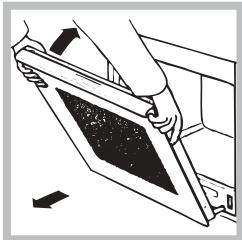
3. Grip the door on the two external sides and close it approximately half way. Pull the door towards you, extracting it from its hinges (see diagram).
To replace the door, reverse this sequence.
Inspecting the seals
Check the door seals around the oven regularly. If the seals are damaged, please contact your nearest After-sales Service Centre (see Assistance). We recommend that you do not use the oven until the seals have been replaced.
Replacing the light bulb
To replace the oven light bulb:
- Remove the glass cover of the lamp-holder.
- Remove the light bulb and replace it with a similar one: Wattage 25 W, cap E 14.
- Replace the glass cover (see diagram).
Assistance
! Never use the services of an unauthorised technician.
Please have the following information handy:
- The type of problem encountered.
- The appliance model (Mod.).
- The serial number (S/N).
The latter two pieces of information can be found on the data plate located on the appliance.
FR

Italiano, 1

English,13

Français, 24

Espanol, 35

Portuges, 46

FZ G /HA
FZ G IX /HA
FBG/HA
FBGIX/HA
FR G /HA
FR G IX /HA
FR G0 /HA
FR GO IX /HA
FH G /HA
FH G IX /HA
FHR G /HA
Sommaire
Installation, 25-28
Positionnement
Kypblfbl cinnataTamacbl, 62
Jaxnbl uony
Backapy TaKtacbi
Kocy xəHe naɪdaɪaɪny, 63-64
Пewтikocy
Taimepdi nai dananhy eici
OTtbIKIeHΦopcyHkanaPbIHcNnataTapbl
Tafam daibihday peximdepi, 65
Tafam daibinyepexmepi
Tafam daibihday boubihwa kehec
Tafam daibihday boibihwa kehec kecteci
CaKtahIbIpyIap MeH KeHeCTep, 66
Kajnbi kayinci3ik
KoHO
KopwaHan opTaHbI caTay XHe KopFay
XeHney XeHe kyTIm, 67
KypbIINfbIbIeWipy
KypbIINfbIHbI Ta3anay
NewecirinTa3anay
UaMbI aybICTbipy
Kemek

Hotpoint
ARISTON
KZ
! KypbIfblHbI icke KocnactaH 6ypbIH HycKayIbIKtbl MyKnT OKbl Nblfblb3. MyHda KypbIfblbHb Kayinci3 KOJaHa, opHaTy XeHe OHbl KyTy TypaIbMaHbI3bl aknapaTTap KaMTblJFaH.
! Keneweke Ta hbiKtama peiHde Kapay yuH naiDanaHy HcayJIbIFbIH caTaN KOJIbIH3. OHbI KpyblfBiHbIH Ke3 KeJrEHN JkaHa neCIne bepiH3.
OpHaJaIacTbIpy
! Opay MaTePnAnIaPbIH 6aJIaNapDbIH KOJIb JKeTneiTH JepDe CaKtAhbI3. TbIbIC TaPbIy HeMece TyHbIbIN KaIy KayPiH TyfB3ybl MymKiH (CaKaMaHObIpYnap MeH KeHeCmep6eImiH KapaHbI3).
! KypbIbHb Hcykaynapra cKeKec apnaIb 6iIKTiniri 6ap
Mamah opHaTyFa Tnic. KypbIbI dYpbIC opHaTbIMarHa
XaJaDa, aAamdap MeH XaHyapnap OMpIe Kayin
TeHdipyi Hemece MylKiTi 3aKbIMdaybl MYMKIn.
!Бул Крьлгынbl,arfIMdaflyЛTTbIK 3aHamaIapfa caikec,ayacbl y3iKci3 aImacbl TpaTbIH 6eImeIepde rana opHaTy XHe naiDalaHy Kepek.TemeHderi ⅢapTTapdbI opbIHday KaKeT:
- Be�me ke3 KeIreH TytIneepi aiJaan 7bIrapbln Xi6epeTIn aayhbl TaTbIn any KyyecimEn Ka6bIKTaIybl Tnic. OJ Kypblfbl Kocblfah Ke3de ABToMaTTb Tpyde KocblaTbH 3JeKtp JeIeTeKlWTeH Hemece KaIkaDaH Tpybl MymKiH.
Mpyuia KBybpuHua Nemee aaiyui Tnyiikdek (TEK TAMAR DnBdHay KBybpuIbnpuYuih)
Tikenei danara
XaHy npoeci KaIbInTbI Tpye 0Tyi yuH in aya KepeK BoIraHdbkTaH 6eJImeDe Tnicti aya aHaNbIMbl BoNybl KepeK. XaHyfKaJxETTI ayaHbIH afbIMbl
6oJMaBbyTnic.
OphatbIINFaH KyaTbIH,ep KBT 6ipniriHe 2 M^3 / caF mHaHHeH a3 6oJmaybi Tnic.
Aya aHnblmbj KJynecihe, iUki
dAmetpi kem derenhe 100 cm²
6oNaTbIn TYtik apkblb ayaHbI
TIkeNei DaanaD anyiba
6oNaDb; Teciri Ke3 KeIreH
6eReTneH 6itejin KaNyra 6eim
CoHdaI-ak, kYye kHaHyf aKaKeTTi ayaHbI kHaHama KOMMeH KaMTamacbl3 eTe aJaDbI,
aFHN XOFapblDa CnnaTTaTaNFA
aya aHaNbIMbl TYtIKTePimEH
Xa6dbkTaNfAH XanCapnac
6eJMeIepdE. DereHMeH, 6yI
6eJMeIep opTaK 6eJIme, kAtaTbIH
6eJIme Hemece ept Kayni 6ap
6eJMeIep 6oImaybl Tnic.
Cbifblfah ra3 ayadaan aybip 6oIraHbIKTaH eDeHre Tyceidi. CoHdbIkTah, cbIfblrAra 3 baIooHdapbl TpaTBIn 6eJImepe ra3dbIn 7bIFybi XaFdaNbIHDa, on 6eJImeDeH 7bIFbIn KeTy i YwIn BEHTNJLAuJIbIK TecikTepeMn JxabIbKTAnybl Tnic. Con cebenti, cbIfblrAra 3 baIIOHdapbl, XapTBInaHemec TeJbIK 6oIca Da, Jep DeHReiHEn TEmen 6eJImepe He caKTay aymakTapbIHda (TeJe XeHe T.6.) opHaTbIMaybl Hemece caKaTaNMaybl Tnic. Tek NaIdaHaBlyda 6oIfaH 6aIIOnDbbl, Ohbl 50^ -Tah Kofapbl TemepaTypaFa DeinH bICbTIIN Xi6epyi MymKiH cbIPTkbl KaHap Ke3depi (NeWTEp, KamHHep XeHe T.6.) 7bIFapbTHKnB3yDah aynak opHaNaCTbIPbn, cakTaFAH ab3aJl.
KypbINfbHbOpHaTy
KypbIfblHbIH,dypbIC KymbIC kacaybIH KaMTaMaCbI3 ety yuiH KOaJIbI ac yin XnHa3bIH KOJaHaBhlB13.
-ПeшkeжakbIHKa6bIpFaJIap bICTbIKa Te3iMdi MaTePnAnDaH XacalFah 6onybl KaKeT.
CbipTkblKa6bIfb6apUkaΦTapdbJxHaHaHda100°CTemnepaTyparaTe3etihKeIIMepKoJaHbIyblKaXeT.
- Пешт ac уу устелиhi actbHa (cbl36aHbI KapaHbI3) Hemece ac yu xinha3bHbIn iwiHe opHaty uWIn shkaФтВн eJiWeMdepi TeMeHderiJeB oJyI KaKeT:
!KypbIJIbI opHaTbIINfAH Ke3Je Ke3 KeIReH 3JIeKTpJI 3aTTapDaH aJIbIC 6OJybl KaKeT.
Herizri depekter kectecinhe bepiiren cahdap ocbi opnaty typiyuin ecentenreH.
KeIeTeY
TnicTi JeknTeTydiH opHaTbIJaHbIH TeKcepy yuH
UkaΦTbIH apTkbl Ka6bIpacBIn aIbIn Tactay KaKeT.
PiwiEki aaraa TaKaTaNfA HemeCe KemiNde 45 x 560 MM
a7bIK TyprAn Teric Jepe OPhaNaCTbIPy YcHbIJaDbI (cbI36aHbI KapaHbI3).
OpTaF a KOIO KHe 6eKiTy
NeuTIn 6yipnepinderi 4 KyaKwA cbpTKbI XaKTayDbH 4 TeciriHe caikec keleTHee etin opHaTbIHb3. KyakwapanapdbTeMeHne KepceTIReHde WkaΦtbH 6yip Ka6bpFacbIHbIH KaNbIHdbfBiHa Kapai NaBkTaHb3:
20 MM 60JCA, KyaJaKaHaHbIH XblXbImaJIbI 6eJIriH aJIbIn TactaHb3 (cbI36aHbI KaPaHbI3).
18 MM 60nca, 3aybTTa opHaTbIINFaH 6ipiHsi TIJIkTi naJdaJaanHbIHbI3 (CbI3BaHbI KaPahbI3).
16 MM 60Jca, ekiHsi TiJIiKTi naIdaIaNbIHbI3 (cbI36aHbI kaPaHbI3).
NeuTin ecirin aubin, 4 6ypaHdaIbI bekTIkwTi cbipTkbl JkaTaydbn 4 tecirihe kipri3in, KypblfbiHbI wkaΦka bekiTin3.
! KypbIJIbIbIH KayiNci3 XyMbIC iCTeyIH KaMTamacbl3 etTeIH 6apJIbIK 6eJIikTepi apHaBI KypaIdapDbIH Kemerimeh fHa aJIbHybl Tnic.
3JneKtp KocbIbIMdapbl
! Yw yanbl 3neKtp Ka6eni 6ap new aHbMaIbI TOK KepHeyimeh XoHe Kypblfblda opHaIaCKaH Heri3ri DepekTep KeCTeciHde KpcetiiIReH XnJIikNeH JyMbIC ICTey yuH xacaKaTaNraH (mMeHee KapaHbI3).
3neKtp ka6eHIn Ophaty
- KaKaTbH 6yip KyaKaHaapanapbHa 6ypaybltBt TbIfbIn, dHekep KaKaHaHaHbI aWbIHb3. BypayblTbTeMeH 6ackaHda KaKaNTbI aWaTaHdaI TyTKa TpyiHde naJaHaHbIHb3 (cbI3bHaHbKapaHbI3).
- BypaybIbI TyTka TpyiHne naJdaJanaHbIn, Kbcna 6ypaHaHbI bocatbIn aBIn TaCTaHbI3 (cbl3baHbI kapaHbI3).
3.YwcbIMdbI L-N- 1一 6aJnHaHbIC bpaHdaIapbIH aIbIN Tactan, TyCTepiHe caJ cbMdApDbI bpaHda 6acTapbIHbIH actbHa 6ekitih3:
Kek(N),KoHbip(L)XeHeCapbl-Jkacbl()
3neKtp Ka6eHin XeJire Kocy
IpekeTep kecTeciHne KepcetinreH Kytemere caikec CTaHapTTbI aBipfblWtbl OPHaTbIHb3 (Kancapna Kopannmbi KapaHb3).
Kypblfbl Tikelene 3eKtp KEnicHe Kpyblfbl MeH 3eKtp
KeNici apacbIHa opHaTbIinah 3 MM aUbIK KIIkeHe
6aIbIbIc 6ap biphewe kaHAnDbI aBbIPbIN-KOCKBI
apKbIbIbIOcblnybi KaKeT. AByIpbl-KCKblk KepCetInreH
KyTeMeRe IaMbIKbTI XeHE aFbIMdaFb Tok peTteYiHe
CaiKec 6ObyI KaKeT (Jepre KocblfAH CbIM aBbIPbIN-
KOCKblTAH axbPaTbIMaybTnic). 3JeKTP Ka6enIH
TemnepaTypacbl 50^ -Tah KOrapbl 6oNaTbH JepDeH
ETneTInde etin opHaIaCTbpy KaKeT.
! Ophatybl dypbic TOK baihaibcih opHaTkaHbHa XaHe OHbH kayinci3ik epexepeine Caikec eKeHdiirHe ceHimDi 6oJybl KaKet.
KypbIfblHb TOkKa KocnactaH 6ypbIH TEmeHderiIepdi TeKcepih3:
KypblfjXepre KocblfrAn XeHe aBipfl3aHfa caikec 60bn TaBla.
po3eTKa Heri3ri DepeKTeP KecTeCihde KePceTilreH KypbIyfbHbIH eH KOFapfbl KyuHHe Te3imdi (acmbH KapaHbI3).
Kephey Heri3ri DepekTep KecTeciHne KepcTeiIreH MApalbIfby ayMaFbIHda (mMeHee KaPaHbI3).
- po3eTka KypblfBihbH aibIpflbHa cKeKc KeJIi. Po3eTka aibIpflbHa cKeC 6oImaca, eKIneTTi MAmAHnah OHbl aybICTpbIn bepydi etiHi3. BiPheWe po3eTkanaIap MeH y3apTkbls CbIMdapbIH naJaIaHa6aHbI3.
!Kypblfbl opHaTbInFaHHan KeiH 3JeKtp Ka6eni MeH po3eTKa KaKbIH KepDe 6Onybl KaKkTe.
! KaßebNb iɪmeyi Hemece KbICbIIMaybl KaKæT.
! Kaßen b Kni TeKcepiin, Tek eKiNetti MaMaHHbIH KemerimeHa anaMaCTbIpblIybl Tnic (KeMek 6JIIMH kappaHbI3).
! Kayinci3dk wapanapbI caKaTImmaH xaFdaNda eHdipywiXyayanKeppwnikTi 03 MoHbHa aNyDaH 6ac TaTAbI.
Газдыхалгay
Kypblfblhra3 JeTki3y JxyneciHe Hemece ra3
6aIIOHbHa aftbIMdaftyTTbIK 3aHamaIapFa
caIkec xajfay KaKeT. KajfaydbI icKe acbIpmac
6ypbIH, nei naJaanahfbHb3 KeJeTIH ra3 JeTki3y
JxynecimeH cbIbCbIMdbI eKeHlHE Ke3 JeTki3iHi3.
CbIbICbIMdbI 6oImaca,“Ta3 TpyJIepiHe cAKeCTeHdIpy" naparpaΦbIHdaftbI HcCKaynapDbI opbIHdaHbI3. BaIIIOHHaNc cyBik Ra3dbI naJaIaNHaHda, aFBIMdaftbI YTTbIK 3aHamaIapra CaIKec KeNETIH KbICbIM peTteriSiH opHaTbIHbI3.
!Fa3 JeTki3y JyueciHderi KbcbIM 1-KeCTeDe (OTtbIK nenΦopcyHKaIapdbIH CnnaTtApbl) KepceTIInReH MəHdepreCaiKec KeNetiH IN TeKcepPi3, ΘeTKeHi 6yJI KyaTTbI TImDi TYpde JyMCan, KypblfBiHb3DbH Kayinci3 epi y3aKJyMbIC ICTeyiH KaMTamacbI3 eTeDi.
! EHNiPnReH ra3 neuHin yCTIhe ra3 KOHOpKacbIn opHaTy Kepek 6oNca, ekeyiH XaJfayra Hemece 6ip aBtY KpaHbH IN OJdaHyFA KaTah TpyDe TbIbIM caIbHaDbI. Eki KypblFbI 6eNEk-6eNEk XaJfAhybI Tnic, XeHe eKeyiH 6ip-6ipiHe TOnbIfbImeH TayenCi3 KblNy YwH eP6ipHIn XeKe aBtY KpaHbI 6OJybl Tnic (cypemmpdi kapaHbI3).
KaTTbI TyTik apKbIInbI xaNfay (MbIC Hemece 6oNaT)
!Ia3 JxKt3y JxuNeciHe JxalfaydbI Ke3 KeIrrn KypblfBlaEw JxK TycneiTIn Typrde icKe acbipy Kepek. KypblfBHLH Xa6DbIKTapbl XINHaFbIHda petTeJImeJI L-niiHInHderI TyTik cPHTnHiI bap XeHE OhBiH ra3dbIH ShbIFbIN KeTyIH anDbIH aAnbIH TaftbIHbI bap. TyTik cPHTnHIrI ap bpaRaH Ke3De TbIfbIHdbI opHbIHa KOIO KEPEK (TbIFbIH KypblfBImen BiPRE bepiJe).Fa3 JxETki3y JxuNeciH, TyTik cPHTnHI-1/2 OIMacbl cbipTTa opHaJnackan UINHHdp TypiHderi JxalFay.
Maibicak6bHcI3TOT6acnTaBIn 6oNaTTaH XacaIHaftyTikTi OImacbl6ap XaNfayfa Kocy
Ia3 JeTki3y JkyueciHr Tytik fntnHri - 1/2 oimacbl cIpTTa opHaJnackaH uINHdp TypiHderi XaIray. Byn TytikTeP ToBbIFbIMeH Co3bInFaHda 2000 MM- den acnaTbIHdAopHaTbIbYbTI niC. KaIray icKe aCbipblfAHHa KeiH MaibickaK MeTaIdaH XacaIaNr H TyIK e6bip K03fanaTbH 6eJIweKTePre TNI TpyMaFAhBiHa XHe OHbI eUHApce KbICbIN TpyMaFAhBiHa Ke3 JeTki3iHi3.
!TeK aTbIMdaTbI yTTbIK 3aHamaIapra cKeKec KeJenIH TYtIKTeP MeH TbIfbIHdApdbI fHa naJaIanaHbIHbI3.
XaJIfaydbIbIMbIKTbIbIbIFbIH TeKcepy
! Ophaty aarktaflraHHaH KeiH, ca6bIHdbcymeH TyTik pHTINrTePiHde TecIKTePdiH 6ap He JOK eKeHiH TekcepiH3. EwkaaHaHa aJayDbI KOnDaHyuBb6OImaHbI3.
TApIepiHe cKeTeHdpy
IeWti on apHaIbI enHdiipinreH ra3 TypiHe (6enrige KepcetirnreH) baca ra3 TypiHe caikeCTeHdipy yuH IN TEmeHderi OHa KaamapdblOpIHdaHbI3:
- NeWtIH OTbIbHbIh φopcyHKacbl aybICTbipy
- NeuTih eciriH ToJIbIK aUbIHbI3.
- NeuTih TemeHri XaFbIH cbIpbltbIn WbIfapbln aNbHbI3.
3.OTtbIKTBiH 6eKiTy 6ypaHdaanapbIH 6ocTaBHB13.
4. "V" 6yaHdaCbH, CoaH KeiH neWtiH OTbIfbH aJbIn TaTcHbI3.
5.ПeштIH OTbIbIbIH форсункасин apHaыbl форсункалapfa apHaJIraH raIGNka kIITIMeH Hemece OdaH rEpi 7 MM raIGNka kIITimeH 6ocatbIN sbIFrapbIn aIbIHb3 da, OHbl backa ra3 TpyiHe ИКЕмдгнфорсункамeH
ajImactbipbIH3 (1-kecmehi kappaHbI3).
6.БарыкбэлшекерджorapьдабepiReн KaДamДармен Kepi 6aftTa KaIТадан opbIHapbHa KOblHb3.
! TyTaHdbipfblWbIh cbIMdapbIme JxHe TepMOxyn TyTikTepeimeh Kymbcic iTeReHde a6aB 60nbHb3.
- Пш OTыгblу wihбactankbl ayahbl backapy. OTык bactankbl ayaFA Ke3 KeIReH petTey kaxet etneiTIN Typde JacaktaJFaH.
- NeiOTbIFbIH eH a3 MHe ro pHaTy.
- Альб IMEN TуTKaHb "Max" KaJIbHa шamamEn 10 MнHyТka ьран КоьИнБIЗда, сдан KeiH«Min» KaJIbHa OрнТынБIЗ.
- TyTkahbl aJbIn TactaHb3.
3.Баç Kapу TaK TaCbHa 6eKtiIinReHДиCKTi aJIbIn TaCTaHbI3. - Anay kiwi bipaKa KaIbIITbI 6oIraHwa TepMoCTaT 6oITbIHbIH cblptbIHda opHaIaCKaH 6ypaHdaHbI peTTeHi3 (anaydbI neuTIn TByiHderi TecikTep apKbIbI Kepyre 6oJa).
- TyTkahbI "Max" KaJIbIHaH Min" KaJIbIHa XbldAm 6yparaHa Hemece neWtIH eciriH XbldAm aUbIn XaKanKaH Ke3De OTbIK eWIn KaImaTbIHbHa K3 XeTki3iHi3.
! Kypblfbl cybik ra3fa jkanfahfah 60Jca, peTey 6ypaHdaacb MyMkiH 60JfauHaMbIKtbl 6eKiTiinyi kepeK.
!Bnypocim aayktafahHHaKeIH,ecki KyaTTbIbIK XancbipmacbIH eHdi naDanaHbIaTbIH ra3 TyPiH KepceTeIH XancbipMaMeH aImactbIpbHbI3. Bny XancbipMaHbI 63dIH Ke3 KeIReH KbI3Met KepceTy opTaIbIbIMbI3daH aIyfa 6OJaBI.
!Erep3dbH KbcbMbl YcblHbJFaH KbICbIMHaH e3Re 60nca, aBIMdaFbl YNTtbK 3aHnHaMaIapFa cKeKC Kipic TYtiriHe KonaJIbbl KbcMb peTteriO opHaTbIybl Kepek.
| ДЕPEKTEP KECTECI | |
| Өлшемерí | еи 43,5 cm биiktiri - 31 cm тereндiri 43,5 cm |
| Калемi | 58л |
| Өлекtp КосылбIMары | DEpeKTeP KeCTeciH KapaHbI3 |
| ГаЗдын сИпаTTapы | DEpeKTeP KeCTeciH KapaHbI3 |
| CE | Бул Крылгы Eypona экOHOMИКаЛьК KayыIMдаСыIfынIH Калесi HUCKayларыHa сай Калесi: 12.12.2006 Xылгы 2006/95/EEC (Temen kerhey) XаHe KeiInHI e3reptулгп - 03.05.1989 Xылгы 89/336/EEC (ЗлектомагнITti УйlecIMdiInIk) XaHe KeiInHI e3reptулгп - 22.07.1993 Xылгы 93/68/EEC XaHe KeiInHI e3reptулгп. -1990 Xылдын 29 МayсыIMынДaRы 90/336/EEC (ra3 Tураль) XaHe OdaH KeiInHI ТузETулр. 2002/96/EC |
Xannby
Баçкapy Тактасы
!KypblfHbI anraW pet naJaIaNHaHaDa OHbI 6oc KyHnde ecirih xaybIn, en XOFaPbI TemnepaTypaJa KeMInDe XapTbI cafTaN Kbi3dbipbHbI3. NeuTi eUipin, OhBi ecirih aunactan bypbHbEJMeHH JAKcBIs JeNdeTIINREH IN TkCEpiH3. Hndipy Ke3iHde KOJaHaBfAH KOPFaBbI 3ATTapDbH JKaHbIN KeTyiHe BaanhaBICTbIXeHIN JXAFbIMCbI NIC WbIFybl MYMKH
Neusti Kocy
Бул ТУТКа TEK的新peЖIMdepiH taHay yuIH
fana naiДаланынмайы, coHda-ak, TUTKaHbIH
e3iHde KePcetinreH TemnepaTpyanapdAn HeWe
TypIi TaramDapra NaBikTbI niCipy TemnepaTpyaHbI
(140°C-tan 240°C-Ka DeiHri ayKbIM) TaHay yuIN De
naDalaHbIaNbI. NeTuTH 3JeKTPOHdbIK TUTaTy KypaJIbI
pettey TUTkacbHa eHri3iJREh. NeW OTbIFbIH JxAFy uIN,
PEU TUTKacbIH MymKH 6oNfaHwa iWke 6acbIH3 Da,
Obl carat TiInIH 6aftbIbHa KapcbI 6ypan KaNbHa
OpHaTBbI3 (NeWtIH eciri JxabIK TpybI KepeK). NeW
Kayinci3dk KypaIbIme Xa6DbIKtanFaH. OTtbIKtBi
XaKKaHHah KeiH PEw TUTkacbIH wAmAmeH 6ceYHd
6acbIN TyPy apKbIbI kayinci3dk TepMOxKy6bl KbI3raHSHA
ra3dbH aiHaJIbIMbHa JxON bepiH3.
!NeuTIN3NEKTPoHdbIK Tytaty KypaIbIH 15ceKHyIaTH acatbIH MEP3IMRE 6enCeHdipyre 60nMaIdbI. OTbIK 15 ceKHyIaTH KeiIN KaHbaca IELI TytKaCbIH XiBepiH3 De, NeuTIN ecirih aMbIn, OTbIKTbI KaIbTa XaKnactan 6ypbIH KEM dereHne 6ip MNHyT Kytih3.
Inicipy TemnepaTypacbH KaIarHaN TemnepaTpyaHbI
baKapy TaKTacbIHdaFb CiITMe BeJIricIMeH cAKeC
keJItpy apKblbTaHdanaDbI; TemnpaTpaIapDbIH
TOJbIK ayKbIMbI TeMeHde KepcTeiInReH: