
Classic 4 - Saucepan FAGOR - Free user manual and instructions
Find the device manual for free Classic 4 FAGOR in PDF.


| Product type | Saucepan |
| Brand | Fagor |
| Model | Classic 4 |
| Main material | 18/10 stainless steel with triple bottom |
| Diameter | 20 cm |
| Height | 10 cm |
| Capacity | 2,5 L |
| Weight | 1,2 kg |
| Color | Silver |
| Interior finish | Brushed |
| Lid included | Yes, tempered glass with vent |
| Handles | Two side handles in stainless steel |
| Induction compatibility | Yes, thanks to the ferromagnetic triple bottom |
| Oven compatibility | Yes, up to 260°C without lid |
| Oven use | Up to 260°C (glass lid up to 180°C) |
| Maintenance and cleaning | Dishwasher safe, hand wash recommended |
| Safety | Riveted and heat-insulated handles |
| Spare parts available | Replacement lid, handles not replaceable |
| Warranty | 2 years |
| Country of manufacture | Spain |
Frequently Asked Questions - Classic 4 FAGOR
User questions about Classic 4 FAGOR
0 question about this device. Answer the ones you know or ask your own.
Ask a new question about this device
Download the instructions for your Saucepan in PDF format for free! Find your manual Classic 4 - FAGOR and take your electronic device back in hand. On this page are published all the documents necessary for the use of your device. Classic 4 by FAGOR.
USER MANUAL Classic 4 FAGOR
natural_image
Illustration of a cooking pot with lid and side handles (no text or symbols)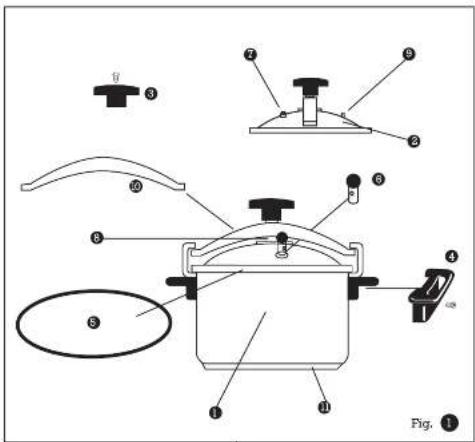
N.I.F. F-20.020.517 - B° San Andrés, n.° 18 - Apartado 49 - 20500 MONDRAGON (Guipuzcoa) ESPAÑA
+
| - Olla-Autocuseur-Panela-Cooker | 4L | 8L | 6L | 10L | ||
| Accessories optionées- Accessantes en optimum- Accessories optionés- Optional accessories |  | -Ecurridor-Egoutoir-Escorredor-Strainer | ● | ● | ● | ● |
 | -Cestillo perforado inoxidable-Panier inoxydable perforé-Cesto perforado inoxidável-Stainless steel basket perforated | ● | ● | ● | ● | |
 | -Cestillo perforado alumnio ∅ 22 cm.-Panier aluminium perforé ∅ 22 cm.-Cesto perforado alumnio ∅ 22 cm.-Aluminium basket perforated ∅ 22cm. | ● | ● | ● | ● | |
 | -Cestillo perforado alumnio ∅ 24 cm.-Panier aluminium perforé ∅ 24 cm.-Cesto perforado alumnio ∅ 24 cm.-Aluminium basket perforated ∅ 24cm. | ● | ● | |||
 | -Cestillo no perforado inoxidable.-Panier inoxydable non-perforé.-Cesto não perforado inoxidável.-Stainless steel basket non-perforated. | ● | ● | ● | ● | |
 | -Soporte interior 30 mm.-Support interieur 30 mm.-Suporte interior 30 mm.-Interior support 30 mm. | ● | ● | ● | ● | |
 | -Soporte interior 45 mm.-Support interieur 45 mm.-Suporte interior 45 mm.-Interior support45 mm. | ● | ● | ● |
The image is too blurry to recognize any text content.
natural_image
Simple line drawing of a laboratory setup with a lid, container, and arrow indicating motion (no text or symbols)natural_image
Abstract diagram with a central 'i' inside an oval, flanked by curved lines (no text or symbols)natural_image
Diagram of a mechanical device with rotating arm and base mount (no text or symbols)natural_image
Simple line drawing of a loop with a small object inside and an arrow indicating direction (no text or symbols)natural_image
Diagram of concentric elliptical orbits with directional arrows and labeled points (no text or symbols)NOTA IMPORTANTE
natural_image
Simple line drawing of a laboratory setup with a lid, container, and arrow indicating motion (no text or symbols)natural_image
Simple line drawing of a stylized icon with an 'i' inside an oval, surrounded by curved lines (no text or symbols)natural_image
Diagram of a mechanical device with rotating arm and base mount (no text or symbols)natural_image
Simple line drawing of a loop connected to a circular shape with arrows (no text or symbols)LER TODAS AS INSTRUÇÕES.
- ESTAR ATENTO SE A PANELA FOR UTILIZADA AO PÉ DE CRIANÇAS.
- NÃO INTRODUZIR A PANELA DE PRESSÃO NUM FORNO QUENTE.
- DESLOCAR A PANELA DE PRESSÃO COM A MÁXIMA PRECAUÇÃO.
- NÃO TOCAR AS SUPERFÍCIES QUENTES, UTILIZAR OS PUNHOS E OS BOTÕES E SE FOR NECESSÁRIO, UTILIZAR LUVAS.
- NÃO UTILIZAR A PANELA A PRESSÃO PARA OUTRO FIM QUE O PARA O QUAL ESTÁ DESTINADA.
- ESTE É UM APARELHO DE COZEDURA A PRESSÃO, UMA MÁ UTILIZAÇÃO PODE PROVOCAR QUEIMADURAS. ASSEGURAR-SE QUE A UNIDADE ESTÁ BEM FECHADA ANTES DE O PÓR EM FUNCIONAMENTO; LER AS INSTRUÇÕES.
- NUNCA ABRIR A PANELA A PRESSÃO FORÇANDO; ASSEGURAR-SE QUE A PRESSÃO INTERIOR CAIU COMPLETAMENTE. LER O MANUAL DE UTILIZAÇÃO (parágrafo C).
- NUNCA UTILIZAR A PANELA SEM AGUA PARA EVITAR DE DANÁ-LA GRAVEMENTE.
• NUNCA ENCHER A PANELA COM MAIS DE 3 VEZES A SUA CAPACIDADE
QUANDO COZER ALIMENTOS QUE INCHAM DURANTE A COZEDURA, COMO O ARROZ, O FEIJÃO OU O GRÃO. NUNCA ENCHER A PANELA A MAIS DA METADE.
- UTILIZAR UMA FONTE DE CALOR TAL COMO INDICADO NAS INSTRUÇÕES DE UTILIZAÇÃO.
- DEPOIS DA COZEDURA DE CARNES COM PELE (LÍNGUA DE VACA) QUE SE PODE INCHAR COM O EFEITO DA PRESSÃO, EVITAR DE PICAR A CARNE ENQUANTO TIVER UM ASPECTO INCHADO PARA EVITAR QUEIMA-DURAS.
• SE COZER ALIMENTOS PASTOSOS, MEXER A PANELA LIGEIRAMENTE ANTES DE ABRIR A TAMPA, PARA EVITAR SALPICADURAS. - VERIFICAR QUE AS VÁLVULAS NÃO ESTÃO OBSTRUÍDAS ANTES DE CADA UTILIZAÇÃO. VER O MANUAL DE INSTRUÇÕES.
- NÃO UTILIZAR A PANELA PARA FRITAR A PRESSÃO COM AZEITE.
- NÃO TOQUE OS SISTEMAS DE SEGURANÇA DE OUTRA MANEIRA QUE NÃO SEJA A INDICADA NAS INSTRUÇÕES DE MANTIMENTO DO MANUAL DE INSTRUÇÕES.
• UTILIZAR UNICAMENTE PEÇAS ORIGINAIS PARA O MODELO CORRESPONDENTE.
• GUARDAR ESTAS INSTRUÇÕES.
natural_image
Simple line drawing of a laboratory setup with a lid and container (no text or symbols)natural_image
Simple line drawing of a stylized eye symbol inside an oval shape (no text or labels)natural_image
Diagram of a mechanical device with rotating arm and base mount (no text or symbols)natural_image
Simple line drawing of a circular object with internal components and an attached loop (no text or symbols)(\*) Your pressure cooker is like this (See fig. 1)
1) Cooker.
2) Lid.
3) Closing handle.
4) Handle.
5) Closing seal.
6) Revolving valve.
7) Safety valve.
8) Operating unit.
9) Automatic valve.
10) Bridge
11) Heat distributing base.
This pressure cooker is designed to satisfy the most demanding requirements.
| ø Heat distributing plate | PRESSURE bar | |
| 4-6 L. | 18 cm. | 0.55 |
| 8-10 L. | 21 cm. |
2) OPERATING INSTRUCTIONS
A) Before using the cooker for the first time
Read all the instructions in the Manual:
- Set the handles in their position, put the screw in the correct hole and tighten with a screwdriver.
- Clean all the parts with hot water and normal detergent and rinse and dry them using a soft cloth.
- If there are white stains because of excessive lime in the water, clean them with a little vinegar.
-
Using the dishwasher may alter the colour of the stainless steel.
-
Do not use metal scourers or abrasive products as the stainless steel may be scratched.
- Use an appropriate heat source, equal to or smaller than the bottom of the appliance. Overheating may blacken the steel or cause yellowish or blue stains which are removed with normal cleaning.
B) BASIC SAFETY PRECAUTIONS
READ ALL THE INSTRUCTIONS.
- MAINTAIN STRICT VIGILANCE IF THE PRESSURE COOKER IS USED NEAR CHILDREN.
- DO NOT PUT THE PRESSURE COOKER IN A HEATED OVEN.
• MOVE THE PRESSURE COOKER WITH MAXIMUM PRECAUTION. - DO NOT TOUCH HOT SURFACES, USE THE HANDLES AND BUTTONS. IF NECESSARY USE GLOVES.
- DO NOT USE THE PRESSURE COOKER FOR ANY OTHER PURPOSE THAN THAT FOR WHICH IT IS DESIGNED.
- THIS APPARATUS COOKS UNDER PRESSURE. ITS INCORRECT USE CAN RESULT IN BURNS, MAKE SURE THAT THE UNIT IS CORRECTLY CLOSED BEFORE OPERATING IT; SEE THE OPERATING FUNCTIONS (PARAGRAPH C.).
- NEVER FORCE OPEN THE PRESSURE COOKER. MAKE SURE THAT THE ITS INTERNAL PRESSURE HAS DISSIPATED COMPLETELY. SEE 'USER MANUAL'.
- NEVER USE THE APPARATUS WITHOUT ADDING WATER, AS THIS WOULD SERIOUSLY DAMAGE IT.
• DO NOT FILL THE APPARATUS TO MORE THAN 2/3 OF ITS CAPACITY; WHEN PREPARING FOODS WHICH
EXPAND WHEN COOKED SUCH AS RICE AND PULSES DO NOT FILL THE COOKER TO MORE THAN HALF ITS CAPACITY.
• USE HEAT SOURCE(S) IN ACCORDANCE WITH THE USER INSTRUCTIONS.
• AFTER COOKING MEAT WITH SKIN (EC. OX TONGUE) WHICH MAY SWELL UNDER PRESSURE, DO NOT PUNCTURE THE MEAT WHEN IT IS SWOLLEN AS YOU MAY GET SCALDED.
• IN THE CASE OF PASTA-BASED FOODS, THE PRESSURE COOKER SHOULD BE LIGHTLY SHAKEN BEFORE OPENING THE LID SO THAT THESE FOODS DO NOT SPLASH OUT.
- CHECK THAT THE VALVES ARE NOT BLOCKED BEFORE EACH OCCASION OF USE. SEE 'INSTRUCTIONS MANUAL'.
• DO NOT USE THE PRESSURE COOKER TO FRY UNDER PRESSURE WITH OIL.
• DO NOT MAKE ANY CHANGES TO THE SAFETY SYSTEMS OTHER THAN THOSE LISTED IN THE MAINTENANCE INSTRUCTIONS IN THE USER MANUAL.
• ONLY USE ORIGINAL PARTS IN ACCORDANCE WITH THE RELEVANT MODEL.
- KEEP THESE INSTRUCTIONS.
OPERATING INSTRUCTIONS
For cooking it is essential:
• To put in the cooker a minimum of 1/4 litre of water or any liquid generating vaporisation, and as a maximum 2/3 parts of the volume (water and ingredients included).
• If you cook sauces make sure that they are not too thick and also to SHAKE
the cooker before the OPENING THE LID in order to eliminate possible heat focuses or depressions which may have arisen in the interior. REQUIRED WHEN COOKING SOUPS OR PULSES SUCH AS CREAM OF LENTILS, CHICK PEAS, etc.
To close the cooker
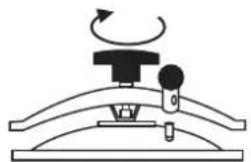
- Turn the handle anticlockwise until the bridge comes down fully on the lid.
- Slide the lid horizontally across the edge of the cooker until the bridge fits into the clamps.

natural_image
Simple line drawing of a laboratory setup with a container and a funnel (no text or symbols)• Make sure that the lid fits right around it perimeter onto the cooker and the bridge into its clamps.
- Turn the handle in the closing direction (clockwise) until you note a slight pressure of the bridge against the clamps (handles).
- When contact is made between the bridge and the clamps of the cooker (body), set the reference as indicated.

natural_image
Simple line drawing of a stylized icon with an 'i' inside an oval, surrounded by curved lines (no text or symbols)- Close completely by turning the handle at least three times.
natural_image
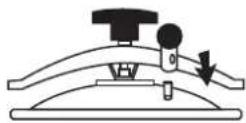
Simple line drawing of a mechanical device with a rotating knob and base mount (no text or symbols)- Place the revolving valve on the operating valve and push it in fully.
Cooking
- Place the cooker on the heat source. When the revolving valve begins to MOVE, emitting steam, turn down the heat source to a position in which the valve turns SLOWLY. It can even rest WITHOUT TURNING, emitting a small quantity of steam. In this situation cooking will take place perfectly, energy will be saved and there will be a higher vitamin contribution.
- At this point the cooking time begins.
• To obtain maximum energy savings:
With electrical cookers select the plate diameter which is equal to or smaller and nearest in size to the bottom of the cooker.
With gas cookers adjust the flame so that it does not overlap the bottom of the cooker.
To open the cooker
TO DO THIS IT IS ESSENTIAL THAT THERE IS NO PRESSURE IN THE INTERIOR:
• Make sure that the heat source is turned off completely and cold.
- If an electric heat source has been used put the cooker on a cold surface
to prevent it continuing to heat when it is being opened.
- Raise the revolving valve slightly letting the steam escape until the pressure drops.

- It is also possible to cool the cooker under running water, which will reduce the pressure more quickly, and also prevent the kitchen from steaming up.
• DO NOT IMMERSE THE COOKER IN WATER. - SHAKE THE COOKER BEFORE OPENING THE LID.
- NEVER FORCE OPEN THE PRESSURE COOKER.
- Turn the handle in the opposite direction to that of closing until the bridge comes down to the lid. Lift the lid until it disengages and slide it off horizontally.
3) MAINTENANCE
After each use:
- Wash the cooker with hot water and normal detergent using a soft cloth, rinse and dry it.
To maintain your cooker, follow these instructions:
- Do not use metallic scourers or abrasive detergents.
- Do not put its parts in the oven.
-
If you cannot clean the parts used, immediately after cooking, fill them with a little soap and water, which will prevent any leftover food from sticking.
-
If there are white stains because of excessive lime in the water, clean them with a little vinegar.
- If intense overheating occurs it may blacken the steel or cause yellowish or blue stains which you can remove with normal cleaning.
• To prevent corrosion do not leave bleach in the interior.
4) PRACTICAL ADVICE
If you observe that:
- Steam escapes from the edge of the lid.
- Before the revolving valve starts to move, it is possible that:
• The lid is not correctly engaged or you have not tightened it enough. - Repeat the closing operation.
• The closing seal is worn. - Replace it.
• The safety valve emits steam. - It is normal that the safety valve emits small jets of steam. This is not significant.
• In the case that the steam escapes violently it is possible that: - The operating unit is blocked by food remnants.
- Check the operating unit and clean it.
• The revolving valve does not revolve.
It is possible that:
- You have insufficient water in the interior of the cooker and it lacks steam to turn the valve.
- Check the quantity of water, and put in what is needed.
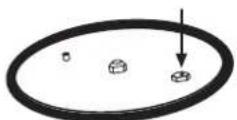
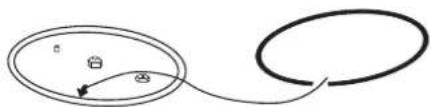
• To change the closing seal. - Normally the closing seal lasts for approximately 1 year.
- The seal needs to be changed when it has a damp, sticky appearance which it makes it difficult to close the lid correctly.
Proceed as follows:
- Remove the used seal and carefully clean its housing groove.
- Wet the new seal for a few seconds in tepid, soapy water.
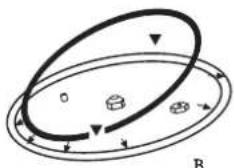
- Put the two ends of the new closing seal together, in a point of its housing groove in the lid and press in hard making sure that the ends are well joined.
natural_image
Simple line drawing of a loop with a small box inside and an arrow pointing to it (no text or symbols)- Finish fitting the rest of the rubber using a blunt object (eg. a wooden spoon).
natural_image
Diagram of concentric elliptical orbits with directional arrows and labeled points (no text or symbols)IMPORTANT NOTE
Do not make changes in the parts, nor try to assemble them other than in the way indicated.
• ALWAYS USE ORIGINAL SPARE PARTS.
COOKING TIMES
| FOOD | Amount water needed | Minutes to cook |
| Soup | 2/3 at most | 10 |
| Puree of dried legumes | " | 25 |
| Stew | " | 30 |
| Artichokes | 1 to 2 centimeters | 10 |
| Asparagus | " | 10 |
| Beets | " | 30 |
| Whole carrots | " | 10 |
| Carrots slices | " | 8 |
| Cabbage | " | 12 |
| Cauliflower | " | 10 |
| Chickory | " | 12 |
| Spinach | " | 8 |
| Green beans (pods) | " | 10 |
| Legume hash | " | 15 |
| Potatoes | " | 12 |
| Peas | " | 15 |
| Tomatoes | " | 10 |
| DRIED LEGUMES | ||
| Beans | To cover | 30 |
| Lentils | 2/3 at most | 30 |
| Assorted pastas | " | 8 |
| Rice | " | 12 |
| ROASTS | ||
| Ox | 25 | |
| Sheep-mutton | To improve quality, do not use water, but rather a piece of lard or shortening (the size of a wainut) | 15 |
| Pork | 25 | |
| Veal | 25 | |
| MEATS IN SAUCE | ||
| Ox | 30 | |
| Larded beef | 40 | |
| Tongue | Make the sauce thicker | 35 |
| Tripe | 60 | |
| Veal stew | 20 | |
| Mutton stew | 30 | |
| Meat-and beans stew | 25 | |
| Rabbit stew | 20 | |
| Rabbit | Brown the meat first | 12 |
| Legs of veal | 20 | |
| Legs of mutton | 30 | |
| Veal | Make the sauce thicker | 25 |
| POULTRY | ||
| Roast chicken | 15 | |
| Chicken in sauce | Brown the meat before cooking | 25 |
| Hen with rice | 40 | |
| FRUIT | ||
| Marmelade | 5 | |
| Compote (assorted fruits) | 5 | |
| Custard | 1 cm. of water | 10 |


- NOTA IMPORTANTE
- (\*) Your pressure cooker is like this (See fig. 1)
- 2) OPERATING INSTRUCTIONS
- A) Before using the cooker for the first time
- B) BASIC SAFETY PRECAUTIONS
- OPERATING INSTRUCTIONS
- For cooking it is essential:
- To close the cooker
- Cooking
- To open the cooker
- 3) MAINTENANCE
- To maintain your cooker, follow these instructions:
- 4) PRACTICAL ADVICE
- IMPORTANT NOTE
Brand : FAGOR
Model : Classic 4
Category : Saucepan