
DMR-STICK6 - Voice recorder KONIG - Free user manual and instructions
Find the device manual for free DMR-STICK6 KONIG in PDF.


| Product type | Digital voice recorder |
| Brand | Konig |
| Model | DMR-STICK6 |
| Dimensions (approx.) | 10 x 2 x 1 cm |
| Weight | Approx. 20 g |
| Power supply | Rechargeable lithium-ion battery via USB port |
| Internal memory | 8 GB (typical capacity) |
| Recording battery life | Approx. 20 hours |
| Supported audio formats | MP3, WAV |
| Microphone | Built-in microphone with noise reduction |
| Speaker | Built-in speaker |
| Connectivity | USB 2.0 |
| Main functions | One-touch recording, playback, voice activation, key lock |
| Care and cleaning | Clean with a soft, dry cloth. Do not expose to moisture. |
| Safety | Do not disassemble. Use only the provided charger. |
| Spare parts and repairability | No spare parts available. Repair by a professional. |
| General information | Stick-form voice recorder, ideal for meetings and conferences. |
Frequently Asked Questions - DMR-STICK6 KONIG
User questions about DMR-STICK6 KONIG
0 question about this device. Answer the ones you know or ask your own.
Ask a new question about this device
Download the instructions for your Voice recorder in PDF format for free! Find your manual DMR-STICK6 - KONIG and take your electronic device back in hand. On this page are published all the documents necessary for the use of your device. DMR-STICK6 by KONIG.
USER MANUAL DMR-STICK6 KONIG
DMR-STICK6 Digital voice recorder

| MANUAL | ANLEITUNG |
| MODE D'EMPLOI | GEBRUIKSAANWIJZING |
| MANUALE | MANUAL DE USO |
| HASZNÁLATI ÚTMUTATÓ | KÄYTTÖOHJE |
| BRUKSANVISNING | NÁVOD K POUŽITÍ |
| MANUAL DE UTILIZARE |
Appearance
1.1 Display screen

-
Voice-control record
-
Cycle mode
-
Battery volume
-
Audio directory
-
High-quality record
-
Long-time record
-
Total fi le number
-
Play
-
Record
-
EQ mode
-
Operation panel
-
A-B repeat
-
Following reading
-
Compare
-
MP3 mode
-
Key lock
-
Audio mode
-
Digital display
1.2 Function of Keys
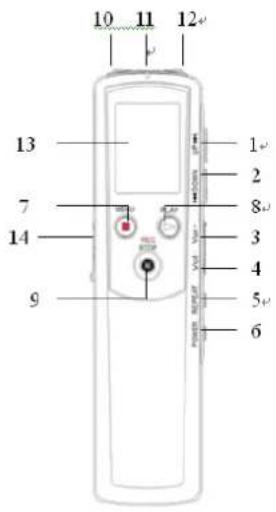

- UP: previous / fast backward
- DOWN: next / fast forward
- VOL+: Increase volume
- VOL:- Decrease volume
- A-B: Repeat/delete
- POWER: On/Off/Time
- MENU: Menu/mode switch
- PLAY: Play/ Pause
-
REC/STOP: Record/stop
-
Outside MIC jack
- Inside MIC
- Headset jack
- Display screen
- USB interface
- Inside speaker
- HOLD: Key locking
- Battery cover
Functions
- Built-in large-capacity storage, to use as mobile hard disk (1G/2G).
- 3 audio file directories (A, B, C) to record massive audio information.
- Play music in various formats (such as MP3, WMA, and ADPCN).
- Voice-control function (VOR) 2 recording formats (SP and LP);
| Format\Memory | 1GB 2GB Remarks | |
| SP 4160min 8320min No VOR function | ||
| LP 16640min 33280min No VOR function | ||
| SP+VOR 4160min 8320min | VOR function | |
| LP+VOR 16640min | 33280min VOR function |
- Cycle mode: Not (not cycle) One (single cycle) all (all cycle).
- 5 play balance modes: NATURL (ordinary), DBB (heavy bass) JAZZ (jazz) DISCO (disco) CLASSOL (classical).
- Repeat mode (A → B): Replay a certain section of sound file.
- Following read & compare: At MP3 play mode.
- Check remaining recording time.
- Delete: Delete single MP3 music file and audio file, or all files in current directory.
-
Clock: check current time.
-
Telephone recording.
- 32-level volume adjustment.
- High-speed USB 2.0 connection, to facilitate rapid uploading/downloading.
- Built-in loudspeaker.
- Low power alerting.
- Key locking: Turn on HOLD key to lock all keys at any work mode.
Battery Device
1) Open battery cover.
2) Install one AAA battery at correct direction of positive/negative electrode, close battery cover.
3) Turn on to check remaining battery power. At low power state, the system prompts shows automatically "Lo batt" and then turns off the voice recorder. At low power during recording or pausing, the system prompts "Lo batt" automatically, saves current recording fi le, and turns off the recording. Power scale is full at sufficient battery volume, and decreases gradually with the decrease in battery volume.
4) At <2 scales of battery power, the recording pen stops playing to turn off due to insufficient power for built-in function operation. Decrease sound volume or use headset at playing. Battery service time varies with battery type and playing volume.
Warning:
- While in use, don't remove the battery. When "Busy" is displayed don't retract the USB cable from the PC. Otherwise the following might happen: program disorders, problems with opening the program and that the program disappears.
Operation
Turn on/off and time checking:
- Turn on/off: Turn on HOLD key before battery installation, and the recording starts automatically after battery installation. Press & hold “POWER” key for 2 seconds in the off state to start the recording, display memory capacity, display current time, enter record standby mode.
Turn off automatically in case of no key operation within 2 minutes at standby mode, and press & hold "POWER" key for more than 2 seconds to turn off at ordinary time.
- Time Checking: At stop state, press "POWER" key to inquire current time (display successively Year-Month-Day-Hour-Minute, and return automatically to stop state.
Record
1) Recording Mode:
- Switch the recorder on, first enter the record mode (display "REC" indication). (Press "MENU" key to switch the mode between the record, audio and MP3 mode). At Stop state of record mode, press "VOL+" key or "VOL-"key, switch record mode and VOR function (LP: Long-time record, SP: High-quality record, VOR: Turn on VOR function, No VOR: Turn off VOR function.

SP record mode LP record mode SP+VOR record mode LP+VOR record mode
2) Start/Pause/Stop Recording:
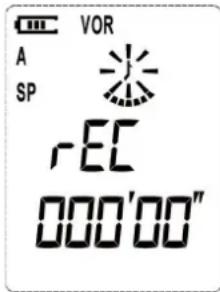
- At Stop state of record mode, press "REC/STOP" key to start recording (right diagram).

- At recording state, press "PLAY" key to pause recording; and then press it again to continue recording.
- At recording/pause state, press "REC/STOP" key to stop recording.
- Beforehand play the record fi le: fi nish recording, press "PLAY" key to play fresh record fi le. When fi nish playing, automatically return to the record standby state.
Running
(Including play, pause, stop, fast forward, fast backward, selective play, volume, cycle, A-B repeat)
(1) Press the "MENU" key, switch to the audio stop state, and then press "PLAY" key to start playing record file.
(2) At playing state, press "PLAY" key to pause playing.
(3) At stop/pause state, press "PLAY" key to start/continue playing. At playing/pause state, press "REC/STOP" key to stop playing.
(4) At playing state, press & hold "DOWN" key to play fast forward.
(5) At playing state, press & hold "UP" key to play fast backward.
(6) At playing/stop state, press "DOWN" key to play selectively/select the next record file (or the first one in case of already the last one). At playing/stop state, press "UP" key to play selectively/select the previous record file (or the last one in case of already the first one).
(7) Volume adjustment.
At playing state, press "VOL+" or "VOL-"key to fast increase or decrease volume (32-level).
(8) Cycle mode.
During the playing, press "MENU" key to enter cycle mode option and display "REP", and press "UP" or "DOWN" key to select All Cycle, Single Cycle, and No Cycle (no icon prompting in display screen).
Exit from this setting: Press "PLAY" key or do not press any key within 8 seconds, then the system saves in current position, and returns to playing state.
(9) (A-B) repeat.
In playing state, press “REPEAT” key to enter A-B repeat mode, then light on “A-B” icon, and set starting point A; press “REPEAT” key again to select repeat ending point B, and play continuously the contents of A-B point; and press “REPEAT” key to exit from A-B repeat mode.
In A-B repeat mode, press "UP" or "DOWN" to reset the starting/ending point of repeating.
(10)Delete.
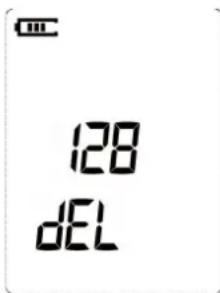
In stop state, press & hold "REPEAT" key to enter deletion state; press "VOL+" or "VOL-" key to select the deletion of single or all files, press "PLAY" key to confirm the deletion, and press "REC/STOP" key to cancel deletion and return to stop state.
MP3 Play
(1) In audio stop state, press "MENU" key to switch to MP3 mode. #008: Current playing music is the 1st one; and 003'58": Play time.

(2) Playing mode:
- Playing: Press "PLAY" key to start playing and display playing progress.
- Pause: In playing state, press "PLAY" key to flash "PAUSE" sign and pause playing, and press "PLAY" key to continue playing.
- Stop: In playing state, press "REC/STOP" key to stop playing, and press "MENU" key to switch mode.
- Fast Forward/Backward: During the playing, press & hold "DOWN" key or "UP" key to fast increase or decrease playing progress.
• Volume Adjustment: Same as when playing audio. - Delete: Same as when playing audio.
• Cycle Mode: Same as when playing audio.
- EQ Mode: At playing state, press & hold "MENU" key to enter EQ mode option state, press "UP" or "DOWN" key to select EQ mode: (5 EQ modes: Eq-01: normal, Eq-02: DBB, Eq-03: JAZZ, Eq-04: DISCO, Eq-05: CLSS), and press "PLAY" key to exit from mode menu. In case of no key operation within 8 seconds, the system saves current setting, and returns to playing state.
• (A-B) Repeat: Same as when playing audio.
• Following Reading & Compare:
This function is very useful for language training programs. It allows you to listen to a certain pre-selected sequence of the audio fi le A-B Repeat) and then record yourself repeating what was said before (Following Reading „FOL“). In „Compare“ mode (CMP) the player will then repeat the pre-selected sequence and your own recorded sequence. This way you can compare your own pronunciation to that of the training program and thus improve it.
- Select a sequence you want to repeat as described under point A to Point B (A-B Repeat Mode).
- While the sequence is being repeated press REPEAT button to enter the (FOL) mode. The recorder will now record what you are saying.
- Press the REPEAT button again to proceed to the COMPARE mode (CMP). The player will now first repeat the pre-selected sequence (A-B Repeat) then play what you have recorded.
- Press Repeat key again to exit and return to normal playing state.
Key Locking
Switch HOLD key to locked position (lock sign), the keys won't respond when you press them, until you unlock the HOLD key. In locked position in off mode, press and hold "POWER" to switch the recorder on, switch off after prompting HOLD.
Menu Setting
In stop state, press & hold "MENU" key to enter Setting mode [including SET DIR/SET TIME/REC MODE/VOR SENSE/SET EQ/SET REP/SEE SPACE). During the setting, press "UP/DOWN" key to change the set directory, press "VOL+" or "VOL-" key to adjust parameter, press "PLAY" key to confirm option, press "REC/STOP" key to return to upper layer of directory (until returning to stop state).
A: Audio Directory: In stop state, press & hold "MENU" key to enter Setting mode and display SET dir, press "PLAY" key to enter Audio Directory setting, press "VOL+" or "VOL-" to change directory, and press "PLAY" key or "REC/STOP" key to confirm and automatically return to Setting mode.
B: Time Setting: In Setting mode state, press "UP" or "DOWN" key to select SET TIME, press "PLAY" key to enter Year setting and press "VOL+" or "VOL-" to adjust the year; press "DOWN" key to enter Month setting and press "VOL+" or "VOL-" to adjust the month; and press "UP" or "DOWN" key to change set option. Set Day, Hour, and Minute through same above method. Press "PLAY" key or "REC/STOP" key to confirm and return to automatically Setting mode.
C: Recording Mode: In Setting mode state, press "UP" or "DOWN" key to select REC MODE, press "PLAY" key to enter Record Mode option (including SP, LP, SP+VOR, and LP+VOR): Press "VOL+" or "VOL-" to change record mode, press "PLAY" key or "REC/STOP" key to confirm and returns automatically to Setting mode state.
D: Sensitivity Setting of Voice-Control Record: In Setting mode state, press "UP" or "DOWN" key to select VOR SENSE, press "PLAY" key to enter VOR Recording Sensitivity, press "VOL+" or "VOL-" to change sensitivity, press "PLAY" key or "REC/STOP" key to confirm and return automatically to Setting mode state.
E. EQ: In Setting mode state, press "UP" or "DOWN" key to select SET EQ, press "PLAY" key to enter EQ Setting, press "VOL+" or "VOL-" to change EQ mode (5 modes, default normal), and press "PLAY" key or "REC/STOP" key to confirm and return automatically to Setting mode state.
F. Replay: In Setting mode state, press "UP" or "DOWN" key to select SET REP, press "PLAY" key to enter Play Mode Setting, press "VOL+" or "VOL-" to change playing mode (3 modes: Normal, Repeat Single, Repeat All, and default Normal), press "PLAY" key or "REC/STOP" key to confirm and return automatically to Setting mode state.
G. Check Remaining Record Time: In Setting mode state, press "UP" or "DOWN" key to select SEE SPACE, press "PLAY" key to check remaining record time at current record mode (i.e. the value displayed at lower line), and press "PLAY" key or "REC/STOP" key to return automatically to Setting mode state.
Junction Box
- Connect junction box with indoor telephone line, attached telephone line, and LINE-IN line, and then connect it with the recording pen (following diagram).

2) After entering record state, press Record key to record telephone call.
USB File Uploading/Downloading(mobile disk):
1) Whenever you connect the player to a PC via the included USB cable. The system will automatically interrupt the current operation and try to connect to the PC. As soon as the device is detected by your PC, it will be shown as new „Removable Disk“ under „My computer“. The Voice Recorder is now connected to the PC. See screen.

2) Uploading/Downloading: After the detection of mobile disk, upload/download MP3/WMA file or other files through copying.
3) If you fi nish the downloading/uploading from your PC, you can disconnect the USB Cable or Press MENU key to switch the normal recorder function mode.
4) At data transfer between disk and PC, the system prompts Busy, and the connection can not be disconnected, and otherwise data is lost.
Notes: Tool installation and record file transfer are detailed in CD-ROM.
I. Accessories
- USB line (1)
- High-fi delity headset (1)
- CD-ROM (1)
- Instruction (1)
Declaration of conformity
We,
Nedis B.V.
De Tweeling 28
Declare that product:
Name: KONIG
Model: DMR-STICK6
Description: Digital voice recorder
Is in conformity with the following standards
EMC: EN 55022: 2006
EN 55024: 1998 + A1 : 2001 + A2 : 2003
Following the provisions of the 2004/108/EC directive.
's-Hertogenbosch, 2008, March 03

Mrs. J. Gilad
Purchase Director
Safety precautions:
This product should ONLY be opened by an authorized technician when service is required. Do not expose the product to water or moisture.
Maintenance:
Clean only with a dry cloth. Do not use cleaning solvents or abrasives.
Warranty:
No guarantee or liability can be accepted for any changes and modifications of the product or damage caused due to incorrect use of this product.
General:
Designs and specifications are subject to change without notice.
All logos brands and product names are trademarks or registered trademarks of their respective holders and are hereby recognized as such.

Attention:
This product is marked with this symbol. It means that used electrical and electronic products should not be mixed with general household waste. There is a separate collections system for these products.
Copyright ©
CE

| MANUAL | ANLEITUNG |
| MODE D'EMPLOI | GEBRUIKSAANWIJZING |
| MANUALE | MANUAL DE USO |
| HASZNÁLATI ÚTMUTATÓ | KÄYTTÖOHJE |
| BRUKSANVISNING | NÁVOD K POUŽITÍ |
| MANUAL DE UTILIZARE |
Aussehen
| MANUAL | ANLEITUNG |
| MODE D'EMPLOI | GEBRUIKSAANWIJZING |
| MANUALE | MANUAL DE USO |
| HASZNÁLATI ÚTMUTATÓ | KÄYTTÖOHJE |
| BRUKSANVISNING | NÁVOD K POUŽITÍ |
| MANUAL DE UTILIZARE |
Présentation
| MANUAL | ANLEITUNG |
| MODE D'EMPLOI | GEBRUIKSAANWIJZING |
| MANUALE | MANUAL DE USO |
| HASZNÁLATI ÚTMUTATÓ | KÄYTTÖOHJE |
| BRUKSANVISNING | NÁVOD K POUŽITÍ |
| MANUAL DE UTILIZARE |
Uiterlijk
1.1 Beeldscherm

| MANUAL | ANLEITUNG |
| MODE D'EMPLOI | GEBRUIKSAANWIJZING |
| MANUALE | MANUAL DE USO |
| HASZNÁLATI ÚTMUTATÓ | KÄYTTÖOHJE |
| BRUKSANVISNING | NÁVOD K POUŽITÍ |
| MANUAL DE UTILIZARE |
Aspetto
1.1 Schermo display

| MANUAL | ANLEITUNG |
| MODE D'EMPLOI | GEBRUIKSAANWIJZING |
| MANUALE | MANUAL DE USO |
| HASZNÁLATI ÚTMUTATÓ | KÄYTTÖOHJE |
| BRUKSANVISNING | NÁVOD K POUŽITÍ |
| MANUAL DE UTILIZARE |
Apariencia
MANUAL
MODE D'EMPLOI
MANUALE
HASZNÁLATI ÚTMUTATÓ
BRUKSANVISNING
MANUAL DE UTILIZARE
ANLEITUNG
GEBRUIKSAANWIJZING
MANUAL DE USO
KÄYTTÖOHJE
NÁVOD K POUŽITÍ
| MANUAL | ANLEITUNG |
| MODE D'EMPLOI | GEBRUIKSAANWIJZING |
| MANUALE | MANUAL DE USO |
| HASZNÁLATI ÚTMUTATÓ | KÄYTTÖOHJE |
| BRUKSANVISNING | NÁVOD K POUŽITÍ |
| MANUAL DE UTILIZARE |
Ulkokuori
1.1 Näyttö

| MANUAL | ANLEITUNG |
| MODE D'EMPLOI | GEBRUIKSAANWIJZING |
| MANUALE | MANUAL DE USO |
| HASZNÁLATI ÚTMUTATÓ | KÄYTTÖOHJE |
| BRUKSANVISNING | NÁVOD K POUŽITÍ |
| MANUAL DE UTILIZARE |
Utseende
1.1 Displayskärm

MANUAL
MODE D'EMPLOI
MANUALE
HASZNÁLATI ÚTMUTATÓ
BRUKSANVISNING
MANUAL DE UTILIZARE
ANLEITUNG
GEBRUIKSAANWIJZING
MANUAL DE USO
KÄYTTÖOHJE
NÁVOD K POUŽITÍ
Vzhled prístroje

MANUAL
MODE D'EMPLOI
MANUALE
HASZNÁLATI ÚTMUTATÓ
BRUKSANVISNING
MANUAL DE UTILIZARE
ANLEITUNG
GEBRUIKSAANWIJZING
MANUAL DE USO
KÄYTTÖOHJE
NÁVOD K POUŽITÍ
Descriere
1.1 Afi şaj


- APPEARANCE
- 1.2 FUNCTION OF KEYS
- FUNCTIONS
- BATTERY DEVICE
- WARNING
- OPERATION
- TURN ON/OFF AND TIME CHECKING
- RECORD
- RUNNING
- CYCLE MODE
- (A-B) REPEAT
- (10)DELETE
- MP3 PLAY
- 008 MP3
- PLAYING MODE
- KEY LOCKING
- MENU SETTING
- JUNCTION BOX
- USB FILE UPLOADING/DOWNLOADING(MOBILE DISK)
- ACCESSORIES
- DECLARATION OF CONFORMITY
- SAFETY PRECAUTIONS
- MAINTENANCE
- WARRANTY
- GENERAL
- ATTENTION
- AUSSEHEN
- PRÉSENTATION
- UITERLIJK
- 888 MP3
- ASPETTO
- APARIENCIA
- ULKOKUORI
- UTSEENDE
- VZHLED PRÍSTROJE
- DESCRIERE
Brand : KONIG
Model : DMR-STICK6
Category : Voice recorder