
X2000-RM - Router CISCO - Free user manual and instructions
Find the device manual for free X2000-RM CISCO in PDF.


| Product Type | Router |
| Brand | Cisco |
| Model | X2000-RM |
| Dimensions (L x W x H) | 265 x 185 x 44 mm |
| Weight | 1.2 kg |
| Power Supply | 12 V DC, 1 A |
| Power Consumption | 12 W max |
| Operating Temperature | 0 °C to 40 °C |
| Operating Humidity | 10% to 90% (non-condensing) |
| Network Interfaces | 4 RJ-45 10/100/1000 ports, 1 WAN RJ-45 port |
| Wi-Fi Standards | 802.11b/g/n, dual band 2.4 and 5 GHz |
| Maximum Wi-Fi Speed | 300 Mbps (2.4 GHz) + 300 Mbps (5 GHz) |
| Wireless Security | WEP, WPA, WPA2, MAC filtering |
| Supported Protocols | IPv4, IPv6, DHCP, NAT, VPN (IPsec, PPTP, L2TP) |
| Main Functions | Router, access point, firewall, DHCP server |
| Mounting Type | Desktop or wall-mount (mounting kit included) |
| Maintenance and Cleaning | Wipe with a soft dry cloth. Do not use solvents. |
| Safety | Use only the supplied adapter. Do not open the casing. |
| Spare parts and repairability | Contact Cisco support for spare parts. Repair by authorized technician. |
| General Information | User manual available for download. Warranty: 2 years. |
Frequently Asked Questions - X2000-RM CISCO
User questions about X2000-RM CISCO
0 question about this device. Answer the ones you know or ask your own.
Ask a new question about this device
Download the instructions for your Router in PDF format for free! Find your manual X2000-RM - CISCO and take your electronic device back in hand. On this page are published all the documents necessary for the use of your device. X2000-RM by CISCO.
USER MANUAL X2000-RM CISCO
Set up your modem-router automatically .....6
Set up your modem-router manually....7
Connect your modem-router 7
Set up your modem-router as only a router 8
How to use Cisco Connect
How to access Cisco Connect....9
Main Menu 9
Main Menu – Computers and Devices 9
Main Menu - Parental Controls 9
Main Menu - Guest Access 9
Main Menu – Router Settings 10
Advanced Configuration
How to access the browser-based utility....11
How to use the browser-based utility....11
Setup > Basic Setup....12
Auto/ADSL mode 12
Ethernet mode 13
Manual setup 15
Wi-Fi Protected Setup 16
Wireless > Wireless Security....17
Personal Options 17
Office Options 17
Wireless Security 17
Wireless > Guest Access .....20
Guest Access 21
Guest Instructions 21
Troubleshooting
X2000. 22
Specifications
X2000. 24
Product Overview
Top


Ethernet If the LED is continuously lit, the Modem Router is successfully connected to a device through that port.

Wi-Fi Protected Setup™ Button Press this button to have Wi-Fi Protected Setup™ search for your Wi-Fi Protected Setup™-supported wireless device. The LED is continuously lit when a Wi-Fi Protected Setup™ connection is successfully established. The LED blinks slowly while Wi-Fi Protected Setup™ is setting up a connection, and blinks rapidly in amber if an error occurs. The LED is off when Wi-Fi Protected Setup™ is idle.

Wireless The Wireless LED lights up when the wireless feature is enabled. It flashes when the Modem Router is actively sending or receiving data over the network.

WAN Lights up white when the modem router is connected directly to an ADSL line. Lights up blue when the modem router is set up as a router only and is connected to the internet through a separate modem.

Power The Power LED lights up when the modem router is powered on. When the modem router goes through its self-diagnostic mode during every boot-up, the LED flashes. When the diagnostic is complete, the LED is continuously lit.
Back


DSL—Connects to the ADSL line.

Cable—To use the modem router as only a router, use a network cable to connect this port to a separate modem's LAN/Ethernet port.

Ethernet—Using Ethernet cables (also called network cables), these Ethernet ports connect the modem router to computers and other Ethernet network devices on your wired network.

Power—The Power port connects to the included power adapter.

Power button—Press | (on) to turn on the modem router.
Bottom
- Reset—This button allows you to reset the router to its factory defaults. Press and hold the Reset button for approximately five seconds.
Wall-mounting placement
The Router has two wall-mount slots on its bottom panel. The distance between the slots is 175.56 mm. Two screws are needed to mount the Router.

NOTE
Cisco is not responsible for damages incurred by unsecured wall-mounting hardware.
Follow these instructions:
- Determine where you want to mount the Router. Make sure that the wall you use is smooth, flat, dry, and sturdy. Also make sure the location is within reach of an electrical outlet.
- Drill two holes into the wall. Make sure the holes are 175 mm apart.
- Insert a screw into each hole and leave 3 mm of its head exposed.
- Position the Router so the wall-mount slots line up with the two screws.
- Place the wall-mount slots over the screws and slide the Router down until the screws fit snugly into the wall-mount slots.
Wall-mounting template
Print this page at 100% size. Cut along the dotted line, and place on the wall to drill precise spacing.
175 mm
Installation
Set up your modem-router automatically
- Insert the CD into your CD or DVD drive.
- Click Set up your Linksys Router.

If you do not see this:
- For Windows, click Start, Computer, then double-click the CD drive and the Setup icon.
-
For Mac, double-click the CD icon on your desktop, then double-click the Setup icon.
-
Read the license terms, select the checkbox, then click Next.
- At the How will you be using your X2000 screen, click Modem router or Router only, then click Next.

- Modem router: Use the X2000 as both a DSL modem and a router. If you have a DSL Internet service provider, this option provides Internet access and networking connectivity to your home's computers, without the need for a separate modem and router.
- Router only: If you have a separate cable or DSL modem for Internet access, this option provides networking connectivity to your home's computers.
The We are now setting up your Linksys X2000 screen opens. You are then asked to connect your router's cables.
- If you chose Modem router in Step 4:
a. Connect the power cable, then turn on the power switch.
b. Connect the gray cable to the modem-router's DSL port and to a telephone jack on your wall.

Or, if you chose Router only in Step 4:
a. Connect the power cable, then turn on the power switch.
b. Connect the blue cable to the Cable port on the back of your router and to the modem.

- Follow the on-screen instructions to finish the setup.
Set up your modem-router manually
NOTE
Run the Setup CD-ROM to install the modem-router. If you cannot run the Setup CD-ROM, refer to the steps below.
NOTE
If you are setting up your modem-router in New Zealand, see "NOTE FOR USERS IN NEW ZEALAND" on page 8.
Connect your modem-router
To connect your modem-router:
- Power down all your network devices, including your computer(s) and the modem-router. If you currently use a modem, disconnect it now—the modem-router replaces your modem.
- Connect one end of the provided Ethernet cable to your computer's Ethernet adapter and the other end to an Ethernet port on the back of the modem-router.

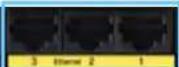

- Repeat step 2 for each additional computer or device that you want to connect to the modem-router.
NOTE
If your computer's Ethernet adapter is not set up, refer to the Ethernet adapter's documentation for more information.
- Connect one end of the phone cable to the DSL port on the back.

- Connect the other end of the phone cable to the wall jack with ADSL service or microfilter.
NOTE
If you experience static on your phone line, you may need a microfilter or splitter. (This is required for users in the UK; other users should contact their ISPs to verify. ISDN users do not need a microfilter.) If you require a microfilter, you must install one for each phone or fax that you use. To install a microfilter, plug it into a phone jack that has ADSL service, then connect one end of the provided phone cable to the microfilter's DSL port.
- Connect one end of the power adapter cord to the Power port and the other end to the electrical outlet.

- Power on the computer that you will use to configure the modem-router.
- The LEDs for Power, Wireless, and Ethernet (one for each connected computer) should light up. If not, make sure the modem-router is powered on and the cables are securely connected.
Set up your modem-router as only a router
NOTE
Run the Setup CD-ROM to install the modem-router. If you cannot run the Setup CD-ROM, refer to the steps below.
To set up your modem-router as a router:
- Connect one end of the provided Ethernet cable to your computer's Ethernet adapter and the other end to an Ethernet port on the back of the modem-router.

- Connect one end of an Ethernet cable to the Cable port on the back of the modem-router, then connect the other end to an available Ethernet/LAN port on your modem.

- Connect one end of the power adapter cord to the Power port and the other end to the electrical outlet.

-
Power on the computer that you will use to configure the modem-router.
-
The LEDs for Power, Wireless, and Ethernet (one for each connected computer) should light up. If not, make sure the modem-router is powered on and the cables are securely connected.
NOTE FOR USERS IN NEW ZEALAND
To set up the device, follow these instructions:
- Access the Setup > Basic Setup screen.
- Select RFC 2364 PPPoA from the Encapsulation drop-down menu.
- For the Virtual Circuit ID, enter 0 for the VPI and 100 for the VCI.
- Select VC for Multiplexing.
- Select Multimode from the DSL Modulation drop-down menu.
- Enter your User Name and Password details from your ISP.
- Click Save Settings.
How to use Cisco Connect
Cisco Connect provides an easy way to manage your router and network. You can connect computers or devices to your router, give Internet access to guests in your home, and change the router's settings.
How to access Cisco Connect
Windows
Go to Start > All Programs > Cisco Connect.
Mac
Go to Go > Applications > Cisco Connect.
Main Menu
When Cisco Connect starts up, the main menu appears and offers four options: Computers and Devices, Parental Controls, Guest Access, and Router Settings.

Main Menu – Computers and Devices
Use this option to connect another computer or device to the router.
- To connect another computer or device to the router, click Add device. Then, follow the on-screen instructions.
Main Menu – Parental Controls
Parental controls restrict Internet access for up to five computers. For the computers you select, you can block or limit Internet access to specific times. You can also block specific websites.
- To enable parental controls or change settings, click Change. Then, follow the on-screen instructions.
Main Menu – Guest Access
Guest Access provides Internet access only; it does not provide access to the local network and its resources. Guest Access helps minimize exposure of your local network. To give Internet access to friends or family, provide the guest network name and password displayed on this screen.
When a guest wants Internet access in your home, have the guest do the following:
- Connect to the wireless guest network, which is the name of your wireless network followed by -guest.
- Open a web browser.
- On the login screen, enter the password of your guest network. Then click Login.
- To disable Guest Access or change settings, click Change. Then, follow the on-screen instructions.
Main Menu – Router Settings
Use this option to personalize the router's settings.
- To change settings, click Change. The Router settings screen appears.

Personalize
Router name The name of the router is displayed (this is also the name of your wireless network). To change the name, click Change. Then, follow the on-screen instructions.
Password The password that protects access to the router's settings is displayed (this also protects wireless access to your local network). To change the password, click Change. Then, follow the on-screen instructions.
CAUTION
When you change the router name or password, the name or password of your wireless network also changes, and the router is reset. ALL computers and devices connected to your router will momentarily lose their Internet connection. Wired computers and devices will reconnect automatically; however, you will need to reconnect all wireless computers and devices using the wireless network's new name or password.
Port Lights
on/off To allow the lights on the router's back panel to turn on, keep the default, on.
Easy Setup Key
Update or create key The Easy Setup Key is a USB flash drive that holds the wireless settings for the router. If you want to create or update an Easy Setup Key, click this option. Then, follow the on-screen instructions.
Internet Speed
Launch Test You can use the Internet speed test to determine your ISP's current download and upload speeds. Connection speed depends on many factors, and may change throughout the day. To run the speed test, click this option. Then, follow the on-screen instructions.
Other Options
Register now to receive special offers and updates To sign up to receive special offers and updates from Cisco and Cisco partners, click this option.
Router details To view more information about the router, click this option. The Router details screen appears, displaying the Model name, Model number, Serial number, Firmware version, Operating system, Software version, Connection type (WAN), IP address (LAN), IP address (WAN), and Computer IP address. (WAN stands for Wide Area Network, such as the Internet. IP stands for Internet Protocol. LAN stands for Local Area Network.)
Advanced settings To access settings for advanced users, click this option. Then, follow the on-screen instructions.
Advanced Configuration
After setting up the router with the setup software (located on the CD-ROM), the router will be ready for use. If you would like to change its advanced settings, or if the software does not run, use the router's browser-based utility. You can access the utility via a web browser on a computer connected to the router. For more help with the utility, click Help on the right side of the screen or go to our website.
How to access the browser-based utility
- To access the browser-based utility, launch the web browser on your computer, and enter the router's default Internet Protocol (IP) address, 192.168.1.1, in the Address field. Then press Enter.
NOTE You can also access the browser-based utility on Windows computers by entering the device name in the Address field.
A login screen appears. (A similar screen appears for non-Windows 7 users.)

-
In the User name field, enter admin.
-
In the Password field, enter the password created by the setup software. If you did not run the setup software, then enter the default, admin.
NOTE You can also access the browser-based utility through Cisco Connect.
- Click OK to continue.
How to use the browser-based utility
Use the tabs at the top of each screen to navigate within the utility. The tabs are arranged in two levels, top-level tabs for general functions and lower-level tabs for the corresponding specific functions.

The top-level tabs are: Setup, Wireless, Security, Access Restrictions, Applications & Gaming, Administration, and Status. Each of these has its own unique, lower-level tabs.
NOTE Within this User Guide, each screen is identified by its top- and lower-level tab names. For example, "Setup > Basic Setup" is the screen accessed via the Setup top-level tab, and its Basic Setup lower-level tab.
If you change any settings on a screen, you must click Save Settings to apply your changes, or click Cancel Changes to clear your changes. These controls are located at the bottom of each screen.

NOTE To learn more about any field, click Help on the right side of the screen.
Setup > Basic Setup
The first screen that appears is the Basic Setup screen. This allows you to change the router's general settings.
Auto/ADSL mode
ADSL mode (default) has the following fields that should be completed:

Language
Select your language To use a different language, select one from the dropdown menu. The language of the browser-based utility will change five seconds after you select another language.
Internet Setup
The Internet Setup section configures the router to your Internet connection. Most of this information can be obtained through your Internet Service Provider (ISP).
Internet Connection Type
Select the type of Internet connection your ISP provides from the drop-down menu. The available types are:
• Bridged Mode Only
• RFC 2684 Bridged
• RFC2684 Routed
• IPoA
• RFC 2516 PPPoE
• RFC2364 PPPoA
Bridged Mode Only
In this mode, only the DSL modem function is available, and all Gateway features are disabled. If selected, you only need to enter the VC Settings.
RFC 2684 Bridged
If selected, enter the correct data for the IP Settings. Select Obtain an IP address automatically if your ISP allocates an IP address upon connection. Otherwise, select Use the following IP address.
RFC2684 Routed
With this method, you are required to use a permanent IP address to connect to the Internet.
IPoA
IPoA (IP over ATM) uses a fixed IP address.
RFC 2516 PPPoE
Some DSL-based ISPs use PPPoE (Point-to-Point Protocol over Ethernet) to establish Internet connections. If you are using PPPoE, your IP address is provided automatically.
RFC2364 PPPoA
Some DSL-based ISPs use PPPoA (Point-to-Point Protocol over ATM) to establish Internet connections. If using PPPoA, your IP address is provided automatically.
Network Setup
The Network Setup section configures the IP settings for your local network.
Ethernet mode
If you select Ethernet (router-only) mode, the following fields are available:

Language
Select your language To use a different language, select one from the dropdown menu. The language of the browser-based utility will change five seconds after you select another language.
Internet Setup
The Internet Setup section configures the router to your Internet connection. Most of this information can be obtained through your Internet Service Provider (ISP).
Internet Connection Type
Select the type of Internet connection your ISP provides from the drop-down menu. The available types are:
• Automatic Configuration - DHCP
• Static IP
- PPPoE
• PPTP
• L2TP
• Telstra Cable
Automatic Configuration - DHCP
The default Internet Connection Type is Automatic Configuration - DHCP (Dynamic Host Configuration Protocol). Keep the default only if your ISP supports DHCP or if you connect using a dynamic IP address. (This option usually applies to cable connections.)
Static IP
If you are required to use a fixed IP address to connect to the Internet, select Static IP.
PPPoE
If you have a DSL connection, check whether your ISP uses Point-to-Point Protocol over Ethernet (PPPoE). If so, select PPPoE.
Connect on Demand or Keep Alive
The Connect on Demand and Keep Alive options let you choose whether the router connects to the Internet only as needed (useful if your ISP charges for connect time), or if the router should always be connected. Select the appropriate option.
PPTP
Point-to-Point Tunneling Protocol (PPTP) is a service that generally applies to connections in Europe.
If your PPTP connection supports DHCP or a dynamic IP address, then select Obtain an IP Address Automatically. If you are required to use a fixed IP address to connect to the Internet, then select Specify an IP Address and configure the options below.
L2TP
Layer 2 Tunneling Protocol (L2TP) is a service that generally applies to connections in Israel.
Telstra Cable
Telstra Cable is a service that generally applies to connections in Australia.
Network Setup
The Network Setup section configures the IP settings for your local network.
Wireless > Basic Wireless Settings
NOTE To learn more about any field, click Help on the right side of the screen.
The basic settings for wireless networking are set on this screen.
There are two ways to configure the Router's wireless network(s), manual and Wi-Fi Protected Setup.
Wi-Fi Protected Setup is a feature that makes it easy to set up your wireless network. If you have client devices, such as wireless adapters, that support Wi-Fi Protected Setup, then you can use Wi-Fi Protected Setup.
Configuration View To manually configure your wireless networks, select Manual.

Manual setup
Set up the wireless network on this screen.
NOTE
After you set up the wireless network(s), set up the wireless security settings. Go to "Wireless > Wireless Security" on page 17.
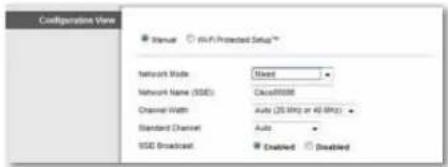
Network Mode In most network configurations, you should leave it set to Mixed (default).
Wireless settings

Basic Wireless Settings (Manual) > Wireless Settings
Network Mode Select the wireless standards your network will support.
- Mixed If you have Wireless-N, Wireless-G, and Wireless-B devices in your network, keep the default, Mixed.
- Wireless-B/G Only If you have both Wireless-B and Wireless-G devices in your network, select Wireless-B/G Only.
- Wireless-B Only If you have only Wireless-B devices, select Wireless-B Only.
-
Wireless-G Only If you have only Wireless-G devices, select Wireless-G Only.
-
Wireless-N Only If you have only Wireless-N devices, select Wireless-N Only.
- Disabled If you have no Wireless-B, Wireless-G, and Wireless-N devices in your network, select Disabled.
NOTE
If you are not sure which mode to use, keep the default, Mixed.
Network Name (SSID) The Service Set Identifier (SSID) is the network name shared by all devices in a wireless network. It is case-sensitive and must not exceed 32 keyboard characters. The default is Cisco followed by the last 5 digits of the router's serial number, which is found on the bottom of the router. If you used the setup software for installation, then the default Network Name is changed to an easy-to-remember name.
NOTE
If you restore the router's factory default settings (by pressing the Reset button or using the Administration > Factory Defaults screen), the Network Name will return to its default value, and all devices on your wireless network will need to be reconnected.
Channel Width For best performance in a network using Wireless-B, Wireless-G and Wireless-N devices, select Auto (20 MHz or 40 MHz). For a channel width of 20 MHz, keep the default, 20 MHz only.
Channel Select the channel from the drop-down list for Wireless-B, Wireless-G, and Wireless-N networking. If you are not sure which channel to select, then keep the default, Auto.
SSID Broadcast When wireless clients survey the local area for wireless networks to associate with, they will detect the SSID broadcast by the router. To broadcast the router's SSID, keep the default, Enabled. If you do not want to broadcast the router's SSID, then select Disabled.
Wi-Fi Protected Setup
Three methods of Wi-Fi Protected Setup are available. Use the method that applies to the client device you are configuring.

NOTE
Wi-Fi Protected Setup configures one client device at a time. Repeat the instructions for each client device that supports Wi-Fi Protected Setup.
Wi-Fi Protected Setup light activity
- The Cisco logo on the top panel of the router functions as the Wi-Fi Protected Setup light.
- When the Wi-Fi Protected Setup process is active, the light flashes slowly. When the Wi-Fi Protected Setup is successful, the light is continuously lit.
- If there is an error, the light flashes quickly for two minutes; please wait and try again.
- Wait until the light is continuously lit, before starting the next Wi-Fi Protected Setup session.
- Wi-Fi Protected Setup Button Use this method if your client device has a Wi-Fi Protected Setup button.
NOTE
Make sure you configure one client device at a time.

a. Click or press the Wi-Fi Protected Setup button on the client device.
b. Click the Wi-Fi Protected Setup button on the router's Wi-Fi Protected Setup screen, OR press and hold the Wi-Fi Protected Setup button on the back panel of the router for one second.
c. After the client device has been configured, click OK on the router's Wi-Fi Protected Setup screen within two minutes.
- Enter Client Device PIN on Router Use this method if your client device has a Wi-Fi Protected Setup PIN (Personal Identification Number).

a. Enter the PIN from the client device in the field on the router's Wi-Fi Protected Setup screen.
b. Click the Register button on the router's Wi-Fi Protected Setup screen.
c. After the client device has been configured, click OK on the router's Wi-Fi Protected Setup screen within two minutes.
- Enter Router PIN on Client Device Use this method if your client device asks for the router's PIN.
- If your client asks for the Router's PIN number, enter this number 76201196 in your client device.
a. On the client device, enter the PIN listed on the router's Wi-Fi Protected Setup screen. (It is also listed on the bottom of the router.)
b. After the client device has been configured, click OK on the router's Wi-Fi Protected Setup screen within two minutes.
For each wireless network, the Network Name (SSID), Security, and Passphrase are displayed at the bottom of the screen.
NOTE
If you have client devices that do not support Wi-Fi Protected Setup, note the wireless settings, and then manually configure those client devices.
Wireless > Wireless Security
The wireless security settings configure the security of your wireless network(s). The router supports the following wireless security options: WPA2/WPA Mixed Mode, WPA2 Personal, WPA Personal, WPA2/WPA Enterprise Mixed Mode, WPA2 Enterprise, WPA Enterprise, WEP, and RADIUS. (WPA stands for Wi-Fi Protected Access. WEP stands for Wireless Equivalent Privacy. RADIUS stands for Remote Authentication Dial-In User Service.)
NOTE
To learn more about any field, click Help on the right side of the screen.
Personal Options
| Security Option Strength | |
| WPA2 Personal Strongest | |
| WPA2/WPA Mixed Mode | WPA2: StrongestWPA: Strong |
| WPA Personal Strong | |
| WEP Basic | |
Office Options
The office options are available for networks that use a RADIUS server for authentication. The office options are stronger than the personal options because WPA2 or WPA provides encryption while RADIUS provides authentication.
| Security Option Strength | |
| WPA2 Enterprise | Strongest |
| WPA2/WPA Enterprise Mixed Mode | WPA2: StrongestWPA: Strong |
| WPA Enterprise | Strong |
| RADIUS | Basic |
Wireless Security
Wireless security is strongly recommended, and WPA2 is the strongest method available. Use WPA2 if it is supported by all of your wireless devices.
Security Mode
Select the security option for your wireless network. Then go to the instructions for your selection.
WPA2/WPA Mixed Mode
NOTE
If you select WPA2/WPA Mixed Mode as your Security Mode, each device in your wireless network MUST use WPA2/WPA and the same passphrase.
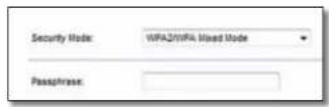
Passphrase Enter a passphrase of 8-63 characters. The default is password. If you used the setup software for installation, then the default is changed to a unique passphrase.
WPA2 Personal
NOTE
If you select WPA2 Personal as your Security Mode, each device in your wireless network MUST use WPA2 Personal and the same passphrase.
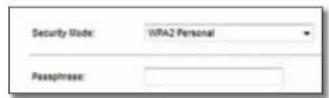
Passphrase Enter a passphrase of 8-63 characters. The default is password. If you used the setup software for installation, then the default is changed to a unique passphrase.
WPA Personal
NOTE
If you select WPA Personal as your Security Mode, each device in your wireless network MUST use WPA Personal and the same passphrase.
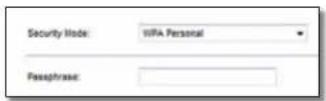
Passphrase Enter a passphrase of 8-63 characters. The default is password. If you used the setup software for installation, then the default is changed to a unique passphrase.
WPA2/WPA Enterprise Mixed Mode
This option features WPA2/WPA used in coordination with a RADIUS server. (This should only be used when a RADIUS server is connected to the router.)
NOTE
If you select WPA2/WPA Enterprise Mixed Mode as your Security Mode, each device in your wireless network MUST use WPA2/WPA Enterprise and the same shared key.
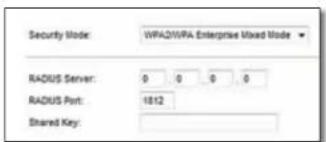
RADIUS Server Enter the IP address of the RADIUS server.
RADluS Port Enter the port number of the RADIUS server. The default is 1812.
Shared Key Enter the key shared between the router and the server.
WPA2 Enterprise
This option features WPA2 used in coordination with a RADIUS server. (This should only be used when a RADIUS server is connected to the router.)
NOTE
If you select WPA2 Enterprise as your Security Mode, each device in your wireless network MUST use WPA2 Enterprise and the same shared key.

RADluS Server Enter the IP address of the RADIUS server.
RADIuS Port Enter the port number of the RADIUS server. The default is 1812.
Shared Key Enter the key shared between the router and the server.
WPA Enterprise
This option features WPA used in coordination with a RADIUS server. (This should only be used when a RADIUS server is connected to the router.)
NOTE
If you select WPA Enterprise as your Security Mode, each device in your wireless network MUST use WPA Enterprise and the same shared key.
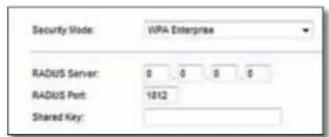
RADIuS Server Enter the IP address of the RADIUS server.
RADluS Port Enter the port number of the RADIUS server. The default is 1812.
Shared Key Enter the key shared between the router and the server.
WEP
WEP is a basic encryption method, which is not as secure as WPA.
NOTE
If you select WEP as your Security Mode, each device in your wireless network MUST use WEP and the same encryption and shared key.
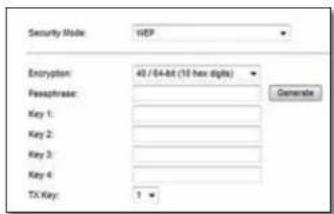
Encryption Select a level of WEP encryption, (40/64-bit 10 hex digits) or 104/128-bit (26 hex digits). The default is 40/64-bit (10 hex digits).
Passphrase Enter a passphrase to automatically generate WEP keys. Then click Generate.
Key 1-4 If you did not enter a passphrase, enter the WEP key(s) manually.
TX Key Select a default TX (Transmit) Key to use. The default is 1.
RADIUS
This option features WEP used in coordination with a RADIUS server. (This should only be used when a RADIUS server is connected to the router.)
NOTE
If you select RADIUS as your Security Mode, each device in your wireless network MUST use RADIUS and the same encryption and shared key.
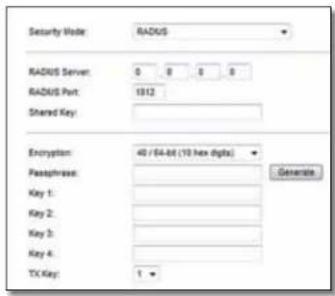
RADIuS Server Enter the IP address of the RADIUS server.
RADIuS Port Enter the port number of the RADIUS server. The default is 1812.
Shared Secret Enter the key shared between the router and the server.
Encryption Select a level of WEP encryption, (40/64-bit 10 hex digits) or 104/128-bit (26 hex digits). The default is 40/64-bit (10 hex digits).
Passphrase Enter a passphrase to automatically generate WEP keys. Then click Generate.
Key 1-4 If you did not enter a passphrase, enter the WEP key(s) manually.
TX Key Select a default TX (Transmit) Key to use. The default is 1.
Disabled
If you choose to disable wireless security, you will be informed that wireless security is disabled when you first attempt to access the Internet. You will given the option to enable wireless security, or confirm that you understand the risks but still wish to proceed without wireless security.
NOTE
When wireless security is disabled, anyone can access your wireless network at any time.

Wireless > Guest Access
The Guest Access feature allows you to provide guests visiting your home with Internet access via wireless. The guest network is a wireless network separate from your local network. The Guest Access feature does not provide access to the local network and its resources, so your guests will not have access to your computers or personal data. For example, the guest computer cannot print to a printer on the local network or copy files to a computer on the local network. This helps minimize exposure of your local network.
NOTE
To learn more about any field, click Help on the right side of the screen.
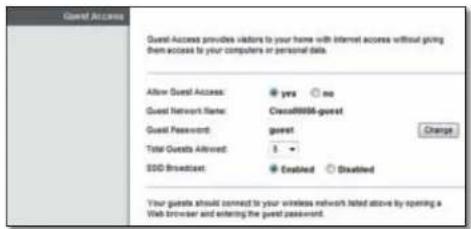
Guest Access
Allow Guest Access To allow Internet access through a guest network, keep the default, yes. Otherwise, select no.
Guest Network Name The default is the name of your wireless network, followed by -guest.
Guest Password The default is guest. If you used the setup software for installation, then the default is changed to a unique password.
Change Click this option to change the Guest Password. The Change Guest Password screen appears.
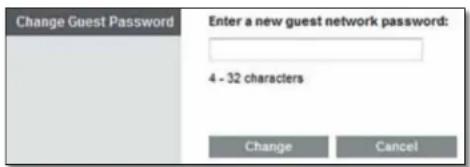
Change Guest Password
- Enter a new guest network password Enter a password of 4-32 characters.
Then click Change to save the new password and return to the Guest Access screen.
Total Guests Allowed By default, 5 guests are allowed Internet access through the guest network. Select the number of guests you want to allow on your guest network.
SSID Broadcast When wireless devices survey the local area for wireless networks to associate with, they will detect the SSID (wireless network name) broadcast by the router. To broadcast the SSID of the guest network, keep the default, Enabled. If you do not want to broadcast the SSID of the guest network, then select Disabled.
Guest Instructions
When a guest wants Internet access in your home, provide these instructions:
- On the guest computer, connect to the wireless guest network named on the Guest Access screen.
- Open a web browser.
- On the login screen, enter the password displayed on the Guest Access screen.
- Click Login.
Troubleshooting
X2000
Your computer cannot connect to the Internet.
Follow the instructions until your computer can connect to the Internet:
- Make sure that the Modem Router is powered on. The Power LED should be green and not flashing.
- If the Power LED is flashing, then power off all of your network devices, including the Modem Router and computers. Then power on each device in the following order:
a. Modem Router
b. Computer
- Check the LEDs on the device's front panel. Make sure the Power, DSL, and at least one of the numbered Ethernet LEDs are lit. If they are not, then check the cable connections. The computer should be connected to one of the Ethernet ports numbered 1-4 on the device, and the device's DSL port must be connected to the ADSL line.
When you double-click the web browser, you are prompted for a user name and password. If you want to get rid of the prompt, follow these instructions.
Launch the web browser and perform the following steps (these steps are specific to Internet Explorer but are similar for other browsers):
- Select Tools > Internet Options.
- Click the Connections tab.
- Select Never dial a connection.
- Click OK.
You are using a static IP address and cannot connect.
Refer to Windows Help and change your Internet Protocol (TCP/IP) Properties to Obtain an IP address automatically.
The computer cannot connect wirelessly to the network.
Make sure the wireless network name or SSID is the same on both the computer and the device. If you have enabled wireless security, then make sure the same security method and key are used by both the computer and the device.
You need to modify the basic settings on the device.
Run the Setup Wizard on the Setup CD-ROM.
You need to modify the advanced settings on the device.
Open the web browser (for example, Internet Explorer or Firefox), and enter the device's IP address in the address field (the default IP address is 192.168.1.1). When prompted, complete the Username and Password fields (the default user name and password is admin). Click the appropriate tab to change the settings
You cannot use the DSL service to connect manually to the Internet.
After you have installed the router, it will automatically connect to your Internet Service Provider (ISP), so you no longer need to connect manually.
When you open the web browser, the login screen appears, even though you do not need to log in.
These steps are specific to Internet Explorer but are similar for other browsers.
- Open the web browser.
- Go to Tools > Internet Options.
- Click the Connections tab.
- Select Never dial a connection.
- Click OK.
The router does not have a coaxial port for the cable connection.
A coaxial cable can connect to only a cable modem. Your modem router works as a modem with your ADSL Internet, but if you have cable Internet, your modem router should be connected to a separate cable modem. Insert the Setup CD into your computer and follow the on-screen instructions to connect your modem-router to a cable modem.
You want to access the browser-based utility from Cisco Connect.
To enter the browser-based utility from Cisco Connect, follow these steps:
- Open Cisco Connect.
- On the main menu, click Router settings.
- Click Advanced settings.
- Write down the username and password that are displayed. (To help protect your password, you can copy it to the Clipboard by clicking Copy password.)
- Click OK.
When you try to log into the browser-based utility, your password does not work.
Your wireless security password also serves as the browser-based utility's login password. To see this password:
- Open Cisco Connect.
- On the main menu, click Router settings.
- The Password is displayed on the left side of the screen.
In Windows XP, you do not see the router in the My Network Places screen.
In the Network Tasks section, click Show icons for networked UPnP devices. If the router does not appear, follow these instructions:
- Go to Start > Control Panel > Firewall.
- Click the Exceptions tab.
- Select UPnP Framework.
- Click OK.
WEB If your questions are not addressed here, refer to the website, linksys.com/support
Specifications
X2000
Standards WLAN: 802.11n, 802.11g, 802.11b
Ethernet: 802.3, 802.3u
ADSL: T1.413i2, G.992.1 (G.DMT), G.992.2
(G.Lite), G.992.3 (ADSL2), G.992.5 (ADSL2+)
for Annex A, B, M, L, U-R2 for Annex B
Ports DSL, Cable, Ethernet (1-3), Power
Buttons On/Off, Reset, Wi-Fi Protected Setup™
LEDs Power, Ethernet (1-3), Wi-Fi Protected Setup, Wireless, Internet
Cabling Type CAT5, RJ-11 (for Annex A), RJ-45 (for Annex B)
Antennas 2 Internal
Modulations 802.11b: CCK/QPSK, BPSK
802.11g: OFDM/BPSK, QPSK, 16-QAM, 64-QAM
802.11n: OFDM/BPSK, QPSK, 16-QAM, 64-QAM
Transmit Power 802.11b: 16 ± 1.5 dBm
802.11g: 16 ± 1.5 dBm
802.11n: 18 ± 1.5 dBm
Receive Sensitivity 802.11b: -87 dBm (typical) @ 11 Mbps
802.11g: -72 dBm (typical) @ 54 Mbps
802.11n HT20: -71 dBm (typical) @ 130 Mbps
802.11n HT40: -68 dBm (typical) @ 270 Mbps
Security Features WPA2™/WPA™ Personal and Enterprise;
128, 64 bits WEP; MAC Address Filtering;
SPI Firewall
OS Requirements Windows 7, Windows Vista, Windows Vista
(for Setup wizard) 64-bit edition (with Network Magic and Setup
Wizard), or Windows XP
Mac OS X 10.5 or higher
Environmental
Dimensions 202 x 34 x 160 mm (8.0" x 1.3" x 6.3")
Weight 287 g (10.1 oz)
Power 12VDC, 1A
Certification FCC, CE, Telepermit, K.21, UL, CB,
Wi-Fi (802.11b/g), WPA™, WPA2™, WMM,
Wi-Fi Protected Setup™
Operating Temperature 0 to 40°C (32 to 104°F)
Storage Temperature -20 to 70°C (-4 to 158°F)
Operating Humidity 10 to 85% Noncondensing
Storage Humidity 5 to 90% Noncondensing
NOTES
For regulatory, warranty, and safety information, see the CD that came with your modem router or go to Linksys.com/support.
Specifications are subject to change without notice.
Maximum performance derived from IEEE Standard 802.11 specifications. Actual performance can vary, including lower wireless network capacity, data throughput rate, range and coverage. Performance depends on many factors, conditions and variables, including distance from the access point, volume of network traffic, building materials and construction, operating system used, mix of wireless products used, interference and other adverse conditions.
المحتويات
ال közويين المتقدم

ملاحظة
(تVisual الموجه) لعرض المزيد من المعلومات حول Mortgage. ت typér Router details Model (اسم الطار) و (رقم النسلىي) و (رقم النسلىي) و (رقم النسلىي) Router details الشاشة (system number) و (Operating system) و (Connection type) و (IP) LAN IP address و (WAN) IP address و (WAN) IP address و (IP) LAN IP address و (WAN) IP address و (IP) LAN IP address و (WAN) IP address و (IP) LAN IP address و (IP) LAN IP address و (IP) LAN IP address و (IP) LAN IP address و (IP) LAN IP address و (IP) LAN IP address و (IP) LAN IP address و (IP) LAN IP address و (IP) LAN IP address و (IP) LAN IP address و (IP) LAN IP address و (IP) LAN IP address و (IP) LAN IP address و (IP) LAN IP address و (IP) LAN IP Address
Conversion Goal: You can find your ability to use your own information. You can find your ability to use your own information. You can find your ability to use your own information. You can find your ability to use your own information. You can find your ability to use your own information. You can find your ability to use your own information. You can find your ability to use your own information. You can find your ability to use your own information. You can find your ability to use your own information. You can find your ability to use your own information.

(اللغة) Language
(DHCP - تكوين تلقاني) Automatic Configuration - DHCP
ملاحظة
Wi-Fi Protected Setup™
Use one of following for each Wi-Fi Protected Setup™ supported device:
- If your client device has a Wi-Fi
Protected Setup™ button, click or press
that button and then click the button on the
right.

- If your client device has a Wi-Fi Protected Setup™ PIN number, enter that number
here
and then click
Register
(المختلم) WPA2/WPA (وضع) WPA2/WPA Mixed Mode
ملاحظة
(RADIUS Port) (RADIUS) : Acceptable Available for RADIUS.
1812
.RADIUS IP (RADIUS Server) أدخل عنوان (CADIUS)
(1) رسمان نفید لخادم (RADIUS) (رسمان نفید) RADIUS Port
.1812
(أ)-(دخل) Enter a new guest network password 1.
™Wi-Fi Protected Setup
0 to 40°C
-20 to 70°C
10 to 85% Noncondensing
5 to 90% Noncondensing
الشهادات
حرارة التشفيل
حرارة النخزين
نسبة رطوبة النشغيل
نسبة رطوبة النخزين
ملاحظة
ADSL: T1.413i2, G.992.1 (G.DMT), G.992.2
(G.Lite), G.992.3 (ADSL2), G.992.5 (ADSL2+)
for Annex A, B, M, L, U-R2 for Annex B
Power (الطاقة) , DSL, Cable, Ethernet (1-3)
Wi-Fi Protected Setup 60
Wireless > Wireless-Sicherheit .....61

Personalisieren
Sprache
Sprache
Wi-Fi Protected Setup
HINWEIS
Wi-Fi Protected Setup™
Use one of following for each Wi-Fi Protected Setup™ supported device:
- If your client device has a Wi-Fi Protected Setup™ button, click or press that button and then click the button on the right.

- If your client asks for the Router's PIN number, enter this number 76201196 in your client device.
Gastzugriff
Gastpasswort ändern
ADSL: T1.413i2, G.992.1 (G.DMT), G.992.2
(G.Lite), G.992.3 (ADSL2), G.992.5 (ADSL2+)
Tasten On/Off (Ein/Aus), Reset, Wi-Fi Protected Setup™
LEDs Power (Netzstrom), Ethernet (1-3),
Wi-Fi Protected Setup, Wireless, Internet
Wi-Fi (802.11b/g/n), WPA™, WPA2™, WMM,
Wi-Fi Protected Setup™
Wi-Fi Protected Setup 82
Wireless > Wireless Security

Language (Idioma)
Language (Idioma)
Wi-Fi Protected Setup
NOTA
Wi-Fi Protected Setup™
Use one of following for each Wi-Fi Protected Setup™ supported device:
- If your client device has a Wi-Fi Protected Setup™ button, click or press that button and then click the button on the right.
- If your client device has a Wi-Fi Protected Setup™ PIN number, enter that number here and then click Register
- If your client asks for the Router's PN number, enter this number 76201196 in your client device.
Encryption (Encriptación) Seleccione el nivel de encriptación WEP, (40/64-bit 10 hex digits) (40/64 bits, 10 dígitos hexadecimales) o 104/128-bit (26 hex digits) (104/128 bits, 26 dígitos hexadecimales). El valor predeterminado es 40/64 bit (10 hex digits) (40/64 bits, 10 dígitos hexadecimales).
ADSL: T1.413i2, G.992.1 (G.DMT), G.992.2
(G.Lite), G.992.3 (ADSL2), G.992.5 (ADSL2+)
Wi-Fi (802.11b/g/n), WPA™, WPA2™, WMM,
Wi-Fi Protected Setup™
Temperatura de
Wi-Fi Protected Setup 105

Langue
Langue
Wi-Fi Protected Setup
REMARQUE
Wi-Fi Protected Setup™
Use one of following for each Wi-Fi Protected Setup™ supported device:
- If your client device has a Wi-Fi Protected Setup™ button, click or press that button and then click the button on the right.

Accès invité
ADSL: T1.413i2, G.992.1 (G.DMT), G.992.2
(G.Lite), G.992.3 (ADSL2), G.992.5 (ADSL2+)
Ports DSL, Cable, Ethernet (1-3), Power (Alimentation)
Boutons On/Off (Alimentation), Reset (Réinitialisation),
Wi-Fi Protected Setup™ (Configuration
protégée par Wi-Fi)
Voyants Power (Alimentation), Ethernet (1-3), Wi-Fi
Protected Setup, Wireless (Sans fil), Internet
Alimentation 12VDC, 1A
Certification FCC, CE, Telepermit, K.21, UL, CB,
Wi-Fi (802.11b/g/n), WPA™, WPA2™, WMM,
Wi-Fi Protected Setup™
Température de

Language (Lingua)
Language (Lingua)
Static IP (IP statico)
Telstra Cable (Cavo Telstra)
Wi-Fi Protected Setup
NOTA
- If your client asks for the Router's PIN number, enter this number 76201196 in your client device.
Wireless > Wireless Security (Protezione wireless)
Encryption (Cifratura): selezionare un livello di cifratura WEP, 40/64 bits (10 hex digits)(40/64 bit-10 cifreesadecimali) o 104/128 bits(26 hexdigits)(104/128 bit-26 cifre esadecimali). L'impostazione predefinita è 40/64 bits (10 hex digits) (40/64 bit - 10 cifre esadecimali).
ADSL: T1.413i2, G.992.1 (G.DMT), G.992.2
(G.Lite), G.992.3 (ADSL2), G.992.5 (ADSL2+)
Porte DSL, Cable, Ethernet (1-3), Power
(Alimentazione)
Wi-Fi Protected Setup™
Protected Setup, Wireless, Internet
64-bit edition, Windows XP
Wi-Fi (802.11b/g/n), WPA™, WPA2™, WMM,
Wi-Fi Protected Setup™
Temperatura di


Taal
Taal
Wi-Fi Protected Setup
OPMERKING
Wi-Fi Protected Setup™
Use one of following for each Wi-Fi Protected Setup™ supported device:
- If your client device has a Wi-Fi Protected Setup™ button, click or press that button and then click the button on the right.

| 2. If your client device has a Wi-Fi Protected SetupTM PIN number, enter that number here and then click Register |
- If your client asks for the Router's PIN number, enter this number 76201196 in your client device.
Wireless (WLAN) > Wireless Security (WLAN-beveiliging)
WPA2/WPA Enterprise Mixed Mode
Encryption (Versleuteling) Selecteer een WEP-versleutelingsniveau: 40/64-bit (10 hex digits) (40/64-bits (10 hexadecimale tekens)) of 104/128-bit (26 hex digits) (104/128-bits) (26 hexadecimale tekens). De standaardwaarde is 40/64 bits (10 hex digits) (40/64-bits (10 hexadecimale tekens)).
Guest Access (Gasttoegang)
ADSL: T1.413i2, G.992.1 (G.DMT), G.992.2
(G.Lite), G.992.3 (ADSL2), G.992.5 (ADSL2+)
LED's Power (Voeding), Ethernet (1-3), Wi-Fi
Protected Setup, Wireless (Draadloos), Internet
Bekabelingstype CAT5, RJ-11 (voor Annex A), RJ-45
(voor Annex B)
Antennes 2 intern
Modulaties 802.11b: CCK/QPSK, BPSK
802.11g: OFDM/BPSK, QPSK, 16-QAM, 64-QAM
802.11n: OFDM/BPSK, QPSK, 16-QAM, 64-QAM
Zendvermogen 802.11b: 16 ± 1,5 dBm
802.11g: 16 ± 1,5 dBm
802.11n: 18 ± 1,5 dBm
(64-bits) editie, Windows XP
Mac OS X 10.5 of hoger
Omgeving
Afmetingen 202 x 34 x 160 mm
Gewicht 287 g
Certificering FCC, CE, Telepermit, K.21, UL, CB,
Wi-Fi (802.11b/g/n), WPA™, WPA2™, WMM,
Wi-Fi Protected Setup™

ETHERNET

Jak uruchomić program Cisco Connect
Windows:
Personalizacja
Język
Język
UWAGA
Wi-Fi Protected Setup™
Use one of following for each Wi-Fi Protected Setup™ supported device:
- If your client device has a Wi-Fi Protected Setup™ button, click or press that button and then click the button on the right.

- If your client asks for the Router's PIN number, enter this number 76201196 in your client device.
ADSL: T1.413i2, G.992.1 (G.DMT), G.992.2
(G.Lite), G.992.3 (ADSL2), G.992.5 (ADSL2+)
Wi-Fi Protected Setup™
Diody LED Power (Zasilanie), Ethernet (1-3), Wi-Fi
Protected Setup, Wireless
Wi-Fi (802.11b/g/n), WPA™, WPA2™, WMM,
Wi-Fi Protected Setup™
WPS (Wi-Fi Protected Setup) 194
Wireless > Wireless Security


Om du istället valde Router only (endast router) i steg 4:
Starta Cisco Connect
Windows:
Gå till Start > Alla program > Cisco Connect.
Mac:
Gå till Gå > Program > Cisco Connect.
Huvudmeny
Language (språk)
Language (språk)
WPS (Wi-Fi Protected Setup)
Wi-Fi Protected Setup™
Use one of following for each Wi-Fi Protected Setup™ supported device:
- If your client device has a Wi-Fi Protected Setup™ button, click or press that button and then click the button on the right.

- If your client asks for the Router's PIN number, enter this number 76201196 in your client device.
Gäståtkomst
ADSL: T1.413i2, G.992.1 (G.DMT), G.992.2
(G.Lite), G.992.3 (ADSL2), G.992.5 (ADSL2+)
Lysdioder Power, Ethernet (1-3), Wi-Fi Protected Setup, Wireless, Internet
Wi-Fi (802.11b/g/n), WPA™, WPA2™, WMM,
Wi-Fi Protected Setup™

1 Plant Go > Applications > Cisco Connect
เมนูหลัก
ภาษา
gaz
หมายเหตุ
Wi-Fi Protected Setup™
Use one of following for each Wi-Fi Protected Setup™ supported device:
- If your client device has a Wi-Fi Protected Setup™ button, click or press that button and then click the button on the right.

- If your client asks for the Router's PIN number, enter this number 76201196 in your client device:
WPA2/WPA Enterprise Mixed Mode
ADSL: T1.413i2, G.992.1 (G.DMT), G.992.2
(G.Lite), G.992.3 (ADSL2), G.992.5 (ADSL2+)
WPA2™/WPA™ Personal was Enterprise; 128, 64 bits
WEP;ตัวกรอง
64-bit edition, Windows XP
FCC, CE, Telepermit, K.21, UL, CB,
Wi-Fi (802.11b/g/n), WPA™, WPA2™, WMM,
Wi-Fi Protected Setup™
Cisco, the Cisco logo, and Linksys are trademarks or registered trademarks of Cisco and/or its affiliates in the United States and other countries.
A listing of Cisco's trademarks can be found at www.cisco.com/go/trademarks. All other trademarks mentioned in this document are the property of their respective owners.
© 2011 Cisco and/or its affiliates. All rights reserved.
3425-01539
- HOW TO USE CISCO CONNECT
- ADVANCED CONFIGURATION
- TROUBLESHOOTING
- SPECIFICATIONS
- PRODUCT OVERVIEW
- BACK
- BOTTOM
- WALL-MOUNTING PLACEMENT
- NOTE
- WALL-MOUNTING TEMPLATE
- INSTALLATION
- SET UP YOUR MODEM-ROUTER AUTOMATICALLY
- SET UP YOUR MODEM-ROUTER MANUALLY
- CONNECT YOUR MODEM-ROUTER
- TO CONNECT YOUR MODEM-ROUTER
- SET UP YOUR MODEM-ROUTER AS ONLY A ROUTER
- TO SET UP YOUR MODEM-ROUTER AS A ROUTER
- NOTE FOR USERS IN NEW ZEALAND
- TO SET UP THE DEVICE, FOLLOW THESE INSTRUCTIONS
- HOW TO ACCESS CISCO CONNECT
- WINDOWS
- MAC
- MAIN MENU
- MAIN MENU – COMPUTERS AND DEVICES
- MAIN MENU – PARENTAL CONTROLS
- MAIN MENU – GUEST ACCESS
- MAIN MENU – ROUTER SETTINGS
- PERSONALIZE
- CAUTION
- PORT LIGHTS
- EASY SETUP KEY
- INTERNET SPEED
- OTHER OPTIONS
- HOW TO ACCESS THE BROWSER-BASED UTILITY
- HOW TO USE THE BROWSER-BASED UTILITY
- SETUP > BASIC SETUP
- AUTO/ADSL MODE
- LANGUAGE
- INTERNET SETUP
- INTERNET CONNECTION TYPE
- BRIDGED MODE ONLY
- RFC 2684 BRIDGED
- RFC2684 ROUTED
- IPOA
- RFC 2516 PPPOE
- RFC2364 PPPOA
- NETWORK SETUP
- ETHERNET MODE
- AUTOMATIC CONFIGURATION - DHCP
- STATIC IP
- PPPOE
- CONNECT ON DEMAND OR KEEP ALIVE
- PPTP
- L2TP
- TELSTRA CABLE
- WIRELESS > BASIC WIRELESS SETTINGS
- MANUAL SETUP
- WIRELESS SETTINGS
- WI-FI PROTECTED SETUP
- WI-FI PROTECTED SETUP LIGHT ACTIVITY
- WIRELESS > WIRELESS SECURITY
- OFFICE OPTIONS
- WIRELESS SECURITY
- SECURITY MODE
- WPA2/WPA MIXED MODE
- WPA2 PERSONAL
- WPA PERSONAL
- WPA2/WPA ENTERPRISE MIXED MODE
- WPA2 ENTERPRISE
- WPA ENTERPRISE
- WEP
- RADIUS
- DISABLED
- WIRELESS > GUEST ACCESS
- GUEST ACCESS
- CHANGE GUEST PASSWORD
- GUEST INSTRUCTIONS
- X2000
- YOUR COMPUTER CANNOT CONNECT TO THE INTERNET
- WHEN YOU DOUBLE-CLICK THE WEB BROWSER, YOU ARE PROMPTED FOR A USER NAME AND PASSWORD. IF YOU WANT TO GET RID OF THE PROMPT, FOLLOW THESE INSTRUCTIONS
- YOU ARE USING A STATIC IP ADDRESS AND CANNOT CONNECT
- THE COMPUTER CANNOT CONNECT WIRELESSLY TO THE NETWORK
- YOU NEED TO MODIFY THE BASIC SETTINGS ON THE DEVICE
- YOU NEED TO MODIFY THE ADVANCED SETTINGS ON THE DEVICE
- YOU CANNOT USE THE DSL SERVICE TO CONNECT MANUALLY TO THE INTERNET
- WHEN YOU OPEN THE WEB BROWSER, THE LOGIN SCREEN APPEARS, EVEN THOUGH YOU DO NOT NEED TO LOG IN
- THE ROUTER DOES NOT HAVE A COAXIAL PORT FOR THE CABLE CONNECTION
- YOU WANT TO ACCESS THE BROWSER-BASED UTILITY FROM CISCO CONNECT
- WHEN YOU TRY TO LOG INTO THE BROWSER-BASED UTILITY, YOUR PASSWORD DOES NOT WORK
- IN WINDOWS XP, YOU DO NOT SEE THE ROUTER IN THE MY NETWORK PLACES SCREEN
- ENVIRONMENTAL
- NOTES
- المحتويات
- ال KÖZويين المتقدم
- ملاحظة
- (اللغة) LANGUAGE
- WI-FI PROTECTED SETUP™
- PERSONALISIEREN
- SPRACHE
- HINWEIS
- GASTZUGRIFF
- GASTPASSWORT ÄNDERN
- LANGUAGE (IDIOMA)
- NOTA
- LANGUE
- REMARQUE
- ACCÈS INVITÉ
- LANGUAGE (LINGUA)
- STATIC IP (IP STATICO)
- TELSTRA CABLE (CAVO TELSTRA)
- WIRELESS > WIRELESS SECURITY (PROTEZIONE WIRELESS)
- TAAL
- OPMERKING
- WIRELESS (WLAN) > WIRELESS SECURITY (WLAN-BEVEILIGING)
- GUEST ACCESS (GASTTOEGANG)
- OMGEVING
- JAK URUCHOMIĆ PROGRAM CISCO CONNECT
- PERSONALIZACJA
- JĘZYK
- UWAGA
- STARTA CISCO CONNECT
- HUVUDMENY
- LANGUAGE (SPRÅK)
- WPS (WI-FI PROTECTED SETUP)
- GÄSTÅTKOMST
- เมนูหลัก
- หมายเหตุ
Brand : CISCO
Model : X2000-RM
Category : Router