
ErgoFit FC9262 - Vacuum Cleaner PHILIPS - Free user manual and instructions
Find the device manual for free ErgoFit FC9262 PHILIPS in PDF.


| Product Type | Bagless Canister Vacuum Cleaner |
| Model | ErgoFit FC9262 |
| Brand | Philips |
| Dimensions (L x W x H) | 400 x 250 x 300 mm |
| Weight | 5.2 kg |
| Power Supply | Mains powered, 220-240 V, 50-60 Hz |
| Power Consumption | 1400 W |
| Dust Capacity | 1.5 L |
| Filtration System | HEPA 12 washable filter |
| Cleaning Radius | 9 m |
| Cord Length | 6 m |
| Noise Level | 78 dB(A) |
| Ergonomic Design | Soft grip handle, low-profile floor nozzle |
| Floor Nozzle | TriActive+ nozzle for carpets and hard floors |
| Accessories Included | Crevice tool, dusting brush, upholstery nozzle |
| Bagless / Bagged | Bagless, transparent dust container |
| Filter Cleaning Indicator | Yes, easy to remove and rinse |
| Maintenance | Washable filter, empty dust container after each use |
| Safety Features | Overheat protection, automatic shut-off |
| Spare Parts Availability | Filters, nozzles, and hoses available online |
| Warranty | 2 years |
Frequently Asked Questions - ErgoFit FC9262 PHILIPS
User questions about ErgoFit FC9262 PHILIPS
0 question about this device. Answer the ones you know or ask your own.
Ask a new question about this device
Download the instructions for your Vacuum Cleaner in PDF format for free! Find your manual ErgoFit FC9262 - PHILIPS and take your electronic device back in hand. On this page are published all the documents necessary for the use of your device. ErgoFit FC9262 by PHILIPS.
USER MANUAL ErgoFit FC9262 PHILIPS


ENGLISH 6
БЪЛГАРСКИ 17
ČEŠTINA 29
EESTI 39
HRVATSKI 49
MAGYAR 59
ҚАЗАҚША 70
LIETUVIŠKAI 82
LATVIEŠU 93
POLSKI 103
ROMÂNĂ 114
РУССКИЙ 125
SLOVENSKY 140
SLOVENŠČINA 148
SRPSKI 158
УКРАЇНСЬКА 169
Introduction
Congratulations on your purchase and welcome to Philips! To fully benefit from the support that Philips offers, register your product at www.philips.com/welcome.
Philips has been incorporating the latest technologies in floor cleaning for over 50 years. This appliance is the result of close cooperation between our best engineers and a team of ergonomic specialists from the renowned Delft University of Technology, The Netherlands.
General description (Fig. 1)
1 Filter cylinder unit
A Handle
B Filter cylinder
C Filter cylinder case
2 Cover release button
3 Release button for filter cylinder unit
4 Cover
5 Motor protection filter
6 Soft rubber rear wheels
7 Hose release button
8 Hose connection opening
9 Cleaning brush
10 Dust bucket
11 Carrying handle
12 On/off button
13 Remote control receiver with standby light
14 Cord rewind button
15 Combination nozzle (specific types only)
16 Parking/storage ridge
17 Rocker switch for carpet/hard floor settings
18 Side brush (specific types only)
19 PostureProtect handgrip (specific types only)
20 Tube release button
21 Infrared remote control (specific types only: with display
22 Infrared remote control (specific types only: without display)
23 Standard handgrip
24 Flexible hose connection
25 Hose
26 Screw cover strip
27 Accessory holder
28 Accessory holder release levers
29 2-piece/3-piece XL telescopic tube without PostureProtect handgrip (specific types only)
30 2-piece/3-piece XL telescopic tube with PostureProtect handgrip (specific types only)
31 HEPA filter cover
32 Release tabs of HEPA filter cover
33 Washable Ultra Clean Air HEPA 13 filter
34 Mains cord and plug
35 Parking slot
36 Small nozzle
37 Brush attachment
38 Crevice tool
39 Storage grip
40 Swivel wheel
41 Storage slot
42 Type plate
Important
Read this user manual carefully before you use the appliance and save it for future reference.
Danger
- Never suck up water or any other liquid. Never suck up flammable substances and do not suck up ashes until they are cold.
Warning
- Check if the voltage indicated on the appliance corresponds to the local mains voltage before you connect the appliance.
- Do not use the appliance if the mains cord, the plug or the appliance itself is damaged.
- If the mains cord is damaged, you must have it replaced by Philips, a service centre authorised by Philips or similarly qualified persons in order to avoid a hazard.
- This appliance is not intended for use by persons (including children) with reduced physical, sensory or mental capabilities, or lack of experience and knowledge, unless they have been given supervision or instruction concerning use of the appliance by a person responsible for their safety.
- Children should be supervised to ensure that they do not play with the appliance.
- Do not point the hose, the tube or any other accessory at the eyes or ears nor put it in your mouth when it is connected to the vacuum cleaner and the vacuum cleaner is switched on.
Caution
- Do not suck up large objects as this may cause the air passage in the tube or hose to become obstructed.
- When you use the vacuum cleaner to vacuum ashes, fine sand, lime, cement dust and similar substances, the pores of the filter cylinder become clogged. If you notice a strong decrease in suction power, clean the filter cylinder.
- Never use the appliance if the filter cylinder, filter cylinder case and the dust bucket are not properly installed or if the cover is not closed properly.
- Always unplug the appliance before you empty the dust bucket.
- Do not press the AutoClean button if the dust bucket, the filter cylinder and filter cylinder case are not properly installed or if the cover is not closed properly.
- Never use the appliance without the motor protection filter. This could damage the motor and shorten the life of the appliance.
- Only use the Philips filter cylinder supplied with the appliance.
- The filter cylinder is not waterproof and cannot be cleaned with water, cleaning agents or flammable substances. Only clean the filter cylinder with the AutoClean system or the cleaning brush supplied.
- Noise level: Lc = 78 dB(A).
- During vacuum cleaning, especially in rooms with low air humidity, your vacuum cleaner builds up static electricity. As a result you can experience electric shocks when you touch the tube or other steel parts of your vacuum cleaner. These shocks are not harmful to you and do not damage the appliance. To reduce this inconvenience we advise you:
1 to discharge the appliance by frequently holding the tube against other metal objects in the room (for example legs of a table or chair, radiator etc.); (Fig. 2)
2 to raise the air humidity level in the room by placing water in the room. For example, you can hang containers filled with water from your radiators or place bowls filled with water on or near your radiators (Fig. 3).
Electromagnetic fields (EMF)
This Philips appliance complies with all standards regarding electromagnetic fields (EMF). If handled properly and according to the instructions in this user manual, the appliance is safe to use based on scientific evidence available today.
Before use
Batteries for the remote control are supplied with the appliance. Insert the batteries into the battery compartment before you use the appliance. The batteries last at least 2 years.
1 Use a screwdriver to remove the screw of the battery compartment lid (1) and remove the battery compartment lid (2) (Fig. 4).
2 Insert two AAA 1.5-volt alkaline batteries into the handle. (Fig. 5)
Note: Make sure that the - and + poles point in the right direction.
3 Reattach the battery compartment lid (1) and fasten the screw with a screwdriver (2). (Fig. 6)
The appliance is now ready for use.
Preparing for use
Ergonomic advice
ComfortControl handgrip (specific types only)
- The unique ComfortControl handgrip is ergonomically designed to give you sufficient comfort during vacuum cleaning.
- To gain optimal benefit from this handgrip, it is important that you do not position your second hand on the tube. When you do so, you twist and bend your back, which could result in back problems (Fig. 7).
- Our ergonomist advises you to adjust the length of the tube so that the hand holding the standard handgrip is at hip level.
PostureProtect handgrip (specific types only)
- The unique PostureProtect handgrip is ergonomically designed for 2-handed use to prevent you from placing your hand on the lower part of the tube. We recommend that you use the PostureProtect handgrip to prevent bending your back, but if you do not find it comfortable to use, you can remove it. In this case, follow the instructions in section ‘Removing the PostureProtect handgrip’ in chapter ‘Troubleshooting’ (Fig. 8).
- Do not place your other hand on the tube. You twist and bend your spine when you do so, which could result in back problems.
- Our ergonomist advises you to adjust the length of the tube so that the hand holding the standard handgrip is at hip level.
Carrying handle
- If you need to carry the appliance, carry it in line with your arm to prevent twisting your wrist. The carrying handle of the appliance is specially designed for this purpose.
Attaching the handgrip
1 Attach the handgrip to the telescopic tube ('click') (Fig. 9).
2 To disconnect the handgrip from the tube, hold the handgrip with one hand. With the other hand, hold the telescopic tube and press the tube release button (1) and pull the tube off the handgrip (2) (Fig. 10).
Note: This vacuum cleaner has been fitted with holes (specific types only) at the end of the handgrip. These holes may prevent objects from getting stuck or damaged when you use your vacuum cleaner without the tube or accessories supplied.
Hose
1 To connect the hose, push it firmly into the appliance ('click') (Fig. 11).
2 To disconnect the hose, press the release button (1) and pull the hose out of the appliance (2) (Fig. 12).
Telescopic tube
1 Adjust the length of the tube in such a way that the hand holding the standard handgrip is at hip level (Fig. 13).
2 Hold the tube so that the standard handgrip is at hip level. (Fig. 8)
3 To connect the tube to a nozzle, press the spring-loaded lock button on the tube and insert the tube into the nozzle. Fit the spring-loaded lock button into the opening in the nozzle ('click') (Fig. 14).
Accessory holder
1 Slide the accessory holder onto the handgrip ('click') (Fig. 15).
2 Push the accessories onto the holder. (Fig. 16)
3 To detach the accessory holder, squeeze the release levers together (1) and slide the accessory holder off the handgrip (2) (Fig. 17).
Crevice tool, small nozzle and brush attachment
1 Connect the crevice tool (1) or small nozzle (2) with or without brush attachment directly to the standard handgrip or to the tube (Fig. 18).
Brush attachment
1 To assemble the brush attachment, slide it onto the bottom of the small nozzle ('click') (Fig. 19).
2 To disassemble the brush attachment, slide it off the bottom of the small nozzle (Fig. 20).
Tri-Active nozzle (specific types only)
The Tri-Active nozzle is a multi-purpose nozzle for carpets and hard floors.
- The side brushes catch more dust and dirt at the sides of the nozzle and allow you to clean better along furniture and other obstacles (Fig. 21).
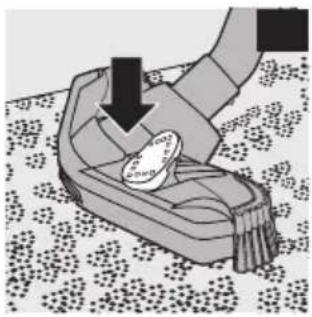
- The opening at the front of the nozzle allows you to suck up larger particles (Fig. 22).
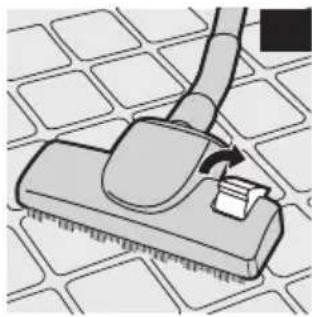
1 Use the hard floor setting to clean hard floors (for instance for tiled, parqueted, laminated and linoleumed flooring): push the rocker switch on top of the nozzle with your foot to make the brush strip come out of the housing. At the same time, the wheel is lifted to prevent scratching and to increase manoeuvrability (Fig. 23).
2 Use the carpet setting to clean carpets: push the rocker switch again to make the brush strip disappear into the nozzle housing. The wheel is lowered automatically (Fig. 24).
Combination nozzle (specific types only)
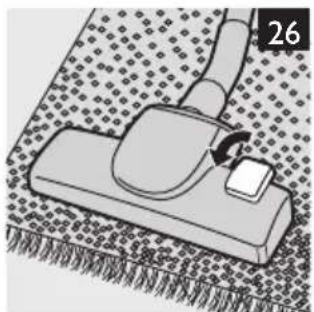
You can use the combination nozzle on carpets (with the brush strips folded in) or on hard floors (with the brush strips folded out).
ENGLISH10
1 To clean hard floors, push the rocker switch on top of the combination nozzle with your foot. The brush strips come out of the nozzle housing. (Fig. 25)
2 To clean carpets, push the rocker switch again to make the brush strips disappear into the nozzle housing again (Fig. 26).
Remote control operation
The control panel has four buttons with which you operate the vacuum cleaner.
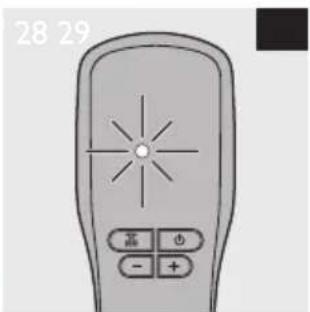
- For types without display: The light flashes when you press a button on the control panel (Fig. 27).
- For types with display: The control panel has a display that gives information about the suction power and the battery status. It also tells you when to clean the filter (Fig. 28).
Using the appliance
1 Pull the cord out of the appliance and put the mains plug in the wall socket.
2 Press the on/off button on top of the appliance to switch on the appliance (Fig. 29).
Tip: To avoid bending your back, press the on/off button with your foot.
The vacuum cleaner starts operating at the highest suction power level.
Specific types only: The timer on the display shows how long you have been vacuuming. During the first minute, the time is shown in seconds. After the first minute, the clock symbol flashes and the time is shown in minutes.
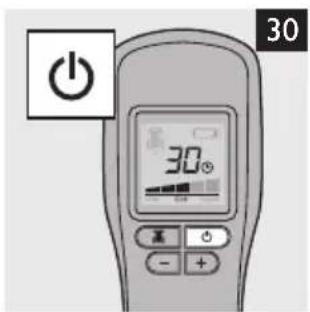
3 To switch off the appliance, press the on/off button on top of the appliance or the standby button on the control panel (Fig. 30).
Adjusting suction power
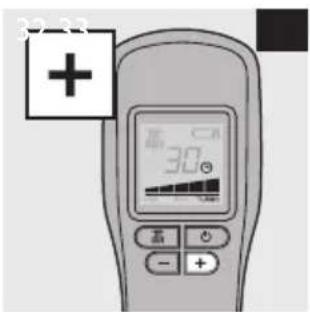
1 During vacuuming, you can adjust the suction power level with the - and + buttons on the control panel.
▶Specific types only: The display shows the set suction power level.
- Use maximum suction power to vacuum very dirty carpets and hard floors (Fig. 31).
- Use minimum suction power to vacuum curtains, tablecloths etc (Fig. 32).
- Use the ECO setting to clean at an energy-efficient suction power level.
Pausing during use
1 If you want to pause for a moment, press the standby button on the control panel to switch off the appliance temporarily (Fig. 30).
Specific types only: The suction power level disappears from the display, the timer stops counting up the time and after approx. 10 seconds, the display goes out.
2 Insert the ridge on the nozzle into the parking slot to park the tube in a convenient position (Fig. 33).
3 To ensure stable parking of the telescopic tube, adjust the tube to the shortest length.
4 To continue vacuum cleaning, simply press the standby button on the control panel again.
- Specific types only: The previously selected suction power level appears on the display again and the timer continues to count up the vacuuming time.
Using the AutoClean button to clean the filter cylinder
A clean filter cylinder helps maintain high suction power.
To clean the filter, press the AutoClean button once every time after you have finished vacuuming.
Always press the AutoClean button when you have finished vacuum cleaning.
1 Switch off the appliance and leave the mains plug in the wall socket during the filter-cleaning process. (Fig. 29)
2 Keep the appliance in horizontal position, with all wheels touching the floor.
Make sure the dust bucket, the filter cylinder and the filter cylinder case are installed properly and the cover is closed properly.
Always leave the hose connected to the appliance during the filter-cleaning process to prevent dust from coming out of the appliance.
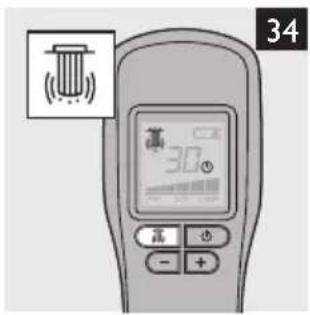
3 Press the AutoClean button on the control panel on the standard handgrip (Fig. 34).
- You hear a beep and the filter-cleaning process starts.
During the filter-cleaning process, the appliance produces a rattling noise. This is completely normal.
When the filter-cleaning process is finished, you hear a beep.
Using the AutoClean button during vacuuming
1 You can also press the AutoClean button during vacuum cleaning.
When you do this, the motor stops running and the filter-cleaning process starts. During the filter-cleaning process, the appliance does not suck up dirt. When the filter-cleaning process is finished, the motor automatically starts running again and you can continue vacuum cleaning.
Reminder to clean the filter cylinder
- If you fail to clean the filter cylinder with the AutoClean button after a number of vacuuming sessions in a row, the light in the AutoClean button (for types without display) or the AutoClean symbol on the display (for types with display) flashes for 15 seconds (Fig. 34).
- If you still do not use the AutoClean button, this happens again the next time you switch on the appliance.
- When the light in the AutoClean button (for types without display) or the AutoClean symbol on the display (for types with display) flashes, you need to press the AutoClean button to prevent the filter from becoming clogged.
Cleaning and maintenance
Use the AutoClean button to clean the filter cylinder after every vacuuming session.
Cleaning the dust bucket and filter cylinder unit
Always unplug the appliance before you empty the dust bucket.
The dust bucket is not dishwasher-proof.
Empty the dust bucket as soon as the dust level has reached the round disc of the filter cylinder case.
1 Switch off the appliance and remove the mains plug from the wall socket.
2 To disconnect the hose, press the release button (1) and pull the hose out of the appliance (2) (Fig. 12).
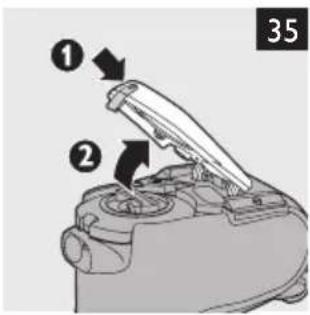
3 To unlock the cover, press the cover release button (1). Swing open the cover (2). (Fig. 35)
4 Lift the dust bucket out of the appliance (Fig. 36).
5 Press the release button for the filter cylinder unit on the bucket handle (1) and remove the filter cylinder unit (2) (Fig. 37).
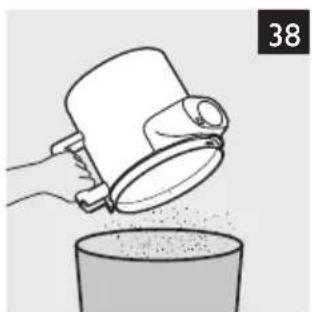
6 Hold the dust bucket over a dustbin and empty it (Fig. 38).
7 Clean the dust bucket with cold tap water and some washing-up liquid.
ENGLISH12
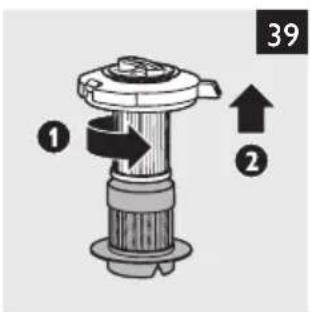
8 If you want to clean the filter cylinder unit, remove the filter cylinder from the filter cylinder case. Turn the handle on top of the filter cylinder anticlockwise (1) and lift the filter cylinder out of the case (2). (Fig. 39)
9 To clean the filter cylinder, gently tap it against the dustbin to release all fine dust from the filter cylinder. (Fig. 40)
- If you persistently fail to press the AutoClean button when the light in the AutoClean button (for types without display) or the AutoClean symbol (for appliance with display) flashes, the filter cylinder clogs up with dirt and the suction power decreases over time (Fig. 34)
If this happens, unclog the filter cylinder in the following way:
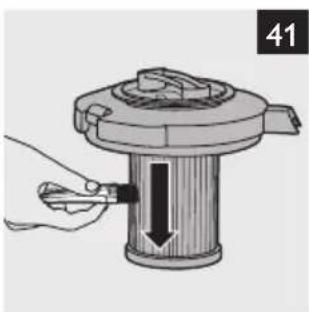
- Hold the filter cylinder over a dustbin and clean it with the cleaning brush supplied. Gently brush from the top of the filter downwards along the ribs of the filter (Fig. 41).
Only use the cleaning brush that comes with the appliance. Other brushes may damage the filter cylinder.
The filter cylinder is not waterproof and cannot be cleaned with water, cleaning agents or flammable substances.
Note: Cleaning does not restore the original colour of the filter, but does restore its filtration power.
10 To clean the filter cylinder case, use a dry cloth or the cleaning brush supplied. You can also clean it with cold tap water and some washing-up liquid (Fig. 42).
- Do not clean the filter cylinder case with the filter cylinder in it under the tap, as the filter cylinder is not waterproof (Fig. 43).
11 Put the filter cylinder back into the filter cylinder case (1) and turn it clockwise to fix it (2) ('click') (Fig. 44).
Make sure that the filter cylinder case is dry before you reinsert the filter cylinder into it.
12 Put the filter cylinder unit back into the dust bucket ('click') (Fig. 45).
Make sure that the dust bucket is dry before you reinsert the filter cylinder unit.
13 Put the dust bucket back into the appliance (Fig. 46).
14 Close the cover firmly ('click') (Fig. 47).
Note: If the dust bucket and/or the filter cylinder unit are not installed properly, the appliance does not work and the standby light on the cover of the appliance flashes.
Cleaning the motor protection filter
Clean the permanent motor protection filter every two months.
1 Unplug the appliance.
2 Take the motor protection filter out of the appliance and clean the filter by tapping the dust out of it over a dustbin (Fig. 48).
If you want to clean the motor protection filter more thoroughly, you can rinse it under a cold tap.
Do not use washing-up liquid, flammable substances or any other cleaning agent to clean the motor protection filter.
3 Press the clean filter firmly back into the filter compartment to ensure that it is properly placed.
Make sure that the motor protection filter is completely dry before you put it back into the filter compartment.
Washable Ultra Clean Air HEPA 13 filter
HEPA 13 washable filter is able to remove 99.95% of all particles down to 0.0003mm in size from the outlet air. This not only includes normal house dust, but also harmful microscopic vermin such as dust mites and their excrements, which are well-known causes of respiratory allergies.
Note: To guarantee optimal dust retention and performance of the vacuum cleaner, always replace the HEPA filter with an original Philips filter of the correct type (see chapter ‘Ordering accessories and filters’).
Clean the washable HEPA 13 filter every 6 months. You can clean the washable HEPA 13 filter max. 4 times. Replace the filter after it has been cleaned 4 times.
Note: Do not clean the HEPA 13 filter in the washing machine, but follow the procedure below.
1 Unplug the appliance.
2 Grab the release tabs of the HEPA filter cover to open and remove the filter cover (Fig. 49).
3 Take out the washable HEPA 13 filter (Fig. 50).
4 Rinse the pleated side of the HEPA 13 filter under a hot slow-running tap (Fig. 51).
Be careful with hot water. Always check if the water is not too hot, to prevent your hands from getting burnt.
- Hold the filter in such a way that the pleated side points upwards and the water flows parallel to the pleats. Hold the filter at an angle so that the water washes away the dirt inside the pleats.
- Turn the filter 180° and let the water flow along the pleats in the opposite direction (Fig. 52).
- Continue this process until the filter is clean.
Never clean the washable filter with a brush (Fig. 53).
Note: Cleaning does not restore the original colour of the filter, but does restore its filtration power.
5 Carefully shake the water from the surface of the filter.
6 Let the HEPA filter dry completely.
7 Place the dry HEPA filter back into the appliance (Fig. 54).
8 Reattach the top of the filter cover (1) and then close the cover (2) ('click') (Fig. 55).
Cleaning the fabric-covered area on top of the appliance (specific types only)
The fabric has been treated to make it dirt repellent. If you would like to clean it anyway, follow the steps below:
- Clean the fabric-covered area on top of the appliance with a moist cloth.
- If the stains are hard to remove, use a mild cleaning agent, water and a moist cloth to clean the fabric of the appliance.
Do not use aggressive or flammable cleaning agents such as bleach or alcohol.
Replacement
Batteries of remote control
1 Replace the batteries when:
- the battery-low indication appears on the display (for types with display). (Fig. 56)
- the light on top of the remote control does not flash when you press any button (for types without display) (Fig. 27).
2 Use a screwdriver to remove the screw of the battery compartment lid (1) and remove the battery compartment lid (2) (Fig. 4).
ENGLISH14
3 Insert two new AAA 1.5-volt alkaline batteries into the handle. (Fig. 5)
Note: Make sure that the - and + poles point in the right direction.
4 Reattach the battery compartment lid (1) and fasten the screw with a screwdriver (2) (Fig. 6).
Storage
Note: Before you store the appliance, always make sure you have cleaned the filter cylinder by pressing the AutoClean button (see section 'Using the AutoClean button' in chapter 'Using the appliance').
1 Switch off the appliance and remove the mains plug from the wall socket (Fig. 29).
2 Press the cord rewind button to rewind the mains cord (Fig. 57).
3 Adjust the telescopic tube to the shortest length (Fig. 58).
4 Specific types only: always put the Tri-Active nozzle in the carpet setting when you store it (brush strip retracted into the nozzle). Also prevent the side brushes from becoming bent (Fig. 24).
5 Use the storage grip to put the appliance in upright position. Insert the ridge on the nozzle into the storage slot on the appliance. (Fig. 59)
Tip: You can also detach the tube from the hose.
Tip: You can also store the appliance horizontally. In this case, insert the ridge on the nozzle into the parking slot.
Ordering accessories and filters
To purchase accessories and filters, visit our website www.philps.com, contact the Philips Consumer Care Centre in your country or visit your vacuum cleaner specialist.
If you have any difficulties obtaining filters or other accessories for this appliance, contact the Philips Consumer Care Centre in your country or consult the worldwide guarantee leaflet.
- Washable Ultra Clean Air HEPA 13 filters are available under service number 432200493350
- Filter cylinder for FC9262/FC9264, dark aubergine: 432200909850
- Filter cylinder for FC9266, burgundy red: 432200909860
Environment
- The batteries of the remote control contain substances that may pollute the environment. Do not throw away batteries with the normal household waste, but dispose of them at an official collection point for batteries. Always remove the batteries of the remote control before you discard and hand in the appliance at an official collection point (Fig. 60).
- Do not throw away the appliance with the normal household waste at the end of its life, but hand it in at an official collection point for recycling. By doing this, you help to preserve the environment (Fig. 61).
Guarantee & service
If you need service or information or if you have a problem, please visit the Philips website at www.philips.com or contact the Philips Consumer Care Centre in your country (you find its phone number in the worldwide guarantee leaflet). If there is no Consumer Care Centre in your country, go to your local Philips dealer.
Troubleshooting
This chapter summarises the most common problems you could encounter with the appliance. If you are unable to solve the problem with the information below, contact the Consumer Care Centre in your country.
Problem Possible cause Solution
| The light in the AutoClean button (for types without display) or the AutoClean symbol on the display (for types with display) flashes. | The filter cylinder needs to be cleaned. | Press the AutoClean button to clean the filter cylinder. |
| The suction power is insufficient. | You have selected a low suction power setting. | Select a higher suction power setting. |
| The filter cylinder is clogged with dirt. | Clean the filter cylinder (see chapter 'Cleaning and maintenance'). | |
| The motor protection filter and/or the HEPA filter are dirty. | Clean or replace the filters (see chapter 'Cleaning and maintenance'). | |
| The nozzle, hose or tube is blocked up. | To remove the obstruction, disconnect the blocked-up item and connect it (as far as possible) the other way around. Switch on the vacuum cleaner to force the air through the blocked-up item in opposite direction. | |
| The infrared remote control does not function. | You have not inserted the batteries properly or the batteries are empty. | Insert the batteries properly or replace them. See chapter 'Replacement'. |
| The appliance does not function and the standby light on the cover of the appliance flashes. | The dust bucket and/or the filter cylinder unit are not installed properly. | Unplug the appliance. Make sure that the filter cylinder is assembled properly into the filter cylinder case ('click'). Also make sure that the filter cylinder unit is inserted properly into the dust bucket ('click'). |
| The cover is not closed properly. | Make sure the cover is closed properly. Put the plug in the wall socket and try again. | |
| When I use my vacuum cleaner I sometimes feel electric shocks. | Your vacuum cleaner has built up static electricity. The lower the air humidity in the rooms, the more static electricity the appliance builds up. | To reduce this inconvenience, we advise you to discharge the appliance by frequently holding the tube against other metal objects in the room (for example legs of a table or chair, radiator etc.). |
Problem Possible cause Solution
To reduce this inconvenience, we advise you to raise the air humidity level in the room by placing water in the room. For example, you can hang containers filled with water from your radiators or place bowls filled with water on or near your radiators.
Removing the PostureProtect handgrip
If you do not find the PostureProtect handgrip comfortable to use, you may consider removing it.
1 Remove the screw cover strip from the PostureProtect handgrip.
2 Use a Torx T15 screwdriver to remove the screws of the PostureProtect handgrip.
3 Remove the PostureProtect handgrip from the tube.
УВОА







- INTRODUCTION
- GENERAL DESCRIPTION (FIG. 1)
- 42 TYPE PLATE
- IMPORTANT
- DANGER
- WARNING
- CAUTION
- ELECTROMAGNETIC FIELDS (EMF)
- BEFORE USE
- PREPARING FOR USE
- ERGONOMIC ADVICE
- COMFORTCONTROL HANDGRIP (SPECIFIC TYPES ONLY)
- POSTUREPROTECT HANDGRIP (SPECIFIC TYPES ONLY)
- CARRYING HANDLE
- ATTACHING THE HANDGRIP
- HOSE
- TELESCOPIC TUBE
- ACCESSORY HOLDER
- CREVICE TOOL, SMALL NOZZLE AND BRUSH ATTACHMENT
- BRUSH ATTACHMENT
- TRI-ACTIVE NOZZLE (SPECIFIC TYPES ONLY)
- COMBINATION NOZZLE (SPECIFIC TYPES ONLY)
- ENGLISH10
- REMOTE CONTROL OPERATION
- USING THE APPLIANCE
- ADJUSTING SUCTION POWER
- PAUSING DURING USE
- USING THE AUTOCLEAN BUTTON TO CLEAN THE FILTER CYLINDER
- USING THE AUTOCLEAN BUTTON DURING VACUUMING
- REMINDER TO CLEAN THE FILTER CYLINDER
- CLEANING AND MAINTENANCE
- CLEANING THE DUST BUCKET AND FILTER CYLINDER UNIT
- ENGLISH12
- CLEANING THE MOTOR PROTECTION FILTER
- WASHABLE ULTRA CLEAN AIR HEPA 13 FILTER
- CLEANING THE FABRIC-COVERED AREA ON TOP OF THE APPLIANCE (SPECIFIC TYPES ONLY)
- REPLACEMENT
- BATTERIES OF REMOTE CONTROL
- ENGLISH14
- STORAGE
- ORDERING ACCESSORIES AND FILTERS
- ENVIRONMENT
- GUARANTEE & SERVICE
- TROUBLESHOOTING
- PROBLEM POSSIBLE CAUSE SOLUTION
- REMOVING THE POSTUREPROTECT HANDGRIP
- УВОА
Brand : PHILIPS
Model : ErgoFit FC9262
Category : Vacuum Cleaner