
LO-7020 - Juicer Concept - Free user manual and instructions
Find the device manual for free LO-7020 Concept in PDF.


| Product Type | Juicer |
| Brand | Concept |
| Model | LO-7020 |
| Manual Language | English, plus 10 other languages |
| Manual Pages | 40 |
| Power Supply | 220-240 V, 50/60 Hz |
| Motor Power | Approximately 800 W |
| Dimensions (HxWxD) | Approximately 30 x 25 x 20 cm |
| Weight | Approximately 4 kg |
| Juice Container Capacity | 1.5 L |
| Pulp Container Capacity | 2 L |
| Feeding Tube Diameter | Approximately 75 mm |
| Speed Settings | 2 speeds |
| Reverse Function | Yes |
| Stainless Steel Filter | Yes |
| BPA-Free Materials | Yes |
| Safety Lock | Yes (ensures lid is properly closed) |
| Non-Slip Feet | Yes |
| Cord Length | Approximately 1.2 m |
| Cleaning | Dishwasher-safe parts (except motor base) |
| Warranty | 2 years |
Frequently Asked Questions - LO-7020 Concept
User questions about LO-7020 Concept
0 question about this device. Answer the ones you know or ask your own.
Ask a new question about this device
Download the instructions for your Juicer in PDF format for free! Find your manual LO-7020 - Concept and take your electronic device back in hand. On this page are published all the documents necessary for the use of your device. LO-7020 by Concept.
USER MANUAL LO-7020 Concept
natural_image
Modern stainless steel juice maker with a clear glass cup beside it, no visible text or symbols on the device itself.LO7020
CZ
SK PL RUHU
EN DE ES RO


PODĚKOVÁNÍ
natural_image
Transparent glass pitcher with a handle and spout, labeled 'A' at the top (no other text or symbols)
Příslušenství
A Nádoba na štávu

UPOZORNĚNÍ:
natural_image
Close-up of a hand holding a small object next to a black and silver food brush (no text or symbols visible)Obr. 1
vytékat do

natural_image
Close-up of hands operating a stainless steel coffee maker with a black arrow pointing to the handle (no visible text or symbols)Obr. 2

natural_image
Close-up of a black and white industrial machine with a downward arrow indicating compression or cooling (no visible text or symbols)Obr. 3
ČIŠTĚNÍ A ÚDRŽBA
natural_image
Metallic stainless steel coffee maker with handle and spout (no visible text or symbols)Obr. 4
natural_image
Clear glass pitcher with a labeled point A on top (no text or symbols on the object itself)
Príslušenstvo
A Nádoba na šťavu
UPOZORNENIE
natural_image
Close-up of a hand holding a small object next to a black cylindrical device with a curved handle (no visible text or symbols)Obr. 1

natural_image
Close-up of hands operating a stainless steel coffee maker with a black arrow pointing to the handle (no visible text or symbols)Obr. 2
natural_image
Close-up of a hand holding a small container with an arrow pointing to it, next to a stainless steel juicer (no text or symbols visible)Rys. 1

natural_image
Close-up of hands operating a stainless steel coffee maker with a black arrow pointing to the handle (no visible text or symbols)Rys. 2

natural_image
Close-up of a black and white industrial machine with a downward arrow indicating compression or cooling (no visible text or symbols)Rys. 3

natural_image
Metallic stainless steel coffee maker with handle and spout (no visible text or symbols)Rys. 4
natural_image
Transparent glass pitcher with a handle and spout, labeled 'A' at the top (no other text or symbols)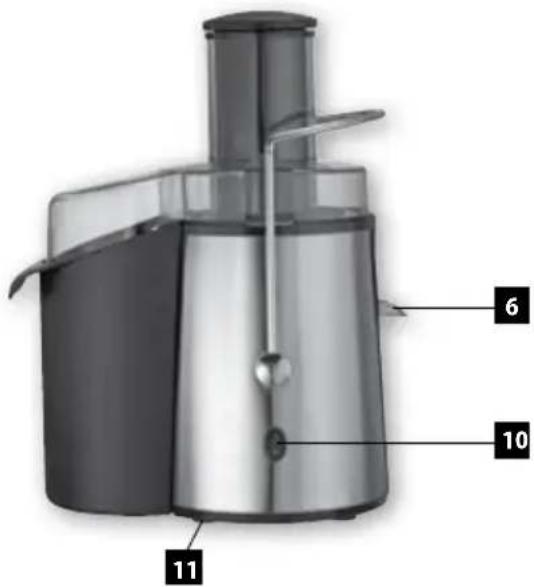
Tartozékok
A Gyümölclékanna

FIGYELMEZTETÉS
natural_image
Close-up of a hand holding a small object next to a black and silver food brush (no text or symbols visible)- ábra
natural_image
Person using a brush to press or adjust a stainless steel coffee maker (no visible text or symbols)- ábra

natural_image
Metallic stainless steel coffee maker with handle and spout (no visible text or symbols)Thank you for purchasing a Concept product. We hope you will be satisfied with our product throughout its service life.
Please study the entire Operating Manual carefully before you start using the product. Keep the manual in a safe place for future reference. Make sure other people using the product are familiar with these instructions.
| Technical parameters | |
| Voltage 220 - 240 V ~ 50 Hz | |
| Power input 700 W | |
| Noise level 85 dB(A) |
IMPORTANT SAFETY PRECAUTIONS:
• Make sure the mains voltage corresponds to the values on the rating plate.
• Do not leave the unit unattended while it is turned on or even only plugged into the wall outlet.
• Before plugging in or unplugging the unit from the wall outlet, make sure the switch is OFF.
- When disconnecting the unit from the wall outlet, never pull the power cord. Grasp the plug and disconnect it by pulling.
• Do not allow children or unskilled people to handle the unit. Use the unit out of the reach of these individuals.
• Take extra care when using the unit near children.
- Turn the unit off, unplug the power cord from the wall outlet, and let the unit cool down before cleaning and after use.
- Do not let the power cord hang loosely over the edge of a table. Make sure the power cord does not touch hot surfaces.
• Do not let the unit hang loose on the power cord.
• Do not use the unit if the rotating sieve is damaged.
• The unit contains sharp parts. Extra care should be taken while cleaning the unit.
• Never remove the upper cover until the rotating sieve stops completely.
- Always use the stuffer to push food through the stuffing opening. Never push in food using your fingers, a fork, spoon, knife or any other object.
• Do not use abrasive or chemically aggressive substances for cleaning the unit.
- Do not use the unit if it does not operate properly, or if it has been dropped, damaged or exposed to any liquids. Refer the unit to an authorized service center for testing and repair.
- Never use an appliance with a damaged power cord or plug. Contact an authorized service center immediately to have the defective components repaired or replaced.
• The unit is not designed for outdoor use.
• The unit is suitable for domestic use only. It is not designed for commercial operation.
• Use the product only for the intended purpose specified in the Operating Manual.
• Do not immerse the power cord, plug, or appliance into water or any other liquid.
• Use only accessories recommended by the manufacturer.
• Put the appliance on a flat, steady surface.
• Do not repair the appliance yourself. Contact an authorized service center.
Failure to follow the manufacturer's instructions may lead to refusal of warranty repair.
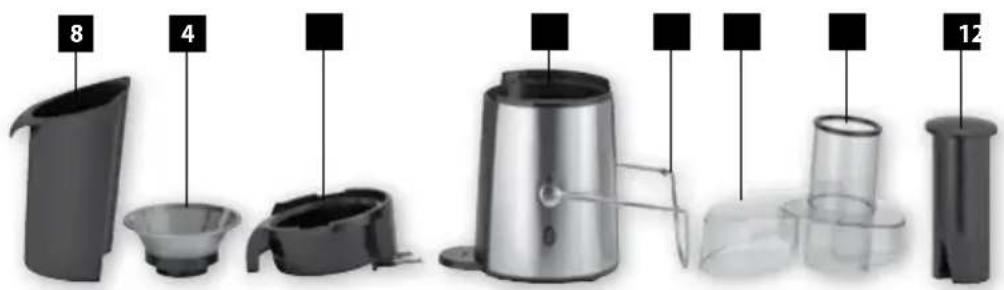
PRODUCT DESCRIPTION
- Stuffer
- Feeder
- Upper cover
- Rotating sieve
- Juice drain cover
- Closing juice drain
- Body of the unit
- Pulp bin
- Lid locking clip
- Speed controller
- Anti-slip feet
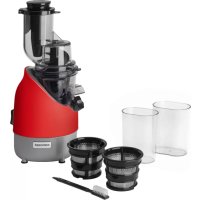
Accessories
A Pulp bin

NOTE
Prior to using a new unit, wipe the surface with a wet cloth and wash the removable accessories in warm water for hygienic reasons.
The unit contains sharp parts. Extra care should be taken while cleaning the unit.
OPERATING INSTRUCTIONS
Note: The unit can be turned on only if the upper cover and locking clip are assembled correctly.
Juice making tips
• Buy only the freshest fruits and vegetables
- Fruits and vegetables contain valuable vitamins and minerals that degrade when exposed to oxygen and light. Drink the juice immediately after extraction.
If the juice must be stored for several hours, put it in a fridge in crockery or glass kitchenware. You may improve the conservation features by adding lemon juice.
• You can use the pulp for preparation of other food (jam, fruit salad, etc.).
• If the fruit is very watery (melons, etc.), insert it slowly in order to extract as much juice as possible.
- If you use very ripe fruits, there can be very little juice. In such case it is necessary to process the fruit very slowly, so that the juice drains easily, and the rotating sieve does not clog.
• It is usual that when processing apples and bananas no juice is extracted.
- To achieve maximum effectiveness of the unit, clean the rotating sieve after every half kilogram of processed food.
Extraction
- Fix the pulp bin to the side of the unit (Fig. 1).
- Fix the juice drain cover to the upper part of the body.
- Apply the rotating sieve to the juice drain cover by pressing on the upper edge of the sieve downwards.
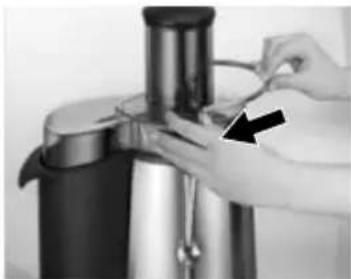
- Put on the upper lid, and fix it with the locking clip (Fig. 2).
- Select the required speed according to the processed food switch. The higher speed is suitable for food with low juice content (apples, carrots, etc.). The lower speed is suitable for food with high juice content (pears, oranges, peaches, etc.).
- Open the juice drain downwards to let the extracted juice flow into a bowl.
- Insert washed pieces of food in the feeder slowly.
You can feed in whole apples and pears, or you may cut them into pieces. You don't have to peel them or remove the cores.
Peel oranges first, feed in only individual grapes.
It is difficult to extract juice from bananas, avocados, blackberries, strawberries, etc.
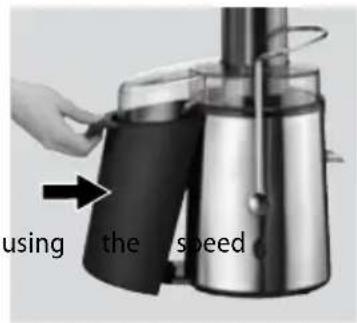
Fig. 1

natural_image
Close-up of hands operating a stainless steel steamer with a black arrow pointing to the handle (no visible text or symbols)Fig. 2
NOTE: Always use the stuffer to push food through the stuffing opening. Never push in food using your fingers, a fork, spoon, knife or any other object (Fig. 3).
- Continuously check the volume of pulp in the bin, or stuck to the upper lid. If the pulp needs to be removed, turn the unit off and wait until the rotating sieve stops. Close the juice drain upwards. Release the upper lid using the closing lock, clean it, empty the pulp bin and clean the rotating sieve.
- After use turn off the product and unplug from the mains outlet.
NOTE: Extracted juice is designed for immediate consumption, as it oxidizes very fast in the open air, which can make its taste worse, change its color and, most importantly, decrease its nutritional value.
Apple or pear juice turns brown fast; you can slow down this process by adding a few drops of lemon juice.

natural_image
Close-up of a black and white industrial machine with a downward arrow indicating compression or cooling (no visible text or symbols)Fig. 3
CLEANING AND MAINTENANCE
Before cleaning the unit, always disconnect the power cord from the wall outlet! The surface of the unit may only be cleaned using a wet cloth. Do not use any detergents or hard objects as they may damage the unit's surface!
Wash the removable parts in warm water.
Never clean the unit under running water, do not rinse it, and do not submerge it in water!
- Open the closing clip.
- Open the upper cover.
natural_image
Metallic stainless steel coffee maker with handle and spout (no visible text or symbols)Fig. 4
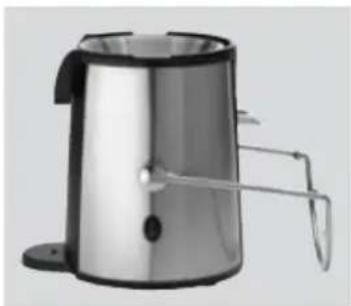
- Release the juice drain cover upwards together with the rotating sieve (Fig. 4).
- Remove and clean the pulp bin.
- After you finish cleaning the removable parts, follow the reverse steps to re-assemble the unit.
TROUBLESHOOTING
| Problem Cause Solution | ||
| Motor does not run. | Plug inserted into the mains outlet incorrectly or insufficiently. | Check the plug connection. |
| The mains outlet is not live. | Check for voltage, e.g. by connecting another appliance. | |
| Wrongly assembled upper cover or closing clip. | Check assembly of the unit. | |
| Supply cable is damaged. | Refer the unit to an authorized service center for testing and repair. | |
| Motor is noisy. Wrongly mounted rotating sieve. Check assembly of the unit. | ||
| Motor has stopped operating. | Motor is overloaded, heat fuse reacted. | Disconnect the cable from the socket. Let the unit cool down. Release the upper lid, empty the pulp bin and clean the rotating sieve. Process a smaller amount of food. |
ACCESSORIES
The following accessories can be bought with the unit:
Rotating sieve |42390307, Ord. No. Price: See price list
REPAIR & MAINTENANCE
Any extensive maintenance or repair that requires access to the inner parts of the product must be performed by an expert service centre.
ENVIRONMENTAL PROTECTION
- Packaging materials and obsolete appliances should be recycled.
• The transport box may be disposed of as sorted waste.
• Polyethylene bags shall be handed over for recycling.

Appliance recycling at the end of its service life:
A symbol on the product or its packaging indicates that this product should not go into household waste. It must be taken to the collection point of an electric and electronic equipment recycling facility. By making sure this product is disposed of properly, you will help prevent the negative effects on the environment
and human health that would otherwise result from inappropriate disposal of this product. You can learn more about recycling this product from your local authorities, a household waste disposal service or in the shop where you bought this product.
natural_image
Close-up of hands operating a stainless steel coffee maker with a black arrow pointing to the handle (no visible text or symbols)Abb. 2
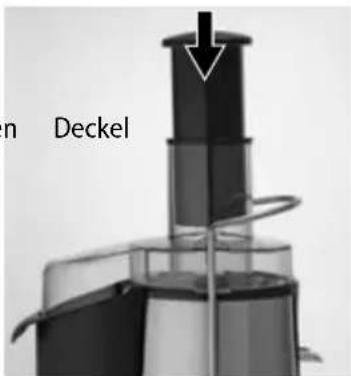
Abb. 3
natural_image
Metallic coffee maker with handle and spout, no visible text or symbolsAbb. 4
natural_image
Close-up of a mechanical device with a vertical stack and handle, showing internal components (no text or symbols visible)Fig. 3

natural_image
Close-up of hands operating a stainless steel coffee maker with a black arrow pointing to the handle (no visible text or symbols)Fig. 2

natural_image
Exterior view of a stainless steel coffee maker with handle and side panel (no text or symbols visible)Fig. 4


- PODĚKOVÁNÍ
- Příslušenství
- UPOZORNĚNÍ:
- ČIŠTĚNÍ A ÚDRŽBA
- Príslušenstvo
- UPOZORNENIE
- Tartozékok
- FIGYELMEZTETÉS
- IMPORTANT SAFETY PRECAUTIONS:
- PRODUCT DESCRIPTION
- NOTE
- OPERATING INSTRUCTIONS
- Juice making tips
- Extraction
- CLEANING AND MAINTENANCE
- ACCESSORIES
- REPAIR & MAINTENANCE
- ENVIRONMENTAL PROTECTION
- Appliance recycling at the end of its service life:
Brand : Concept
Model : LO-7020
Category : Juicer