
SeeMe HD - Camcorder AIPTEK - Free user manual and instructions
Find the device manual for free SeeMe HD AIPTEK in PDF.


| Product type | Camcorder |
| Brand | Aiptek |
| Model | SeeMe HD |
| Video resolution | High definition (HD) 1080p |
| Photo resolution | 5 megapixels (interpolated) |
| Optical zoom | None |
| Digital zoom | Up to 4x |
| Screen | LCD 2.7 inches |
| Storage | SD/SDHC card (up to 32 GB) |
| Power supply | Rechargeable Li-ion battery (3.7 V) |
| Battery life | Approximately 60 minutes |
| Connections | USB 2.0, HDMI output, AV input |
| Dimensions (L x W x H) | 110 x 70 x 25 mm |
| Weight | 150 g (with battery) |
| Main features | HD video recording, photo, webcam mode, audio recording |
| Maintenance and cleaning | Clean with a soft, dry cloth |
| Safety | Do not expose to moisture or extreme temperatures |
| Spare parts and repairability | Battery and charger available, repair by authorized center |
| General information | Manual available in multiple languages |
Frequently Asked Questions - SeeMe HD AIPTEK
User questions about SeeMe HD AIPTEK
0 question about this device. Answer the ones you know or ask your own.
Ask a new question about this device
Download the instructions for your Camcorder in PDF format for free! Find your manual SeeMe HD - AIPTEK and take your electronic device back in hand. On this page are published all the documents necessary for the use of your device. SeeMe HD by AIPTEK.
USER MANUAL SeeMe HD AIPTEK
Dear user, thank you for purchasing this product.
Much investment in time and effort has gone into its development, and it is our hope that it will give you many years of trouble-free service.
Safety Notice:
- Do not drop, puncture or disassemble the camera; otherwise the warranty will be voided.
- Avoid all contact with water, and dry hands before using.
- Do not expose the camera to high temperature or leave it in direct sunlight. Doing so may damage the camera.
- Use the camera with care. Avoid pressing hard on the camera body.
- For your own safety, avoid using the camera when there is a storm or lightning.
- Do not use batteries of different specifications. Doing so may lead to the potential for serious damage.
- Remove the battery during long periods between usage, as a deteriorated battery may affect the functionality of the camera.
- Remove the battery if it shows signs of leaking or distortion.
- Use only the accessories supplied by the manufacturer.
- Keep the camera out of the reach of infants.
- Risk of explosion if battery is replaced by an incorrect type.
- Dispose of used batteries according to the instructions.
FCC Compliance Statement:
This device complies with Part 15 of the FCC Rules. Operation is subjected to the following two conditions: (1) this device may not cause harmful interference, and (2) this device must accept any interference received, including interference that may cause undesired operation.

This equipment has been tested and found to comply with limits for a Class B digital device, pursuant to Part 15 of the FCC rules. These limits are designed to provide reasonable protection against harmful interference in
residential installations. This equipment generates, uses, and can radiate radio frequency energy, and if not installed and used in accordance with the instructions, may cause harmful interference to radio communications.
However, there is no guarantee that interference will not occur in a particular installation. If this equipment does cause interference to radio or television equipment reception, which can be determined by turning the equipment off and on, the user is encouraged to try to correct the interference by one or more of the following measures:
- Reorient or relocate the receiving antenna.
- Move the equipment away from the receiver.
- Plug the equipment into an outlet on a circuit different from that to which the receiver is connected.
- Consult the dealer or an experienced radio/television technician for additional suggestions.
You are cautioned that any change or modifications to the equipment not expressly approved by the party responsible for compliance could void your authority to operate such equipment.

If the time arises to throw away your product, please recycle all the components possible. Batteries and rechargeable batteries are not to be disposed in your domestic waste! Please recycle them at your local recycling point.
Together we can help to protect the environment.
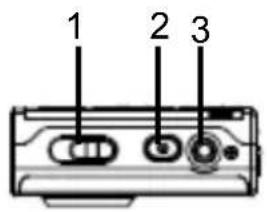
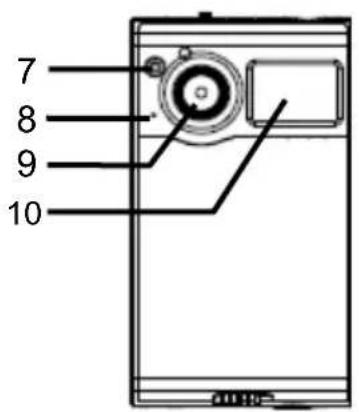
- Knowing the camcorder parts
1 Macro/Normal mode switch
2 Power button
3 3.5mm earphone jack
4 Strap mount
5 Battery cover lock
6 Tripod socket
7 LED light
8 Microphone
9 Lens
10 Front LCD monitor
11 SD card slot
12 Power indicator
13 Main LCD monitor
14 Video record button
15 5-direction button
16 Shutter button
17 Zoom switch
18 Playback
19 Speaker
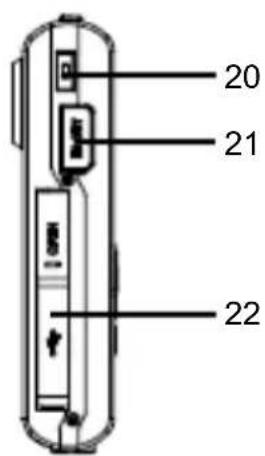
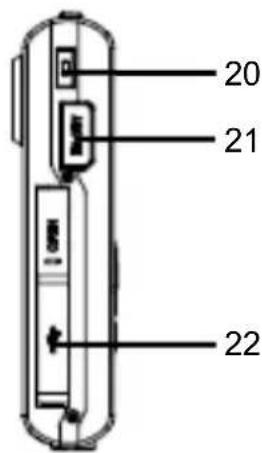
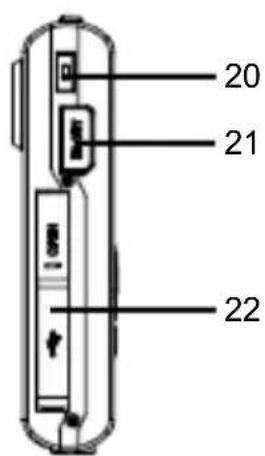
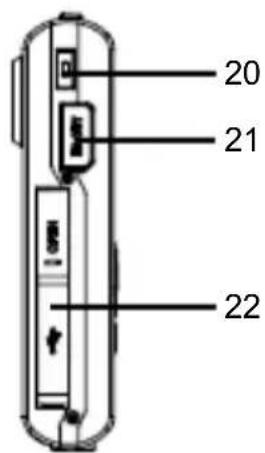
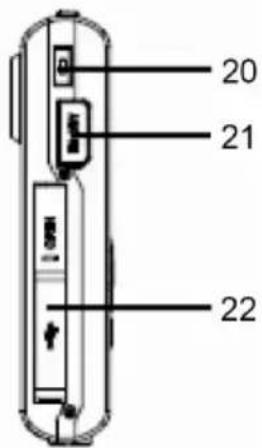
20 LCD switch button
21 HDMI output
22 USB connector


natural_image
Technical line drawing of a cylindrical mechanical component with mounting holes and a labeled dimension (11), no readable text or symbols present.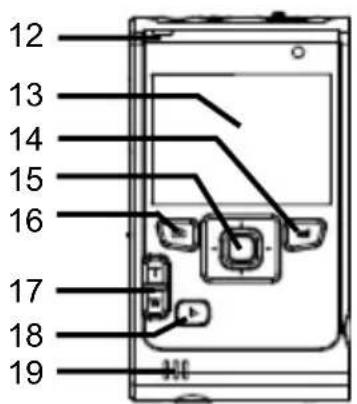


For select model only. Please refer to the package printing for detailed specification.

Loading the battery
Camcorder supplied with a lithium battery
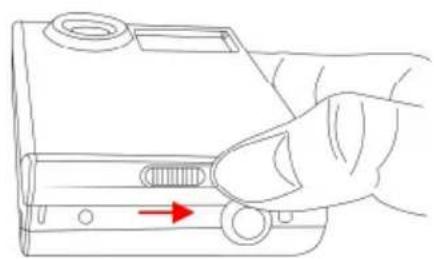
Push the battery cover lock to the right, then open the cover. Slide in the connector end of the lithium battery as the direction of the arrow shown and make sure that the metallic contacts are aligned with the contacts in the compartment.
natural_image
Line drawing of a hand inserting a device into a slot (no text or symbols)
natural_image
Line drawing of a device casing with an arrow indicating the top panel area, and a separate flat panel below (no text or symbols)
Inserting the SD card (★)
Camcorder has built-in internal memory for storage, but you can insert a SD/SDHC memory card to expand your camcorder's memory capacity.
-
Insert the card as the direction of indication until it reaches the end of the slot.
-
When the card is inserted successfully, the icon (☐) will appear on screen and the internal memory will become inaccessible.
To remove the card, push the card to release it and then pull it out gently.
* When using a brand new memory card, you are recommended to format the card with camcorder.
* The camcorder will use the inserted memory card as the main storage medium. Only when the inserted card is removed will the files be stored in the built-in memory.

natural_image
Line drawing of a digital camera module with a red arrow indicating a component or insertion point (no text or symbols present)
Charging the battery
Connect the camcorder to your computer or other power supplied USB port.
Please charge the battery at least 8 hours for first time use.
- Connect one end of the supplied USB cable to the USB port of the camcorder and the other end to a powered PC. Make sure the camcorder is powered off.
- The charging LED turns red and the charge starts.
- When the charging is interrupted or the battery pack is fully charged, the charging LED will turn off.

When using a PC to charge the battery, do not power on camcorder, or the charge will stop.

Connecting to PC / Notebook
Push the USB connector lock to the direction shown "OPEN", then the USB connector will eject automatically. Connect the USB connector to the USB port on PC / Notebook. If the camcorder is powered off when connected to PC / Notebook, it will only charge the battery. You should power on the camcorder before or after connecting it to PC / Notebook, then can access the camcorder storage to view the recordings.


You can only read the recordings in the internal memory or memory card instead of saving files to them.

Turning the power on/off
To turn on the camcorder, press the Power button then the power indicator lights green. To turn off the camcorder, press and hold the Power button until the power indicator is extinguished.
If the power is not turned on after you have completed the above procedures, please check the following have been done correctly: Battery is correctly loaded. The loaded battery has enough power.
The [Auto Off] setting may cause the camcorder to turn off after it's idle for a period of time.

Mode selection
- Push the Joystick Left to enter the Mode menu.
- Push the Joystick Up or Down to select the desired item.
- Push the Joystick Right to confirm.
- Push the Joystick Left to exit.

Choosing the screen language
Power-on → enter Setting mode → select the Language item → push the Joystick Up or Down to select the language → push the Joystick Right to confirm.
Setting the date and time
Power-on → enter Setting mode → select the Clock item → push the Joystick Up or Down to select numbers for the YY/MM/DD and HH:MM fields → push the Joystick Right to confirm each field → push the Joystick Left to exit.

For select model only. Please refer to the package printing for detailed specification.

Realizing the battery life indicator
| Icon | Description | ||
 | Full battery life | ||
 | Moderate battery life | ||
 | Low battery life* The video light will be disabled. | ||
 | Empty battery life |
Note: To avoid sudden outage of power supply, you are recommended to replace the battery when the icon indicates low battery life.
Comprehending icons on the screen
Camera mode:
1 Mode icon (camera mode)
2 Number of recordings
3 Exposure
4 Video light status
5 Still resolution
6 Video resolution
7 Memory card inserted
8 Battery level indicator
9 Stabilizer
10 Focus type (macro mode)
11 Effect
12 White balance
13 Snap mode

Playback mode:
1 Mode icon (play mode)
2 Current / total recordings
3 File format
4 Memory card inserted
5 Battery level indicator
6 Recording time

Voice mode:
1 Mode icon (voice mode)
2 Number of recordings
3 Memory card inserted
4 Battery level indicator
5 Voice recorder
6 Exit


Recording a video clip
- If you want to take close up pictures, you can switch to Macro mode ( ).
- Press the Record button() to start recording.
- Press the Zoom buttons (T/W) to zoom in or zoom out the screen.
- Push the Joystick Right to Pause, and Left to resume.
- Press the Record button() again to stop recording.
| 50cm~∞ | |
| 30cm~50cm |

Taking a still picture
- If you want to take close up pictures, you can switch to Macro mode ( ).
- Zooming: press the Zoom buttons (T/W) to zoom in or zoom out the screen.
- For better image quality, it is recommended that you hold camcorder steady to avoid the image from blurring caused by hand shake.
- Press the Shutter button() to take a still picture.

Recording an audio clip
- At the Mode menu, use the Joystick to select Voice mode, the push Right to enter.
- Press the Record button() to start recording.
- Push the Joystick Right to Pause, and Left to resume.
- Press the Record button() again to stop recording.

Using the front LCD monitor
The front monitor has 3 modes for you to choose from, and you can switch modes by pressing LCD switch button:
- Normal mode: for the self-snap, you can see yourself in the screen
- Animation mode: for you to take pictures on children; the animation shows in the screen can attract the children's attention, so that you can take pictures more easily
- Off mode: the screen turns off
The frame per second of front monitor is only 5 to 10, so it's normal that you would probably feel the image lagging a little.

Playing-back
- Press the ▶ button to enter Playback mode.
- The last recorded picture, video clip, or audio clip starts playing.
- Push the Joystick Up or Down to shift between files.
- The file you select will be displayed or automatically start playing.

Setting menu options
The menu items provide several options for you to fine-tune your camcorder functions. The following table gives details on menu operations:
| How to... Action | |
| Bring up the menu in Camera/ Playback mode | Push the Joystick Right. |
| Move the highlight bar | Push the Joystick Up or Down. |
| Confirm an item | Push the Joystick Right. |
| Exit menu/Go back to previous menu | Push the Joystick Left. |

Menu options in camcorder mode
Power on → enter Camera mode → Use the Joystick Right.
| Item | Option | Description |
| Video Resolution | Please refer to the package printing for resolution specification. | |
| Still Resolution | Please refer to the package printing for resolution specification. | |
| Stabilizer ★ | On/Off | Enable/Disable stabilizer function. Stabilizer function can prevent the image from blurring causing by hand shake. (Only support 1080p and 720p resolution.) |
| Video Light | Off | The Video light is disabled. |
| On The Video light is enabled. | ||
| Flash Strobe | The Video light is forced on in every shot. | |
| Snap Mode | Single | The camcorder will take a single shot when the Shutter button is pressed. |
| Self-Timer | The camcorder will have ten seconds delay before taking a shot when the Shutter button is pressed. | |
| Continuous | The camcorder will take a sequence of shots when the Shutter button is pressed. | |
| Exposure | -2~+2 | Manually adjust the exposure to gain better effect when the preview image appears too bright or too dark. A positive value indicates the image will be brighter than usual; while a negative value makes the image dimmer. |
| Flicker 50Hz/60Hz | Set flicker frequency to 50Hz or 60Hz. For more information, please refer to the "Flicker Settings reference" table in the Appendix. | |
| Date Stamp | On/Off | Enable this feature to print a date mark on each picture. |
| White Balance | Auto | The camcorder adjusts white balance automatically. |
| Sunny | This setting is suitable for outdoor recording in sunny weather. | |
| Cloudy | This setting is suitable for recording in cloudy weather or shady environments. | |
| Fluorescent | This setting is suitable for indoor recording with fluorescent lamp lighting, or environments with high color temperature. | |
| Tungsten | This setting is suitable for indoor recording with incandescent lamp lighting, or environments with low color temperature. | |
| Effect | Normal | Make recordings in natural color. |
| Black&White | Make recordings in black and white. | |
| Classic | Make recordings in sepia-toned color. | |

The “Video resolution” and “Still resolution” menu items are model-dependent. Please refer to the package printing for detailed specifications.

Menu options in Playback mode
Power on → enter Playback mode → Push the Joystick Right.
| Item | Option | Description |
| File Info - | View the file's title, saved date and time, size, and length of recording. | |
| Slide show | On/Off | Start picture slideshow. / Repeat playing all video clips. |
| Delete One | Yes/No | Delete current file. |
| Delete All | Yes/No | Deletes all files. |

Menu options in Setting mode
Power on → enter Setting mode → Push the Joystick Right.
| Item | Option | Description |
| Beep | On/Off | Switch beep sound on/off. |
| Start up | Menu | Enter mode selection when camcorder starts up. |
| Camera | Enter camera mode when camcorder starts up. | |
| Auto off | Off/1min/3min/5min | Set how long the camcorder will automatically shut down when idle. Set to [Off], the camcorder stay powered on until the batter is dead. |
| AV Mode | Menu | Allows you to select from Earphone or AV Out function. |
| Earphone | Play sound through your earphones. | |
| AV Out | Connecting to a TV or external monitor. | |
| TV System | NTSC | Set TV system compatibility to NTSC. This option is suitable for America, Taiwan, Japan, and Korea. |
| PAL | Set TV system compatibility to PAL. This option is suitable for Europe, China, Japan, and Hong Kong. | |
| USB Mode | Disk | You can choose Disk (removable disk) mode when the camcorder is connected to a PC. |
| Language | EN/DE/FR/IT/ES/PT/NE/SC/TC/JP/KR/BPT | Allows you to select the OSD language. |
| Icon | Off/On | Hide/Show the status icons on the screen. |
| Clock | - | Set date and time. |
| Format | Yes/No | Format the storage medium. Please note that all files stored in the medium will be deleted. |
| Reset Default | Yes/No | Restore camcorder to factory default settings. Please note that your current settings will be restored. |

Flicker settings reference
| Area | England | Germany | France | Italy | Spain | Russia |
| Setting 50 Hz | 50 Hz | 50 Hz | 50 Hz | 50 Hz | ||
| Area | Portugal | America | Taiwan | China | Japan | |
| Setting 50 Hz | 50 Hz | 60 Hz | 60 Hz | 50/60 Hz | 50 Hz | |
Korea
Note: The flicker setting is based on the frequency standard of your local power supply.

System Requirements
For Windows:
● Operating System: Windows XP SP2 / Vista / Win7
● CPU: AMD or Intel CPU with 3.2Ghz or multi core CPU
● RAM: 1GB (2GB recommended)
● Graphic Card: 256MB memory
- CD-ROM Speed: 4X and above
● Software: H.264 decoder (Quick Time Player 7.4.1 or above)
● Other: 1 free USB port, Optical drive
Note: The specification might be modified without notice.
| Model | 14 Mega-pixels camcorder |
| Image Sensor 14 Mega-pixels CMOS (4416X3312) | |
| Resolution | Camcorder: FullHD1080p (1920X1080) / HD720p (1280X720) / VGA (640X480)Camera: 16MP (4608X3456) / 14MP (4416X3312) / 10MP (3600x2700) / 5M (2560X1920) / 2M (1600X1200) |
| File Format MP4 (H.264), JPEG, WAV | |
| Video Frame Rate Up to | 30fps |
| Internal Memory | 32MB NAND-Flash Build in, around 15MB for available for storage |
| External Memory SD / SDHC card slot (up to 32GB SDHC) | |
| LCD Display | Front: TFT, 2.36",480*234,RGBRear: CSTN, 1.0" 96*64 dot, RGB |
| Lens Fixed, 2 steps | |
| Focus Range | Normal: 50cm ~∞Marco: 30 ~ 50cm |
| Aperture Range F3.0, f=8.15mm | |
| Shutter Speed | 1/12 ~ 1/5000 sec. |
| Video Light | White LED (Off / On /Flash strobe) |
| Digital Zoom | 4X |
| Digital Stabilizer | Yes |
| Night Mode | Yes |
| White Balance | 5 modes (Auto / Daylight / Cloudy / Fluorescent / Tungsten) |
| Exposure Control | Auto, EV: +2.0 ~ -2.0 |
| Still Image Effect | 3 modes (Normal / Black & White / Classic) |
| Continuous Shot | Yes |
| Microphone | Yes (Mono) |
| Speaker | Yes (Mono) |
| Voice Recorder | Yes |
| TV Out | NTSC / PAL color system supported |
| HDMI Output | Yes |
| Self-timer | 10 sec |
| Power Save Mode | 1 min. / 3 min. / 5 min. / off |
| Interface | USB 2.0 (Slide Out connector, A-type) |
| Battery | Rechargeable Li-Ion Battery (NP60) |
| Dimensions(L x W x H) | 105 x 59.6 x 22.2mm |
Note: Specifications are subject to change without notification.
Willkommen:
natural_image
Technical line drawing of a cylindrical mechanical component with mounting holes and a labeled dimension (11), no readable text or symbols present.


natural_image
Line drawing showing a hand pressing a button on a device, with a close-up of the next component (no text or symbols)
natural_image
Line drawing of a digital camera module with a red arrow pointing to its side panel (no text or symbols present)
Akku laden
natural_image
Technical line drawing of a cylindrical mechanical component with mounting holes and a labeled dimension (11), no readable text or symbols present.

natural_image
Line drawing showing a hand inserting a device into a device with red arrows indicating the next component (no text or symbols present)
Insertion de la carte SD (★)
natural_image
Line drawing of a digital camera with a red arrow pointing to a screen (no text or symbols)
natural_image
Technical line drawing of a cylindrical mechanical component with mounting holes and a labeled dimension (11), no readable text or symbols present.


natural_image
Line drawing of a device with a hand inserting a button into a device, showing internal components and a separate close-up of the next component (no text or symbols)
Inserire la SD card (★)
natural_image
Line drawing of a digital camera module with a red arrow pointing to its side panel (no text or symbols present)
natural_image
Technical line drawing of a cylindrical mechanical component with mounting holes and a labeled dimension (11), no readable text or symbols present.


natural_image
Line drawing showing a hand inserting a device into a device casing, with no text or symbols present.
Insertar la tarjeta SD (★)
natural_image
Line drawing of a mobile phone with a red arrow pointing to a device component (no text or symbols)
Cargar la batería
Conectar a PC/Notebook
natural_image
Technical line drawing of a cylindrical mechanical component with mounting holes and a labeled dimension (11), no readable text or symbols present.


natural_image
Line drawing showing a hand inserting a device into a case, with no text or symbols present.
natural_image
Line drawing of a digital camera module with a red arrow pointing to a device panel (no text or symbols)
Carregar a bateria
natural_image
Technical line drawing of a cylindrical mechanical component with mounting holes and a labeled dimension (11), no readable text or symbols present.


natural_image
Hand inserting a USB into a device component with a red arrow indicating the direction (no text or symbols present)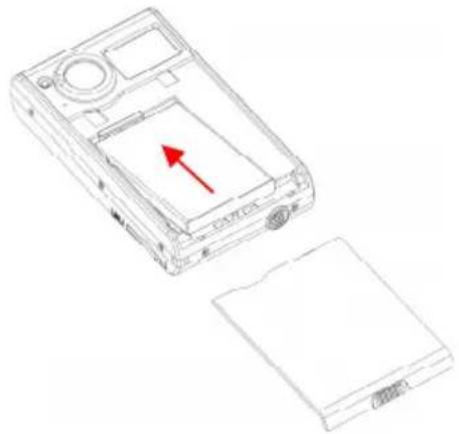
natural_image
Technical line drawing of a device casing with an arrow indicating a red directional component (no text or symbols present)
SD kartı takma (★)
natural_image
Line drawing of a digital camera module with a red arrow pointing to its side panel (no text or symbols present)
Pilin şarj edilmesi
natural_image
Technical line drawing of a cylindrical mechanical component with mounting holes and a labeled dimension (11), no readable text or symbols present.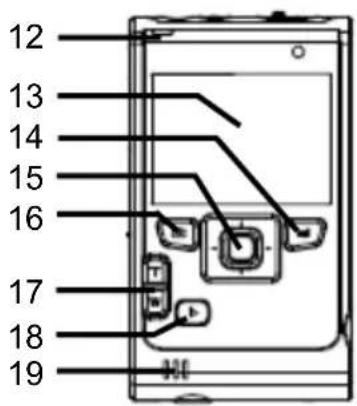

裝載電池
攝錄影機與隨附的鋰電池一併供貨
natural_image
Line drawing showing a hand inserting a device into a device with red arrows indicating the component (no text or symbols present)
插入 SD 卡(★)
natural_image
Line drawing of a digital camera module with a red arrow indicating a component (no text or symbols present)
電池充電
natural_image
Technical line drawing of a cylindrical mechanical component with mounting holes and a labeled dimension (11), no readable text or symbols present.


装入电池
锂电池随摄相机提供
natural_image
Line drawing showing a hand inserting a device into a case, with red arrows indicating the component (no text or symbols present)
插入 SD 卡(★)
natural_image
Line drawing of a digital camera module with a red arrow indicating a component (no text or symbols present)
电池充电
natural_image
Technical line drawing of a cylindrical mechanical component with mounting holes and a labeled section (11), no readable text or symbols present.

natural_image
Line drawing showing a hand inserting a device into a case, with no text or symbols present.
SD 카드 삽입하기 (★)
natural_image
Line drawing of a digital camera module with a red arrow pointing to a device panel (no text or symbols present)
배터리 충전하기
natural_image
Technical line drawing of a cylindrical mechanical component with mounting holes and a labeled section (11), no readable text or symbols present.

バッテリーの装着
カムコーダー付属のリチウムバッテリー
natural_image
Line drawing showing a hand inserting a button into a device, with no text or symbols present.
SD カードの装着(★)
natural_image
Line drawing of a digital camera module with a red arrow pointing to a small inset device (no text or symbols)
バッテリの充電
natural_image
Technical line drawing of a cylindrical mechanical component with mounting holes and a labeled dimension (11), no readable text or symbols present.
natural_image
Hand holding a device with a red arrow pointing to a button (no text or symbols visible)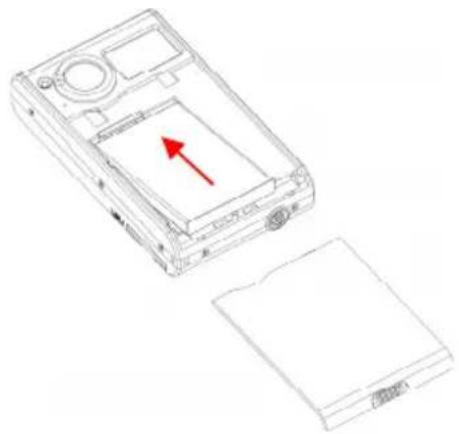
natural_image
Line drawing of a device casing with an arrow pointing to its top panel, shown alongside a blank sheet (no text or symbols)(★) SD إدراج بطاقة

natural_image
Line drawing of a handheld electronic device with a circular button and a red arrow pointing to a small inset card (no text or symbols)

- Safety Notice:
- FCC Compliance Statement:
- - Knowing the camcorder parts
- Loading the battery
- Camcorder supplied with a lithium battery
- Inserting the SD card (★)
- Charging the battery
- Connecting to PC / Notebook
- Turning the power on/off
- Mode selection
- Choosing the screen language
- Setting the date and time
- Realizing the battery life indicator
- Comprehending icons on the screen
- Camera mode:
- Playback mode:
- Voice mode:
- Recording a video clip
- Taking a still picture
- Recording an audio clip
- Using the front LCD monitor
- Playing-back
- Setting menu options
- Menu options in camcorder mode
- Menu options in Playback mode
- Menu options in Setting mode
- System Requirements
- For Windows:
- Willkommen:
- Akku laden
- Insertion de la carte SD (★)
- Inserire la SD card (★)
- Insertar la tarjeta SD (★)
- Cargar la batería
- Conectar a PC/Notebook
- Carregar a bateria
- SD kartı takma (★)
- Pilin şarj edilmesi
- 裝載電池
- 攝錄影機與隨附的鋰電池一併供貨
- 插入 SD 卡(★)
- 電池充電
- 装入电池
- 锂电池随摄相机提供
- 电池充电
- SD 카드 삽입하기 (★)
- 배터리 충전하기
- バッテリーの装着
- SD カードの装着(★)
- バッテリの充電
- (★) SD إدراج بطاقة
Brand : AIPTEK
Model : SeeMe HD
Category : Camcorder