
ICN620 - GPS Navigator NAVMAN - Free user manual and instructions
Find the device manual for free ICN620 NAVMAN in PDF.
| Brand | NAVMAN |
| Model | ICN620 |
| Product Type | In-car navigation GPS |
| Dimensions (approx.) | Approximately 120 x 80 x 20 mm |
| Weight (approx.) | Approximately 200 g |
| Power Supply | 12/24 V DC adapter (cigarette lighter) and mains adapter |
| Screen | Color LCD screen |
| GPS Receiver | Built-in, adjustable antenna |
| Internal Memory | Storage for maps and software |
| Memory Expansion | Memory card (format not specified) |
| Navigation Software | smartMAP™ |
| Included Maps | Regional maps according to country of purchase (on CD-ROM) |
| Main Features | Voice guidance, route calculation, Back-on-Track (automatic recalculation), auto restart, zoom, brightness adjustment |
| Mounting | Suction cup on windshield or dashboard mount |
| Maintenance | Clean with a soft, dry cloth. Do not use solvents. |
| Safety | Do not use while driving. Fix without obstructing visibility or safety equipment. |
| Package Contents | iCN device, CD-ROMs (smartMAP, maps, manual), mounting supports (foot, suction cup, etc.), 12/24 V adapter, mains adapter, USB cable, carrying case, windshield cleaner, quick start guide |
| Available Languages | Multilingual (FR, DE, EN, ES, IT, NL, etc.) |
| Warranty | Not specified, probably 2 years |
Frequently Asked Questions - ICN620 NAVMAN
User questions about ICN620 NAVMAN
0 question about this device. Answer the ones you know or ask your own.
Ask a new question about this device
Download the instructions for your GPS Navigator in PDF format for free! Find your manual ICN620 - NAVMAN and take your electronic device back in hand. On this page are published all the documents necessary for the use of your device. ICN620 by NAVMAN.
USER MANUAL ICN620 NAVMAN
Congratulations on the purchase of your iCN in-car Navigation unit.
This Quick Start Guide will help you set up the iCN and use it for the first time. It is recommended that you read the User Manual, contained on the CD supplied, in order to get the best from your new iCN.
Important
When using your iCN in a vehicle, it is your sole responsibility to place, secure, and use the device in a manner that will not cause accidents, personal injury or property damage, or in any manner obstruct your view or vehicle safety equipment.
The user of this product is solely responsible for observing safe driving practices. Do not operate your iCN while driving. Park the vehicle first. It is your sole responsibility that the vehicle mount installation
instructions are read carefully, understood, and followed.
NAVMAN NZ LIMITED
DISCLAIM ALL LIABILITY FOR ANY USE OF THIS PRODUCT IN A WAY THAT MAY CAUSE ACCIDENTS, DAMAGE OR THAT MAY VIOLATE THE LAW.
Safety first - remember
- Do not operate your iCN while driving.
- The iCN must be placed in a position where it cannot obstruct the driver's view, or interfere with the operation of any air-bags or other vehicle safety equipment.
- For security, and to avoid overheating, do not leave your iCN on the dash or wind-shield while your vehicle is unattended, especially in strong sunlight. Do not use or handle the iCN while it is hot - leave it to cool, away from heat sources.
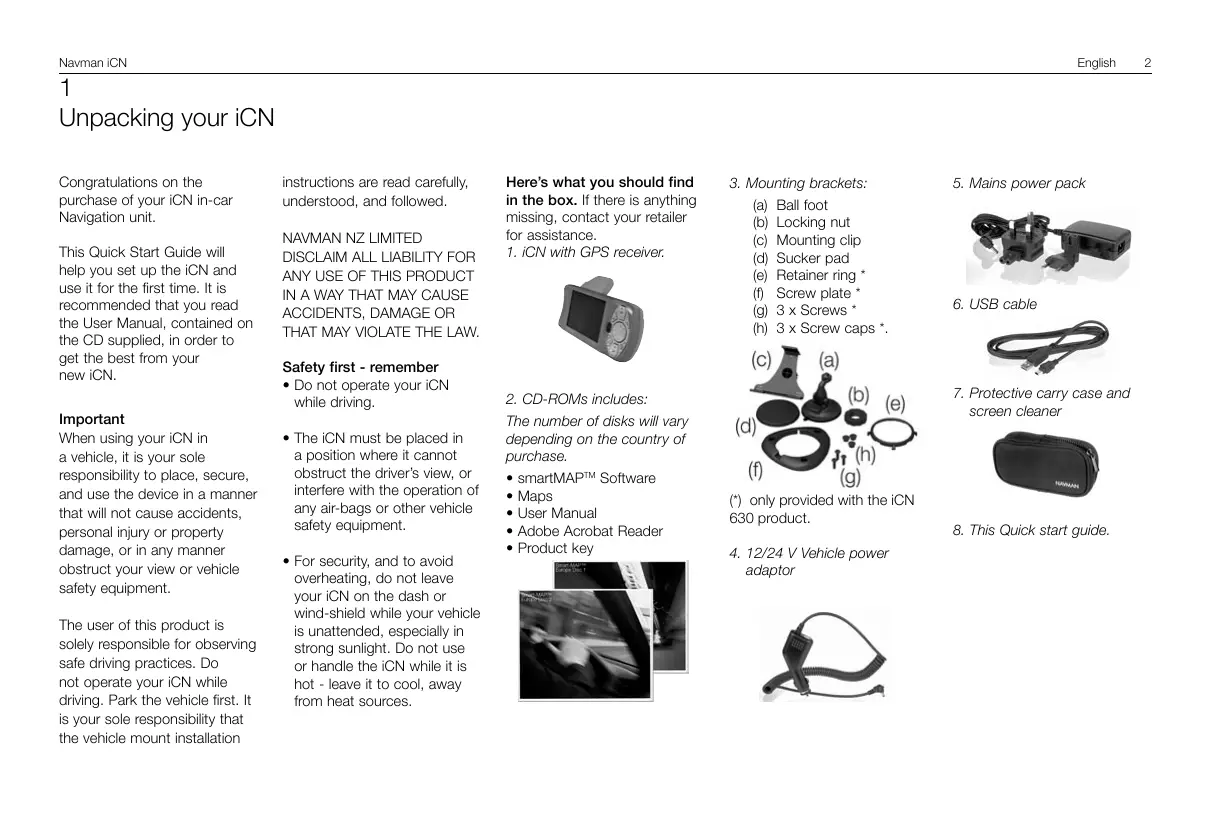
Here's what you should find in the box. If there is anything missing, contact your retailer for assistance.
- iCN with GPS receiver.
2. CD-ROMs includes:
The number of disks will vary depending on the country of purchase.
smartMAP™ Software
- Maps
- User Manual
- Adobe Acrobat Reader
Product key

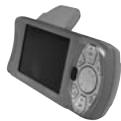
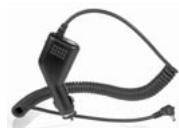
3. Mounting brackets:
(a) Ball foot
(b) Locking nut
(c) Mounting clip
(d) Sucker pad
(e) Retainer ring *
(f) Screw plate *
(g) 3 × Screws
(h) 3 × Screw caps .
(*) only provided with the iCN 630 product.
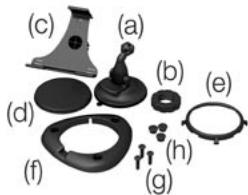
- 12/24 V Vehicle power adaptor
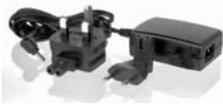
5. Mains power pack
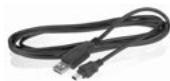
6. USB cable
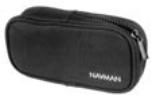
7. Protective carry case and screen cleaner
- This Quick start guide.
2
Installing software and maps
Before you can begin using your iCN, the smartMAP™ application and maps must be installed onto your iCN. These can be found on the CD-ROMs supplied with your iCN.
Complete the following tasks:
IMPORTANT: Steps 1 to 5 must be performed in this order to ensure a successful installation.
- Install the iCN Desktop application.
- Connect the iCN to your PC.
- Install the smartMAPTM application onto your iCN.
- Download maps onto your iCN.
- Remove the USB cable.
1. Install iCN desktop
- Windows XP users: ensure that the Service Pack 1 is installed on your PC before starting the iCN Desktop installation.
- Place the CD-ROM into your PC. The Installation Wizard will start automatically.
- Follow the screen prompts.
- Once the installation is complete, iCN Desktop will start automatically.
2. Connect the iCN to your PC
- Use the mains power adaptor (supplied) to plug the iCN into a power socket.
- Turn the iCN on by holding down the button for 1 second, this screen should be displayed on the iCN.
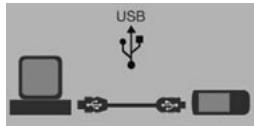
- Connect the iCN to a USB port on the PC using the USB cable (supplied).
- The iCN will display this screen.

3. InstallsmartMAPTM
Use iCN Desktop to install the smartMAP™ application onto the iCN. This is a two-step process - first download the application, then you must register the installation to activate the software (this requires an Internet connection).
- Click "ICN APPLICATION" from the Main Menu.
- Click "INSTALL APPLICATION".
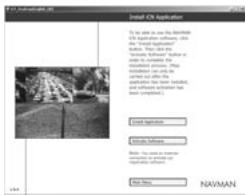
- Once the installation is complete, click on "Activate Software" to register your installation on-line.
- Follow the instructions to register the smartMAP™ software and maps.
Note: the Product Key can be found on the back of the smartMAP™ CD sleeve - this is required every time you install and register the smartMAP™ software. Keep this number in a safe place - it is important.
4. Install maps
Maps are available as separate regions of varying sizes, which can be stored in the internal memory of the iCN and also on memory cards which plug into the iCN.
- Click "Install Maps" from the Main Menu.
- Click and hold the mouse button down over the map area you require, and drag it across to one of the right-hand windows. Alternatively, you can click on the required map area and it will be displayed in the bottom left-hand screen. Choose one of the "ADD TO" buttons to download the map.

The maps available on the supplied CD-ROMs are dependent on the country of purchase.
5. Remove the USB cable
The iCN must be un-plugged from the USB cable, in order to complete the installation process.
3
Installing the iCN into your vehicle
The iCN can be mounted in three different ways:
- By suction straight onto the windshield
- By suction or an adhesive disc onto the dash;
- By directly screwing onto the dash (iCN 630 only).
For detailed information on using options 2 and 3, refer to the User Manual, Installing the iCN into your Vehicle.
Follow the safety guidelines to ensure that the iCN does not obstruct the view of the driver, or interfere with the operation of any airbags and safety devices in the vehicle.
Suction mount
- Choose a position on the windshield where the iCN will be clearly visible by the driver without obstructing the view of the road.
- Thoroughly clean and dry the suction cup and the windshield.
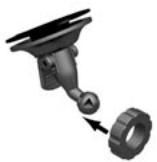
- Hold the suction cup firmly against the windshield and press the lever down until it snaps close.
- The ball foot should now be securely fixed on the windshield. Slip the locking nut loosely over the ball foot, with the flat side facing upwards.
- Snap the socket clip onto the ball foot.
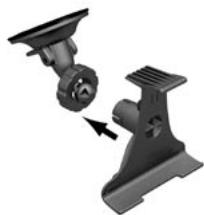
- Adjust the position of the socket clip, so that the iCN will be clearly visible by the driver.
- Wind the locking nut onto the thread of the socket clip until firm.

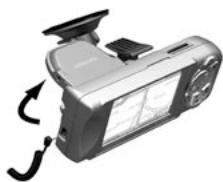
- Snap the iCN onto the socket clip. First, position the two locating tabs on the underside of the iCN into the corresponding slots on the socket clip. Then snap the upper side of the iCN into the clip.
- Flip the GPS antenna outwards so that the antenna is pointing horizontally.
-
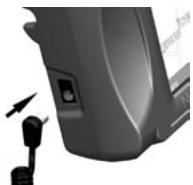
Plug the power adaptor into the vehicle's cigarette lighter socket.
-
Plug the other end of the power cable into the socket on the left hand side of the iCN.
- Make sure that the iCN is positioned such that the GPS antenna has a clear view of the sky.
You are now ready to enter in your destination and start navigating.
4
Getting started with the iCN controls
To ensure your safety, set up your iCN and enter information about your destination BEFORE you start your journey. Do not operate the iCN while driving.
Specific features may vary from one iCN model to the other. Please refer to the User Manual for further information.
Powering up
Hold the button down for approximately 1 second.
A short tutorial is available to show you how to use the iCN. Use the button to move through the screens.
The Main Menu will then be displayed.
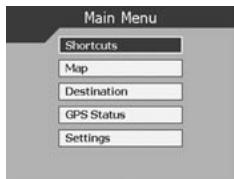
Main Menu
The Main Menu provides you with access to all of the setup and viewing modes of the iCN.
Navigate through the Main Menu using the 8-way toggle button , and make your selection by pressing OK
- Return to the Main Menu at any time by pressing 0. The ESC button will exit you from what you are doing, and return you to the previous screen.
Zoom/Brightness Change the amount of map that is shown, or hold down for longer to adjust the screen brightness.
OK OK
Select the highlighted menu option, text or command.
Menu/Power
Press to return to the main menu at any time, or hold down for longer to power the iCN on/off.
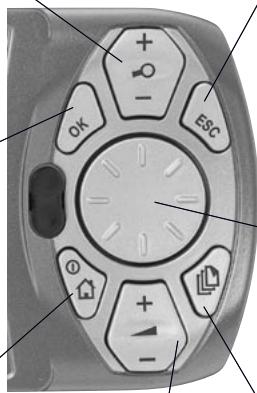
Volume

Press to hear the very next instruction, or hold down for longer to turn the volume of the voice guidance instructions up or down at any time.
ESC ESC
Cancel what you are doing, delete the last text character you typed, or return to the previous screen. Hold down for longer to delete a whole line at once.
8-way Toggle

Scroll up and down through menus, and move around the map when selecting your destination.
Page

Jump between different map views, or pages when a list of options is spread across several pages.
5
Setting your destination
Getting a GPS fix
Once you have entered your destination, the iCN uses a "GPS Fix" to determine your current location. Then from the maps in its memory, the iCN calculates the best way from your current location to the destination you have entered.
In order for the GPS antenna to receive signals, ensure that:
- The iCN is outside or in a vehicle parked outside.
- The GPS antenna is pointing horizontally out, with a clear view of the sky.
It may initially take several minutes to get a GPS fix.
Minimise this time by remaining stationary in your vehicle until the iCN has a fix.
To confirm you have a GPS fix
- select "Map" from the Main Menu.
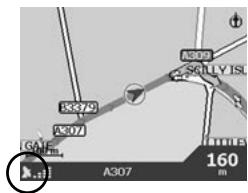
The map screen will show your current location, if you have a GPS fix. The GPS fix is displayed in the lower left corner of the screen.
No GPS fix, the satellite icon is red and the strength indicators are not displayed.
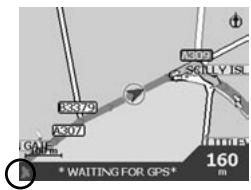
GPS fix, the satellite icon and strength indicators are green.
Setting a destination
There are three main ways that you can program your destination:
- Use "SHORTCUTS" that you have previously programmed for destinations used on a regular basis.
- Program your destination directly on the "MAP".
- Set a new "DESTINATION" by entering an address, intersection, Point of Interest, favourite or recently travelled location.
Refer to the User Manual for information on programming. Shortcuts and Favourites.
Directly from the map
You may find it easier to program your destination directly from the map. The iCN will allow you to scroll around a map and pick a point on the map.
- From the Main Menu, select "MAP". You are now in the automatic Map Browser screen.
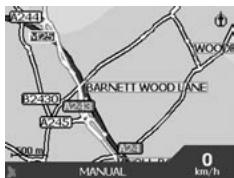
-
Navigate around the map using the button. Zoom in and out as required using +and
-
Press OK to display grid-lines - you are now in the manual Map Browser screen.
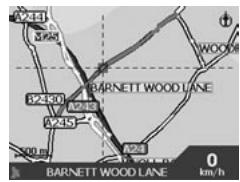
- Use the button to position the intersection of the grid-lines over the destination that you require.
- Press OK to select a point as your destination. The address details are displayed.
- Select "GO" to calculate the route and display the address on the navigation screens.
- Select "SAVE" to save the destination as a Shortcut or Favourite.
6
Driving with your iCN
Now that you have programmed your destination, its now time to use the iCN 630 on your drive.
Viewing your route
There are four different ways that you can view instructions along your way. From the Main Menu, select "MAP". 'Cycle' through the four navigation screens by simply pressing
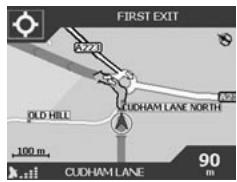
Map browser
This view is always oriented to the North, and shows your current position and surrounding street names. If you have already programmed a route, the route and all turns are highlighted.
Zoom in and out as required using 0+ and 0- .
Navigation map
Similar to the Map Browser view, except that the map is always oriented to the direction in which your vehicle is travelling. This is often an easier way to keep your bearings.
Zoom in and out as required using 0+ and 0-
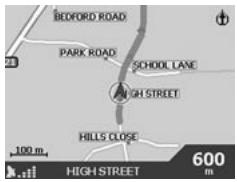
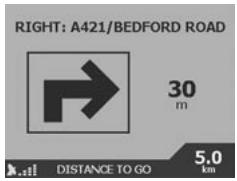
Next instruction
This view clearly shows the information that you need for the next turn - the direction of the turn and the distance to the turn.
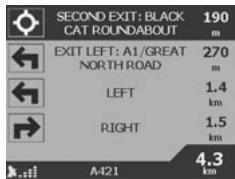
Next four instructions
The most simple of views, the next four turns are described by the direction of the turn, the next street name and the distance to the turn. The very next turn is highlighted, and is always at the top of the list.
Back-on-Track™ feature
The iCN is designed to re-plan your route automatically if you take a wrong turn. When the iCN 630 is recalculating a route, BACK-ON-TRACK will appear on the lower bar of the map screens.
Automatic restart feature
Once you get to your destination, the route is cancelled automatically. If you turn the iCN off before reaching your destination (for example, stopping for petrol), the destination is saved and your route is automatically restarted from your current position when you power the iCN back on.
1
A Anything is possible.
A Anything is possible.
A Nothing is possible.
A Nothing is possible.
4
3. Installation of smartMAPTM
Brug iCN Desktop til installation af applicatonen smartMAP™ pa iCN. Dette er en totrinsproces - indles forst applicacionen. Derefter skal du registriere installationen, for
For technical support, frequently
asked questions and additional
information, please consult our
website at http://www.navman-mobile.com/html/support.htm
Navman Europe Ltd
The Office Building
Gatwick Road
Manor Royal
Crawley
West Sussex
RH10 9RZ
United Kingdom
www.navman-mobile.com
support@navman-mobile.com
Copyright© Navman NZ Limited
NAVMAN is a registered trademark of
Navman NZ Limited
smartMAP™ is a trademark of Navman NZ
Limited. All rights reserved
Published in New Zealand
LA000080C
- Important
- NAVMAN NZ LIMITED
- Safety first - remember
- CD-ROMs includes:
- Mounting brackets:
- Mains power pack
- USB cable
- Protective carry case and screen cleaner
- 2
- Installing software and maps
- Install iCN desktop
- Connect the iCN to your PC
- InstallsmartMAPTM
- Install maps
- Remove the USB cable
- 3
- Installing the iCN into your vehicle
- Suction mount
- 4
- Getting started with the iCN controls
- Powering up
- Main Menu
- OK OK
- Menu/Power
- Volume
- ESC ESC
- 8-way Toggle
- Page
- 5
- Setting your destination
- Getting a GPS fix
- To confirm you have a GPS fix
- Setting a destination
- Directly from the map
- 6
- Driving with your iCN
- Viewing your route
- Map browser
- Navigation map
- Next instruction
- Next four instructions
- Back-on-Track™ feature
- Automatic restart feature
- 1
- Installation of smartMAPTM
- Navman Europe Ltd
Brand : NAVMAN
Model : ICN620
Category : GPS Navigator