
MPV 1705 SR - Mp3 player Trevi - Free user manual and instructions
Find the device manual for free MPV 1705 SR Trevi in PDF.


| Product type | MP3 player |
| Brand | Trevi |
| Model | MPV 1705 SR |
| Dimensions (L x W x H) | Approximately 4 x 9 x 1 cm |
| Weight | Approximately 30 g |
| Power supply | Built-in rechargeable lithium-ion battery |
| Battery life | Up to 10 hours of playback |
| Storage capacity | 8 GB internal, expandable via microSD card |
| Supported audio formats | MP3, WMA, WAV, FLAC |
| FM radio | Yes, with recording function |
| Voice recording | Yes, via built-in microphone |
| Display | 1.8-inch backlit LCD screen |
| Connectivity | USB 2.0 for data transfer and charging |
| Audio output | 3.5mm headphone jack |
| Additional features | Lyrics display, repeat, shuffle, equalizer |
| Maintenance and cleaning | Clean with a soft, dry cloth. Avoid moisture. |
| Safety | Do not expose to excessive heat. Use only the provided charger. |
| Spare parts and repairability | Parts not available separately. Repair by authorized center. |
| Box contents | MP3 player, USB cable, earphones, user manual |
Frequently Asked Questions - MPV 1705 SR Trevi
User questions about MPV 1705 SR Trevi
0 question about this device. Answer the ones you know or ask your own.
Ask a new question about this device
Download the instructions for your Mp3 player in PDF format for free! Find your manual MPV 1705 SR - Trevi and take your electronic device back in hand. On this page are published all the documents necessary for the use of your device. MPV 1705 SR by Trevi.
USER MANUAL MPV 1705 SR Trevi
Mini MP3 player with Radio
COLLEGAMENTO AL PC E TRASFERIMENTO FILE NELLA SCHEDA DI MEMORIA DEL LETTORE + RICARICA BATTERIA
natural_image
Illustration of a digital audio workstation with playback controls and a blue screen (no text or symbols)
To avoid possible hearing damage, limit the time listening at high volumes.
Warnings
Don'ts
- Do not place naked flames, such as lighted candles on or near the product.
- Do not place objects filled with liquids, such as vases on or near the product.
- Do not use or store this product in a place where it is subject to direct sunlight, heat, excessive dust or vibration.
• Do not use this product with wet hands.
• Do not clean this product with water or other liquids. - Do not block or cover the slots and holes in the product.
- Do not push foreign objects into the slots or holes in the product.
- Do not attempt to open this product yourself. There are no user serviceable parts inside.
• Do not allow children access to plastic bags.
SAFETY WARNINGS
• Before using this product, read and follow all warnings and instructions.
- This product is not intended for use by young children. Young children should be properly supervised.
• This product is intended for household use only and not for commercial or industrial use.
• Do not expose to dripping or splashing.
- No naked flame sources, such as lighted candles, should be placed on the product.
- Ventilation should not be impeded by covering ventilation openings with items such as newspapers, table cloths, curtains and the like.
- Make sure the unit is adjusted to a stable position. Damage caused by using this product in an unstable position or by failure to follow any other warning or precaution contained within this user manual will not be covered by warranty.
We, suggests retaining the packaging in case for future transport of the product.
If at any time in the future you should need to dispose of this product please note that: All batteries and accumulators need to be removed from this product (Removal of Waste Batteries and Accumulators).

WARNING: Prolonged exposure to loud sounds from personal music players may lead to temporary or permanent hearing loss. When participating in the traffic listening to a personal music player can make the listener less aware of potential dangers such as approaching cars.
1. Get to know the controls on Player
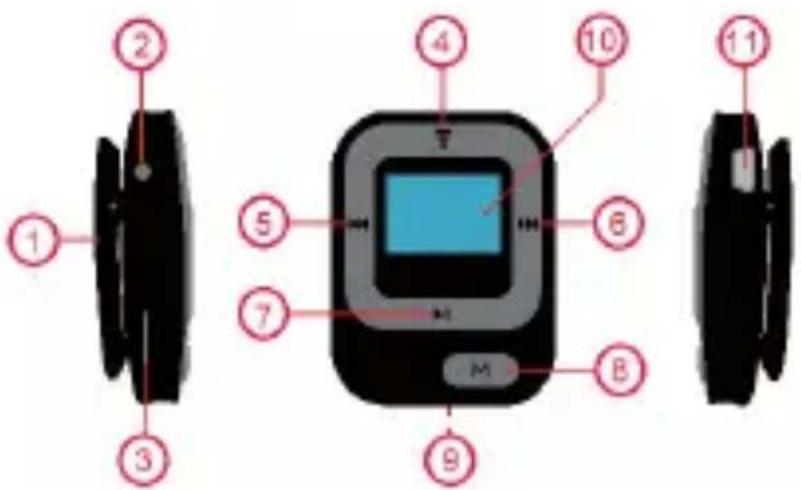
| Item | Description | Item | Description |
| 1 Clip 7 | (Play / Pause / Power ON - OFF) | ||
| 2 | Earphone Output Jack (3.5mm Stereo) | 8 | M (Menu / Enter / Select) |
| 3 Micro SD Memory Card Slot 9 | Reset Button (On the back side) | ||
| 4 | Button (Volume Control) | 10 LCD Display | |
| 5 | (Previous / Fast-Rewind / Tune -) | 11 | MicroUSB Port |
| 6 | (Next / Fast-Forward / Tune +) | ||
2. About Player Battery
Player has an internal, non-user-replaceable battery. For best results, the first time you use player, let it charge for about 2 -3 hours or until the battery status icon in the “Connect” screen shows that the battery is in full.

Battery is in full
Note: Player continues to use battery power after it's been turned off, if unit isn't used for a while, the battery might need to be charged.
a. Charging the Battery:
You can charge the player battery in two ways:
■ Connect player to your computer. Or,
■ Use the USB power charger. (not included)
b. Connection and Charging:
■ Once you have connected player with computer / power charger, then you will see the "Connect" screen appear on screen,
The level bars are running in battery status icon at the "Connect" screen. The battery is in charging.
"Connect" Screen

natural_image
Simple line drawing of a printer and computer monitor with an arrow indicating data transfer (no text or symbols)In Charging

Important: The battery does not charge when your computer is in sleep. The USB port on most keyboards does not provide enough power to charge the player. Connect player to a USB 2.0 port on your computer only to prevent charge problem.
3. Connecting and Disconnecting Player
You can connect the player with your computer to transfer those media files and recorded voice memos when necessary, and to charge the battery. Disconnect the player when you're done.
a. To Connecting Player
Plug the USB cable to the Player's Micro USB port and into a USB port on your computer, then the computer will detect and install the driver automatically. Once the installation is complete the player will be displayed in "My Computer" or for MAC users on the desktop.
Now the player is ready for media files transfer with your computer and the battery is charging.
- You can transfer the media files by using the computer mouse use drag and place, or copy and paste, in between the player and your computer. Disconnect it when you're done.
b. To Disconnecting Player
It's important not to disconnect player while it's syncing or transferring files. Eject the player before disconnect it.
To eject player, press and hold M button for about 2 seconds, the "Connect" screen will switch to "Main Menu" screen. And now is safe to disconnect the player with your computer. Unplug the player from you computer. Or,
If you're using a Windows PC, you can also eject player in My Computer or by clicking the "Safely Remove Hardware" icon in the Windows system tray, select the correspondence name of USB Device and choose "Stop" > choose "Confirm" > choose "Confirm" follow by the pop up windows you're your computer.
If you're using a Mac, you can also eject player by dragging the player icon on the desktop to the Trash.
If you accidentally disconnect player without ejecting it, reconnect it to your computer and sync again. However, some media file may loss.
4. Getting Start the Player
Turn ON / OFF the player and use of Main Menu:
■ To Turn On the player, press and hold the ▶ button for 2 – 3 seconds.
■ Then, you will see the following shown Main Menu screen (Music / Radio / Sys Set) will appear on LCD after the Loading and Opening screen have displayed.
"Main Menu" Screen
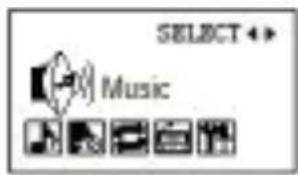
■ To turn OFF the player, press and hold the ▶ button for 2 – 3 seconds.
5. Use Memory Card Slot
This player allows you to play those support media files from your Micro SD memory card (T-Flash). Also it will increase the mobile hard disk memory capacity of the player if you use this option.
a. Play From Memory Card:
■ Turn Off the player. Now insert your Micro SD memory card into the memory card slot on side of player.
■ Turn On the player and now the Micro SD memory card, T-Flash, is ready to use.
■ The “Card folder” item will be existed to use when you enter in Music mode.
■ Go into the card folder and choose you desired folder(s) and file(s) to play.
■ Before to take out the Micro SD memory card from card slot, please turn Off the player.
6. Sys Set Menu
You might need to set date & time or change some default setting as you desired in setup sub menu before you start to use the player.
To go into setup menu, from main menu, choose "Sys Set" by use / button and then press M button to enter. A "Sys Set" menu appears to use.
■ You can go back to previous menu by press the ▶ button during in setup menu. Or, press and hold the M button to return to main menu.
a. To change "Backlight"
You can set the backlight to illuminate the screen for a certain amount of time as you desired or make the backlight to always ON when every time you turn ON the player.
To change LCD backlight, choose "Backlight", a level bar with number appear then choose "0 (always On) / 3 / 6 / 9 / 12 / 15 / 18 / 21 / 24 / 27 / 30 seconds" as you desired by using M and
◀◀ / ▶◀ buttons. Choose “0” to prevent the LCD backlight from turning to off. (choosing this option decrease battery performance).
b. To Change "Language"
This player can use difference OSD languages.
To set the language, choose "Language", and then choose which language as you desired by using M and / buttons.
c. To Set "Power Off"
The Power Off setting can extend the time between battery charges by turning OFF the player when you are not using the controls or no operation. Also, Sleep function provided for more choice.
To set power off time, choose “Power off”, then choose “Off time”, a levels bar with number menu appear, then choose “0 - 60 seconds” as you want by using M and / buttons.
To set sleep time, choose “Power off”, then choose “Sleep time”, a levels bar with number menu appear, choose “0 / 10 / 20 /30 / 40 / 50 / 60 / 80 / 90 / 100 / 110 / 120 minutes” as you want by using M and 📄/buttons.
d. To Change "Contrast"
To adjust contrast of display, choose “Contrast”, a level bar with number appear then choose level “1 - 10” as you desired by using M and / buttons.
e. To View "Memory info"
You can view about the memory status of player, such as the numbers of remaining memory space available and the percentage of memory have used.
To view the status, choose “Memory info” by using M and / buttons. An information screen, remaining memory space available and percentage of memory used, appear for view.
■ To return to setup menu or main menu press ▶ button or press and hold M button
f. To View "Firmware Version"
You might need to view the details about firmware information inside the Player.
- Choose “Firmware version” by using M and ◀◀ / ▶▶ buttons, an information screen appear for view.
■ To return to setup menu or main menu, press ▶ button or press and hold M button.
g. To "Exit"
■ Select Exit to back to main menu. Or, press and hold the M button to go back main menu.
7. Music Menu
You can use music player to playback with supported music file format of audio coding; WMA and MP3 are supported by the player. To open the music player:
■ From main menu, choose “Music” by using 🎥 / ➞ and M button, a “Music Now Playing” screen appears to use.
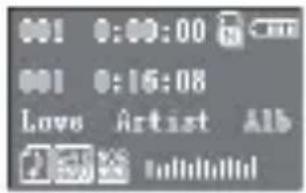
a. To Play Music
■ In Music Now Playing screen, press ▶ button to start the play.
■ Press ▶ button to pause the playing music. Press it again to play.
b. Play Previous or Next Music
■ Press ▶ button to play next music.
■ Press ◀ button to play previous music.
c. Play Fast-backward or Fast-forward
■ Press and hold ▶ button to use fast-forward
■ Press and hold ◀ button to use fast-backward.
d. Adjust volume level
■ Press 📋 button, a levels bar with number menu appear, then press or pressing << / >> button to decrease or increase the volume levels as you desired.
■ Wait for 8 - 10 seconds or press ▶ button to return to music now playing screen.
e. Use Lyric Display
This player supports “*.LRC” lyric files and lyrics can synchronous displayed while playing music if you music has lyric included. How to know whether the lyrics exist? If the current song has matching lyric files, the letter “T” will exist beside the music icon:

Music only

Music with Lyric Message
■ Playing the music with lyrics, and then press and hold M button to enter the lyric display mode and the lyrics is displaying and moving up accordingly with the playing music.
■ Press M button to cancel the lyrics display and go back to Music Now Play screen if you want.
8. Use Music Submenu in Music Stop Mode
You might need to selecting folders for music play and delete music files. To do this:
a. Card Folder
In Music Now Playing screen, press ▶ button to stop the playing music if player is in playing, then press M button to call up the Music Submenu.
In Music Submenu screen, choose "Card folder" a list menu appear, and then select folder and / or choose a music file by using ◀◀/▶▶ and M button.
It will go back to music now playing screen once a music file is selected. Then press button to play.
b. Del file
In Music Submenu screen, choose “Del file” to delete the current music in Music Now Playing screen. A dialog box appears to confirm, then choose “Yes” or “No” by using 🐎/ ➞ button and then press M button to confirm.
c. Del All
In Music Submenu screen, choose “Del all”, a dialog box appears to confirm, then choose “Yes” or “No” by using ◀◀◀ / ▶▶▶ button and then press M button to confirm.
All music files will be deleted once “YES” is selected and confirmed, a “Deleting” screen appear for a while and deleting process is in progress, all music files have been deleted, then the screen will go back to Voice Now Playing screen
d. Exit
■ Select Exit to back to music now playing screen.
9. Use Play Menu in Music Playing Mode
You might need to do some changes for music playing, such as repeat, EQ settings for music files... etc. To change setting:
a. To Set Play mode
In music playing mode, press M button, a play menu appear, then choose “Play Mode”, choose “Normal / Repeat one / Folder / Repeat folder / Repeat all / Random / Intro” as you desired by using ◀◀/▶ and M buttons.
b. To Change Equalizer
In music playing mode, press M button, a play menu appear, the choose “Equalizer”, then choose “Natural / Rock / Pop / Classic / Soft / Jazz / DBB” as you desired.
c. To set Replay
Set Repeat A-B:
In play menu, press M button, a list menu appear, then choose “Replay”, then a letter “A” is flashing in Music Now Playing screen, then press ➤ button to select the starting point of track “A”.
■ Then a letter “B” is flashing once “A” is selected, use ➤ button again to select the ending point of track “B” which you want. And now the A – B distance of track is repeating.
However, the repeating time and the replay gap time is depend on the set values of Replay Time and Replay Gap have mentioned in below items.
■ To create another A – B distance of track to repeat, press ➤ button again and then again. A
new created A - B distance of track is repeating.
■ To cancel the repeat A – B function, press the M button. Or press ▶ button to pause.
d. Set Replay Times:
In music playing mode, press M button, a play menu appear, the choose “Replay times”, then choose “1 / 2 / 3 / 4 / 5 / 6 / 7 / 8 / 9 / 10” as you desired by using 🐎/ 🐎 and M buttons. The Player will replay those music file as your selected number of times accordingly.
e. Set Replay Gap:
In music playing mode, press M button, a play menu appear, the choose “Replay Gap”, then choose “1 / 2 / 3 / 4 / 5 / 6 / 7 / 8 / 9 / 10 second(s)” as you desired by using 🐘/ and M buttons. The replay gap time in between music to music or in repeat A- B will replay and stop according the selected number of time.
f. Exit
■ Select Exit to back to music now playing screen.
10. FM Radio
This player is use the wire of earphone set as antenna for FM radio, plug in the earphone set into the earphone output jack.
From main menu, choose "Radio" by using ◀◀ / ▶ and M button, a "Radio Tune" screen appears to use.

a. Adjust Volume Level
■ Press ▼ button, a levels bar with number menu appear, then press or pressing << / >> button to decrease or increase the volume levels as you desired.
■ Wait for 8 - 10 seconds or press ▶ button to return to music now playing screen.
b. Manual Search Stations
■ Press and hold / button for searching down / up to receive next station. The radio searching will stops and show the next received radio station to listening.
■ Press / button for fine tune the frequency down / up, each press will step down / up by 0.1MHz.
c. Use Radio Menu
In radio tune screen, press M button to call up the radio menu, a list screen “Save / Record / Delete / Del All / Auto Search / Normal Band / Japan Band / Exit” is appears to use for few seconds.
■ Press / button to choose one of them and then press M button to entering.
d. Save (save the manual tuned station)
In radio menu, choose “Save” to store the tuned radio station into player’s memory. The tuned radio station will be stored at the last empty location in channel list internally. The stored channel number, example CH01, will show on top of the channel frequency.

Note: In default internal channel list there have total 20 preset stations, CH01 – CH20, can be used to store the wanted radio stations.
e. Delete
In radio menu, choose “Delete” to delete the unwanted stations. The current receiving frequency will be deleted immediately once “Delete” is chosen by using the M button. The channel number will switch to the first station CH01 in channel list.
■ Press ▶ button to find the next unwanted station for delete if you want.
f. Del All
In radio menu, choose “Del All” to delete all stations in channel list. All stored stations will be deleted immediately once “Del All” is chosen by using the M button. No radio station and channel number will show in radio tune screen.
g. Auto Search
In radio menu, choose “Auto Search” to enter to auto search and auto preset mode, the radio is searching stations in the range of frequency “76MHz – 92MHz or 87MHz – 108MHz”.
All found radio stations will be stored at the channel list into player's memory. The radio searching will stop and show the first received radio station to listening.
h. Normal Band
To suit your region frequency, choose “Normal Band” to switch the receiving frequency range to 87MHz – 108MHz. (common for Europe, USA, China area)
Note: All stored stations may be deleted when every time the region has set or changed.
i. Japan Band
■ To suit your region frequency, choose "Japan Band" to switch the receiving frequency range to 76MHz – 92MHz. (common for Japan area)
j. Exit
- Choose "Exit" to back to radio tune screen.
k. Change Stored Radio Stations From Channel List
■ Once you have tuned and stored the radio station into channel list by Manual tune / Auto Search function, and then you can recall them by press or pressing ▶ button.
The channel number (CH01 - CH20) will change up from low number when each time you press ▶ button and the stored radio station will change for listening accordingly.
11. Reset
If the player encounters dead halt during use, press the built-in "RESET" switch through the reset hole, at the back cabinet as show below picture, by using the suitable object / tool, such as wooden tooth pick or plastic screw driver, to restart the player.
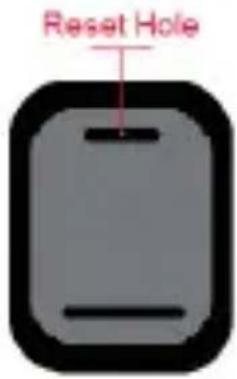
Back View
- Trouble Shooting
| Unit cannot turn ON | * Check battery is it charged with enough energy. |
| No sound is heard from headphone. * | Check whether Volume is set “0” and connect the headphone plugs firmly.* Check whether the headphone plug is dirty.* Corrupted MP3 may make a static noise and the sound may cut off. Make sure that the music files are not corrupted. |
| Characters in LCD are corrupted * Check whether the right language has been selected. | |
| Download of music files fails. | * Check whether USB plug is dirty and is connected properly.* Check whether driver is installed correctly.* Check whether the player’s memory is in full. |
- Specification
| Dimension | 52 mm (H) x 38.6 mm (W) x 17.8mm (D) (Approximate) | |
| Weight 22g (Approximate) | ||
| LCD | 20mm x 13mm (B&W), Resolution 128 x 64 dots | |
| PC connection | Micro Usb 2.0 | |
| Earphone Impedance 32 Ohm | ||
| External Memory Slot | Micro SD Card (supports up to 32GB) | |
| Battery | Li-ion 3.7V, 110mAh | |
| Max. Play Time: 8 - 10 Hours (MP3 music with power saving mode) | ||
| Audio | Output Power of Earphone | L = 275 mV(rms) at 32 OhmR = 275 mV(rms) at 32 Ohm |
| Frequency Responses 20Hz | to 20000Hz | |
| SNR >70dB | ||
| Music Format | MP3 | 32Kbps – 320kbps |
| FM Radio | Normal Band | 87 – 108 MHz |
| Japan Band | 76 – 92MHz | |
| Operating Temperature | 0 to 40°C | |
| Operating System | Window 2000/XP/Vista/Win7, Mac 9.2 or above | |
WARNING FOR A CORRECT USE OF RECHARGEABLE BATTERY
- Recharge the battery in an ambient temperature between 5irc C and 35irc C.
- When the recharge is complete the device shows a message/signal (check the user's guide).
- Don't recharge more than the suitable period to prevent the risk of overheating and burst.
- Recharging the battery over the suitable period or an extended period of inactivity may reduce battery duration.
- Rechargeable battery is liable to wear and tear and its performance will reduce gradually.
- To extend the duration of the battery use it when is completely charged up to the complete discharging, then recharge it fully before use it again. Recharge a battery not completely consumed, will result a reduced duration. In this case, repeat the full charging/discharging cycle many times.
- Avoid recharge the battery for the whole night.
Warning!
Misuse of the battery may cause explosion or overheating of the battery.
INFORMATION NOTE ON THE REMOVAL AND DISPOSAL OF BATTERIES
Warning: Only high-qualified personnel should perform this operation!
BATTERY REMOVAL
I) Remove the back part of the appliance from cogs;
2) Select the battery;
3) Disconnect and remove the battery.
Used batteries should not be disposed of with household waste or thrown into fire or water. Used batteries should be recycled or disposed of in separate waste collection centres.

natural_image
Simple line drawing of a trash bin with crossed-out lines indicating no waste or discharge (no text or symbols)USERS INFORMATION pursuant to Legislative Decree No. 49 of March 14, 2014
"Implementation of Directive 2012/19 / EU on Waste Electrical and Electronic Equipment (WEEE)"
This wheeled bin symbol on the product indicates that at the end of its life must be collected separately from other waste. The user must, therefore, take the remote control integrates the essential components that got to its life to the appropriate differentiated collection centers for electronic and electro-technical waste, or return it to the dealer when purchasing a new appliance of equivalent type, in terms of one to one, or one to zero for equipment having longer side of less than 25 cm. Appropriate separate collection for the decommissioned equipment for recycling, processing and environmentally compatible disposal helps prevent negative impact on the environment and human health and promotes recycling of the materials making up the product. Illegal dumping of the product by the user entails the application of administrative sanctions stated in Legislative Decree n. Legislative Decree No. 49 of March 14, 2014.
CONNEXION À VOTRE PC ET LE TRANSFERT DES FICHIERS DANS LE LECTEUR DE CARTE MÉMOIRE + RECHARGE DE LA BATTERIE
natural_image
Simple line drawing of a trash bin with no text or symbols
natural_image
Simple line drawing of a trash bin with no text or symbols
natural_image
Simple line drawing of a trash bin with no text or symbols
SIMPLIFIED EU DECLARATION OF CONFORMITY
Hereby TREVI Spa declares that the radio equipment type MPV 1705 SR is in compliance with directive 2014 / 53 / EU.
The full text of the EU declaration of conformity is available at the following internet address www.trevi.it


- COLLEGAMENTO AL PC E TRASFERIMENTO FILE NELLA SCHEDA DI MEMORIA DEL LETTORE + RICARICA BATTERIA
- Warnings
- Don'ts
- SAFETY WARNINGS
- Get to know the controls on Player
- About Player Battery
- a. Charging the Battery:
- b. Connection and Charging:
- Connecting and Disconnecting Player
- a. To Connecting Player
- b. To Disconnecting Player
- Getting Start the Player
- Use Memory Card Slot
- a. Play From Memory Card:
- Sys Set Menu
- a. To change "Backlight"
- b. To Change "Language"
- c. To Set "Power Off"
- d. To Change "Contrast"
- e. To View "Memory info"
- f. To View "Firmware Version"
- g. To "Exit"
- Music Menu
- a. To Play Music
- b. Play Previous or Next Music
- c. Play Fast-backward or Fast-forward
- d. Adjust volume level
- e. Use Lyric Display
- Use Music Submenu in Music Stop Mode
- a. Card Folder
- b. Del file
- c. Del All
- d. Exit
- Use Play Menu in Music Playing Mode
- a. To Set Play mode
- b. To Change Equalizer
- c. To set Replay
- Set Repeat A-B:
- d. Set Replay Times:
- e. Set Replay Gap:
- f. Exit
- FM Radio
- a. Adjust Volume Level
- b. Manual Search Stations
- c. Use Radio Menu
- d. Save (save the manual tuned station)
- e. Delete
- f. Del All
- g. Auto Search
- h. Normal Band
- i. Japan Band
- j. Exit
- k. Change Stored Radio Stations From Channel List
- Reset
- WARNING FOR A CORRECT USE OF RECHARGEABLE BATTERY
- Warning!
- Misuse of the battery may cause explosion or overheating of the battery.
- INFORMATION NOTE ON THE REMOVAL AND DISPOSAL OF BATTERIES
- BATTERY REMOVAL
- USERS INFORMATION pursuant to Legislative Decree No. 49 of March 14, 2014
- CONNEXION À VOTRE PC ET LE TRANSFERT DES FICHIERS DANS LE LECTEUR DE CARTE MÉMOIRE + RECHARGE DE LA BATTERIE
- SIMPLIFIED EU DECLARATION OF CONFORMITY
Brand : Trevi
Model : MPV 1705 SR
Category : Mp3 player