
GF 30 - Dash cam AEG - Free user manual and instructions
Find the device manual for free GF 30 AEG in PDF.


| Product Type | Dash Camera (Dashcam) |
| Brand | AEG |
| Model | GF 30 |
| Dimensions (H x W x D) | 27 x 60 x 105 cm |
| Weight | 140 g |
| Video Resolution | VGA (640x360) / HD (1280x720) |
| Sensor | CMOS 1.0 megapixels |
| Video / Image Format | AVI |
| Max Photo Resolution | 1280 x 720 pixels |
| Wide-angle Lens | 120° (adjustable) |
| Screen | TFT 2.31 inches (adjustable 270°) |
| Power Supply | Lithium-ion battery 3.6 V / 350 mAh + USB/cigarette lighter adapter 12 V/24 V |
| Storage | SD/MMC card up to 32 GB (not included) |
| Connectivity | USB, HDMI, external GPS receiver |
| Night LED | High Power white LED indicator |
| Built-in G-sensor | 3-axis acceleration detection with automatic write protection |
| GPS | Yes (external receiver included) |
| Intended Use | Recording of road events from the driver's perspective |
| Maintenance and Cleaning | Soft dry cloth; clean and dry storage |
| Spare parts and repairability | Parts not specified; contact a specialized retailer for service |
| General Information | User manual provided; disposal according to WEEE directive |
Frequently Asked Questions - GF 30 AEG
User questions about GF 30 AEG
0 question about this device. Answer the ones you know or ask your own.
Ask a new question about this device
Download the instructions for your Dash cam in PDF format for free! Find your manual GF 30 - AEG and take your electronic device back in hand. On this page are published all the documents necessary for the use of your device. GF 30 by AEG.
USER MANUAL GF 30 AEG
natural_image
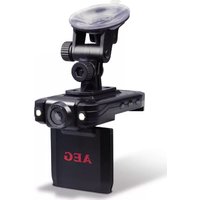
Black AEG remote camera with mounted sensor and display unit (no visible text or symbols on device body)DE - Seite 3
Read these instructions before using the charger. Follow all instructions and recommendations.
FR - Page 35
Inserting the memory card.... 26
Charging the battery 26
Charging process 26
Mounting the suction cup bracket. 27
Operation 27
Powering on 27
Enable/disable GPS. 28
Start/stop recording.... 28
Playback 29
Powering off 29
Copying data to the computer. 30
Built-in gravity sensor - G-Sensor 30
Settings. 32
Cleaning, Care and Maintenance. 33
Service....33
Disposal 33
INTRODUCTION
Explanation of symbols and signal words used in these operating instructions and/or the device:

Follow instructions when using the device.

Risk of injury or death for children!

Please note warnings and safety notices!

Dispose of packaging and unit, including battery, in an environmentally friendly manner!
| Symbol/signal word | Possible consequences of non-observance |
| Danger! | Immediate danger to life or severe injuries. |
| Warning! | Serious injuries, potentially life-threatening. |
| Caution! | Light to moderate injuries. |
| Attention! Risk of property damage. | |
Note:
Theses operating instructions also refer to the cockpit camera as device.
Normal use
The cockpit camera is used to record events (e.g. traffic) from the driver's view. It is powered by a USB/car adapter (12 V/24 V) and a USB connector cable, or optionally via the Li-ion battery.
NOTE: The privacy of others is protected by law. Recording third parties can be a criminal offence. You are responsible for your actions.
This device is not intended for use by children or persons with limited mental capacity or lacking experience and/or lacking expertise. Children should be supervised to ensure they do not play with the device.
This device is not intended for commercial use.
Any other use or modification of the device is considered improper and involves significant risks. The manufacturer assumes no liability for damages due to improper use.
Contents
Be sure to verify contents immediately upon opening the product. Check the product and all parts for damage. Do not use a defective product or parts.
Camera (incl. suction cup bracket)
USB connecting cable
©PS receiver
USB/car adapter (12 V/24 V)
Operating instructions
Please include all relevant documentation to other users!
Technical Data
| Model GF 30 | |
| Item number 97151 | |
| Dimensions (h x w x d) 27 x 60 x 105 mm | |
| Weight 140 g | |
| Recording resolutions VGA / HD | |
| CMOS sensor 1.0 Megapixel | |
| Video format/Picture format AVI | |
| max. image resolution (pictures) 1280 x 720 pixel | |
| Lens 120° wide angle lens (pivoted) | |
| Power supply Li-ion rechargeable battery (3.6 V / 350 mAh)12 V/24 V car adapterUSB connecting cable | |
| SD/MMC cards up to 32 GB | |
| Display 2.31 inch LCD TFT (tilt: 270°) | |
| LED High Power white LED | |
SAFETY
General Safety Guidelines
Read all safety guidelines and instructions. Noncompliance with safety guidelines and instructions can cause electric shock, fire and / or serious injury. Keep all safety guidelines and instructions for future reference.

Warning!

Life-threatening danger to infants and children! Never leave children unsupervised with the packing material as this can cause suffocation. Do not allow children to play with cables – strangulation hazard! Do not allow children to play with the components or fasteners, as they could be swallowed and result in suffocation.
The manufacturer is not responsible for damages caused by:
Improper connection and/or operation.
External forces, damage to the device and/or damage to parts of the device due to mechanical impacts or overload.
Any type of modifications to the device.
Using the device for purposes not described in this operating manual.
Subsequent damages from improper and/or incorrect use.
Moisture and/or inadequate ventilation.
Unauthorised opening of the device.
This will void the warranty.


Explosion and fire hazard!
SVerify the on-board voltage matches the input voltage specified on the device (12 V DC) to prevent damage to the device.
Never expose the device to direct sunlight.
Immediately stop using the device if you notice smoke or an unusual odour.
Do not throw the rechargeable battery into fire or expose it to extreme heat. The rechargeable battery may otherwise burst or explode.

Risk of electrical shock!
Ensure that the device is always stored in a safe place. Do no expose the device to rain or wet conditions.
Do not allow the device to come into contact with water or other liquids. Water entering the electric device increases the risk of electric shock. If the device comes into contact with water, immediately unplug the car plug. Discontinue use of the device and consult a speciality shop.
Please verify there is no moisture on plugs and cables. Never connect the device to the on-board power system with wet hands.
Always unplug the cable from the 12 V car outlet by the plug. The cable may otherwise be damaged.
Do not use device if damaged. Damage to the device or the charging cable increases the risk of electrical shock.
Never use the cable to carry or pull the device.

Accident hazard
Using a mobile device whilst driving may distract from traffic. Maintain your focus on driving and traffic.
The airbag being released can project devices mounted near the airbag at high speeds, resulting in serious injuries. Never mount the mobile device near airbags.
PRODUCT OVERVIEW
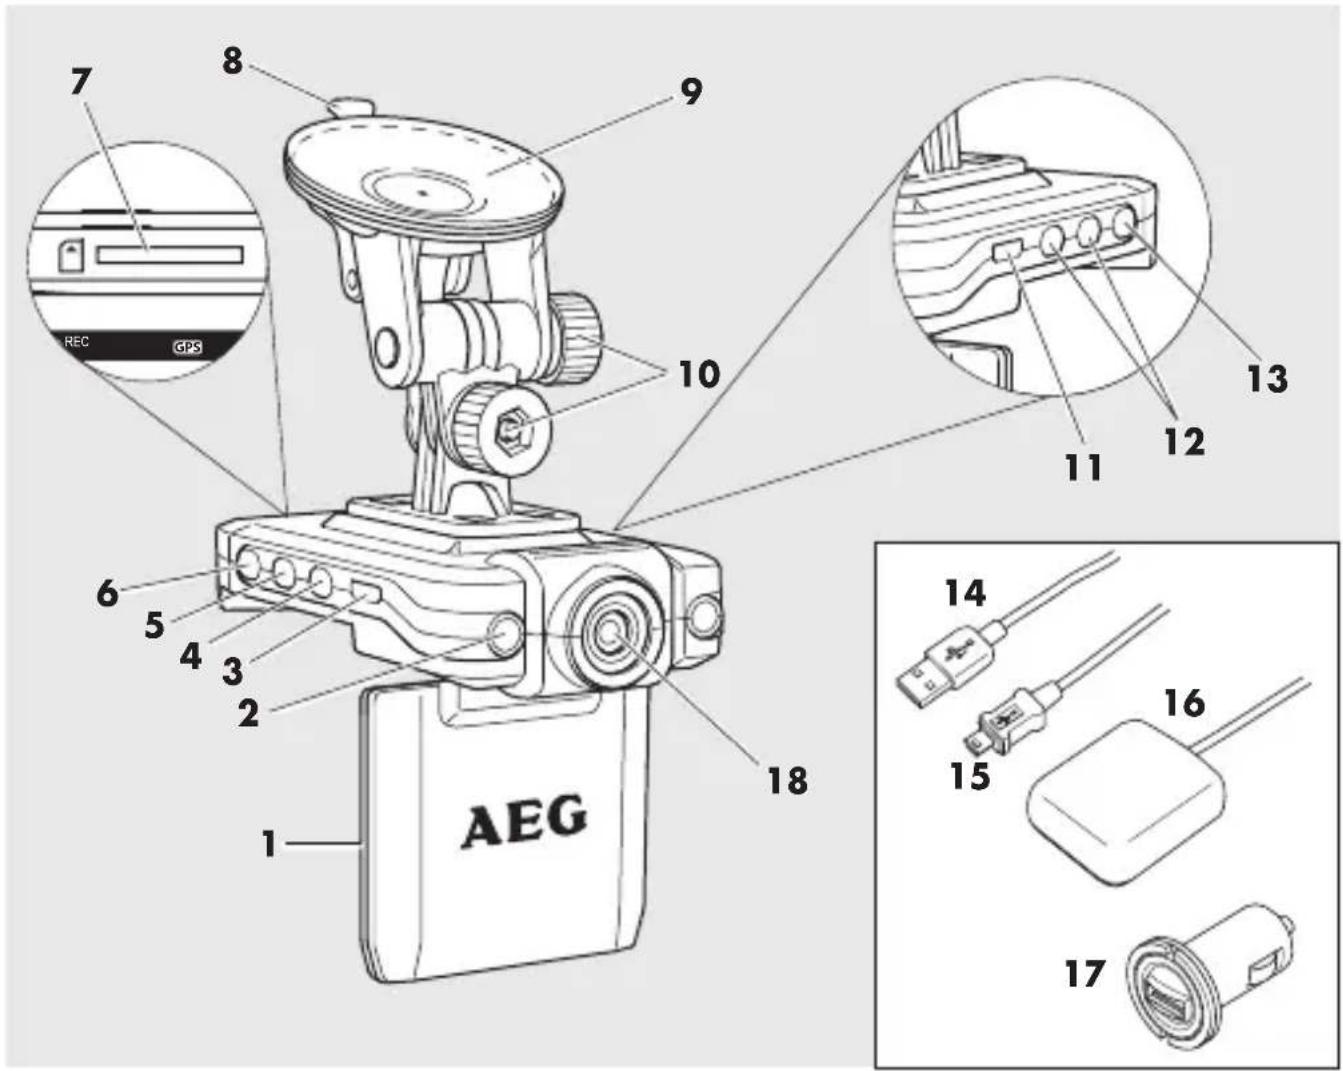
- TFT LCD display
- Night LED
- HDMI port
- POWER button
- MENU button
- MODE button
- SD/MMC card slot
- Lever on suction cup bracket
-
Suction cup bracket
-
Knurled screws
- USB port
- Function keys
- OK button
- USB plug
- Mini-USB plug
- GPS receiver
- USB/car adapter (12 V/24 V)
- Lens
BEFORE USE
Carefully unpack the device and remove the protective film from lens and display.
Inserting the memory card
Note: When using the SD/MMC card with the cockpit camera for the first time, it must first be formatted.
Attention! All data on the SD/MMC card will be erased.
A memory card is required to save camera recordings.
Insert an SD/MMC card (max. 32 GB, not included) into the SD/MMC card slot (7).
Charging the battery
Fully charge the camera battery before first use.

Attention!
Risk of damage due to incorrect charger. Using the wrong charger can ruin the camera during charging. use the included connecting cable to charge the rechargeable battery.
Remember the vehicle's battery will be discharged when the vehicle is not running.
Charging process
- Plug the mini-USB plug (15) into the USB port (11) on the cockpit camera.
- Plug the USB plug (14) of the connecting cable into the USB/car adapter (17).
- Plug the adapter into a car outlet. The status LED on the plug will light up and the charging light will light up red. Once the battery is charged the charge indicator will extinguish.
You may also connect the USB plug to a PC.
-
The charging process will start. If it is off, the camera will automatically switch on and start recording. You will hear a sound.
-
Press the OK button (13) to stop recording. Charging will continue.
The charge indicator on the display (1) indicates the charging process.
Once the camera is connected to a power source via the connecting cable the camera is ready for use (even without battery inserted).
Mounting the suction cup bracket
Caution! When mounting the camera please be sure not to obstruct your field of vision, the charging cable will not interfere with driving and the camera is mounted securely.
Attention! Some automakers' vehicles feature panes with reflective coating as standard or as special equipment. In this case, mount the GPS sensor in a position able to receive a GPS signal to ensure smooth operation.
Attention! Risk of damage! Do not over-tighten the threaded connection.
- Release the lever on the suction cup bracket (8).
- Place the suction cup bracket in a suitable location (e.g. windscreen) and lock the lever to secure.
- Using the knurled screws on the joints, adjust the camera to the desired position.
OPERATION
Note: Please also see information under "Settings".
Powering on
Holding the POWER button (4) will switch the camera on. You will hear a sound. The camera is immediately active and will start recording. The blue LED will flash.
Note:
If the cockpit camera is permanently connected to the car outlet using the USB connecting cable, the camera will start recording once the car outlet is powered. Please refer to the owner's manual for your vehicle.
Enable/disable GPS
Note:
if the GPS receiver is not mounted, GPS data will not be recorded.
When using an SD/MMC card for the first time, the display (1) will show a red exclamation mark. The GPS does not recognise the current time zone. Connect the card to a computer to write the GPS time zone to the SD/MMC card.
- Plug the GPS receiver (16) into the HDMI port (6).
- Mount the GPS receiver to the windscreen. Be sure not to diminish your field of vision.
- The GPS symbol will appear in the display (1).
- Once the GPS receiver acquires a satellite signal the GPS symbol appears, if the GPS receiver is unable to acquire a signal, the GPS symbol will flash.
Start/stop recording
Press the OK button (13) to stop recording. Press the OK button again to resume recording.
Note:
No SD/MMC card was inserted, a blue screen will appear for 3 seconds with the message "no card". No functions are available.
the SD card has no free memory, a blue screen will appear with the message "Protected slot full". Erase the data medium or insert an SD card with sufficient free memory. Additional recordings will erase existing data.
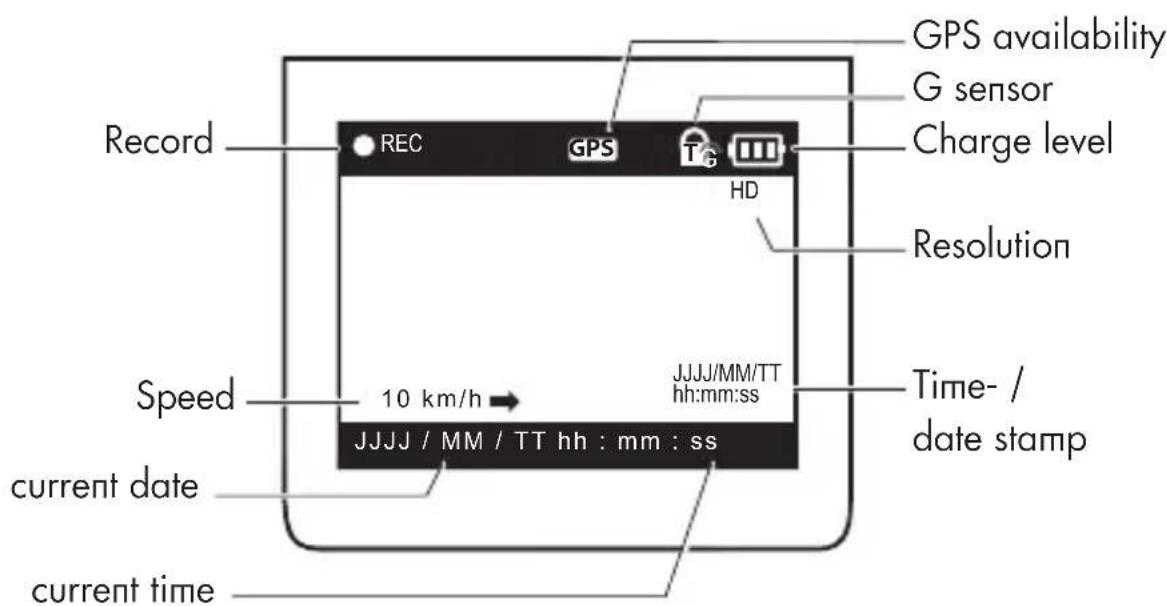
Note:
Use the function keys (12) to switch between day/night mode whilst recording. End recording by pressing the OK button (13) again.
Playback

Viewing video recordings:
- Use the MODE button (6) to select the playback mode.
- Select the respective film using the function keys (12).
- Press the OK button (13) to start/stop playing a film.
Powering off
Hold the POWER button (4) to manually switch off the camera. You will hear a sound.
Note:
If the cockpit camera is permanently connected to the car outlet using the USB connecting cable, the camera will stop recording once the car outlet is no longer powered. Please refer to the owner's manual for your vehicle.
Copying data to the computer
Remove the SD/MMC card from the SD/MMC card slot (7) and insert the card into your computer's card slot.
Open file "ADRPlayer.exe". This player allows you to view and edit films.
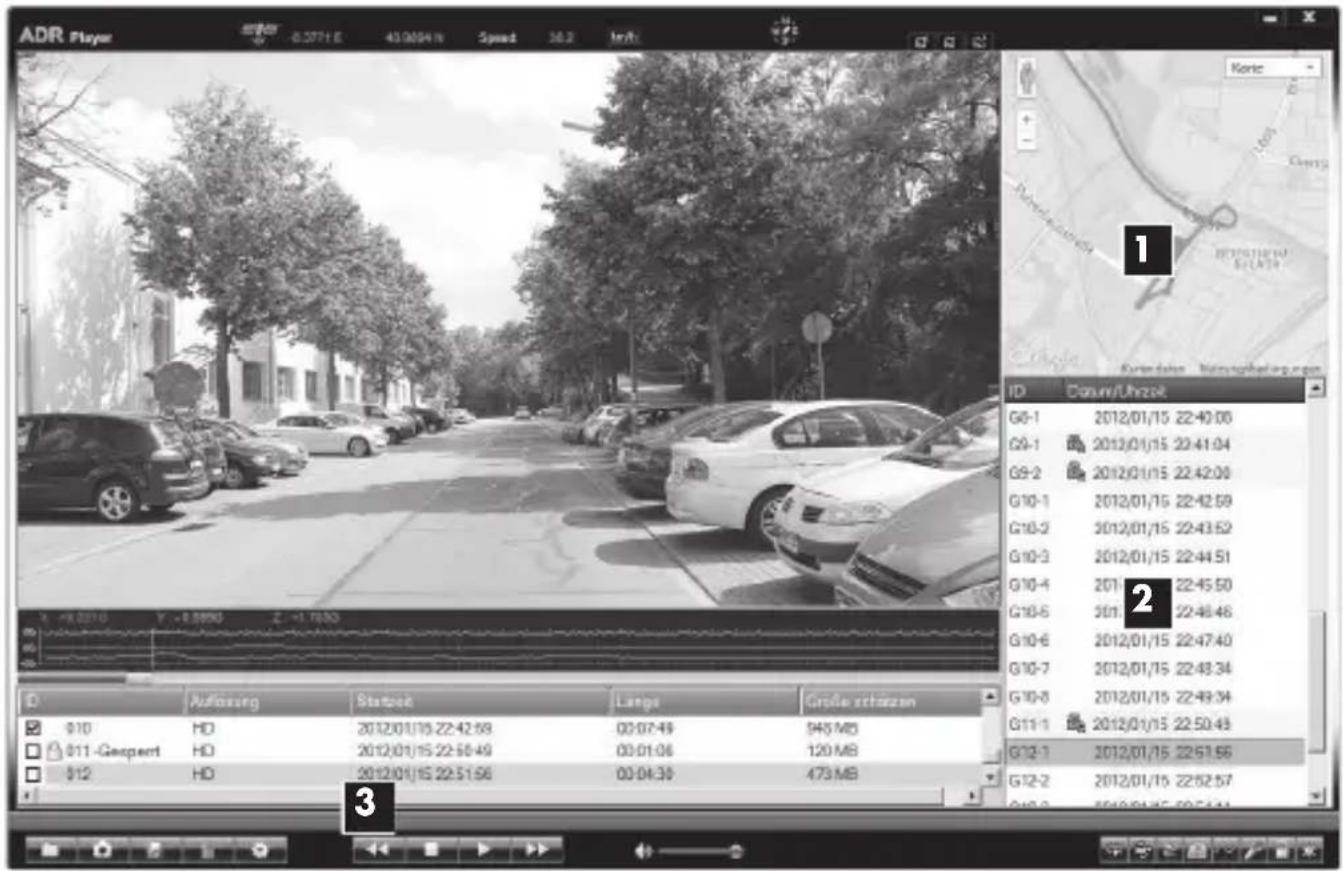
-
GPS recording
-
Individual sequences (video)
-
Video recording
Built-in gravity sensor - G-Sensor
By detecting the 3-axis XYZ orientation, the built-in G-sensor can record the gravity sensing information depending on the car up or down, left or right, forward or backward motion. When this information is reaches certain predetermine limit, it is considered an abnormal value (for example a sudden stop which created an abnormal change of XYZ orientation) and the camera will automatically carry out the current video lock protection. This is shown by a in front of the video clip/session in video recording screen (3).
While playback of the video clips on the ADR Player (specialized software), on the computer, user will see the changes in gravity sensor data (XYZ orientation), retroactive gravity in driving the process.
In addition, there is a limited capacity for G-sensor video clips. When 25% of the SD card capacity is filled by video clips with lock protection, the camera will prompt a message „Protect slot full“. For example 2Gb for 8Gb card, 4Gb for 16Gb card and 8Gb for 32Gb card.
Please unlock and delete the unnecessary lock protected video clips to further enable the G-Sensor Lock Protection function.
| Symbol Function | |
 | Opens videos within a directory |
 | Saves the current still frame to the computer |
 | Saves the file (film) |
 | Erases the selected recording |
 | ADR player settings (password, language, etc.) |
 | Loops the current video |
 | Rotates the file by 180° |
 | Saves the current KML file |
 | Google Maps link |
 | Shows or hides the g sensor curve |
 | Repairs corrupt files. |
 | Unlocks locked files. |
 | Colour adjustment (brightness, contrast, chroma) |
SETTINGS
Press the MENU button (5) to enter settings. Navigate the menu with the function keys (12). Use the OK button (13) to confirm entries. Use the MENU button to exit the menu.
| Video Size Size | VGA (640 pixel x | 360 pixel)HD (1280 pixel x 720 pixel) |
| Time Setup Date/time entry Date entry - YYYY/MM/DDTime entry - hh:mm:ss | ||
| Format Delete Formats the memory cardATTENTION! All data will be erased. | ||
| Audio Record Records audio ON / OFF - switches the audio recording/playback on/off. | ||
| Language Language English/ Simplified Chinese/ Traditional Chinese/ Japanese/ Korean / Pyccknn | ||
| LCD Default ON / OFF | ||
| G-Sensor Sensitivity | G sensor Low / Normal / High / Disable - Adjust motion sensor accuracy | |
| Night Vision IR LED | high white power LED | ON / OFF |
| Frequency Light frequency 60 Hz/50 Hz | ||
CLEANING, CARE AND MAINTENANCE
Minimal care will ensure your device remains functional for years.
Carefully wind the cable when storing the device. This will help prevent accidental damage to the cable and the device.
☑ clean the product with a soft, dry cloth.
Store the device in a clean, dry place.
Service
Should you have any questions regarding commissioning or operating in spite of studying these operating instructions, or if a problem should occur against all expectations, please get in contact with your specialist supplier.
Disposal
The packaging consists of non-contaminating materials that you can dispose of at your local recycling point.

Do not throw electrical appliances in with domestic waste!
In accordance with European Directive 2002 / 96 / EC for waste
electrical and electronic equipment (WEEE) and conversion to national law, used electrical appliances must be collected separately and taken to a recycling point. For ways to dispose of old electrical appliances please contact your community or city administration.
TABLE DES MATIÈRES
Introduction 36
www.aeg-automotive.com
AEG is a registered trademark used under license from AB Electrolux (publ)
- DE - Seite 3
- FR - Page 35
- Operation 27
- Settings. 32
- Cleaning, Care and Maintenance. 33
- INTRODUCTION
- Normal use
- Contents
- SAFETY
- General Safety Guidelines
- Warning!
- Explosion and fire hazard!
- Risk of electrical shock!
- Accident hazard
- PRODUCT OVERVIEW
- BEFORE USE
- Inserting the memory card
- Charging the battery
- Attention!
- Charging process
- Mounting the suction cup bracket
- OPERATION
- Powering on
- Enable/disable GPS
- Note:
- Start/stop recording
- Playback
- Viewing video recordings:
- Powering off
- Copying data to the computer
- Built-in gravity sensor - G-Sensor
- SETTINGS
- CLEANING, CARE AND MAINTENANCE
- Service
- Disposal
- TABLE DES MATIÈRES
- Introduction 36
Brand : AEG
Model : GF 30
Category : Dash cam