
Novea B4 - Blender CASO - Free user manual and instructions
Find the device manual for free Novea B4 CASO in PDF.


| Product type | Blender |
| Brand | CASO |
| Model | Novea B4 |
| Dimensions (W x D x H) | 20 x 18 x 40 cm |
| Weight | 2.1 kg |
| Power supply | 220-240 V ~ 50/60 Hz |
| Power | 600 W |
| Bowl capacity | 1.5 L |
| Bowl material | Glass |
| Number of speeds | 2 + Pulse |
| Main functions | Blending, soup blending, ice crushing, smoothies |
| Safety | Automatic overload shutdown, non-slip base, safety lid lock |
| Maintenance and cleaning | Bowl, lid, and blade removable and dishwasher safe |
| Spare parts and repairability | Bowl, lid, blade, seal available as spare parts |
| General information | 86-page instruction manual available in multiple languages |
Frequently Asked Questions - Novea B4 CASO
User questions about Novea B4 CASO
0 question about this device. Answer the ones you know or ask your own.
Ask a new question about this device
Download the instructions for your Blender in PDF format for free! Find your manual Novea B4 - CASO and take your electronic device back in hand. On this page are published all the documents necessary for the use of your device. Novea B4 by CASO.
USER MANUAL Novea B4 CASO
natural_image
Exterior view of a modern kitchen blender with visible control panel and brand logo (no text-heavy elements)Braukmann GmbH
Raiffeisenstraße 9
D-59757 Arnsberg
Tel.: +49 (0) 29 32 / 80 55 4 - 99
Fax: +49 (0) 29 32 / 80 55 4 - 77
eMail: kundenservice@caso-germany.de
Internet: www.caso-germany.de
10 Operating Manual....22
10.1 General 22
10.2 Information on this manual....22
10.3 Warning notices....22
10.4 Limitation of liability....23
10.5 Copyright protection 23
11 Safety 23
11.1 Intended use....23
11.2 General Safety information....24
11.3 Dangers due to electrical power....25
12 Commissioning....25
12.1 Safety information 25
12.2 Delivery scope and transport inspection....25
12.3 Unpacking....25
12.4 Disposal of the packaging....26
12.5 Setup location requirements: 26
12.6 Electrical connection....26
13 Design and Function 27
13.1 Overview....27
13.2 Rating plate 27
14 Operation and Handling 27
14.1 Preparing the Blender ....28
14.2 Use 28
14.2.1 Using the Single Serve bottle 30
14.2.2 Blender tips and techniques....31
15 Cleaning and Maintenance....31
15.1 Safety information ....31
15.2 Cleaning....31
16 Disposal of the Old Device....32
17 Guarantee....32
18 Technical Data....33
19 Mode d'emploi....35
19.1 Généralités ....35
19.2 Informations relatives à ce manuel ....35
19.3 Avertissements de danger 35
19.4 Limite de responsabilités....36
19.5 Protection intellectuelle ....36
natural_image
Line drawing of a blender with a hand operating it, showing the blade and handle (no text or symbols)5.2 Gebrauch
natural_image
Line drawing of a hand pouring liquid into a blender jar (no text or symbols)Crush Ice-Funktion
natural_image
Line drawing of a hand placing a rectangular object into a blender jar (no text or symbols)⚠️WARNUNG
natural_image
Diagram of a blender with a handle and control panel, no text or symbols present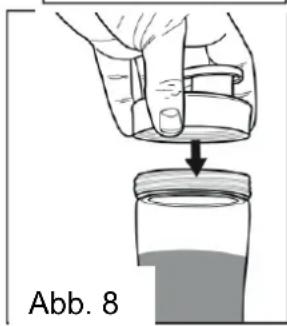
natural_image
Illustration of a hand pouring liquid into a jar with a downward arrow, labeled 'Abb. 8' (no text or symbols on the diagram itself)Original Operating Manual Blender NOVEA B4

natural_image
Exterior view of a Coso design blender with black handle and digital display (no text or symbols on main body)
Item No. 3612
10 Operating Manual
10.1 General
Please read the information contained herein so that you can become familiar with your device quickly and take advantage of the full scope of its functions.
Your Blender will serve you for many years if you handle it and care for it properly. We wish you a lot of pleasure in using it!
10.2 Information on this manual
These Operating Instructions are a component of the Blender (referred to hereafter as the device) and provide you with important information for the initial commissioning, safety, intended use and care of the device. The Operating Instructions must be available at all times at the device. This Operating Manual must be read and applied by every person who is instructed to work with the device:
- Commissioning - Operation - Troubleshooting and/or - Cleaning
Keep the Operating Manual in a safe place and pass it on to the subsequent owner along with the device.
10.3 Warning notices
The following warning notices are used in the Operating Manual concerned here.
⚠GEFAHR
Danger
A warning notice of this level of danger indicates a potentially dangerous situation.
If the dangerous situation is not avoided, this can lead to death or serious injuries.
▶ Observe the instructions in this warning notice in order to avoid the danger of death or serious personal injuries.
⚠️WARNUNG
Warning
A warning notice of this level of danger indicates a possible dangerous situation.
If the dangerous situation is not avoided, this can lead to serious injuries.
▶ Observe the instructions in this warning notice in order to avoid the personal injuries.
▲VORSICHT
Attention
A warning notice of this level of danger indicates a possible dangerous situation.
If the dangerous situation is not avoided, this can lead to slight or moderate injuries.
▶ Observe the instructions in this warning notice in order to avoid the personal injuries.
HINWEIS
Please note
A notice of this kind indicates additional information, which will simplify the handling of the machine.
10.4 Limitation of liability
All the technical information, data and notices with regard to the installation, operation and care are completely up-to-date at the time of printing and are compiled to the best of our knowledge and belief, taking our past experience and findings into consideration.
No claims can be derived from the information provided, the illustrations or descriptions in this manual. The manufacturer does not assume any liability for damages arising as a result of the following:
• Non-observance of the manual
• Uses for non-intended purposes
- Improper repairs
- Technical alterations, modifications of the device
- Use of unauthorized spare parts
Modifications of the device are not recommended and are not covered by the guarantee. All translations are carried out to the best of our knowledge. We do not assume any liability for translation errors, not even if the translation was carried out by us or on our instructions. The original German text remains solely binding.
10.5 Copyright protection
This document is copyright protected. Braukmann GmbH reserves all the rights, including those for photomechanical reproduction, duplication and distribution using special processes (e.g. data processing, data carriers, data networks), even partially. Subject to content and technical changes.
11 Safety
This chapter provides you with important safety notices when handling the device. The device corresponds with the required safety regulations. Improper use can result in personal or property damages.
11.1 Intended use
This device is only intended for use in households in enclosed spaces for
- Mixing, stirring and chopping fruits and vegetables
- Crushing ice cubes
Uses for a different purpose or for a purpose which exceeds this description are considered incompatible with the intended or designated use.
⚠️WARNUNG
Warning
Danger due to unintended use! Dangers can emanate from the device if it is used for an unintended use and/or a different kind of use.
▶ Use the device exclusively for its intended use.
▶ Observe the procedural methods described in this Operating Manual.
Claims of all kinds due to damages resulting from unintended uses are excluded. The User bears the sole risk.
11.2 General Safety information
HINWEIS
Please note
Please observe the following general safety notices with regard to the safe handling of the device.
▶ Read all instructions before using.
This appliance can be used by children aged 8 years and above and persons with reduced physical, sensory or mental capabilities or lack of experience and knowledge if they have been given supervision or instruction concerning use of the appliance in a safe way and understand the hazards involved.
▶ Children shall not play with the appliance.
▶ Cleaning and user maintenance shall not be made by children without supervision.
▶ To protect against fire, electric shock and injury to persons, DO NOT immerse cord, plug, or the device in water or other liquids.
▶ ALWAYS UNPLUG the device from power outlet before cleaning, and when storing. Allow to cool before putting on or taking off parts, cleaning or storing.
▶ AVOID contact with moving parts.
▶ DO NOT operate any appliance with a damaged cord or plug, or after the appliance malfunctions or has been dropped or damaged in any manner. Return appliance to the nearest authorized service facility for examination, repair or adjustment.
The use of accessory attachments not recommended by the appliance manufacturer may result in fire, electric shock or injury to persons.
▶ DO NOT use outdoors.
▶ NEVER let the cord hang over the edge of table or counter or touch hot surfaces.
▶ DO NOT use this device for anything other than its intended use.
▶ Keep hands and utensils out of container while blending to reduce the risk of severe injury to persons or damage to the blender. A scraper may be used, but must be used ONLY when the blender is not running.
▶ Blades are sharp. Handle carefully.
▶ When blending hot liquids remove measuring cup from the two-piece lid.
▶ Do not fill jar beyond 3-cup level.
▶ This appliance is for HOUSEHOLD USE ONLY.
▶ SAVE THESE INSTRUCTIONS.
⚠️WARNUNG
Warning
For your own safety:
Never operate the device without the original lid that is part of delivery scope. In addition do never put your hand into the blender jar during operation.
11.3 Dangers due to electrical power
⚠️GEFAHR
Danger
Mortal danger due to electrical power!
Mortal danger exists when coming into contact with live wires or subassemblies! Observe the following safety notices to avoid dangers due to electrical power:
▶ Do not dip the cable, device or plug into water or other liquid to prevent an electric shock.
This appliance has a grounding 3-prong plug to reduce the risk of electric shock. This plug will fit into an outlet only one way. If the plug does not fit into an available outlet, contact a qualified electrician.
▶ Do not modify the plug in any way. If an extension cord is used, it should be a grounding 3-wire cord.
12 Commissioning
This chapter provides you with important safety notices during the initial commissioning of the device. Observe the following notices to avoid dangers and damages:
12.1 Safety information
⚠️WARNUNG
Warning
Personal and property damages can occur during commissioning of the device! Observe the following safety notices to avoid such dangers:
▶ Packaging materials may not be used for playing. There is a danger of suffocation.
12.2 Delivery scope and transport inspection
As a rule, the Blender is delivered with the following components:
- Base
- Blender jar with blade assembly
- Lid with measuring cup
- Operation Manual
HINWEIS
Please note
▶ Examine the shipment for its completeness and for any visible damages.
▶ Immediately notify the carrier, the insurance and the supplier about any incomplete shipment or damages as a result of inadequate packaging or due to transportation.
12.3 Unpacking
To unpack the device, proceed as follows:
Remove the device out of the carton and remove the packaging material.
12.4 Disposal of the packaging
The packaging protects the device against damages during transit. The packaging materials are selected in accordance with environmentally compatible and recycling-related points of view and can therefore be recycled.

Returning the packaging back to the material loop saves raw materials and reduces the quantities of accumulated waste.
Take any packaging materials that are no longer required to "Green Dot" recycling collection points for disposal.
12.5 Setup location requirements:
In order to ensure the safe and trouble-free operation of the device, the setup location must fulfil the following prerequisites:
- Place the device on a firm and even work surface.
- Do not use the device outdoors.
- Do not operate the product near hot gas or hot stove.
- Choose the setup location in such a way that children cannot reach the device.
- The device is not intended to be installed in a wall or a built-in cupboard.
- Do not set up the device in a hot, wet or extremely damp environment or near flammable material.
12.6 Electrical connection
In order to ensure the safe and trouble-free operation of the device, the following instructions must be observed for the electrical connection:
- Before connecting the device, compare the connection data (voltage and frequency) on the rating plate with those of your electrical network. This data must agree in order that no damages occur in the device. If in doubt, ask your qualified electrician.
- The electrical outlet must be protected by a 16A safety cut-out switch.
- The connection between the device and the electrical network may employ a 3 meter long (max.) extension cable with a cross-section of 1.5 mm 2 . The use of multiple plugs or gangs is prohibited because of the danger of fire that is involved with this.
- Make sure that the power cable is undamaged and has not been installed under the device or over hot or sharp surfaces.
- The electrical safety of the device is only guaranteed if the device is connected to a properly installed protective conductor system. Operations using an electrical outlet without a protective conductor are prohibited. If in doubt, have the house installation checked over by a qualified electrician.
The manufacturer cannot be made responsible for damages that are caused by a missing or damaged protective conductor. - A short power-supply cord is provided to reduce the risk resulting from becoming entangled in or tripping over a longer cord.
- Extension cords are available and may be used if care is exercised in their use. The marked electrical rating of the extension cord should be at least as great as the electrical rating of the appliance cord.
- The cord should be arranged so that it will not drape over the countertop or tabletop where it can be pulled on by children or tripped over unintentionally.
13 Design and Function
In this chapter, you'll find important information on the design and function of the device.
13.1 Overview

HINWEIS
Please note
▶ Please consider that the Sport Bottle is not part of the delivery scope. It is separately available: NOVEA Single Serve, Item No. 3613
13.2 Rating plate
The rating plate with the connection and performance data can be found beneath the device.
14 Operation and Handling
This chapter provides you with important notices with regard to operating the device. Observe the following notices to avoid dangers and damages.
⚠️WARNUNG Warning
▶ Do not leave the appliance unsupervised during operation.
14.1 Preparing the Blender
- Before assembling your blender, wipe blender base with a warm sudsy cloth, then wipe clean with a damp cloth.
- Dry with a soft cloth.
- Wash blender jar and the lid in warm, sudsy water.
- Rinse and wipe parts dry.
⚠️WARNUNG Warning
▶ NEVER place blender motor/base in water or other liquid.
▶ Blades are sharp. Handle carefully.
- Align the guides of the collar with the guides on the motor base and lower securely into place (Fig. 2).
14.2 Use
Your blender has been designed to work in a variety of ways to suit your blending needs. You can easily control its function by selecting one of the 6 speed settings.
There are six control button speed settings:
- Mix / Single Serve
- Chop
Mix - Liquefy
- Smoothie function
- Crush Ice function
Fig. 2

natural_image
Line drawing of a blender with handle and lid, showing internal components (no text or symbols)
bar
| Function | Value | Change (%) | |---|---|---| | Mix / Single Serve | 18.000 RPM +/- 15; 210 W +/- 40 W | | | Chop | 12.000 RPM +/- 10% | | | Mix | 15.000 RPM +/- 10% | | | Liquefy | 18.000 RPM +/- 10% | | | Smoothie function | 21.000 RPM +/- 10% | | | Crush Ice function | 21.000 RPM +/- 10% | | | Pulse function | 24.000 RPM +/- 10% | | | On / Off | | |- Place Blender motor/base on a dry, level, stable surface.
- Set jar into place on motor/base.
- Place the food solids and liquids to be blended into the jar and put the lid on the jar before blending. Be sure the measuring cup is in place in the middle of the lid.
-
Plug power cord into a standard electrical outlet.
-
Press 🔒 to turn the blender on. The blue LED will display 0:00 for the timer, and will flash.

HINWEIS Please note
The blender will enter stand-by mode after 2 minutes if no button is pressed. To re-active the blender from stand-by mode, press 🔊.
Chop / Mix / Liquefy / Smoothie function
- Rest one hand on top of blender jar with lid securely in place.
- Press / / . The button will illuminated blue and the timer will begin counting up from 0:00.
- The timer will stop and the blender will turn off at 1 minute.
- You can press the button again or press ⏻ at any time to cancel the operation.
Crush Ice function
- To crush ice, ALWAYS have liquid in the jar. Start out with 450 ml of liquid, and add about two hands full of ice cubes.
- Hold one hand firmly on the lid.
- Press ✉, the Blender will spin for one second and rest for two seconds.
- This will repeat 5 times. The blender will then run continuously for 45 seconds and then turn off.
- If more ice is needed, remove the measuring cup in the middle of the lid and add cubes one at a time through the hole in the lid.
▲WARNUNG Warning
▶ DO NOT CRUSH ICE WITHOUT LIQUID. Failure to follow all of the above directions can result in damage to the blades, jar, blender motor, and possibly result in personal injury.
Pulse mode (intermittent operation)
The blender has a pulse mode that is controlled by the other speed settings. This means it operates only by pressing Ⓞ and then choosing a speed level (except Single Serve!). All other speeds are continuous cycle operation. By pressing Ⓞ the device blends intermittently.
- To run the blender intermittently (pulse mode) rather than continuously, rest one hand on top of blender jar with lid securely in place.
-
Press ☐. The button light will illuminate. LED displays 'P'.
-
Then press 🎨 / 🎨 / 🎨 / 🎨, hold it for 2 seconds. When you release the button the blender will stop and turn off. Allow blades to coast to a stop.
-
Repeat procedure until contents reach desired consistency.
-
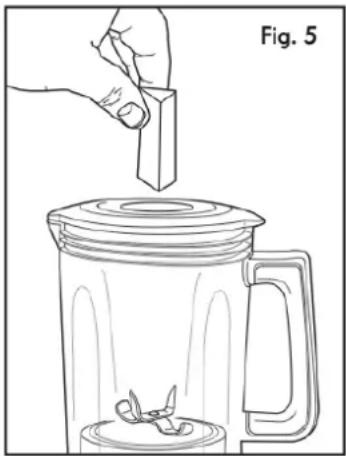
To add food or fruit to the jar, remove the measuring cup in the middle of the lid. Add the food or fruit through the hole in the middle of the lid and then replace the measuring cup on lid (see fig. 5)
-
Press 📍 again if you want to go back to normal state.
HINWEIS
Please note
▶ button can be held longer than 2 seconds if needed.
▶ The Pulse mode cannot be combined with the Single Serve function!
natural_image
Line drawing of a hand using a tool to lift a small object into a glass pitcher (no text or symbols)⚠️WARNUNG
Warning
▶ Do not touch blades. Always turn blender off and wait until blades have stopped rotating before moving jar or lid.
▶ NEVER start up the blender without the lid and measuring cup. The speed of the blades will throw contents high up in the jar, and without the lid could spill out.
▶ For your own safety:
Never operate the device without the original lid that is part of delivery scope. In addition do never put your hand into the blender jar during operation.
14.2.1 Using the Single Serve bottle
⚠️WARNUNG
Warning
Personal and property damages can occur during commissioning of the accessory!
Observe the following safety notices to avoid such dangers:
▶ Only put the Single Serve Bottle onto the blender if it is completely assembled! Do not put the blade assembly onto the base on its own!
- Insert the plug into an appropriate wall socket.
- Fill the bottle with desired food and secure the blade assembly lid onto the bottle as shown in Fig. 6.
- Turn the bottle upside down and place it onto the motor base, aligning the tabs on the bottle with the motor base.
- Turn the bottle clockwise.
- Press ⏻, the buttons ⏻ and ⏻ will flash. LED display will flash with 0:00.
- Press and hold 📋 to start blending. Release the button to stop blending.
- Blending will stop after 1 minute, even if 📄 is still pressed. The countdown is shown in the display.
-
Counter returns to 0:00 and illumination starts flashing.
-
Press momentarily for pulsed operation.

natural_image
Illustration of a hand holding a small container with a downward arrow, partially submerged in a jar (no text or symbols)
natural_image
Diagram of a blender with a handle and control panel, labeled Fig. 7 (no text or symbols on the diagram itself)- Rotate the bottle counterclockwise and take it out from the base (Fig. 7).
- Turn the bottle over and rest it on a flat surface.
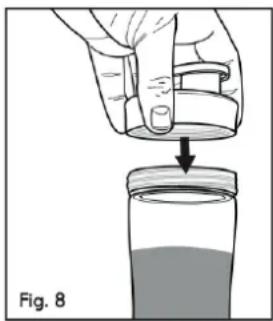
- Replace the blade assembly with the drinking lid (Fig. 8)
- Raise the cap on the drinking lid to drink the blended contents directly out of the bottle.
14.2.2 Blender tips and techniques
natural_image
Illustration of a hand pouring liquid into a jar with a downward arrow (no text or symbols)- For quicker, easier blending, cut food into 2 cm long pieces before adding to blender jar.
- To chop or grate either fresh or frozen fruit, cut fruit into pieces about 1 cm long.
- To best circulate foods or fruit that are to be blended with liquid, pour the liquid into the jar first, then add the solid foods or fruit.
The following tasks cannot be performed efficiently with a blender:
- beating egg whites
- whipping cream
- mashing potatoes
- grinding meats
- mixing dough
• extracting juices from fruit and vegetables
The following items should never be placed in the blender jar, as they can cause damage:
- bones
• large pieces of solid frozen foods - dense, tough foods such as turnips.
15 Cleaning and Maintenance
This chapter provides you with important notices with regard to cleaning and maintaining the device. Please observe the notices to prevent damages due to cleaning the device incorrectly and to ensure trouble-free operation.
15.1 Safety information
▲VORSICHT
Attention
Please observe the safety instructions, before cleaning your device.
▶ Unplug the device when not in use and before any cleaning.
▶ Never immerse the unit, cord or plug in water or other liquids and do not place in the dishwasher.
▶ Do not use iron brush, abradant, kitchen cleaner, or sharp cleaning tool for cleaning.
15.2 Cleaning
- Before cleaning, unplug the blender.
- Rinse parts (jar, blade assembly, lid and measuring cup inner lid) immediately after blending for easier cleanup.
- All removable parts can be washed by hand or in a dishwasher.
- The lid, measuring cup, collar and gasket should be placed in the top rack only.
-
Disassemble all parts from each other before placing in the dishwasher (except jar and blades).
-
The jars are bottom rack dishwasher-safe. Do not place the jar or any other parts in boiling liquids.
⚠️WARNUNG Warning
The blender blades are sharp. Be very careful when washing them by hand to avoid being cut.
-
The motor/base is designed to be resistant to liquids. If liquids spill into the motor/base:
-
Unplug the motor/base. • Wipe with a damp cloth and dry thoroughly.
-
NEVER immerse the motor/base in water.
-
Do not use abrasive scouring pads or cleaners on base as finish may become scratched or damaged.
16 Disposal of the Old Device
Old electric and electronic devices frequently still contain valuable materials. However, they also contain damaging substances, which were necessary for their functionality and safety.
If these were put in the non-recyclable waste or were handled incorrectly, they could be detrimental to human health and the environment.
Therefore, do not put your old device into the non-recyclable waste under any circumstances.

HINWEIS Please note
▶ Utilise the collection point, established in your town, to return and recycle old electric and electronic devices. If necessary, contact your town hall, local refuse collection service or your dealer for information.
▶ Ensure that your old device is stored safely away from children until it is taken away.
17 Guarantee
We provide a 24 month guarantee for this product, commencing from the date of sale, for faults which are attributable to production or material faults. Your legal guarantee entitlements in accordance with § 439 ff. BGB-E remain unaffected by this. The guarantee does not include damages, which were incurred as a result of improper handling or use, as well as malfunctions which only have a minor effect on the function or the value of the device. Consumables, transit damages, inasmuch as we are not responsible for these, as well as damages, which were incurred as a result of any repairs that were not performed by us, are also excluded from the guarantee entitlements. This device is designed for use in domestic situations and has the appropriate performance levels. Any use in commercial situations is only covered under the guarantee to the extent that it would be comparable with the stresses of being used in a domestic situation. It is not intended for any additional, commercial use. In the event of justified complaints, we will repair the faulty device at our discretion or replace it with a trouble-free device. Any pending faults must be reported within 14 days of delivery. All further claims are excluded. To enforce a guarantee claim, please contact us prior to returning the device (always provide us with proof of purchase).
18 Technical Data
| Device Blender NOVEA B4 | |
| Item No.: 3612 | |
| Mains data 220-240 V, 50 Hz | |
| Power consumption 1000 W | |
| External measurements (W x H x D): 29,5 x 42,5 x 29,5 cm | |
| Net weight 3,973 kg |
natural_image
Exterior view of a modern kitchen blender with visible control panel and brand logo (no text extraction required)
N°. d'article 3612
19 Mode d'emploi
19.1 Généralités
natural_image
Line drawing of a blender with a hand holding the lid, showing internal components and a control panel (no text or symbols)natural_image
Illustration of a hand using a tool to remove or brush into a blender jar (no text or symbols)Piler la glace
natural_image
Line drawing of a hand using a tool to press or apply a small object into a blender (no text or symbols)HINWEIS Remarque
natural_image
Illustration of a hand holding a small container with an arrow pointing downward, above a jar filled with liquid (no text or symbols)
natural_image
Diagram of a blender with a handle and control panel, labeled Fig. 7 (no text or symbols on the diagram itself)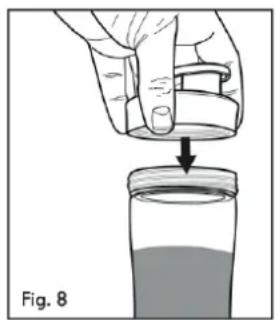
natural_image
Illustration of a hand pouring liquid into a jar with a downward arrow, labeled Fig. 8 (no text or symbols on the diagram itself)natural_image
Exterior view of a modern kitchen blender with visible control panel and digital display (no text or symbols on main body)CE


Articolo-N. 3612
28 Istruzione d'uso
28.1 In generale
natural_image
Line drawing of a blender with handle and control knob, no text or symbols present32.2 Uso
natural_image
Line drawing of a hand placing a rectangular object into a blender jar (no text or symbols)natural_image
Line drawing of a hand using a knife to lift a small object into a blender jar (no text or symbols)▲WARNUNG Avviso
natural_image
Illustration of a hand holding a small object above a container with liquid, labeled Fig. 6 (no text or symbols on the diagram itself)natural_image
Line drawing of a blender with a handle and spool, labeled Fig. 7 (no text or symbols on the diagram itself)natural_image
Illustration of a hand pouring liquid into a jar with a downward arrow (no text or symbols)natural_image
Exterior view of a modern kitchen blender with visible control panel and brand logo (no text-heavy elements)


Ref. 3612
natural_image
Line drawing of a blender with a hand operating it, showing the blade and handle (no text or symbols)41.2 Uso
natural_image
Line drawing of a hand using a tool to press down a small object into a blender jar (no text or symbols)Triturar hielo
natural_image
Line drawing of a hand using a tool to press down a small object into a blender jar (no text or symbols)⚠️WARNUNG Advertencia
natural_image
Illustration of a hand holding a small container with a downward arrow, partially submerged in a jar (no text or symbols)
natural_image
Diagram of a blender with a handle and control panel, labeled Fig. 7 (no text or symbols on the diagram itself)
natural_image
Illustration of a hand pouring liquid into a jar with a downward arrow (no text or symbols)natural_image
Exterior view of a modern kitchen blender with visible control panel and digital display (no text or symbols on the device itself)CE


Artikelnummer 3612
natural_image
Line drawing of a blender with a hand holding the lid, showing internal components and a control panel (no text or symbols)50.2 Gebruik
natural_image
Line drawing of a hand using a tool to lift a small object into a blender jar (no text or symbols)natural_image
Line drawing of a hand using a tool to press down a small object into a blender jar (no text or symbols)natural_image
Illustration of a hand holding a small container with a downward arrow, partially filled with liquid, next to a jar (no text or symbols)
natural_image
Line drawing of a blender with a handle and control panel, labeled Fig. 7 (no text or symbols on the diagram itself)natural_image
Illustration of a hand pouring liquid into a jar with a downward arrow, labeled Fig. 8 (no text or symbols on the diagram itself)

- Braukmann GmbH
- Operating Manual....22
- Gebrauch
- Crush Ice-Funktion
- ⚠️WARNUNG
- Original Operating Manual Blender NOVEA B4
- Operating Manual
- General
- Information on this manual
- Warning notices
- ⚠GEFAHR
- Danger
- Warning
- ▲VORSICHT
- Attention
- HINWEIS
- Please note
- Limitation of liability
- Copyright protection
- Safety
- Intended use
- General Safety information
- Please observe the following general safety notices with regard to the safe handling of the device.
- For your own safety:
- Dangers due to electrical power
- ⚠️GEFAHR
- Mortal danger due to electrical power!
- Commissioning
- Safety information
- Delivery scope and transport inspection
- Unpacking
- Disposal of the packaging
- Setup location requirements:
- Electrical connection
- Design and Function
- Overview
- Rating plate
- Operation and Handling
- ⚠️WARNUNG Warning
- Preparing the Blender
- Use
- HINWEIS Please note
- Chop / Mix / Liquefy / Smoothie function
- Crush Ice function
- ▲WARNUNG Warning
- Pulse mode (intermittent operation)
- Using the Single Serve bottle
- Blender tips and techniques
- Cleaning and Maintenance
- Safety information
- Cleaning
- Disposal of the Old Device
- Guarantee
- Technical Data
- Mode d'emploi
- Généralités
- Piler la glace
- HINWEIS Remarque
- Istruzione d'uso
- In generale
- Uso
- ▲WARNUNG Avviso
- Uso
- Triturar hielo
- ⚠️WARNUNG Advertencia
- Gebruik
Brand : CASO
Model : Novea B4
Category : Blender