
AC 350 RVKT - Air Conditioning TAURUS - Free user manual and instructions
Find the device manual for free AC 350 RVKT TAURUS in PDF.


| Product Type | Portable Air Conditioner (Monoblock) |
| Model | AC 350 RVKT |
| Brand | Taurus |
| Cooling Capacity | 12000 BTU/h (approx. 3.5 kW) |
| Heating Capacity | 12000 BTU/h (approx. 3.5 kW) - Reverse Cycle |
| Power Supply | 220-240 V ~ 50 Hz |
| Power Consumption (Cooling) | Approx. 1.2 kW |
| Dimensions (W x D x H) | 45 x 35 x 70 cm |
| Weight | 25 kg |
| Noise Level | ≤ 65 dB(A) |
| Air Flow Rate | 350 m³/h |
| Refrigerant | R-290 (Propane) or R-32 |
| Functions | Cooling, Heating, Fan, Dehumidifier, Timer, Sleep Mode, Swing |
| Fan Speeds | 3 (Low, Medium, High) |
| Remote Control | Yes, included |
| Timer | 1-24 hours |
| Energy Class | A (Cooling) / A+ (Heating) |
| Maintenance | Clean washable filter every 2 weeks |
| Safety Features | Auto shut-off, overheat protection, restart delay |
| Spare Parts | Filter, remote control, exhaust hose, window kit |
| Installation | Simple DIY with window venting kit included |
| Warranty | 2 years |
Frequently Asked Questions - AC 350 RVKT TAURUS
User questions about AC 350 RVKT TAURUS
0 question about this device. Answer the ones you know or ask your own.
Ask a new question about this device
Download the instructions for your Air Conditioning in PDF format for free! Find your manual AC 350 RVKT - TAURUS and take your electronic device back in hand. On this page are published all the documents necessary for the use of your device. AC 350 RVKT by TAURUS.
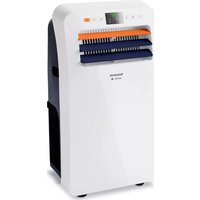
USER MANUAL AC 350 RVKT TAURUS
natural_image
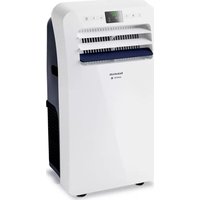
Exterior view of a Tourus Alpatec air purifier device (no signage or text beyond branding)
flowchart
graph TD
    A7 -->|A6| Timer
    A7 -->|A7| UP
    A7 -->|A7| DOWN
    Timer -->|A5| Heater
    Heater -->|A4| Timer
    Heater -->|A4| Power
    Heater -->|A4| MODE
    Heater -->|A4| FAN
    Heater -->|A4| A1
    Heater -->|A4| A2
    Heater -->|A4| A3
Climatiseur local
AC35S - AC 350KT - AC 350 RVKT
i
Cher Client,
Many thanks for choosing to purchase a ALPATEC brand product.
Thanks to its technology, design and operation and the fact that it exceeds the strictest quality standards, a fully satisfactory use and long product life can be assured.
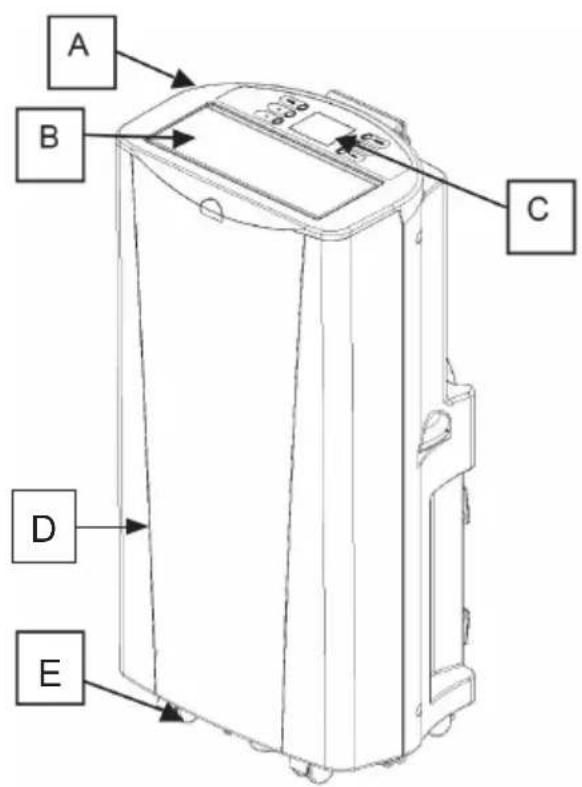
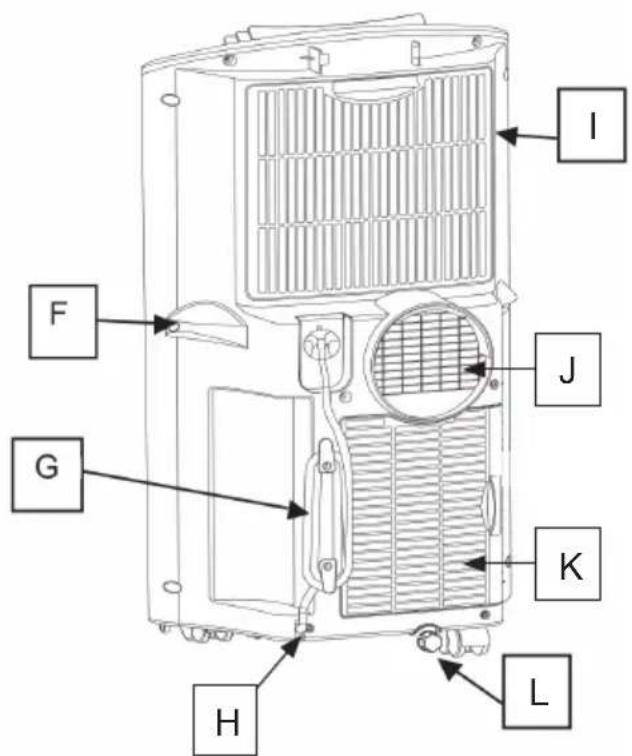
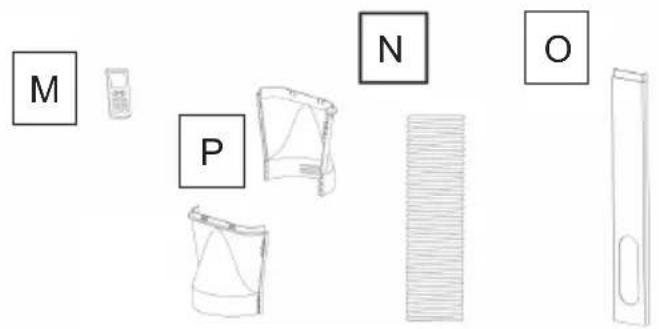
Description
| A | Top Cover | I | Up filter frame |
| B | Air Outlet grill | J | Protective net |
| C | Panel control | K | Down filter frame |
| D | Housing | L | Water plug |
| E | Castor | M | Remote control |
| F | Handle | N | Exhaust hose |
| G | Power cord | O | Window kit |
| H | Drain port | P | Hose adaptor |
Control Panel
| A1 | On/Off power | A5 | Display area |
| A2 | Mode | A6 | Timer |
| A3 | Fan Speed | A7 | Up and down buttons |
| A4 | LED lamp |
Remote control
| A | Power | E | Auto swing |
| B | Mode | F | Auto clean |
| C | Fan function | G | Up and down function |
| D | Timer |
- Read these instructions carefully before switching on the appliance and keep them for future reference. Failure to follow and observe these instructions could lead to an accident.

Safety advice and warnings
- This appliance can be used by children aged from 8 years and above and persons with reduced physical, sensory or mental capabilities or lack of experience and knowledge if they have been given supervision or instruction concerning use of the appliance in a safe way and understand the hazards involved.
- This appliance is not a toy. Children should be supervised to ensure that they do not play with the appliance.
- Cleaning and user maintenance shall not be made by children unless they are supervised.
- Only use the appliance with the specific electric connector provided.
- If the connection to the mains has been damaged, it must be replaced, take the appliance to an authorised technical support service. Do not attempt to disassemble or repair the appliance by yourself in order to avoid a hazard.
- Ensure that the voltage indicated on the rating label matches the mains voltage before plugging in the appliance.
- Connect the appliance to a base with an earth socket withstanding a minimum of 16 amperes
- The appliance's plug must fit into the mains socket properly. Do not alter the plug. Do not use plug adaptors.
- Do not force the power cord. Never use the power cord to lift up, carry or unplug the appliance.
- Do not wrap the power cord around the appliance.
- Do not clip or crease the power cord.
- Check the state of the power cord. Damaged or tangled cables increase the risk of electric shock.
- Do not touch the plug with wet hands.
- Do not use the appliance if the cable or plug is damaged.
- If any of the appliance casings breaks, immediately disconnect the appliance from the mains to prevent the possibility of an electric shock.
- Do not use the appliance if it has fallen on the floor, if there are visible signs of damage or if it has a leak.
- Do not place the appliance where it can reach the sunlight.
- Place the appliance on a horizontal, flat, stable surface away from heat sources and contact with water (splashes etc.)
- Do not use or store the appliance outdoors.
Use and care:
- Fully unroll the appliance's power cable before each use.
- Do not use the appliance if the on/off button does not work.
- Do not move the appliance while in use.
-Do not remove the castors of the appliance
- Use the appliance handle, to catch it or move it.
- Do not turn the appliance over while it is in use or connected to the mains.
- Unplug the appliance from the mains when not in use and before undertaking any cleaning task.
- This appliance is for household use only, not professional, industrial use.
- This appliance should be stored out of reach of children and/or the disabled.
- Do not expose the appliance to extreme temperatures.
- Never leave the appliance connected and unattended if is not in use. This saves energy and prolongs the life of the appliance.
- Any misuse or failure to follow the instructions for use renders the guarantee and the manufacturer's liability null and void.

Installation
- Be sure to remove all packaging material from inside the appliance.
- Respect the legal provisions concerning safety distances from other elements such as pipes, electrical connections, etc.
- Ensure that the appliance is level with respect to the floor.
- The appliance requires suitable ventilation in order to work properly. Leave a space of 50cm between walls or other obstacles.
- Do not cover or obstruct any of the openings of the appliance.
- Do not cover or obstruct the sides of the appliance, and leave a minimum space of 40cm front other walls, ceiling.
- The plug must be easily accessible so it can be disconnected in an emergency.
- To achieve the highest efficiency from the appliance it should be situated in a place where the atmospheric temperature is between 12 and 32°C.
- Ensure that the extraction pipe remains in a horizontal position.
- Do not add new sections to the extraction tube provided, as it could cause the appliance to malfunction.
Assemble the hose adaptor.
Don't push too hard to prevent damage.

natural_image
Simple line drawing of three cylindrical containers with a double-headed arrow indicating transformation (no text or symbols)Assembly of the exhaust hose
Lengthen one head of the hose, screw it into the unit anti-clockwise.
-The same way to connect the hose to the assembled adaptor( At least three circles)
Installation of window kits
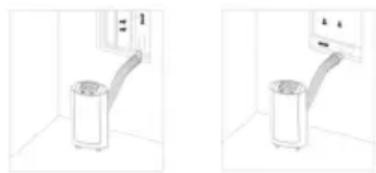
Partially open the window and then fix the window kits to the window.
The window kits can be installed on most normal and vertical windows, and it is adjustable.

Fix the other end of the heat-exhausted hose to the air-outlet window kit.
natural_image
Two technical line drawings of a trash bin with an air conditioner unit, shown from different angles (no text or symbols present)Instructions for use
Before use:
- Remove the appliance's protective film.
- Before using the unit, please keep it upright at least 2 hours.
Use
- Unroll the cable completely before plugging it in.
- Connect the appliance to the mains.
- You will hear a beep, the unit is in stand by status.
- Digital screen will indicate temperature (Range: 5\~35°C), if ambient temperature above 35°C, screen will show "H". If it is below 5°C, it will indicate "L" and the unit will enter standby status.
- When press the ON/OFF button, the unit will enter in cooling mode (setting temperature 24^ C), high speed fan.
- Press again, unit will shut off and play shut off beep.
- Press the MODE button to choose Cooling, Heating (only for the model AC 350 RVKT) Fan or dehumidifying mode.
Fan speed:
- Under the cooling and the fan mode, the speed goes as follow:
- Low Fan (F1)→Middle Fan (F2)→High Fan (F3)→Low Fan (F1)
- Under the dehumidifying mode, fan is working in low speed.
Timer function:
- The appliance's operating time can be controlled.
- To program the operating time simply select it using pressing the timer icon.
- Timer icon will flash "88" area indicates 24:00
- You can set your time through UP and DOWN buttons.
- The HOUR number will change from 1,2,3...24; the Minute number will change from 10, 20,30...50.
- Auto-shut-off timer is only available when the unit on.
- Auto-run timer is only available when the unit is off. After timer setting accomplishes effectively, TIMER icon will keep on flashing until setting time is due. If set again, history record will be cleared.
1.6
- Up and Down button : can set temperature and timer.
- Under cooling mode, the setting temperature ranges from 18\~30°C.
Auto swing:
- Press this button to control the swing function.
Cooling function:
- Press the button MODE until the word Cool appear on the control panel.
- Press the up or down button to increase or decrease the temperature.
- NOTE: If the temperature of the room is higher of the selected one, the appliance will not start working.
Fan function:
- Press the button MODE until the word Fan appear on the control panel.
-You can choose the speed fan: Low-middle-high
Dehumidifying function:
- Press the button MODE until the word Dry appear on the control panel
- On the dehumidifying mode, the fan is working in low speed.
Anti-freezing protection control
(only for the model AC 350 RVKT):
- Under anti freezing function, the heat light will flash
Anti-heating protecting
(only for the model AC 350 RVKT):
- Under heating mode, the compressor and motor will stop work until the temperature of the machine automatically recover to ordinary heating status.
Compressor delay-protection
Except for the first power-on, the compressor can start at once. In other cases, the compressor runs under 3 minutes delay protection.
Water tank full protection:
- When the water level in the bottom water plate is above the warning level, the unit will alert automatically and "FL" will flashes on LCD.
-Please discharge water in the machine according to chapter "water drainage".
Stand-by function:
- In order to save energy, the appliance passes to stand-by after 10 seconds if the user does not use it.
- To turn it on again, you simply have to press the on/off button.
Once you have finished using the appliance:
- Stop the appliance by releasing the pressure on the on/off button.
- Unplug the appliance from the mains.
- Remove the water from the water tank.
- Clean the appliance.
Carry handle/s:
- This appliance has a handle on the side of the body, which facilitates comfortable transport.
Water drainage:
Manual drainage:
- When the water tank is full and unit stop working, please shut off the unit and unplug.
- Do not move the model sharply, or the water will split out from water received plate.
- Use a water container to take water under the water plug.
- Screw off the water plug and unplug the water blocker, water will come out the water container.
- Stuff up the water blocker and screw down the water plug.
Continuous drainage:
- Screw off the water plug and unplug the water blocker.
-Use water pipe to connect the water outlet. Lead the pipe to the outside or washroom.
NOTE: This method can be done only if there is no water in the water received plate.
-This model have self evaporative function, under cooling mode, please do not use continue drainage to get better cooling effect.

Cleaning
- Disconnect the appliance from the mains and allow it to cool before undertaking any cleaning task.
- Clean the electrical equipment and the mains connection with a damp cloth and dry. DO NOT IMMERSE IN WATER OR ANY OTHER LIQUID.
- Clean the equipment with a damp cloth with a few drops of washing-up liquid and then dry.
- Do not use solvents, or products with an acid or base pH such as bleach, or abrasive products, for cleaning the appliance.
- Do not let water or any other liquid get into the air vents to avoid damage to the inner parts of the appliance.
- Never submerge the appliance in water or any other liquid or place it under running water.
- If the appliance is not in good condition of cleanliness, its surface may degrade and inexorably affect the duration of the appliance's useful life and could become unsafe to use.
Air filter cleaning
- Clean the air filters every 2 weeks. If the air filter is blocked with dust, the efficiency will reduce.
- Pull out up and down filter as below pictures
- Wash the air filters by immersing it gently into warm water with a neutral detergent, rinse it and dry it thoroughly in a shaded place.
- Install air filters carefully after cleaning the filters.

natural_image
Diagram showing a mechanical component transforming into a container (no text or symbols present)After Season Maintenance:
- Pull out the plug in drainage hole and empty the water received plate, or drain out the water by leaning the unit, then shift the unit mode to Fan mode, and press the button for 5 seconds till it low fan speed.
-Keep this mode for half day till the conduit is dried. Doing like this can keep the inner unit dried and not go moldy.
- Turn off the unit and pull out the plug.
- Coil the wire and bind it together, then put it into the accessories room.
- Separate the air-exhausted pipe and safely keep it.
- Put the unit into a plastic bag, then keep it in a dried place.
- Take out the batteries of remote control and safely keep them.
* All accessories can be put in the accessories room on the back of the unit.

Anomalies and repair
- Take the appliance to an authorised technical support service if product is damaged or other problems arise. Do not attempt to disassemble or repair the appliance yourself as this may be dangerous.
- If any anomaly is detected, check the following table:
| Anomalies Causes Solutions | ||
| The unit does not work No power supplyWater full indicator illuminateTimer function is activeRoom temperature too low or too high | Turn on the applianceDrain out the inner stored waterCancel timer functionSuggesting ambient temperature between 7-40°C | |
| The unit does not seem to perform | Indirect sunlightWindow or doors openFilter is very dirtyAir inlet or air outlet is blockedRoom temperature is lower than the setting one | Draw the curtainsClose windows and turn on another air conditionerClean or change the air filterClean out the stemmingChange the temperature setting |
| The unit noise is high | The unit is not put on a flat surface | Put the unit on a flat and stable surface that can support its weight |
| Compressor does not work Heat exceeded protection is active Re start the unit 3 minutes later till the temperature low down | ||
| Remote control does not work | The distance is too farThe batteries run out | Let the remote control near the unitChange the batteries |
| E1 on LCD Coil temperature is abnormal Check coil temperature sensor or relevant circuitContact the technical support | ||
| E2 on LCD Room temperature is abnormal Check the room temperature sensor. | Contact the technical support | |
| E3 on LCD No refrigerant or there is very few refrigerant Check leakage, wielding, vacuum pump and contact the technical support | ||
| P2 on LCD The water tank is full Drain out the water | ||
Specifications:
Voltage; 220-240V
Frequency: 50Hz
Dehumidifying capacity: 33.6L/j
Airflow: 453m3/h4
Exhaust pipe diameter: 1.5m/150mm
Working temperature: between 7-40°C
Timer: 24 hours
Class I
Refrigerant gaz: R410A
Product size: 47*84*37cm
Product weight: 36kg
For EU product versions and/or in case that it is requested in your country:
Ecology and recyclability of the product
- The materials of which the packaging of this appliance consists are included in a collection, classification and recycling system. Should you wish to dispose of them, use the appropriate public recycling bins for each type of material.

- The product does not contain concentrations of substances that could be considered harmful to the environment.
- This appliance contains, or could contain, oil. Remember that one should abide by the regulations concerning the elimination of this type of contaminant.
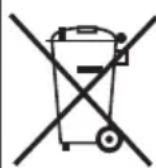
- This symbol means that in case you wish to dispose of the product once its working life has ended, take it to an authorised waste agent for the selective collection of Waste from Electric and Electronic Equipment (WEEE).
This appliance complies with Directive 2006/95/EC on Low Voltage and Directive 2004/108/EC on Electromagnetic Compatibility.
natural_image
Simple line drawing of three cylindrical containers with a double-headed arrow indicating transformation (no text or symbols)Modo de empleo
natural_image
Diagram showing a mechanical component before and after rotation, with no visible text or symbols
natural_image
Simple line drawing of three cylindrical containers with a double-headed arrow indicating transformation (no text or symbols)Modo de utilização
Compressor delay-protection
natural_image
Diagram showing a device with a rotating arrow and a separate container with a rectangular object (no text or symbols)
natural_image
Diagram showing a device interior transforming into a container with a textured surface (no text or symbols)طريقة استخدام
natural_image
Simple line drawing of three containers with a double-headed arrow indicating transformation (no text or symbols)العربيya
مکیف هواه محول
AC 35 S
AC 350 KT
AC 350 RVKT
عزيزی الزBON:
- Climatiseur local
- i
- Cher Client,
- Safety advice and warnings
- Use and care:
- Installation
- Assemble the hose adaptor.
- Assembly of the exhaust hose
- Installation of window kits
- Instructions for use
- Before use:
- Use
- Fan speed:
- Timer function:
- Auto swing:
- Cooling function:
- Fan function:
- Dehumidifying function:
- Anti-freezing protection control
- Anti-heating protecting
- Compressor delay-protection
- Water tank full protection:
- Stand-by function:
- Once you have finished using the appliance:
- Carry handle/s:
- Water drainage:
- Manual drainage:
- Continuous drainage:
- Cleaning
- Air filter cleaning
- After Season Maintenance:
- Anomalies and repair
- Specifications:
- Ecology and recyclability of the product
- Modo de empleo
- Modo de utilização
Brand : TAURUS
Model : AC 350 RVKT
Category : Air Conditioning